MAQUILLAJE EN NARANJA CON CUTCREASE AZUL 💙 l MAKEUP IN ORANGE WITH BLUE CUTCREASE 💙 [ESP-ENG]


ESPAÑOL
Que tal hermosa comunidad de #MakeUpPower? Como va su mitad de semana? El día de hoy me paré bien temprano, me sentía inspirada, asi que, les traigo un maquillaje mas elaborado comparado con lo que estoy acostumbrada a hacer, fue bastante divertido porque la verdad no sabía que estaba haciendo, al menos no al principio, podemos decir que fue improvisado, quise hacer algo que se pudiera usar de dia o de noche. Sin mas que agregar, comencemos!
ENGLISH
How are you doing beautiful #MakeUpPower community? How is your midweek going? Today I got up early, I felt inspired, so, I bring you a more elaborate makeup compared to what I'm used to do, it was quite fun because the truth is I didn't know what I was doing, at least not at first, we can say it was improvised, I wanted to do something that could be used day or night. Without further ado, let's get started!
Materiales:
⚜️ Crema Hidratante
⚜️ Base M.A.C
⚜️ Polvo compacto
⚜️ Kit para cejas
⚜️ Corrector L.A Girl
⚜️ Brochas para ojos: Difuminar, precisión, lengua de gato
⚜️ Elsa Palette
⚜️ Delineador azul
⚜️ Iluminador Plata
Nota: No estaré aplicando nada en las pestañas, porque actualmente tengo un problema de caída, si tienen alguna recomendacion, algun tonico magico, sera bien recibido
Materials:
⚜️ Moisturizing Cream.
⚜️ M.A.C Base.
⚜️ Compact Powder
⚜️ Eyebrow kit
⚜️ Concealer L.A Girl
⚜️ Eye brushes: blending, precision, cat tongue.
⚜️ Elsa Palette
⚜️ Blue Eyeliner
⚜️ Silver Highlighter
Note: I will not be applying anything on my eyelashes, because I currently have a problem with eyelash loss, if you have any recommendation, any magic tonic, it will be well received.
Paso 1:
Hidratar nuestra piel siempre debe ser lo primero que hagamos antes de aplicar ningún producto pesado, yo estaré usando mi crema habitual de Alive. Lo siguiente será aplicar corrector en nuestro párpado, lo sellaremos y colocaremos cinta adhesiva en la parte externa del ojo.
Step 1:
Moisturizing our skin should always be the first thing we do before applying any heavy product, I will be using my usual Alive cream. Next we will apply concealer on our eyelid, seal it and tape it on the outer part of the eye.
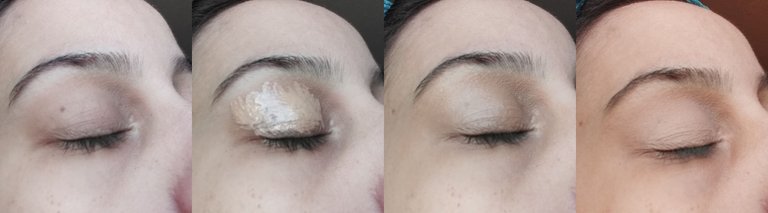
Paso 2:
Usaremos un color beige como base, lo difuminaremos en todo el párpado, esta será solo una capa porque será nada más para darle uniformidad. Ahora, aplicaremos un tono naranja ladrillo con una brocha de precisión e iremos difuminando hacia el lagrimal poco a poco, de esta serán 3 capas para que el color sea bastante notable
Step 2:
We will use a beige color as a base, we will blend it all over the eyelid, this will be only one layer because it will be nothing more to give it uniformity. Now, we will apply a shade of brick orange with a precision brush and we will blend it towards the tear trough little by little, this will be 3 layers so that the color is quite noticeable.

Paso 3:
Haremos un pequeño corte de cuenca, ¿en qué consiste? Con el corrector de nuestra preferencia haremos un semicírculo en el párpado móvil pero que solo llegue a nuestra cuenca, depende de nosotros hasta donde lo llegaremos, por mi parte solo hasta la mitad de la cuenca
Step 3:
We will make a small cut crease, what does it consist of? With the concealer of our preference we will make a semicircle on the mobile eyelid but only up to our crease, it is up to us how far we will go, in my case only up to the middle of the crease
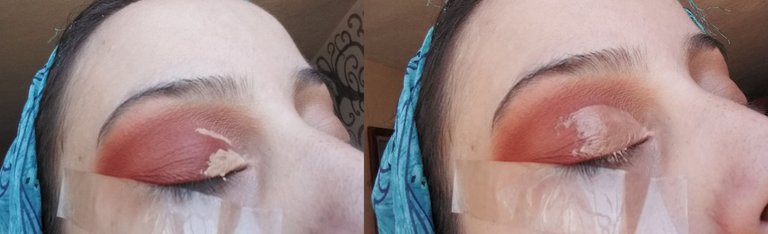
Paso 4:
Azul cielo será el tono que usaremos a continuación donde aplicamos antes el corrector, vamos poniendo capa a capa hasta llegar a nuestro color o acabado deseado
Step 4:
Sky blue will be the tone we will use next where we applied the concealer before, we are putting layer by layer until we reach our desired color or finish.
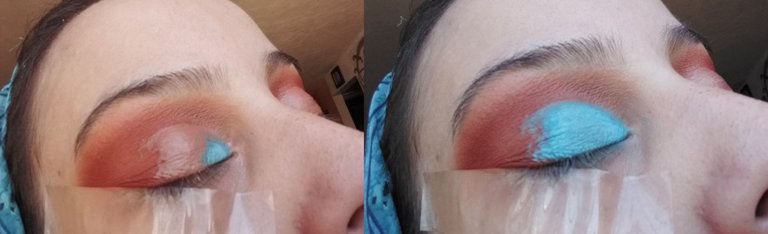
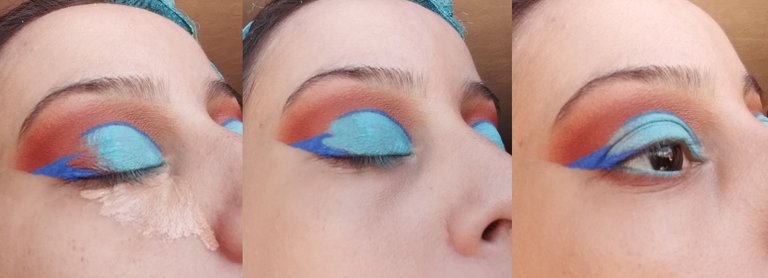
Paso 5:
Aquí es donde les digo que empecé a improvisar jajaja. Empezaremos con el delineado. Primero quitamos la cinta adhesiva, luego haremos una línea en el medio de ambos colores (cuenca), luego un delineado estilo diamante con un pequeño semicírculo antes de llegar a la línea superior de las pestañas, haciendo alusión a una mini ola
Step 5:
This is where I tell you that I started improvising hahaha. Let's start with the eyeliner. First we remove the adhesive tape, then we will make a line in the middle of both colors (socket), then a diamond style eyeliner with a small semicircle before reaching the top line of the lashes, alluding to a mini wave.
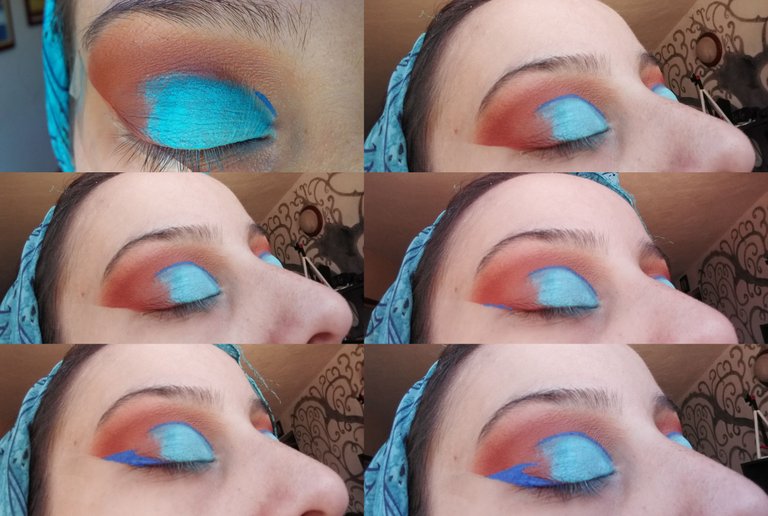
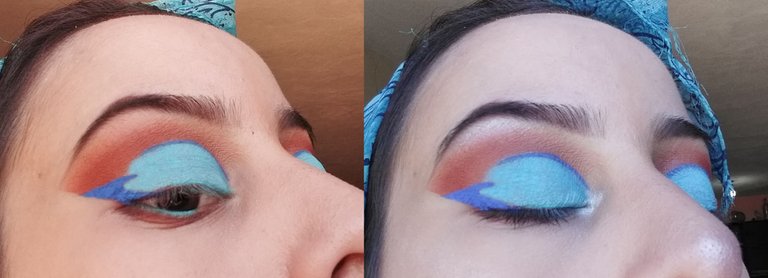
Paso 6:
Después de terminar con el delineado, pondremos corrector debajo de nuestros ojos para limpiar la zona, aquí me di cuenta de que había un hueco entre el delineado y la sombra, asi que, decidi continuar el color de la cuenca hasta rellenar la ola. En la lineal de agua pondremos el mismo color azul cielo de la cuenca sin llegar al lagrimal y debajo de este el naranja ladrillo difuminando un poco ambos, esto será para darle profundidad al ojo
Step 6:
After finishing with the eyeliner, we will put concealer under our eyes to clean the area, here I realized that there was a space between the eyeliner and the shadow, so, I decided to continue the color of the crease to fulfill the wave. In the water line we will put the same sky blue color of the crease without reaching the tear trough and under it the brick orange blurring a little bit both, this will be to give some depth to the eye
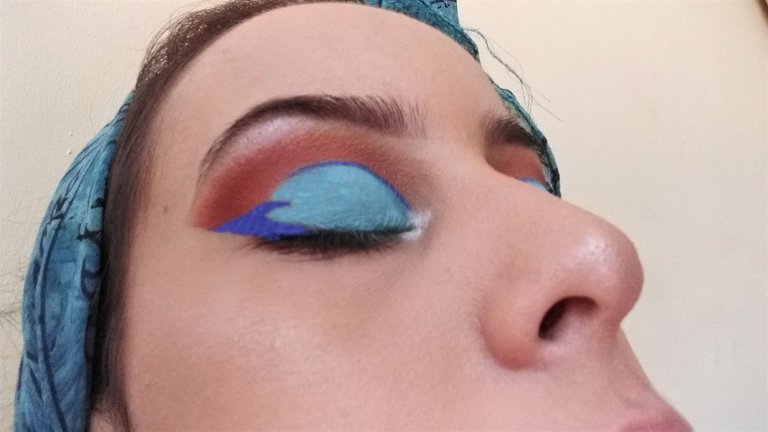
Paso 7:
Cejas listas. Pondremos iluminador en el lagrimal, en la parte inferior de la ceja, la punta de la nariz y en la parte de los pómulos para dar luz al rostro
Step 7:
Eyebrows ready. We will put highlighter on the tear trough, on the lower part of the eyebrow, the tip of the nose and on the cheekbones to give light to the face.
Y, ¡estamos listos! l And, that's it, we're ready!
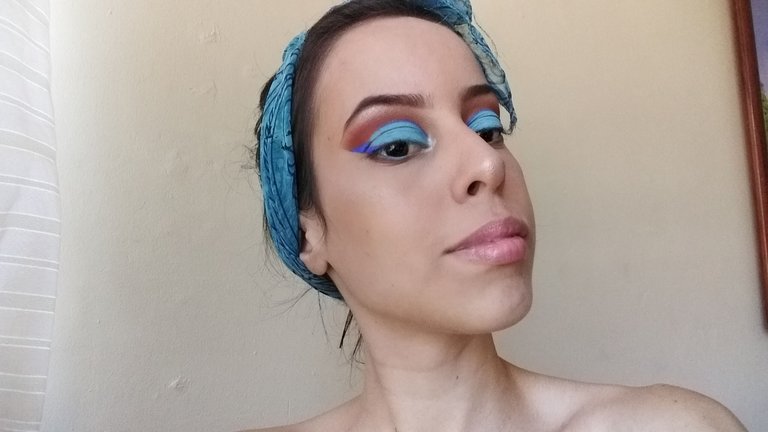
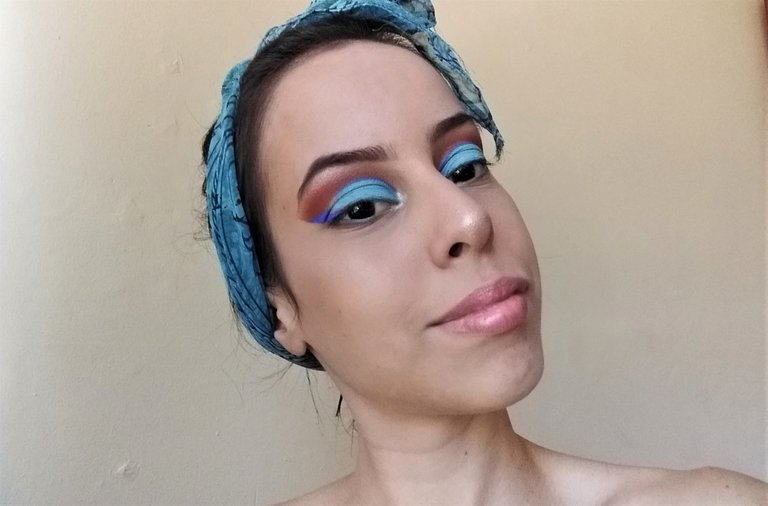
Espero les haya gustado este paso a paso, cada dia me hace mas feliz poder compartir con ustedes algo que tanto me gusta como lo es el maquillaje, falta mucho por aprender y por recorrer, si algo sé es que me alegra es que ustedes me acompañen, nos vemos en una próxima entrega mis linduras 💕
I hope you liked this step by step, every day makes me happier to share with you something that I like so much as it is the makeup, there is much to learn and to go, if something I know is that I'm glad is that you accompany me, see you in a next post my darlings. 💕


Aunque son colores intensos te queda muy natural Vanessa, una reina!
!PIZZA
!PGM
100 PGM token to send 0.1 PGM three times per day
500 to send and receive 0.1 PGM five times per day
1000 to send and receive 0.1 PGM ten times per day
Discord
Support the curation account @ pgm-curator with a delegation 10 HP - 50 HP - 100 HP - 500 HP - 1000 HP
Get votes from @ pgm-curator by paying in PGM, here is a guide
Create a HIVE account with PGM from our discord server, here is a guide
I'm a bot, if you want a hand ask @ zottone444
Muchas gracias @criptosectadepit, puse bastante esfuerzo y corazón, me alegra que tenga tan buen recibimiento 😍😍
PIZZA Holders sent $PIZZA tips in this post's comments:
@criptosectadepit(3/15) tipped @vvgm (x1)
Please vote for pizza.witness!