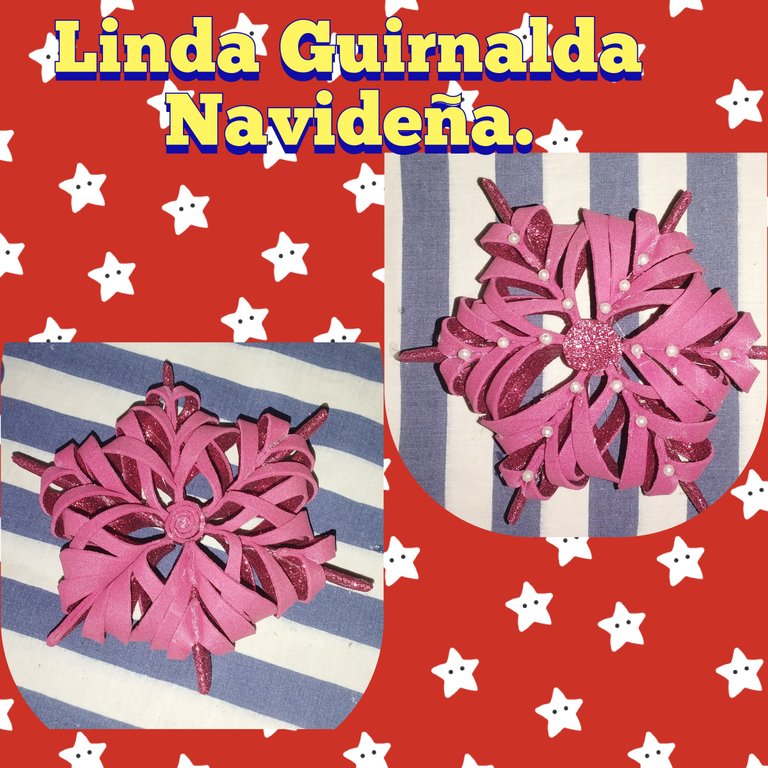
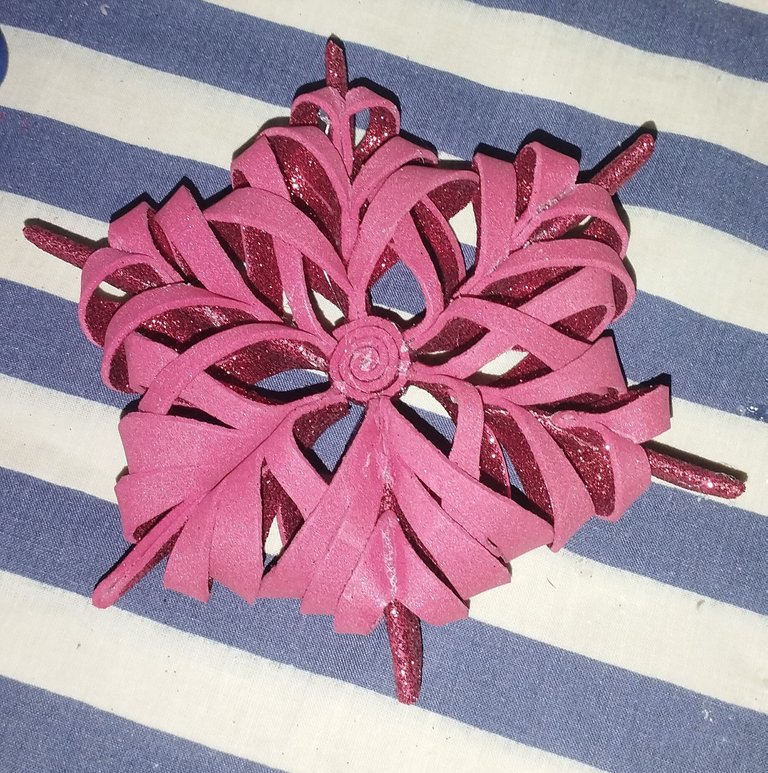
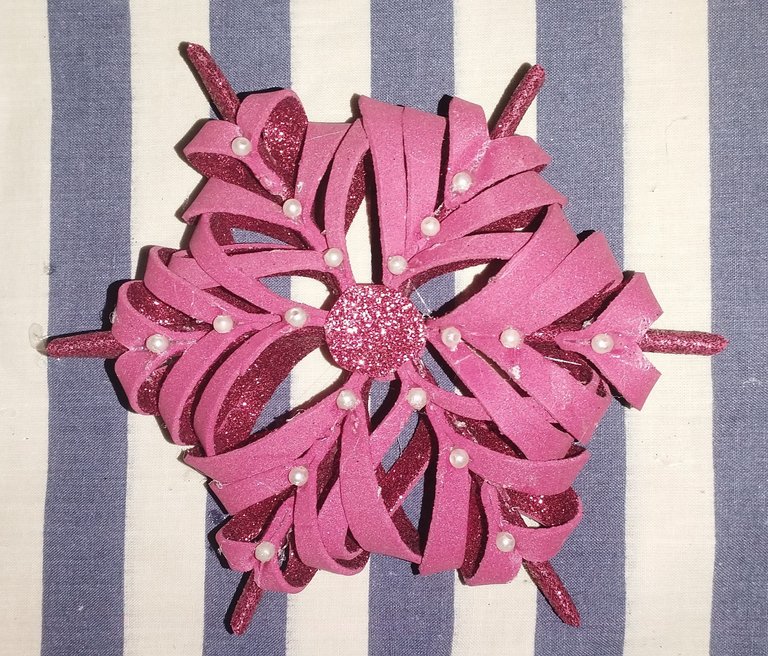
Lindo girnalda , Adorno para árbol de navidad. / Cute wreath , Christmas tree ornament.
Hola amigos de @Hive, desde que estoy en la plataforma nunca había tenido la oportunidad de subir contenido ya que he estado muy ocupada con los estudios de la universidad. Pero ya que estamos en las vacaciones decembrina me uno al concurso donde me hizo mención @rouseeve26 en esta comunidad de @diyhub. No tengo mucha experiencia en crear contenido paso a paso pero he leído algunas publicaciones y bueno haré lo mejor que pueda y espero que me salga bien o por lo menos cubra las expectativas.
Para mí grirnalda utilice los materiales a continuación:
Materiales:
✓ Foami rojo con escarchas.
✓ Tijera
✓ Silicón en barra o caliente.
✓ Regla.
✓ Piedras perladas.
Paso a paso:
N° 1:
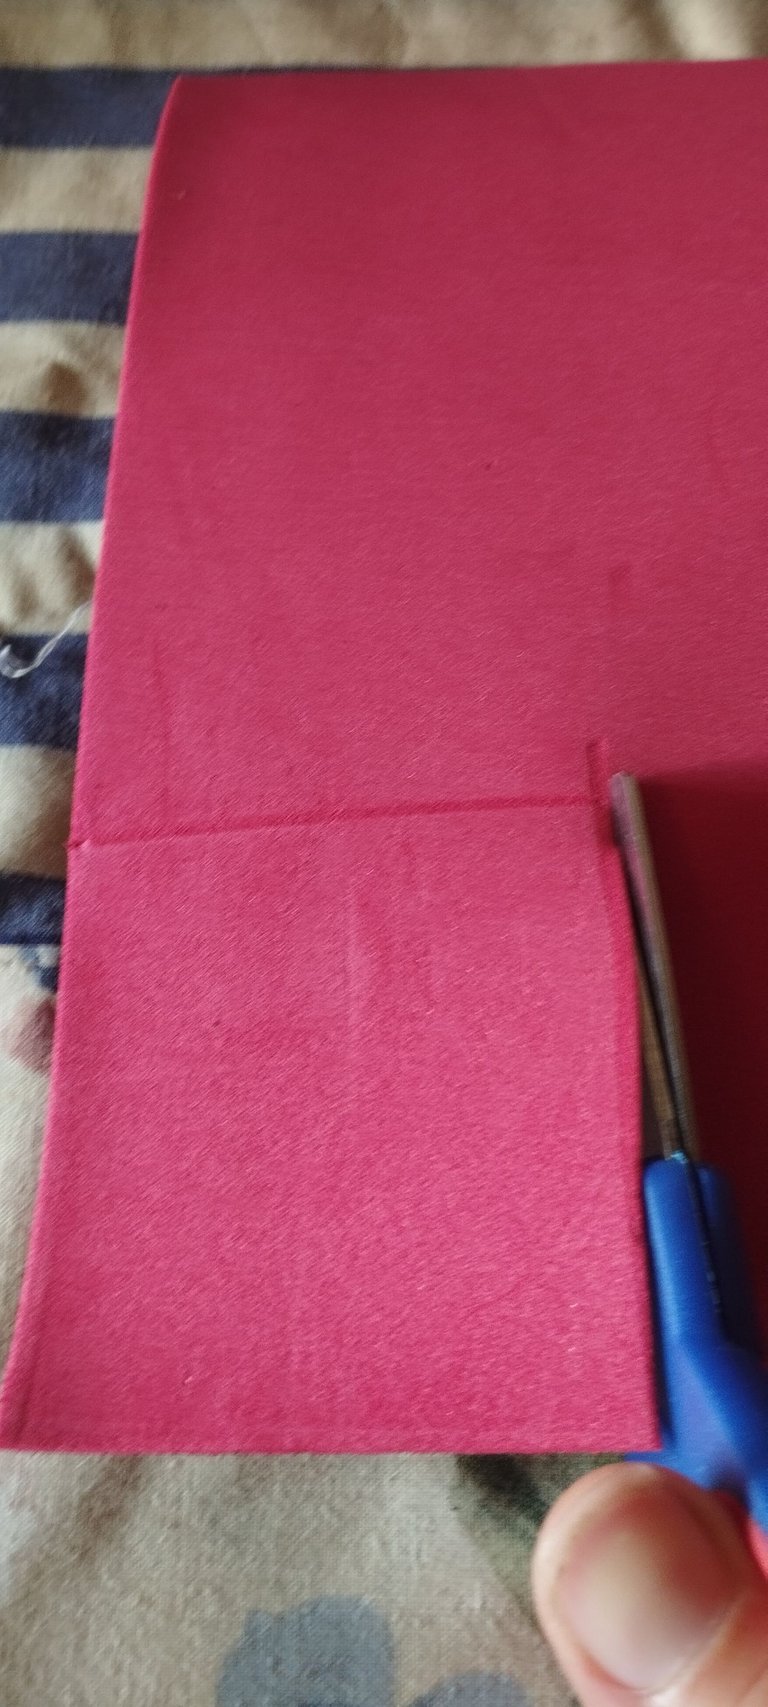
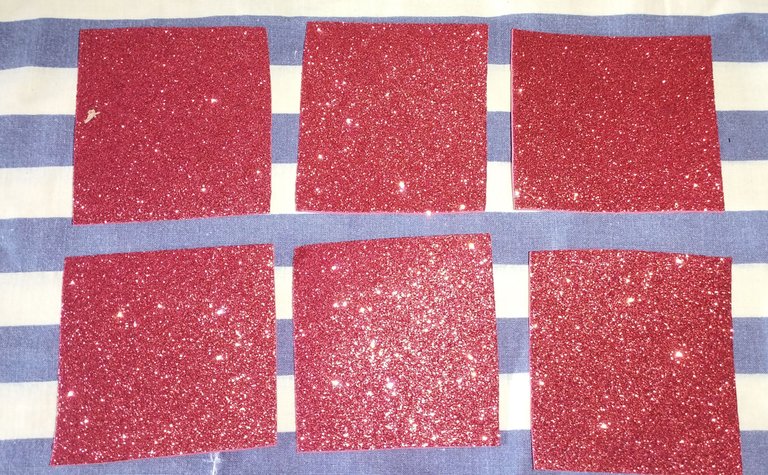
En primer lugar corte 6 cuadrados de 7 centimetro por 7 centimetro de largo. Con la regla medimos un cuadro de estás medidas y yo luego los puse encima de foami para realizar los otros cuadrados y al final obtener 6 partes iguales.
N° 2:
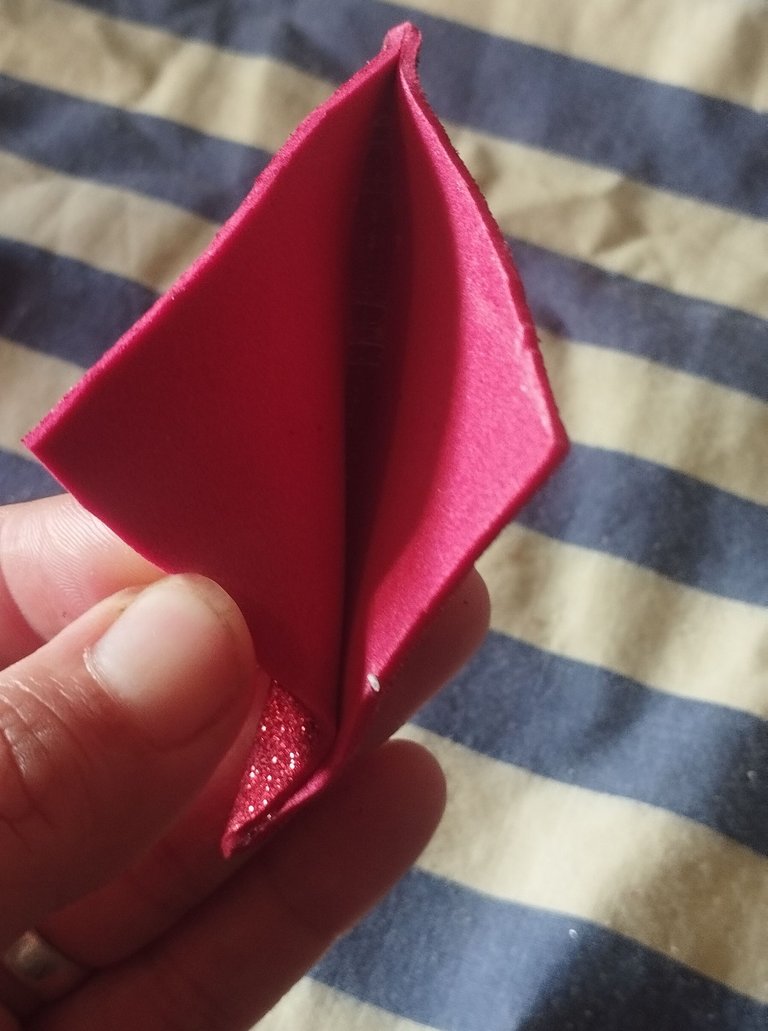
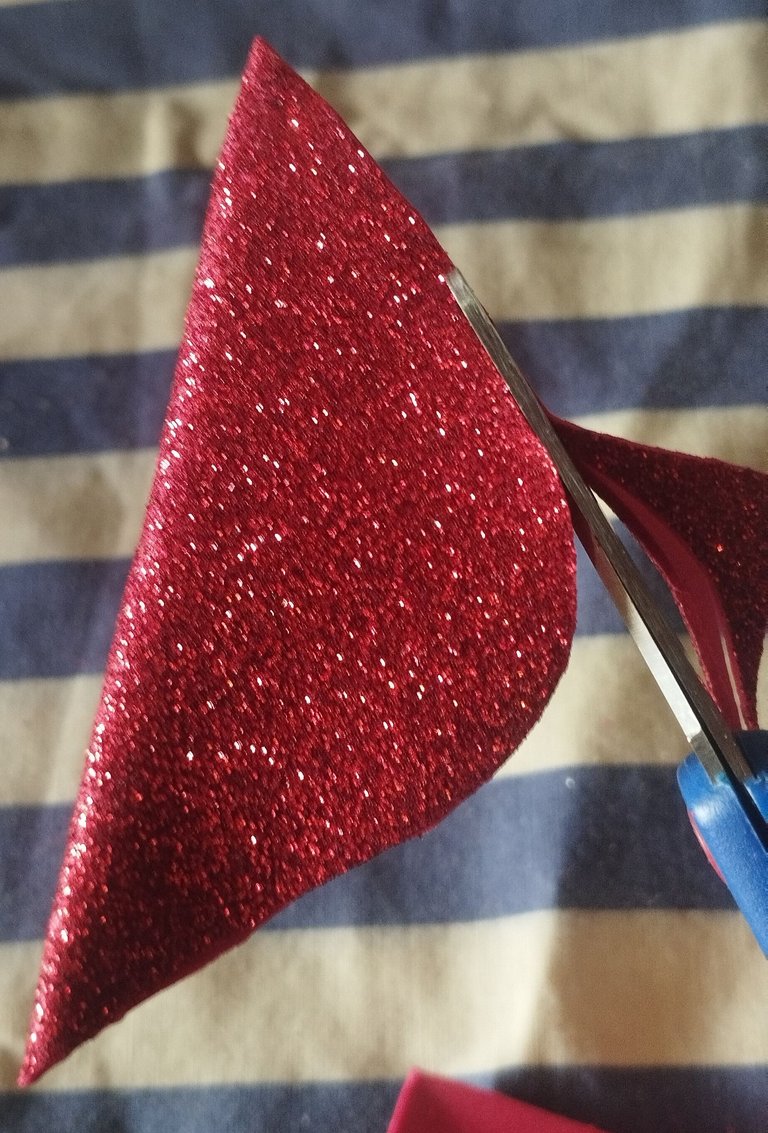
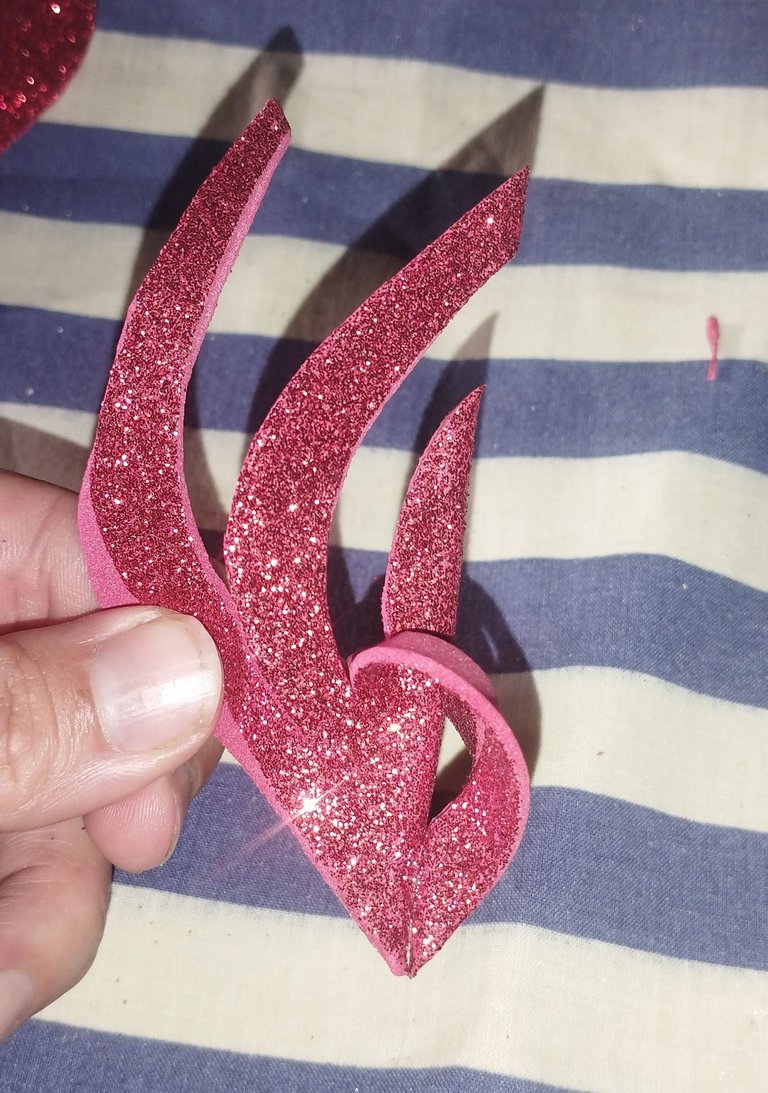
Ahora voy a doblar el cuadrado y lo voy a pegar un poco en la parte de adentro y voy hacer un corte ovalado en la punta superior para que quede de esa forma.en la imagen lo podrán apreciar.
N° 3:
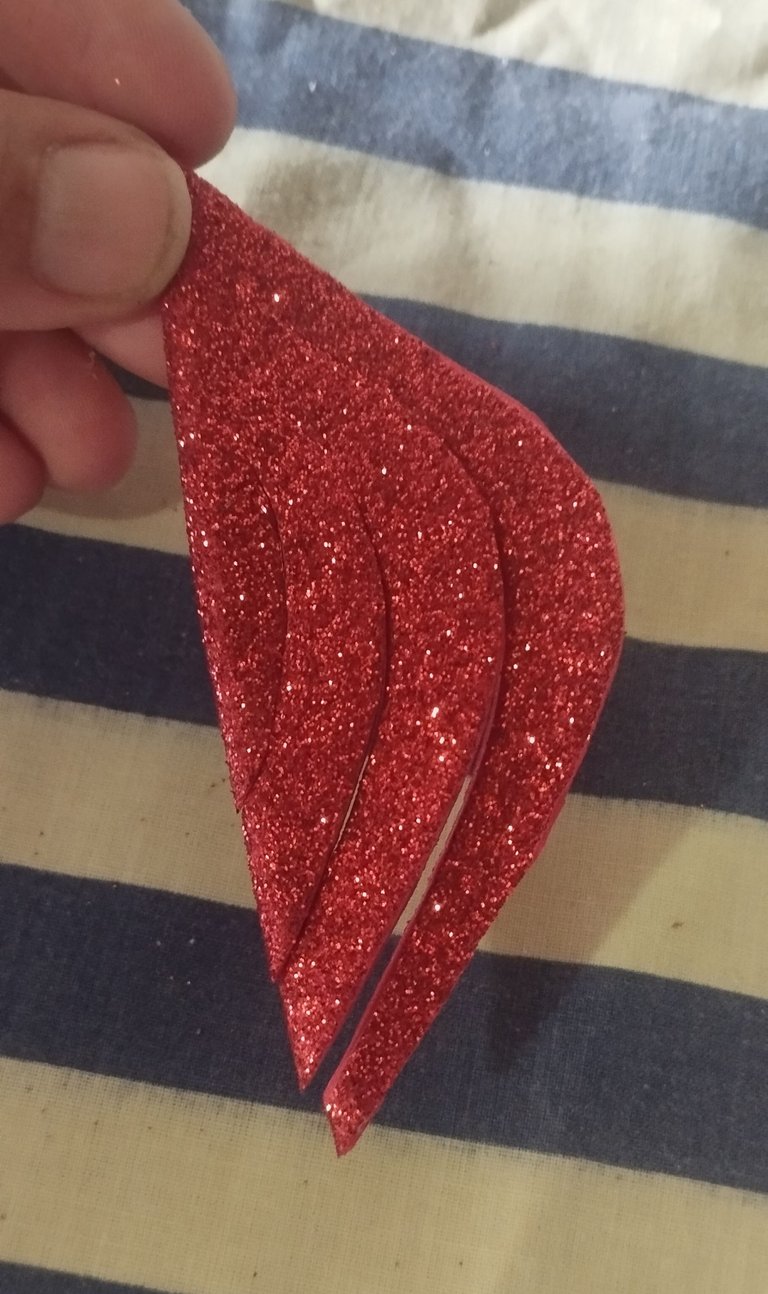
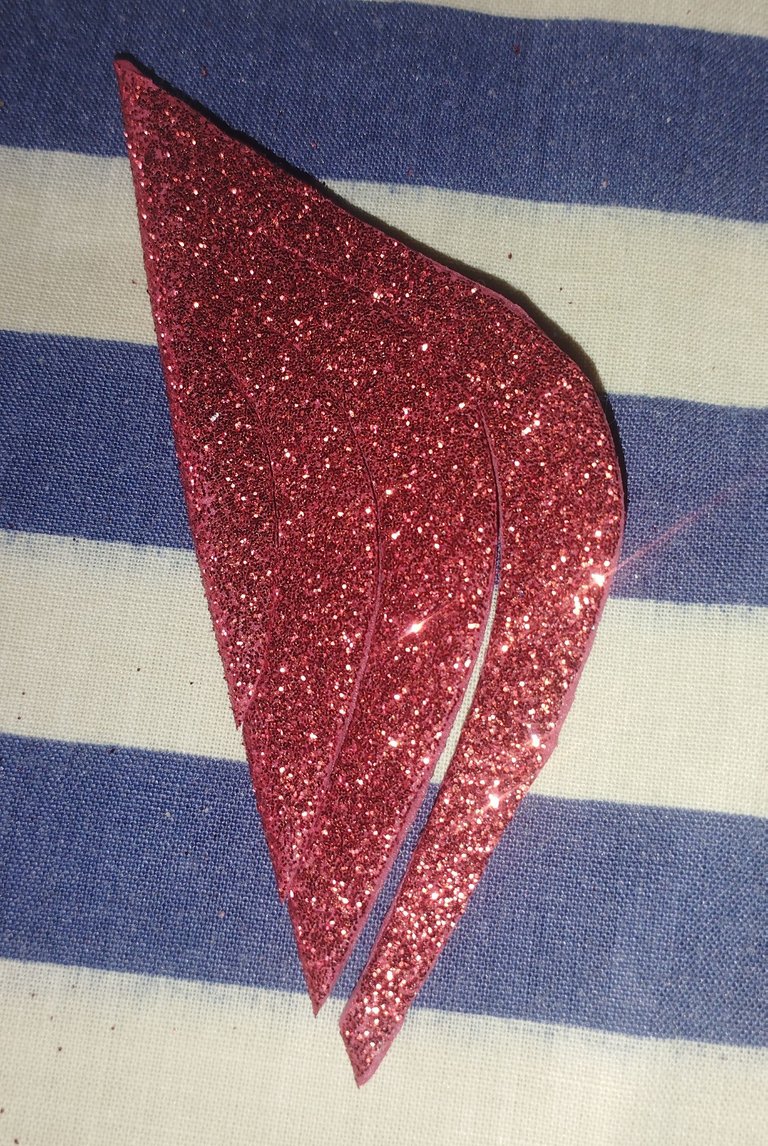
Cuando ya se tenga los 6 cuadros con el corte ovalado en las puntas y pegadas en el medio vamos a realizar cortes de aproximadamente 1 Centímetro o menos dependiendo de cuántos listones quiera hacerle, YO realice 3 para hacer las forma del pétalo.si usted quiere agregarle más lista es depende de usted.
N° 4:
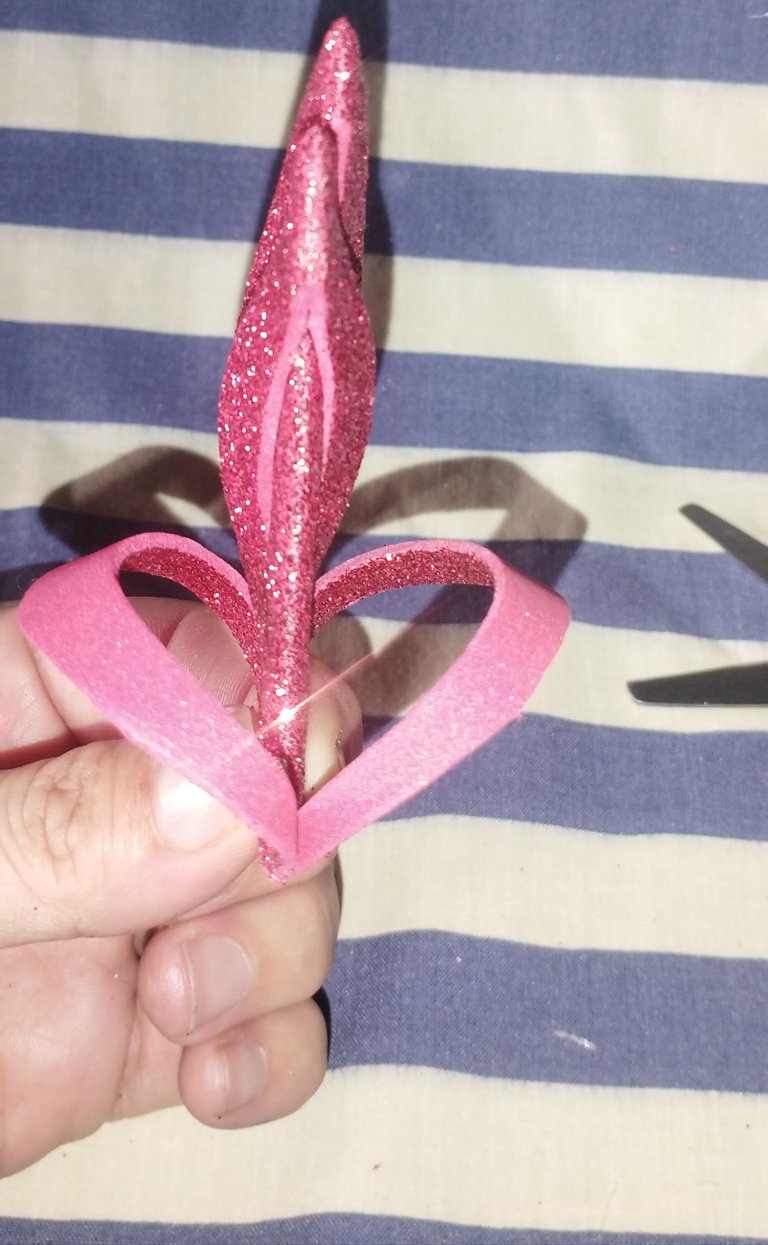
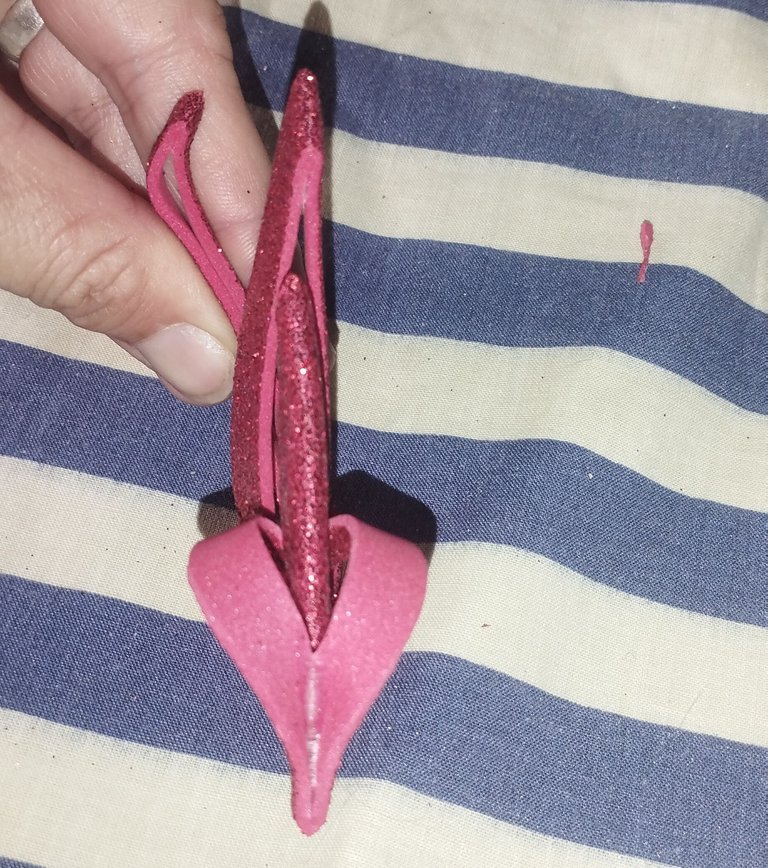
Ahora agarramos los listones y los vamos pegando de arriba hacia abajo y nos quedará como un pétalo así formaremos los 6.
N° 5:
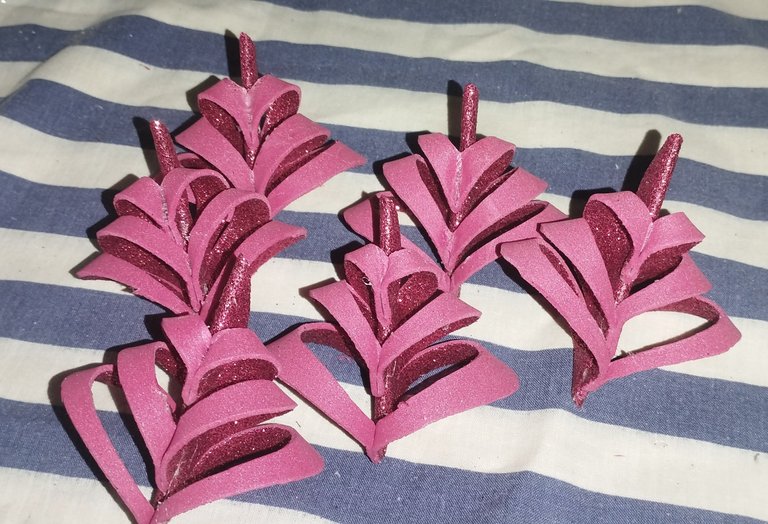
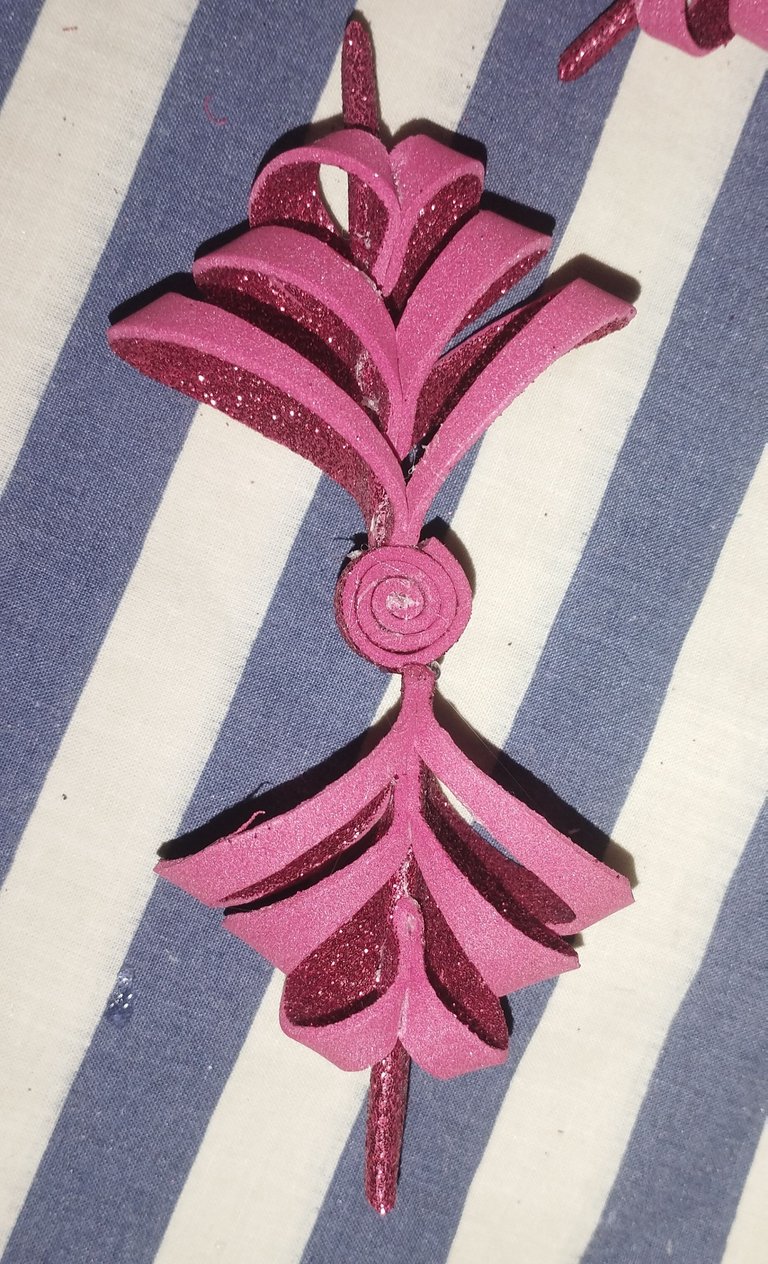
Luego que tengamos todos la piezas listas vamos a unirlas. Cortamos un listón del foami rojo de 1/2 centimetro,
Y lo enrrollamos para formar un círculo donde vamos a ir colocando las piezas una por una hasta quedar unidas todas, luego le vamos a colocar las piedras perladas como ustedes quieran yo las puse una debajo de la otra.

No fue muy fácil para mí la elaboración de esta grirnalda me queme mucho mis dedos con el silicón caliente, les recomiendo tener cuidado al Memento de pegar las piezas ya que no es que sean quemaduras graves peros si son molestas en el momento por es cuiden mucho sus manos.
De resto el corte y las medicinas si son más rápidas creo que para ser primera vez se ve bien.
Espero les guste mi publicación y espero ir mejorando poco a poco ya que ahora sí tendré un poco más de tiempo para ir creando a ir conociendo más de esta hermosa plataforma que tiene mucho que dar.
Infinitas gracias y saludos, que tengan una hermosa navidad y un próspero año nuevo.
Nos vemos pronto y espero sus comentarios al final de mi post, se aceptan críticas constructivas para el crecimiento de mis publicaciones muchas Gracias y ¡Saludos!.
Las imagenes me pertenecen, fueron tomadas de mi teléfono.
traductor: Deepl Traslator.
Hi @Hive friends, since I've been on the platform I've never had the opportunity to upload content since I've been very busy with my university studies. But since we are in the december vacations I join the contest where I was mentioned by @rouseeve26 in this @diyhub community. I don't have much experience in creating content step by step but I've read some posts and well I'll do my best and I hope it turns out well or at least meets the expectations.
For my garland use the materials below:
Materials:
✓ Red foami with frosting.
✓ Scissors.
✓ Silicone glue stick or hot glue.
✓ Ruler.
✓ Pearlized stones.
Step by step:
N° 1:
First cut 6 squares of 7 centimeters by 7 centimeters long. With the ruler we measured a square of these measures and then I put them on top of foami to make the other squares and finally get 6 equal parts.
N° 2:
Now I am going to fold the square and glue it a little on the inside and make an oval cut at the top to make it look that way. You can see it in the image.
N° 3:
When you have the 6 squares with the oval cut at the ends and glued in the middle we will make cuts of approximately 1 centimeter or less depending on how many ribbons you want to make, I made 3 to make the petal shape. If you want to add more list is up to you.
N° 4:
Now we take the ribbons and glue them from top to bottom and we will have a petal shape to form the 6.
N° 5:
After we have all the pieces ready we are going to join them together. Cut a ribbon of red foami of 1/2 centimeter,
And roll it to form a circle where we are going to place the pieces one by one until they are all joined together, then we are going to place the pearl stones as you like, I put them one under the other.
It was not very easy for me to make this garland. I burned my fingers a lot with the hot silicone. I recommend that you be careful when gluing the pieces since they are not serious burns, but they are annoying at the moment so take great care. her hands.
For the rest, the cut and the medicines are faster, I think that for the first time it looks good.
I hope you like my publication and I hope to improve little by little since now I will have a little more time to create and learn more about this beautiful platform that has a lot to give.
Infinite thanks and greetings, have a beautiful Christmas and a prosperous new year.
See you soon and I look forward to your comments at the end of my post. Constructive criticism is accepted for the growth of my publications. Thank you very much and Greetings!
The images belong to me, they were taken from my phone.
translator: Deepl Traslator.
Te aseguro que poco a poco irás mejorando tu técnica, se constante para que veas que vas a evolucionar rápido. 🤗, bendiciones!
Gracias por el apoyo amiga.
Congratulations @vvfariana19! You have completed the following achievement on the Hive blockchain And have been rewarded with New badge(s)
Your next target is to reach 50 upvotes.
You can view your badges on your board and compare yourself to others in the Ranking
If you no longer want to receive notifications, reply to this comment with the word
STOPCheck out our last posts:
Thank You
You're making a big difference @vvfariana19! Your first upvotes on Hive are helping to grow the community. Keep it up!
Exitos amiga, te quedó lindo!
Gracias por el apoyo amigo
Suerte en el concurso amiga, que bueno que te animaste.. saludos!
Gracias amiga
Muy lindo amiga, éxitos !
Que bueno q te gustó amiga gracias
What a nice design! It looks so beautiful. And it shows your creativity. Well done!
Thank You 🤗❤️❤️❤️
Buen trabajo, quedó lindo
Muchísimas gracias amiga. 🤗❤️