(ESP.ENG) PRÁCTICO SERVILLETERO HANDY NAPKIN RING
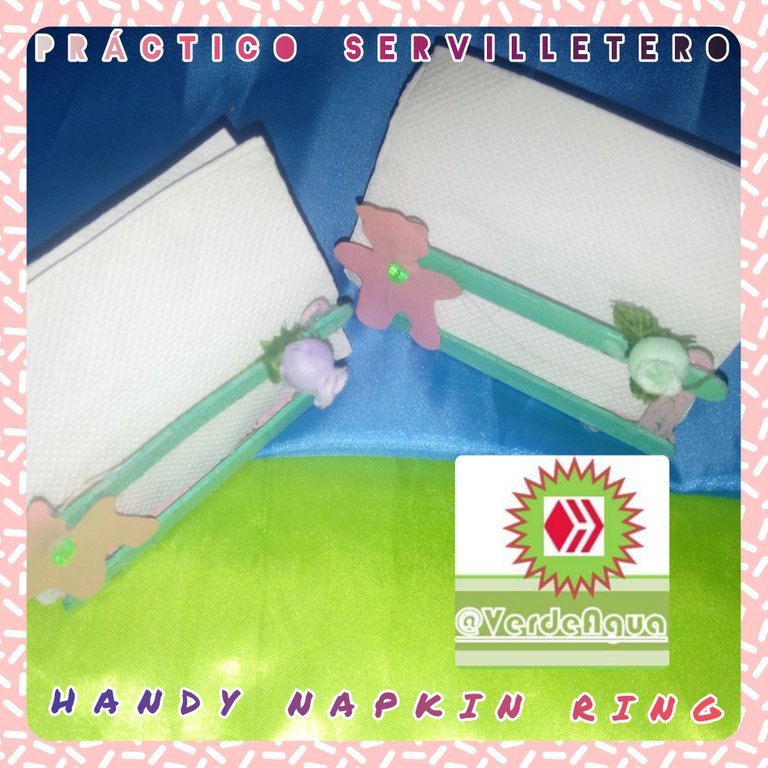
Saludos a toda la comunidad de Hive¡ para hoy @VerdeAgua les invita a recrear un práctico servilletero de oso a través de la sencillez creativa de una manualidad, ésta se hace para que podamos mostrar las cosas bonitas que se pueden crear para el hogar. También es un detalle personalizado para obsequiar a amigos y familiares, ¡Espero les guste! se hizo con cariño para todos y cada uno de ustedes.
Greetings to the entire community of Hive¡ for today @VerdeAgua invites you to recreate a practical bear napkin holder through the creative simplicity of a craft, this is done so we can show the beautiful things you can create, for your home. It is also a personalized detail to give to friends and family, I hope you like it! it was made with love for you.

El origen de esta palabra es europeo y se le otorga a Leonardo da Vinci haber creado la servilleta de tela (si desean saber más, ir a final en la referencia). Debido a esto las servilletas primeras se fueron popularizando hasta cumplir cuatro funciones: higiene, estética, orden y belleza. El utensilio que recrearemos hoy con toque personalizado, puede hacerse de múltiples formas en el diseño, éste servilletero de oso es práctico e inclusive puede hacerse con los miembros más pequeños de la casa.
The origin of this word is European and Leonardo da Vinci is credited with having created the cloth napkin (if you want to know more, go to the end of the reference). Because of this, the first napkins became popular until they fulfilled four functions: hygiene, aesthetics, order and beauty. The utensil that we will recreate today with a personalized touch, can be made in multiple ways in the design, this bear napkin holder is practical and can even be made with the smallest members of the house.

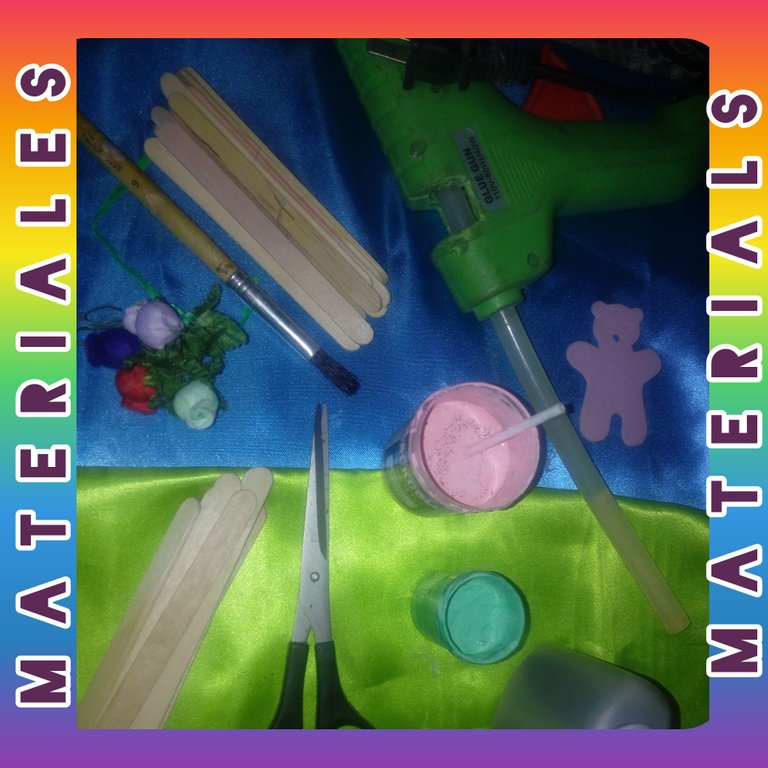
Como datos curiosos les diré que la servilleta de papel es de origen francés y viene de la palabra servitiette que a su vez, viene de servir. Además de ser un sustantivo, se define como un aro donde se colgaban las servilletas y con el pasar de tiempo cambio su forma y tamaño, hasta convertirse en parte de nuestra cotidianidad en casa y fuera de ella. Después de disfrutar de estos datos interesantes, te invito a recrear esta manualidad en cinco pasos, para ello, necesitaremos los siguientes materiales:
REGLA
BOLÍGRAFO “O” LÁPIZ
FOAMY O CARTULINA
TIJERA
ESCARCHA
PISTOLA DE SILICÓN
SILICÓN
2 O MÁS FLORES
PINTURA VERDE Y ROSADA
PEGA BLANCA
MOLDE DE OSO
As curious facts I will tell you that the paper napkin is of French origin and comes from the word servitiette which in turn, comes from serve. Besides being a noun, it is defined as a ring where napkins were hung and with the passing of time it changed its shape and size, until it became part of our daily life at home and outside of it. After enjoying these interesting facts, I invite you to recreate this craft in five steps, for this, we will need the following materials:
RULER
PEN OR PENCIL
FOAMY "O" CARDBOARD
SCISSOR
ESCARCHA
SILICONE GUN
SILICON
2 OR MORE FLOWERS
GREEN AND PINK PAINT
WHITE GLUE
BEAR MOLD
PRIMER PASO
Primero requerimos pintar las paletas de color verde y las rosadas por un lado, y cuando estén bien secas, repetir en su reverso el mismo procedimiento, luego repetimos una vez más para fijar el color de la pintura (yo use un ventilador para secar más rápido).
STEP ONE
First we need to paint the green and pink palettes on one side, and when they are well dry, repeat the same procedure on the reverse side, then repeat once more to fix the color of the paint (I used a fan to dry faster).

SEGUNDO PASO
Completar lo que te haya faltado por pintar, y en mi caso requirió de dos veces más para cubrir de pintura las paletas, debido a la calidad de pintura que tenía disponible; seguidamente, después de secar bien las paletas sellamos con la pega blanca y escarcha de tu color favorito, es decir, en un envase pequeño agregas pega blanca más la escarcha, y repetimos el proceso de pintar otra vez, por cada lado de la paleta, también le otorga brillo.
SECOND STEP
Complete what you have left to paint, and in my case it took two more times to cover the pallets with paint, due to the quality of paint I had available; then, after drying the pallets well we seal with the white glue and frost of your favorite color, that is, in a small container add white glue plus the frost, and repeat the process of painting again, on each side of the pallet, it also gives it shine.

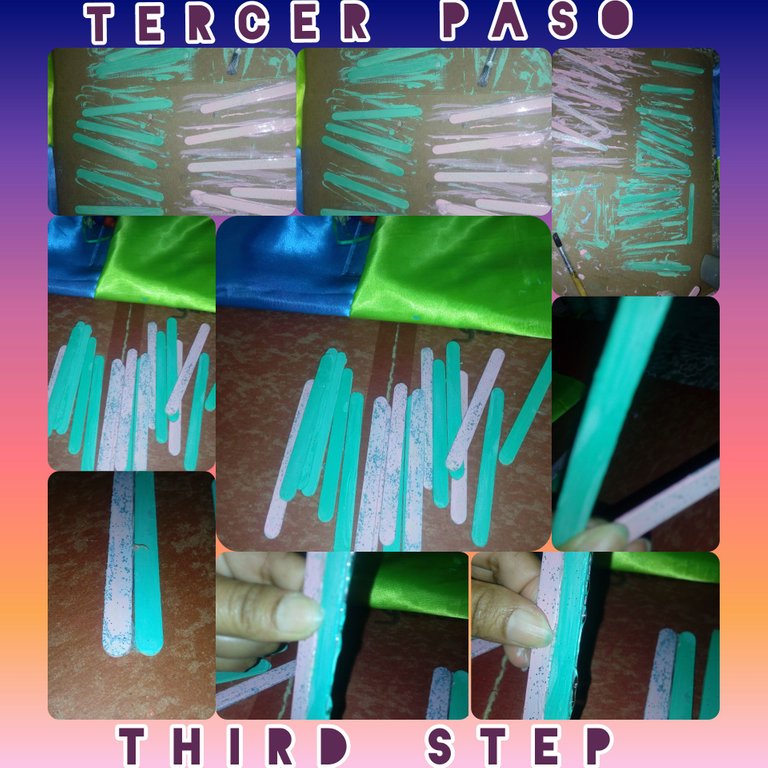
TERCER PASO
Para este momento, empezamos a unir las paletas en las combinaciones que se quiera, pero solo deben ser cuatro las que servirán de base. Yo elegí, colocar dos verdes en el centro y una rosada a cada lado (ver fotos). Después necesitamos, agregar al principio y final de la base, una paleta vertical para darle más soporte a la estructura.
STEP THREE
At this point, we begin to join the palettes in the combinations you want, but there should only be four that will serve as a base. I chose to place two green ones in the center and a pink one on each side (see photos). Then we need to add a vertical palette at the beginning and end of the base to give more support to the structure.
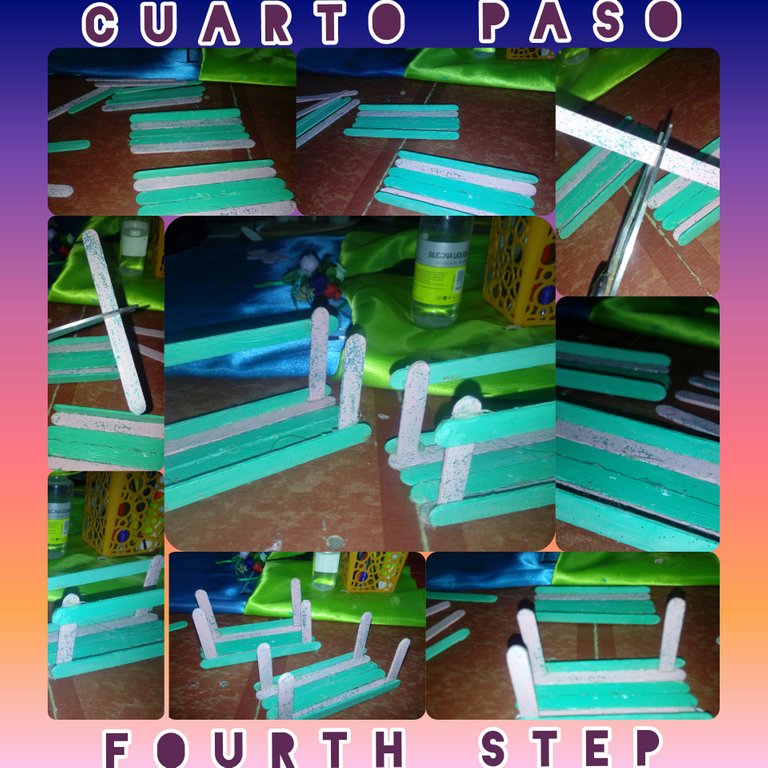
CUARTO PASO
Seguimos ahora uniendo las paletas, pero ahora solo requerimos cortar por la mitad, a dos paletas. Yo decide cortar las de color rosado y luego con sílicón uní de cada lado de la base y cerramos, después seguimos colocando dos paletas más en la parte superior de las que cortamos. (Ver fotos)
FOURTH STEP
We continue now joining the popsicles, but now we only need to cut in half, to two popsicles. I decided to cut the pink ones and then with silicon I joined them on each side of the base and closed them, then we continued placing two more popsicles on top of the ones we cut. (See photos)
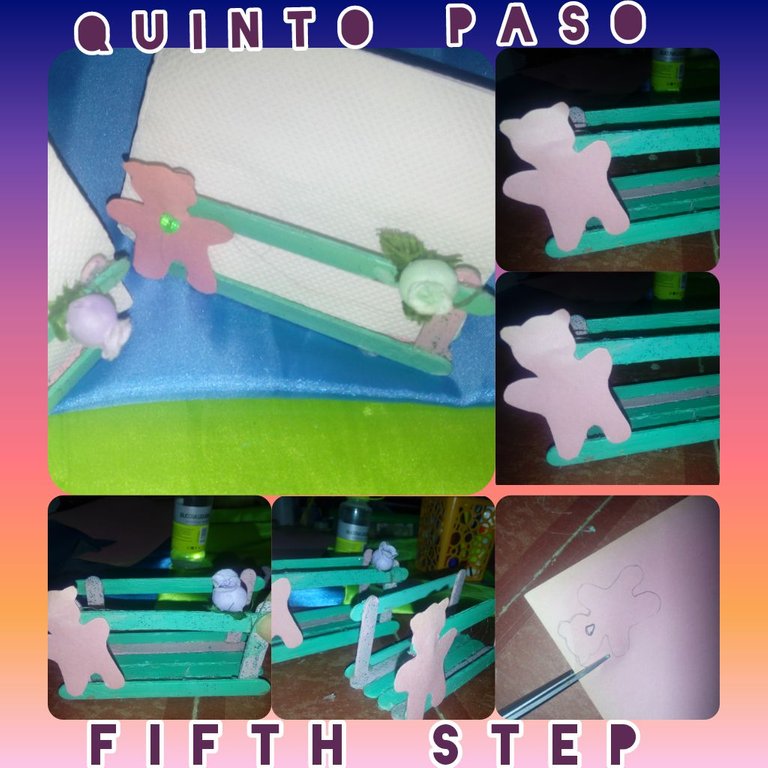
PASO CINCO
Ahora busca la imagen de un lindo oso como modelo, lo trasladas a la cartulina (eso fue lo que hice yo) o foamy, recortas y pegas a un lado del servilletero. Después adornas con una o más flores en el otro extremo. ¡Ah se me olvidaba! yo le coloque un corazón para realzar el oso. Ustedes son libres de adornar como quieran este hermoso y practico servilletero. Pueden hacer el que yo hice “o” generar una sana competencia de creatividad con los reyes del hogar y disfrutar de un momento hermoso en familia.
FIFTH STEP
Now look for the image of a cute bear as a model, transfer it to cardboard (that's what I did) or foamy, cut it out and glue it to one side of the napkin ring, then decorate it with one or more flowers on the other side. Then decorate with one or more flowers on the other side. Oh, I forgot! I put a heart to enhance the bear. You are free to decorate as you wish this beautiful and practical napkin ring. You can do what I did "or" generate a healthy competition of creativity with the kings of the house and enjoy a beautiful moment with your family.
Finalizo agradecida por realizar una agradable y relajante manualidad para compartirla con todos y cada uno de ustedes. Recordemos diferenciarnos en lo que hacemos; sobre todo ahora, porque las múltiples redes facilitan un amplio abanico de manualidades, quizás haya coincidencias pero la creación o recreación depende de tu toque personal. Hazte único en técnica y materiales, combinación, colores... Lo dice alguien que aprende cada día de ti ¡Cuídense, y feliz jornada!
I end grateful for making a nice and relaxing craft to share with everyone, and each of you. Let's remember to differentiate ourselves in what we do; especially now, because the multiple networks facilitate a wide range of crafts, perhaps there are coincidences but the creation or recreation depends on your personal touch. Become unique in technique and materials, combination, colors... Says someone who learns every day from you! Take care, and happy day!
.

REFERENCIAS
La imagen de portada fue tomada por mí con un celular Lg G3 y editadas en Power Point e Inshot.
La barra de corazones fue creación propia, así como el logo que me identifica como VerdeAgua, para ello, use la herramienta de formas, que están presente en Power Point.
REFERENCES
The cover image was taken by me with a Lg G3 cell phone and edited in Power Point and Inshot.
The hearts bar was my own creation, as well as the logo that identifies me as VerdeAgua, for it, I used the shapes tool, which are present in Power Point.