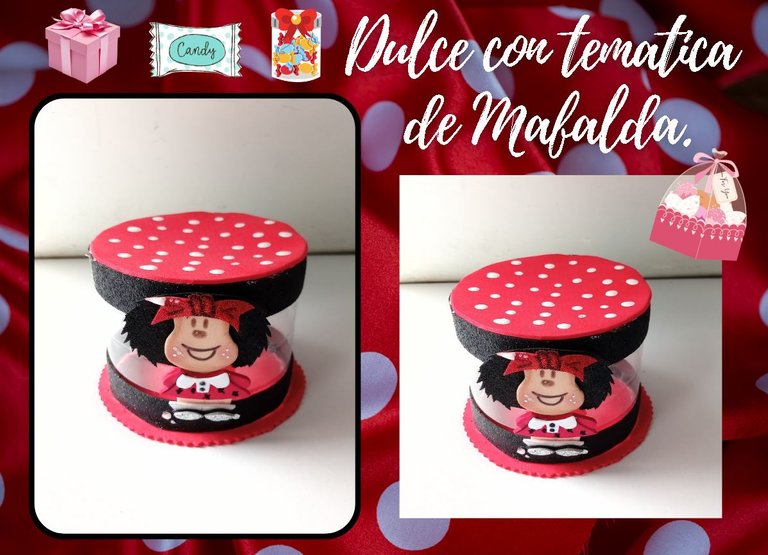
[Esp/Eng] ✨Dulcero con temática de Mafalda // Mafalda-themed candy ✨
✨🎀🍬¡Hola amigos amantes de la creatividad! Espero que hayan pasado un muy buen comienzo de semana.🍬🎀✨
🔸Sin más que añadir, a continuación los dejo con el paso a paso:
✨🎀🍬¡Hello friends who love creativity! I hope you had a very good start to the week.🍬🎀✨
¡Good afternoon friends! I hope you are having a great week. For my part, I write to you with a bit of cold, let's say that we spent these carnivals with rain and very strong breezes. Today I share with you the step by step of a beautiful Mafalda-themed candy maker. For some time now, images of Mafalda have been appearing everywhere, even on printed clothing, and with all this, it made me want to make some creation with this beautiful character and share an idea with you.
I think it's a nice idea as a theme for a children's party or for a person who is a fan of this character, but also, adding a couple of hearts to the candy bowl, it is perfect to give something as a gift in this beautiful month of love and friendship.
🔸Without more to add, then I leave you with the step by step:
♥️ESPERO QUE TE GUSTE,
¡Empecemos!
♥️I HOPE YOU LIKE IT,
Let's start!

✂️ MATERIALES | ✂️ MATERIALS
- Botella plástica.
- Foami rojo, piel y blanco.
- Foami escarchado, negro, rojo
y blanco. - Marcadores y tizas.
- Pintura blanca.
- Pegamento.
- Regla.
- Lápiz.
- Tijeras.
- Plastic bottle.
- Red, skin and white foami.
- Frosted foami, black, red
and white. - Markers and chalks.
- White paint
- Glue.
- Ruler.
- Pencil.
- Scissors.
🍬 PROCEDIMIENTO | 🍬 PROCESS
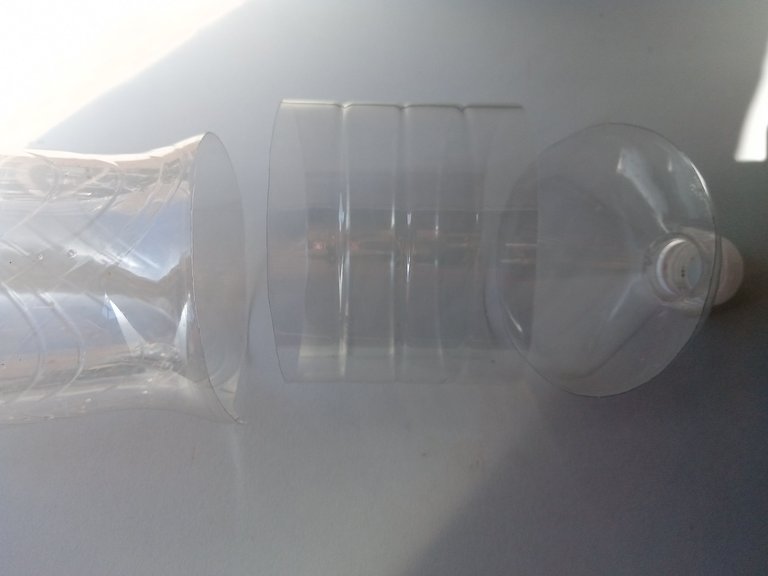
✨ PASO 1:
Lo primero que debemos hacer es retirar la etiqueta de la botella, recortamos justo la parte donde estaba la etiqueta y con un pañito con acetona o vinagre, frotamos sobre el pegamento que dejo la etiqueta, hasta retirarlo por completo.
✨ STEP 1:
The first thing we must do is remove the label from the bottle, we cut out just the part where the label was and with a cloth with acetone or vinegar, we rub over the glue left by the label, until it is completely removed.
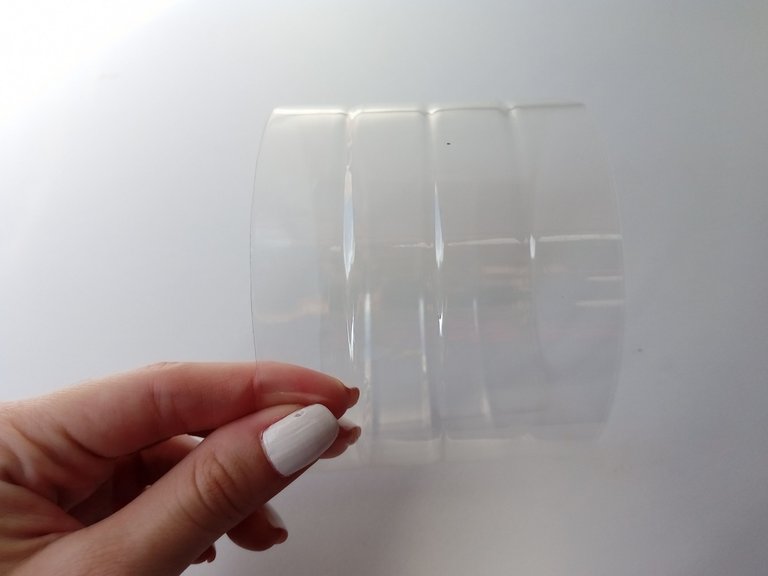
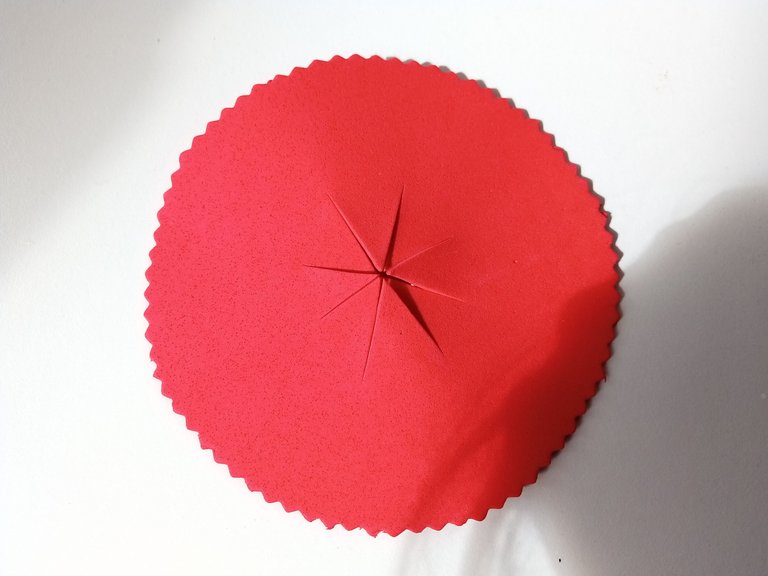
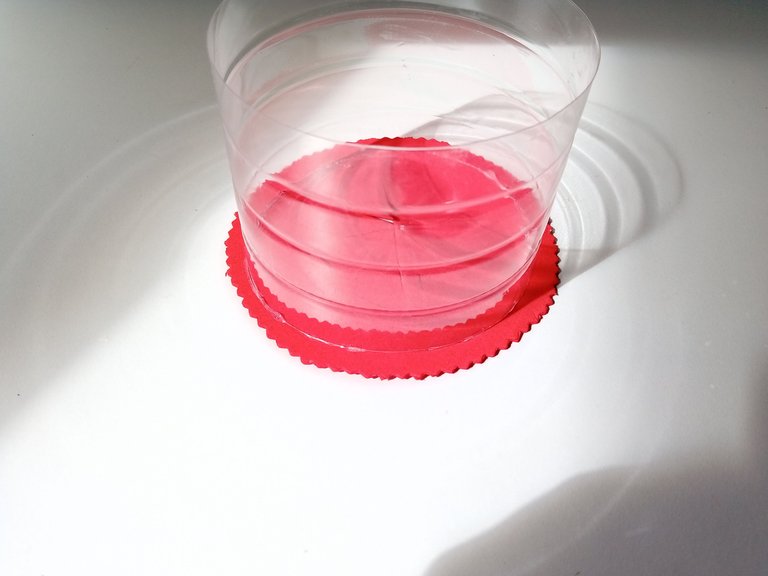
✨ PASO 2:
Luego, recorté un círculo 0.5 cm más grande que el cilindro de plástico, recorté el borde con una tijera con diseño de triángulos y en medio, recorté dando forma de asterisco, que será por donde se metan y saquen los dulces. Después, pegamos el cilindro centrado en el foami.
✨ STEP 2:
Then, I cut out a circle 0.5 cm larger than the plastic cylinder, I cut out the edge with scissors with a triangle design and in the middle, I cut out the shape of an asterisk, which will be where the candy goes in and out. Then, we glue the cylinder centered on the foam.
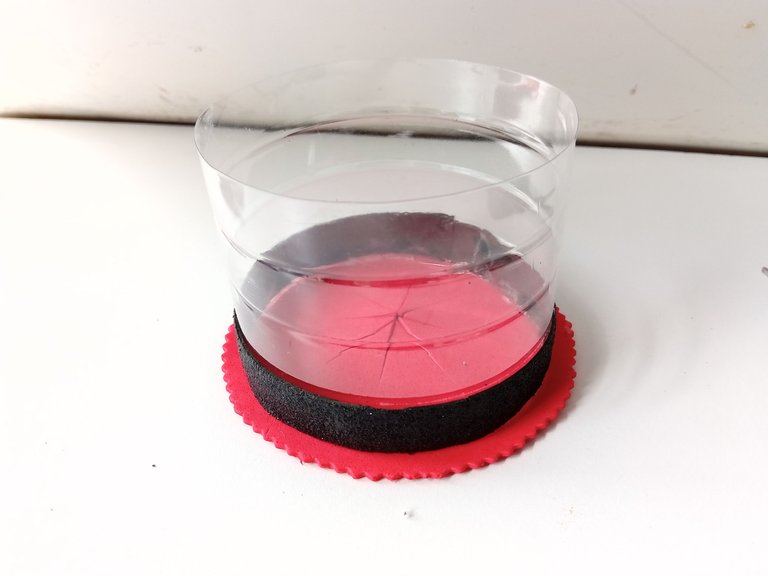
✨ PASO 3:
Para cubrir un poco las imperfecciones, recorté una tira de 1.5 cm en foami escarchado negro y lo pegué por todo el borde inferior del plástico. Para la tapa, pegamos directamente la parte superior del plástico sobre foami rojo, recortamos el excedente y pegué otra tira de 1.5 cm por todo el borde superior.
✨ STEP 3:
To cover the imperfections a little, I cut out a 1.5 cm strip of black frosted foam and glued it along the entire bottom edge of the plastic. For the lid, we directly glued the top part of the plastic onto red foam, cut off the excess and glued another 1.5 cm strip along the entire top edge.

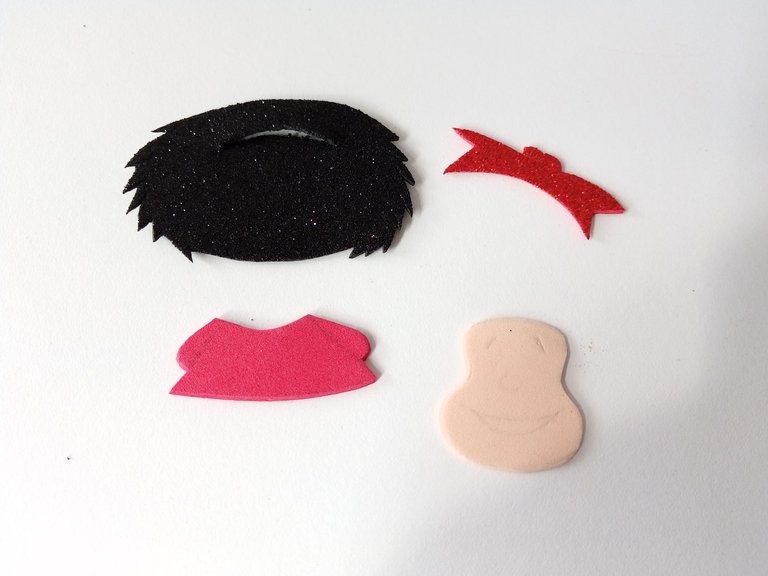
✨ PASO 4:
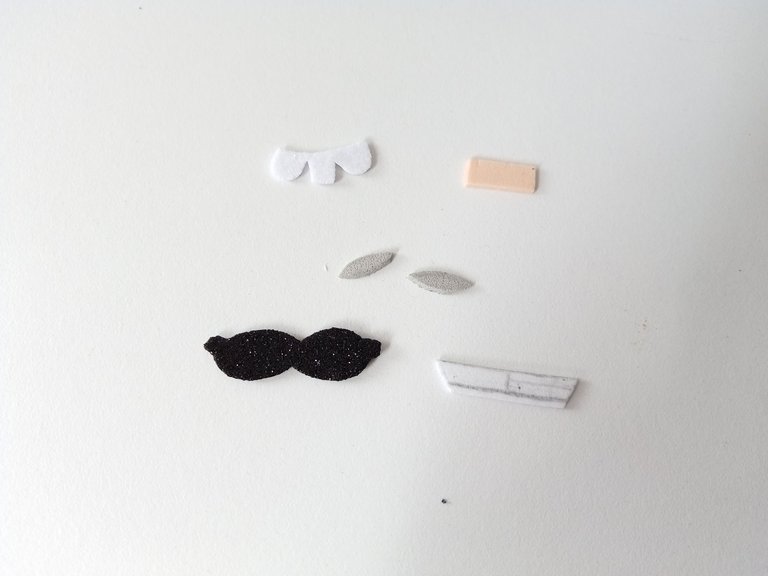
Ahora vamos con la decoración. Comencé dibujando el patrón o dibujo de Mafalda en una hoja blanca, recorté y calqué cada parte al color correspondiente de foami, utilizando los siguientes colores: el cabello en foami negro escarchado, el lazo en foami rojo escarchado, la ropa en rojo, los zapatos negro y plateado escarchado, partes de la ropa y medias en blanco escarchado, zapatos en negro escarchado, cabeza, cuello y piernas en color piel.
✨ STEP 4:
Now let's get to the decoration. I started by drawing the pattern or drawing of Mafalda on a white sheet, I cut out and traced each part to the corresponding color of foami, using the following colors: the hair in frosty black foami, the bow in frosty red foami, the clothes in red, the shoes frosted black and silver, parts of clothing and stockings in frosted white, shoes in frosted black, head, neck and legs in flesh color.
✨ PASO 5:
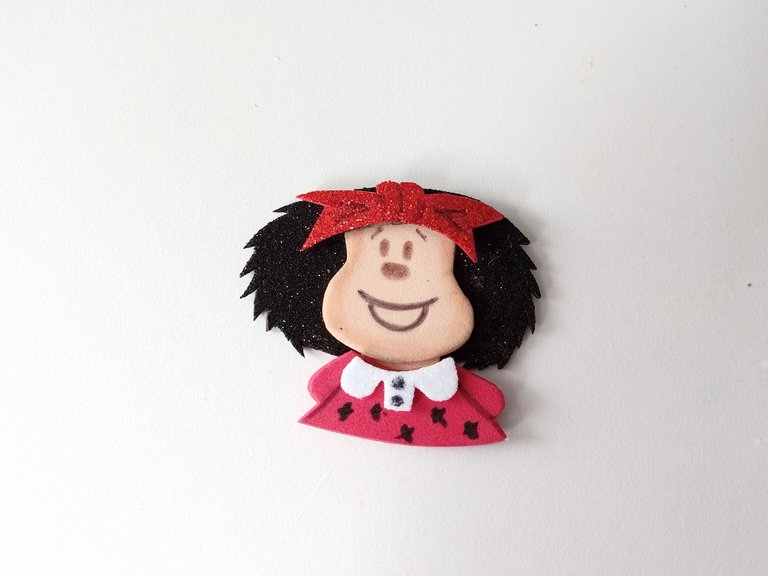
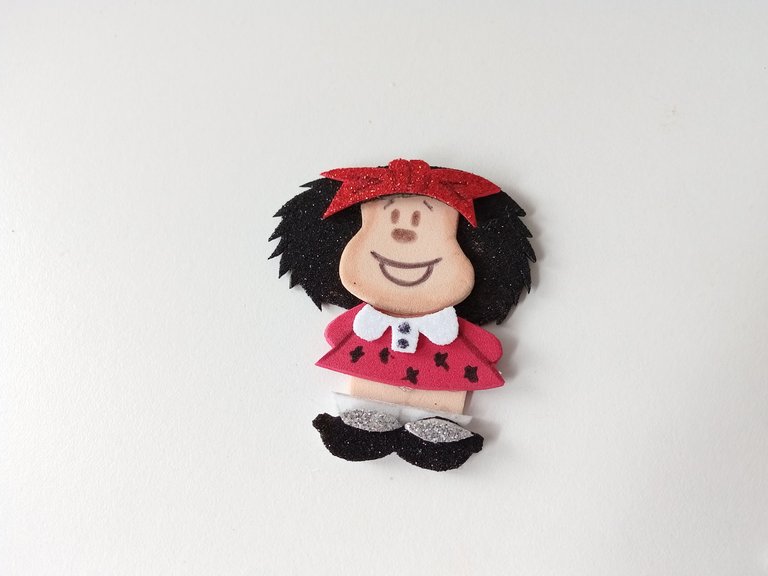
Al tener todas las piezas listas, pasé un tono de tiza más oscuro que el color de la cabeza por el borde, también dibujé el rostro, los detalles a la ropa, botones y lazo. Luego, comencé a pegar todas las piezas de la siguiente manera: Al cabello le corté una abertura para que entrara la cabeza, después pegué el cuello, la ropa, seguidamente las piernas, medias y zapatos.
✨ STEP 5:
Having all the pieces ready, I passed a tone of chalk darker than the color of the head along the edge, I also drew the face, the details on the clothing, buttons and bow. Then, I began to glue all the pieces in the following way: I cut an opening in the hair for the head to enter, then I glued the neck, the clothes, then the legs, stockings and shoes.
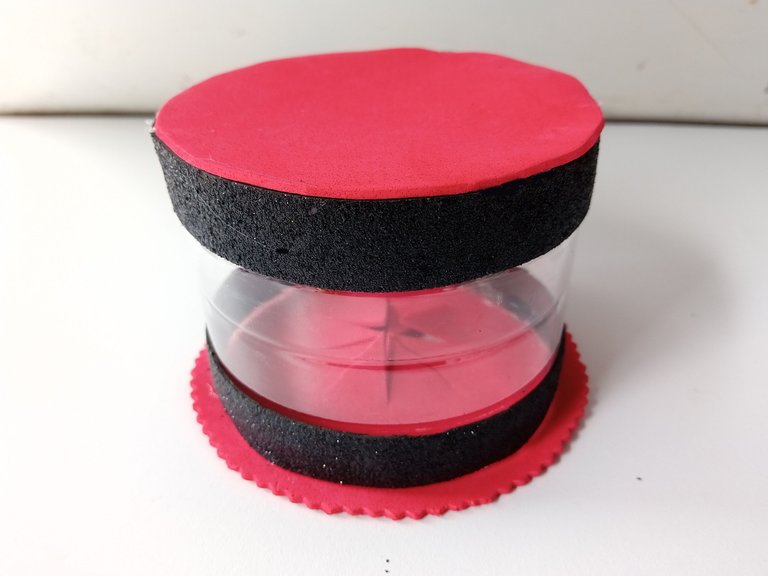
✨ PASO 6:
Al estar la figura lista, pegué en medio del dulcero, di color a las mejillas y con pintura blanca, algunos puntos de luz por dónde creí que se verían bien. Además, dibujé puntos distribuidos por toda la tapa.
✨ STEP 6:
Once the figure was ready, I glued in the middle of the candy bowl, I colored the cheeks and with white paint, some points of light where I thought they would look good. Additionally, I drew dots distributed throughout the cover.
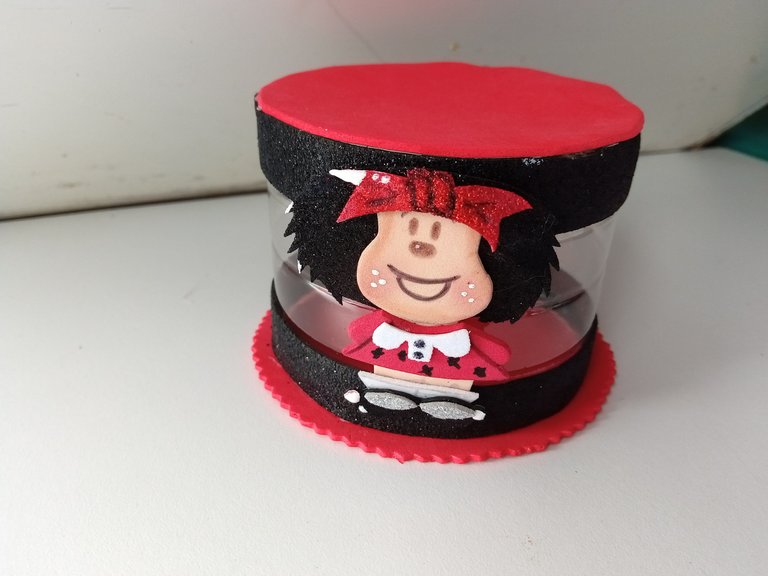
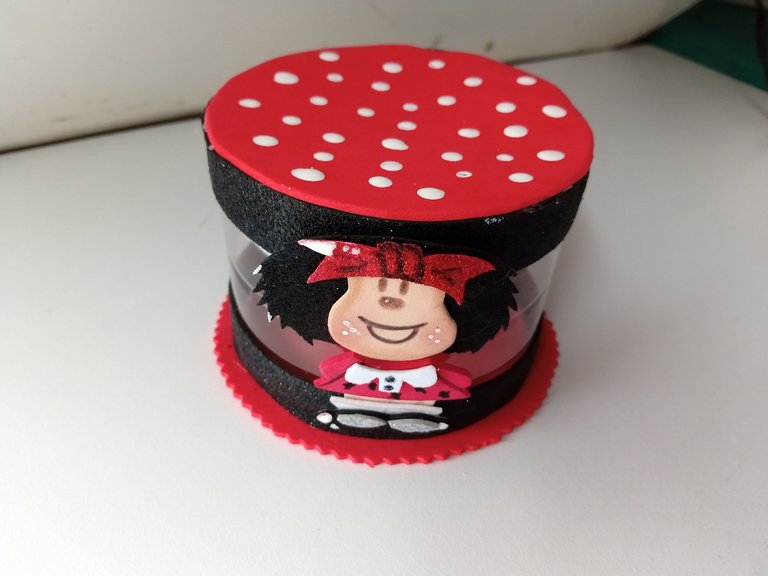
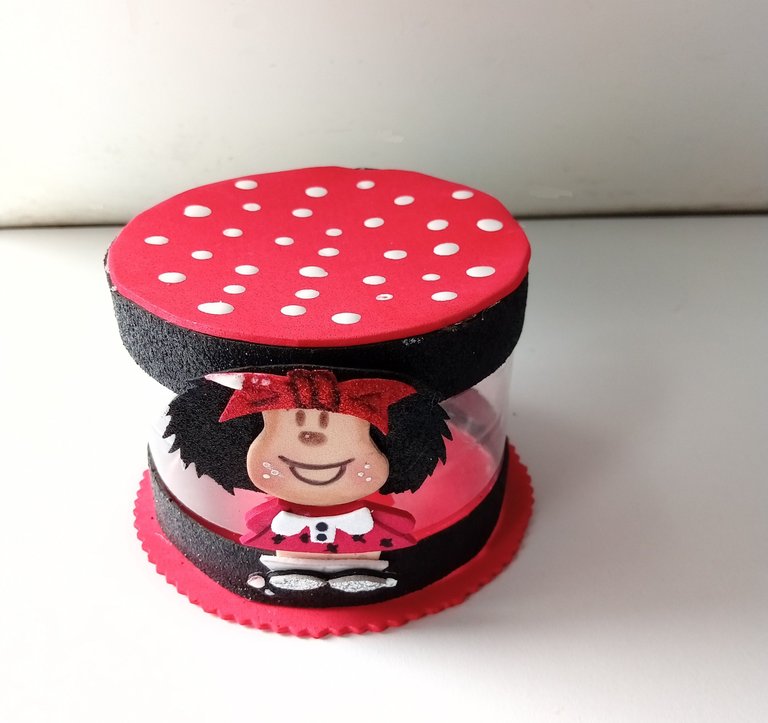
✨🎀🍬¡And ready!🍬🎀✨This way they can make a beautiful candy box of Mafalda or the character of her choice. This is a nice idea for birthdays or to give a nice detail in this month of love and friendship. I hope you liked the step by step and are encouraged to make it.
❤️Until the next post.
✨RESULTADO: | ✨RESULT:


Todas las fotografías son de mi propiedad.
Separador y Fotos editadas en Canva
All photographs are my property.
Photos edited in Canva
Te quedó super Cuchiii, valen! Me encantó 😍🫶. Está perfecto para un cotillón de una fiesta temática o algo así m
Que belleza ami 🤗 Mafalda es una temática que le gusta a muchos aunque la verdad no había visto un dulcero de ello, el tuyo quedó hermoso, hiciste un trabajo impecable ❤️
Amiga, adoro a Mafalda! Te quedó muy hermoso y delicado (como TODAS tus creaciones)... Felicidades! <3
It looks pretty cool. Wonderful design and it shows your skills. Well done! Thank you for sharing this.
Many thanks friends! I'm glad you liked this candy bar idea. 💗
Hermoso, mi caricatura favorita
Que ternura más hermosa🥰
Ay ño mio que bello. Yo amo a Mafalda.
Te quedó hermoso ami, haces un lindo trabajo con el foamy
Te quedó super lindooo mi Valen 😍 Mi mamá ama a Mafalda, así que seguro le encantaría recibir algo así. Que belleza 💕
Valentina pero que es esta belleza?😍😍😍
Está demasiado hermoso amiga, me encanta cada detalle, está perfecto.. gracias por compartir 🩷✨
Te quedó precioso, que buen trabajo 😊
Precioso como todo lo que haces amii😍😍 esos colores de Mafalda son hermosos ademas😍😍
Tan bella, muchas gracias por esas palabras Ami!!
Cierto? Pienso que los colores quedaron bien combinados.
💗💗
Congratulations, your post has been upvoted by @dsc-r2cornell, which is the curating account for @R2cornell's Discord Community.
Enhorabuena, su "post" ha sido "up-voted" por @dsc-r2cornell, que es la "cuenta curating" de la Comunidad de la Discordia de @R2cornell.
Muchas gracias por el apoyo amigos. 💗✨
Que lindo te quedo amiga, me gusto mucho! Que haces luego con todas las manualidades que haces, las vendes?
Me encanta tu creatividad e ideas!😍 Gracias por compartir! 💛
Muchas gracias mi Kerit!! La verdad que las guardo y cuando les quiero dar un detallito a familiares o amigos, pues aprovecho de regalarlas.
Que bella! Muchas gracias por tus lindas palabras amiga.🤭💗
So adorable!
Muchas gracias linda!
Ay! Soy muy fan de Mafalda!! La amo. Qué bella sea la protagonista del dulcero, me encanta los colores que usaste y por supuesto tu estupenda presentación.
🤭 Me alegra muchísimo que te haya gustado , amiga! Últimamente me aparece por todas partes y ya era hora de elaborar algo con ella.
Muchísimas gracias por tan bonitas palabras.
Bendiciones 💗
https://twitter.com/hivediy47901/status/1760419639811608622
¡¡¡Buen trabajo!!! Gracias por publicar tu excelente contenido en Hive Diy, este tipo de dulceros son muy útiles para cualquier fiesta, con estas ideas podremos hacerlas de diferentes estilos.
Tu comunidad artesana ahora es testigo

Muchas gracias por el comentario! Así es , es una gran idea para alguna reunión o fiesta.
Saludos! 💗