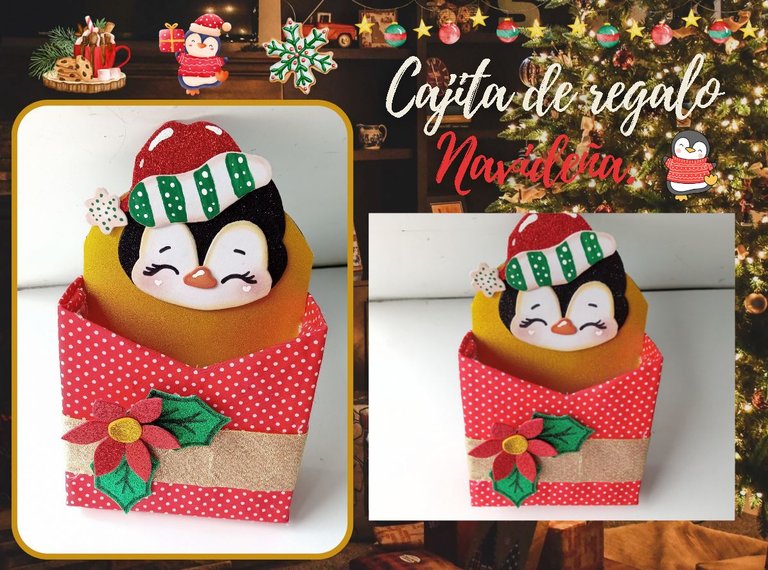
[Esp/Eng] ✨Cajita de regalo navideña. // Christmas gift box.✨
✨🌟☃️🦌¡Hola amigos amantes de la creatividad! Espero que hayan pasado un muy buen comienzo de semana.✨
🔸Sin más que añadir, a continuación los dejo con el paso a paso:
✨🌟☃️🦌¡Hello friends who love creativity! I hope you had a very good start to the week.✨
I hope you are doing well and had a nice Monday. On this occasion I share with you the step by step of a beautiful gift box with a Christmas penguin. Oh friends, I know that I always say that everything turned out beautiful, but well... That's what you have when you recognize that with practice you can do much more beautiful things and obtain better results. These months I have noticed a big change compared to my crafts from last year and which I was also happy with, but this year I notice the difference and I am very happy.
But well, without going off the beaten path and getting distracted by emotion haha, today I share with you this cute little gift box that is quite easy and quick to make, using useful materials, in this case, fabric and a box of cornstarch, but also, making a foam penguin and more details.
🔸Without more to add, then I leave you with the step by step:
♥️ESPERO QUE TE GUSTE,
¡Empecemos!
♥️I HOPE YOU LIKE IT,
Let's start!

🎄 MATERIALES | 🎄 MATERIALS
- Caja de maicena.
- Tela.
- Cartulina.
- Foami blanco y naranja.
- Foami escarchado, negro, verde,
amarillo y rojo. - Cinta navideña.
- Marcadores, tizas o pinturas.
- Pegamento
- Regla.
- Tijera.
- Lápiz.
- Cornstarch box.
- Fabric.
- Cardboard.
- White and orange foami.
- Frosted foam, black, green,
yellow and red. - Christmas ribbon.
- Markers, chalk or paints.
- Glue
- Ruler.
- Scissors.
- Pencil.
🌟 PROCEDIMIENTO | 🌟 PROCESS
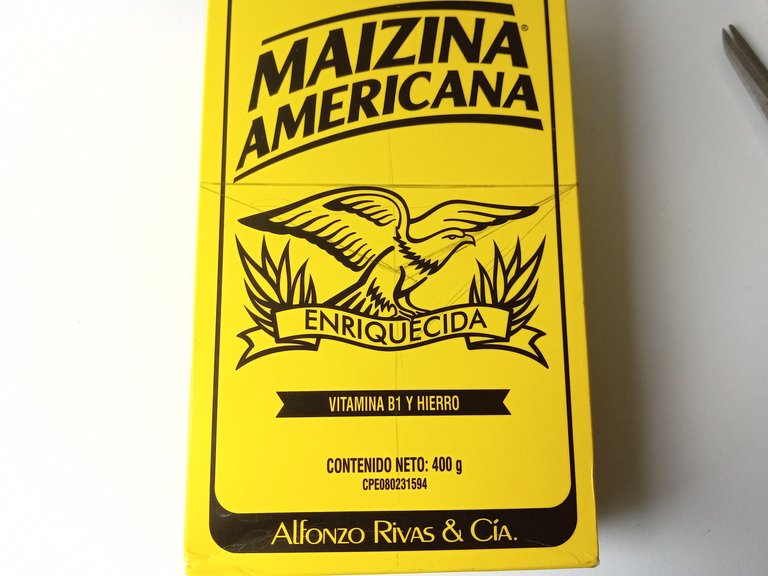
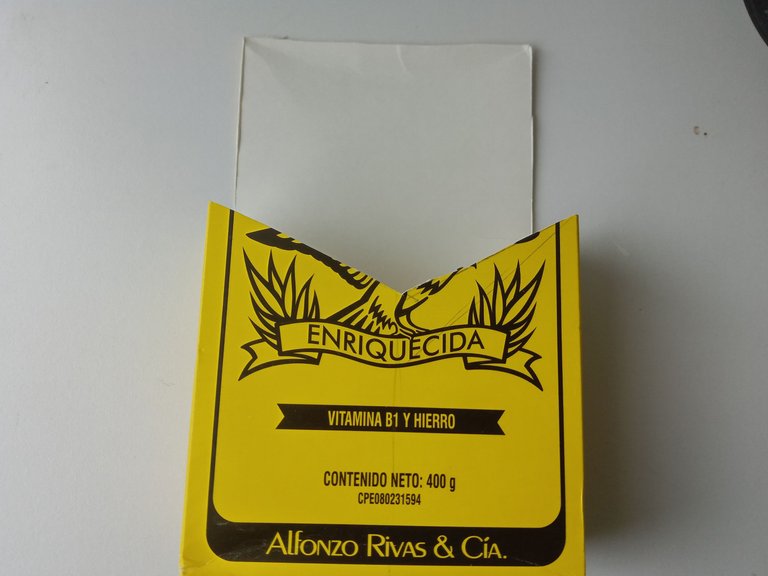
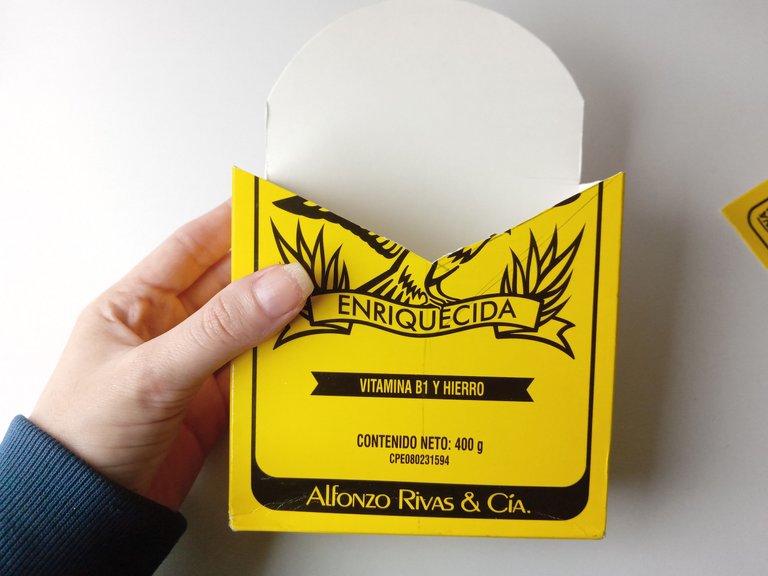
- PASO 1:
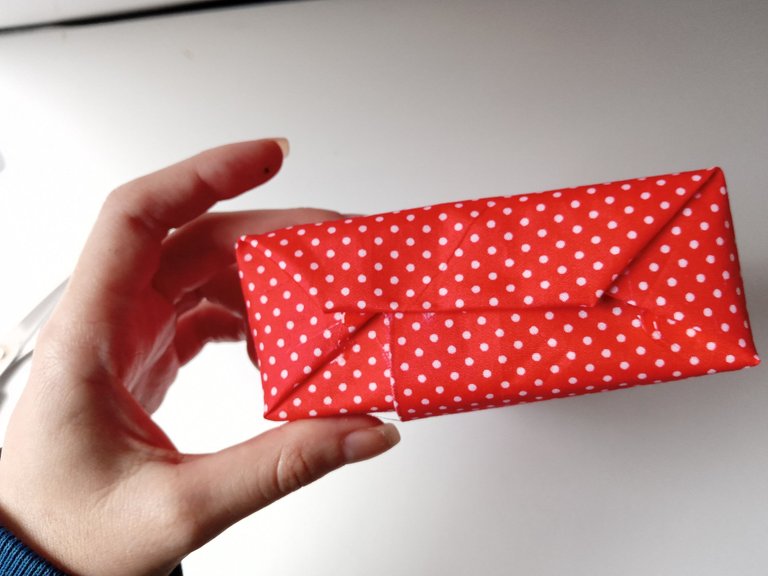
Lo primero que hice fue la caja, así que tomé la caja de maicena y a los 5 cm de largo, tracé una línea horizontal y di forma triangular en medio (El triángulo puede ser del tamaño que desees, yo lo hice para que la caja tengo apariencia de sobre). Una vez listo, recortamos dando esta forma y las paredes laterales, menos la pared trasera, a esta le di forma circular, solo en la parte superior.
- STEP 1:
The first thing I made was the box, so I took the box of cornstarch and at 5 cm long, I drew a horizontal line and made a triangular shape in the middle (The triangle can be any size you want, I made it so that the box looks like an envelope). Once ready, we cut out giving this shape, and the side walls, except the back wall, I gave this a circular shape, only in the upper part.
- PASO 2:
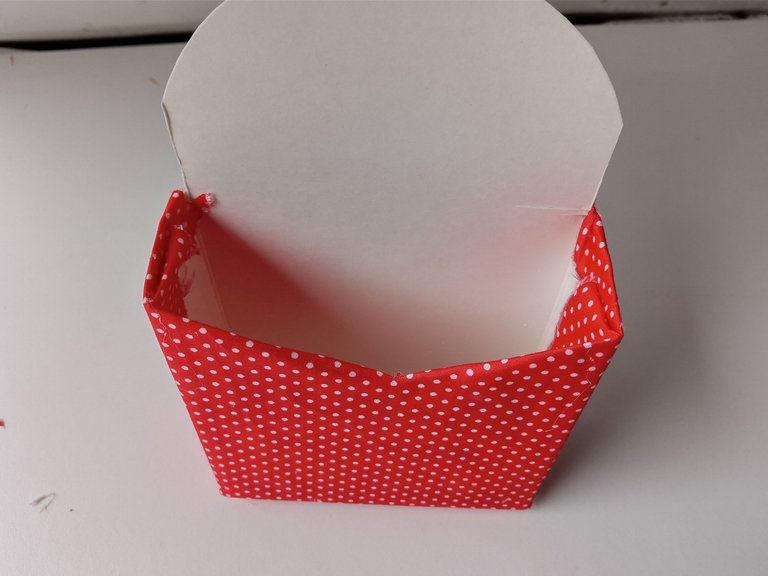
Ahora llego el momento de forrar, tomé la tela y la corté unos 3 cm más grandes de cada lado para que todo quedara bien tapado, en este caso, solo iba a cubrir la pared principal y laterales, así que simplemente pegué las puntas a la pared rasera, en la base pegué como si fuera un papel de regalo y el sobrante de los laterales, recorté el exceso y pequé del borde interior.
- STEP 2:
Now it's time to cover, I took the fabric and cut it about 3 cm larger on each side so that everything was well covered. In this case, I was only going to cover the main wall and sides, so I simply glued the ends to the flush wall, at the base I glued as if it were wrapping paper and the excess from the sides, I trimmed the excess and saved the inside edge.

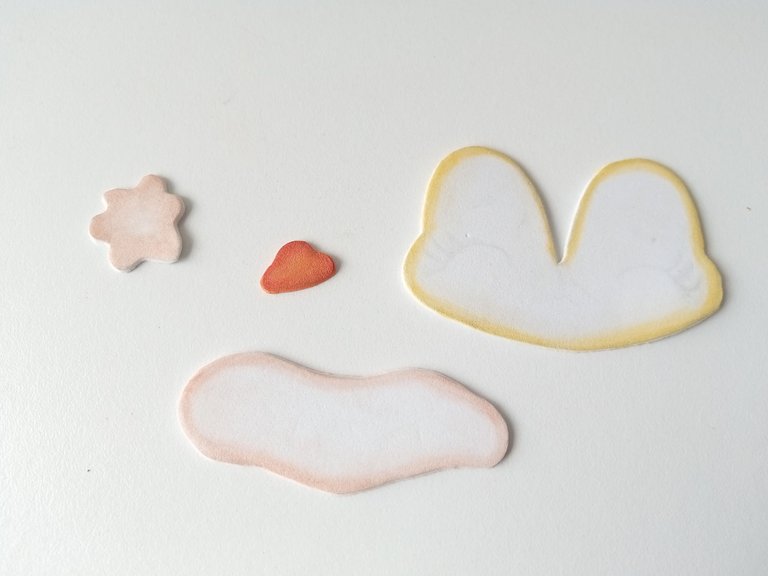
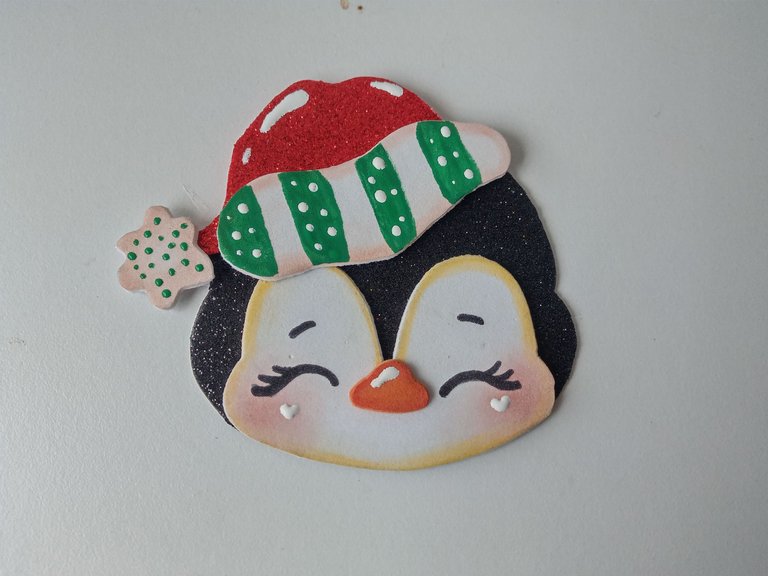
- PASO 3:
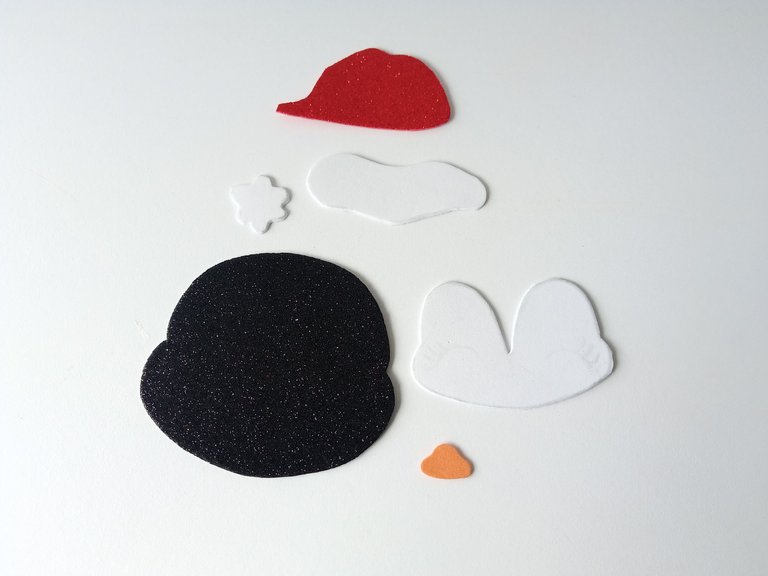
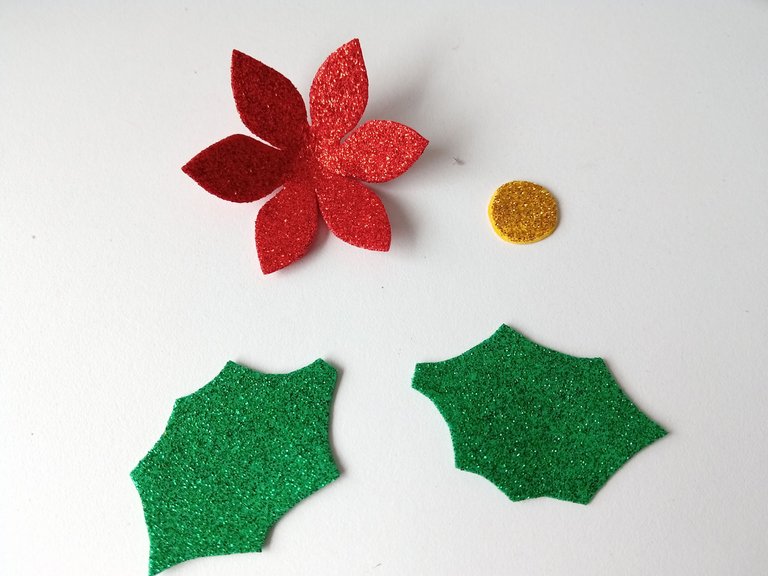
Ahora vamos con la decoración, dibujé el patrón de un pingüino en hoja blanca y luego pase al color correspondiente de foami, en este caso; la cabeza en foami escarchado negro, la cara en foami blanco y partes del gorro, el gorro en foami escarchado rojo y el pico en foami naranja. También, hice una flor como extra para decorar, en este caso; la flor en rojo escarchado, centro en foami escarchado dorado y hojas verdes escarchado.
- STEP 3:
Now let's go with the decoration, draw the pattern of a penguin on white paper and then move on to the corresponding color of foami, in this case; the head in black frosted foam, the face in white foam and parts of the hat, the hat in red frosted foam and the beak in orange foam. Also, I made a flower as an extra to decorate, in this case; the flower in frosty red, center in golden frosty foam and frosty green leaves.
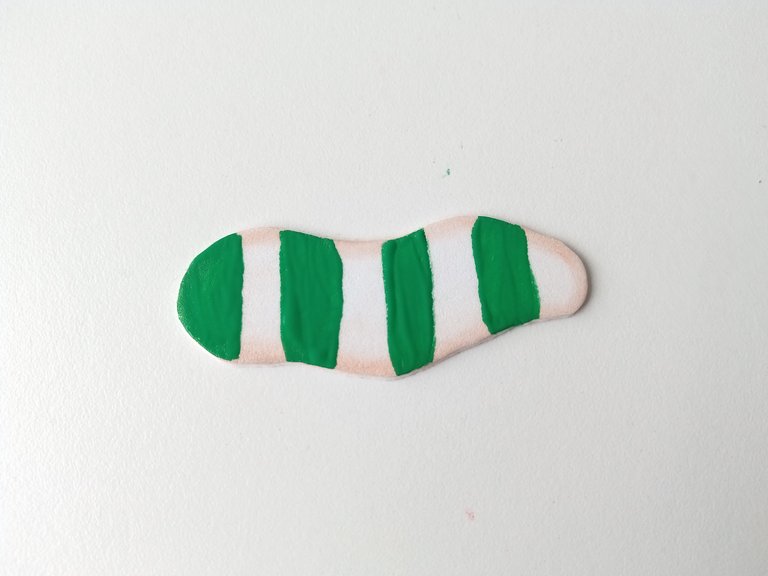
- PASO 4:
Una vez recortadas todas las piezas, comencé a dar detalles con tiza; a las partes blancas del gorro le pase tiza marrón por el borde para que se viera un poco anticuado, al rostro le pase tiza color mostaza y a la nariz, tiza roja. En seguida, dibujé unas franjas verdes en la parte blanca del gorro (yo utilicé pintura, pero puedes utilizar marcador). Dibujé el rostro y le di color a las mejillas.
- STEP 4:
Once all the pieces were cut out, I began to give details with chalk; I put brown chalk on the edge of the white parts of the hat to make it look a little old-fashioned, I put mustard-colored chalk on the face, and red chalk on the nose. Next, I drew some green stripes on the white part of the hat (I used paint, but you can use a marker). I drew the face and gave color to the cheeks.
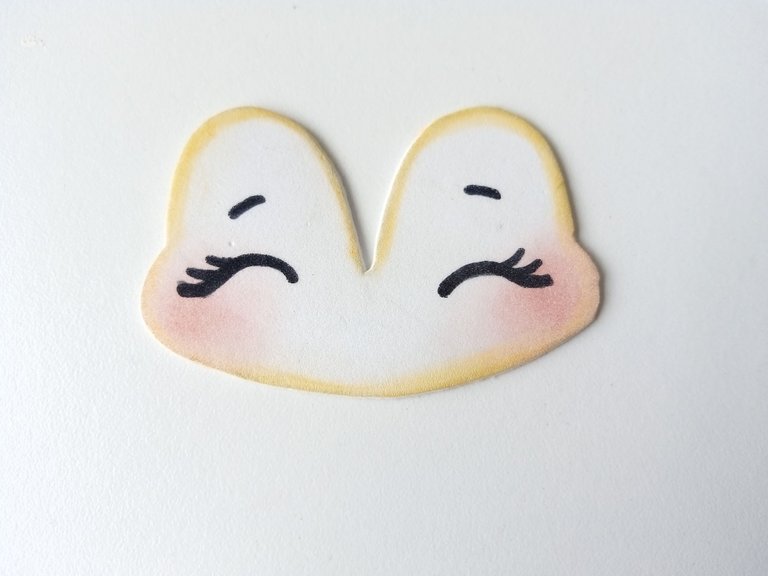
- PASO 5:
Uní todas las piezas con pegamento y di más detalles. En el caso del pompón pinté unos puntos verdes y di luz a la nariz, gorro y mejillas, con pintura blanca. En cuanto a la flor, también la pegué y dibujé las hojas con marcador negro.
- STEP 5:
I joined all the pieces with glue and gave more details. In the case of the pompom I painted some green dots and highlighted the nose, hat and cheeks with white paint. As for the flower, I also glued it and drew the leaves with black marker.
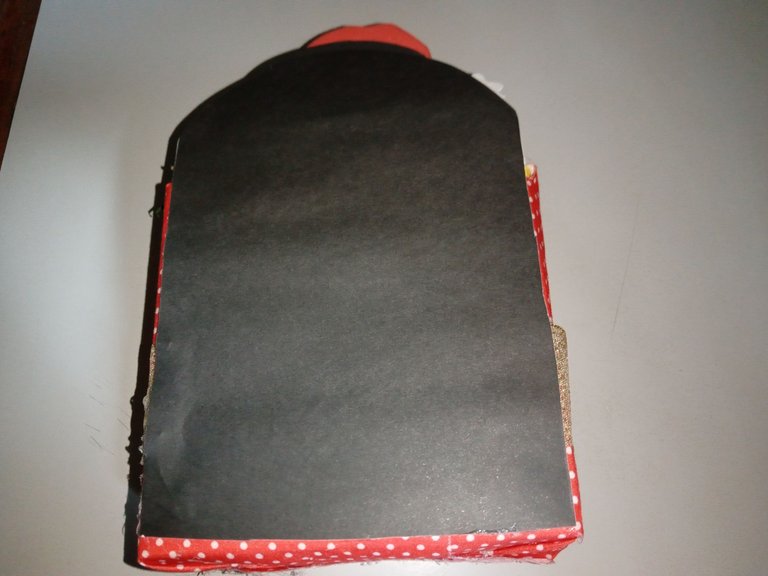
- PASO 6:
Para cubrir las imperfecciones y guiándome por la forma de pared trasera, recorté dos piezas en cartulina (yo utilicé dos colores de cartulina, puedes utilizar la misma o cubrir con otro material), pegué la cartulina dorada en el interior, y el pingüino en la misma pared, centrado.
- STEP 6:
To cover the imperfections and guided by the shape of the back wall, I cut out two pieces of cardboard (I used two colors of cardboard, you can use the same or cover with another material), I glued the gold cardboard inside, and the penguin on the same wall, centered.


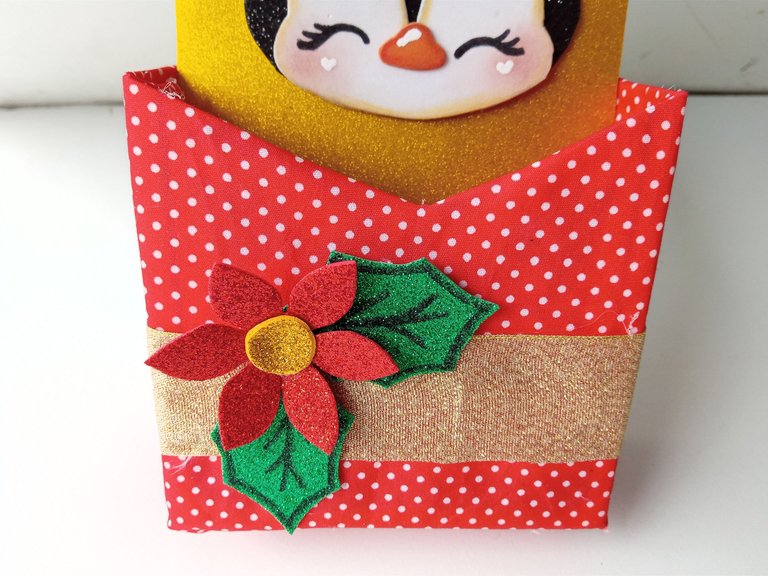
- PASO 7:
Luego, para la parte de en frente, pegué una cinta navideña dorada hasta la parte de atrás y cubrí con la cartulina negra. Por último, pegué la flor a un lado de la cinta, dejando espacio para un mensaje.
- STEP 7:
Then, for the front, I glued gold Christmas ribbon to the back and covered with the black cardstock. Lastly, I glued the flower to one side of the ribbon, leaving room for a message.
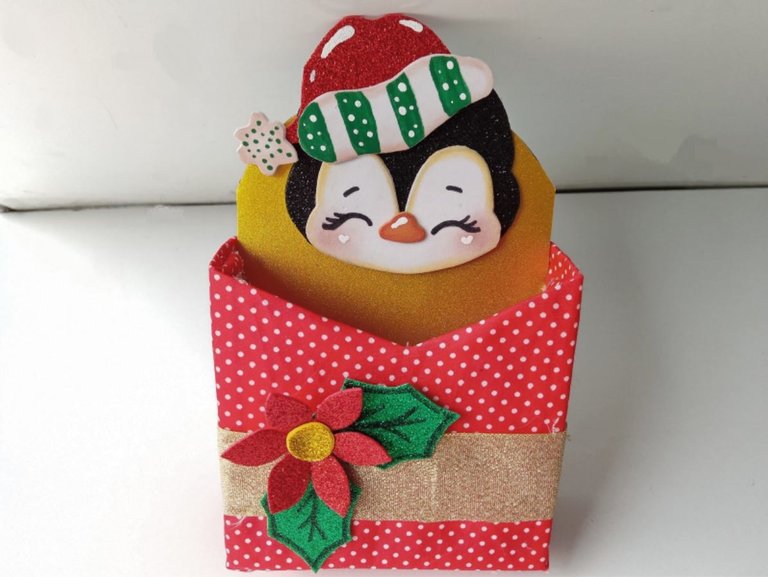
✨¡And ready!✨This way you can make a beautiful gift box or candy box to give a nice detail this holiday season. They can make the figure of their choice, play with other colors of fabric and shapes of the box. I hope you liked it and are encouraged to make it.
❤️Until the next post.
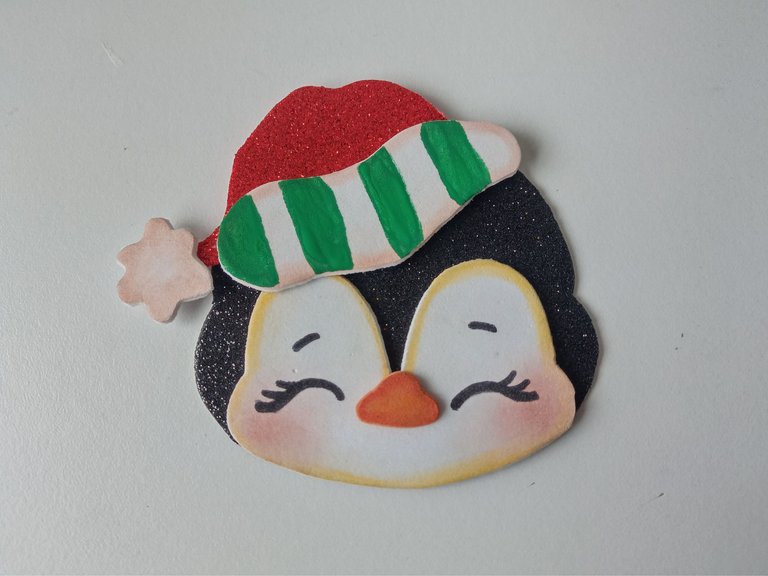
✨RESULTADO: | ✨RESULT:


Todas las fotografías son de mi propiedad.
Separador y Fotos editadas en Canva
All photographs are my property.
Photos edited in Canva
Pero que belleza es esta Por Dioooos.. yo la quiero y la necesito (con muchos dulces por supuesto) jajaja
Siempre mi amiga compartiendo bellezas💗💗💗💗🫂
Jajaja ay amiga bella 🥺 Ojalá pudiera dártelo ¡prácticamente! 🥺🤭
Gracias amiii!!! 💕💕
Amiiii que bellooooo😍😍😍 amo tu talento jeje y obvio que cada vez lo haras mas lindo, la practica hacr al maestro🥰
Ayyy es que de verdad todo te queda super cuchiiii, todo tierno y hermoso mi Valen 😍
Muchas gracias mi Vane bella!!! 💕🥰
Te mando un abrazote Ami.💕
Muy hermoso!
Muchas gracias amiga!
Hermosa 😍 muy delicada y original 🎅🎄✨ te quedó esas cajitas de regalo 🎁🎁 Saludos y te deseo que recibas un feliz año en unión familiar 🥳
Que lindo este detalle navideño muy fácil de hacer.
Uyyyy que lindo 😍, el pingüino se ve tan chulo, la práctica hace al maestro no cabe duda, saludos 👋
Ayyy pero que cosa tan bonita 😍. Te quedó demasiado tierna y me gusta mucho como explicas cómo hacerla tan bien.
Me encantó tu post ✨
Congratulations, your post has been upvoted by @dsc-r2cornell, which is the curating account for @R2cornell's Discord Community.
Enhorabuena, su "post" ha sido "up-voted" por @dsc-r2cornell, que es la "cuenta curating" de la Comunidad de la Discordia de @R2cornell.
Muchas gracias por el apoyo amigos 💕🥰🎄
Contáctenos para saber más del proyecto a nuestro servidor de Discord.
Si deseas delegar HP al proyecto: Delegue 5 HP - Delegue 10 HP - Delegue 20 HP - Delegue 30 HP - Delegue 50 HP - Delegue 100 HP.
Muchas gracias gracias por el apoyo amigos 🎄
Que bonita te quedó,me gusto mucho la cara del pingüino, es tierno y también me gusta que es con material de provecho.
Chao 💞💗
Muchas gracias Miri bella! A mí también me gustó mucho y los brillos de luz en forma de corazón 🤭. Me alegra que te haya gustado Ami.
Aprovecho para desearte un feliz cumpleaños 🎂🤭
Ami, eres súper creativa y sin dudas tu trabajo ha mejorado muchísimo, es realmente bello y prolijo.
Amo que uses cosas que podemos tener en casa porque es fácil poder hacerlos.
Gracias por compartir mi bella
https://twitter.com/hivediy47901/status/1740149444002390335
Hola, me encanta como te quedo, esta muy linda, gracias por compartir. Un abrazo.
Que preciosa te quedó esa cajita navideña amiga, como todo lo que haces, amé el pingüinito, está super cuchi 🥰 Excelente tutorial ami, seguro me servirá para decorar una cajita y ojalá me quede tan linda como la tuya.
Que linduraaaaa