Libro de Tela de las Vocales / Vowel Fabric Book
Mi Libro de Vocales
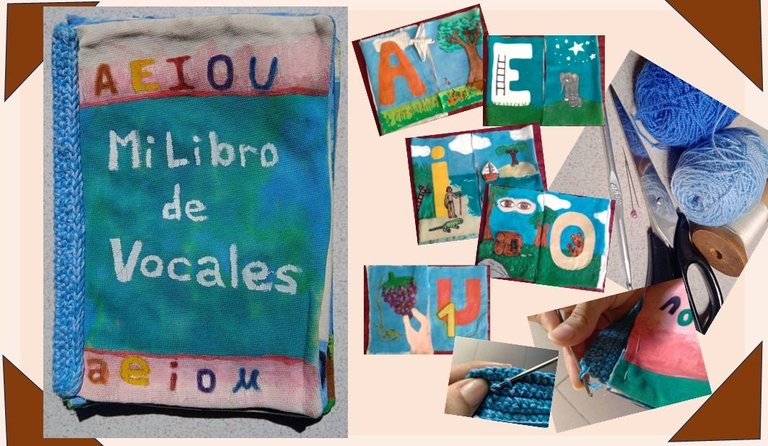
Saludos a esta bella comunidad, en esta ocasión quiero compartirles un libro de tela que le hice a mi hijo, cuando cursó su primer año del preescolar. Desde que tuvo 6 meses de nacido me di cuenta que casi no se venden libros de tela para bebés, de manera que ellos puedan interactuar con los mismos sin dañarlos, por tal motivo yo decidí hacerle uno con dibujos de animales, y años después se me ocurrió hacerle otro, pero esta vez sobre vocales para ayudarlo en su aprendizaje y que también fuera interactivo.
Primero hice los diseños sobre papel (el borrador), para aclarar las ideas sobre los dibujos que haría, los colores que utilizaría, y cómo los haría de forma más interactiva, tomando en cuenta mi experiencia con el primer libro que hice. Finalmente decidí realizar 3 dibujos sobre elementos, que se escribieran al inicio de su palabra con cada vocal respectiva.
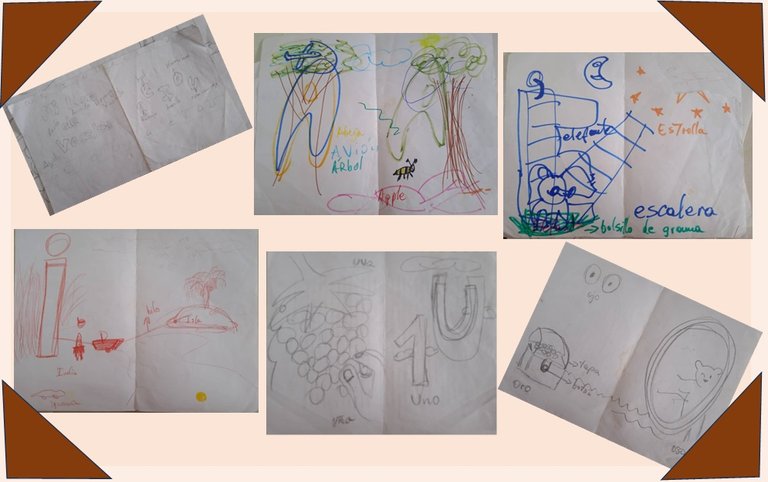
✏️-Para la vocal A, la acompañé de unas abejas, un árbol y un avión que se puede guardar detrás de una nube, con un bolsillo que le hice en la nube.
✏️-Para la vocal E, hice una escalera, unas estrellas y unos elefantes, sin elementos que se pudieran mover.
✏️-Para la Vocal I, dibujé una iguana, un indio y una isla, también realicé un barco de tela que se mueve a través de un hilo que lo conduce de la playa a la isla.
✏️-Para la vocal O, realicé el dibujo de unos ojos, un oso y un cofre, al que le cosí elementos de color oro y le agregué una tapa que se podía mover y levantar para ver el tesoro del cofre (lo que simula el candado del cofre es un botón).
✏️-Para la vocal U, pinté el número uno, unas uvas y una mano agarrando una de las mismas, en la que se observa una uña, siendo este el tercer elemento que se escribe con dicha vocal.
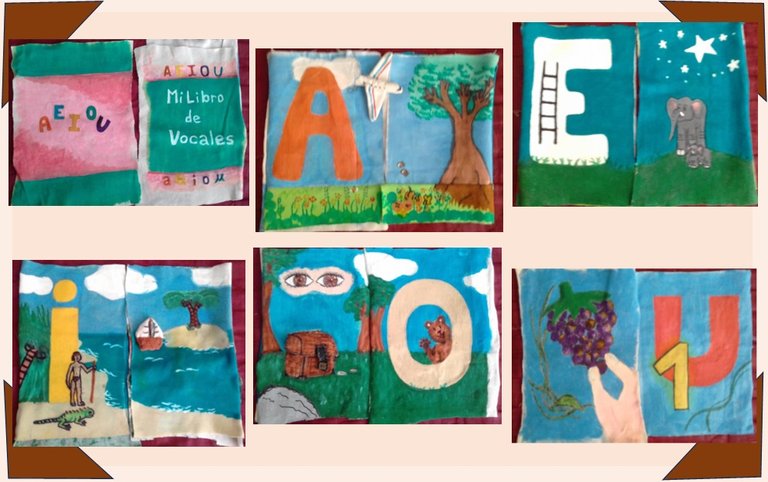
✏️-La portada lleva el título : Mi Libro de Vocales, de manera central, acompañado del dibujo en diferentes colores de las vocales, tanto en mayúscula como en minúscula, en la parte superior e inferior respectivamente. Y la contraportada, solo lleva las Vocales en mayúsculas, con diferentes colores y de manera centrada.
Las telas fueron recortadas casi del mismo tamaño, las dibujé y pinté (usé pintura de tela, pintura al frío y marcadores permanentes) por separado calculando que tuvieran la misma altura y grosor para tener un buen acabado, luego cosí las páginas (con las respectivas imágenes) para crear las hojas, junto a la portada y la contraportada, finalmente las uní en lo que corresponde al lomo del libro con hilo nylon blanco.
Cabe destacar, que el avión y el barco que acompañan al libro de vocales también los dibujé, pinté, cosí y les puse relleno.
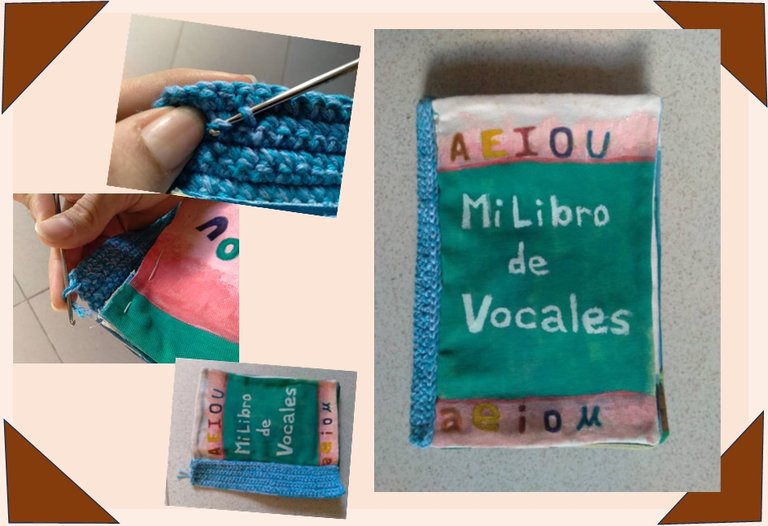
Para finalizar con un mejor acabado, decidí forrar el lomo del libro con un tejido en crochet, ya que se veían las costuras de las hojas, y para que fuese mas resistente utilicé 2 hilos: 1 azul celeste y el otro azul cian. Combinando ambos hilos juntos, realicé un rectángulo de 42 cadenetas, con medios puntos tejí 8 vueltas de altura (este es el forro del lomo); cosido al libro con hilo azul.
El lomo tejido le dio un gran toque, al librito de tela que hice.
Mide 14 cm de ancho por 20 cm de alto.
Las fotos fueron tomadas por mí, y también hice los collages; si gustan pueden seguirme en mis redes sociales:
Facebook, @riverourama
Instagram, @riverourama
"X" , @riverourama
Hive, @uramarivero
Gracias por leerme y compartir. ✏️🖌🌼✂️📖
English Version
My Vowel Book
Greetings to this beautiful community, this time I want to share with you a fabric book that I made for my son, when he was in his first year of preschool. Since he was 6 months old I realized that almost no fabric books for babies are sold, so that they can interact with them without damaging them, for that reason I decided to make him one with drawings of animals, and years later it occurred to me to make him another one, but this time about vowels to help him in his learning and that it was also interactive.
First I made the designs on paper (the draft), to clarify the ideas about the drawings I would make, the colors I would use, and how I would make them more interactive, taking into account my experience with the first book I made. Finally I decided to make 3 drawings about elements, to be written at the beginning of their word with each respective vowel.
✏️-For the vowel A, I accompanied it with bees (Abeja in Spanish), a tree (Árbol in Spanish) and an airplane(Avión in Spanish) that can be stored behind a cloud, with a pocket I made in the cloud.
✏️-For the vowel E, I made a ladder (Escalera in Spanish), some stars (Estrella in Spanish) and some elephants (Elefante in Spanish), without elements that could move.
✏️-For the vowel I, I drew an iguana (Iguana in Spanish), an Indian (Indio in Spanish) and an island (Isla in Spanish), I also made a fabric boat that moves through a thread that leads from the beach to the island.
✏️-For the vowel O, I drew a picture of eyes (Ojos in Spanish), a bear (Oso in Spanish) and a chest, to which I sewed gold (Oro in Spanish) elements and added a lid that could be moved and lifted to see the treasure of the chest (the lock simulating the lock of the chest is a button).
✏️-For the vowel U, I painted the number one (Uno in Spanish), some grapes (Uvas in Spanish) and a hand holding one of them, in which a fingernail (Uña in Spanish) can be seen, being this the third element that is written with this vowel.
✏️-The front cover bears the title: My Vowel Book, centrally, accompanied by the drawing in different colors of the vowels, both uppercase and lowercase, at the top and bottom respectively. And the back cover, only carries the Vowels in capital letters, with different colors and in a centered way.
The fabrics were cut almost the same size, I drew and painted them (I used fabric paint, cold paint and permanent markers) separately, calculating that they had the same height and thickness to have a good finish, then I sewed the pages (with the respective images) to create the pages, along with the front and back cover, finally I joined them in what corresponds to the spine of the book with white nylon thread.
It should be noted that I also drew, painted, sewed and stuffed the airplane and the boat that accompany the vowel book.
To finish with a better finish, I decided to line the spine of the book with a crochet fabric, since the seams of the leaves were visible, and to make it more resistant I used 2 yarns: 1 light blue and the other cyan blue. Combining both threads together, I made a 42 chain stitch rectangle, with half stitches I knitted 8 loops high (this is the lining of the spine); sewn to the book with blue thread.
The woven spine gave a great touch to the fabric booklet I made.
It measures 14 cm wide by 20 cm high.
The photos were taken by me, and I also made the collages; if you like you can follow me on my social networks:
Facebook, @riverourama
Instagram, @riverourama
"X" , @riverourama
Hive, @uramarivero
Thank you for reading and sharing. ✏️🖌🌼✂️📖
Excelente trabajo y es una muy buena forma de reciclar telas y además contribuir a que los niños tengan una experiencia más sensorial de aprendizaje al trabajar con un libro de tela. Saludos 🤗
Así es, muchas gracias 🌼
Congratulations @uramarivero! You have completed the following achievement on the Hive blockchain And have been rewarded with New badge(s)
Your next target is to reach 300 upvotes.
You can view your badges on your board and compare yourself to others in the Ranking
If you no longer want to receive notifications, reply to this comment with the word
STOPTo support your work, I also upvoted your post!
Check out our last posts:
Hola!! 🌸 Esta es una muy bonita idea y una excelente forma de acompañar a los niños en su aprendizaje!! Se nota mucho la dedicación que le pusiste a este trabajo, hasta en el mínimo detalle😍 Te felicito!!
Muchísimas gracias, así es 🌼
Wao, que bonita idea!
Se nota que le pusiste mucho amor y dedicación a este libro. Cada detalle se ve muy hermoso.
Gracias por compartir tu proceso creativo con nosotros.
Bendiciones.
Muchas gracias a ustedes por sus hermosos comentarios y el apoyo 🌼
Bienvenida a la comunidad, espero que este post sea el primer de muchos que compartas con nosotros.
En esta comunidad encontrarás muchas personas amables que comparten tu misma pasión por las manualidades y las artes con agujas. Como eres nueva en la comunidad, te voy a dejar algunas pautas que son importantes a tener en cuenta al momento de publicar acá. Saludos y bendiciones.
Cada semana los trabajadores de la aguja de todo el mundo compartimos nuestro trabajo, patrones, consejos, ideas y atajos mientras nos apoyamos unos a otros. El objetivo es inspirar a Hive blockchain a darle una oportunidad a la artesanía.
Los lunes usamos la etiqueta #needleworkmonday y los demás días usamos la etiqueta #needlework sin la palabra lunes. Compartimos y publicamos nuestro trabajo directamente desde la página de la Comunidad.
Animamos a nuestros miembros a que compartan el proceso de su trabajo a través de fotos. Esto no sólo valida su trabajo sino que nos lleva al viaje creativo con ustedes.
Para más información sobre lo que hacemos y para nuestras pautas de publicación por favor visita nuestras FAQs.
Importante leer Oh, Just Another Tutorial
Muchas gracias por tu apoyo y recomendaciones, las seguiré con mucho gusto 😁🌼🌸
hola, esta hermoso siempre va ser más atractivo para los niños aprender de esta forma, gracias por la idea
A la orden 🌼. Gracias a ti por leerme 🌸