Kirby Tejido en Crochet / Kirby Crochet Knitting

Un saludo a toda la comunidad de Hive, esta semana les quiero hablar sobre un amigurumi de Kirby tejido en crochet que hice para mi hijo, y aquí les muestro la explicación:
Decidí utilizar hilo pabilo y colocar 2 mostacillas negras para que sean los ojos, ellas deben estar en el hilo desde antes de comenzar a tejer, aunque las usaremos después. Comencé el tejido haciendo un anillo mágico para formar sobre el mismo un círculo de 6 medios puntos, al terminar la vuelta, subo 2 cadenetas para que la siguiente vuelta sea también con medios puntos y con un aumento en cada punto, por lo tanto quedaría en un círculo con 12 medios puntos.
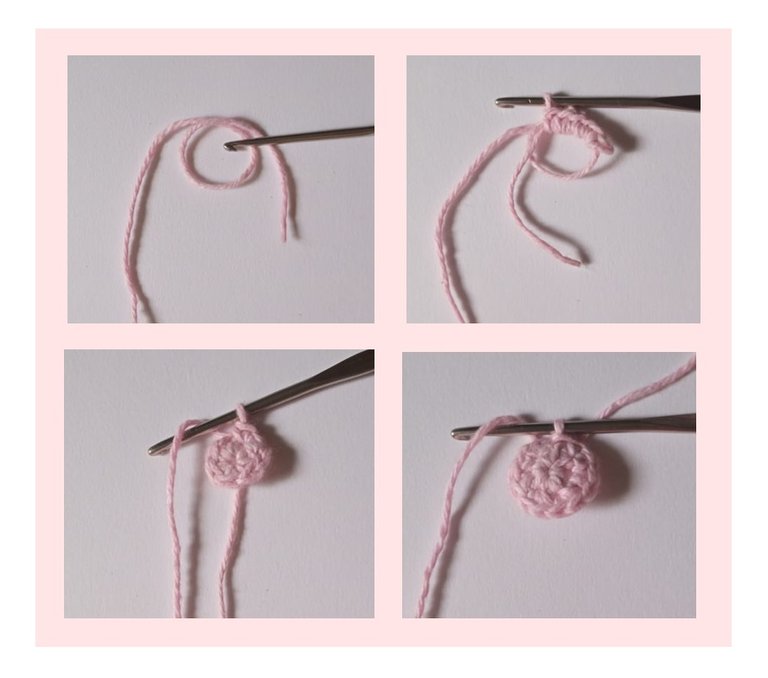
En la siguiente vuelta subo 2 cadenetas e hice un aumento en puntos intermedios, me explico: un punto medio, dos puntos medios; un punto medio, dos puntos medios; un punto medio, dos puntos medios, y así hasta completar 18 puntos medios.
Ya vamos por la cuarta vuelta, aquí dejaré dos puntos medios y luego haré el aumento, me explico: un punto medio, un punto medio, dos puntos medios (el aumento); un punto medio, un punto medio, dos puntos medios (el aumento); y así hasta obtener un total de 24 puntos medios.
En la cuarta vuelta incorporo las mostacillas, en esta ocasión no conté los puntos, solo los ubiqué en donde consideré que sería el centro de su rostro.
Las vueltas 5, 6 y 7 serán sin aumento, seguirán siendo de 24 puntos medios.
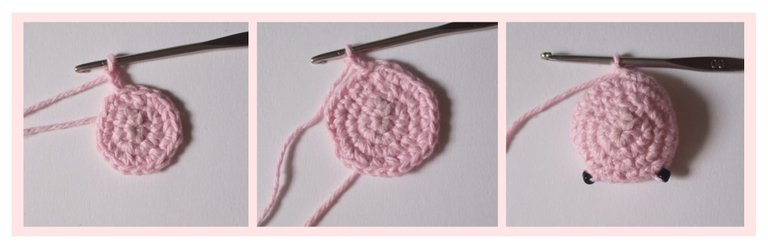
En la octava vuelta tejeremos 2 medios puntos y luego haremos una reducción, y así durante toda la vuelta y en cada espacio: un punto medio, un punto medio, reducción; un punto medio, un punto medio, reducción; un punto medio, un punto medio, reducción, así hasta terminar la vuelta.
En la novena vuelta se hace un punto medio y una reducción; un punto medio y una reducción; un punto medio y una reducción, hasta terminar la vuelta.
Este es un buen momento para rellenarlo con el algodón.
Esta es la última vuelta, es todo reducciones, en cada punto se reducirá. Hasta que ya no haya mas espacio y se hace un punto raso, se saca la hebra, se corta con suficiente espacio para cerrar (10 cm). Y para que no quede con un pico, se debe pasar esta hebra entre los puntos restantes, como simulando el anillo mágico a la inversa, se halará la hebra para que quede bien apretada y firme, y el mismo se mete dentro del kirby.

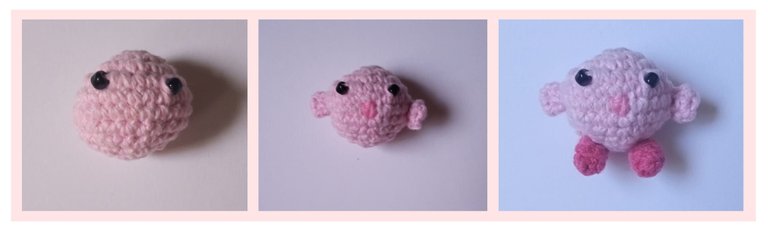
Una vez que tejí por completo el cuerpo de Kirby decidí tejer sus manos y pies con forma de triángulo y cilindro respectivamente, o por lo menos en esa idea me basé.
nuevamente comencé con el anillo mágico, pero esta vez solo hice 3 medio puntos para comenzar en ambas extremidades.
Para las manos realicé una ampliación de 2 medios puntos en la segunda vuelta, la cerré con un nudo y con el mismo hilo lo cosí sobre el cuerpo.
Para realizar los pies, hice 3 vueltas, con los mismos 3 medios puntos, sin hacer aumentos. Al finalizar el nudo, cosí los piesitos con el mismo hilo que fue tejido al cuerpo de Kirby. Y la boca fue bordada.
Los hilos son todos de hilo pabilo, y el relleno es de algodón.
El Kirby mide 4cm de alto por 4,5cm de ancho.
Las fotos fueron tomadas por mí, y también hice los collages; si gustan pueden seguirme en mis redes sociales:
Facebook, @riverourama
Instagram, @riverourama
"X" , @riverourama
Hive, @uramarivero
Gracias por leerme. Feliz día. ⛅️
English Version
.
Greetings to all the Hive community, this week I want to talk about a crocheted Kirby amigurumi that I made for my son, and here I show you the explanation:
I decided to use wicker thread and place 2 black beads to be the eyes, they should be in the yarn from before starting to knit, although we will use them later. I started the knitting by making a magic ring to form a circle of 6 half stitches on it, at the end of the row, I go up 2 chains so that the next row is also with half stitches and with an increase in each stitch, so it would be a circle with 12 half stitches.
In the next row I go up 2 chains and make an increase in intermediate stitches, I explain: one medium stitch, two medium stitches; one medium stitch, two medium stitches; one medium stitch, two medium stitches, and so on until completing 18 medium stitches.
Now we are on the fourth row, here I will leave two half stitches, and then I will make the increase, I explain: one half stitch, one half stitch, two half stitches (the increase); one half stitch, one half stitch, two half stitches (the increase); and so on until I get a total of 24 half stitches.
In the fourth round I incorporate the beads, this time I didn't count the stitches, I just placed them where I considered it would be the center of her face.
Rounds 5, 6 and 7 will be without increase, they will still be 24 half stitches.
In the eighth row we will knit 2 half stitches and then make a reduction, and so on throughout the row and in each space: a half stitch, a half stitch, reduction; a half stitch, a half stitch, reduction; a half stitch, a half stitch, reduction, and so on until the end of the row.
In the ninth row, you knit a half stitch and a reduction; a half stitch and a reduction; a half stitch and a reduction, until the end of the row.
This is a good moment to fill it with cotton.
This is the last round, it is all reductions, in each stitch you will reduce. Until there is no more room and a single crochet is done, pull out the strand, cut it with enough room to close (10 cm). And so that it is not left with a peak, you must pass this strand between the remaining stitches, as simulating the magic ring in reverse, the strand will be pulled to make it tight and firm, and the same is put inside the kirby.
Once I had completely knitted Kirby's body, I decided to knit his hands and feet in the shape of a triangle and cylinder respectively, or at least that was my idea.
Again I started with the magic ring, but this time I only knit 3 half stitches to start on both extremities.
For the hands I made an extension of 2 half stitches in the second round, closed it with a knot and with the same yarn I sewed it on the body.
To make the feet, I made 3 rounds, with the same 3 half stitches, without making increases. At the end of the knot, I sewed the feet with the same thread that was knitted on Kirby's body. And the mouth was embroidered.
The threads are all wick thread, and the filling is cotton.
The Kirby is 4cm high by 4,5cm wide.
The photos were taken by me, and I also made the collages; if you like, you can follow me on my social networks:
Facebook, @riverourama
Instagram, @riverourama
"X" , @riverourama
Hive, @uramarivero
Thank you for reading me. Happy day to you. ⛅️
Éstos personajes me parecen tan adorables, mi hija se la pasa dibujándolos y a crochet son aún más adorables, le quedó muy lindo este Kirby amiga la felicito, espero tengas un feliz día
Muchas gracias, e igualmente feliz día para ti ⛅️
Hahahaha, I know that video game character. LOL
Congratulations @uramarivero! You have completed the following achievement on the Hive blockchain And have been rewarded with New badge(s)
Your next target is to reach 3250 upvotes.
You can view your badges on your board and compare yourself to others in the Ranking
If you no longer want to receive notifications, reply to this comment with the word
STOPCheck out our last posts: