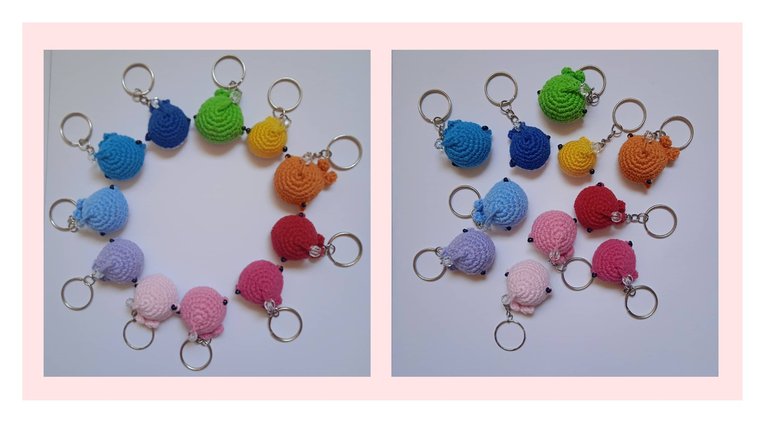
Ballenas Tejidas (llaveros) / Whale Keychains in Chrochet
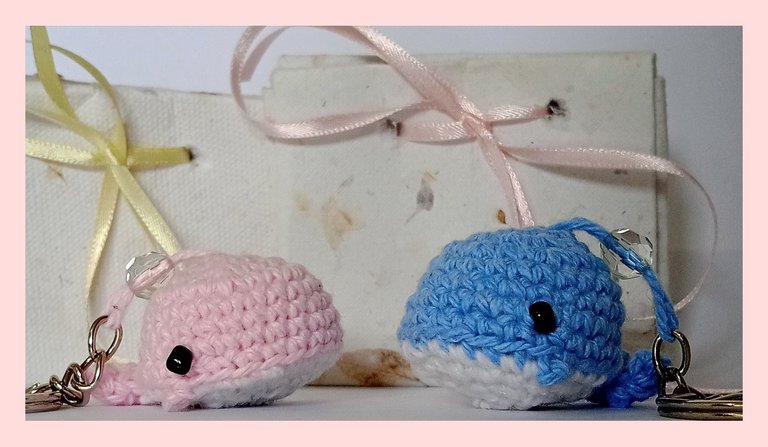
Les deseo un excelente día a todos en la comunidad de Hive, en esta ocasión quiero hablarles sobre unos llaveros de ballenas tejidas en crochet que hice hace unos meses, encontré el tutorial en youtube, y observé modelos de todos los tamaños que las personas han hecho, me inspiré e hice mis propios llaveritos, aunque no pude tomarle foto a todo el proceso, aquí les va la explicación:
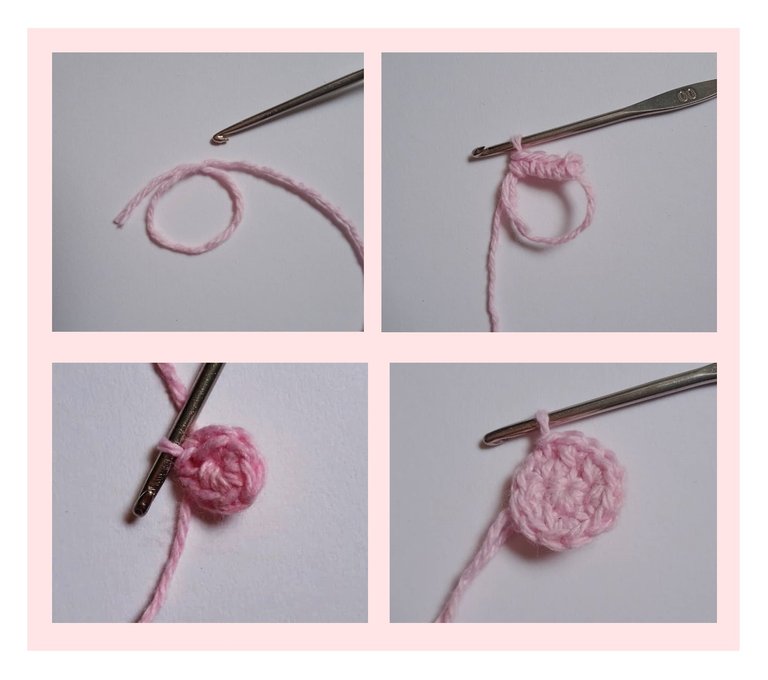
Decidí utilizar hilo pabilo y colocar 2 mostacillas negras para que sean los ojos, ellas deben estar en el hilo desde antes de comenzar a tejer, aunque las usaremos después. Comencé el tejido haciendo mi primera ballena de color rosado, poco a poco las tejí de más colores, el tejido comienza con un anillo mágico para formar sobre el mismo un círculo de 6 medios puntos, al terminar la vuelta, subo 2 cadenetas para que la siguiente vuelta sea también con medios puntos y con un aumento en cada punto, por lo tanto quedaría en un círculo con 12 medios puntos.
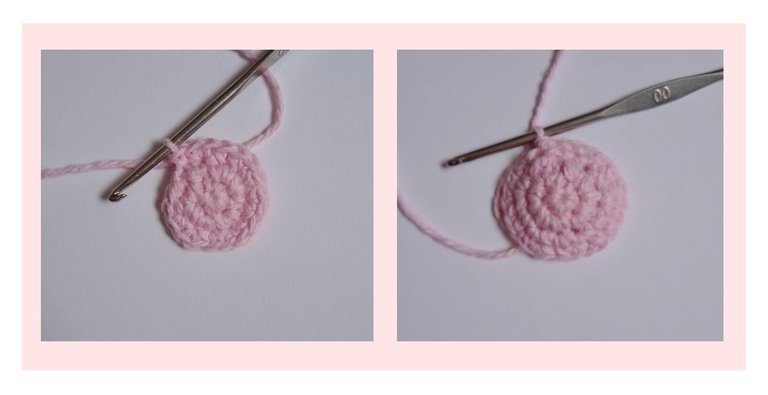
En la siguiente vuelta subo 2 cadenetas y haré un aumento en puntos intermedios, me explico: un punto medio, dos puntos medios; un punto medio, dos puntos medios; un punto medio, dos puntos medios, y así hasta completar 18 puntos medios.
Ya vamos por la cuarta vuelta, aquí dejaré dos puntos medios y luego haré el aumento, me explico: un punto medio, un punto medio, dos puntos medios (el aumento); un punto medio, un punto medio, dos puntos medios (el aumento); y así hasta obtener un total de 24 puntos medios.
Las vueltas 5, 6 y 7 serán sin aumento, seguirán siendo de 24 puntos medios.
Cabe destacar que es en la 7ma vuelta que yo incorporo las mostacillas, cuando cuento que he realizado 5 puntos medios, en el siguiente punto agrego la primera, luego cuento 12 puntos medios para agregar la siguiente y que tengan una distancia paralela una de la otra.
En la octava vuelta se harán la cola y las aletas.
Comenzando la 8va vuelta se deja un punto medio y se comienza a tejer la cola, para ello se hacen 5 cadenetas, dejas 2 de espacio y en la tercera cadeneta tejes un punto alto, luego otros 2 puntos altos en las cadenetas restantes, para terminar con un punto raso.
En seguida se hace un punto medio y se repite el proceso para la siguiente aleta de la cola.
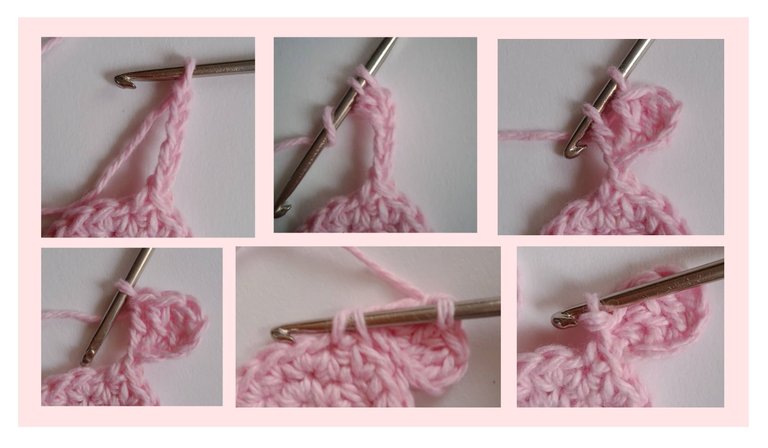
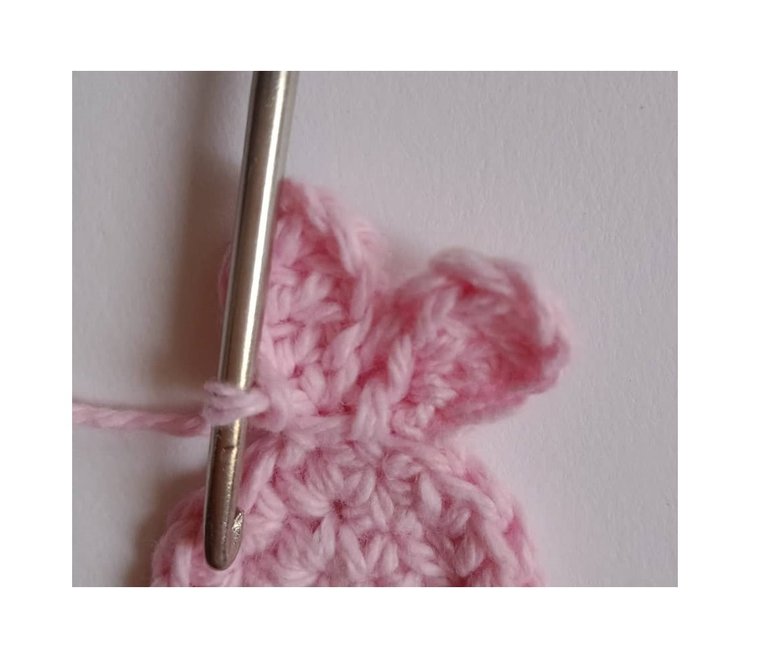
Continúo con 3 puntos medios, al llegar al cuarto debe coincidir con la mostacilla para quedar debajo de esta, hago 3 cadenetas y estas las uno con un punto raso, les mostraré unas imágenes para explicarme mejor:
Luego se realizan 14 puntos medios y se repite el procedimiento, calculando que la siguiente aleta quede también debajo de la otra mostacilla. Se termina la vuelta con medios puntos.
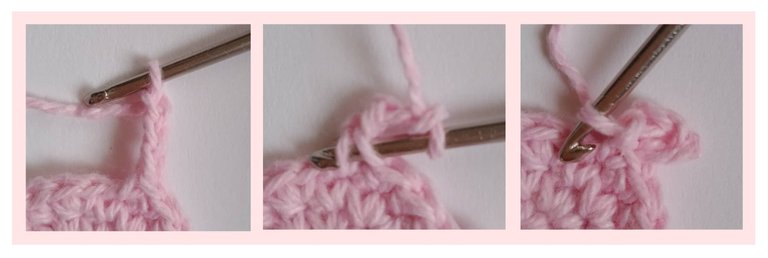
En la novena vuelta se hace el cambio de color, yo utilicé el blanco, continuaremos con los mismos 24 medios puntos. Se debe tener cuidado cuando se pasa por el punto de las aletas y la cola, para no taparlas debes pasar la aguja por la parte de atrás donde verás el punto que corresponde.
En la vuelta 10 tejeremos 2 medios puntos y luego haremos una reducción, y así durante toda la vuelta y en cada espacio: un punto medio, un punto medio, reducción; un punto medio, un punto medio, reducción; un punto medio, un punto medio, reducción, así hasta terminar la vuelta.
En la vuelta 11 se hace un punto medio y una reducción; un punto medio y una reducción; un punto medio y una reducción, hasta terminar la vuelta.
Este es un buen momento para rellenarlo con el algodón.
Esta es la última vuelta, es todo reducciones, en cada punto se reducirá. Hasta que ya no haya mas espacio y se hace un punto raso, se saca la hebra, se corta con suficiente espacio para cerrar (10 cm). Y para que no quede con un pico, se debe pasar esta hebra entre los puntos restantes, como simulando el anillo mágico a la inversa, se halará la hebra para que quede bien apretada y firme, y el mismo se mete dentro de la ballena.
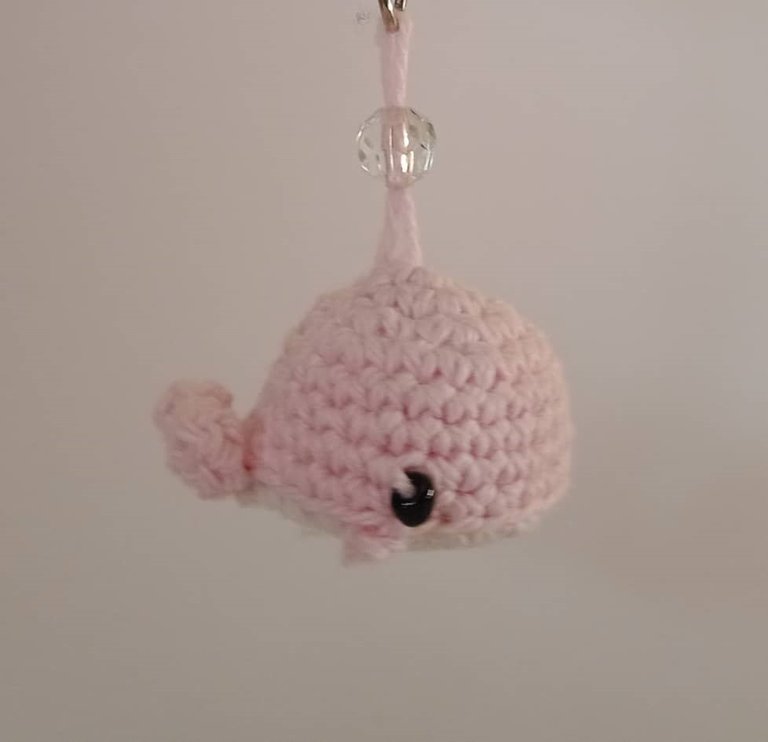
Con hilo del mismo color de la ballena incorporé el llavero desde la parte superior.
Tanto el hilo blanco como el rosado son de hilo pabilo, y el relleno es de algodón.
La ballenita mide 3cm de alto por 4cm de ancho.
Las fotos fueron tomadas por mí, y también hice los collages; si gustan pueden seguirme en mis redes sociales:
Facebook, @riverourama
Instagram, @riverourama
"X" , @riverourama
Hive, @uramarivero
Gracias por leerme. Feliz día. ⛅️
.
English Version
.
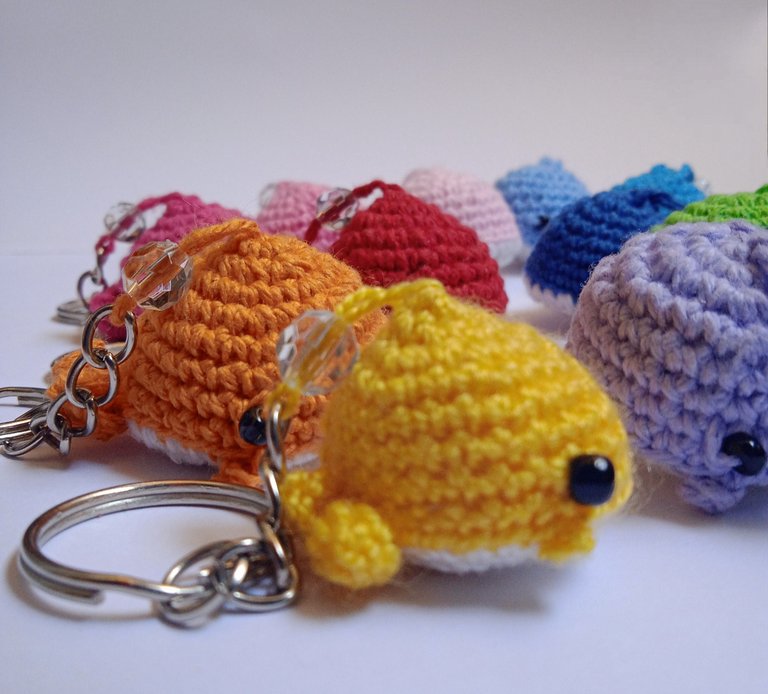
I wish a great day to everyone in the Hive community, this time I want to tell you about some crocheted whale keychains that I made a few months ago, I found the tutorial on youtube, and I saw models of all sizes that people have made, I got inspired and made my own keychains, although I could not take a picture of the whole process, here is the explanation:
I decided to use wick yarn and place 2 black beads to be the eyes, they should be in the yarn before starting to weave, although we will use them later. I started the knitting by making my first whale in pink, little by little I knitted them in more colors, the knitting starts with a magic ring to form a circle of 6 half stitches, at the end of the row, I go up 2 chains so that the next row is also with half stitches and with an increase in each stitch, so it would be a circle with 12 half stitches.
In the next row I will go up 2 chains and I will make an increase in intermediate stitches, I explain: one medium stitch, two medium stitches; one medium stitch, two medium stitches; one medium stitch, two medium stitches, and so on until completing 18 medium stitches.
We are already on the fourth row, here I will leave two half stitches, and then I will make the increase, I explain: one half stitch, one half stitch, two half stitches (the increase); one half stitch, one half stitch, two half stitches (the increase); and so on until I get a total of 24 half stitches.
The 5th, 6th and 7th rows will be without increase, they will still be of 24 half stitches.
It should be noted that it is in the 7th row that I incorporate the beads, when I count that I have made 5 half stitches, in the next stitch I add the first one, then I count 12 half stitches to add the next one and that they have a parallel distance from each other.
In the eighth row, you will knit the tail and the fins.
Beginning the 8th row, leave a medium stitch and start knitting the tail, for this you make 5 chains, leave 2 of space and in the third chain you knit a double crochet, then another 2 double crochets in the remaining chains, to finish with a single crochet.
Then you knit a medium stitch and repeat the process for the next tail fin.
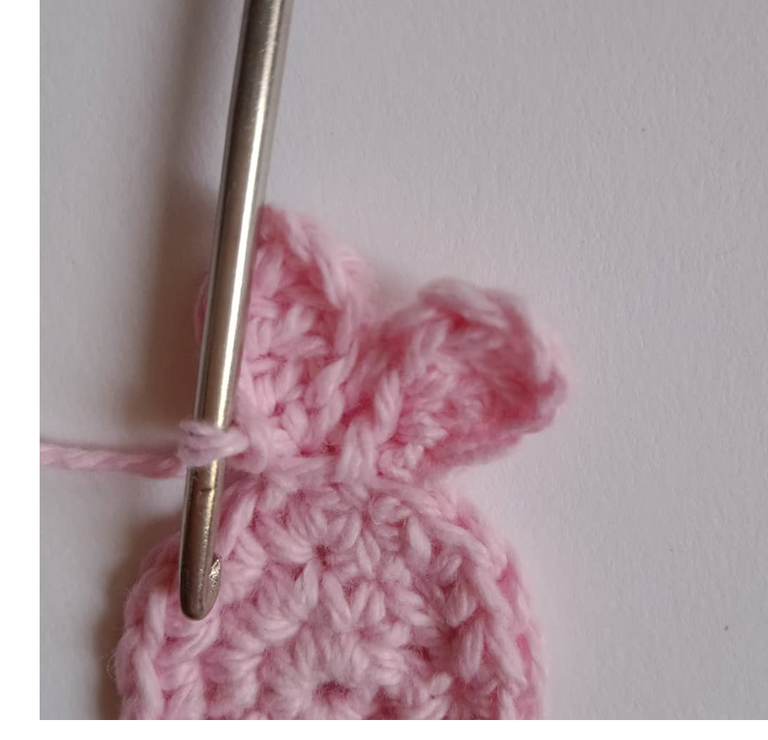
I continue with 3 medium stitches, when I reach the fourth one it must coincide with the mustard stitch to be under it, I make 3 chain stitches and join them with a single crochet, I will show you some pictures to explain better:
Then knit 14 half stitches and repeat the procedure, making sure that the next purl is also under the other fly. The row is finished with half stitches.
In the ninth row, the color change is made, I used white, we will continue with the same 24 half stitches. Care must be taken when passing through the stitch of the fins and the tail, in order not to cover them you must pass the needle through the back part where you will see the corresponding stitch.
In row 10 we will knit 2 half stitches and then make a reduction, and so on for the whole row and in each space: a half stitch, a half stitch, reduction; a half stitch, a half stitch, reduction; a half stitch, a half stitch, reduction, and so on until the end of the row.
On the 11th row, you knit a half stitch and a reduction; a half stitch and a reduction; a half stitch and a reduction, until the end of the row.
This is a good moment to fill it with cotton.
This is the last round, it is all reductions, in each stitch will be reduced. Until there is no more space and a single crochet is done, pull out the yarn, cut it with enough space to close (10 cm). And so that it does not remain with a peak, this strand should be passed between the remaining stitches, as simulating the magic ring in reverse, the strand will be pulled so that it is tight and firm, and it is put inside the whale.
With thread of the same color as the whale, I incorporated the key ring from the top.
Both the white and pink threads are made of Wicker thread, and the stuffing is made of cotton.
The whale measures 3cm high by 4cm wide.
The photos were taken by me, and I also made the collages; if you like, you can follow me on my social networks:
Facebook, @riverourama
Instagram, @riverourama
"X" , @riverourama
Hive, @uramarivero
Thank you for reading me. Happy day. ⛅️
Hola, @uramarivero !! 🌸 Qué diseño tan tierno!! Se ven muy bien en todos esos colores que hiciste! 🌷 muchas gracias por compartir este bonito trabajo!!
Lo hago con mucho gusto ⛅️
@uramarivero Que tiernas y hermosas ballenas,me encantaron gracias por compartir Saludos 🤗
Gracias a ustedes, saludos ⛅️
Wow my friend, it's a great job you have done here both with the woven keychains and in the presentation of your post. i see you are relatively new but you already understand what it is to make quality posts on the platform and i see you also interact and support others, that's the secret to success on Hive, congratulations. i wish you the best in this blockchain journey!.....
I am Thankful, and appreciate your words. And I value your welcome and the good wishes, best wishes to you too. ⛅️
Hola @uramarivero estas ballenas te quedaron super tiernas, te felicito. La idea de usar mostacilla para los ojos me gustó mucho. Saludos, gracias por compartir.
From Venezuela, our witness drives decentralization and the adoption of Web3 technology, creating opportunities for the local community and contributing to the global ecosystem. // Desde Venezuela, nuestro testigo impulsa la descentralización y la adopción de la tecnología Web3, generando oportunidades para la comunidad local y contribuyendo al ecosistema global.
Sigue, contacta y se parte del testigo en: // Follow, contact and be part of the witness in:
Congratulations @uramarivero! You have completed the following achievement on the Hive blockchain And have been rewarded with New badge(s)
Your next target is to reach 2750 upvotes.
You can view your badges on your board and compare yourself to others in the Ranking
If you no longer want to receive notifications, reply to this comment with the word
STOPCheck out our last posts: