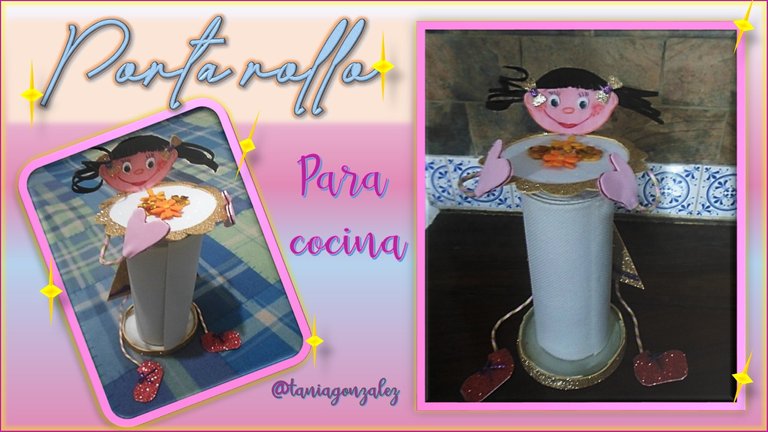
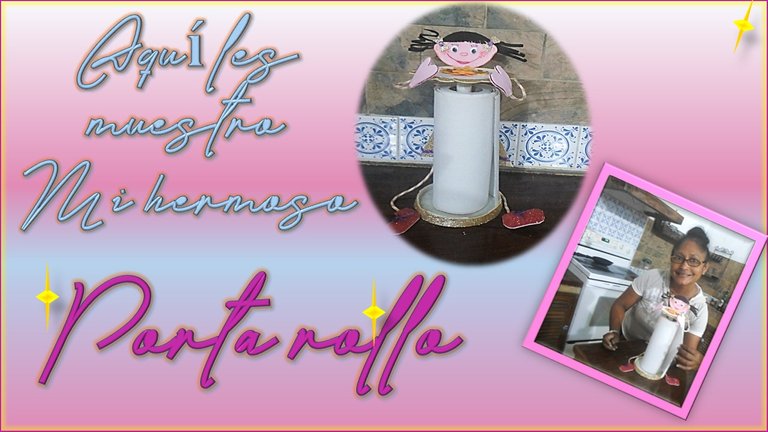
[ESP – ENG] Hermoso Porta rollo de cocina. / Beautiful kitchen roll holder.
Buena noche para toda mi gente bella de esta comunidad de #hivediy, aquí estoy con otra de mis creaciones. No sé la pude mostrar antes porque el trabajo me ha absorbido un poco más de mi tiempo, pero bien aquí estoy hoy con una porta papel de cocina muy alegre y colorido. En casa teníamos los criterios divididos al respecto porque si me dejan le pongo muchas flores y mi hijo y esposo querías que creará algo diferente, siempre me gusta escucharlos porque eso alimenta mi creatividad.
Entonces decidí cambiar el estilo, porque todo no puede llevar solo flores, aunque el mes lo merezca; ustedes me dirán si les gusto o no mi nueva creación, lo que quería era adornar mi porta papel para embellecer mi cocina.
Ahora les voy a mostrar mi hermoso Porta papel de cocina y los materiales que utilice.

Good night to all my beautiful people in this #hivediy community, here I am with another of my creations. I don't know I was able to show it before because work has absorbed a little more of my time, but well here I am today with a very cheerful and colorful kitchen paper holder. At home we had divided criteria in this regard because if they let me I put many flowers and my son and husband wanted me to create something different, I always like to listen to them because that feeds my creativity.
So I decided to change the style, because everything cannot have only flowers, even if the month deserves it; you will tell me if you liked my new creation or not, what I wanted was to decorate my paper holder to beautify my kitchen.
Now I am going to show you my beautiful Kitchen Paper Holder and the materials I use.

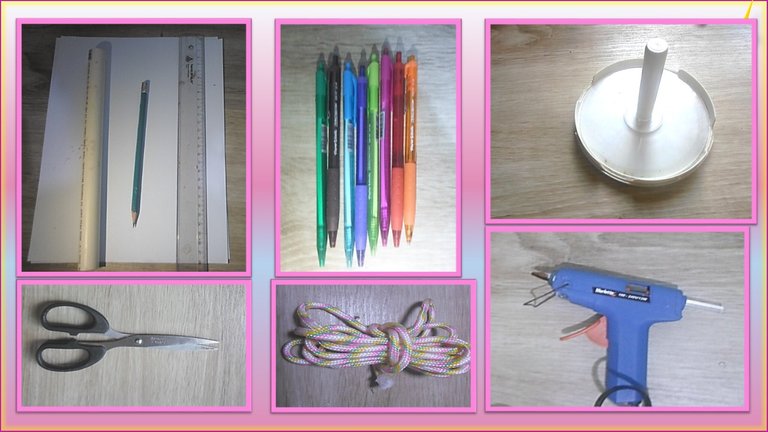
Foami de colores
Foami escarchado
Hoja blanca
Lápiz
Regla de medidas
Bolígrafo de colores
Porta CD
Tuvo plástico de electricidad.
Tijeras
Pistola de silicón
Cuerda de colores.
colored foam
frosty foami
white sheet
Pencil
measurement ruler
colored pen
CD holders
He had electricity plastic.
Pair of scissors
Silicone gun
Color rope.
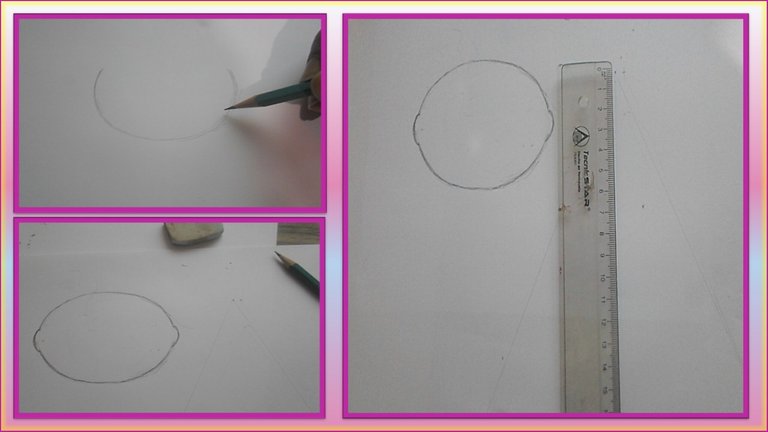
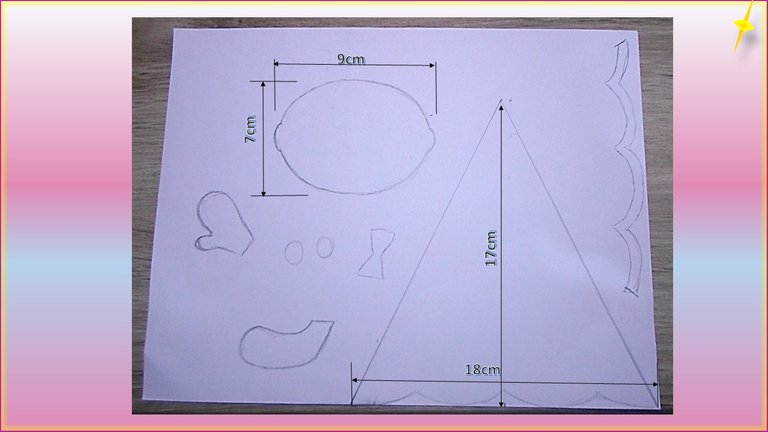
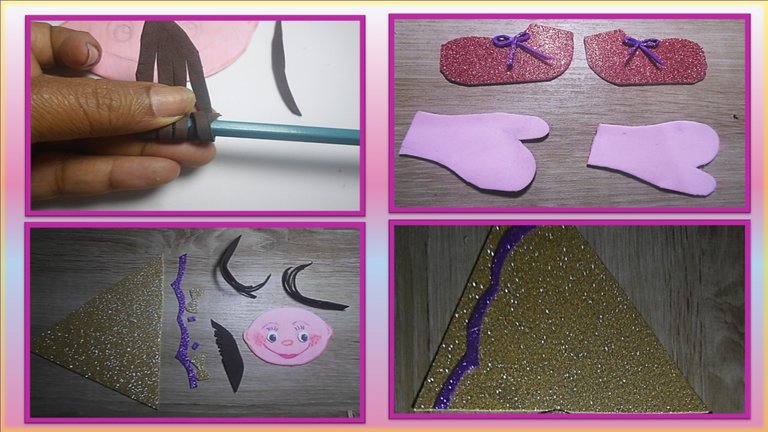
Comencé primeramente dibujando en la hoja blanca con el lápiz las figuras que serían posteriormente mis moldes, para poder transferir al foamis cada una de ellas.
I first began by drawing on the white sheet with the pencil the figures that would later be my molds, in order to transfer each one of them to the foamis.
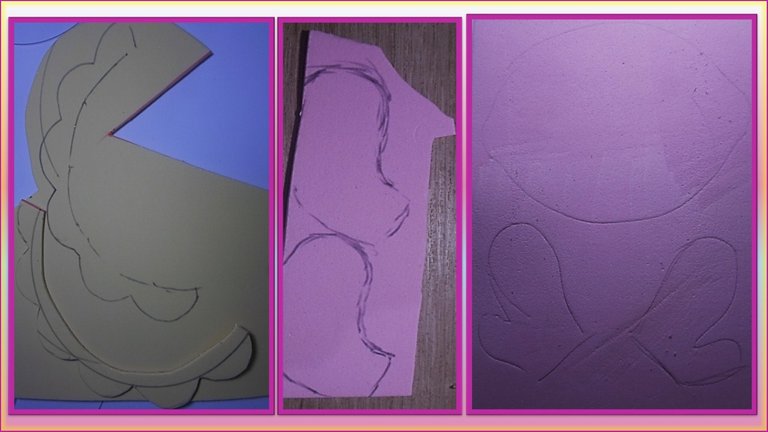
Ya transferidas cada una de mis piezas al foamis las recorto con mucho cuidado porque algunas son piezas muy pequeñas, con algún grado de dificultas.
Once each of my foam pieces have been transferred, I cut them very carefully because some are very small pieces, with some degree of difficulty.
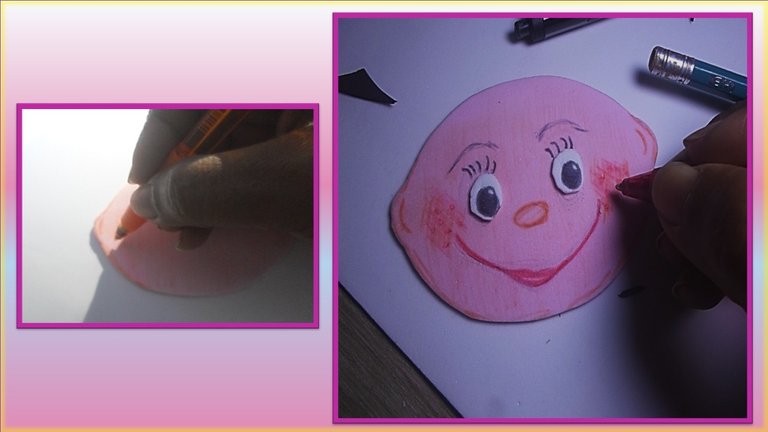
Paso a dibujar con los bolígrafos de colores la cara de la muñeca que será el centro de esta creación. Le doy un poco de color a sus mejillas y boca con el bolígrafo naranja y rojo, le coloque algunos detalles en los ojos y pestañas con el bolígrafo negro.
I'm going to draw with the colored pens the face of the doll that will be the center of this creation. I give a little color to her cheeks and mouth with the orange and red pen, I put some details on her eyes and eyelashes with the black pen.
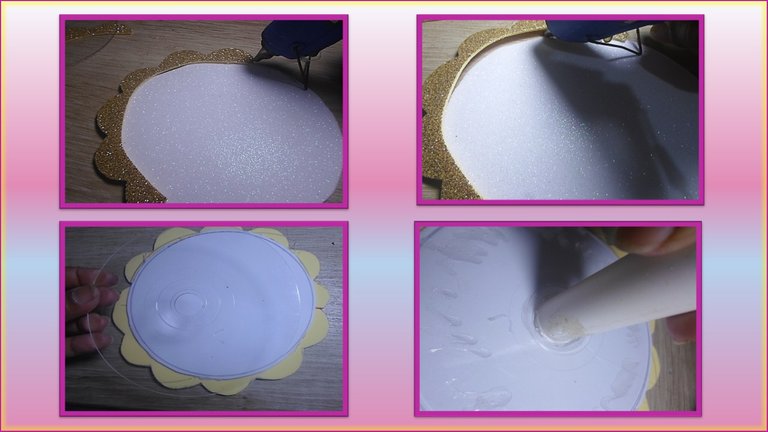
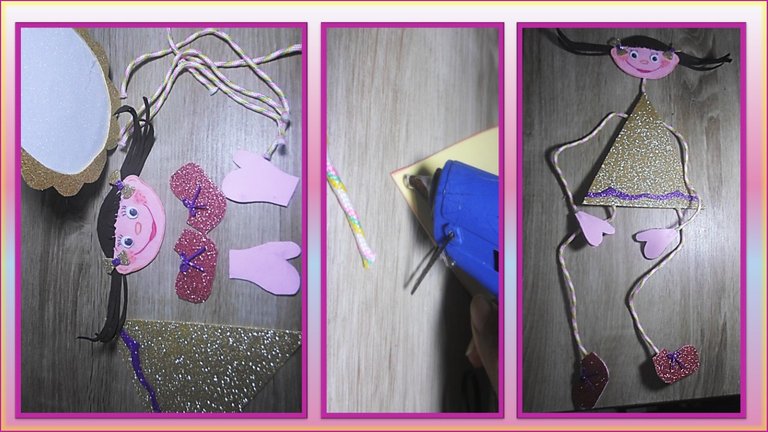
Pego la flor gigante en el círculo plástico, primero pego el centro y luego lo que serían los pétalos, por la parte posterior pego el tubo de electricidad de 23 centímetros de largo, soy muy generosa a la hora de ponerle silicón y ya así tengo lista la pieza que irá en la base de CD para cuando coloque el Royo de papel pueda girar con facilidad.
I paste the giant flower in the plastic circle, first I paste the center and then what would be the petals, on the back I paste the 23 centimeter long electricity tube, I am very generous when it comes to putting silicone on it and that is how I have it ready the piece that will go on the base of the CD so that when you place the paper Royo it can rotate easily.
Como tengo las piezas cortadas comienzo a unirlas, le coloco el adorno al vestido y armo los lazos, de forma tal que queden parejos. Pego bien la cuerda de la cabeza al vestido, también las cuerdas de los brazos y las piernas pasando por ultimo a pegar las manos a la cuerda y los zapatos, ya tengo lista mi muñeca.
Since I have the pieces cut, I begin to unite them, I place the ornament on the dress and I make the bows, so that they are even. I glue the rope of the head to the dress well, also the ropes of the arms and legs, finally sticking the hands to the rope and the shoes, I already have my doll ready
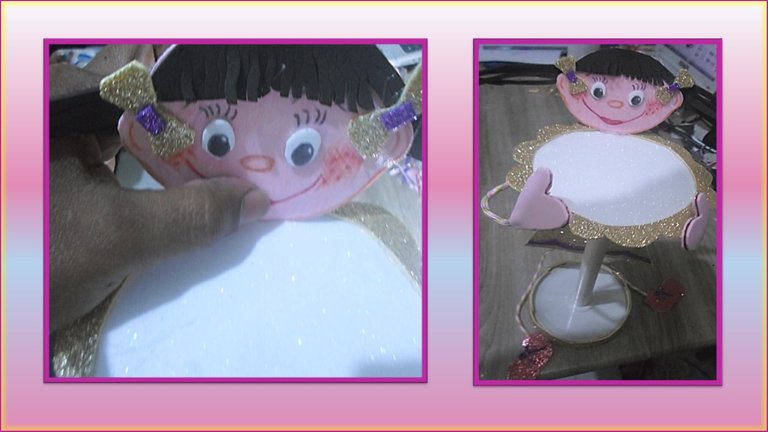
Al tener terminada la muñeca y la gran flor con el tubo, me dispongo a unirlos todas las piezas comenzando a pegar cabeza a la flor primeramente pasando a los brazos de manera que parezca que abraza la flor, solo poniendo un poco de silicón y dejo colgando las piernas para que no me entorpezca a la hora de cambiar el rollo de papel.
Having finished the doll and the big flower with the tube, I am about to join all the pieces, starting to glue the head to the flower, first moving to the arms so that it seems that it hugs the flower, just putting a little silicone and leaving it hanging legs so it doesn't get in the way when changing the paper roll.
Ya tengo todo mi material listo, es hora de ponerme armar mi hermoso porta papel.
I already have all my material ready, it's time to put together my beautiful paper holder.
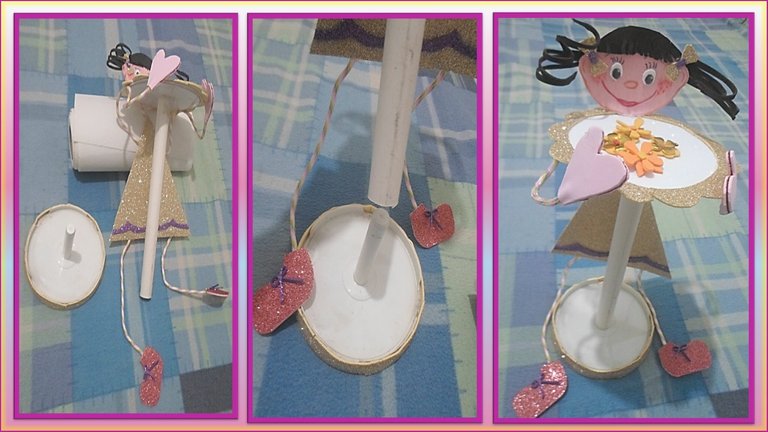
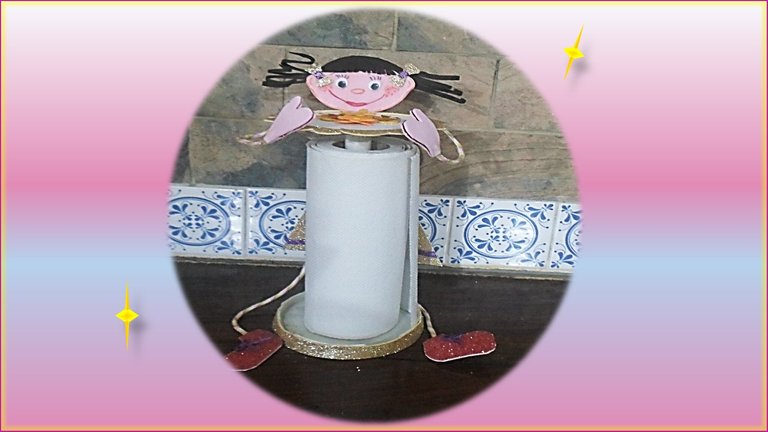
Aquí les muestro como quedado mi porta rollos de papel de cocina.
Here I show you how my kitchen paper roll holder turned out.
Queridos amigos espero que les haya gustado la manualidad que les mostré hoy, nos vemos pronto en otra de mis creaciones. Tengan un lindo y relajado fin de semana.
Dear friends, I hope you liked the craft that I showed you today, see you soon in another of my creations. Have a nice and relaxed weekend.

Las fotos fueron tomadas con una cámara SAMSUNG F2.5
Fue utilizado el Traductor de Google
Separadores realizados en Microsoft Power Point.
The photos were taken with a SAMSUNG F2.5 camera and a ZTE Blade A3 Lite phone
Google Translate was used.
Dividers made in Microsoft Power Point.
Hermoso porta rollo de cocina @taniagonzalez , hermosa creación , como solo tú sabes😍😘
Gracias mi hermana @lileisabel ,fue una creación divertida.
Bello esa creación como todo lo q nos enseña en tus post
Gracias @panchito1972 me alegra mucho que te gustara😍😘
Thank you for sharing this amazing post on HIVE!
Your content got selected by our fellow curator @rezoanulvibes & you just received a little thank you via an upvote from our non-profit curation initiative!
You will be featured in one of our recurring curation compilations and on our pinterest boards! Both are aiming to offer you a stage to widen your audience within and outside of the DIY scene of hive.
Join the official DIYHub community on HIVE and show us more of your amazing work and feel free to connect with us and other DIYers via our discord server: https://discord.gg/mY5uCfQ !
If you want to support our goal to motivate other DIY/art/music/homesteading/... creators just delegate to us and earn 100% of your curation rewards!
Stay creative & hive on!
Hola, Hermoso te quedó ese porta rollo.
Gracias @ingridmar, me alegra que le gustara.