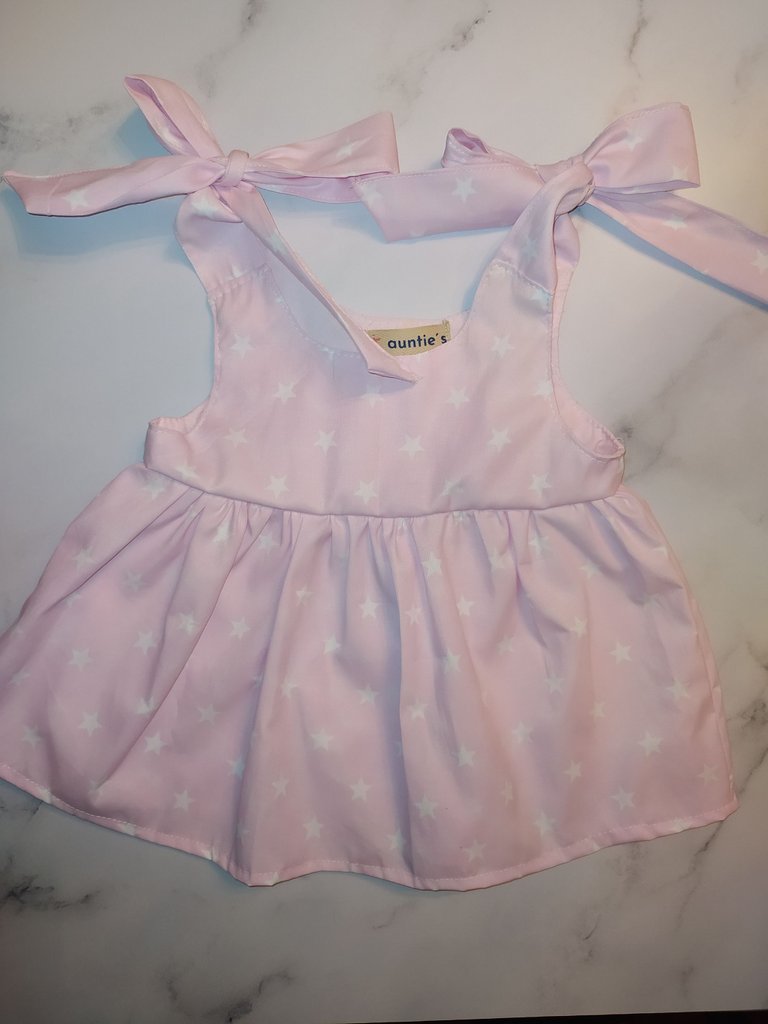
Easy to make dress for girls (ESP/ENG)
Hi #needleworkmonday friends, yesterday I couldn't write for the community because of some work issues that kept me pretty busy during the day and part of the night, so I had to postpone my post for today when I'm a little calmer.
Hola amigos de #needleworkmonday, ayer no pude escribir para la comunidad por algunos temas laborales que me tuvieron bastante ocupada durante el día y parte de la noche, así que tuve que postergar mi post para el día de hoy que estoy un poco más tranquila.
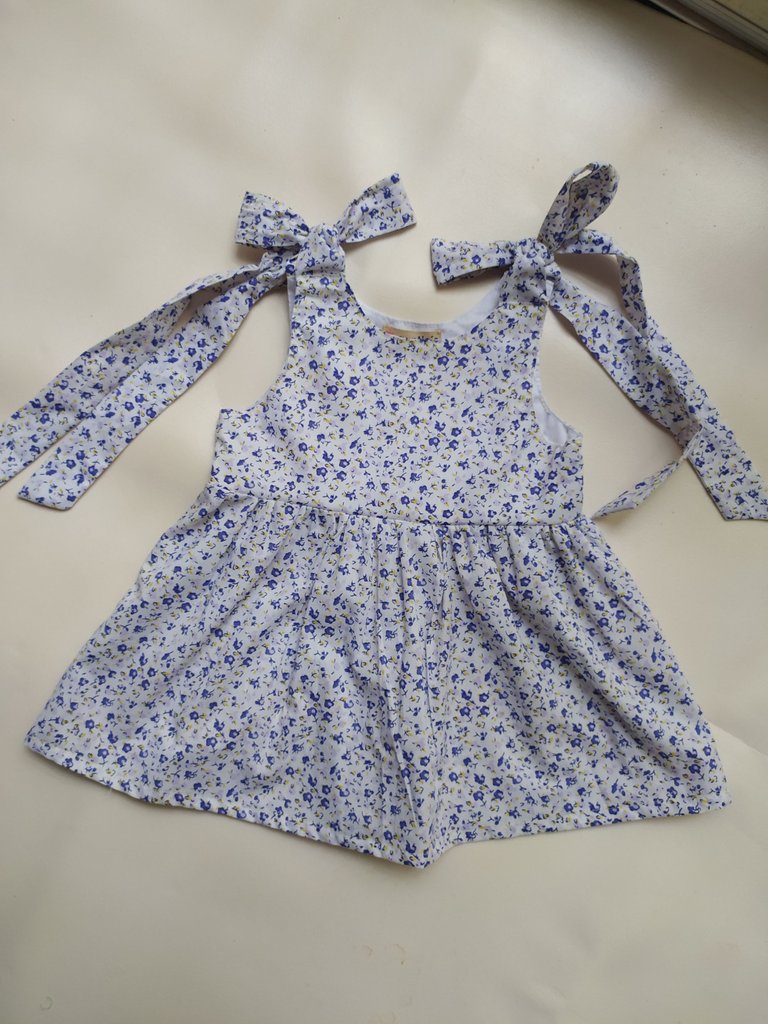
Today I want to show you how I made this dress for girls, super easy to make and cool for hot days.
Hoy quiero mostrarles como confeccioné este vestido para niñas super fácil de hacer y fresco para los días de calor.
If you read my post last week where I show you how to make a paper bag style skirt for girls, you will see that some parts of this dress are similar to last week's pattern.
Si leiste mi post la semana pasada donde te enseño a hacer una falda para niñas estilo paper bag, verás que algunas partes de este vestido son similares al patrón de la semana pasada.
What makes this dress super easy is that both the front and back of the dress are exactly the same, so you will only need to pull the pattern from one side.
Lo que hace súper fácil este vestido es que tanto el delantero como el trasero del vestido son exactamente iguales, así que solo necesitarás sacar el patrón de un solo lado.
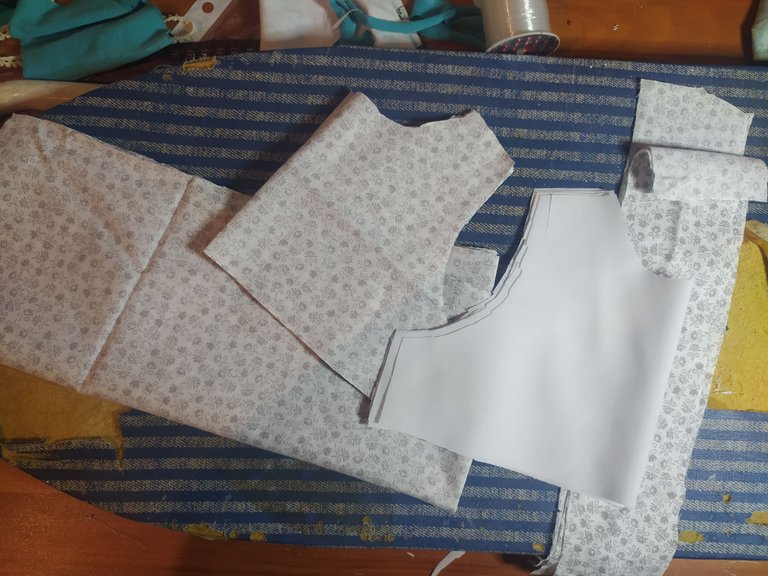
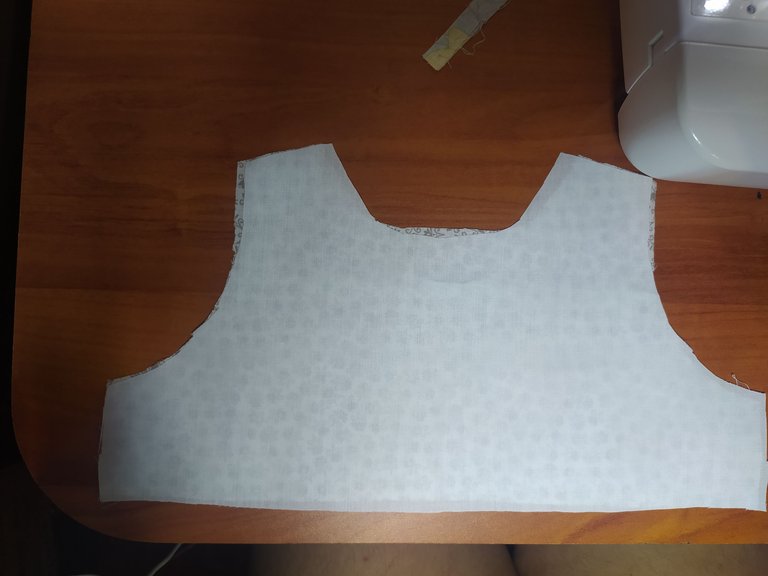
For the top you can use a tank top of the size your girl wears, but you will not make it the length of the t-shirt. The top will be similar in length to a girl's bra, that is, about 4 centimeters from the armpit and you will have to cut two pieces in the fabric you want the dress and two pieces in lining fabric. If you do not like the lining fabric you can use the same fabric of the dress (In total you will have 4 pieces distributed in 2 that will be the lining of the dress and 2 that will be the outer side of the dress).
Para la parte superior puedes apoyarte con una camiseta sin mangas de la talla que use tu niña, pero no la harás del largo de la camiseta. La parte superior quedará de un largo similar a los sostenes de niñas, es decir, a unos 4 centímetros de la axila y deberás cortar dos piezas en la tela que quieras el vestido y dos piezas en tela de forro. Si no te gusta la tela de forro puedes usar la misma tela del vestido. (En total tendrás 4 piezas distribuidas en 2 que serán el forro del vestido y 2 que serán la cara exterior del vestido)
The skirt of this dress I make it with the same pattern of the paper bag skirt, but instead of making a waistband and placing garters I make a gathering at the waist and then one at the top of the dress.
La falda de este vestido yo la hago con el mismo patrón de la falda paper bag, pero en lugar de hacerle cintura y colocarle ligas hago un fruncido en la cintura y luego uno a la parte superior del vestido.
To complete the top skirt, I cut 8 strips that should be one centimeter narrower than the shoulder part of the top of the dress and the length you can do it to your liking. For this model I cut the strips about 30 centimeters long and 4 centimeters wide, because it is a dress for one year old babies, so the less excess of the strip will be much safer.
Para completar la falda superior, corté 8 tiras que deberán ser un centímetro más angostas que la parte de los hombros del superior del vestido y el largo podrás hacerlo a tu gusto. Para este modelo yo corte las tiras de unos 30 centímetros de largo y 4 centímetros de ancho, porque es un vestido para bebes de un año, así que mientras menos excedente quede de la tira será mucho más seguro.
To make the skirt, measure the contour of the girl's waist, divide the number you get in half and add about 5 centimeters approximately and keep this measurement on a piece of paper. Then measure the length you want for the skirt, this measurement should be taken from about 4 centimeters below the armpit, you can leave a few extra centimeters in case of doubt and then adjust once the dress is finished.
Para hacer la falda, mide el contorno de la cintura de la niña, divide el número que te dé a la mitad y agrega unos 5 centímetros aproximadamente y manten esta medida en un papel. Luego mide el largo que quieras para la falda, esta medida deberás tomarla desde unos 4 centímetros debajo de la axila, puedes dejar unos centímetros extra en caso de dudas y luego ajustar una vez finalizado el vestido.
With these measurements you can cut directly on the fabric or do it first on pattern paper. As we are working with half the waist measurement, when cutting the fabric you will have to fold it in half, this piece will be one of the sides of the bottom of the dress, as I said before, back and front is exactly the same. From the bottom you will have 2 pieces, don't worry about how wide you can see it, when you gather it, it will be the width we need.
Con estas medidas puedes cortar directamente en la tela o hacerlo primero en papel de patrón. Como estamos trabajando con la mitad de la medida de la cintura, a la hora de cortar la tela deberás doblar a la mitad, esta pieza será uno de los lados de la parte inferior del vestido, que como te dije antes, trasero y delantero es exactamente igual. De la parte inferior tendrás 2 piezas, no te preocupes por lo ancho que puedas verlo, al fruncirlo quedará del ancho que necesitamos.
Now, let's get to sewing.
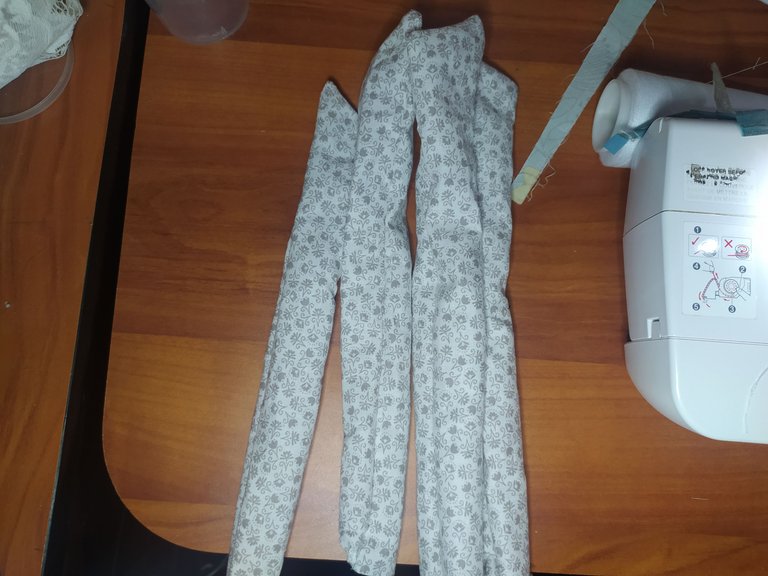
To make the dress, the first thing we will do is sew the straps, we will join two pieces of fabric right sides together. You can sew one end of the strap diagonally or straight, I particularly like to sew it diagonally. And you should leave the other end unsewn, which will be the one that will be attached to the top of the dress.
Ahora sí, a confeccionar.
Para la confección del vestido, lo primero que haremos sera coser los tirantes, uniremos dos piezas de tela por los lados derechos. Puedes coser uno de los extremos del tirante en diagonal o recto, a mi en lo particular me gusta coserlo en diagonal. Y deberás dejar el otro extremo sin coser, que sera el que uniremos a la parte superior del vestido.
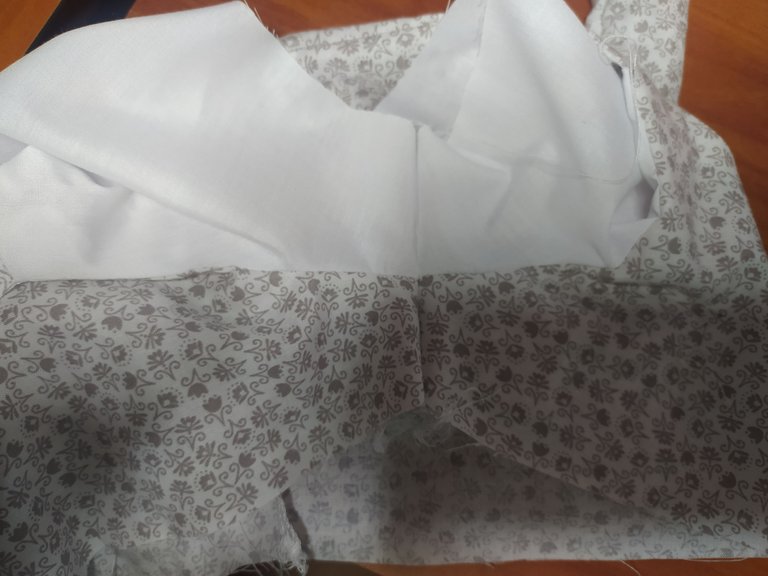
Once you have the 4 straps sewn together, we will turn so that the front of the fabric is facing out and attach to the top of the dress. To do this, we will place the piece of fabric right side up, the strap on the side that we do not close on the shoulder and cover with the lining of the top of the dress right side down, imagine that we make a sandwich (you can guide you with the photo).
Una vez tengas los 4 tirantes cosidos, daremos vuelta de forma que la parte frontal de la tela quede hacia afuera y uniremos a la parte superior del vestido. Para hacer esto, vamos a colocar la pieza de tela con el derecho hacia arriba, el tirante por el lado que no cerramos en el hombro y cubriremos con el forro de la parte superior del vestido con el derecho hacia abajo, imagina que hacemos un sandwich (puedes guiarte con la foto)
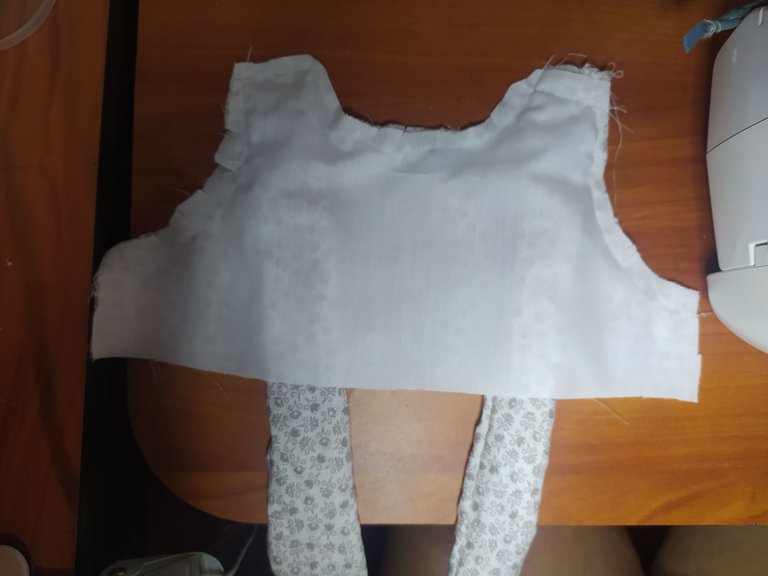
We are going to sew the armhole, shoulders and neck, but we will not yet join the sides of the top and the bottom, we will do this later. Then we will make small cuts in the curved parts of the seam so that the seam can be turned without deforming our piece.
vamos a coser la sisa, los hombros y el cuello, pero no uniremos aun los laterales de la parte superior ni la parte de abajo, esto lo haremos más adelante. Luego haremos pequeños cortes en las partes curvas de la costura para que pueda darse vuelta a esta sin que se deforme nuestra pieza.
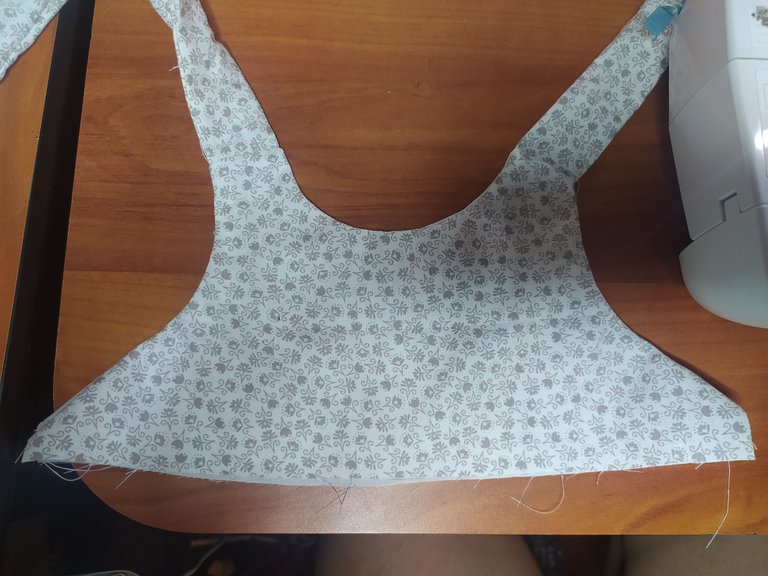
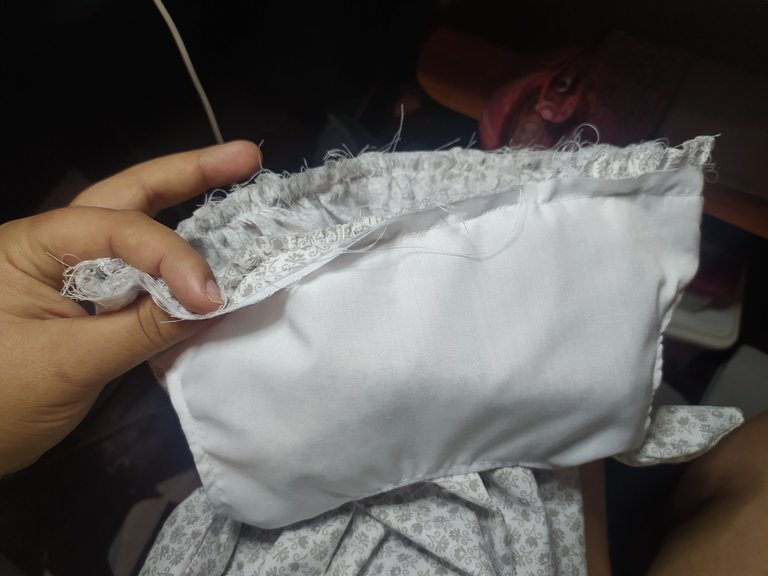
Once this is done, let's turn the seam allowance over and check that everything has been sewn together. To secure the straps to the dress, I make a stitch all around the dress, which also looks like a decorative stitch. We are going to repeat this step, so that we have two equal pieces.
Una vez hecho esto, vamos a darle vuelta a la costura y verificar que todo haya quedado bien unido. Yo, para asegurar los tirantes al vestido, hago una puntada a todo el contorno del vestido, que ademas luce como una puntada decorativa. Este paso lo vamos a repetir, de forma que nos queden dos piezas iguales.
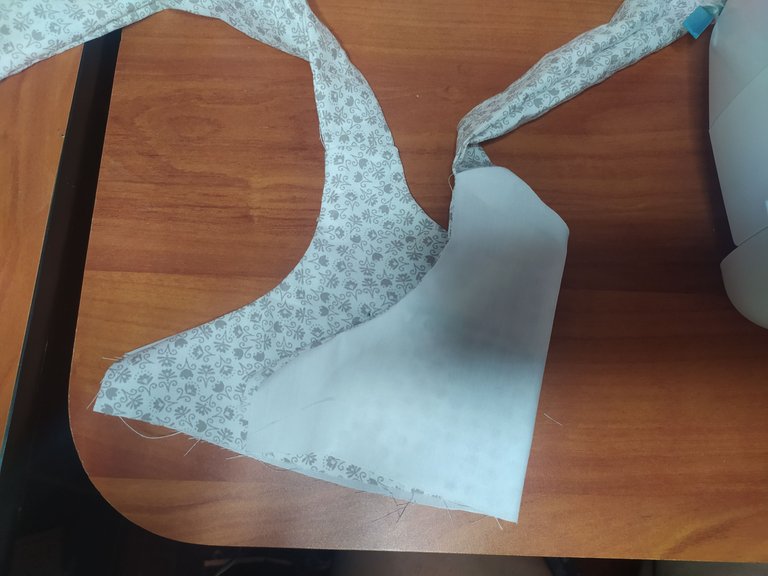
When I make this dress I like to finish with the top first, so I'll explain at once how to join the sides. We're going to face as usual, right sides to right sides of the fabrics, and we're going to separate the lining from the fabric to face the sides of the lining to lining and fabric to fabric, trying to match the side seams and sew.
Cuando hago este vestido a mi me gusta terminar con la parte superior primero, así que les explicaré de una vez como unir los laterales. Vamos a enfrentar como siempre, derecho con derecho de las telas, y vamos a separar el forro de la tela para enfrentar los laterales del forro con forro y tela con tela, tratando de hacer coincidir las costuras laterales y cosemos.
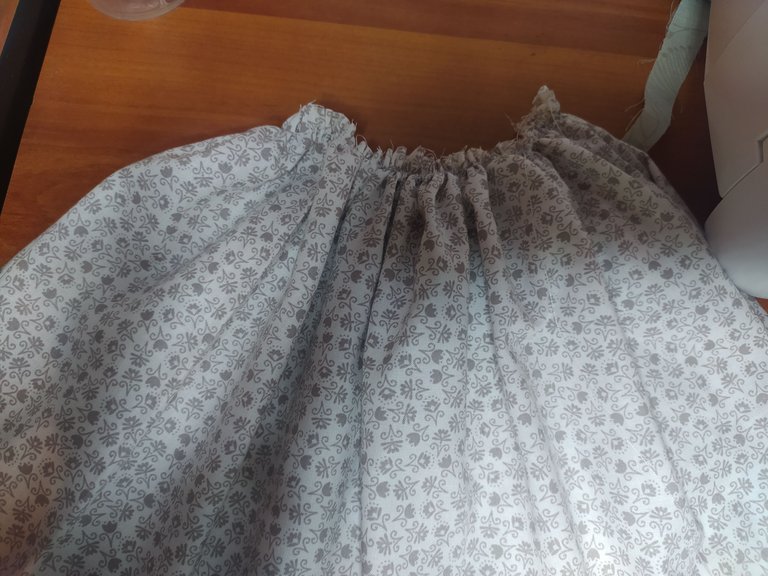
The last thing we will do of this dress will be the skirt part, here we will have only two pieces of fabric (this one does not have lining) we will sew along the sides joining as always the right sides of the fabric, and at the top we will gather all the contour. For the gathering, we place the thread stitch in the widest stitch, in my case it is number 5, and the strongest tension, in my case it is number 9, and we sew, you will see that it starts to gather by itself.
Lo último que haremos de este vestido será la parte de la falda, aquí tendremos solo dos piezas de tela (esta no lleva forro) coseremos por los costados uniendo como siempre los derechos de la tela, y en la parte superior vamos a fruncir todo el contorno. Para el fruncido, colocamos la puntada del hilo en la más ancha, en mi caso es el número 5, y la tensión más fuerte, en mi caso es el número 9, y coseremos, veras que comienza a fruncirse sola.
Then, we join the side seams of the top and the skirt and distribute the gathering all around so that it looks as good as possible. In this part we must be very patient and careful so that it does not come loose and we have to start from scratch. You could also gather it by hand, but with the sewing machine it is much faster and the gathering is more beautiful.
Luego, unimos las costuras laterales de la parte superior y de la falda y distribuimos el fruncido por todo el contorno para que quede lo mejor posible. En esta parte debemos ser muy pacientes y cuidadosos para que no se nos suelte y debamos comenzar de cero. También podrías fruncirlo a mano, pero con la maquina de coser es mucho más rápido y el fruncido queda más bonito.
Sew all the way around and secure with an overlock stitch. We make the bottom of the dress if we are sure of the length, if not you can measure the dress to the girl and check the length and then sew the bottom. Iron to verify that everything is in order.
Cosemos todo el contorno y aseguramos con puntada overlock. Hacemos el bajo del vestido si estamos seguros del largo, sino lo estas puedes medirle el vestido a la niña y verificar el largo para luego coser el bajo. Planchamos para verificar que todo este en orden.
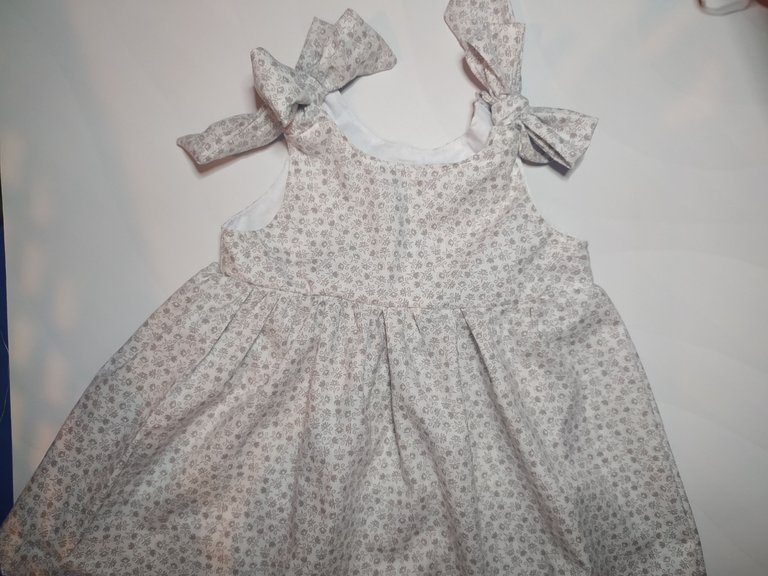
The advantage of this dress is that the straps are adjustable, so it's not a dress that they outgrow very quickly, plus it's usually quite cool, which makes it ideal for hot days.
La ventaja de este vestido es que los tirantes son ajustables, así que no es un vestido que les quede pequeño muy rápido, además suele ser bastante fresco, lo que lo hace ideal para los días de calor.
I hope you liked this pattern, in a next post I will show you a panty that I make based on this pattern.
Espero te haya gustado este patrón, en un próximo post te enseñaré una braga que realizo a base de este patrón.