Part One of Four Part Series - How To - Turn Sculpture into Finished Resin
In this four part series my plan is to take you from your finished sculpture, in whatever medium you have chosen, to a finished resin reproduction of your original. This process should work for most mediums. Some like water based clay may have some extra steps for which I lack pictures. For those types of things I'll try and remember to write tips for dealing with other mediums that might need extra stuff.
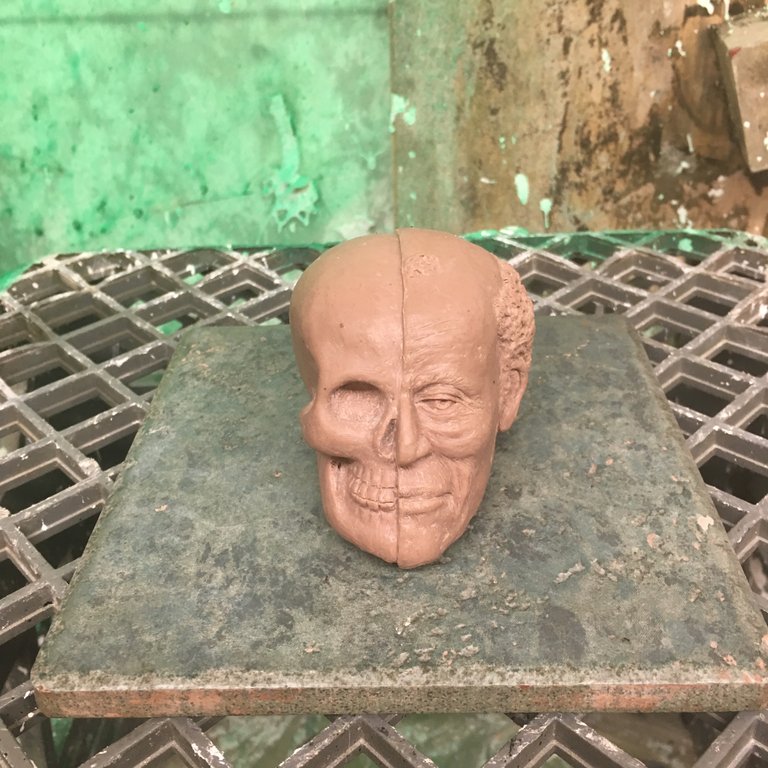
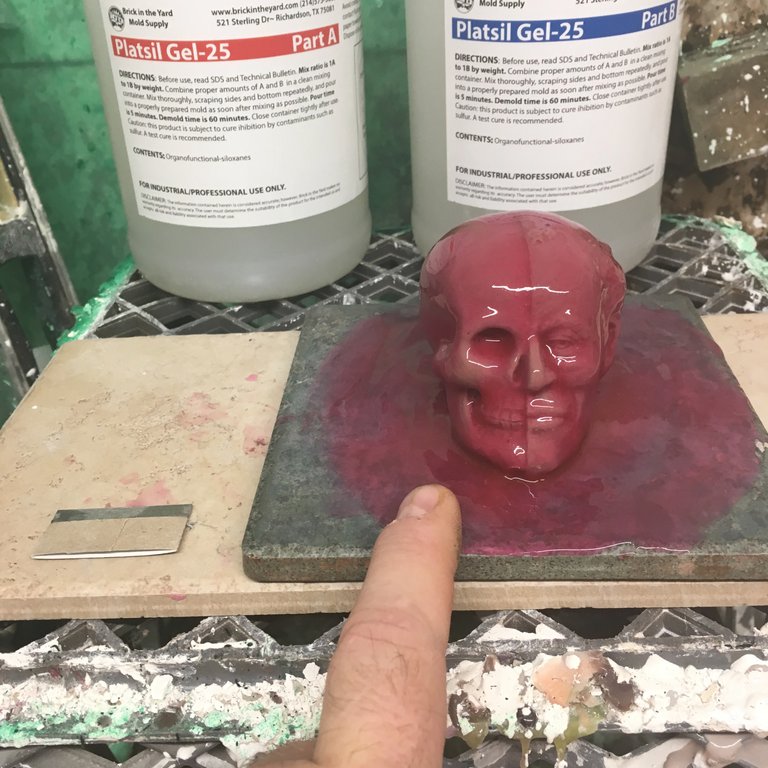
For our work case today we'll be dealing with a head I made that many of you may remember from my last post. For this sculpture I chose to use an oil based clay called Monster Clay (tm) It has the unique properties of being like a clay and being like a wax. I've found that it most definitely works like a soft wax rather than a clay. One of the neatest things about this particular clay is that it can be heated up in the microwave until soft or even until liquefied. The later comes in handy if you want to rework a piece from a former mould. You can just heat up this clay, pour it into the mold, let it cool down then you can go to changing things until your heart is satisfied.
For this medium I did not have to use a release spray therefore no pictures of me doing so. But I'd like to throw in a tip here; Many other mediums need a release spray or at the very least to have a light coat of vaseline or baby powder applied. Today, no need. The silicone we're using does not adhere to Monster Clay(tm).
All in all we will be making a 4 layered silicone mould. The first layer is the detail layer, sometimes called the beauty layer. This one we stipple on making sure to get complete coverage with no air bubbles. The second layer works like a backup for the first. Not only does it give more integrity to the mould but also ensures that any uncovered areas that might have been missed is taken care of. Third layer is the thickened layer. Adding a thickener to the mix we will use it to fill in any undercuts that might act like keys (that could lock the piece into the mother mould; Sometimes making it impossible to extract the sculpture without destroying the mould).
The fourth layer is another integrity layer. I have been able to get away with only doing 3 layer before. This in an effort to save money. If doing only 3 you can move the thickened undercut layer to the second. However I do not recommend this. You may come out with a perfectly workable mould but it will not last. The lifespan of a well done mould should be somewhere around 50 detailed casts. You will get this with 4 layers. It is unlikely you will get anywhere near 50 with only 3 layers.
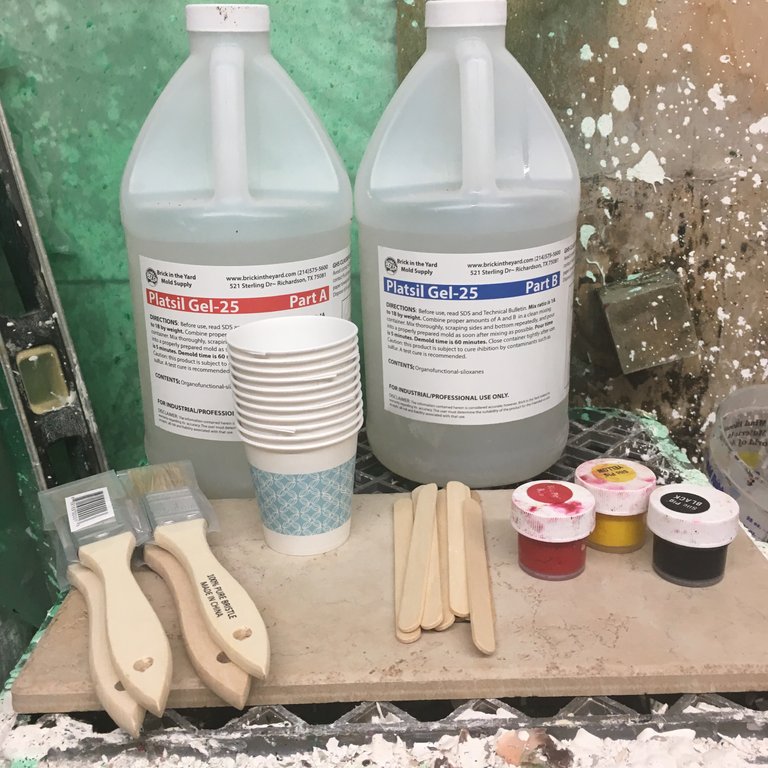
To start things off I've got a picture here showing the tools and materials we'll be using for the rubber part of the mould.
Since this piece is rather small I've chosen to make a seamless brush on mould, sometimes called a glove mold. There are many different ways to make a mould. I've chosen the simplest here for a couple of reasons. One being that I don't really need anything more complex than this for my purposes. Secondly since I don't know the mould making abilities of the reader I think it best to stick to the basics. Fancy is only better if it is necessary to get the result you want. Our result will be just fine without fancy.
In the picture above you will see that I've place the silicon, chip brushes, stir sticks (popsicle sticks), paper dixie cups, and silicone pigments. We will be coloring each layer of the rubber a contrasting different color from the preceding layer. This helps to make sure you get complete coverage.
The following picture shows the way I set up right before mixing. I've labeled the first two cups with an 'A' and a 'B'. I've done this so I can make the very important point that with almost all silicones the standard is that anything you are adding, such as pigment or filler, or thickener, always goes into the 'B' part of the solution. Whatever brand you use will clearly mark their containers 'A' and 'B' no worries.
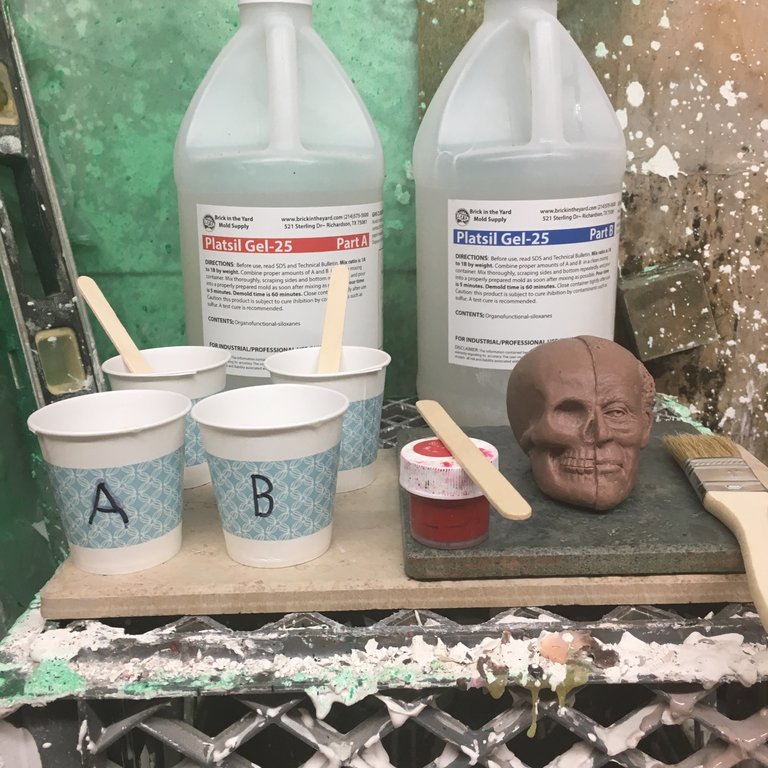
I have four cups because I hold to the old mould makers adage that you should mix twice, pour once. More on this saying later. This particular brand of silicone uses a 1-1 by volume ratio. I strongly recommend this for beginners. The other option is ratio by weight. Much more finicky stuff if you get it wrong by even a little. Plus you need an accurate scale to use that stuff. I've only ever use the by volume stuff and I've never been even a little disappointed.
About silicone; what type to use? Well, like just about everything else, it depends. What I'd suggest is to find you local dealer and make a trip to their shop. Have pictures or sketches and a good description of what you want your end product to look like. I've yet to find an unhelpful owner of one of these shops. Another reason for the face to face is, relationship. It really does do wonders on shipping times if the person shipping can put a face to a name. At least this is what I've found to be the case. Ok, less life lesson and more how-to. Back to the tutorial.
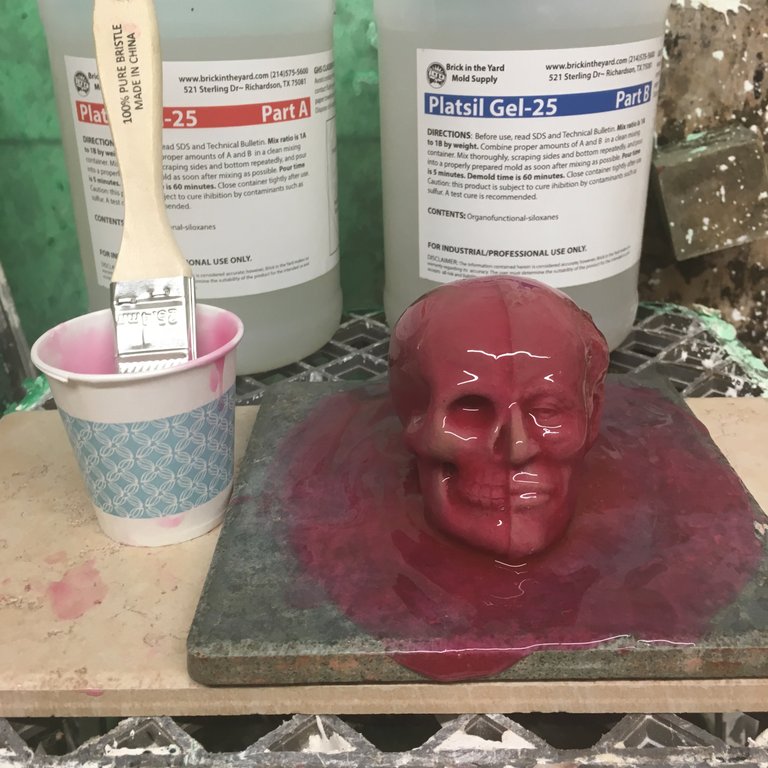
As you can see I've chosen red for the first color. The color you use doesn't matter, just as long as you alternate colors between layers. The standard time to wait between layers has always come out to be about 20 minutes for me. This will vary depending on the environment you are in, wether it is hot, cold, or humid, can and does affect the curing time. I'm in North Texas and it is summer time here; I do have an air-conditioner in my studio and try and keep it around 75 degrees Fahrenheit. The best way to know is to do a test puddle. This will give you a good idea if you can go grab a sandwich in between layers.
A good tip for knowing if your rubber is ready for the next layer is to touch it with your finger.
If it is tacky and does not come off or stick to your finger you are usually good to go.
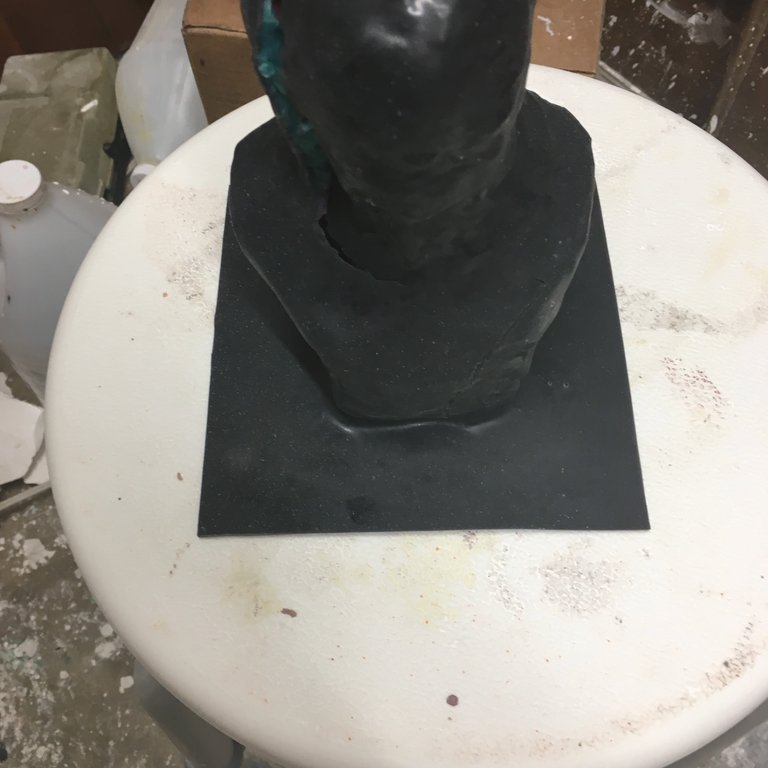
Cut your flange around 3/4 inch to an inch away from the edge of your sculpture. This is both handy when you make the mother mold and also helps when extracting the final resin. I normally use the width of a paint stir stick (the kind you can get from any hardware store) as a decent guide for the width of the flange.
Tip: It's a good idea to at least cut the two front edges of the flange at a 45 degree angle. This help with seating the rubber into the mother mold.
This is a picture of another mold that unfortunately got some tears. I left it inside out for too long of a period. Please learn from my mistake. Leave the rubber mould in the mother mold when storing. What I really wanted to show was a properly done flange. The width of this flange is close to what you should be shooting for. I did not 45 the front corners like I should have but like my father always said as I was growing up, do as I say not as I do. He never actually said this but for the sake of, funny, we will pretend that he did.
This is the end of Part One of our four part series. Next, Part Two; We will get through layer 2, 3, and 4. Part Three will cover making the Mother Mould; and part 4 will take us through to a finished resin cast of our Memento mori skull head thingy.
Thank you so much for reading this first part of my tutorial.
I hope everyone is looking forward to the next installment as much as I'm looking forward to putting it together.
Ok, Much thanks and good feelings,
Matt (SC)
Wow!!! Well written tutorial, @sleepingcowboy!
Posted using Partiko iOS
Thank you so much!
!tip
Posted using Partiko iOS
Thank you for the tip. I didn't even know we could do that. I'll have to find a post to learn more.
🎁 Hi @sleepingcowboy! You have received 0.1 STEEM tip from @silversaver888!
@silversaver888 wrote lately about: #Menemonday: Build Your Savings, One Charm At A Time Feel free to follow @silversaver888 if you like it :)
Sending tips with @tipU - how to guide :)
Well done , for a non clayer like me is great to see. So again let us know when part 2 is up
Thank you very much. Second one will be up tomorrow or the next day. I'm considering adding a supplemental for tomorrow to drill down on some of the things I brought up in this post. If I can get it done in time it will go up before post 2. If not post 2 will go up tomorrow :)
Thank you.
You're welcome! ;-)
I found this post thanks to @miti-blog work, and his Curation Project: Undervalued Deserving Contents. Your work deserves way better, I'm happy to give you my upvote. Cheers, Nicola @knfitaly
Coltellinaio per passione e non solo...
Trentino - Italy

Thank you 🙏
This post was shared in the Curation Collective Discord community for curators, and upvoted and resteemed by the @c-squared community account after manual review.
@c-squared runs a community witness. Please consider using one of your witness votes on us here
Thank you @c-squared for sharing my post.
Just in time! I wanna experiment with resin but I don't know where to start. I usually use epoxy for sculptures but I want to try resin for a glass-like look :D Glad I found this. I certainly am confused with the silicon part cos I only see the artists on youtube use one layer of silicone but I will research more about it. So many materials to buy for this I don't even know if there is a shop here that sells locally haha. Many more tutorials to come! :D
Awesome! I'm so glad this will come in useful. I'll be happy to answer any questions you might have, If I can that is. If you have anything specific you'd like to ask me I hang out on Steem Terminal: https://discord.gg/ discord server a decent amount of time.
Thank you for using the #build-it tag. This post has been rewarded with BUILD tokens in the form of an upvote.
Build-it is a central hub for DIY and How-To projects. It's an opportunity to find and share the latest in DIY, and How-To tutorials. The recommended tags required when creating a DIY artcle are #diy, #build-it. #how-to, or #doityourself. Please read our guide
Need help? Live technical support on Discord or Telegram
This project is run and supported by our witness @gulfwaves.net. If you like what we do, click here to vote for us
This was a first-rate tutorial! I am truly impressed! Thank you for taking the time and the effort to do this!
I look forward to the second installment!
!tip
Thank you so much fo the encouragement. As I type I am in the middle of choosing arrangement of the pictures for the remaining parts.
I am very excited to see how it turns out!
I have the finished piece sitting in front of me right now. But I'm gonna be sneaky and hold out showing it until post 4. ;-)
That is just cruel. :)
🎁 Hi @sleepingcowboy! You have received 0.1 STEEM tip from @dswigle!
@dswigle wrote lately about: What Are The Odds Of A Trifecta? Feel free to follow @dswigle if you like it :)
Sending tips with @tipU - how to guide :)
Thank you.
Awesome. I haven't ordered any monster clay yet (just too busy), but I'm paying close attention for when I do I don't re-do too many mistakes in the learning process. Thanks!
I'm pretty sure you will like it. I have yet to speak with anyone that has used it that haven't found a good use for it. Hmm. That was quite a sentence I just wrote. More of a feel your way through it than clear and precise communication :-)
!tip
🎁 Hi @sleepingcowboy! You have received 0.1 STEEM tip from @wwwiebe!
@wwwiebe wrote lately about: Escaping Fort Delaware Feel free to follow @wwwiebe if you like it :)
Sending tips with @tipU - how to guide :)