How to make old houses with textures🌲| Como hacer casas y sus texturas

Hello dear friends of Hive and Sketchbook!!
Today I want to share with you a project that has taken me some time.
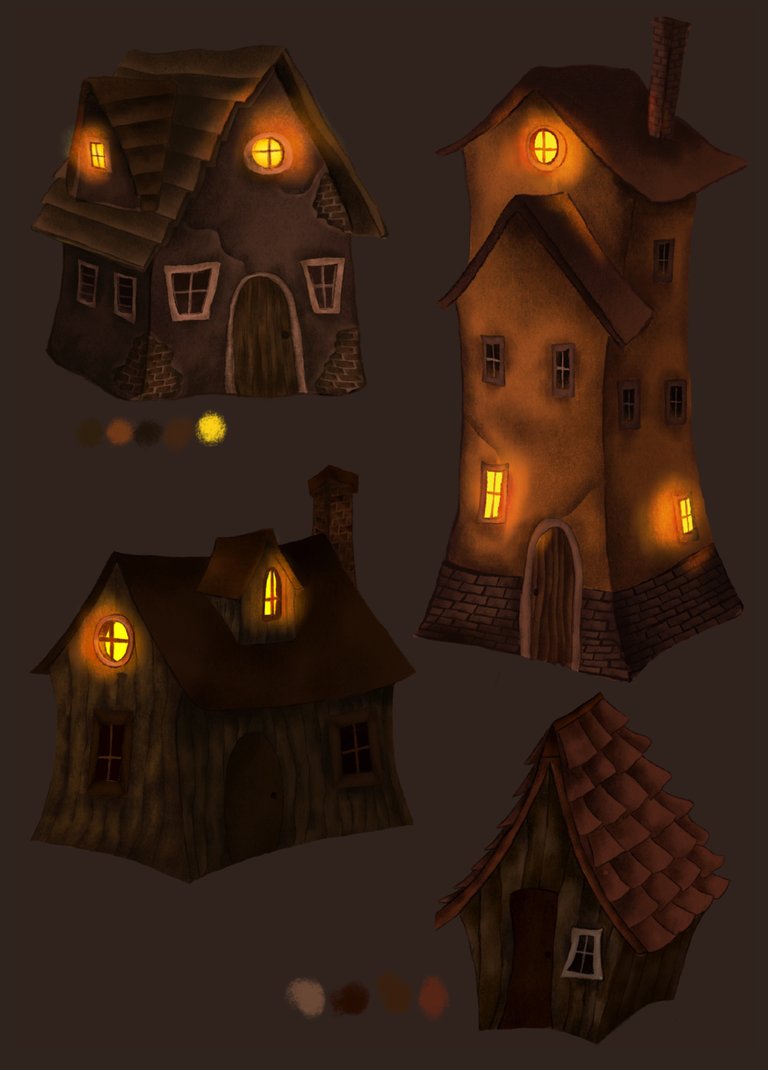
I have been doing several studies on some materials that could be used in houses, especially when it comes to houses a little older than the ones we usually see today. More rustic materials.
I have been making 4 houses in which you can see different materials.
The whole process involved a lot of analysis of the references that can be found on the internet and those that can be seen physically and more closely.
I'll be sharing with you this step by step of how I captured the textures of the materials in these drawings. I hope you like it a lot and you can learn how all this can be made real in a drawing.
I previously shared the process in a video of how I started it all. Speed Painting Digital processing of old houses🌲
This time I will share the tutorial on how to get textures from natural materials AND the lights on them.
Anteriormente compartí el proceso en un video de como empecé todo Speed Painting Digital processing of old houses🌲
En esta ocasión compartiré el tutorial de como obtener texturas de materiales naturales.
En el día de hoy les quiero compartir un proyecto que me ha llevado algo de tiempo.
Estuve realizando varios estudios sobre algunos materiales que podrían llevar las casas, y más cuando se trata de casas un poco más antiguas que las que solemos ver actualmente. Materiales más rústicos.
Estuve realizando 4 casas en las que se pueden apreciar diversos materiales.
Todo el proceso conllevó a mucho análisis de las referencias que se pueden encontrar en internet y las que se pueden apreciar físicamente y más de cerca.
Estaré compartiendo con ustedes este paso a paso de como plasme las texturas de los materiales en estos dibujos. Espero les guste mucho y puedan aprender como todo esto se puede hacer realidad en un dibujo.
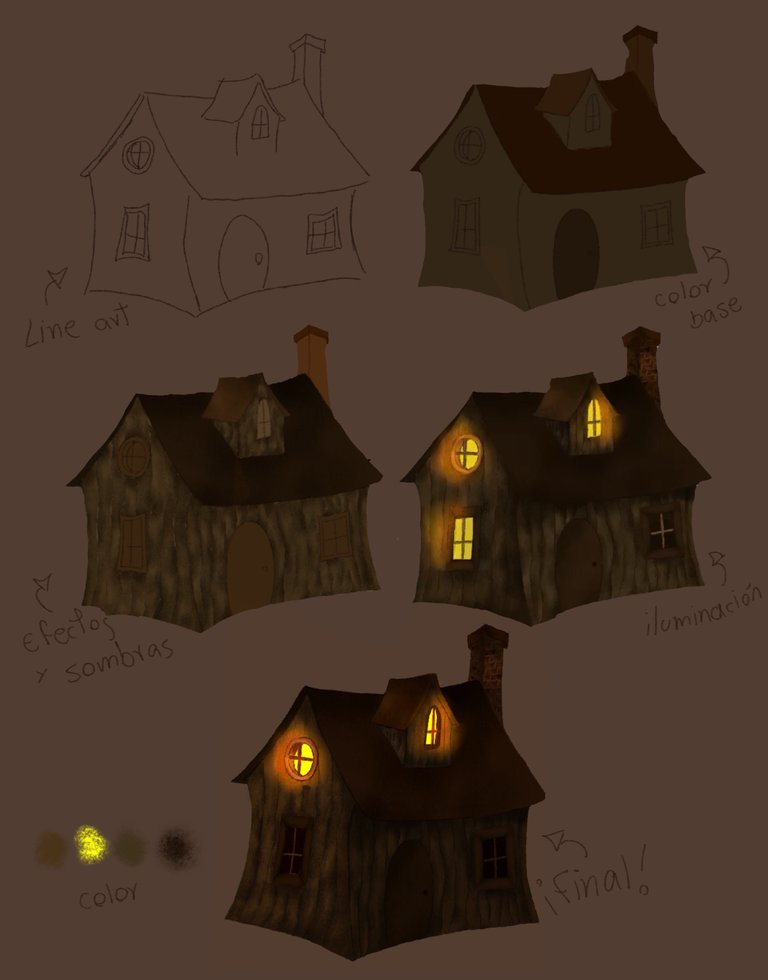
Now let's get started! The first thing I will do is to create the house and I will be placing the base colors along with small shadows. I will be showing in a small image the process. Remember that if you want to see the complete work you can find it in the previous post.
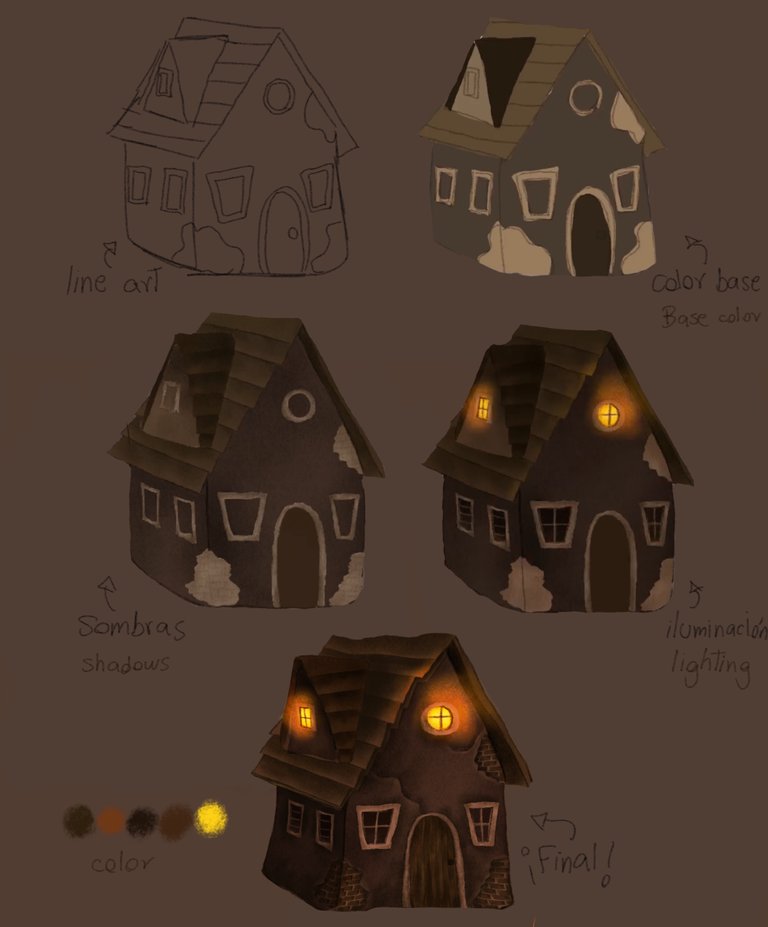
Ahora si comencemos! Lo primero que haré será crear la casa y estaré colocando los colores base junto con pequeñas sombras. Estaré mostrando en una pequeña imagen el proceso. Recuerden que si quieren ver el trabajo completo lo podrán encontrar en el post anterior.
The main thing for me when making these houses is to highlight the texture very well and make it as similar as possible to what we can see in real life. The first thing I will be explaining are the bricks, which is the essential material in this house.
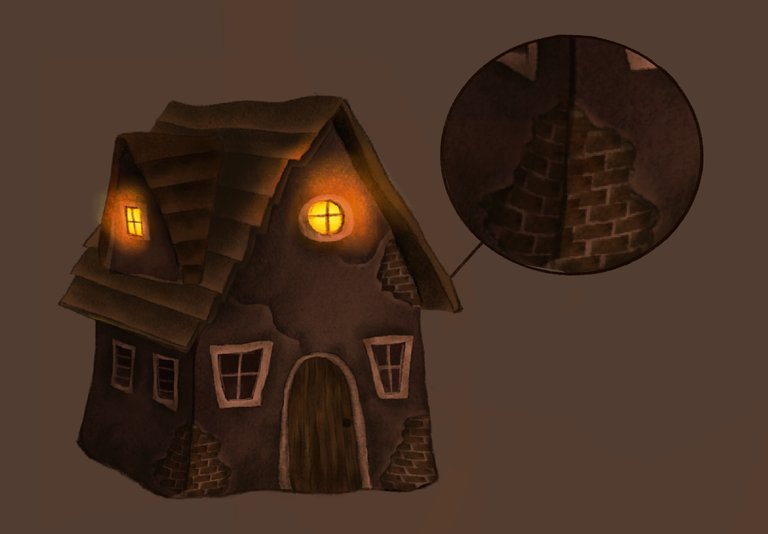
Lo principal para mi al realizar estas casas es resaltar muy bien la textura y hacerla lo más parecida posible a lo que podemos ver en la vida real. Lo primero que estaré explicando son los ladrillos, que es el material esencial en esta casa.
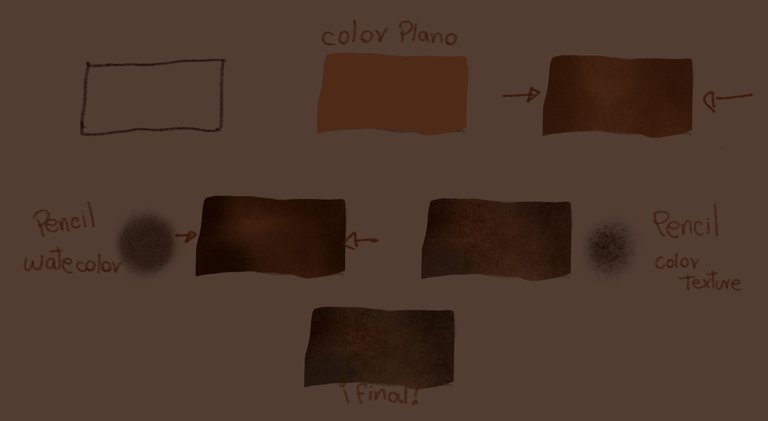
The first thing I will be doing will be the shape with the Pencil brush, then I will fill it with a flat color, the color will vary depending on the color palette of your preference. With the crayon and watercolor brushes that you have in your program, I will be using them to start making the textures.
First I will apply with the Watercolor Brush a very thin layer and then with a slightly darker tone, very gently I will be filling in the edges on both sides. Finally I will add small touches with the Crayon Brush using a medium tone between the two that we have used before (this varies according to the colors of your preference) and this way we will obtain the desired texture.
Lo primero que estaré haciendo será la forma con el pincel de Lapiz, a continuación lo rellenaré con un color plano, el color varía dependiendo de la paleta de colores de tu preferencia. Con los pinceles de crayón y de acuarela los que tengas en tu programa, los estaré usando para empezar a realizar las texturas.
Lo primero será aplicar con el Pincel de Acuarela una capa muy delgada y luego con un tono un poco más oscuro, muy suavemente estaré rellenando los bordes de lado y lado. Finalmente agregaré pequeños toques con el Pincel de Crayon utilizando un tono medio entre los dos que hemos usado anteriormente(esto varía según los colores de tu preferencia) y así ya obtendremos la textura deseada.
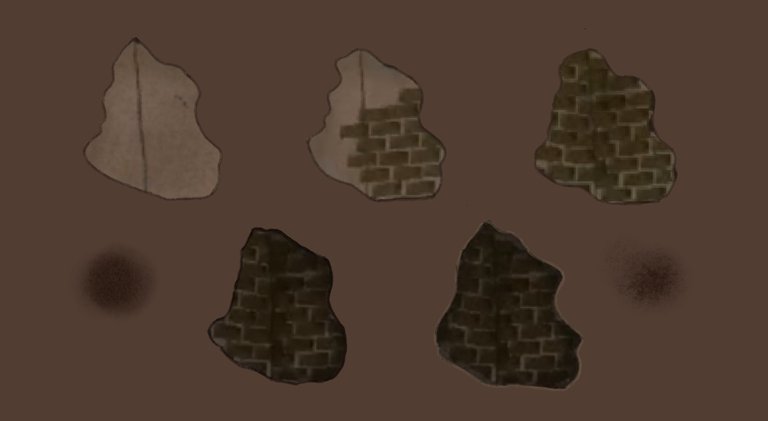
Already knowing how a brick is structured and the way I paint it. We can start placing them in different ways in our project.
Remember that the bricks almost never meet each other, so let's try not to put them so close together. Another very important thing is that the bricks will always have a base color that is either lighter than the same or darker, this will make them stand out much more on the wall where you place them. Finally it is important to add shadows of depth on the edges to give to understand more its reality and highlight the illuminations in the case that there are on it.
Ya sabiendo cómo se estructura un ladrillo y la forma en que yo lo pinto. Podemos empezar a colocarlos de diferentes formas en nuestro proyecto.
Recuerden que los ladrillos casi nunca se juntan mucho entre sí, así que tratemos de no juntarlos tanto. Otra cosa muy importante, es que los ladrillos siempre su lugar base será de un color o más claro que el mismo o más oscuro, esto hará que resalte mucho más sobre la pared en la que los coloques. Por último es importante agregar sombras de profundidad en los bordes para dar a entender más su realidad y destacar las iluminaciones en el caso de que haya sobre el.
Now, how to make wood? Logs?
It also requires study and observation. The process is very similar to the previous one, but this time the strength in which we apply the technique will be our best ally.
Ahora. ¿Como realizar madera? ¿Troncos?
También requiere de estudio y observación. El proceso es muy parecido al anterior, pero en esta ocasión la fuerza en la que aplicamos la técnica será nuestro mejor aliado.
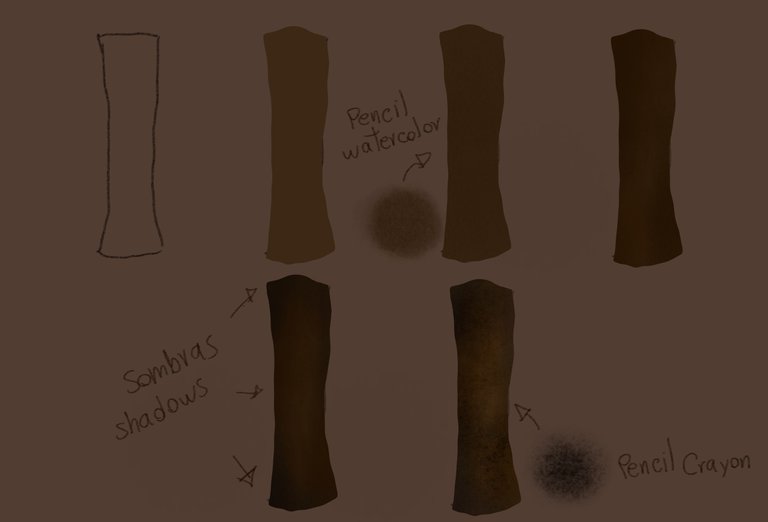
To begin with, the first thing I will do is the shapes of the logs or wood sheets, this varies depending on the occasion and drawing.
When making the sketch I will quickly apply the base color and I will be implementing the Watercolor Brush. I will apply a small layer on top of the base color.
Then we will be applying in a downward direction small shadows of a darker tone than the previous one, also using the same brush.
Finally the final details will be done with the Crayon Brush of a dark tone combined with a different but similar color. This will give the appearance of dirt on it. This will also be applied with small touches but in different areas of the trunk or sheet of wood.
Para comenzar lo primero que haré son las formas de los troncos o las láminas de madera, esto varía dependiendo de la ocasión y dibujo.
Al realizar el boceto aplicaré rápidamente el color base y estaré implementando el Pincel de Acuarela. Aplicaré una pequeña capa por encima del color base.
Luego estaremos aplicando en dirección hacia abajo pequeñas sombras de un tono más oscuro que el anterior, utilizando también el mismo pincel.
Por último los detalles finales los estaré realizando con el Pincel Crayon de un tono oscuro combinado con un color diferente pero similar. Esto dará la apariencia de suciedad en ella. Esta también la aplicaré con pequeños retoques pero en diferentes áreas del tronco o lámina de madera.
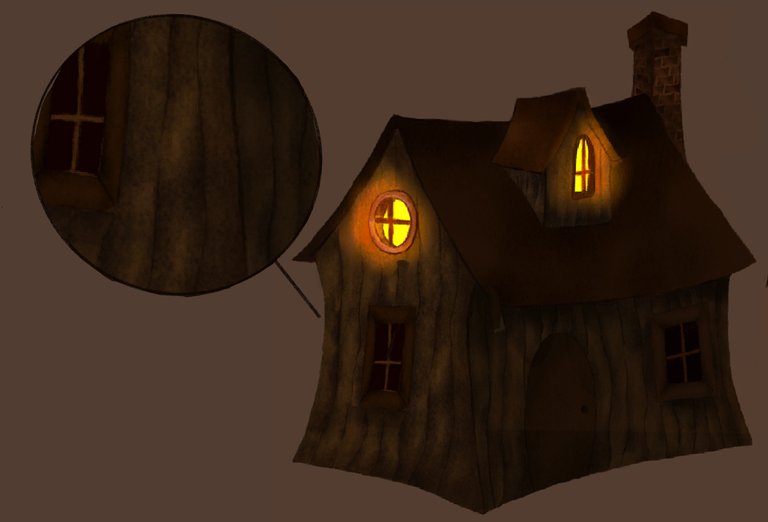
Knowing all these techniques I will be applying it in all my drawing.
Sabiendo todas estas técnicas lo estaré aplicando en todo mi dibujo.
And that's it folks! This would be all on this occasion, I hope to bring you more tutorials like this. Let me know what you think. If you have any questions, don't hesitate to leave them in the comment section. Thanks for watching! It'sn Best regards and have a happy start of the week.
Y listo amigos! Esto sería todo en esta ocasión, espero poder traerles más tutoriales así. Quisiera saber qué tal les pareció. Si tienen alguna pregunta no duden en dejármelas en la sesión de comentarios. Gracias por ver! Espero les haya gustado mucho. Un abrazo y que tengan un feliz inicio de semana.
Thanks for visiting me. 🍎
Gracias por visitarme. 🍎
Todas ilustraciones y gifs de este post han sido creadas por mí a través Procreate
Genial mi niña @sannae.art. Me encanta tu meticulosidad para lograr la perfección de los detalles que crean el efecto de las texturas en las paredes de tus casas 💜✨ Estoy fascinada y creo que a Alan le interesa ver esta publicación, porque él, ya antes te ha preguntado sobre los detalles en tus ilustraciones.
Saludos y mi abrazo virtual ♥
Hola! @parauri, me alegra saber que ta ha gustado la ilustración y el pequeño tutorial que he ensañado. Los detalles para mi se han vuelto algo realmente esencial en mis ilustraciones y más cuando tengo que transmitir texturas que podemos observar el la realidad. Me gusta que el poder utilizar pinceles que se asemejen mucho a la textura real... pinceles que podemos utilizar tanto en arte digital como en tradicional. Muy pronto espero volver a compartir arte tradicional por acá.
Esperare a Alan por acá💕
Un abrazo✨🌸
Eso de los pinceles en arte digital me encantan porque es como sentir el arte tradicional. Alan va a venir, ha estado algo ocupado con algunas tareas escolares en casa.
Otro abracito de vuelta 💐
OMG! Qué lindas casitas y las texturas están hermosísimas. Nunca he hecho dibujos sobre casas o paisajes en general, siento que no soy bueno, pero todo es experimentar! Feliz día! ♥
Congratulations @sannae.art! You have completed the following achievement on the Hive blockchain and have been rewarded with new badge(s):
Your next target is to reach 2000 upvotes.
You can view your badges on your board and compare yourself to others in the Ranking
If you no longer want to receive notifications, reply to this comment with the word
STOPCheck out the last post from @hivebuzz: