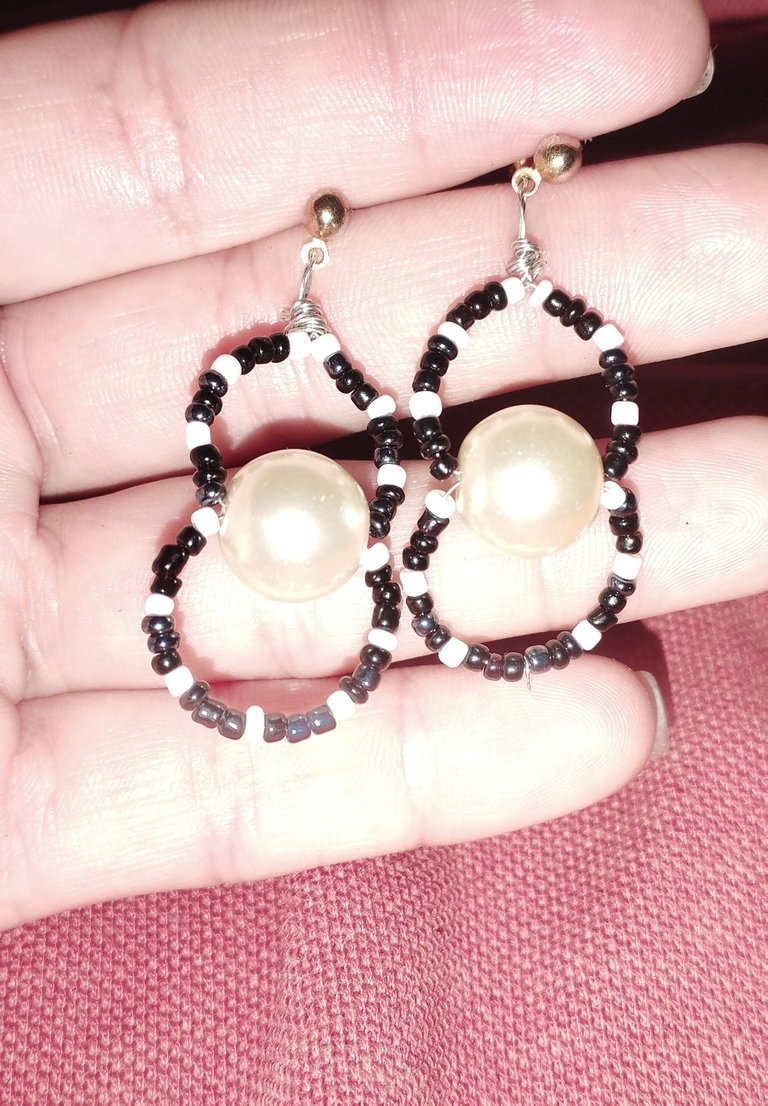
Hermosos y fácil zarcillos de mostacillas y perla en Alambrismo. / Beautiful and easy to make beads and pearl tendrils in Alambrismo..
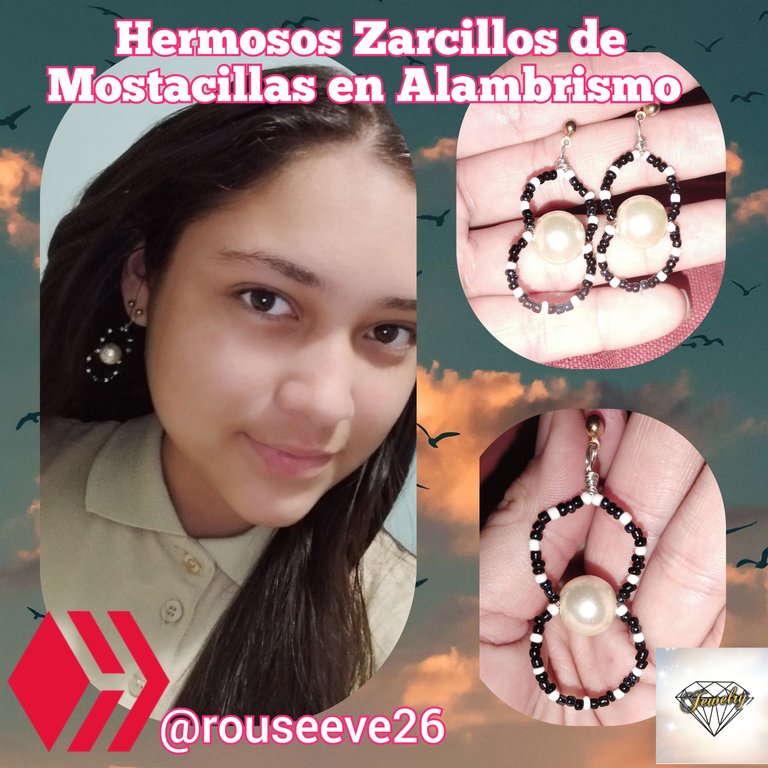
Saludos mis queridos amigos de @jewelry y compañeros de esta hermosa plataforma @hive, me alegra poder seguir compartiendo con ustedes mi trabajo en esta materia de las joyas. Hoy les traigo unos zarcillos lindo y muy fáciles de elaborar en mostacillas negras blancas creados con
Alambrismo y una perla en medio para resaltar la belleza del zarcillo,no se llevó muchos materiales y tampoco mucho tiempo, claro cuando no se tiene mucha experiencia se hace algo difícil el trabajo con el tiempo, pero ya poco a poco cuando tenemos esa experiencia y esa confianza, le tenemos agilidad es mucho más fácil..
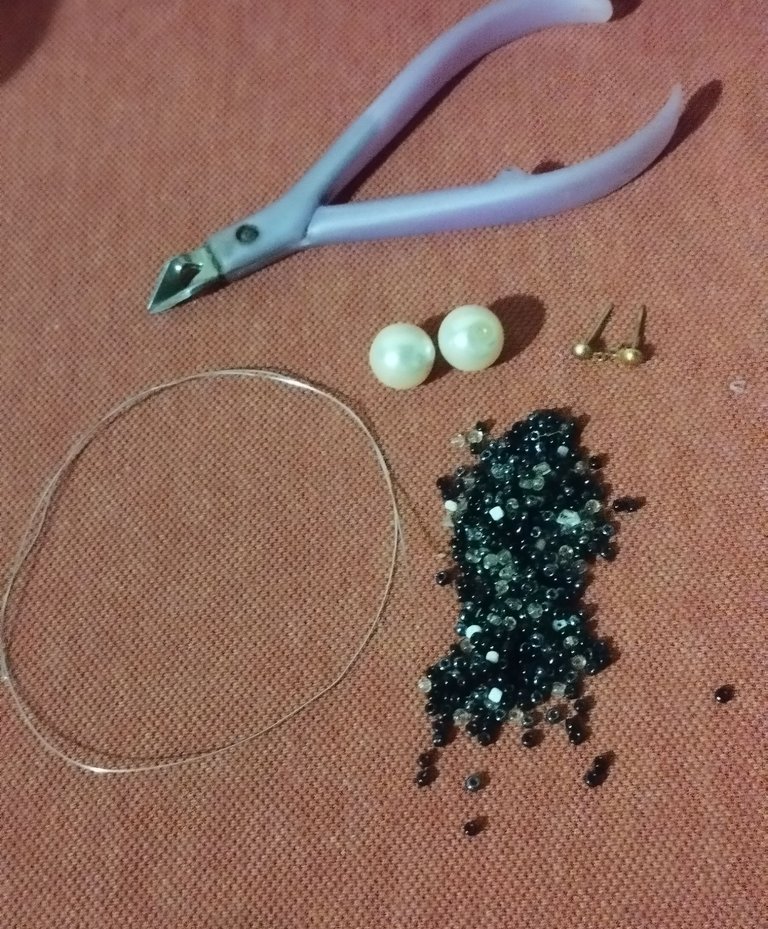
Para la elaboración de estos hermosos zarcillos, utilice los siguientes Materiales.
Materiales:
- Mostacillas negras y blancas.
- Alambre 28 plateado.
- Pin de zarcillos.
- 2 Perlas grandes.
- Pinza.
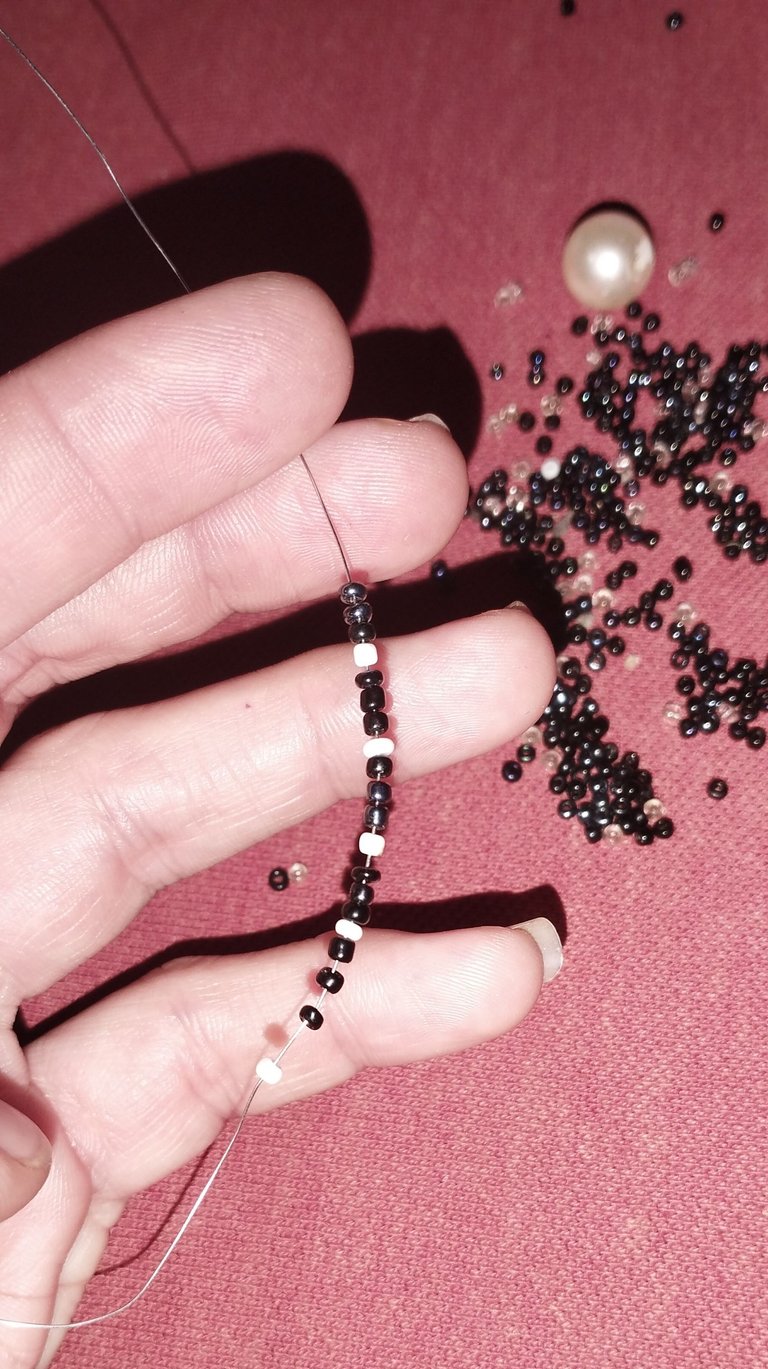
Paso a Paso:
Primer paso:
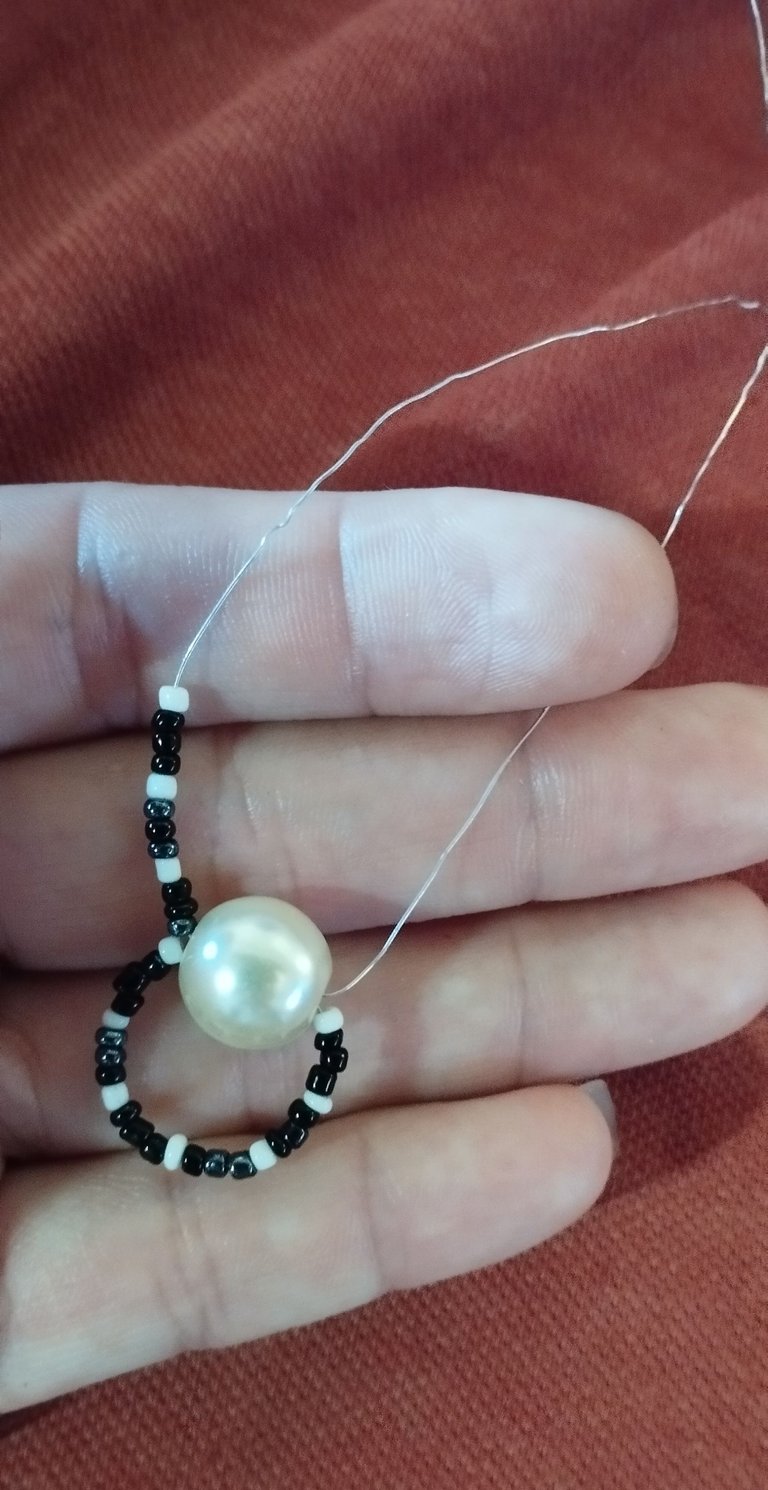
Cortaremos 30 centímetros de alambre número 28, también se puede elaborar con número 26 ya que son muy flexibles y muy manejables, ahora vamos a ir colocando las mostacillas.. yo coloque 3 mostacillas negras 1 blanca y luego 3 negras nuevamente y otra blanca hasta formar 3 juegos de las mostacillas en esa secuencia, yo utilice este número de mostacillas para que no fuera tan Grandes pero si ustedes los prefieren más grandes solo introducen más mostacillas es decir en vez de ser 3 juegos de mostacillas por cada lado le puede colocar dos juegos más, solo le recuerdo que esto los hace ver más grandes osea el círculo más pronunciado y quizás no se vea tan delicado pero igual se verán Hermosos.
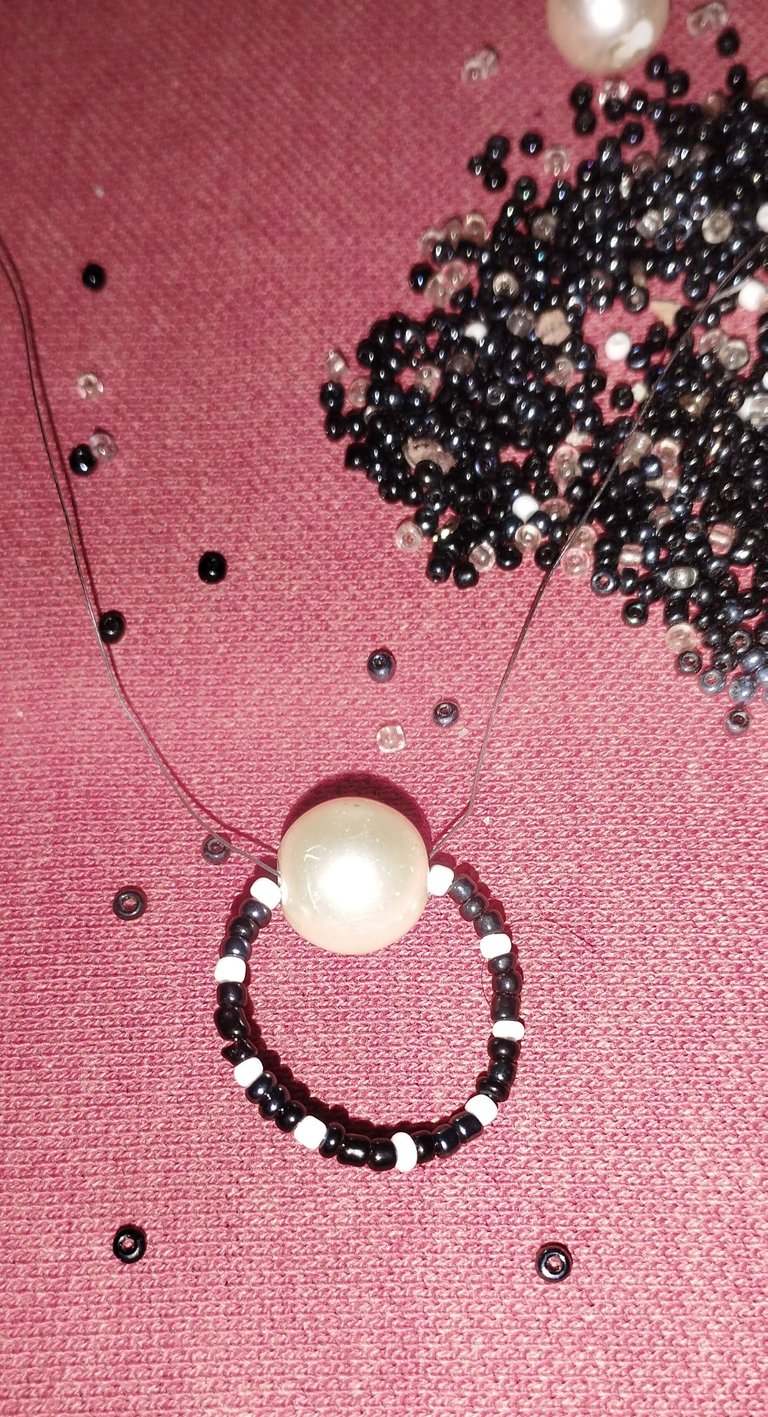
Segundo Paso:
Ahora vamos a colocar la perla en y Luego introducimos las dos puntas de los alambres para asegurar la perla y hacer un invertido que pareciera que hiciéramos el número ocho (8) es una forma de diseño al zarcillo una vez terminado vamos a realizar la misma secuencia de 3 mostacillas negras y 1 blanca por tres veces hasta lograr los dos lados.
Tercer Paso:
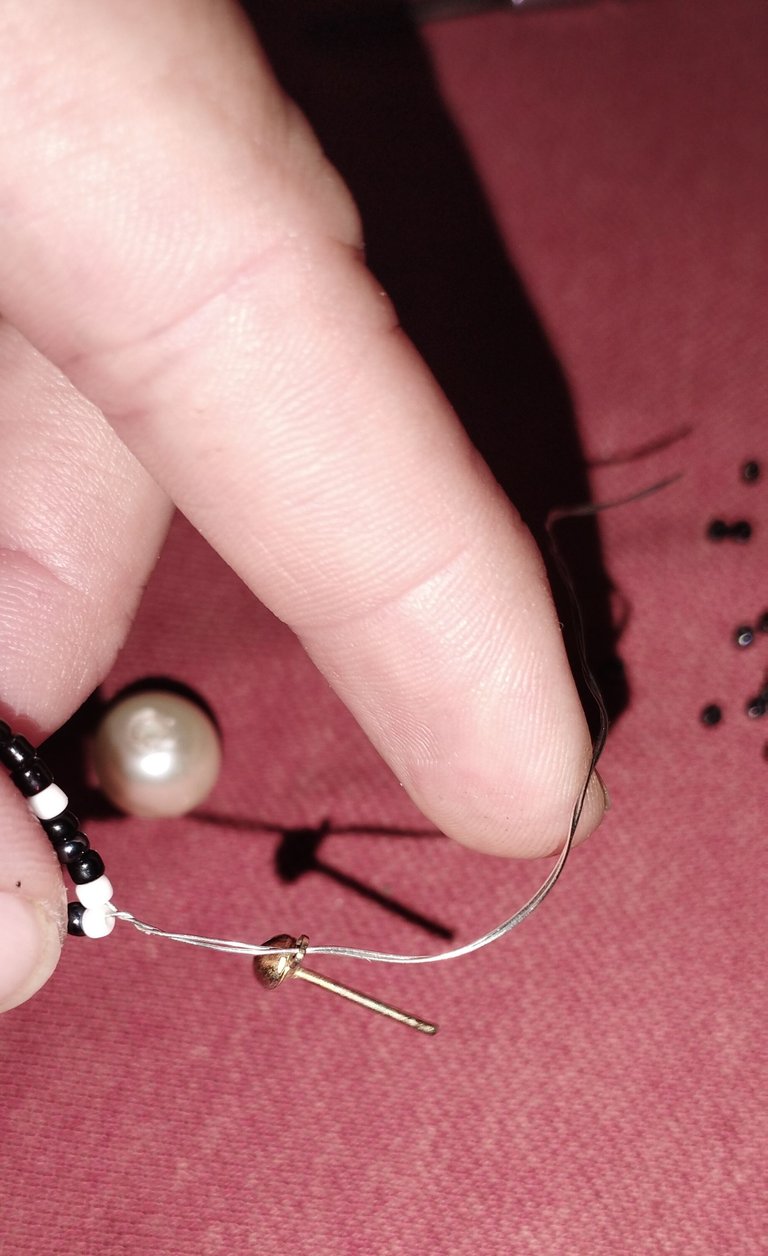
En este punto que ya tenemos todo Unido y las mostacillas unidas vamos a realizar un tejido entre las dos puntas para que sea fuerte y este se introduzcan en el pin y le damos varias vueltas alrededor para que no se vea el Alambre y quede un delicado doblaje y así lo ajustamos directamente al pin y no tendríamos que colocar una argolla extra al zarcillo porque se vería muy largo y preferí colocarlo de esta manera para ahorrar tiempo y materiales que se pueden utilizar en otra creación y no quede tan largo Y así de fácil logramos tener unos hermosos zarcillos de mostacillas en simples pasos.

Espero les guste mi elaboración del día de hoy, sobre todo tengan muchas bendiciones al lado de sus seres queridos, cada día pongo más empeño en aprender y gracias a ustedes hivers por los comentarios de buena vibra, de sus consejos que logran ayudarme a seguir creciendo.

Muchas gracias por el apoyo y les mando besos y abrazos.
¡Saludos!
Las imagenes me pertenecen, fueron tomadas de mi teléfono Redmi 10.
fotos Editadas por Polish.
traductor: Deepl Traslator.
Greetings my dear friends of @jewelry and fellow members of this beautiful platform @hive, I am happy to continue to share with you my work in this matter of jewelry. Today I bring you some cute and very easy to make tendrils in black and white beads created with
Wire wrap and a pearl in the middle to highlight the beauty of the tendril, it did not take many materials and not much time, of course when you do not have much experience it becomes difficult to work with time, but little by little when we have that experience and that confidence, we have agility is much easier....
To make these beautiful tendrils, use the following materials.
Materials:
- Black and white beads.
- Silver-plated wire 28.
- Pin of tendrils.
- 2 large pearls.
- Tweezers.
Step by Step:
First Step:
We will cut 30 centimeters of wire number 28, it can also be made with number 26 because they are very flexible and very manageable, now we will be placing the beads. I placed 3 black beads 1 white and then 3 black again and another white to form 3 sets of beads in that sequence, I used this number of beads so it was not so big but if you prefer them bigger just introduce more beads that is instead of being 3 sets of beads on each side you can place two more sets, just remember that this makes them look bigger osea the circle more pronounced and may not look so delicate but still will look beautiful.
Second Step:
Now we are going to place the pearl in and then we introduce the two ends of the wires to secure the pearl and make an inverted that seems that we made the number eight (8) is a form of design to the tendril once finished we are going to make the same sequence of 3 black beads and 1 white bead for three times until achieving the two sides.
Third Step:
At this point we already have everything together and the beads attached we are going to make a weave between the two ends so that it is strong and this is introduced into the pin and we give several turns around so that the wire is not seen and it is a delicate folding and so we adjust it directly to the pin and we would not have to place an extra ring to the tendril because it would look very long and I preferred to place it this way to save time and materials that can be used in another creation. We would not have to place an extra ring to the tendril because it would look too long and I preferred to place it this way to save time and materials that can be used in another creation and not be so long and so easy to get some beautiful tendrils of beads in simple steps.
I hope you like my elaboration of today, especially have many blessings with your loved ones, every day I put more effort to learn and thanks to you hivers for the comments of good vibes, your advice that manage to help me continue to grow.
Thank you very much for your support and I send you hugs and kisses.
Greetings!
The images belong to me, they were taken from my Redmi 10 phone.
photos edited by Polish.
translator: Deepl Traslator.
Congratulations @rouseeve26! You have completed the following achievement on the Hive blockchain And have been rewarded with New badge(s)
Your next target is to reach 200 replies.
You can view your badges on your board and compare yourself to others in the Ranking
If you no longer want to receive notifications, reply to this comment with the word
STOPThank You ❤️
Awesome work @rouseeve26! You're well on your way to reaching your Hive goals. Keep buzzing!
Quedaron muy lindos.. éxitos y bendiciones para ti también.
Gracias amiga , amén !
Muy lindo te quedaron. Bendiciones!
Gracias amigoo. Saludos
Te quedaron muy lindos. Saludos bella
Gracias que bueno que te gustó
El toque de la perla le quedó muy bien. Saludos
Gracias amiga
It is so beautiful and stylish. Love the design and its color combination that make it more attractive. Well done!
Thank you for your support, I loved them.❤️
Hacer nuestros propios accesorios hace que sean una más únicos, la forma que diste a los aretes me gusta, además los colores usados los hace ver sofisticados.
Muchísimas gracias amiga, me alegra que te gustaron 🤗💕
Hermosos zarcillos amiga éxitos