Brazalete neón para adolescentes/Neon bracelet for teens 🌟💗


Los accesorios para adolescentes suelen ser un poco diferentes a los que utilizamos los adultos, sobre todo en lo que se refiere al color y a los materiales, ya que suelen utilizarse colores vibrantes, y en cuanto a los materiales, generalmente llevan cuentas plásticas, dijes, colgantes, pompones, etc. Y en su mayoría, son elaborados con hilo chino, como base, y yo, con un adolescente en casa, que aunque no es fan de los accesorios, cuando ve que estoy haciendo algunas piezas para mí, ella también quiere, así que he elaborado algunas cositas para ella.
Accessories for teenagers tend to be a little different from those we adults use, especially in terms of color and materials, as vibrant colors are often used, and in terms of materials, they usually feature plastic beads, charms, pendants, pompoms, etc. Most of them are made with Chinese thread as a base, and I have a teenager at home who, although she is not a fan of accessories, when she sees me making some pieces for myself, she wants some too, so I have made a few things for her.

En mi caso confieso que no sé trabajar con el hilo chino, pero me encantaría aprender, así que de momento las piezas que le he realizado a @elmundodemiri son del estilo en que he hecho los míos, pero adaptándolos a su edad. Por ejemplo, hoy les comparto la elaboración de un brazalete que ocupa cuentas en diferentes colores en tonos neón y algunos dijes y balines dorados, y la verdad siento que todo el conjunto quedó muy lindo, ya que no solo es bastante llamativo y juvenil, sino que también se ve muy delicado por el uso del dorado, y sin más vamos con los materiales y el paso a paso.
In my case, I confess that I don't know how to work with Chinese thread, but I would love to learn, so for now, the pieces I have made for @elmundodemiri are in the same style as my own, but adapted to her age. For example, today I'm sharing with you how to make a bracelet using different colors of neon beads and some gold charms and beads, and I really think the whole thing turned out very pretty, as it's not only quite striking and youthful, but also looks very delicate thanks to the use of gold. Without further ado, let's get started with the materials and step-by-step instructions.
Materiales
Cuentas en tonos neón
Balines medianos
Balines pequeños
Cadena de eslabones pequeños
Alfileres de ojo
Cerrador
Argollas medianas
Argollas pequeñas
Dijes variados
Tenaza
Pinza de punta plana
Pinza de punta redonda
Materials
Neon-colored beads
Medium-sized beads
Small beads
Small link chain
Eye pins
Clasp
Medium-sized rings
Small rings
Assorted charms
Pliers
Flat-nose pliers
Round-nose pliers
Paso a paso/Step by step
Para esta pulsera vamos a necesitar varias piezas diferentes, en principio, cuatro que vamos a utilizar para la pulsera o brazalete y otra que será tipo accesorio decorativo como un colgante, así que vamos con la primera pieza que será la pieza central de nuestro brazalete.
Para ésta vamos a trabajar con dos cuentas en su color favorito que es el lila, 4 balines dorados de tamaño mediano, un pompón fucsia y un alfiler de ojo, y lo que haremos es pasar por el alfiler de ojo las siguientes piezas: un balin, una cuenta lila, un balin, el pompón, un balin, una cuenta lila y finalmente un balin.
Seguidamente procedemos a cerrar nuestra pieza y como necesitamos conectarlas entre sí, creamos nuestro ojito del otro extremo con ayuda de la pinza redonda. Solo tomamos el extremo del alfiler de ojo con la pinza y lo doblamos hacia adentro creando un ojito o argolla, y de esta forma tenemos lista nuestra pieza central.
For this bracelet, we will need several different pieces. Initially, we will use four pieces for the bracelet or cuff and another piece that will serve as a decorative accessory, such as a pendant. So, let's start with the first piece, which will be the centerpiece of our cuff.
For this, we will work with two beads in your favorite color, which is lilac, four medium-sized gold beads, a fuchsia pompom, and an eye pin. What we will do is thread the following pieces onto the eye pin: a bead, a lilac bead, a bead, the pompom, a bead, a lilac bead, and finally a bead.
Next, we close our piece and, since we need to connect them together, we create our eyelet at the other end with the help of the round pliers. We simply take the end of the eyelet pin with the pliers and bend it inward, creating an eyelet or ring, and thus our center piece is ready.


Seguidamente creamos la segunda pieza de nuestro brazalete, de la que haremos solo dos, y ésta está formada por un balin mediano y un alfiler de ojo, y lo que haremos es pasar el balin por el alfiler, cortar el excedente del mismo y cerrar de la misma forma en que lo hicimos con la pieza anterior.
Next, we create the second piece of our bracelet, of which we will make only two. This piece consists of a medium-sized bead and an eye pin. We will thread the bead onto the pin, cut off the excess, and close it in the same way we did with the previous piece.

De la siguiente pieza vamos a crear dos de cada color, y usaremos tres colores diferentes que son fucsia, amarillo y azul, también en tonos neón, y para su armado estaremos usando dos balines pequeños, un alfiler de ojo y una cuenta, y el procedimiento para elaborar esta pieza es el siguiente: tomamos el alfiler de ojo pasamos un balín seguido de una cuenta del color correspondiente, finalmente otro balín, cortamos el excedente del alfiler y cerramos como ya les enseñé, dejando un ojito, ya que como les dije vamos a estar conectando piezas entre sí, y de esta forma hacemos con todos los colores que vamos a utilizar para el brazalete.
We are going to make two of each color from the following piece, and we will use three different colors: fuchsia, yellow, and blue, also in neon tones. To assemble them, we will use two small beads, an eye pin, and a bead. The procedure for making this piece is as follows: We take the eye pin, thread a bead followed by a bead of the corresponding color, and finally another bead. We cut off the excess pin and close it as I showed you, leaving a small eye, since, as I said, we are going to be connecting pieces together. We do this with all the colors we are going to use for the bracelet.


La siguiente pieza que crearemos será el colgante decorativo de nuestra pulsera, y para ello vamos a necesitar una orgolla mediana, un dije de un pequeño cactus, un pompon multicolor, una pieza de cadena fina y una argolla pequeña.
Lo que haremos será unir la argolla pequeña a la pieza de cadena, seguidamente abrimos la argolla mediana e incorporaramos estos 3 accesorios y finalmente cerramos agolla.
El siguiente paso es cortar dos piezas de cadena de 2 cm cada una, las que irán a los extremos del brazalete.
The next piece we will create is the decorative pendant for our bracelet, and for this we will need a medium-sized ring, a small cactus charm, a multicolored pompom, a piece of thin chain, and a small ring.
What we will do is attach the small ring to the piece of chain, then open the medium-sized ring and add these three accessories, and finally close the ring.
The next step is to cut two pieces of chain, each 2 cm long, which will go at the ends of the bracelet.


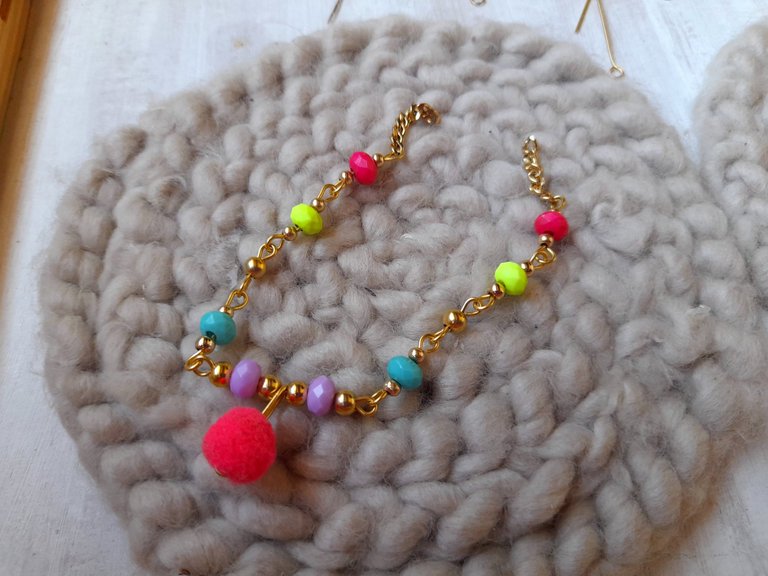
En este punto ya tenemos listas todas las piezas que conforman nuestra pulsera, por lo que ahora corresponde unir las piezas, y comenzaremos por la pieza central que es la que tiene nuestro pompón fucsia, y a los extremos vamos a colocar las piezas con cuentas azules, seguidamente las piezas que tienen un solo balín, y de aquí en adelante colocamos las piezas restantes.
Yo coloqué la amarilla, seguida de la fucsia y de esta forma terminé el armado del brazalete como tal.
El siguiente paso es conectar en los dos extremos del brazalete las dos piezas de cadenas que cortamos, por lo que con la pinza redonda abriremos la argollita o el "ojo" de nuestra última pieza y haremos pasar la cadena y luego cerramos.
At this point, we have all the pieces that make up our bracelet ready, so now we need to join the pieces together. We will start with the center piece, which has our fuchsia pompom, and at the ends we will place the pieces with blue beads, followed by the pieces that have a single bead, and from here on we will place the remaining pieces.
I placed the yellow one, followed by the fuchsia one, and in this way I finished assembling the bracelet itself.
The next step is to connect the two pieces of chain we cut to both ends of the bracelet. Using the round-nose pliers, open the small ring or "eye" of our last piece, thread the chain through, and then close it.
En este punto ya solo nos falta agregar las piezas para cerrar, y cómo saben son la argolla y el cerrador, y en este caso, además debemos agregar el colgante, y lo que haremos es colocar en uno de los extremos de la pulsera el gancho para cerrar, y para esto ya saben que debemos abrir un poquito el ojito que trae y lo conectamos a la cadena, y en el otro extremo, vamos a colocar una argolla pequeña y por ella vamos a hacer pasar la cadena además de nuestro colgante.
Una vez tengamos las dos piezas dentro cerramos la argolla y tenemos listo nuestro brazalete.
At this point, we just need to add the pieces to close it, which, as you know, are the ring and the clasp. In this case, we also need to add the pendant. What we will do is place the hook to close it on one end of the bracelet. To do this, as you know, we need to open the small eye a little and connect it to the chain. At the other end, we will place a small ring and pass the chain and our pendant through it.
Once we have both pieces inside, we close the ring and our bracelet is ready.


Como pueden ver es una pulsera súper linda, muy colorida, delicada y súper chic, además a mi parecer es muy sencilla de hacer a pesar de llevar muchas piezas, por lo que creo que vale la pena intentarlo en casita, ya sea para nuestras niñas o sus amiguitas.
As you can see, it's a super cute bracelet, very colorful, delicate, and super chic. In my opinion, it's also very easy to make despite having many pieces, so I think it's worth trying at home, whether for our girls or their friends.
Lindísimo..
Yo lo usaría muy diva 😂
Beautiful brazalete dearest lady, you did a fantastic job!!
Thanks for sharing.
selected by @ibbtammy