[ESP/ENG] Reparé las bases de las bisagras de una laptop / I repaired the hinge bases of a laptop
Hoy les contaré como reparé las bases de las bisagras a una laptop que me trajo una profesora de la universidad donde estudié. Ella me comentaba que tenía problemas para abrir y cerrar la laptop, entonces le dije que podía traerla a mi casa para revisarla y decirle si podría repararla. Una vez que me di cuenta que el problema era que las bisagras rompieron las bases donde estas estaban fijadas, debido a un exceso de fuerza cada vez que abría la laptop, le dije que si podría realizar la reparación.
Entonces, manos a la obra apreciados Hivers...
A big greeting to all the HIVE community, welcome to my blog!
Today I will tell you how I repaired the hinge bases on a laptop brought to me by a professor from the university where I studied. She told me that she was having problems opening and closing the laptop, so I told her that she could bring it to my house to check it and tell her if I could repair it. Once I realized that the problem was that the hinges broke the bases where they were fixed, due to an excess of force every time I opened the laptop, I told her that I could make the repair.
So, let's get to work dear Hivers....


Comenzaré nombrando y mostrando alguna de las herramientas que utilicé para realizar esta reparación, la verdad es que no son herramientas muy especializadas ni nada del otro mundo, simplemente utilicé dos brochas, un destornillador de estrella pequeño, un pequeño cuchillo para poder crear superficie de adherencia al momento de pegar las bases de los tornillos que fijan las bisagras, pegamento instantáneo, un trozo de papel doblado en forma de "V", bicarbonato de sodio y una pinza.
I will begin by naming and showing some of the tools I used to make this repair, the truth is that they are not very specialized tools or anything else, I simply used two paintbrushes, a small Phillips screwdriver, a small knife to create an adherence surface when gluing the bases of the screws that fix the hinges, instant glue, a piece of paper folded in a "V" shape, baking soda and a tweezers.
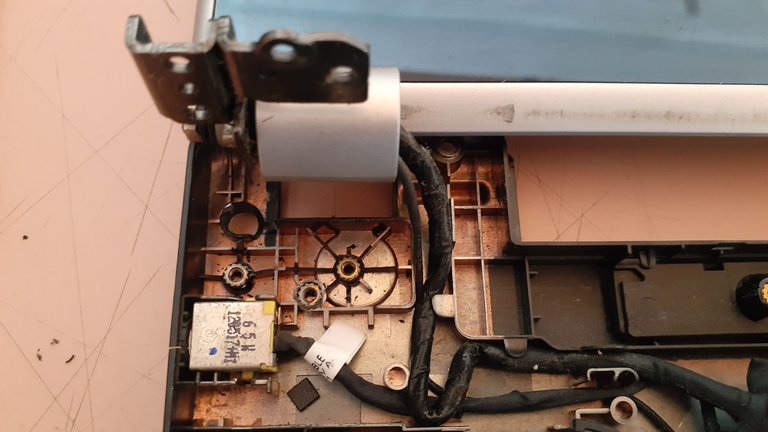
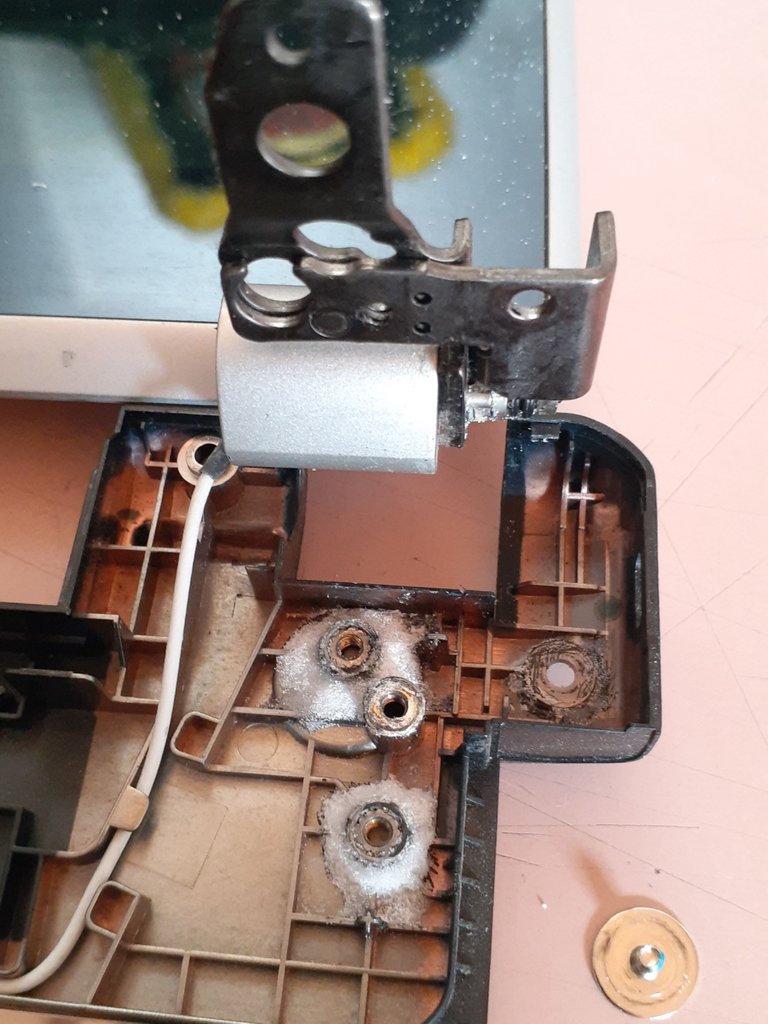
Luego de haber destapado la laptop, evaluar el daño y de separar las piezas que estaban rotas, procedí a limpiar la zona con la ayuda de las brochas. Como ambos lados estaban afectados, tanto las bases de las bisagras del lado izquierdo como las del lado derecho también, realicé el mismo procedimiento en el lado derecho como pueden observar.
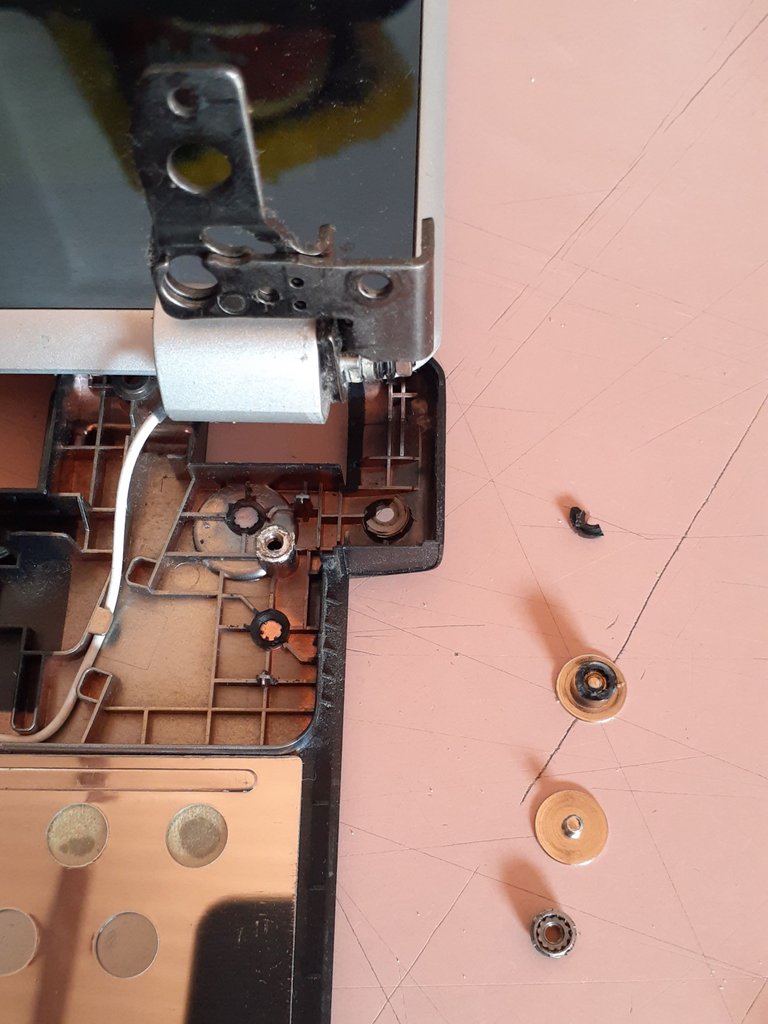
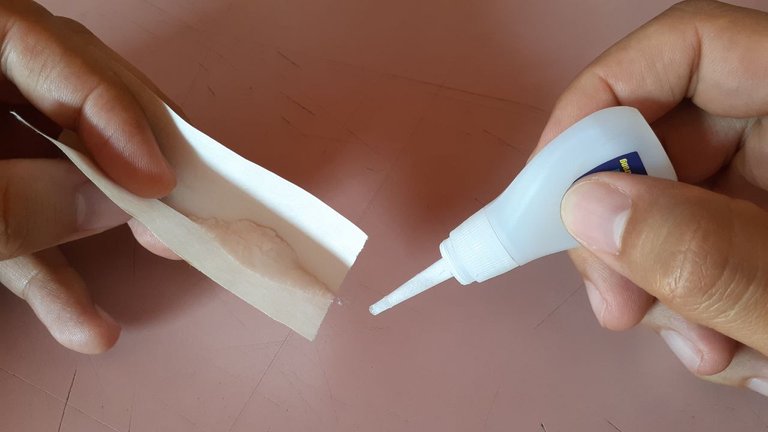
Una vez que hemos realizado la inspección visual adecuada para saber como haría la reparación, tomamos el bicarbonato lo colocamos dentro del papel en forma de "V" y tomamos también el pegamento instantáneo. La forma correcta de realizar este procedimiento es el siguiente, luego de haber creado alrededor de la zona en la que vamos a pegar las piezas una superficie de adherencia idónea para que el pegamento se fije mejor, lo cual se hace con la ayuda de un cuchillo raspando un poco alrededor de la zona, procederemos a aplicar un poco de pegamento instantáneo y seguidamente con la ayuda de la pinza colocaremos la pieza a pegar en el lugar correspondiente, en este caso las bases donde van atornilladas las bisagras. Una vez que la pieza está fija y el pegamento se ha secado, para reforzar la zona procederemos a aplicar un poco más de pegamento instantáneo alrededor de la pieza a pegar y seguidamente esparciremos con mucho cuidado una cantidad generosa de bicarbonato de sodio.
Ustedes se preguntarán por qué esta combinación de el pegamento instantáneo con el bicarbonato de sodio, resulta que estos dos productos, cuando entran en contacto se forma una reacción química la cual acelera el proceso de secado y al mismo tiempo le da mayor dureza al pegamento y finalmente termina reforzando muy bien la zona o la pieza que estamos pegando.
Once we have done the proper visual inspection to know how the repair would do, we take the baking soda we place it inside the paper in a "V" shape and we also take the instant glue. The correct way to perform this procedure is as follows, after having created around the area where we are going to glue the pieces a suitable adhesion surface for the glue to fix better, which is done with the help of a knife scraping a little around the area, we will proceed to apply some instant glue and then with the help of the clamp we will place the piece to be glued in the corresponding place, in this case the bases where the hinges are screwed. Once the piece is fixed and the glue has dried, to reinforce the area we will proceed to apply a little more instant glue around the piece to be glued and then we will carefully spread a generous amount of baking soda.
You may wonder why this combination of instant glue with baking soda, it turns out that these two products, when in contact, form a chemical reaction which accelerates the drying process and at the same time gives greater hardness to the glue and finally ends up reinforcing very well the area or the piece that we are gluing.
Y así es como se ve luego de realizar el procedimiento que les comenté arriba, la verdad no hay que esperar mucho tiempo para que esto seque, ya que al aplicar el bicarbonato de sodio sobre el pegamento instantáneo, este se endurece casi automáticamente, por seguridad esperamos un poco más y luego ya estaría listo para volver a fijar las bisagras en esas bases y el último paso sería armar de nuevo la laptop, obteniendo así un resultado excelente.
And this is how it looks like after performing the procedure I mentioned above, the truth is that you do not have to wait long for this to dry, because when applying the baking soda on the instant glue, it hardens almost automatically, for safety we wait a little longer and then it would be ready to re-fix the hinges on those bases and the last step would be to reassemble the laptop, thus obtaining an excellent result.
Hasta la siguiente publicación!
Until the next post!
Todas las fotografías fueron tomadas con mi celular SAMSUNG Galaxy A20.
All photographs were taken with my SAMSUNG Galaxy A20 cell phone.
El separador de texto y las demás imágenes son de mi autoría.
The text separator and other images are of my authorship.

https://twitter.com/robertsreinold/status/1489345590836277254
The rewards earned on this comment will go directly to the person sharing the post on Twitter as long as they are registered with @poshtoken. Sign up at https://hiveposh.com.
Deberías ayudarme con las de mi laptop que están destrozadas xd
Buen trabajo 👍 eso te ahorras una ida al técnico
😆 Gracias, espero que te sirva de ayuda 🙌