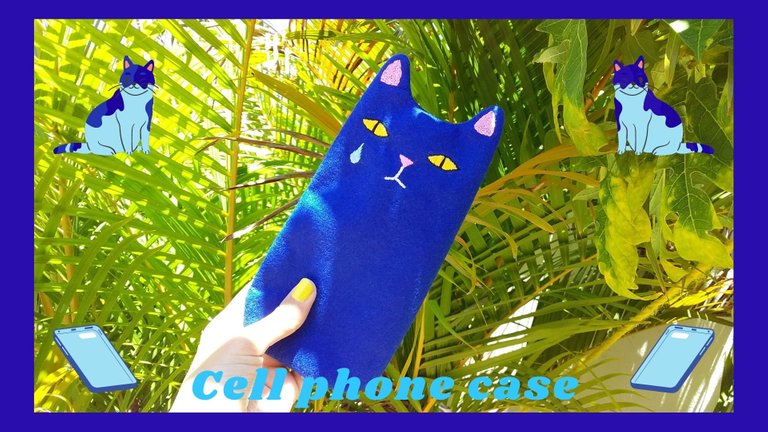
[ESP/ENG]💙🐱Haciendo una linda funda para celular | Making a nice cell phone case🐱💙
💙💙BIENVENIDOS A MI BLOG | WELCOME TO MY BLOG💙💙
¡Hola de nuevo, gente preciosa de hive! espero se encuentren muy bien. Estas últimas semanas he estado un poco ausente de la plataforma debido a varias situaciones que se me han presentado, pero aquí estoy de regreso con mucha más energía y ganas de seguir compartiendo con ustedes.
El día de hoy les mostraré cómo hacer una hermosa funda para celular en forma de gato.🐱💙 El mío lo hice de color azul y con una lagrimita por una canción de Roberto Carlos llamada: "El gato que está triste y azul" 😂, mi canción favorita en el mundo. Si quieres, puedes seguir este concepto o simplemente modificarlo más a tu gusto.💙 Está muy fácil de hacer, así que sin más, empezamos con el tutorial.
Hello again, beautiful people of hive! I hope you are doing well. These last weeks I've been a little absent from the platform due to various situations that have come up, but here I am back with much more energy and desire to continue sharing with you.
Today I will show you how to make a beautiful cell phone case in the shape of a cat.🐱💙 I made mine in blue color and with a little tear for a song by Roberto Carlos called: "El gato que está triste y azul" 😂, my favorite song in the world. If you want, you can follow this concept or just modify it more to your liking.💙 It's very easy to make, so without further ado, let's start with the tutorial.
Materiales | Materials:

| Fieltro | Tijeras | Hoja de papel |
|---|---|---|
| Lápiz | Aguja e hilos | Nuestro celular para las medidas |
| Felt | Scissors | Sheet of paper |
|---|---|---|
| Pencil | Needle and thread | Our cell phone for measurements |
Proceso | Process
Paso 1 | Step 1
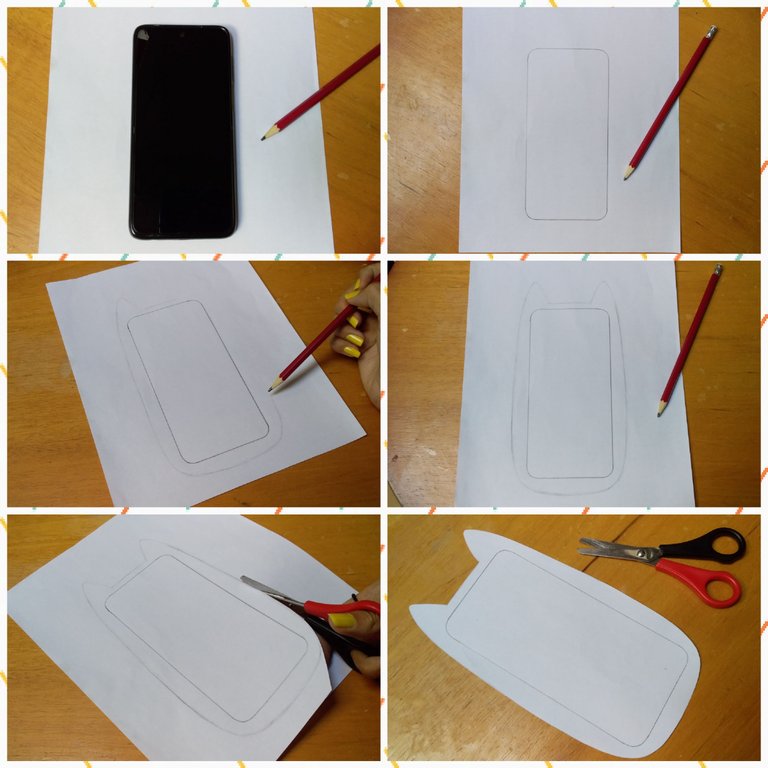
Lo primero que haremos será ubicar nuestro celular sobre la hoja de papel y marcaremos su contorno. Luego, al rededor, dibujaremos la figura del gato y por último cortaremos.
The first thing we will do is place our cell phone on the sheet of paper and mark its outline. Then, around it, we will draw the figure of the cat and finally we will cut it out.
Paso 2 | Step 2
Lo siguiente será ubicar el patrón sobre el fieltro y marcarlo 2 veces, luego cortaremos dejando un ligero margen de costura de aproximadamente 0,5cm.
The next step is to place the pattern on the felt and mark it twice, then cut it leaving a slight seam allowance of approximately 0.5cm.
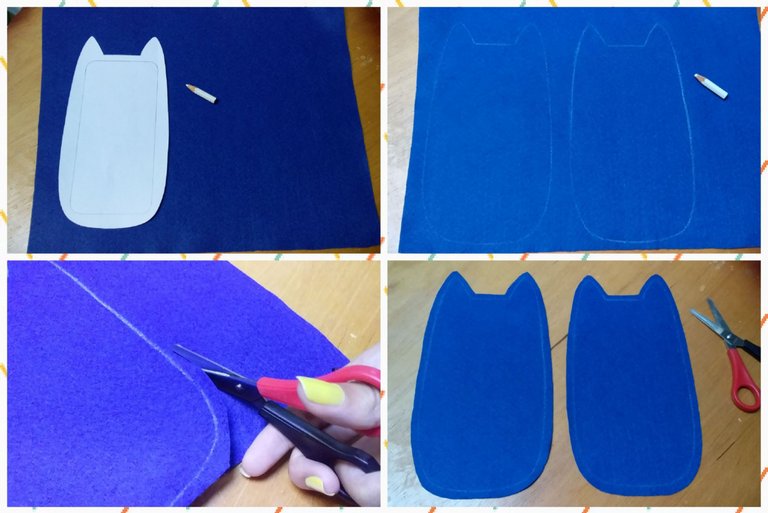
Paso 3 | Step 3

Tomaremos una de las piezas de fieltro y con un lápiz dibujaremos el rostro del gatito.
We will take one of the pieces of felt and with a pencil we will draw the face of the kitten.
Paso 4 | Step 4
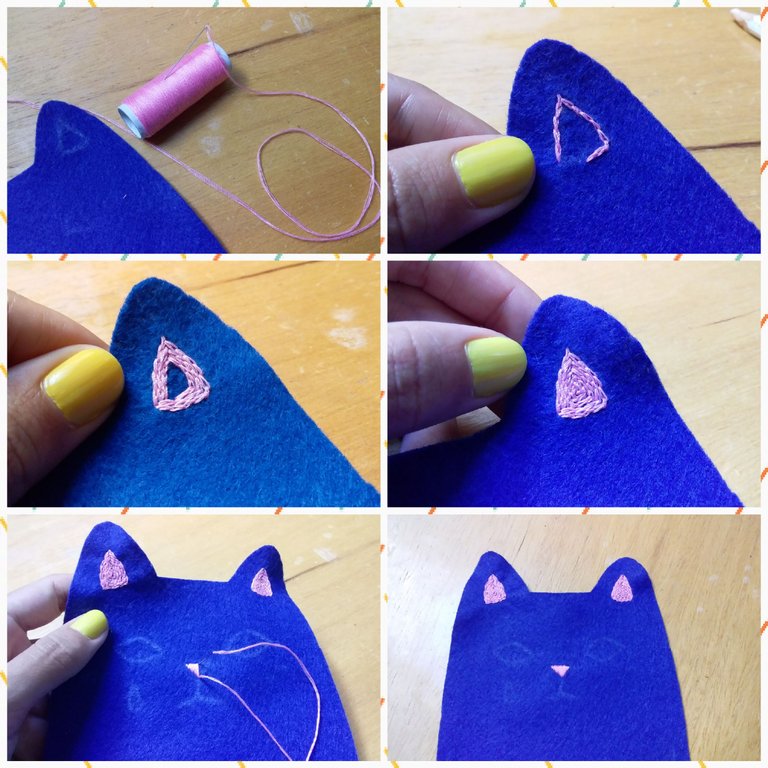
Ahora es momento de bordar. Empezaremos con hilo rosa para las orejas y nariz. En el caso de las orejas, recomiendo hacer una puntada Split en espiral, ya que de esta forma se verá más lindo y es mucho más fácil de manejar. Para la nariz si puedes usar una puntada normal de relleno.
Now it's time to embroider. We will start with pink thread for the ears and nose. For the ears, I recommend doing a Split Stitch spiral, as this way it will look cuter and is much easier to handle. For the nose if you can use a normal filling stitch.
Paso 5 | Step 5
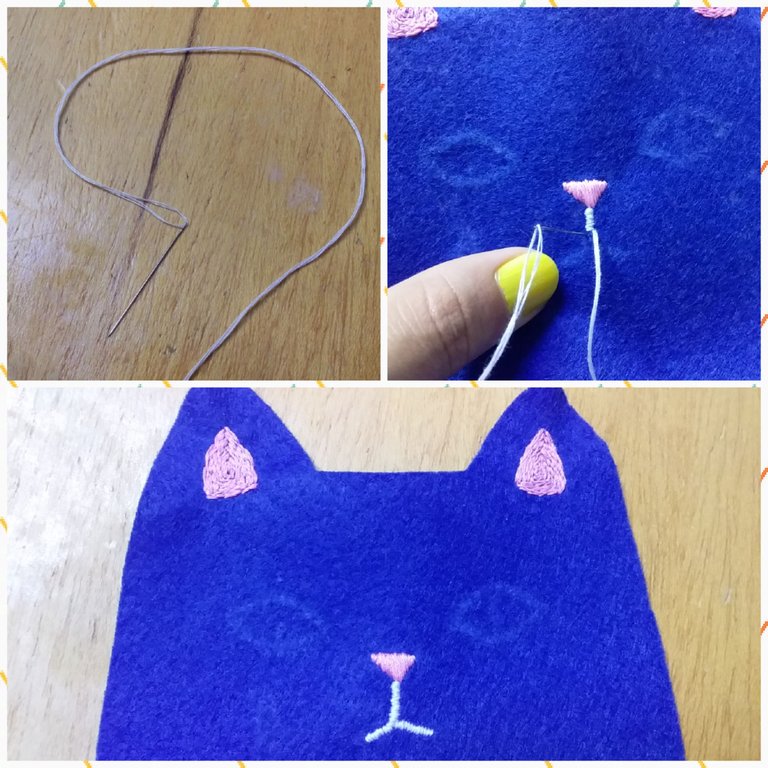
Continuaremos con el detalle de la boca en hilo blanco.
We will continue with the detail of the mouth in white thread.
Paso 6 | Step 6
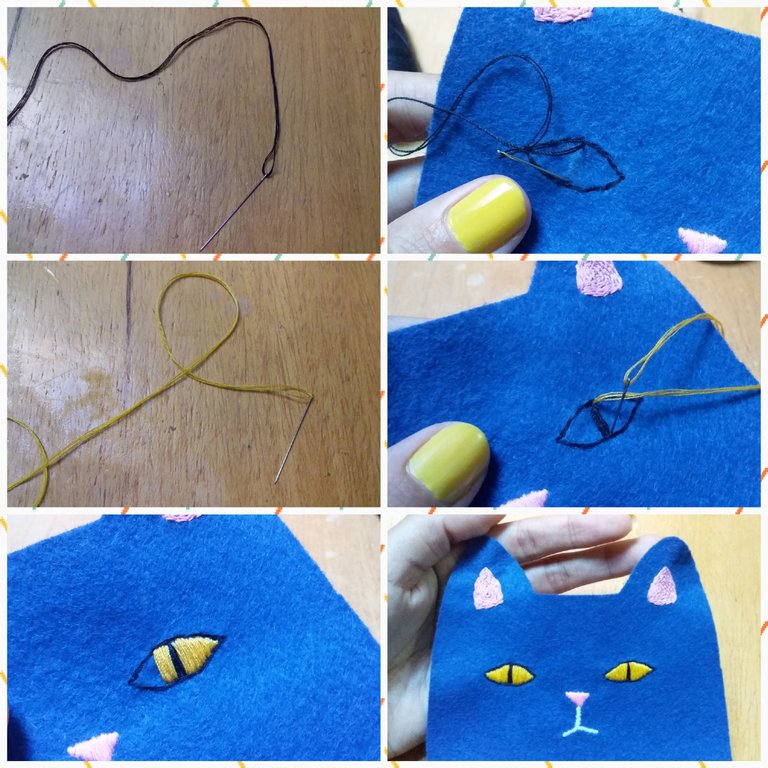
Con hilo negro bordaremos el contorno de los ojitos y los rellenaremos con hilo amarillo.
With black thread we will embroider the outline of the eyes and fill them with yellow thread.
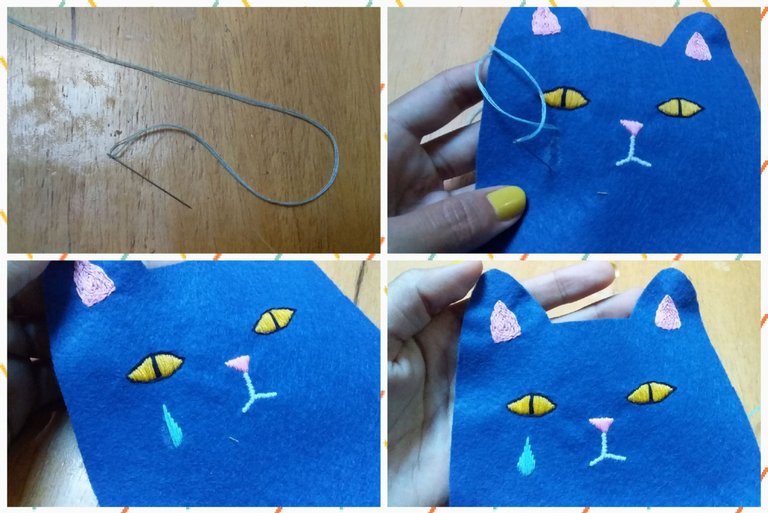
Este fue mas que todo un toque personal y como lo dije al principio, fue inspirado en una canción 😂 puedes bordarle una lagrimita si gustas.
This was mostly a personal touch and as I said at the beginning, it was inspired by a song 😂 you can embroider a tear if you like.
Paso 7 | Step 7
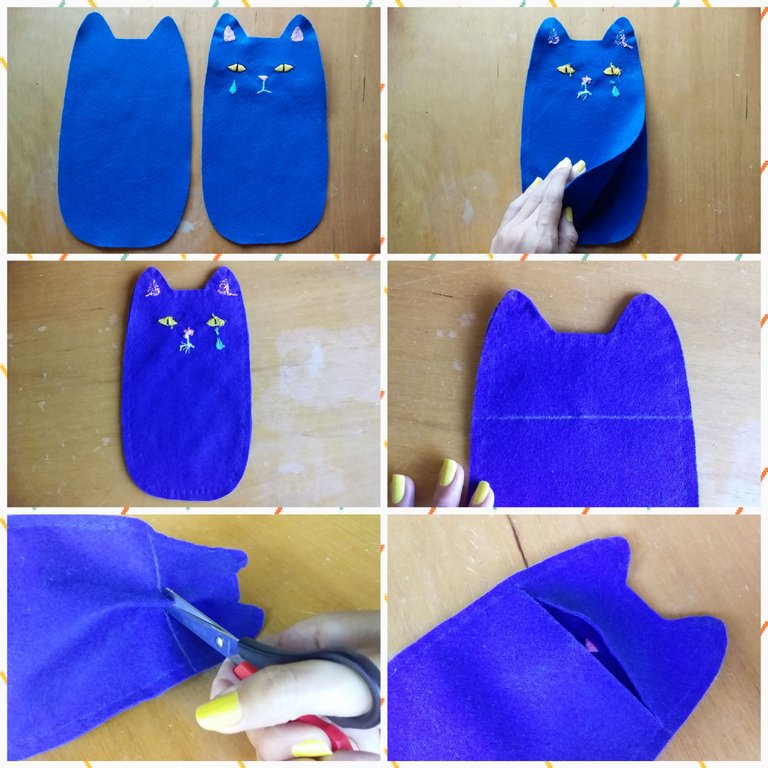
Por último solo nos queda unir ambas piezas de fieltro. Las pondremos una sobre la otra con el derecho hacia adentro y coseremos por todo el contorno. Una vez listo, marcaremos una línea recta en la parte de atrás y cortaremos para hacer una abertura.
Finally we just have to join both pieces of felt. We will put them one on top of the other with the right side facing in and sew all around. Once ready, we will mark a straight line on the back and cut to make an opening.
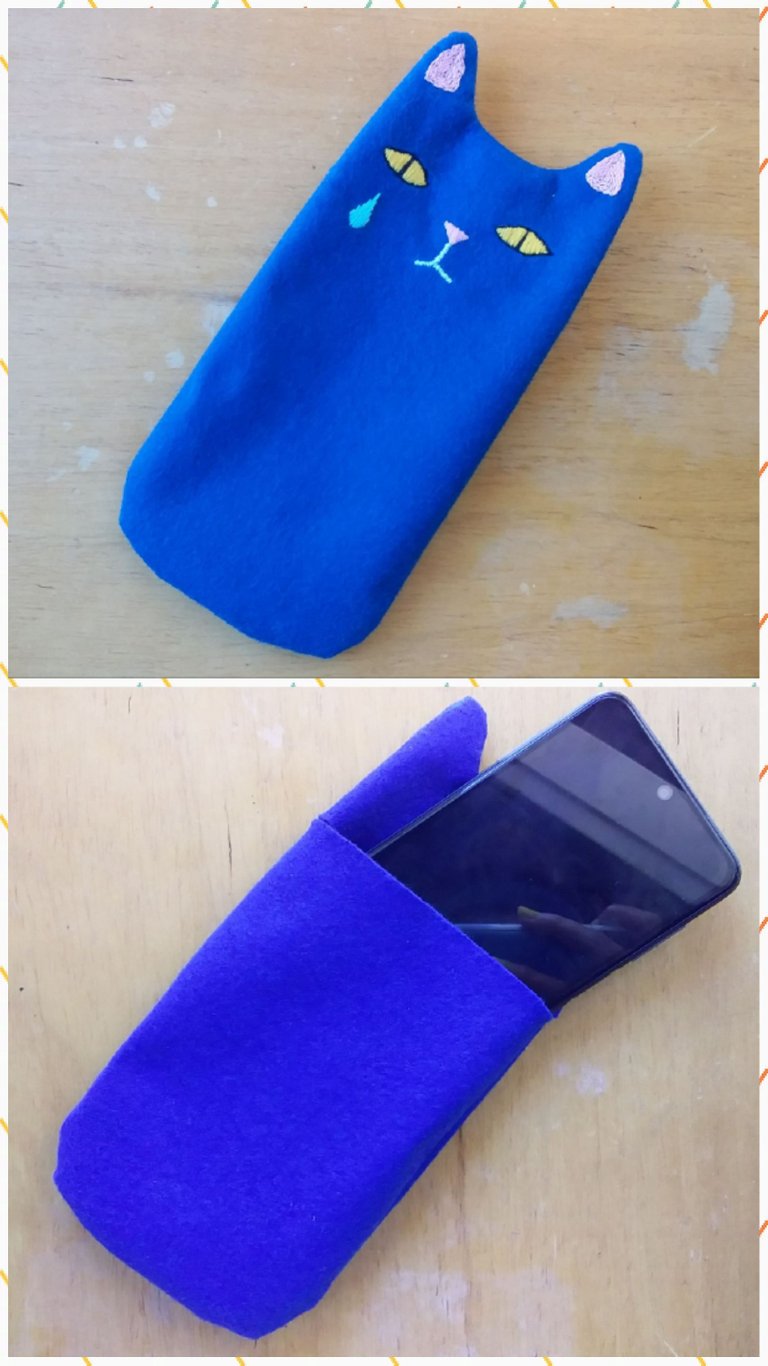
Daremos vuelta y listo.
We will turn and that's it.
💙Resultado | Result💙
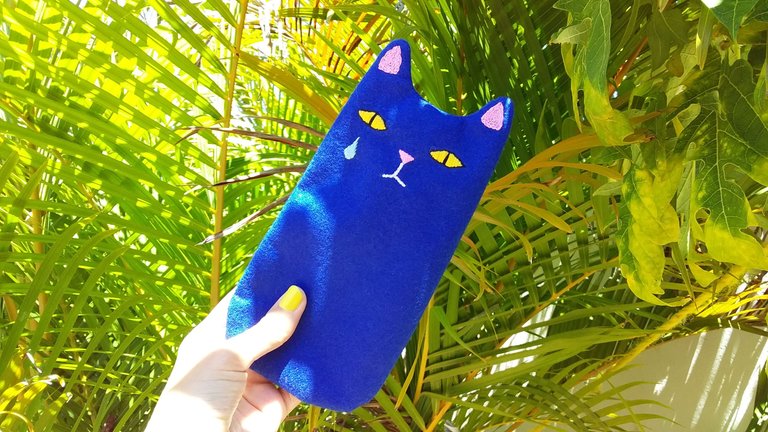
Este es el resultado final! Espero les haya gustado mucho y que se animen a realizarlo.
Muchas gracias por leerme.💙💙
This is the final result! I hope you liked it a lot and that you are encouraged to make it.
Thank you very much for reading me.💙💙
Wow I love your creativity @paugomez
Thank you 🤗💖💞
This is so cute! I love that deep blue color you chose. The embroidery work looks good on the felt. I’m glad you’re able to get back to posting. Thanks for sharing :)
I'm glad you liked it 🤗💖 Thank you so much for your nice words, they made me very happy.💖💞
You’re very welcome ~ 😉
Congratulations @paugomez! You have completed the following achievement on the Hive blockchain and have been rewarded with new badge(s):
Your next target is to reach 2500 upvotes.
You can view your badges on your board and compare yourself to others in the Ranking
If you no longer want to receive notifications, reply to this comment with the word
STOPCheck out the last post from @hivebuzz:
Bellísimo, te felicito amiga. Gracias por compartir ❣️
Muchas gracias, linda💖