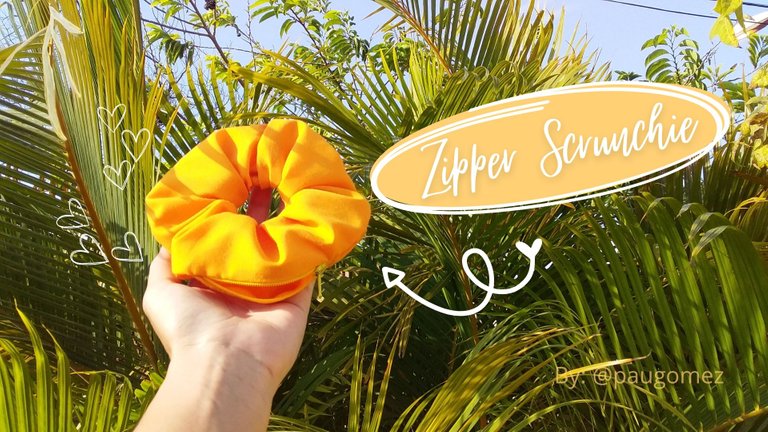
[ESP/ENG] ✨Como hacer una Scrunchie con cremallera | How to make a zipper Scrunchie✨
Bienvenidos | Welcome
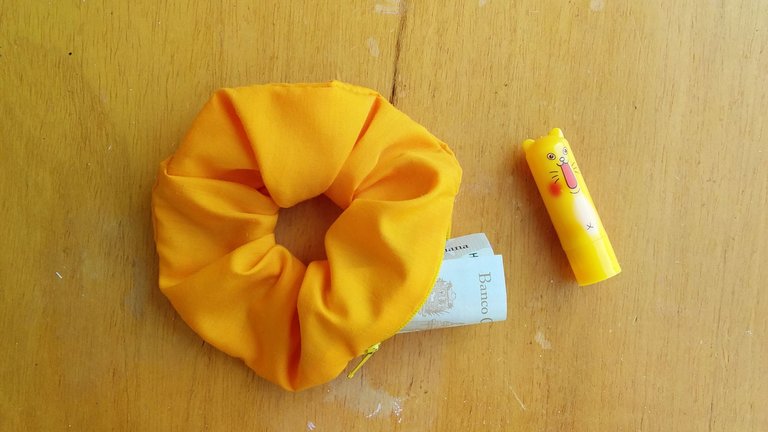
Saludoos, gente linda de Needleworkmonday, espero que se encuentren súper de maravilla. El día de hoy traigo para ustedes un tutorial en el que les mostraré cómo hacer una Scrunchie con cremallera✨ y se preguntarán para qué 😅 pues simple, esto es para que nuestra Scrunchie tenga una doble funcionalidad: la de recoger el cabello y la de guardar cosas como dinerito, un labial e incluso nuestras llaves 😱 cosas pequeñas pero indispensables ☝️ nadie se esperaria algo así, es algo único y en cuanto las ví dije "necesito una de esas" 😂 así que decidí hacer una y mostrarles el proceso✨ espero que les guste mucho y que lo hagan en casita.
Greetings, beautiful people of Needleworkmonday, I hope you are feeling great. Today I bring for you a tutorial in which I will show you how to make a Scrunchie with zipper✨ and you may wonder why 😅 well simple, this is so that our Scrunchie has a dual functionality: the one to collect hair and the one to keep things like money, lipstick and even our keys 😱 small but indispensable things ☝️ nobody would expect something like this, it's something unique and as soon as I saw them I said "I need one of those" 😂 so I decided to make one and show you the process✨ I hope you like it a lot and that you make it at home.
Materiales | Materials:
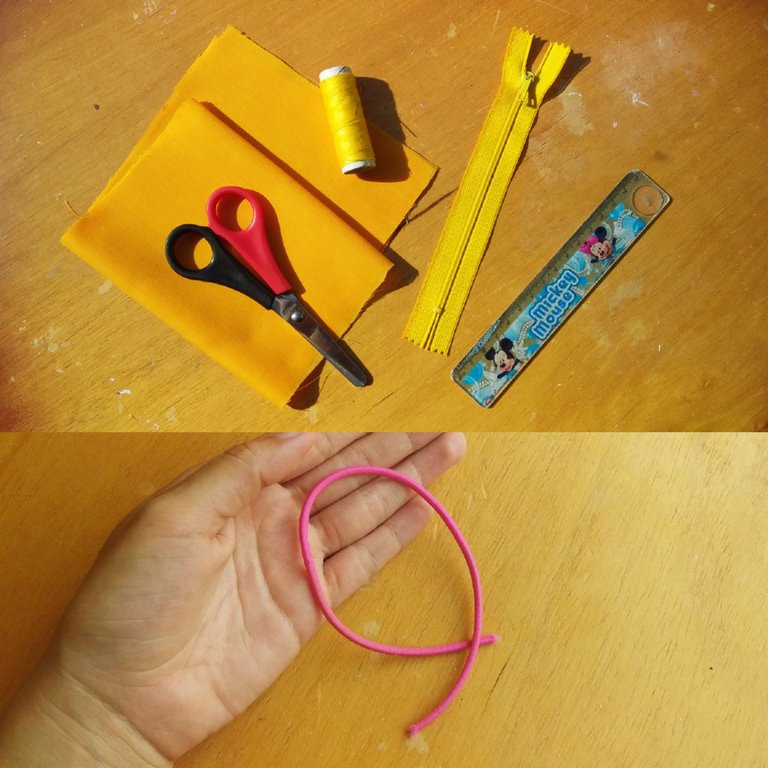
| Tela | Aguja e hilo | Elástico |
|---|---|---|
| Cremallera | Tijeras | Regla |
| Fabric | Needle and thread | Elastic |
|---|---|---|
| Zipper | Scissors | Ruler |
✨Proceso | Process✨
Paso 1 | Step 1
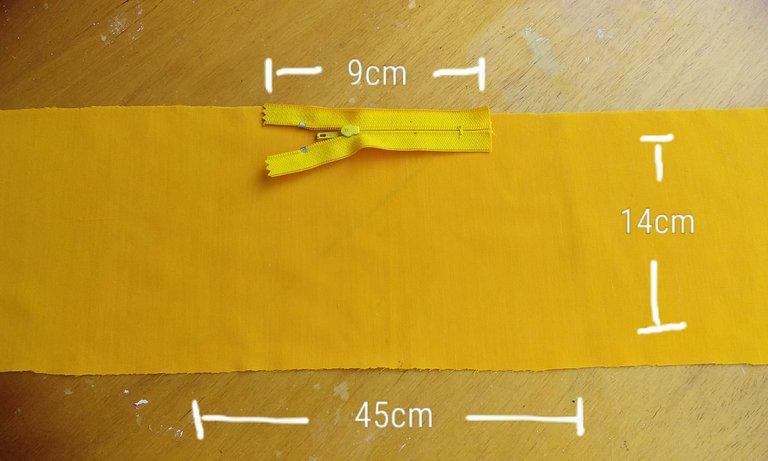
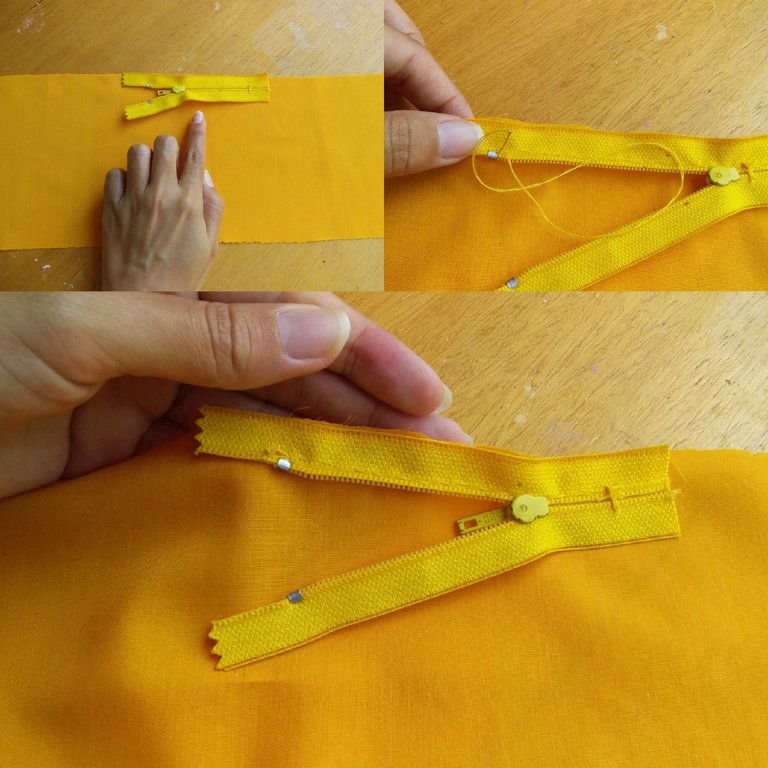
Las medidas de la tela son 45cm de ancho x 14cm de alto, la cremallera debe medir unos 9cm pero si no consigues una de este tamaño puedes usar otra que tengas que sea más larga y a continuación te mostraré como puedes modificarla:
✨Before you start✨
The measurements of the fabric are 45cm wide x 14cm high, the zipper should measure about 9cm but if you don't get one of this size you can use another one you have that is longer and I will show you how you can modify it below:
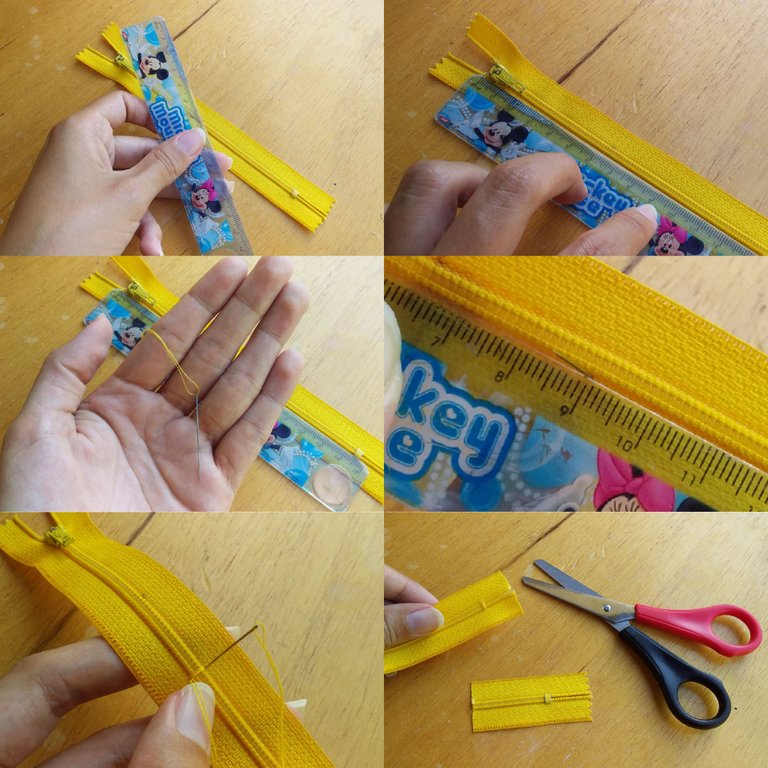
Mediremos 9cm en nuestra cremallera y con aguja e hilo haremos unas puntadas envolventes en los "dientes" (como se ve en las fotos👀), luego cortaremos el sobrante.
We will measure 9cm on our zipper and with needle and thread we will make some wrapping stitches on the "teeth" (as seen in the pictures👀), then we will cut the excess.
Ahora sí:
Lo primero que haremos será poner boca abajo nuestra cremallera sobre la tela, cerca del borde y luego coseremos.
Now we do:
The first thing we'll do is lay our zipper face down on the fabric, close to the edge and then sew.
Paso 2 | Step 2
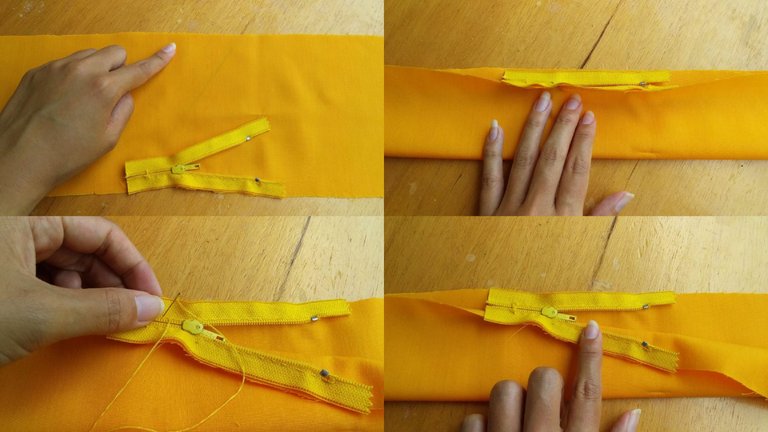
Llevaremos el otro lado de la cremallera al otro lado de la tela y los coseremos.
We will bring the other side of the zipper to the other side of the fabric and sew.
Paso 3 | Step 3
Ahora, coseremos por los costados
Now, we will sew on the sides
Paso 4 | Step 4
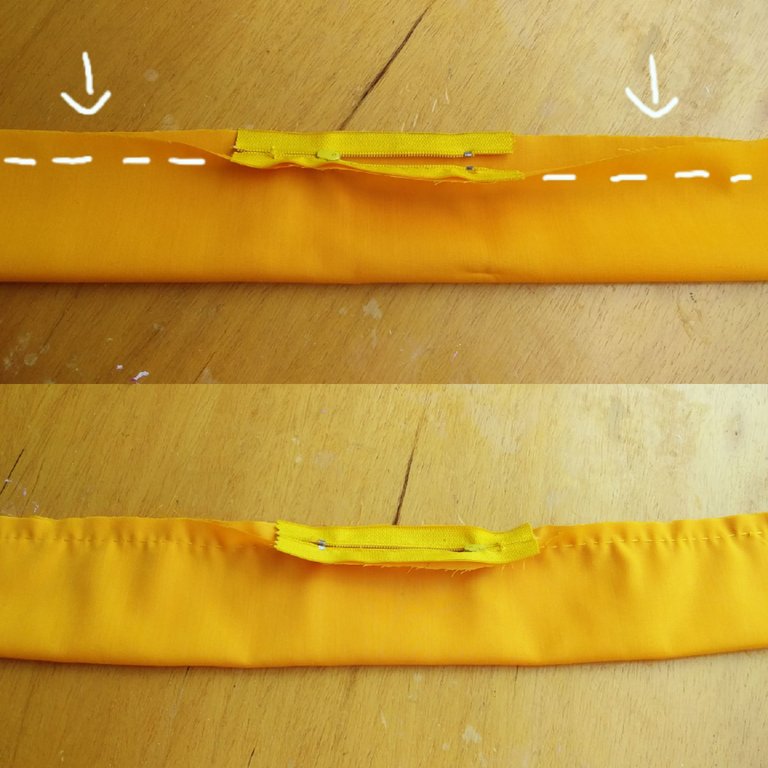
Daremos vuelta a nuestra tela y pasaremos un trozo de elástico por dentro, hasta que salga por el otro extremo, entonces le haremos un nudo.
Nota: el tamaño del elástico puede ser de tu preferencia, yo utilicé 22cm más o menos
We will turn our fabric inside out and pass a piece of elastic through it, until it comes out at the other end, then we will tie a knot.
*Note: the size of the elastic can be of your preference, I used 22cm more or less.
Paso 5 | Step 5
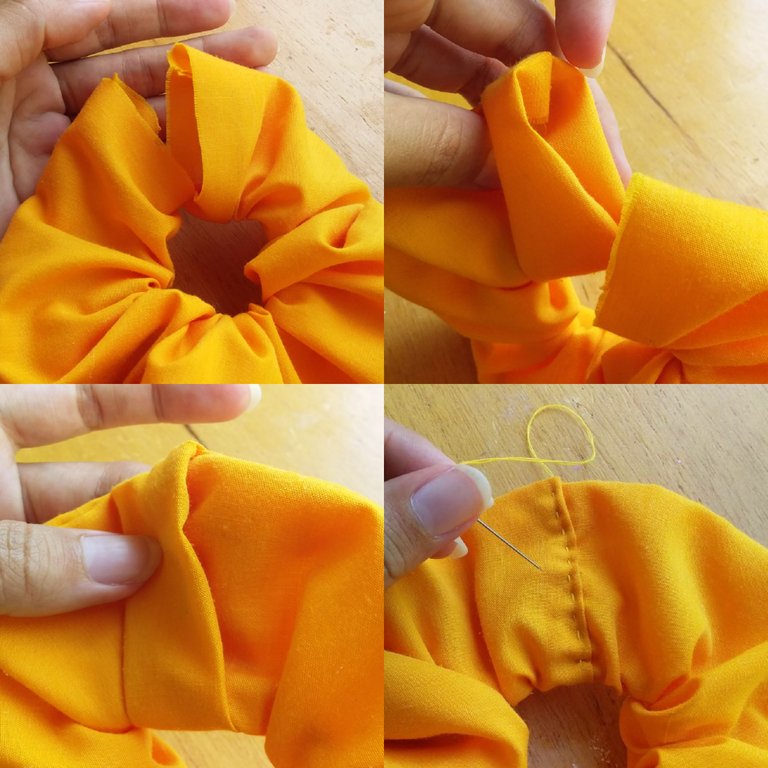
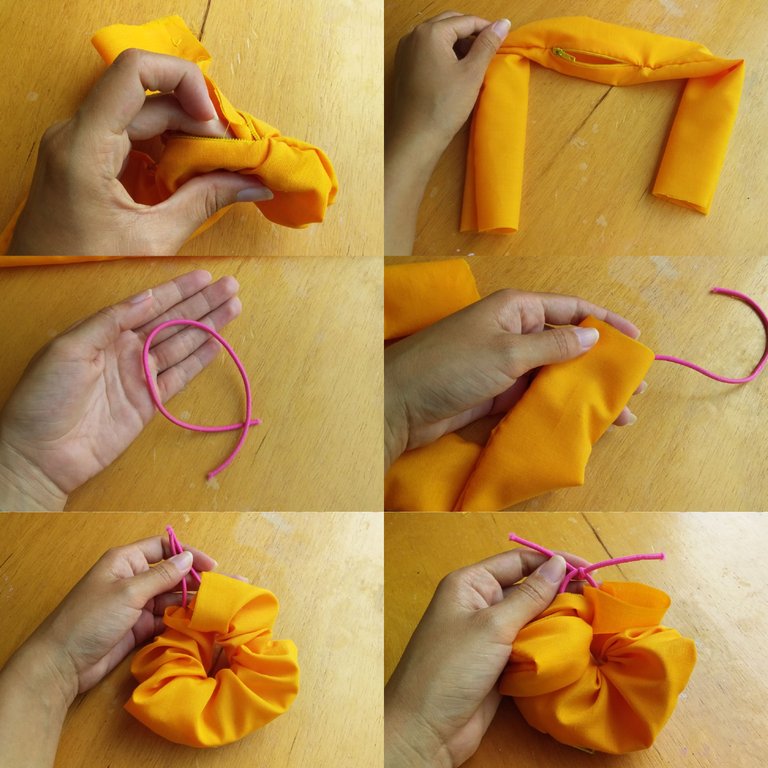
Para cerrar nuestra Scrunchie, tomaremos uno de los extremos de la tela y la doblaremos un poco hacia adentro, meteremos el otro extremo (como se muestra en las fotos) y finalizamos con unas puntadas.
To close our Scrunchie, we will take one of the ends of the fabric and fold it a little bit inwards, we will put the other end in (as shown in the pictures) and finish with a few stitches.
💛Resultado | Result💛
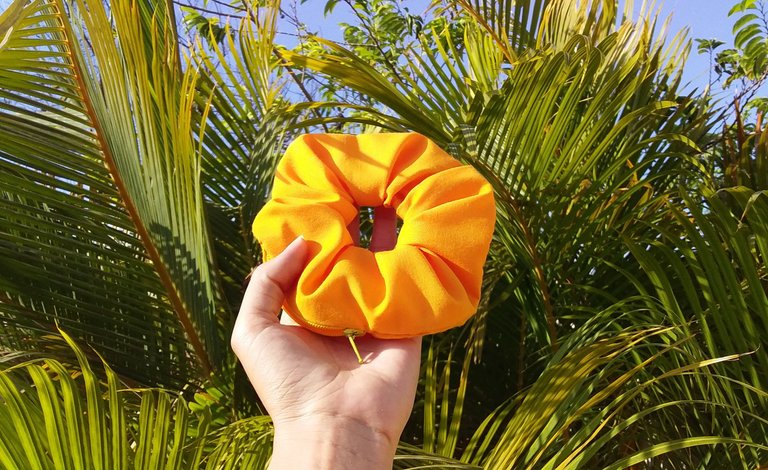

Y este es el resultado, el cual me gustó muchísimo por el color y porque por fin tengo donde guardar mi dinerito para cuando me toque salir 😂 espero que les haya gustado. Muchas gracias por leerme! 💛
And this is the result, which I really liked because of the color and because I finally have a place to keep my money for when I have to go out 😂 I hope you liked it. Thank you very much for reading me! 💛
Una idea muy novedosa. El paso a paso está excelente. Me encantó el color amarillo de la tela. Todo te quedó muy bien explicado amiga.
Gracias por compartir.
Muchas gracias por tu comentario 💛 me alegra que le haya gustado😊💖
It is very beautiful I liked it a lot, I congratulate you very creative
Hola amiga, esa idea es genial, gracias por compartir.
Thank you very much 😊💖.
Congratulations @paugomez! You have completed the following achievement on the Hive blockchain and have been rewarded with new badge(s):
Your next target is to reach 4000 upvotes.
You can view your badges on your board and compare yourself to others in the Ranking
If you no longer want to receive notifications, reply to this comment with the word
STOPSupport the HiveBuzz project. Vote for our proposal!
Congratulations @paugomez! You received a personal badge!
You can view your badges on your board and compare yourself to others in the Ranking
Check out the last post from @hivebuzz:
Support the HiveBuzz project. Vote for our proposal!
Oh wao! Una idea genial cuando vas a caminar o al gym, excelente!
Claro que si jejeje 😁 gracias💖
This is perfect especially for those that love to travel. It's easier to stash away your cash while keeping your long hair in a bun!
That's right, I found it really useful 😊💛
This Scrunchie is nothing short of excellence, you really did a great job on this project, and I believe that's why it's so gorgeous.
Oh, wow, thank you very much for your comment 😳💖💖.
You're welcome.
Unique and functional creation @paugomez! Bravo!