[ESP-ENG] Mantenimiento y reparación de ventilador de pedestal / Maintenance and repair of pedestal fan
EN ESPAÑOL:
Hola amigos es un placer compartir con ustedes una nueva experiencia, en esta ocasión les mostraré como le hice la reparación y el mantenimiento a un ventilador de pedestal, creo que en la mayoría de los hogares hay un equipo de estos y mas, en los talleres, por esta razón considero que es importante aprender a hacerle su debido mantenimiento, y de esta manera, prolongarle su vida útil.
Mi esposa es la encargada de coordinar las actividades de los niños en la Iglesia Cristiana "Manantial de agua viva", estas actividades se realizan en un salón donde utilizan dos ventiladores, porque el aire acondicionado no es suficiente, y precisamente ayer, mi esposa me dijo que uno de estos equipos había dejado de funcionar, por lo que hoy en la mañana lo fui a buscar para revisarlo e intentar repararlo.
Mantenimiento y reparación de ventilador de pedestal
Si amigos, cuando mi esposa me dijo que el ventilador de los niños de la iglesia se había dañado, enseguida lo fui a buscar, para intentar repararlo, porque es importante que esa área de los se mantenga bien ventilada y por otra parte, la iglesia no cuenta con los recursos para comprar otro ventilador, de manera que hoy me puse a revisar este ventilador, cuando lo prendí, se escuchaba el ruido del motor, pero no arrancaba, lo que me hizo pensar que el capacitor podía estar dañado, también me dí cuenta que estaba bastante sucio, fíjense que cuando giré el aspa con la mano, sentí que estaba un poco duro, creo que lo mejor es comenzar con el mantenimiento y si es necesario abriré la carcasa, así que a continuación les mostraré todo este proceso.
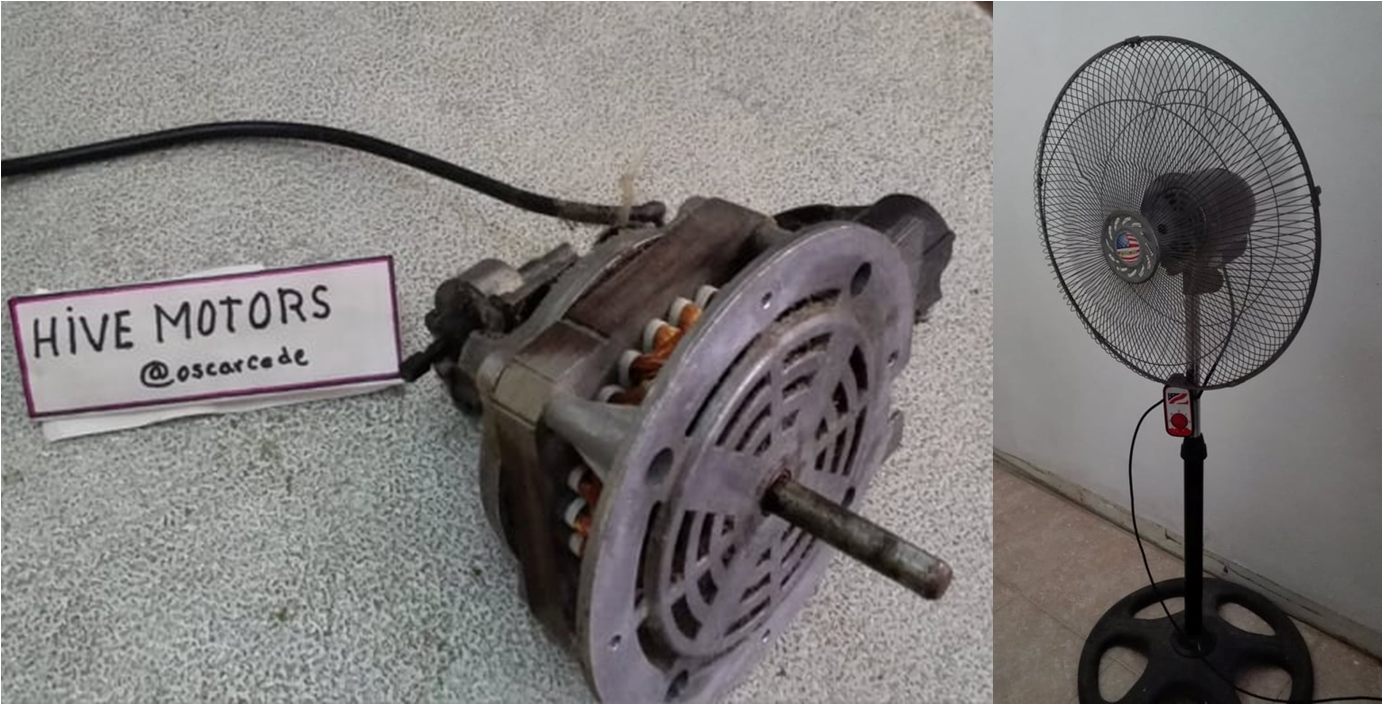
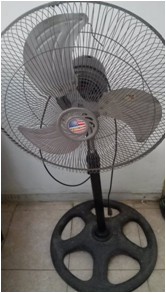
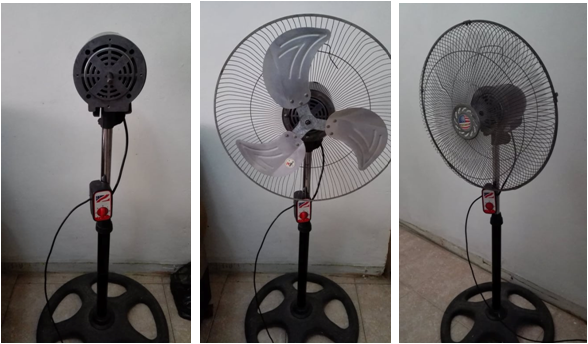
Este es el ventilador:
Proceso para la reparación del ventilador
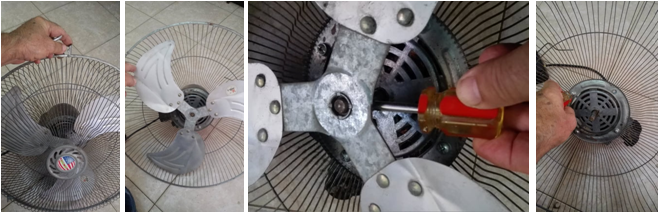
- Lo primero que hice fue separar la cabeza del ventilador del pedestal, para colocarla sobre la mesa y proceder a desarmar las demás piezas:
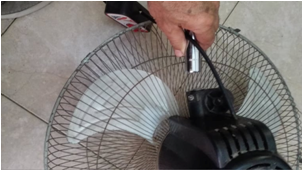
- Ahora voy a quitar la tapa plástica que cubre la carcasa del motor, porque quiero ver como esta esto por dentro:
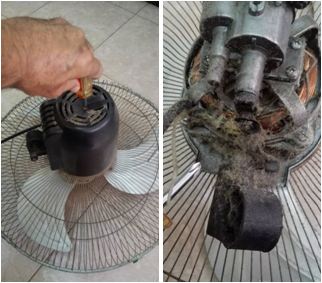
Bueno amigos, como pueden ver, esto esta demasiado sucio, así que tengo que desarmar la carcasa.
- Lo siguiente será remover las rejillas protectoras y el aspa:
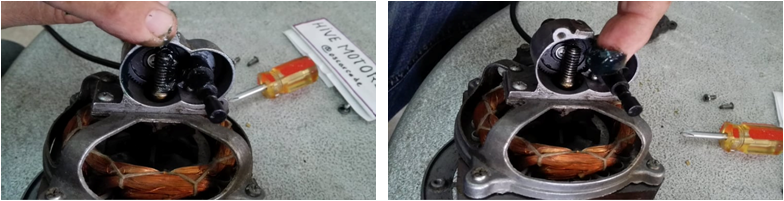
- Les cuento que cuando me disponía a limpiar la carcasa, me di cuenta que el cable de la fuente eléctrica estaba casi suelto, este cable se empalma con los alambres que salen del embobinado del estator, de verdad amigos, que cuando vi esto, me desanime un poco, porque cuando se parten estos alambres, es complicado soldarlos, pero bueno, decidí continuar, porque no podemos decir que algo es difícil, sin aun intentarlo:
Miren como están esos alambres:
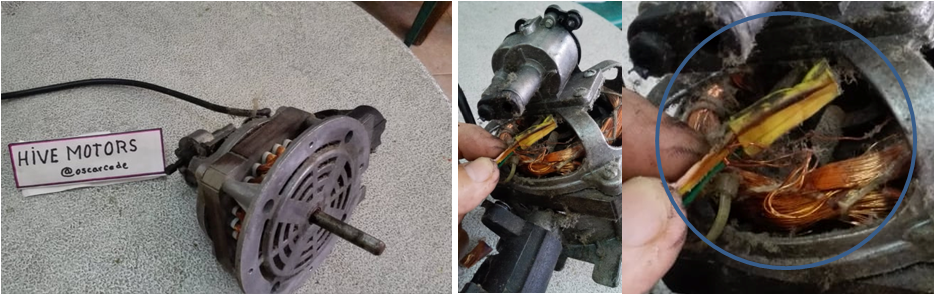
- Lo siguiente será desarmar el motor para revisar los alambres que se ven sueltos:
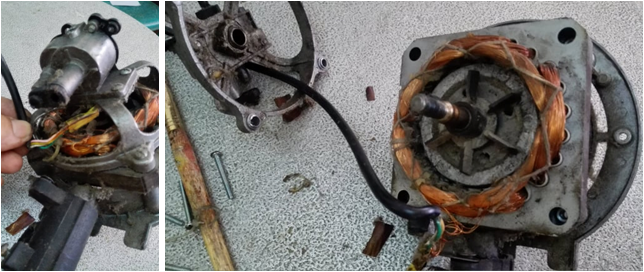
- Después de ordenar los alambres, los amarré con hilo, la verdad amigos que no vi otros alambres partidos, por lo que espero que el ventilador funciones, de no ser así, tendría que hablar con mi compadre para que me preste el capacimetro, para medir los mfd del capacitor que tiene, si esta malo compraré uno igual.
- Ahora voy a retirar la masa o inducido del motor para limpiar toda esa área, y a la vez lubricar el eje con aceite multiuso que llaman 5x1 y grasa fina:

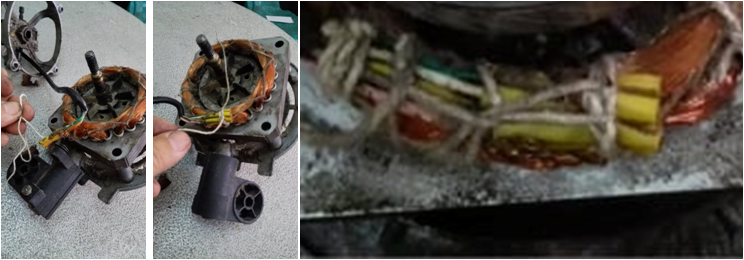
- Lo siguiente será armar nuevamente el motor, para luego aplicar grasa en los engranajes que permiten el giro del ventilador, es importante que estos engranajes se mantengan lubricados para que el eje del motor gire suavemente:
- Ahora voy enchufar el cable en el toma-corriente para comprobar el funcionamiento del motor, les cuento, que mi esposa estaba a la expectativa, y se alegró cuando pase la perilla del suiche y el motor comenzó a girar:
Prueba en vídeo:
- Lo siguiente será colocar la carcasa plástica, el pedestal, las rejillas protectoras y el aspa:
La verdad, es que me siento muy contento por este importante logro, porque este próximo domingo, los niños de la iglesia tendrán su ventilador, gracias a Dios el ventilador no sufrió daños, solo le arreglé unos alambres los cuales estuvieron a punto de romperse, y el mantenimiento general a todas las piezas. saludos, Dios los bendiga.

IN ENGLISH:
Hello friends, it is a pleasure to share a new experience with you, this time I will show you how I did the repair and maintenance of a pedestal fan, I believe that in most homes there is a team of these and more, in which workshops, for this reason I consider it important to learn how to properly maintain it, and in this way, prolong its useful life.
My wife is in charge of coordinating the activities of the children in the Christian Church "Manantial de agua viva", these activities are carried out in a room where they use two fans, because the air conditioning is not enough, and precisely yesterday, my wife He said that one of these pieces of equipment had stopped working, so this morning I went to look for it to check it and try to repair it.
Maintenance and repair of pedestal fan
Yes, friends, when my wife told me that the fan for the children in the church had been damaged, I immediately went to look for it, to try to repair it, because it is important that this children's area be kept well ventilated and, on the other hand, the church He does not have the resources to buy another fan, so today I started to check this fan, when I turned it on, the noise of the motor was heard, but it would not start, which made me think that the capacitor could be damaged, I also I realized that it was quite dirty, note that when I turned the blade by hand, I felt that it was a little hard, I think that the best thing is to start with maintenance and if necessary I will open the casing, so I will show you this whole process next .
This is the fan
Process for fan repair
- The first thing I did was separate the head of the fan from the pedestal, to place it on the table and proceed to disassemble the other pieces:
- Now I am going to remove the plastic cover that covers the motor casing, because I want to see how this is inside:
Well folks, as you can see, this is too dirty, so I have to take the case apart.
- The following will be to remove the protective grids and the blade:
- I tell you that when I was preparing to clean the casing, I realized that the electrical source cable was almost loose, this cable is spliced with the wires that come out of the stator winding, really friends, when I saw this, I was get a little discouraged, because when these winding wires break, this is really complicated, but hey, I decided to continue, because we cannot say that something is difficult, without even trying:
Look how those wires are:
- The following will be to disassemble the motor to check the wires that look loose:
- After ordering the wires, I tied them with thread, the truth is, friends, I did not see any other broken wires, so I hope the fan works, if not, I would have to talk to my compadre so that he can lend me the capacitance meter, to measure the mfd of the capacitor it has, if it's bad I'll buy the same one.
- Now I am going to remove the mass or armature from the motor to clean all that area, and at the same time lubricate the axis with multipurpose oil that they call 5x1 and fine grease:
- The following will be to assemble the motor again, and then apply grease to the gears that allow the fan to rotate. It is important that these gears remain lubricated so that the motor shaft rotates smoothly:
- Now I am going to plug the cable into the outlet to verify the operation of the motor, I tell you, that my wife was waiting, and she was happy when I turned the switch knob and the motor began to turn:
Proof on video:
- The following will be to place the plastic casing, the pedestal, the protective grids and the blade:
The truth is that I feel very happy for this important achievement, because this coming Sunday, the children of the church will have their fan, thank God the fan was not damaged, I only fixed some wires which were about to break, and general maintenance to all parts. Greetings, God bless you.
By damn😳 you won't say that fans can build up so much dirt and grime in the motor area hey👀
Nice! It looks alot like thhe concept of an altenator.
Well done on trying to fix it, usually people just throw it away🙈
Non venezuela people, in here fixing them is so common that people rarely throw something away at all...
That's right Jesus, here in Venezuela we always try to repair these fans, the only way we throw them away is when the winding burns, because repair is expensive.
As Jesús says, here in Venezuela, when a fan of this type breaks, generally people try to repair it, as long as the repair does not involve a winding, because taking them to repair that part costs more than a new fan, for example. , The winding for this fan is about $50, and a new fan like this is about $45. but generally what is damaged is the capacitor and the dirt that blocks the shaft.
Te cuento que tengo un ventilador super parecido a ese y gracias a esta publicación ya mas o menos se como cooperar para que este me dure bastante tiempo!
Ahora lo estamos utilizando porque estan haciendo unos calores terribles, hoy por ejemplo estuvimos a 40° y aun no llega el verano ¿que tal?. Que el Señor nos ayude xD!
Si en algun momento puedes realizar algun video a detalle arreglando otro motor seria buenisimo!!
Bendiciones Amigo!
Hola yetx, los ventiladores suelen llenarse de muchas partículas, sobre todo de algodón, el cual invade el eje, ocasionando que el eje gire con dificultad, para evitar esto, debemos realizar un mantenimiento, por lo menos cada dos mese, el cual incluye, la limpieza y la lubricación, puedes usar un pincel grueso, grasa fina y aceite 3 en 1, que sé que lo conoces, porque es popular en Venezuela, en Argentina a lo mejor este aceite tiene otro nombre, pero utiliza uno similar. Deseo que estés bien, cuídate mucho, Dios te bendiga.