[ENG-ESP] How to collect refrigerant in a split type air conditioner / Cómo recolectar refrigerante en un Aire acondicionado tipo split
IN ENGLISH:
Hello friends, today I want to show you in a simple way, how to collect the refrigerant gas in the condensing unit of a SPLIT type air conditioner, well friends, it is important to learn to collect or collect the refrigerant, because we always have to maintain the equipment in the house, many people prefer to hire a technician to do the maintenance on their air conditioners, simply because they do not know how to collect the refrigerant, although there are those who wash the air conditioners without removing them from the wall , the truth is that doing it that way is quite uncomfortable due to the amount of water and dirt that splashes on the walls and furniture, many use plastic bags and a drainage tube, but it is still uncomfortable, apart from the fact that the evaporator is not clean.
EN ESPAÑOL:
Hola amigos, hoy quiero mostrarles de una manera sencilla, como recoger el gas refrigerante en la unida condensadora de un Aire acondicionado tipo SPLIT, bueno amigos, es importante aprender a recoger o recoger el refrigerante, porque siempre tenemos que hacerle el mantenimiento a los equipos de la casa, muchas personas prefieren contratar a un técnico para que le hagan el mantenimiento a sus aires acondicionados, simplemente porque no se saben como recoger el refrigerante, aunque hay quienes lavan los aires acondicionados sin quitarlos de la pared, la verdad es que hacerlo de esa manera, es bastante incomodo por la cantidad de agua y suciedad la cual salpica las paredes y los muebles, muchos usan bolsas plásticas y un tubo para el drenaje, pero aun así es incomodo, aparte de que el evaporador no queda bien limpio.
How to collect the refrigerant in the condensing unit of a Split type air conditioner / Cómo recoger el refrigerante en la Unidad condensadora de un aire acondicionado tipo Split
There is a saying that says: "No one is born learned", if we do not know how to do something, we must investigate or seek advice from those who know, I confess that although I knew the theory of how to collect the refrigerant in a Split, I never dared to do it, until 4 months ago my friend Alberto taught me the steps to do this job, my friend Alberto is a refrigeration technician and he had always done maintenance on my air conditioners, well friends, there are technicians who do not like to teach their work, for reasons obvious, but Alberto, as he was leaving the country, was teaching me the most important details about the maintenance of split-type air conditioners, in truth, I was very grateful for his valuable gesture.
Hay un dicho que dice: "Nadie nace aprendido", sino sabemos hacer algo, debemos investigar o asesorarnos con los que saben, les confieso, que aunque yo sabia la teoría de cómo recoger el refrigerante en un Split, nunca me atreví hacerlo, hasta que hace 4 meses mi amigo Alberto me enseñó los pasos para hacer este trabajo, mi amigo Alberto es técnico en refrigeración y siempre le había hecho el mantenimiento a mis aires acondicionados, bueno amigos, hay técnicos quienes no les gusta enseñar su trabajo, por razones obvias, pero Alberto como se iba del país me estuvo enseñando los detalles más importantes sobre el mantenimiento de los aires acondicionados tipo Split, en verdad, quedé muy agradecido por su valioso gesto.
Doing the maintenance myself to my Split Air Conditioner
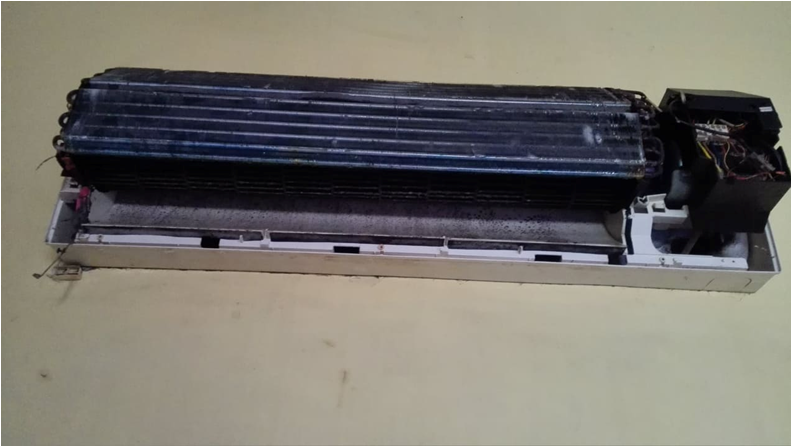
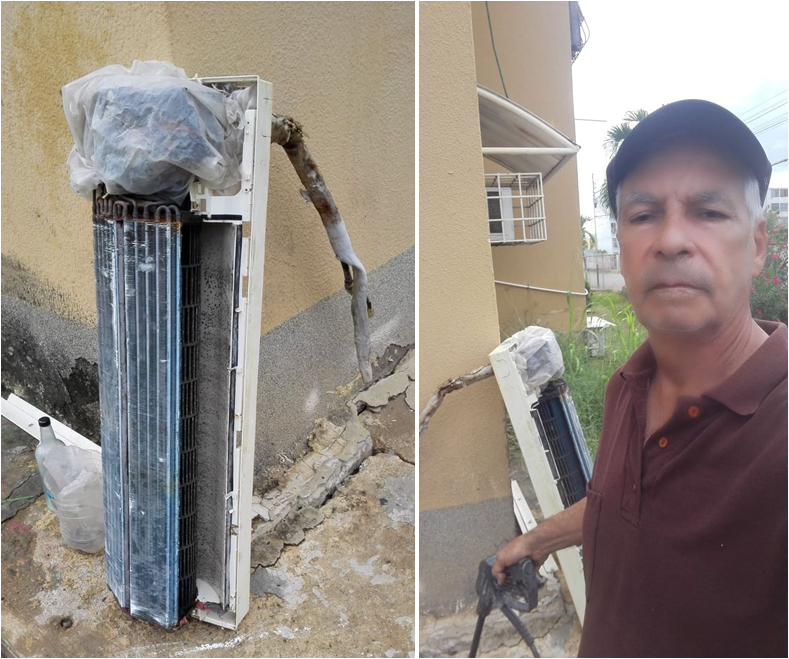
So all the knowledge I learned, I have put it into practice, a month ago I did maintenance on my son's air conditioner, then I did maintenance on my sister's split unit, and everything turned out fine, now I had to do the maintenance again to my Air conditioning, the truth is that this air needed good maintenance because the fan turbine was too dirty, so after collecting the refrigerant in the condensing unit, I removed the console with the evaporator to take it to the courtyard of the building and wash it with the hydro-jet.
Haciendole yo mismo el mantenimiento a mi Aire acondicionado Split
Así que todos los conocimientos que aprendí, los he puesto en práctica, hace un mes le hice mantenimiento al aire acondicionado de mi hijo, después le hice mantenimiento al split de mi hermana, y todo ha quedado bien, ahora me tocó hacerle nuevamente el mantenimiento a mi Aire acondicionado, la verdad es que a este aire le hacía falta un buen mantenimiento porque la turbina del ventilador estaba demasiada sucia, por lo que después de recoger el refrigerante en la unidad condensadora, retiré la consola con el evaporador para llevarla hasta el patio del edificio y lavarla con el hidro-jet.
Next I am going to show you some images of the maintenance I did to my air conditioner. / A continuación les voy a mostrar algunas imágenes del mantenimiento que le hice a mi aire acondicionado.
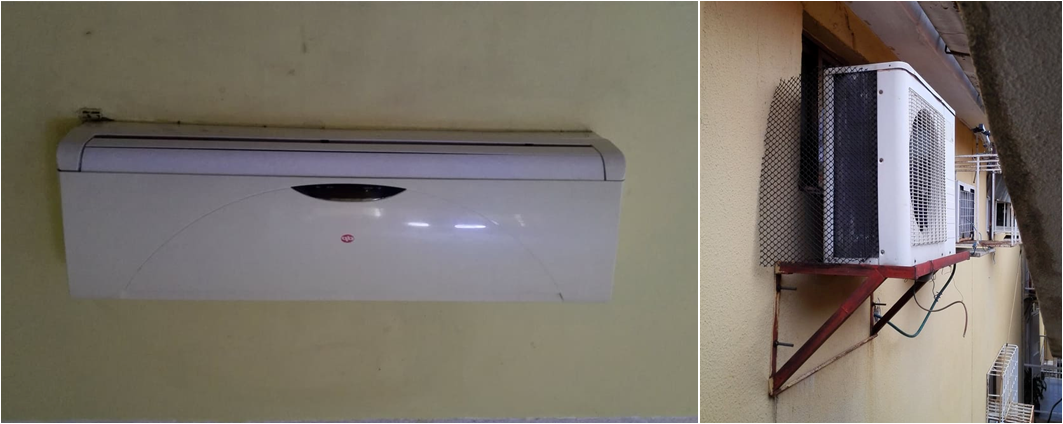
This is my 30,000 btu Split Air Conditioner / Este es mi Aire acondicionado tipo Split de 30.000 btu
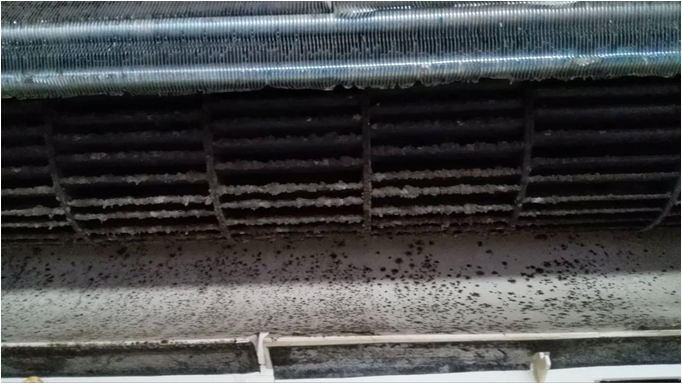
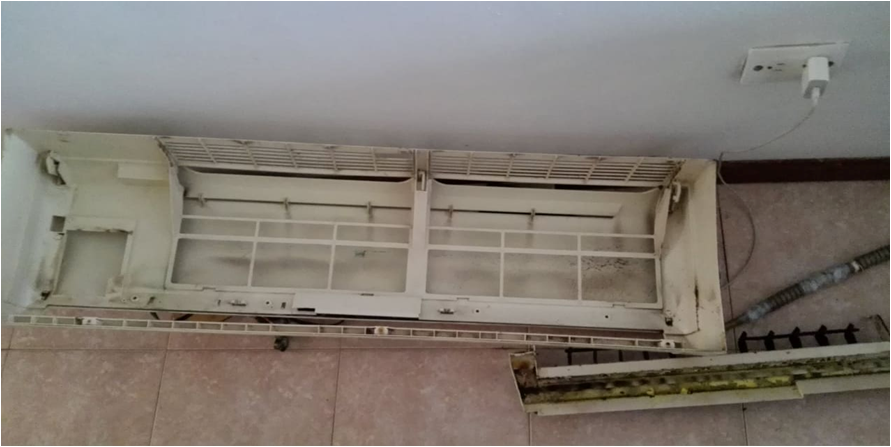
Look how dirty the air conditioning was: / Miren como estaba de sucio el Aire acondicionado:
Console housing and drain tank: / La carcasa de la consola y el tanque del desagüe:
Steps to collect refrigerant from a Split: / Pasos para recoger el refrigerante de un Split:
Good friends, the idea of this publication is to show you the steps to collect the refrigerant in the Split Air Conditioning Condensing Unit, the truth is that if we do not know how to do this, we are not going to do a good job. maintenance to this type of equipment, it is also necessary to collect the refrigerant when we want to change the place of all the equipment, for this reason it is important to learn how to carry out this work.
Bueno amigos, la idea de esta publicación es mostrarles los pasos para recoger el refrigerante en la Unidad Condensadora del Aire acondicionado tipo Split, la verdad es que si no sabemos como hacer esto, no le podríamos hacer un buen mantenimiento a este tipo de equipo, incluso, también es necesario recoger el refrigerante cuando queremos cambiar de lugar todo el Equipo, por esta razón es importante aprender a realizar este trabajo.
Procedure for collecting refrigerant: / Procedimiento para recoger el refrigerante:
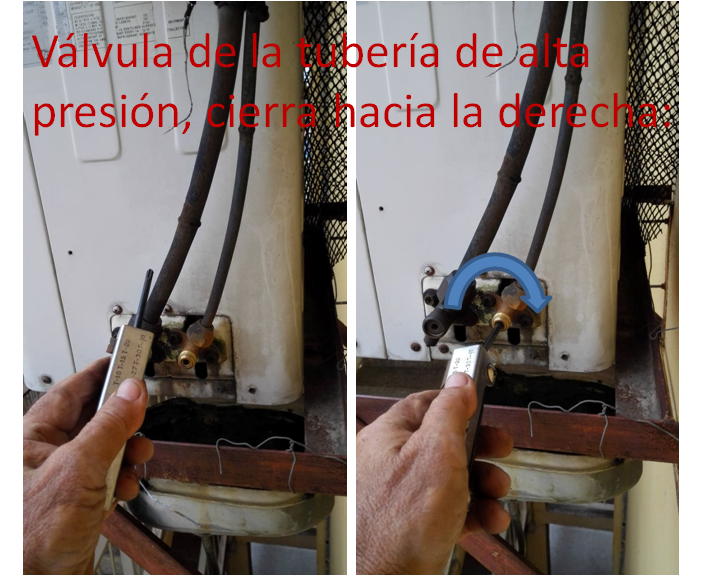
The condensing unit has two valves, one of them has a thin pipe which corresponds to the high pressure pipe that is the one that leads the refrigerant to the evaporator. The other valve has the thick pipe, which corresponds to the suction of the refrigerant, that is, the refrigerant leaves the thin pipe and returns to the compressor through the thick pipe.
La unidad condensadora posee dos válvulas, una de ellas posee una tubería delgada la cual corresponde a la tubería de alta presión que es la que conduce el refrigerante hasta el evaporador. La otra válvula, posee la tubería gruesa, la cual corresponde a la succión del refrigerante, es decir, que por la tubería delgada sale el refrigerante y regresa al compresor por la tubería gruesa.
Collecting the gas: / Recolectando el gas:
Now, since we want to trap the refrigerant in the condenser, we turn on the air conditioning, making sure that the compressor is working and we close the thin pipe, which leads the refrigerant to the evaporator, logically, by closing the valve of this pipe, the gas already it will not leave the compressor, only the compressor will be sucking the gas that is in the system through the low pressure pipe, which is the thick pipe, which we will close in an approximate time of one minute after closing the valve of the thin tubing, trapping refrigerant in the condensing unit.
Ahora, como queremos atrapar el refrigerante en el condensador, encendemos el aire acondicionado, asegurándonos que el compresor este funcionando y cerramos la tubería delgada, la cual conduce el refrigerante hacia el evaporador, lógicamente, al cerrar la válvula de esta tubería, el gas ya no saldrá del compresor, solo el compresor estará succionando el gas que esta en el sistema a través de la tubería de baja presión, que es la tubería gruesa, la cual la cerraremos en un tiempo aproximado de un minuto después de cerrar la válvula de la tubería delgada, y así quedará atrapado el refrigerante en la unidad condensadora.
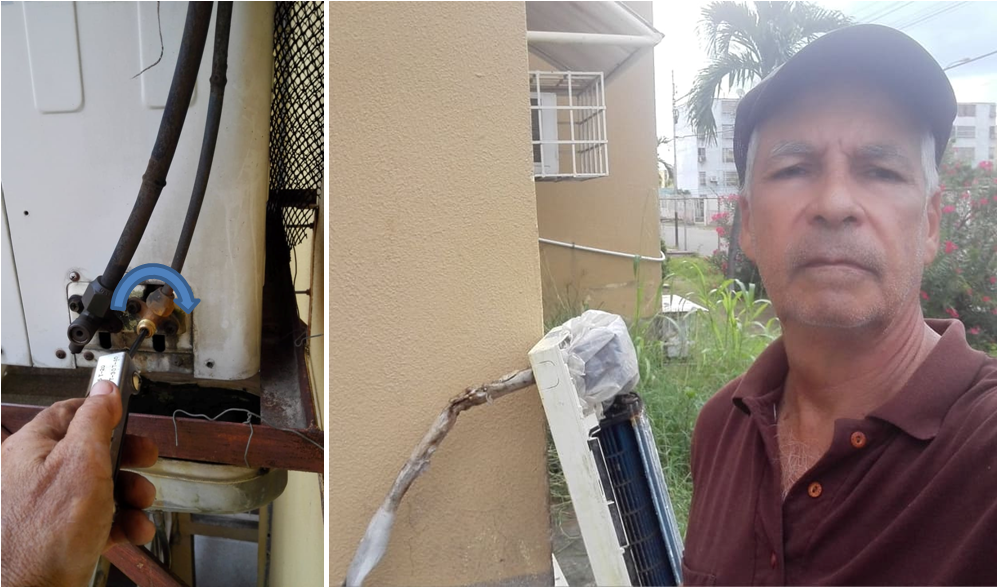
- Step-1: Remove the two covers of the valves of the condensing unit, as I said, one of these valves has the thin pipe that is the high pressure one and the other valve has the low pressure pipe that is the suction :
- Paso-1: Quitar las dos tapas de las válvulas de la unidad condensadora, como les decía, una de estas válvulas posee la tubería delgada que la de alta presión y la otra válvula, posee la tubería de baja presión que es la se succión:
- Step-2: The second thing is to start the air conditioning, we must make sure that the compressor is working, since it will be responsible for carrying out the work of gas suction, it is important to set the thermostat to maximum cold, so that the compressor does not turn off while we are doing the work.
- Paso-2: Lo segundo, es poner en funcionamiento el Aire acondicionado, debemos asegurarnos que el compresor esté funcionando, ya que será el responsable de efectuar el trabajo de la succión del gas, es importante poner el termostato en frío máximo, para que el compresor no se apague mientras realizamos el trabajo.
- Step-3: Now we will begin to collect the gas, for this we must have the allen key at hand to close the valve of the thin pipe, but before closing this valve we look at the clock and close the valve, which closes by turning it clockwise. right, clockwise:
- Paso-3: Ahora comenzaremos a recoger el gas, para ello debemos tener a la mano la llave allen para cerrar la válvula de la tubería delgada, pero antes de cerrar esta válvula miramos el reloj y cerramos la válvula la cual cierra girándola a la derecha, en el sentido de las agujas del reloj:
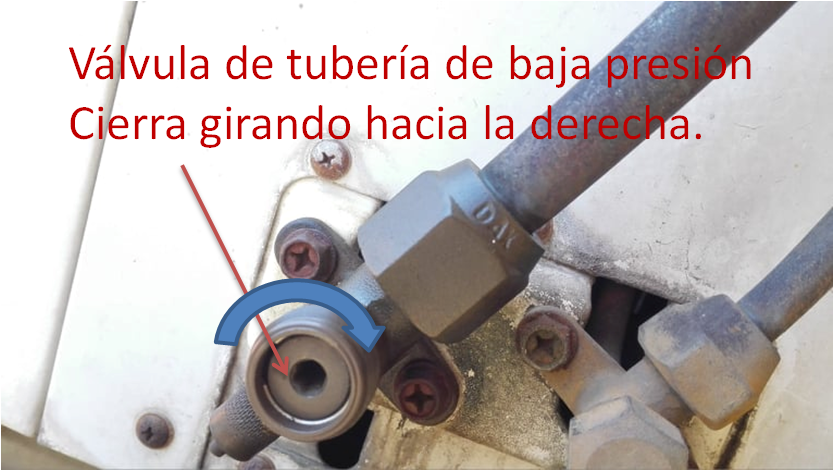
- Step-4: Once the valve of the thin pipe is closed, we let about 60 seconds pass and then we close the valve that has the thick pipe, which is the suction pipe. By closing this valve, the gas will be trapped inside the condensing unit.
- Paso-4: Una vez cerrada la válvula de la tubería delgada, dejamos pasar unos 60 segundos y luego cerramos la válvula que posee la tubería gruesa, la cual es la tubería de succión, el cerrar esta válvula el gas quedará atrapado dentro de la unidad condensadora.
There are those who wait only about 30 seconds, another 40 seconds, but this depends on the type of equipment and the distance of the pipes between the condensing unit and the evaporator, if it is a 12,000 or 24,000 btu split, you can close the suction valve between 30 to 40 seconds, now if the equipment is 30,000 btu like mine, it is best to wait about 60 seconds and thus we are more sure that the gas entered 100% to the condensing unit.
Hay quienes esperan solo unos 30 segundos, otros 40 segundos, pero esto depende del tipo de equipo y la distancia de las tuberias entre la unidad condensadora y el evaporador, si es un split de 12.000 o de 24.000 btu se puede cerrar la válvula de succión entre los 30 a 40 segundos, ahora si el equipo es de 30.000 btu como el mio, lo mejor es esperar unos 60 segundos y así estamos más seguros de que el gas entro en un 100% a la unidad condensadora.
- Step-5: Immediately when closing the valve of the thick pipe, we must turn off the equipment
- Paso-5: Inmediatamente al cerrar la válvula del caño grueso, debemos apagar el equipo
- Step-6: After collecting the gas, now you can disconnect the pipes from the indoor unit or evaporator, either to do maintenance or simply to change their place, after doing these jobs, reconnect the pipes and open both valves, which open by turning them to the left.
- Paso-6: Después de recoger el gas, ahora pueden desconectar las tuberías de la unidad interna o evaporador, bien sea para hacerle el mantenimiento o simplemente para cambiarlos de lugar, después de hacer estos trabajos, conectan nuevamente las tuberías y abren las dos válvulas, las cuales abren girandolas hacia la izquierda.
I think that with this explanation, you will be able to dare to collect the gas from your split-type equipment, and thus do the respective maintenance without using bags or dirtying the walls of your house, in truth, the best way to do it maintenance to a split is removing the internal unit or evaporator, so we can clean the fan turbine and the evaporator beehive well, as well as the drainage channel which is difficult to wash when doing this work mounted on the wall.
Creo que con esta explicación, ya ustedes podrán atreverse a recoger el gas a sus equipos tipo split, y así hacerle el respectivo mantenimiento sin estar utilizando bolsas ni estar ensuciando las paredes de su casa, en verdad, la mejor manera de hacerle el mantenimiento a un split, es retirando la unidad interna o evaporador, así podemos limpiar bien la turbina del ventilador y la colmena del evaporador, así como el canal de desagüe el cual es difícil lavarlo cuando se hace este trabajo montado en la pared.
¡Enhorabuena!
✅ Has hecho un buen trabajo, por lo cual tu publicación ha sido valorada y ha recibido el apoyo de parte de CHESS BROTHERS ♔ 💪
♟ Te invitamos a usar nuestra etiqueta #chessbrothers y a que aprendas más sobre nosotros.
♟♟ También puedes contactarnos en nuestro servidor de Discord y promocionar allí tus publicaciones.
♟♟♟ Considera unirte a nuestro trail de curación para que trabajemos en equipo y recibas recompensas automáticamente.
♞♟ Echa un vistazo a nuestra cuenta @chessbrotherspro para que te informes sobre el proceso de curación llevado a diario por nuestro equipo.
🥇 Si quieres obtener ganancias con tu delegacion de HP y apoyar a nuestro proyecto, te invitamos a unirte al plan Master Investor. Aquí puedes aprender cómo hacerlo.
Cordialmente
El equipo de CHESS BROTHERS
Buen punto con el tema de la espera mientras se recoge el gas, yo también recomiendo que sean aproximadamente 1 minuto, tomando encuesta precisamente los factores que usted comenta, como la longitud de la tubería.
Congratulations @oscarcede! You have completed the following achievement on the Hive blockchain And have been rewarded with New badge(s)
Your next payout target is 10000 HP.
The unit is Hive Power equivalent because post and comment rewards can be split into HP and HBD
You can view your badges on your board and compare yourself to others in the Ranking
If you no longer want to receive notifications, reply to this comment with the word
STOP