Construcción a escala de Volkswagen Escarabajo, Incluye: Guardafangos, capot, techo, estribos y enmasillado (PARTE-2) [ENG-ESP]
EN ESPAÑOL:
Un gran saludo para toda la comunidad de HiveDiy, Después de 5 días de haber iniciado mi proyecto: Elaboración a escala del Auto "Volkswagen Escarabajo" hoy he querido mostrarles otro avance de esta interesante obra, que hasta el día de hoy, le he dedicado unas 7 horas de trabajo, claro, trabajando una media hora en la mañana, a veces le dedico una hora, lo cierto es que lo he ido haciendo poco a poco, en realidad, es un trabajo que requiere de mucha paciencia y sobre todo creatividad, porque mientras voy construyendo este auto, también voy pensando en todos sus detalles, como la construcción de los guardafangos, así como la de mejorar la superficie de la carrocería, la pintura, los cauchos, puertas, capót, maletero, en fin, son tantas cosas que van surgiendo en la medida que voy avanzando.
Les cuento que he estado ansioso por ponerle los gardafandos, el capót y la compuerta del motor, a la estructura del auto, porque deseo darle la verdadera forma al Volkswagen Escarabajo, y así lo hice, pero al mirarlo, lo vi muy feo, ¡ Pues claro! el cartón al mojarlo con el pegamento suele deformarse, así que pensando y pensando me vino a la mente la idea de usar la masilla de retoque para pinturas de autos, por lo que tuve que comprar un pequeño tubo de 0.2 gr de EPOT PUTTY, la cual es una masilla que se usa para corregir los detalles de la carrocería de los autos antes de la aplicación de la pintura, este producto me costó 6 dólares, pero bueno, lo importante es que el trabajo quede bien, porque para mí, este Volkswagen Escarabajo, representa un gran reto.
Construcción a escala de Volkswagen Escarabajo, (Guardafangos, capot, techo, estribos y enmasillado) (PARTE-2)
Bueno amigos, tomando en cuenta lo largo del proceso, he decidido mostrarles otro avance de la obra, como les decía, este trabajo lo he estado haciendo en mis ratos libres, a veces trabajo media hora en la mañana, a veces en la tarde, lo cierto es que hasta hoy le he dedicado 7 horas de trabajo, entre cafe y cafe.
¿Cómo va la construcción de mi Volkswagen Escarabajo?
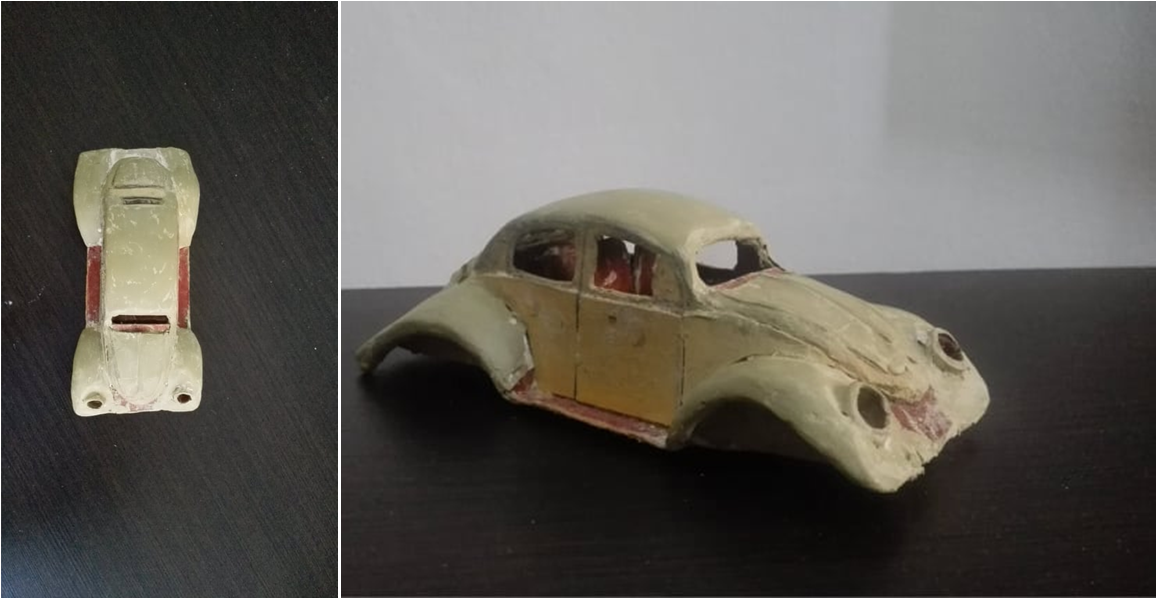
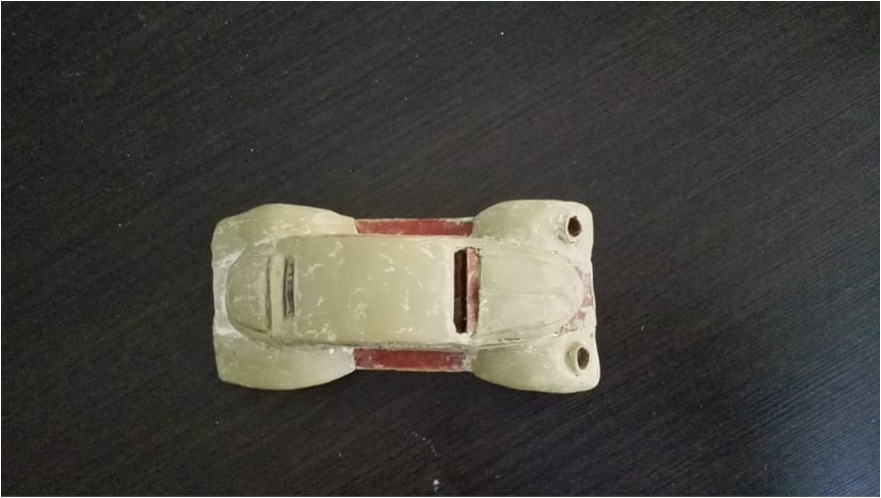
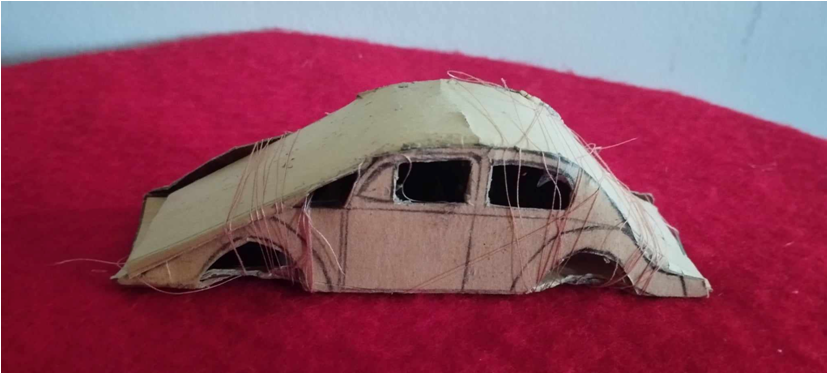
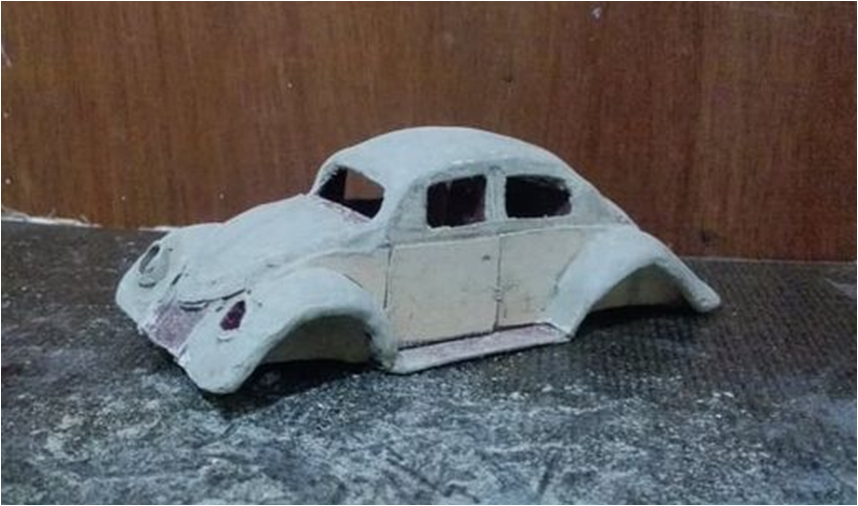
Hasta el día de hoy, el Auto posee sus 4 guardafangos, el capot, la compuerta del motor, los aros de los focos delanteros, los estribos y algo muy importante, el enmasillado y lijado de la superficie.
¿Qué le falta al Auto?
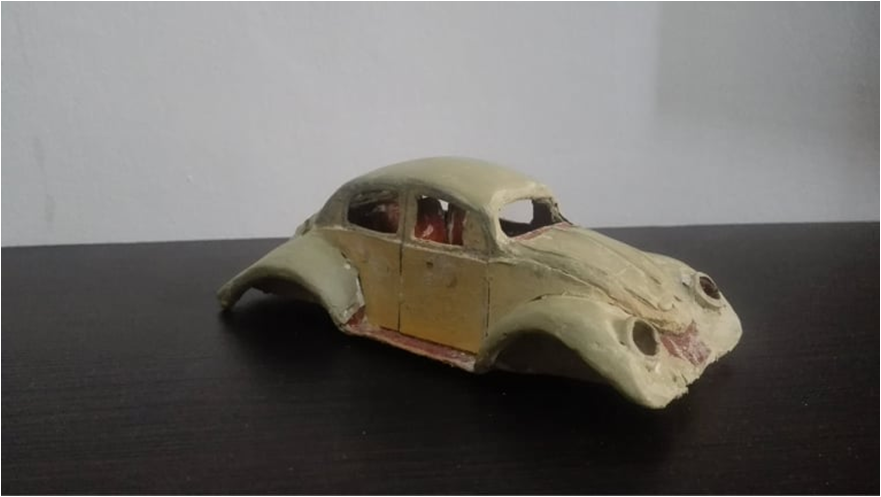
Ya el auto posee la verdadera forma del Volkswagen Escarabajo, pero todavia le faltan muchas piezas más, tales como: La pintura, los parachoques, accesorios del capót y de la compuerta del motor, así como los focos, las micas traseras, los vidrios de las puertas y parabrisa,los retrovisores, y por supuesto "Los cauchos". La verdad es que estoy ansioso de terminar este auto, creo que dentro de 3 días les puedo mostrar el resultado de este interesante proyecto.
Materiales para esta segunda etapa:
Para esta segunda etapa, usaré el siguiente material:
- Cartón de carpeta y papel, para eleborar los guardafangos y estribos del auto.
- Masilla de retoque automotriz ( EPOT PUTTY): Esta masilla se usa para rellenar irregularidades en la superficies antes de aplicar la pintura.
- Lija grano 320 y 600
- Pega blanca escolar
Retrospectiva de la primera etapa de la construcción a escala del Auto "Volkswagen Escarabajo":
Bueno amigos, antes de mostrarles la segunda etapa de este proyecto, es importante presentarle una memoria descriptiva de la publicación anterior.
Primer Avance de la obra:
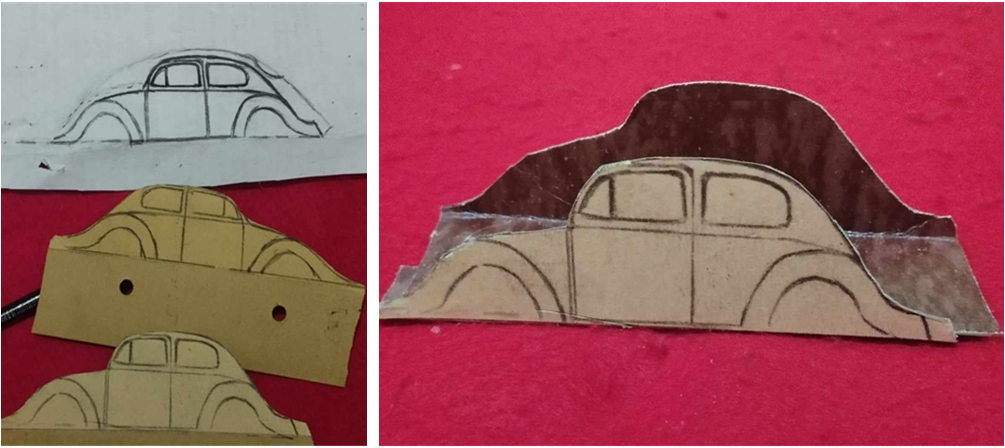
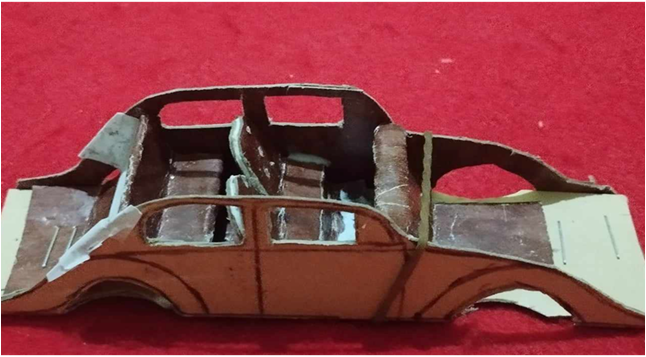
La obra comenzó con el dibujo de la silueta del auto Volkswagen, la cual me serviría de guía para darle forma al auto. La figura del Auto la trasladé al cartón con el uso de papel carbón, tomando en cuenta los dos lados, luego corte la figura del cartón y las uní, dejando un espacio entre estas dos partes, cuyo espacio va a definir el ancho y el largo del auto y de su habitaculo. Estos dos laterales los uní con los asientos del auto, luego le coloque el techo, cotando simplemente un pedazo de cartón en forma rectangular tomando en cuenta el ancho y el largo del auto.
A continuación les mostraré una secuencia de imágenes correspondientes a esta primera etapa:
Ahora pasamos a la segunda etapa.......
Proceso:
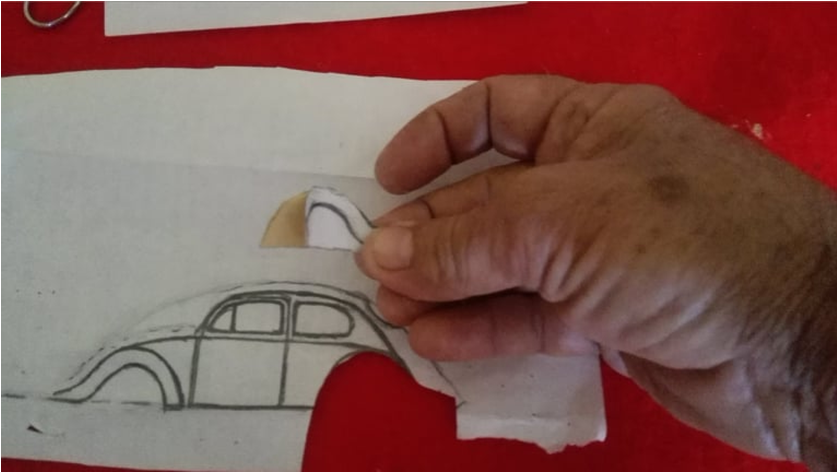
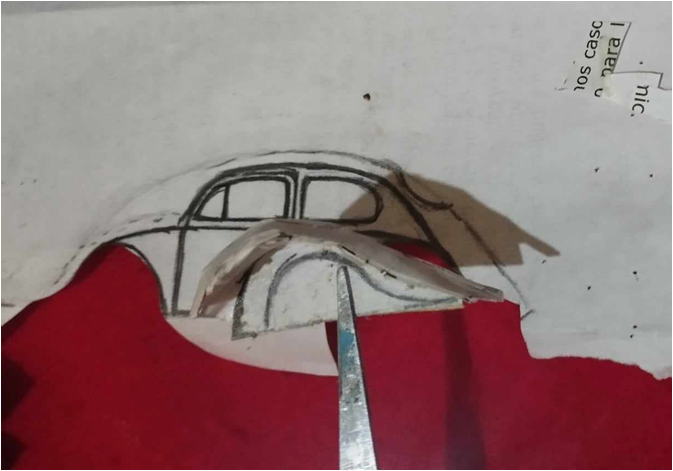
- Para darle forma al auto, voy a elaborar los guardafangos, estos los haré recortando la forma de los guardafangos del dibujo, esta pieza la voy a reforzar con el cartón:
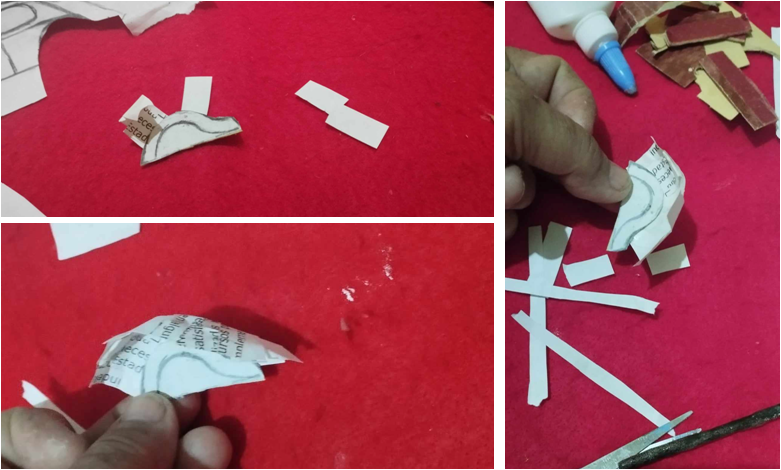
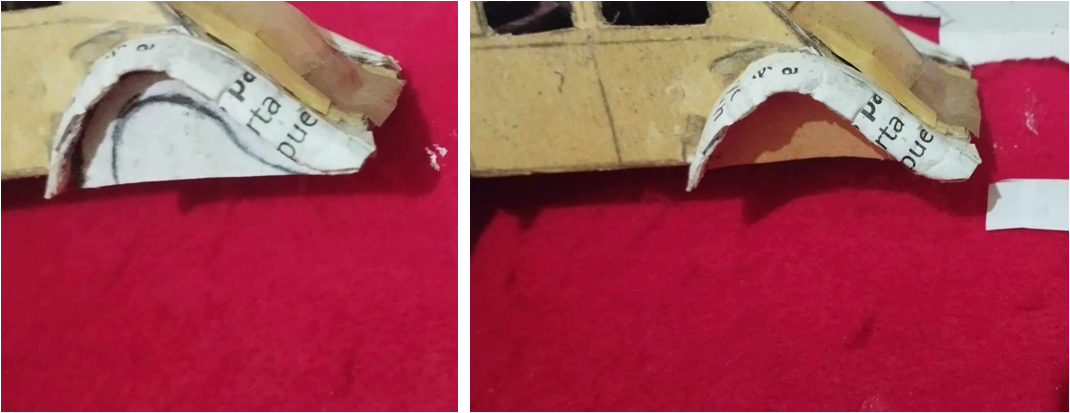
- Ahora comenzaré a ponerle varias tiras de papel, las cuales quedarán superpuestas, es decir, una encima de la otra, hasta que esta pieza quede fuerte, para esto voy a usar la pegablanca, mientras coloco las tiras de papel voy a procurar darle la forma al guardafango:
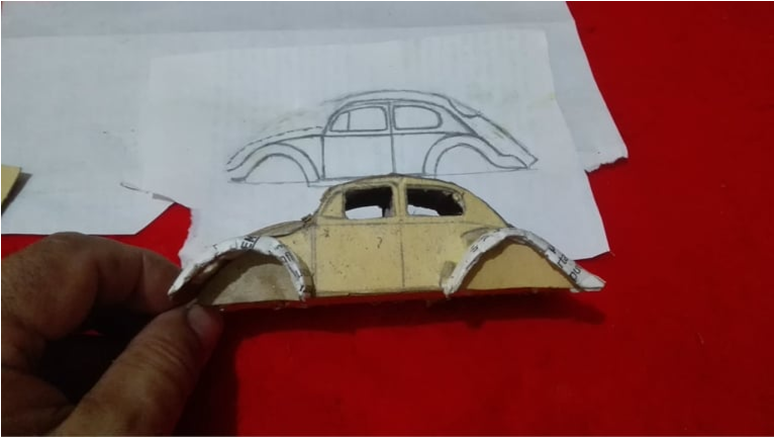
- En el siguiente paso voy a colocar todos los guardafangos en la carrocería del auto:
- Ahora le abriré un orificio a cada guardafango delantero para los focos:
- En este paso voy a cortar dos tiras de cartón para hacer los estribos, estas piezas las colocaré en la parte inferior de cada lado:

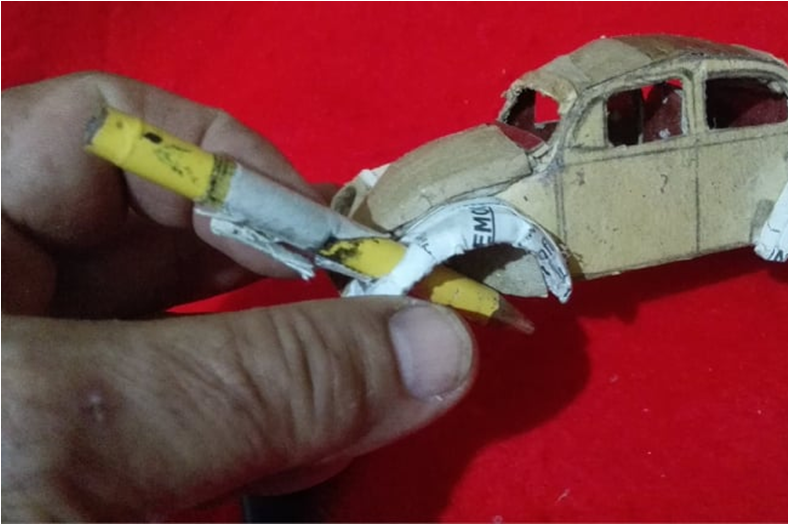
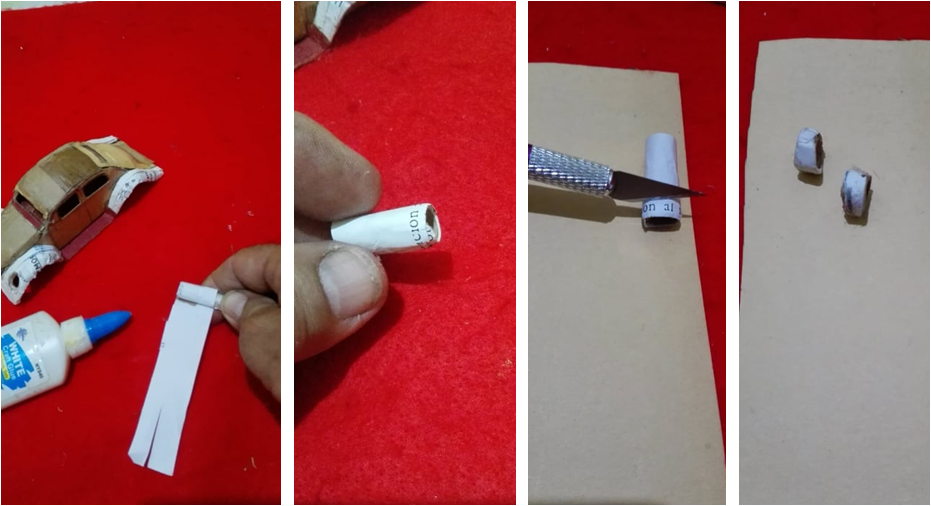
- Ahora voy a enrollar una tira de papel y cartón para hacer un tubo, luego con el cutter, voy a cortar los aros de los focos del carro:
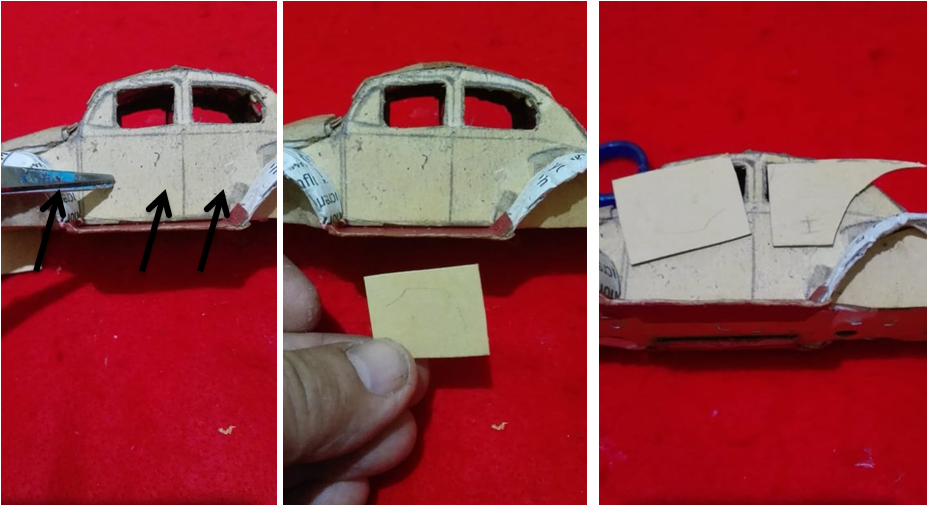
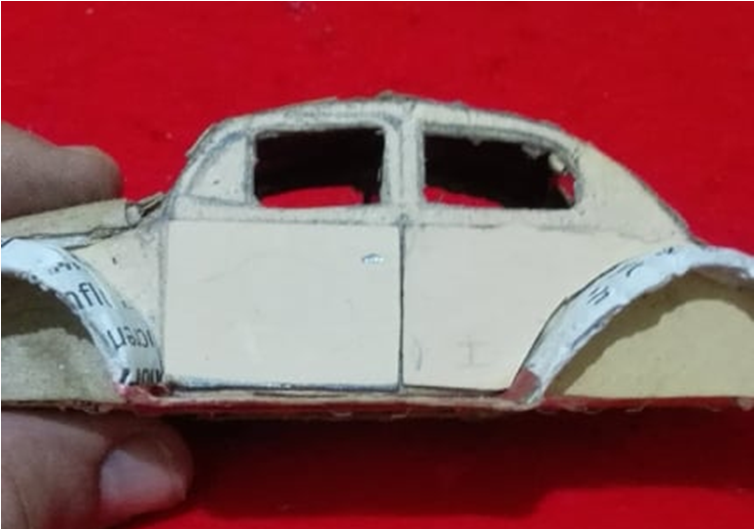
- Para que haya una separación entre las puertas y la carrocería, voy a cortar tres piezas, una de ellas tendrá la forma de la puerta, porque precisamente la colocaré encima de la puerta y las dos restantes, van al lado de cada puerta:
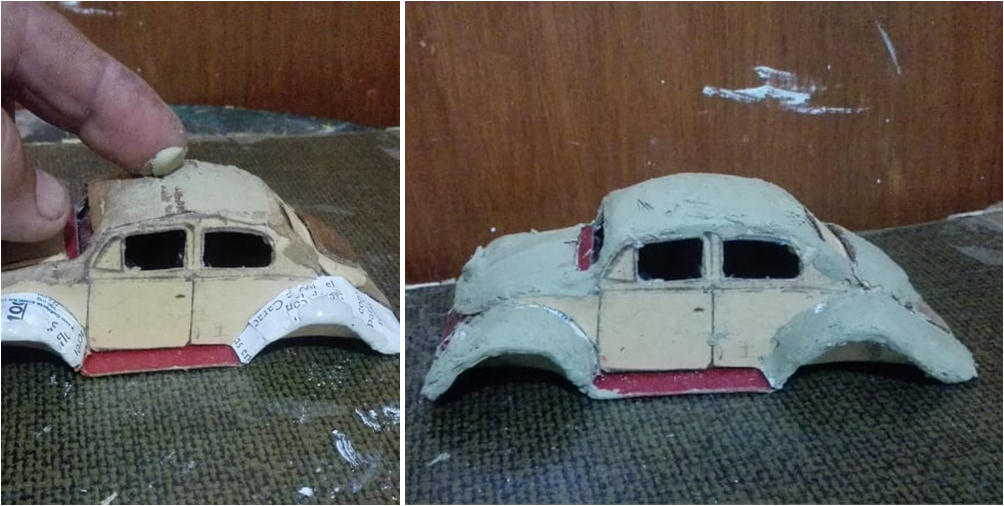
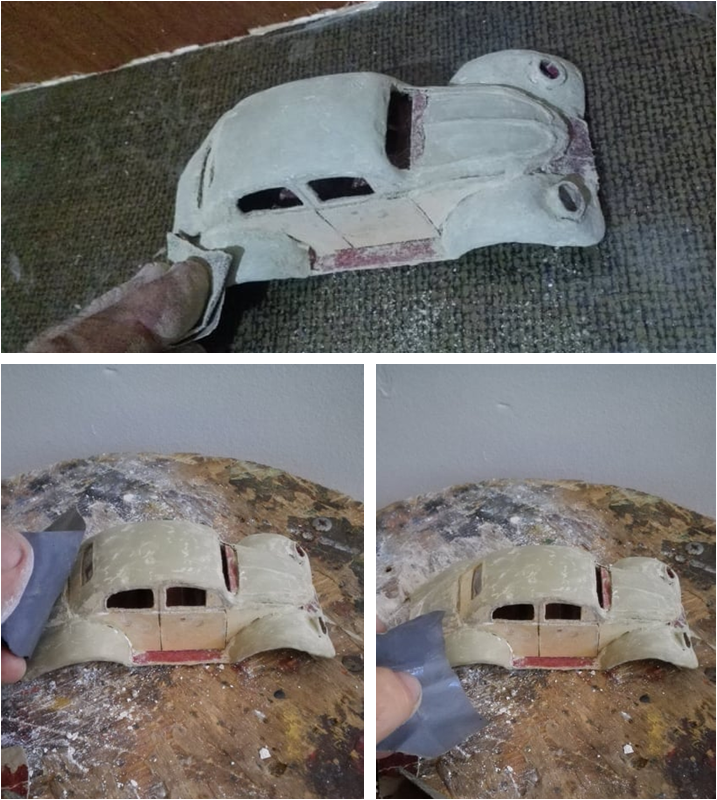
- Bueno amigos, ahora llevaré esta carrocería directo al departamento de latoneria y pintura, para enmasillar toda la superficie de la carrocería del auto, voy a usar masilla de retoque para autos, es una masilla que se usa para corregir las imperfecciones de la carrocería, se aplica antes de pintar y después de la primera capa de pintura:
- Después de aplicar la masilla, lo siguiente será lijar toda la superficie de la carrocería comenzando con la lija 320 y después de corregir los detalles usaré la lija 600 para lograr un acabado liso:
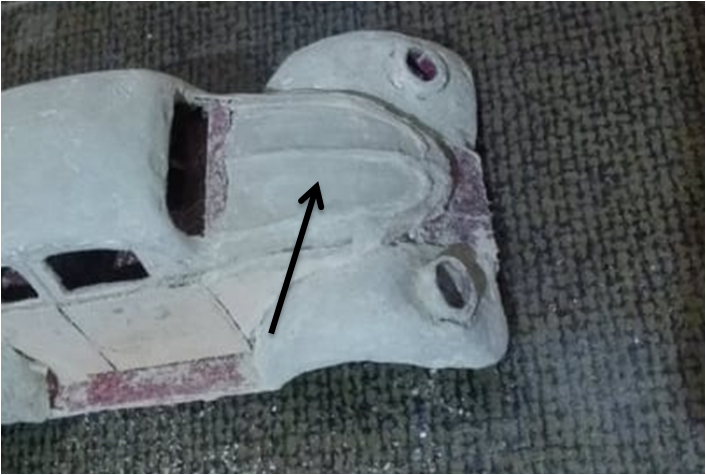
- En las imágenes podrán ver el dibujo en relieve que le hice al capót y a la tapa de la carrocería que cubre motor, este dibujo lo hice con la masilla:
Ya lijé la carrocería, por supuesto, aun existen muchos detalles, pero estos los voy a corregir después de aplicar la primera capa de pintura, es un trabajo que requiere mucha paciencia.
Como les decía en el Item anterior, es un trabajo que requiere de mucha paciencia, pero poco a poco se van corrigiendo los detalles, ¡Claro! siempre quedarán detalles, porque estoy trabajando sobre cartón, el cual no se le puede hacer mucha fuerza porque se hunde, pero trataré de minimizar los detalles, y les digo algo, aunque al final quedenalgunos detalles, para mi, el solo hecho de haber elaborado este Auto en miniatura., me da mucha satisfacción, a parte de que la he disfrutado. Saludos, nos vemos dentro de pocos días para presentarles el resultado de este proyecto.

IN ENGLISH:
A big greeting to the entire HiveDiy community, After 5 days of starting my project: Scale elaboration of the "Volkswagen Beetle" Car, today I wanted to show you another preview of this interesting work, which until today, I have dedicated to about 7 hours of work, of course, working for half an hour in the morning, sometimes I dedicate an hour to it, the truth is that I have been doing it little by little, in reality, it is a job that requires a lot of patience and, above all, creativity , because while I'm building this car, I'm also thinking about its many details, such as the construction of the fenders, as well as improving the surface of the body, the paint, the tires, doors, hood, trunk, in short, there are so many things that emerge as I progress.
I tell you that I have been eager to put the gardafandos, the hood and the engine door, to the structure of the car, because I want to give the Volkswagen Beetle the true shape, and so I did, but when I looked at it, I saw it very ugly,! Well of course! Cardboard when wet with glue tends to deform, so thinking and thinking, the idea of using touch-up putty for car paints came to mind, so I had to buy a small 0.2 g tube of EPOT PUTTY, the which is a putty that is used to correct the details of the car body before applying the paint, this product cost me 6 dollars, but hey, the important thing is that the work turns out well, because for me, this Volkswagen Beetle, represents a great challenge.
Scale construction of Volkswagen Beetle, (Fender, hood, roof, running boards and caulking) (PART-2)
Well friends, taking into account the length of the process, I have decided to show you another progress of the work, as I told you, I have been doing this work in my free time, sometimes I work for half an hour in the morning, sometimes in the afternoon, The truth is that until today I have dedicated 7 hours of work to it, between coffee and coffee.
How is the construction of my Volkswagen Beetle going?
To this day, the Car has its 4 fenders, the hood, the engine door, the headlight rings, the running boards and something very important, the caulking and sanding of the surface.
What is missing from the Car?
The car already has the true shape of the Volkswagen Beetle, but it is still missing many more parts, such as: The paint, the bumpers, hood and engine door accessories, as well as the headlights, rear lenses, door glass and windshield, the mirrors, and of course "The tires". The truth is that I am eager to finish this car, I think that within 3 days I can show you the result of this interesting project.
Materials for this second stage:
For this second stage, I will use the following material:
- Folder cardboard and paper, to make the fenders and running boards of the car.
- Automotive touch-up putty (EPOT PUTTY): This putty is used to fill irregularities on surfaces before applying paint.
- 320 and 600 grit sandpaper
- White school glue
Retrospective of the first stage of the scale construction of the "Volkswagen Beetle" Car:
Well friends, before showing you the second stage of this project, it is important to present a descriptive memory of the previous publication.
First Preview of the work:
The work began with the drawing of the silhouette of the Volkswagen car, which would serve as a guide for me to shape the car. I transferred the figure of the Car to the cardboard with the use of carbon paper, taking into account the two sides, then I cut the figure from the cardboard and joined them, leaving a space between these two parts, whose space will define the width and length of the car and its cabin. I joined these two sides with the seats of the car, then I placed the roof, simply measuring a piece of cardboard in a rectangular shape taking into account the width and length of the car.
Below I will show you a sequence of images corresponding to this first stage:
Now we go to the second stage......
Process:
- To give shape to the car, I am going to make the fenders, I will make these by cutting out the shape of the fenders in the drawing, I am going to reinforce this piece with cardboard:
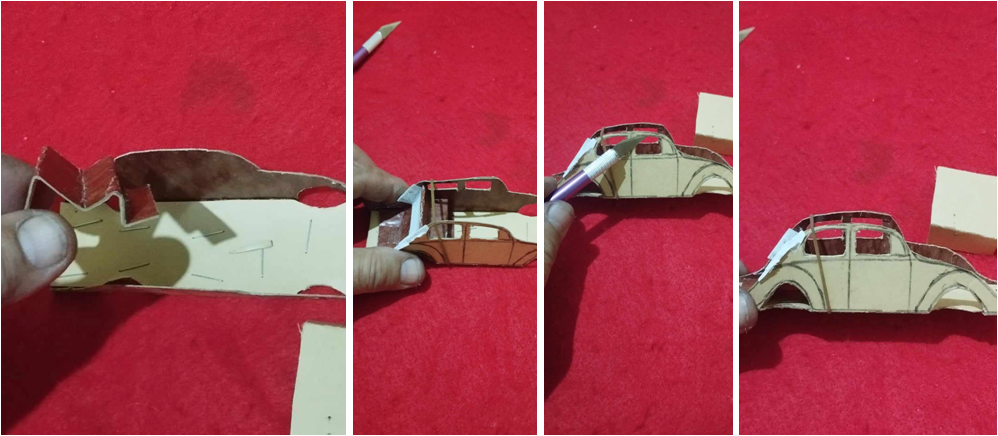
- Now I will begin to put several strips of paper, which will be superimposed, that is, one on top of the other until this piece is strong, for this I am going to use the white glue, while I place the strips of paper I am going to try to give it the shape to the fender:
- In the next step I am going to place all the fenders on the body of the car:
- Now I will open a hole in each front fender for the lights:
- In this step I am going to cut two strips of cardboard to make the stirrups, I will place these pieces at the bottom of each side:
- Now I am going to roll up a strip of paper and cardboard to make a tube, then with the cutter, I am going to cut the rings of the car's headlights:
- So that there is a separation between the doors and the body, I am going to cut three pieces, one of them will be in the shape of the door, because I will precisely place it on top of the door and the remaining two will go next to each door:
- Well friends, now I will take this body directly to the metalwork and painting department, to putty the entire surface of the body of the car, I am going to use touch-up putty for cars, it is a putty that is used to correct imperfections in the bodywork, It is applied before painting and after the first coat of paint:
- After applying the putty, the next thing will be to sand the entire surface of the body starting with the 320 sandpaper and after correcting the details I will use the 600 sandpaper to achieve a smooth finish:
- In the images you can see the relief drawing that I made on the hood and the body cover that covers the engine. I made this drawing with putty:
I already sanded the body, of course, there are still many details, but I will correct these after applying the first layer of paint, it is a job that requires a lot of patience.
As I said in the previous Item, it is a job that requires a lot of patience, but little by little the details are corrected, of course! There will always be details, because I am working on cardboard, which cannot be used with great force because it sinks, but I will try to minimize the details, and I will tell you something, even if in the end there are some details left. For me, the mere fact of having built this miniature car gives me a lot of satisfaction, apart from the fact that I enjoyed it.Greetings, see you in a few days to present the result of this project.
Demasiado bello va quedando. Entiendo que estés ansioso, yo también lo estaría. Es un proyecto ambicioso y laborioso. El resultado no me lo pierdo. 🙋
Hola, bueno amiga, mañana tengo que comprar la pintura metalizada de color dorado, creo que para el lunes debo tener listo este Auto, saludos y gracias por su agradable comentario.
Claro.que si mucha paciencia y creatividad es lo que hay que tener para elaborar un auto en miniatura con material de provecho, espero poder ver pronto el resultado final
En pocos días podrás ver este maravilloso Auto, conocido popularmente como "Escarabajo", saludos.
Son impresionante la cantidad de detalles querido Oscar! Me encantaría lucirlo como pieza de coleccion
Hola amiga, quiero pintar este escarabajo de color dorado, creo que debe lucir bien combinado con sus manillas y parachoques plateados, trataré de minimizar al maximo los detalles irregulares de la pintura. saludos.
@oscarcede
https://inleo.io/threads/view/hive-130560/re-leothreads-2spscud62
https://twitter.com/hivediy47901/status/1712977981910433825
Grandioso trabajo! 👏 por acá esperando el resultado de su hermoso proyecto.
Wow, la atención al detalle es impresionante! Excelente trabajo, está quedando espectacular
Jajaja esto es arte amigo Oscar, usted siempre sorprendiendo a los lectores con su ingenio y dedicación. Suerte y muchos saludos
Hola Emilio, bueno, aprovechando el tiempo libre para inventar algo, aunque este tipo de arte requiere de mucho tiempo, creo que más rápido pinto mi carro, jeje..., saludos
Jajaja es verdad
Enhorabuena tu publicación ha sido elegida entre las mejores del día.
SIGUA CREANDO BUEN CONTENIDO.