[Ing~Esp] Beautiful 🤩 my first crochet hat, I'll show you how I did it // Hermoso 🤩 mi primer gorro a crochet, te enseño como lo hice
Hello dear readers, I wish all the hive bees a nice weekend, especially this beautiful needleworkmonday community
On this occasion I want to share this beautiful creation with the purpose of approaching the cold season, I wanted to practice starting with this crochet hat for my daughter, I confess that I had no idea how to do it, but everything is a matter of will and following some advice from who you already have experiences, I hope you like the result as much as I do 🤭 with much love for you
Materials of use:
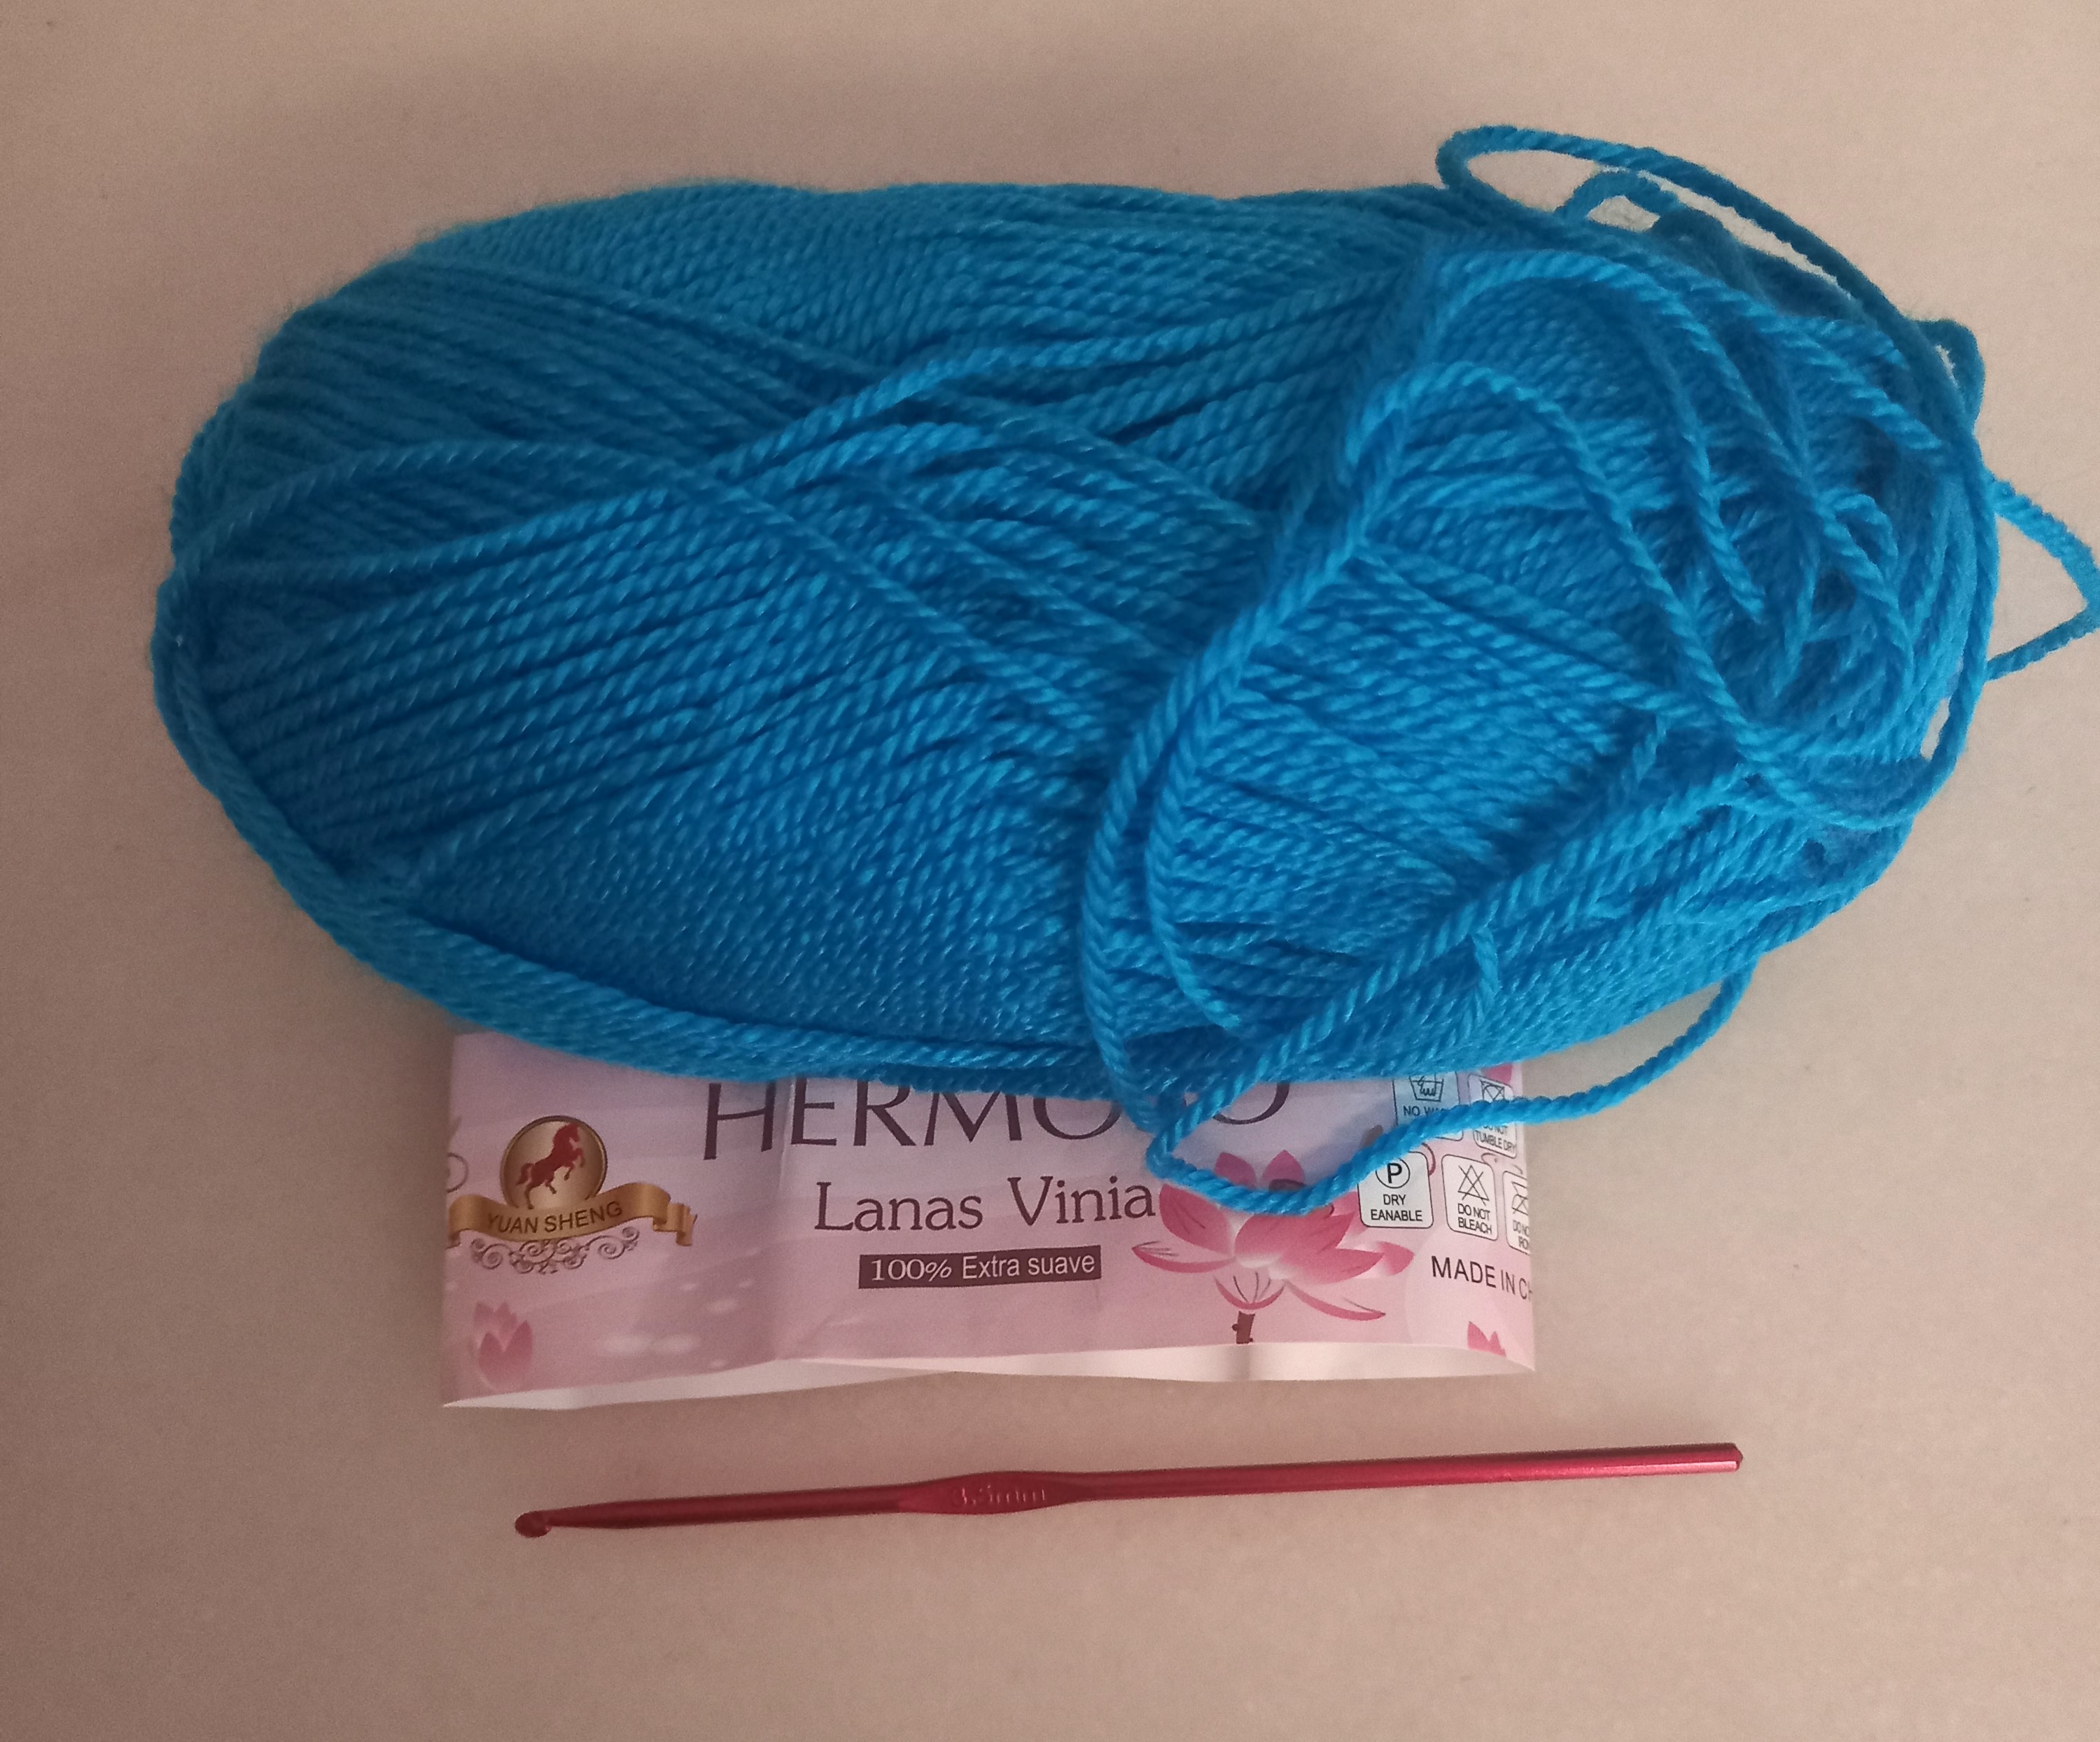
♡ A roll of wool thread nr 5
♡ A case nr 3.5
Let's start:

We will make a chain of 50 stitches, which would be the height of our hat.
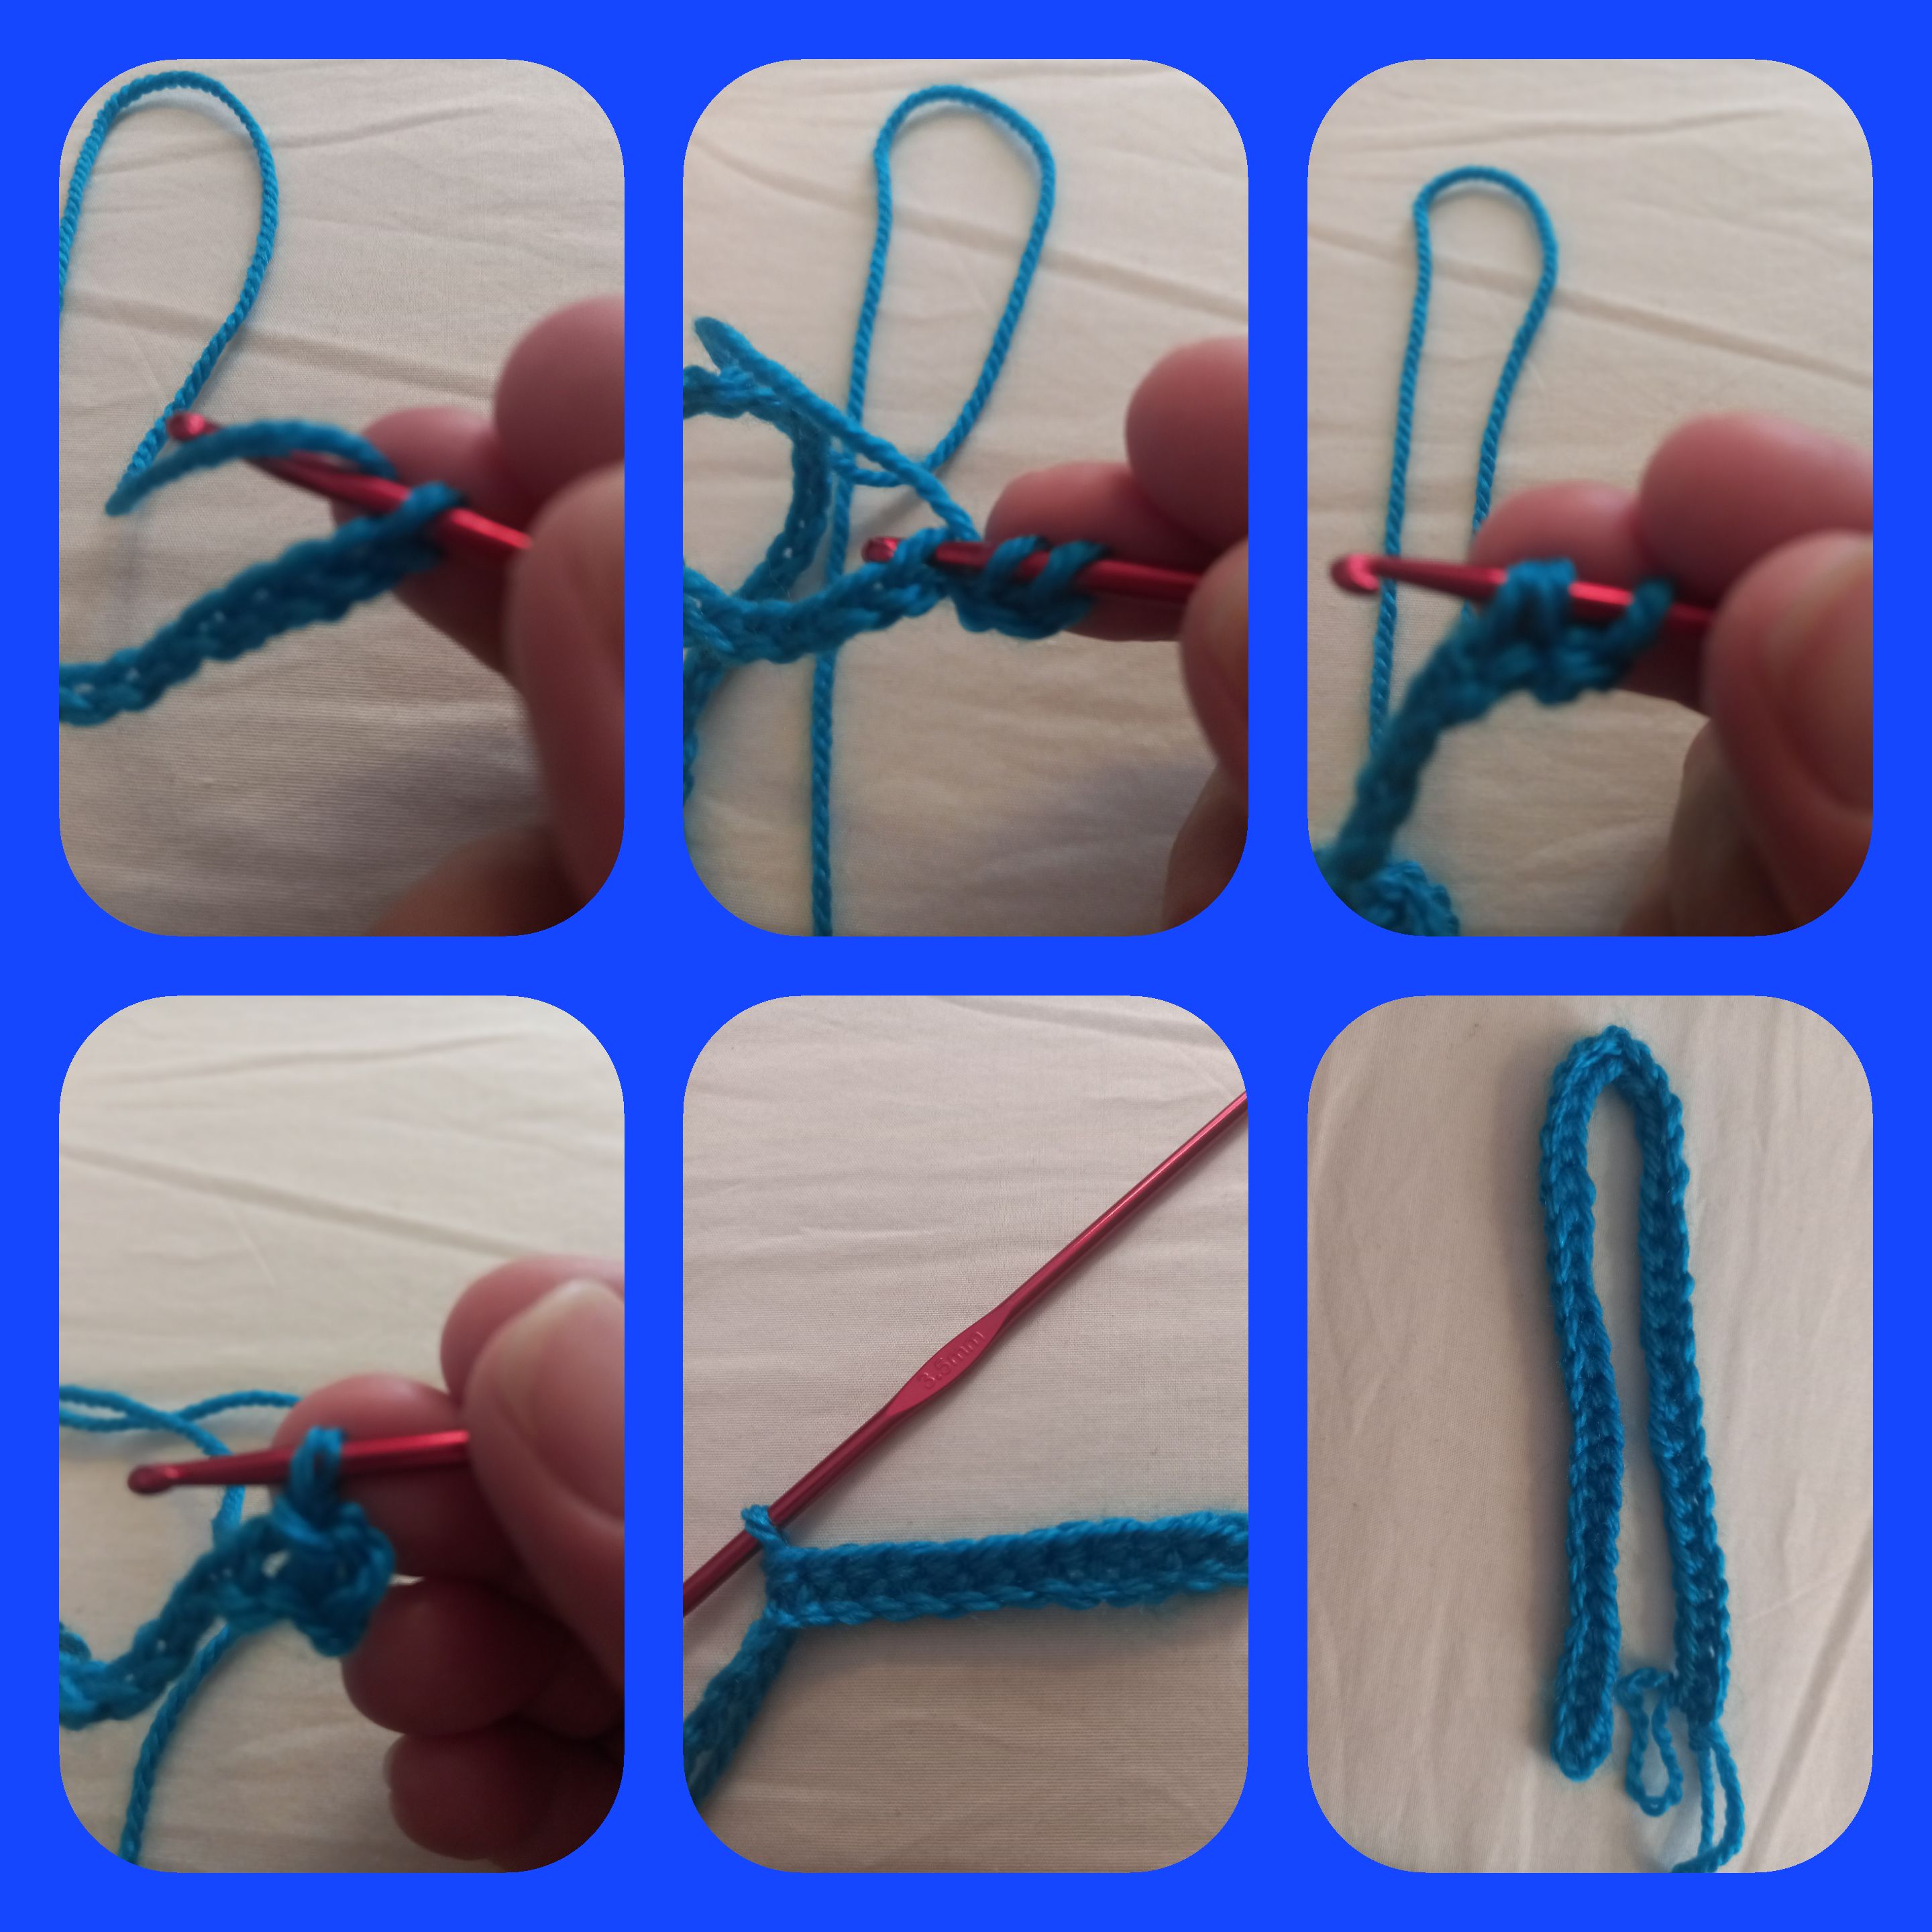
At the end we go for the first round and this corresponds to a double crochet in each space taking the thread from the end to give it the ribbed finish that we want
And so in the same way and with the same point we will continue making the turns, only that when we reach the end of each one we turn and continue our procedure, it is very easy to do and it is super cute.
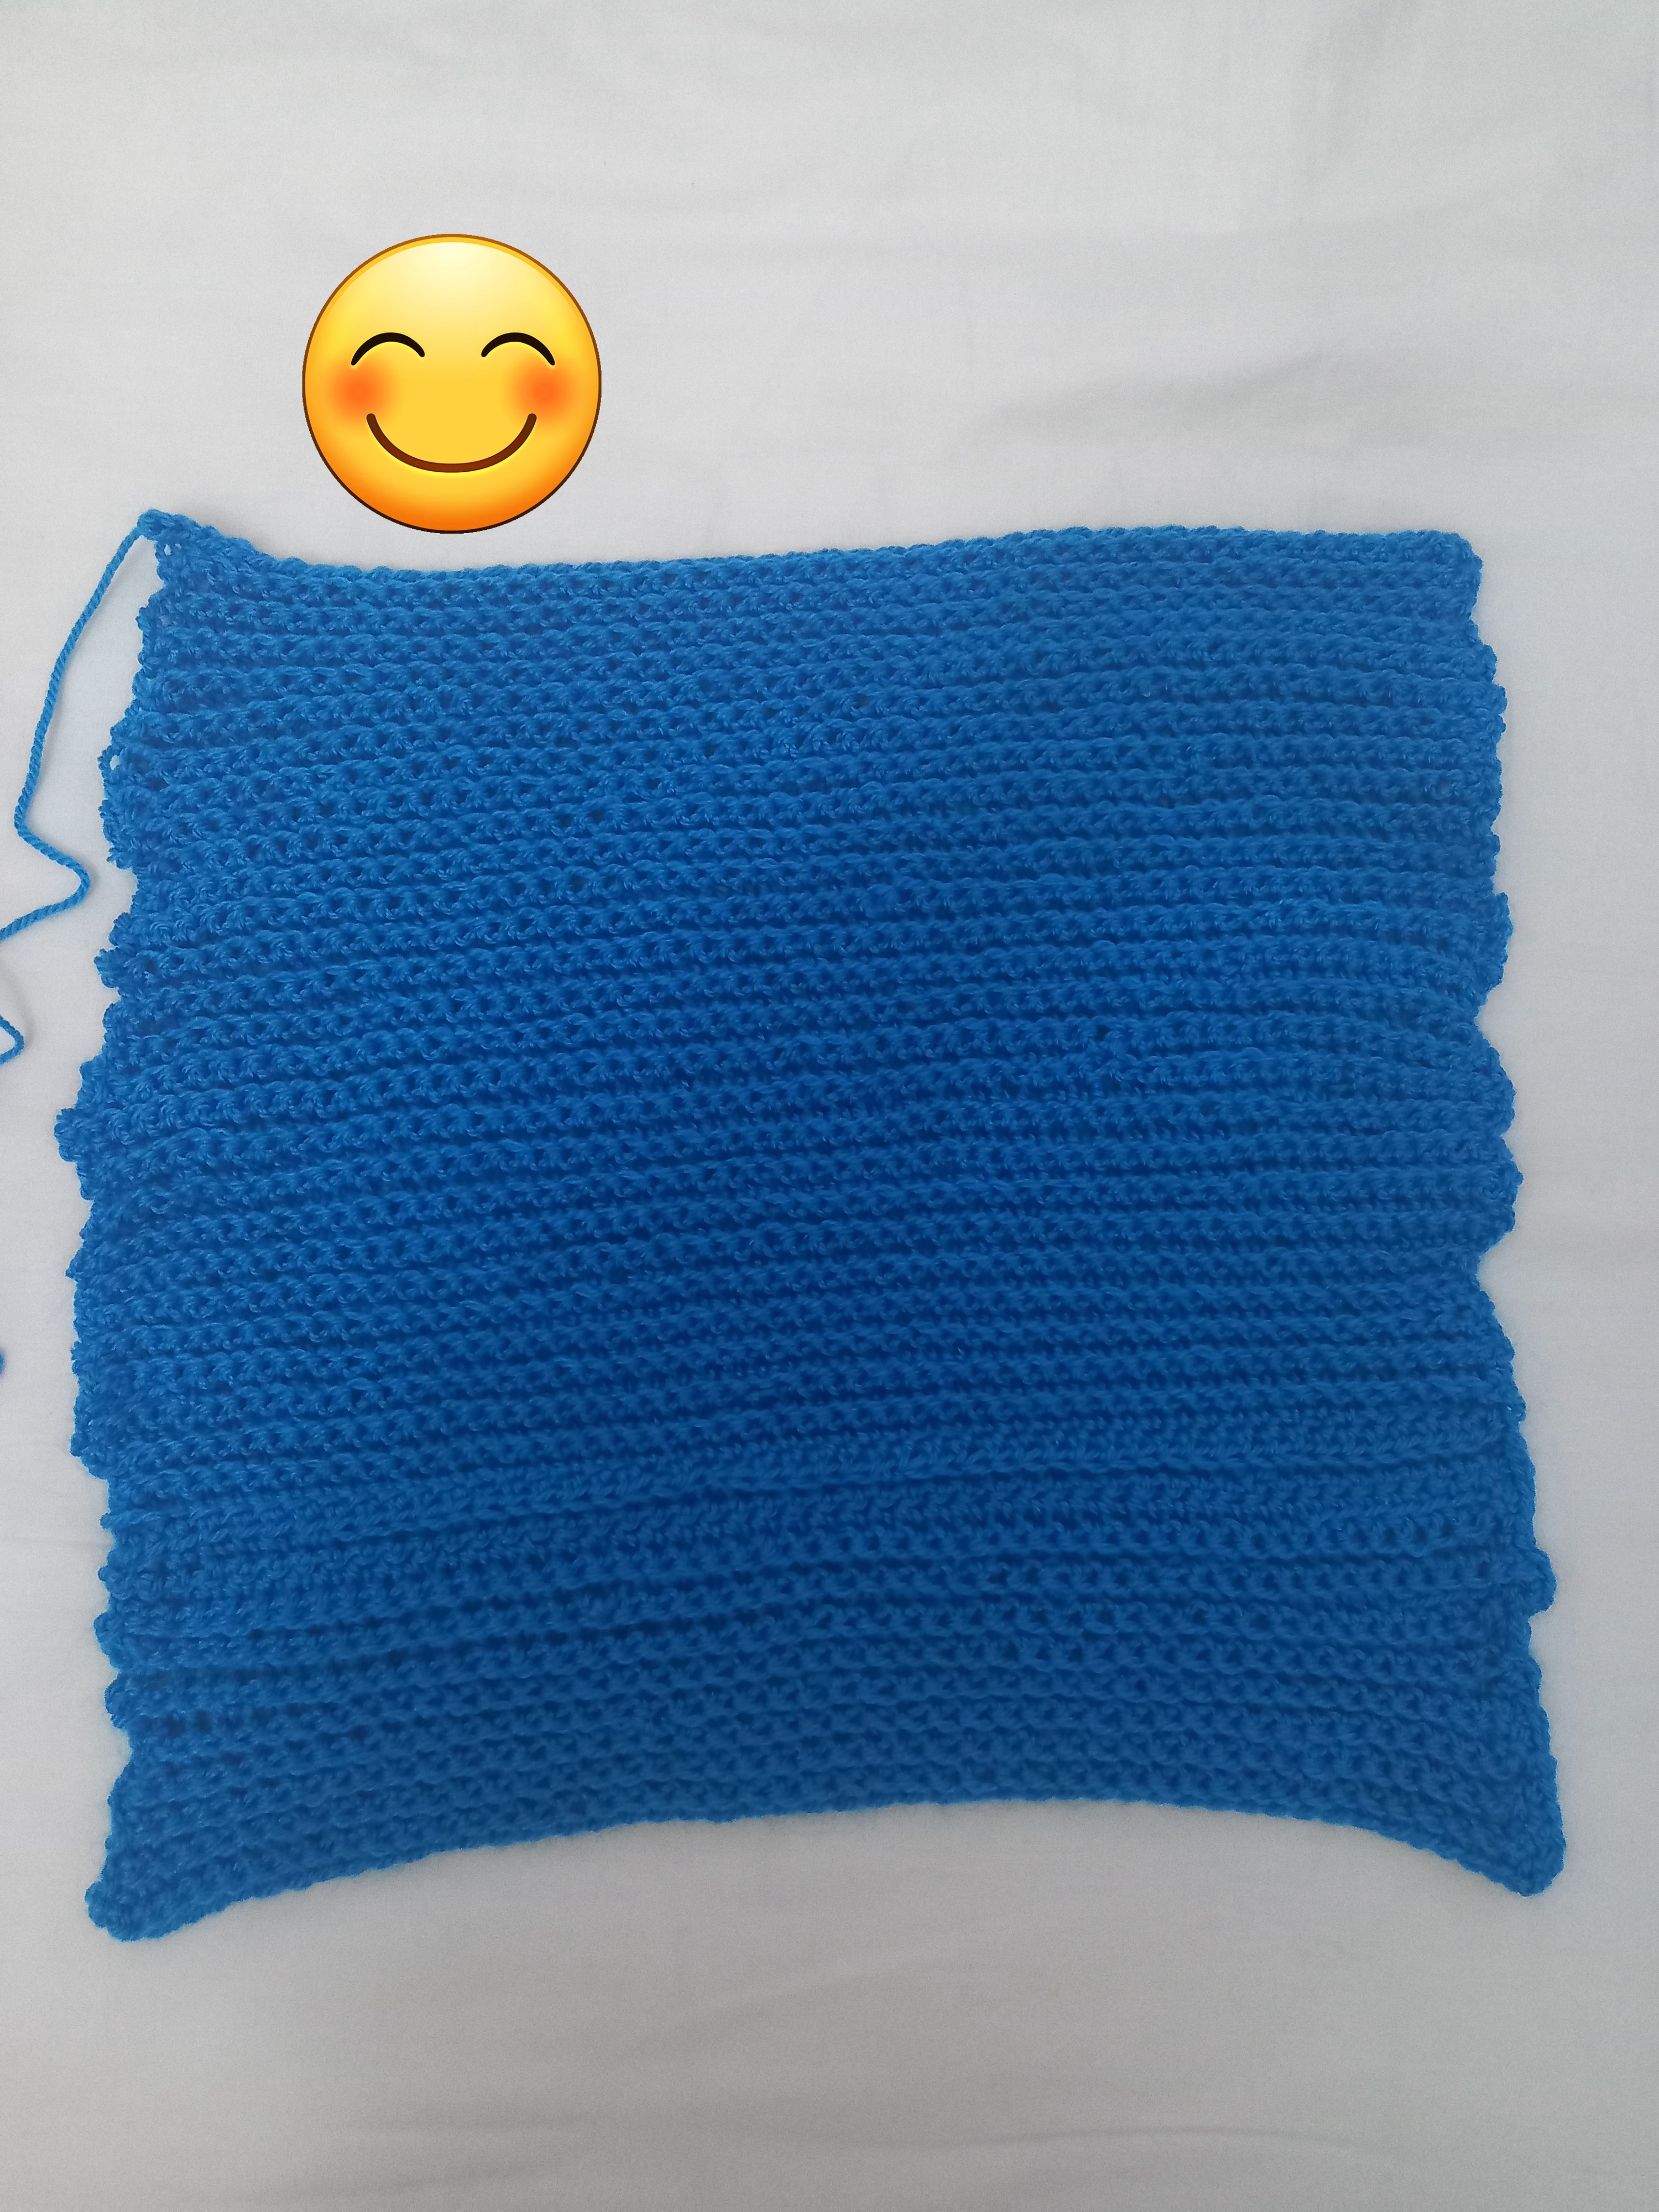
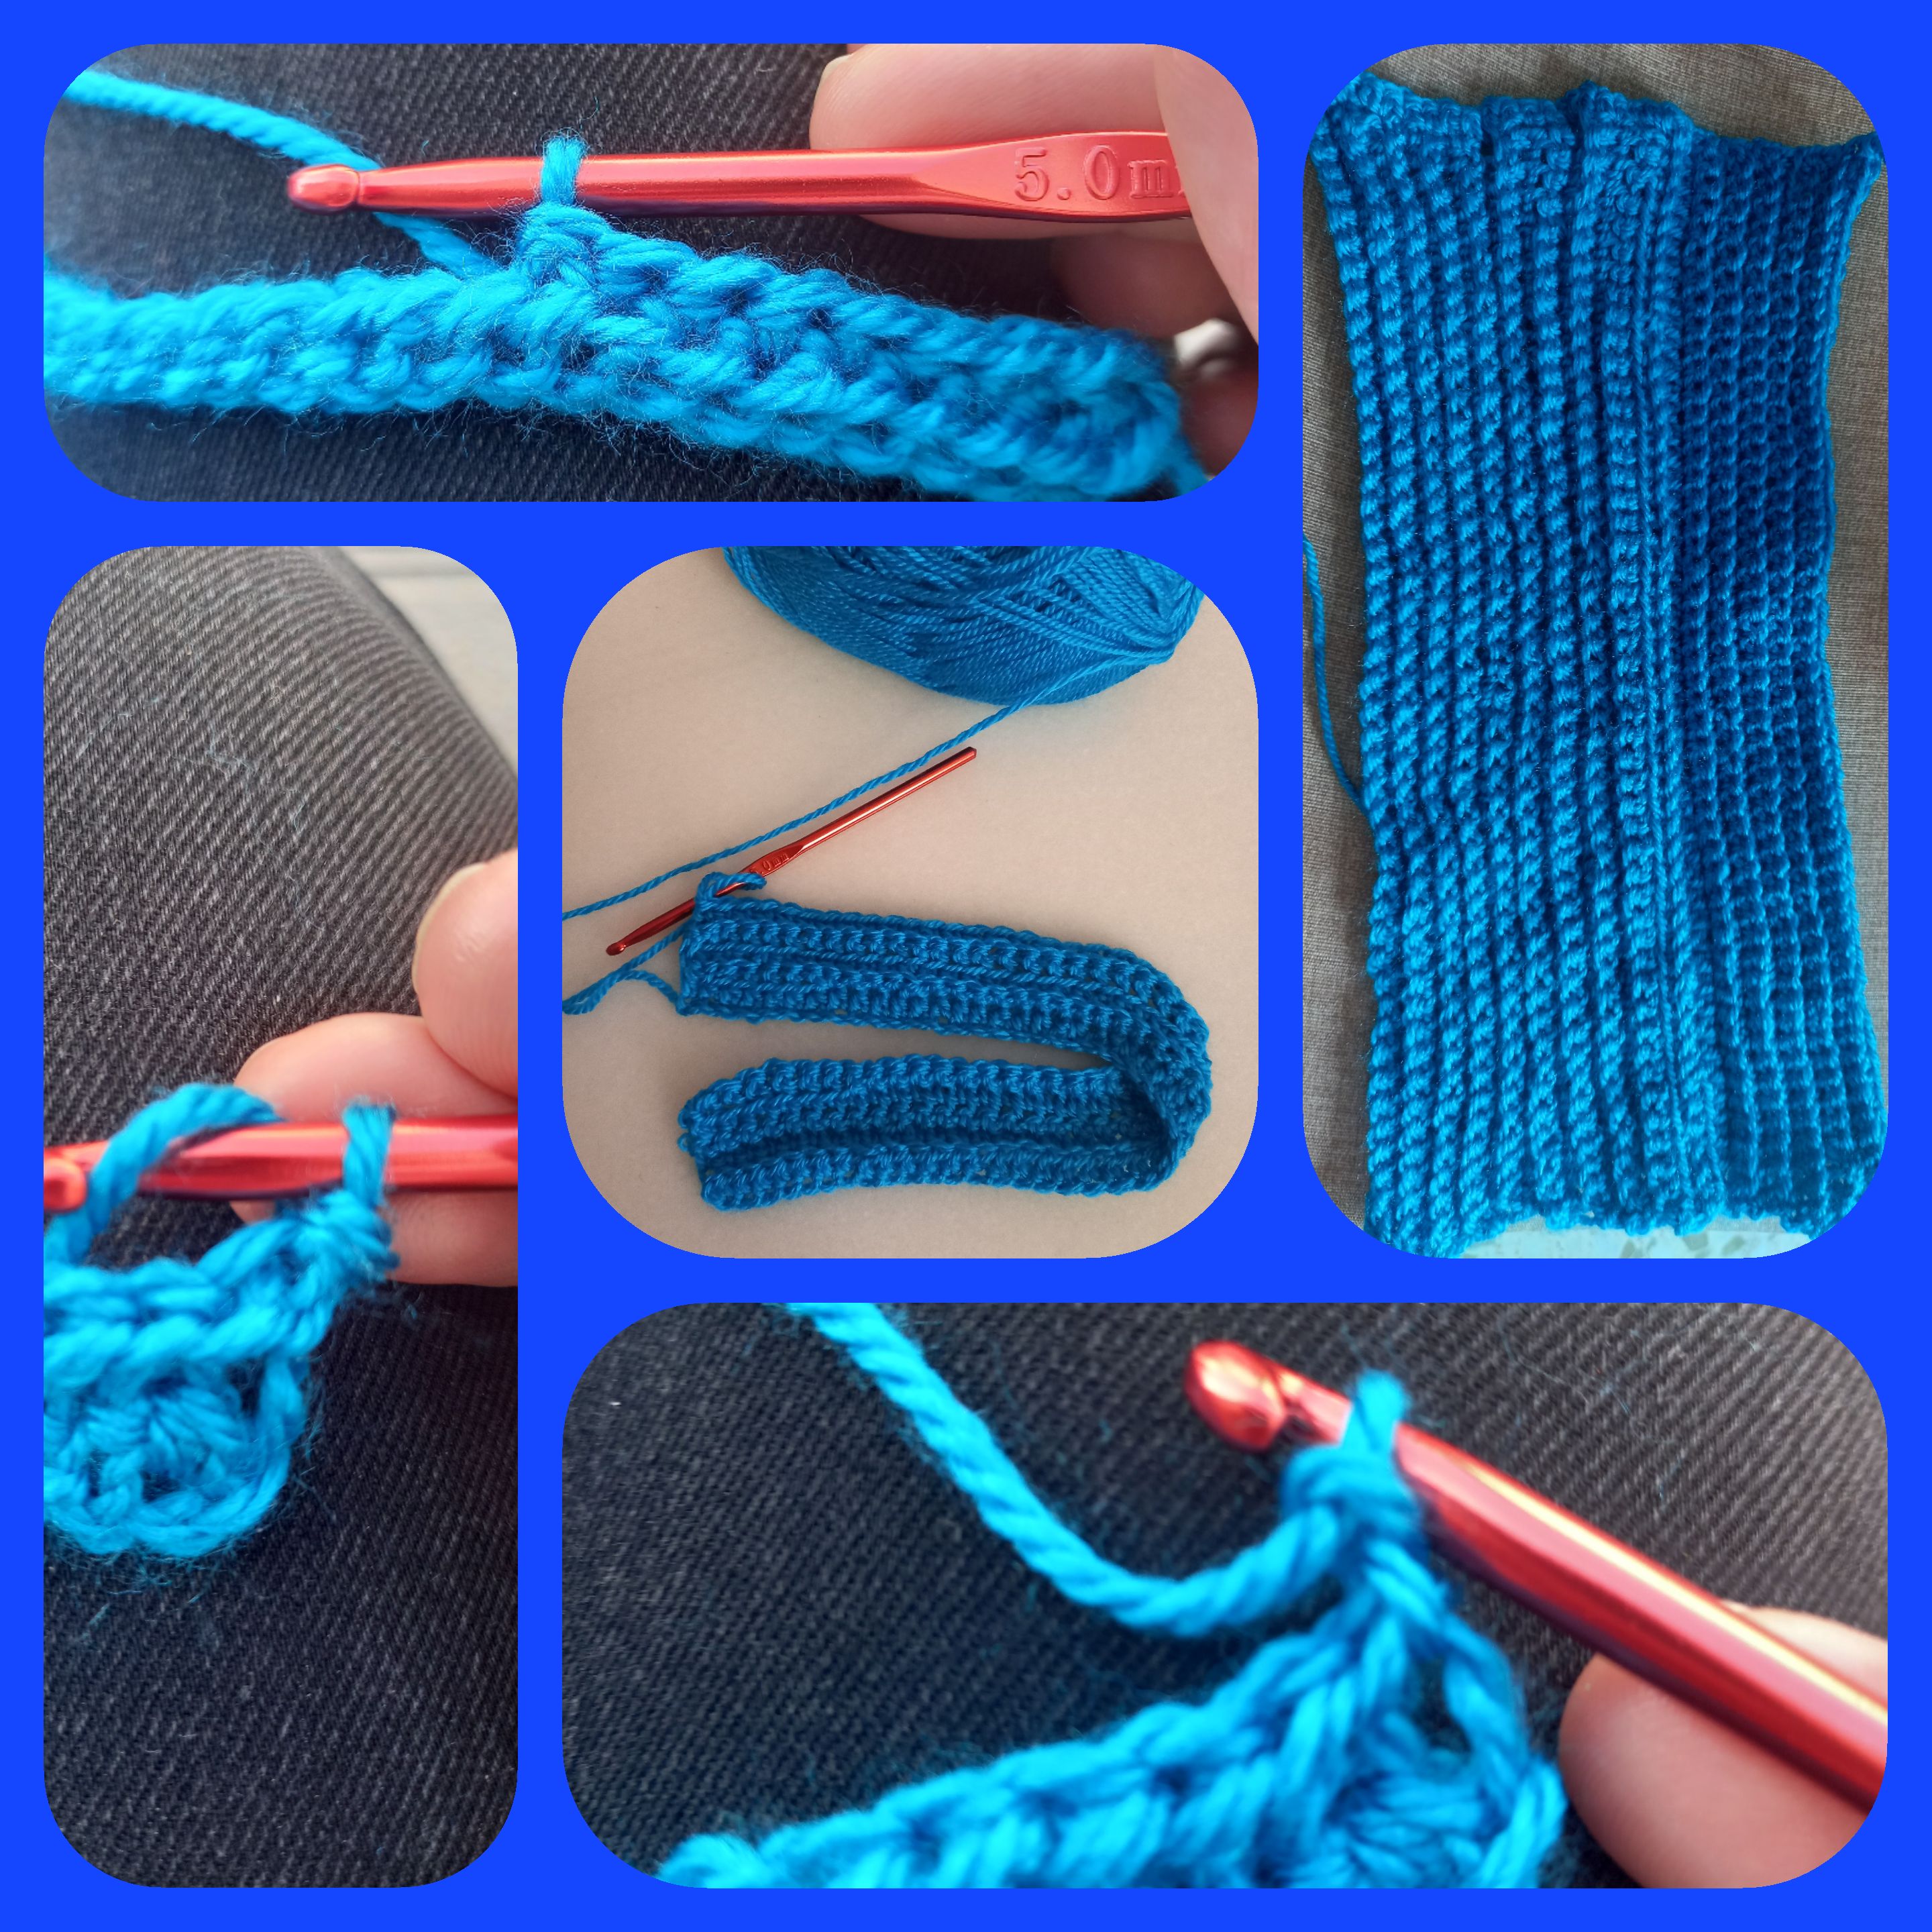
And so on until we make 35 laps, which would be the width of our hat.
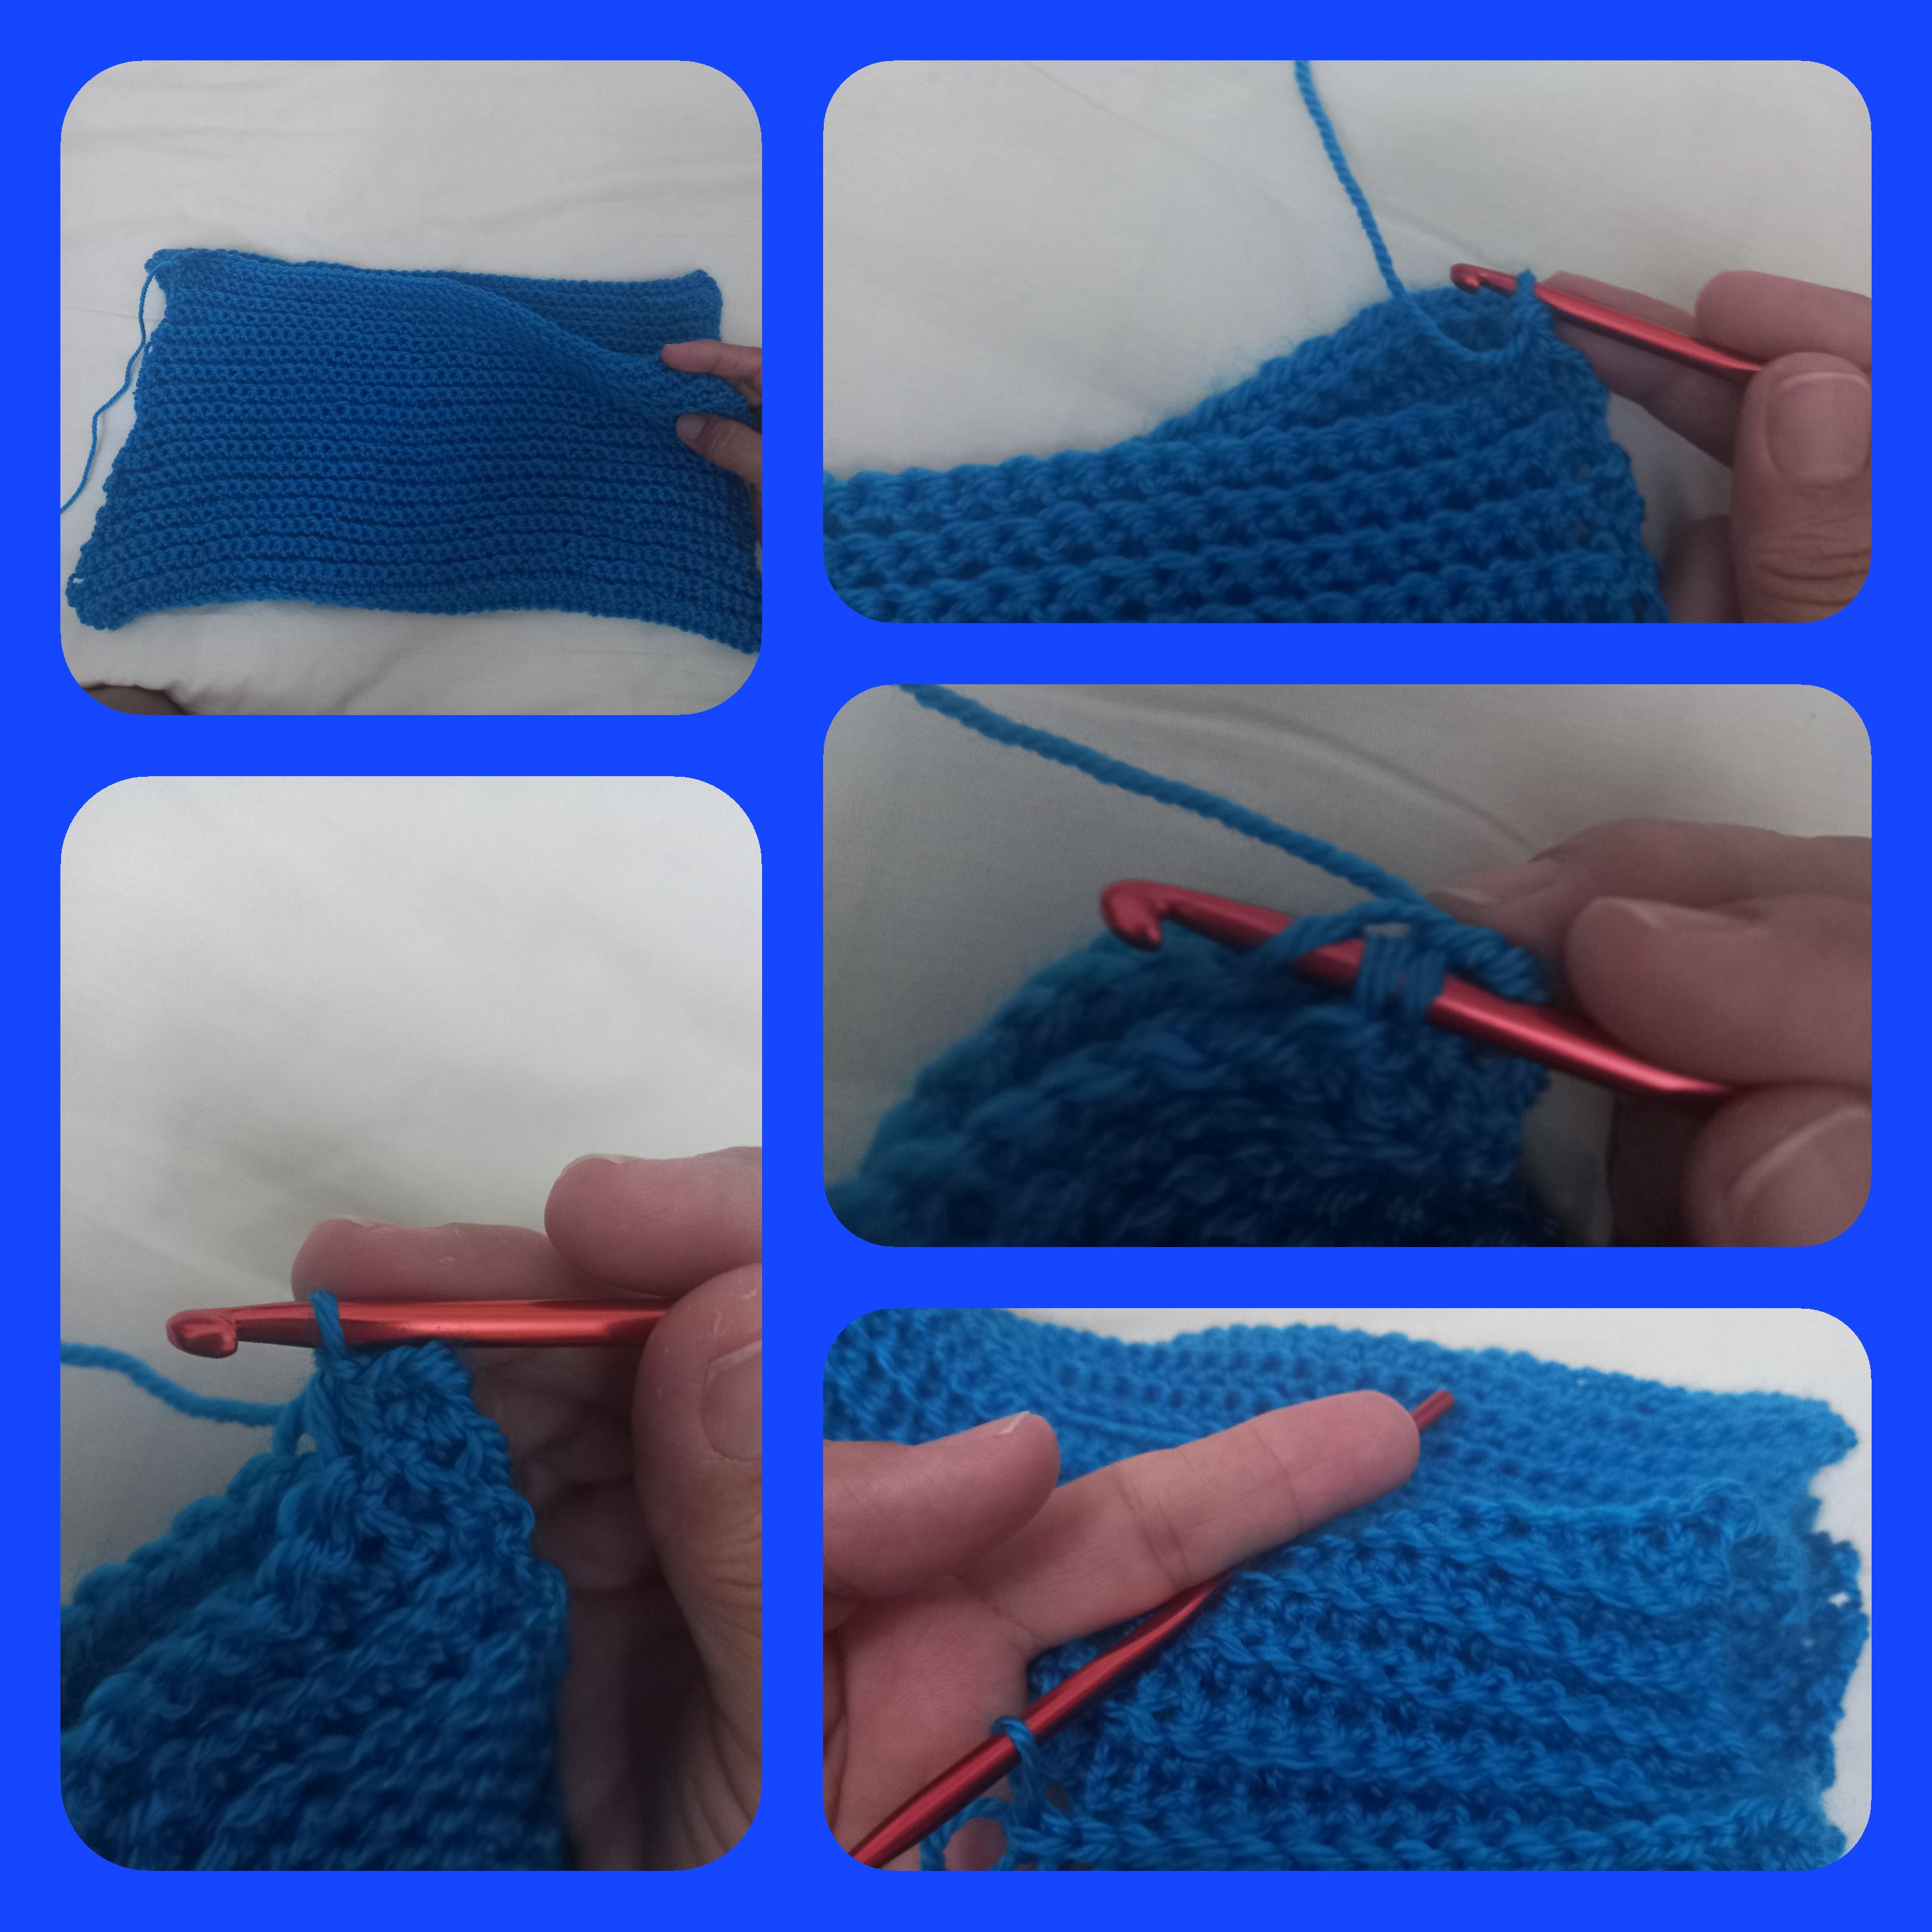
Then we fold and close both ends with the same knitting stitch
And so our fabric is taking shape

This step was not in my plans but I thought it would be better to do it with this needle and sew through the extreme points and then curl and tie both ends to finish it on the top of the head.
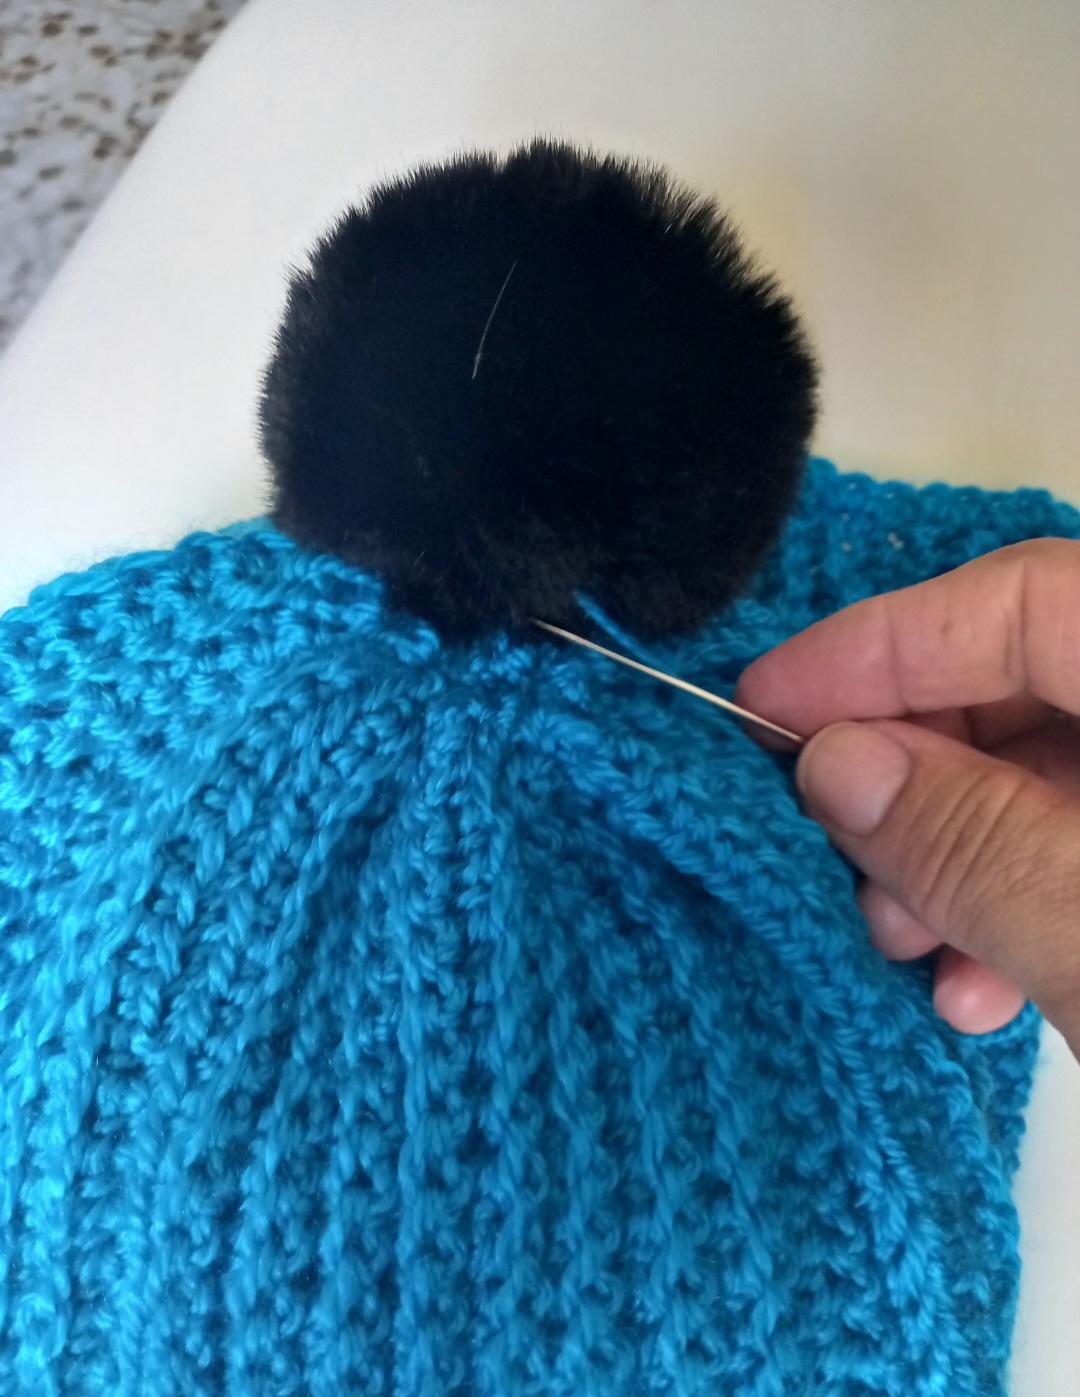
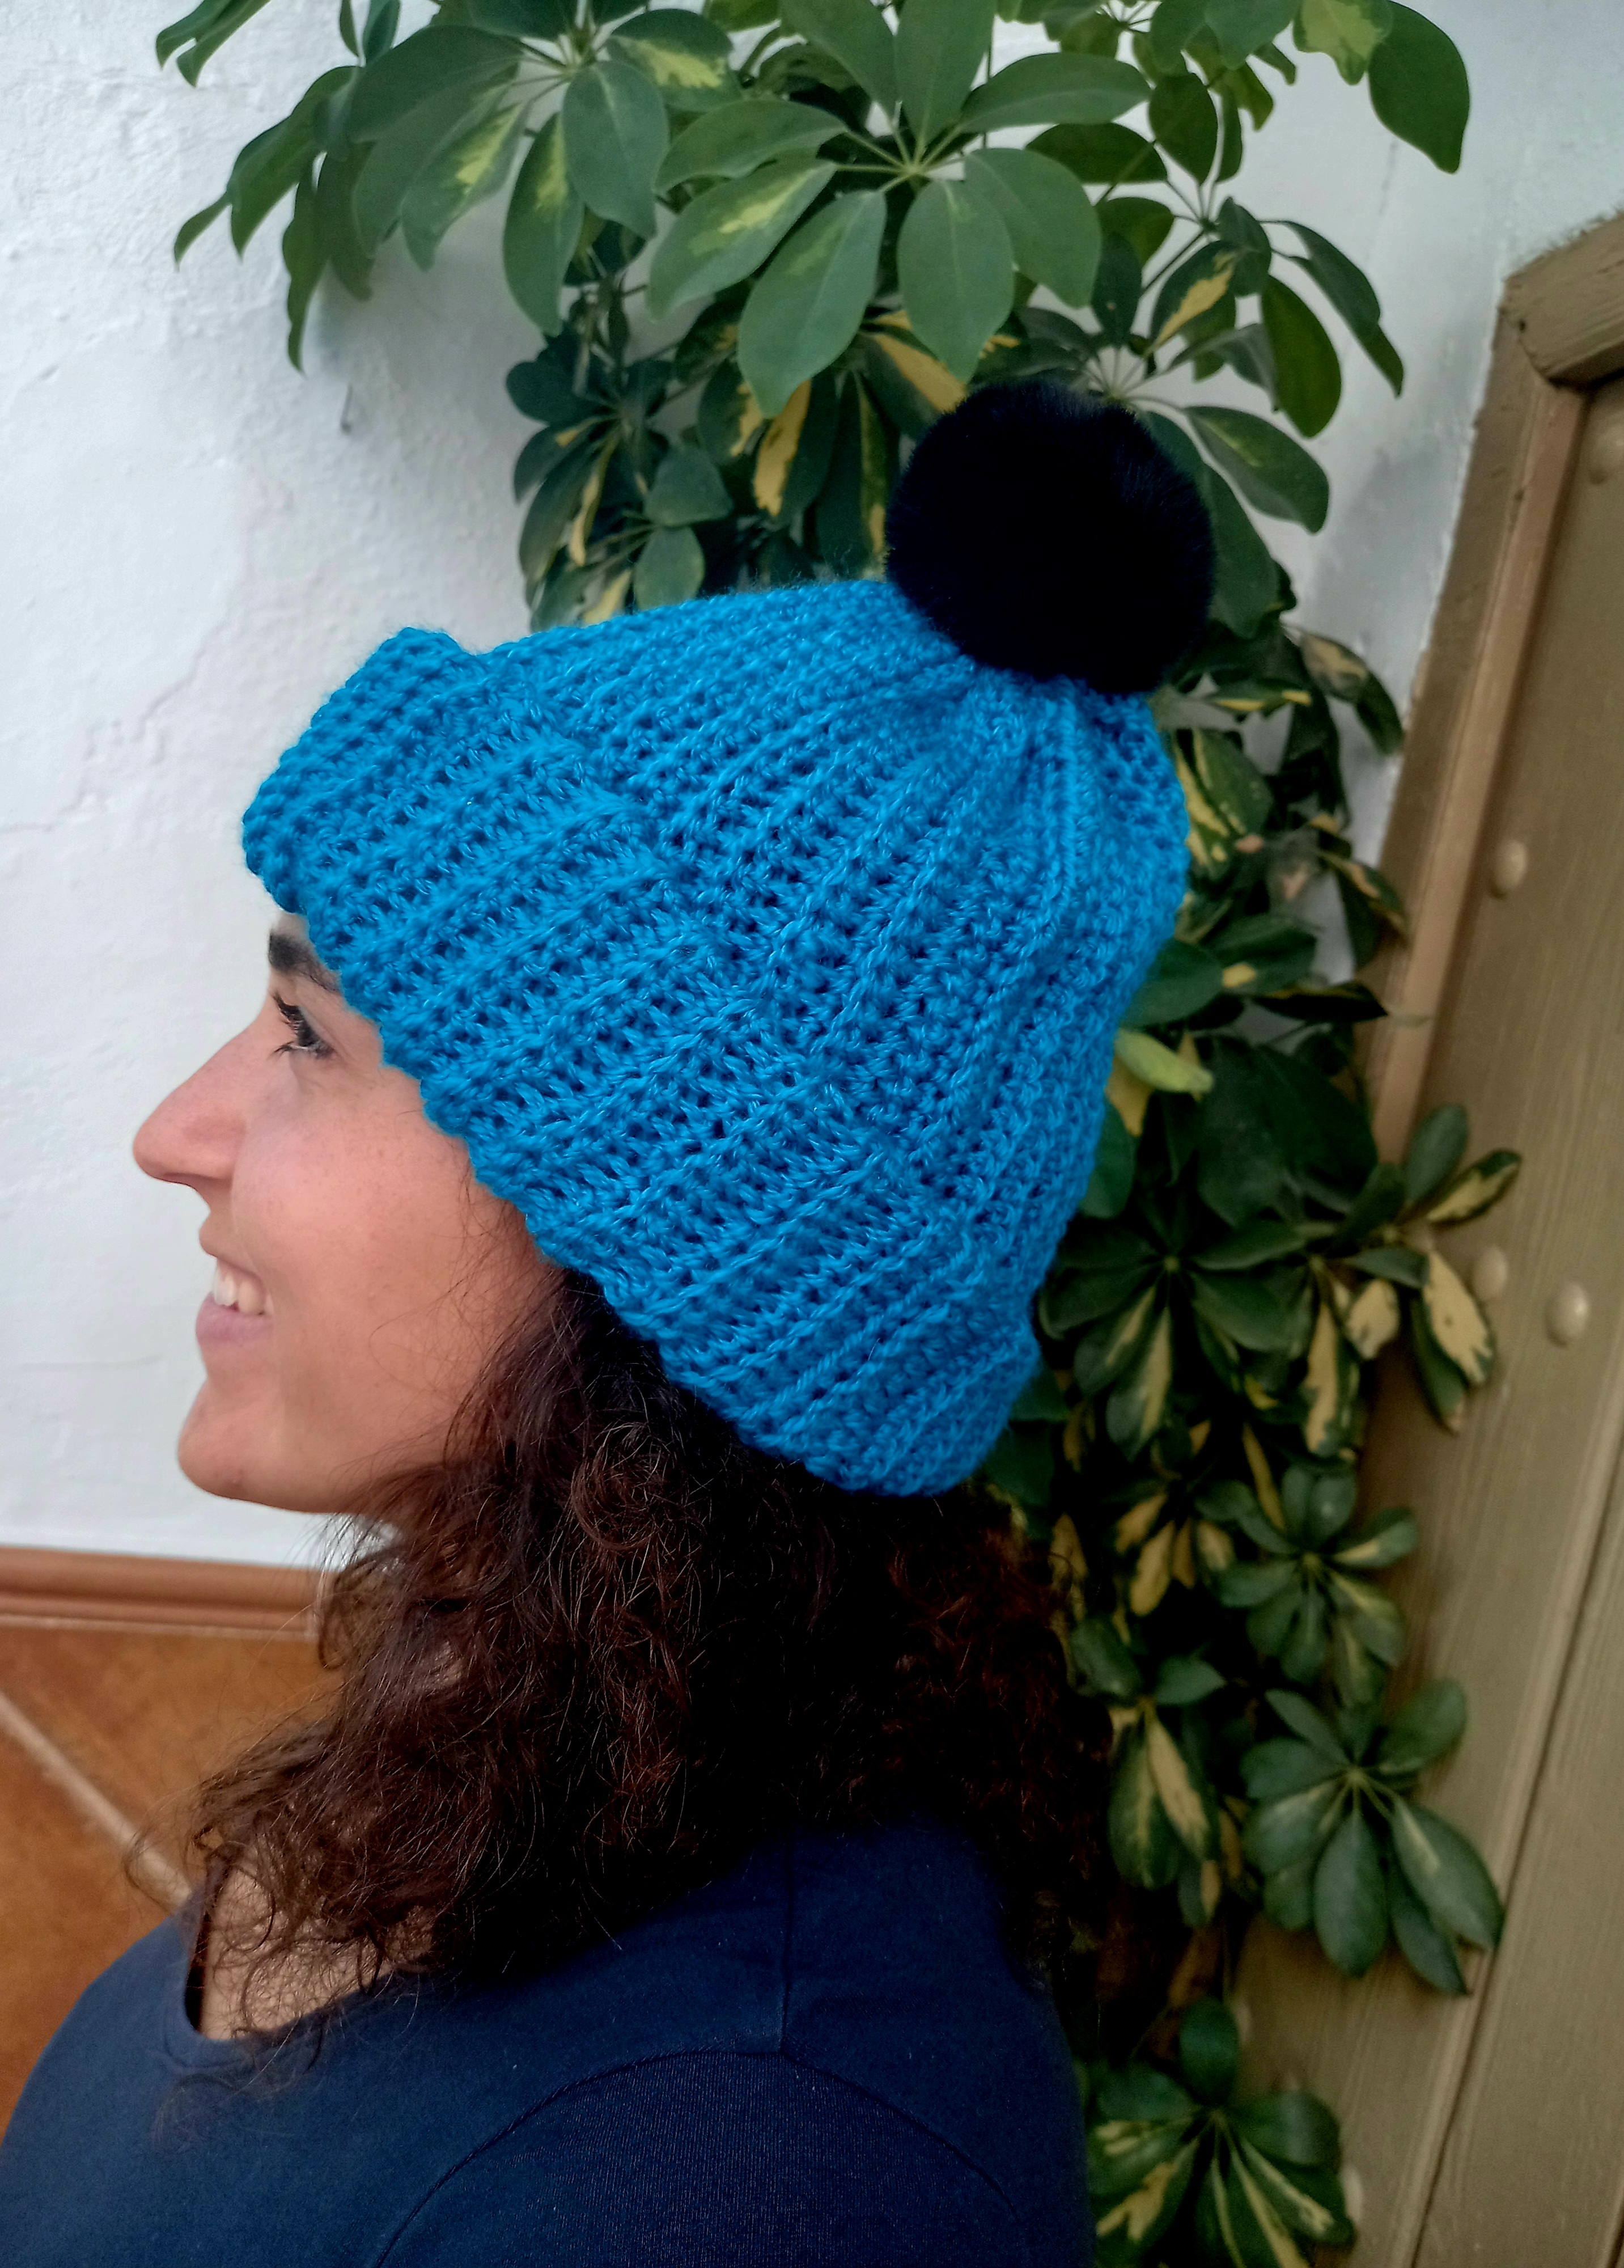
Then I realized that something was missing and I went for a black pompom to cover the imperfection and I placed it in the center sewing it with the same thread

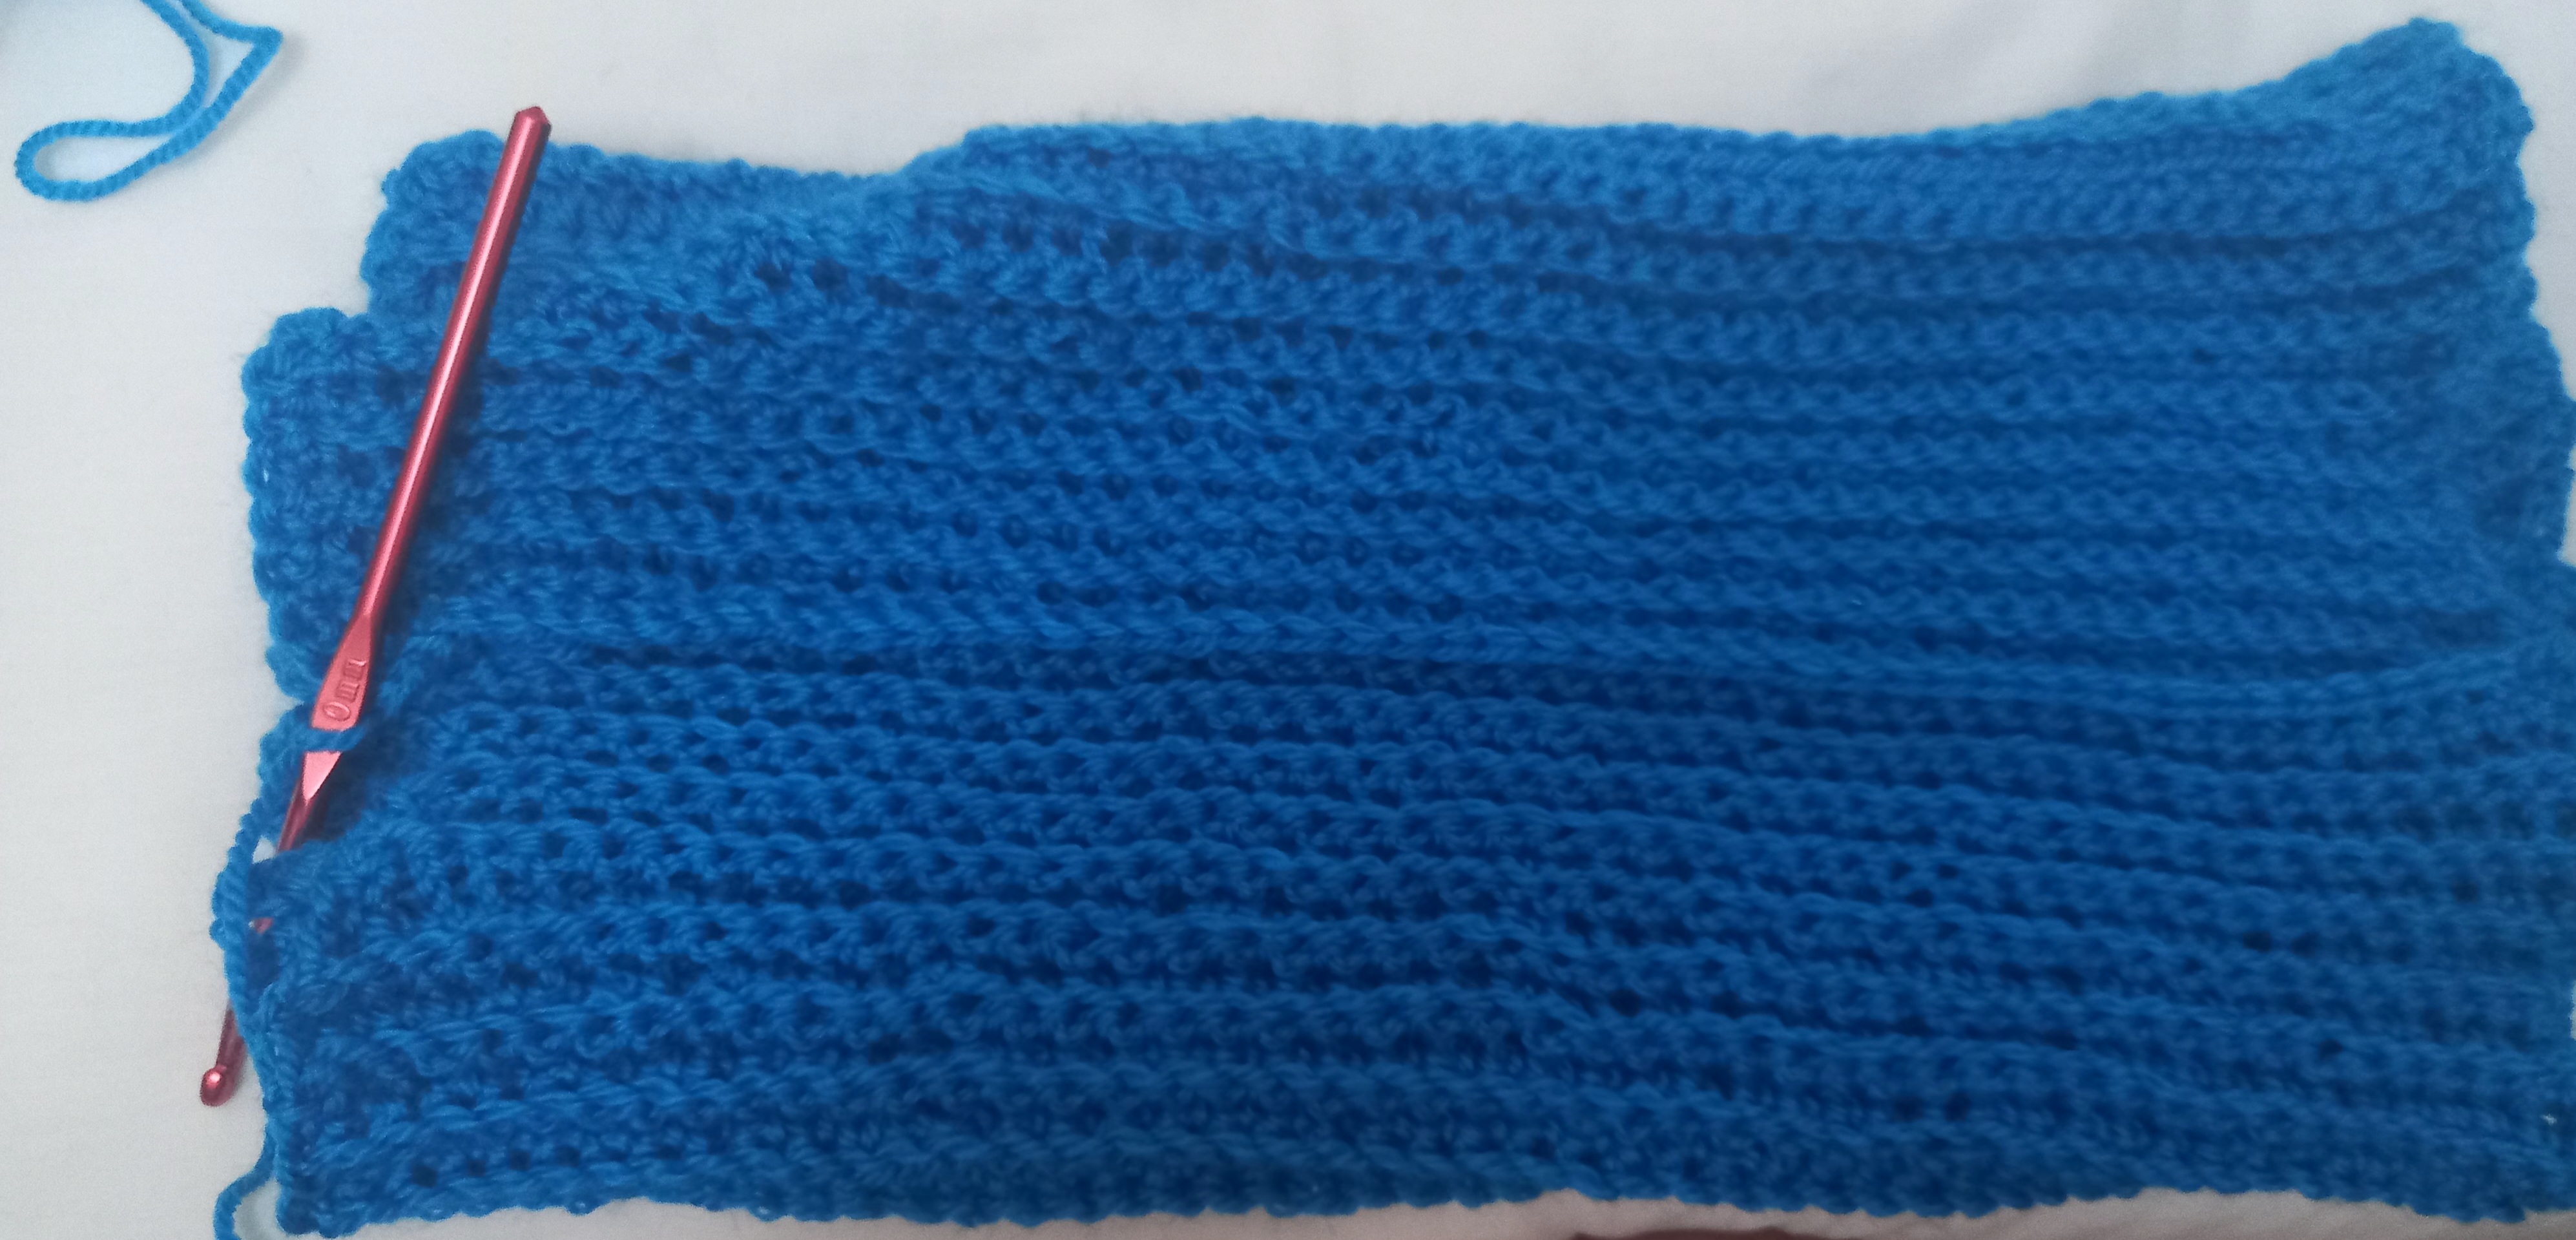
I make a double upward fold because it was a bit long, so if you are going to take this example, you would make a chain of 35 or 40 stitches, so that what happened to me does not happen to you
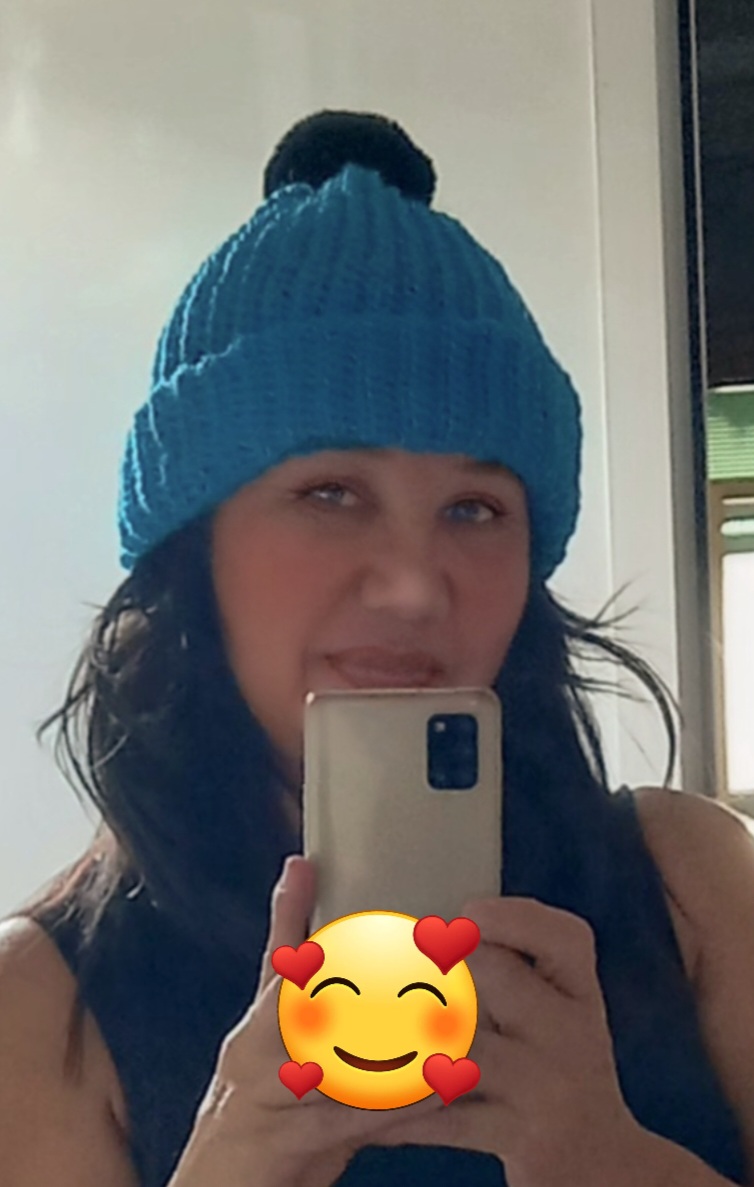
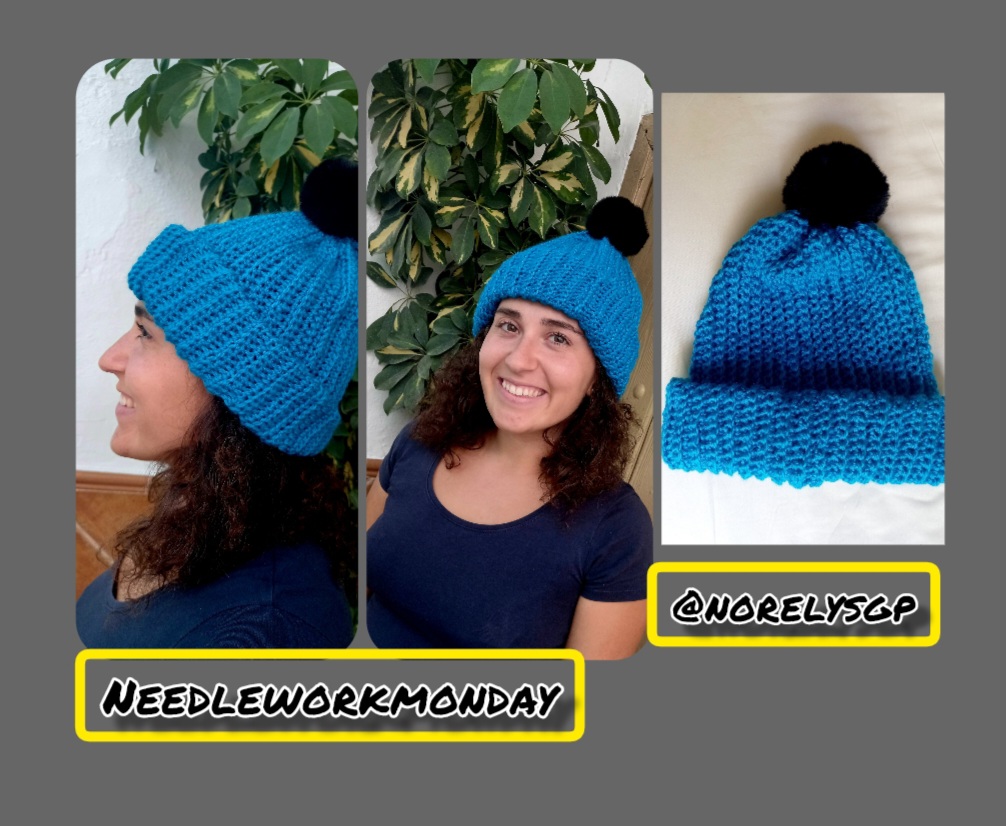
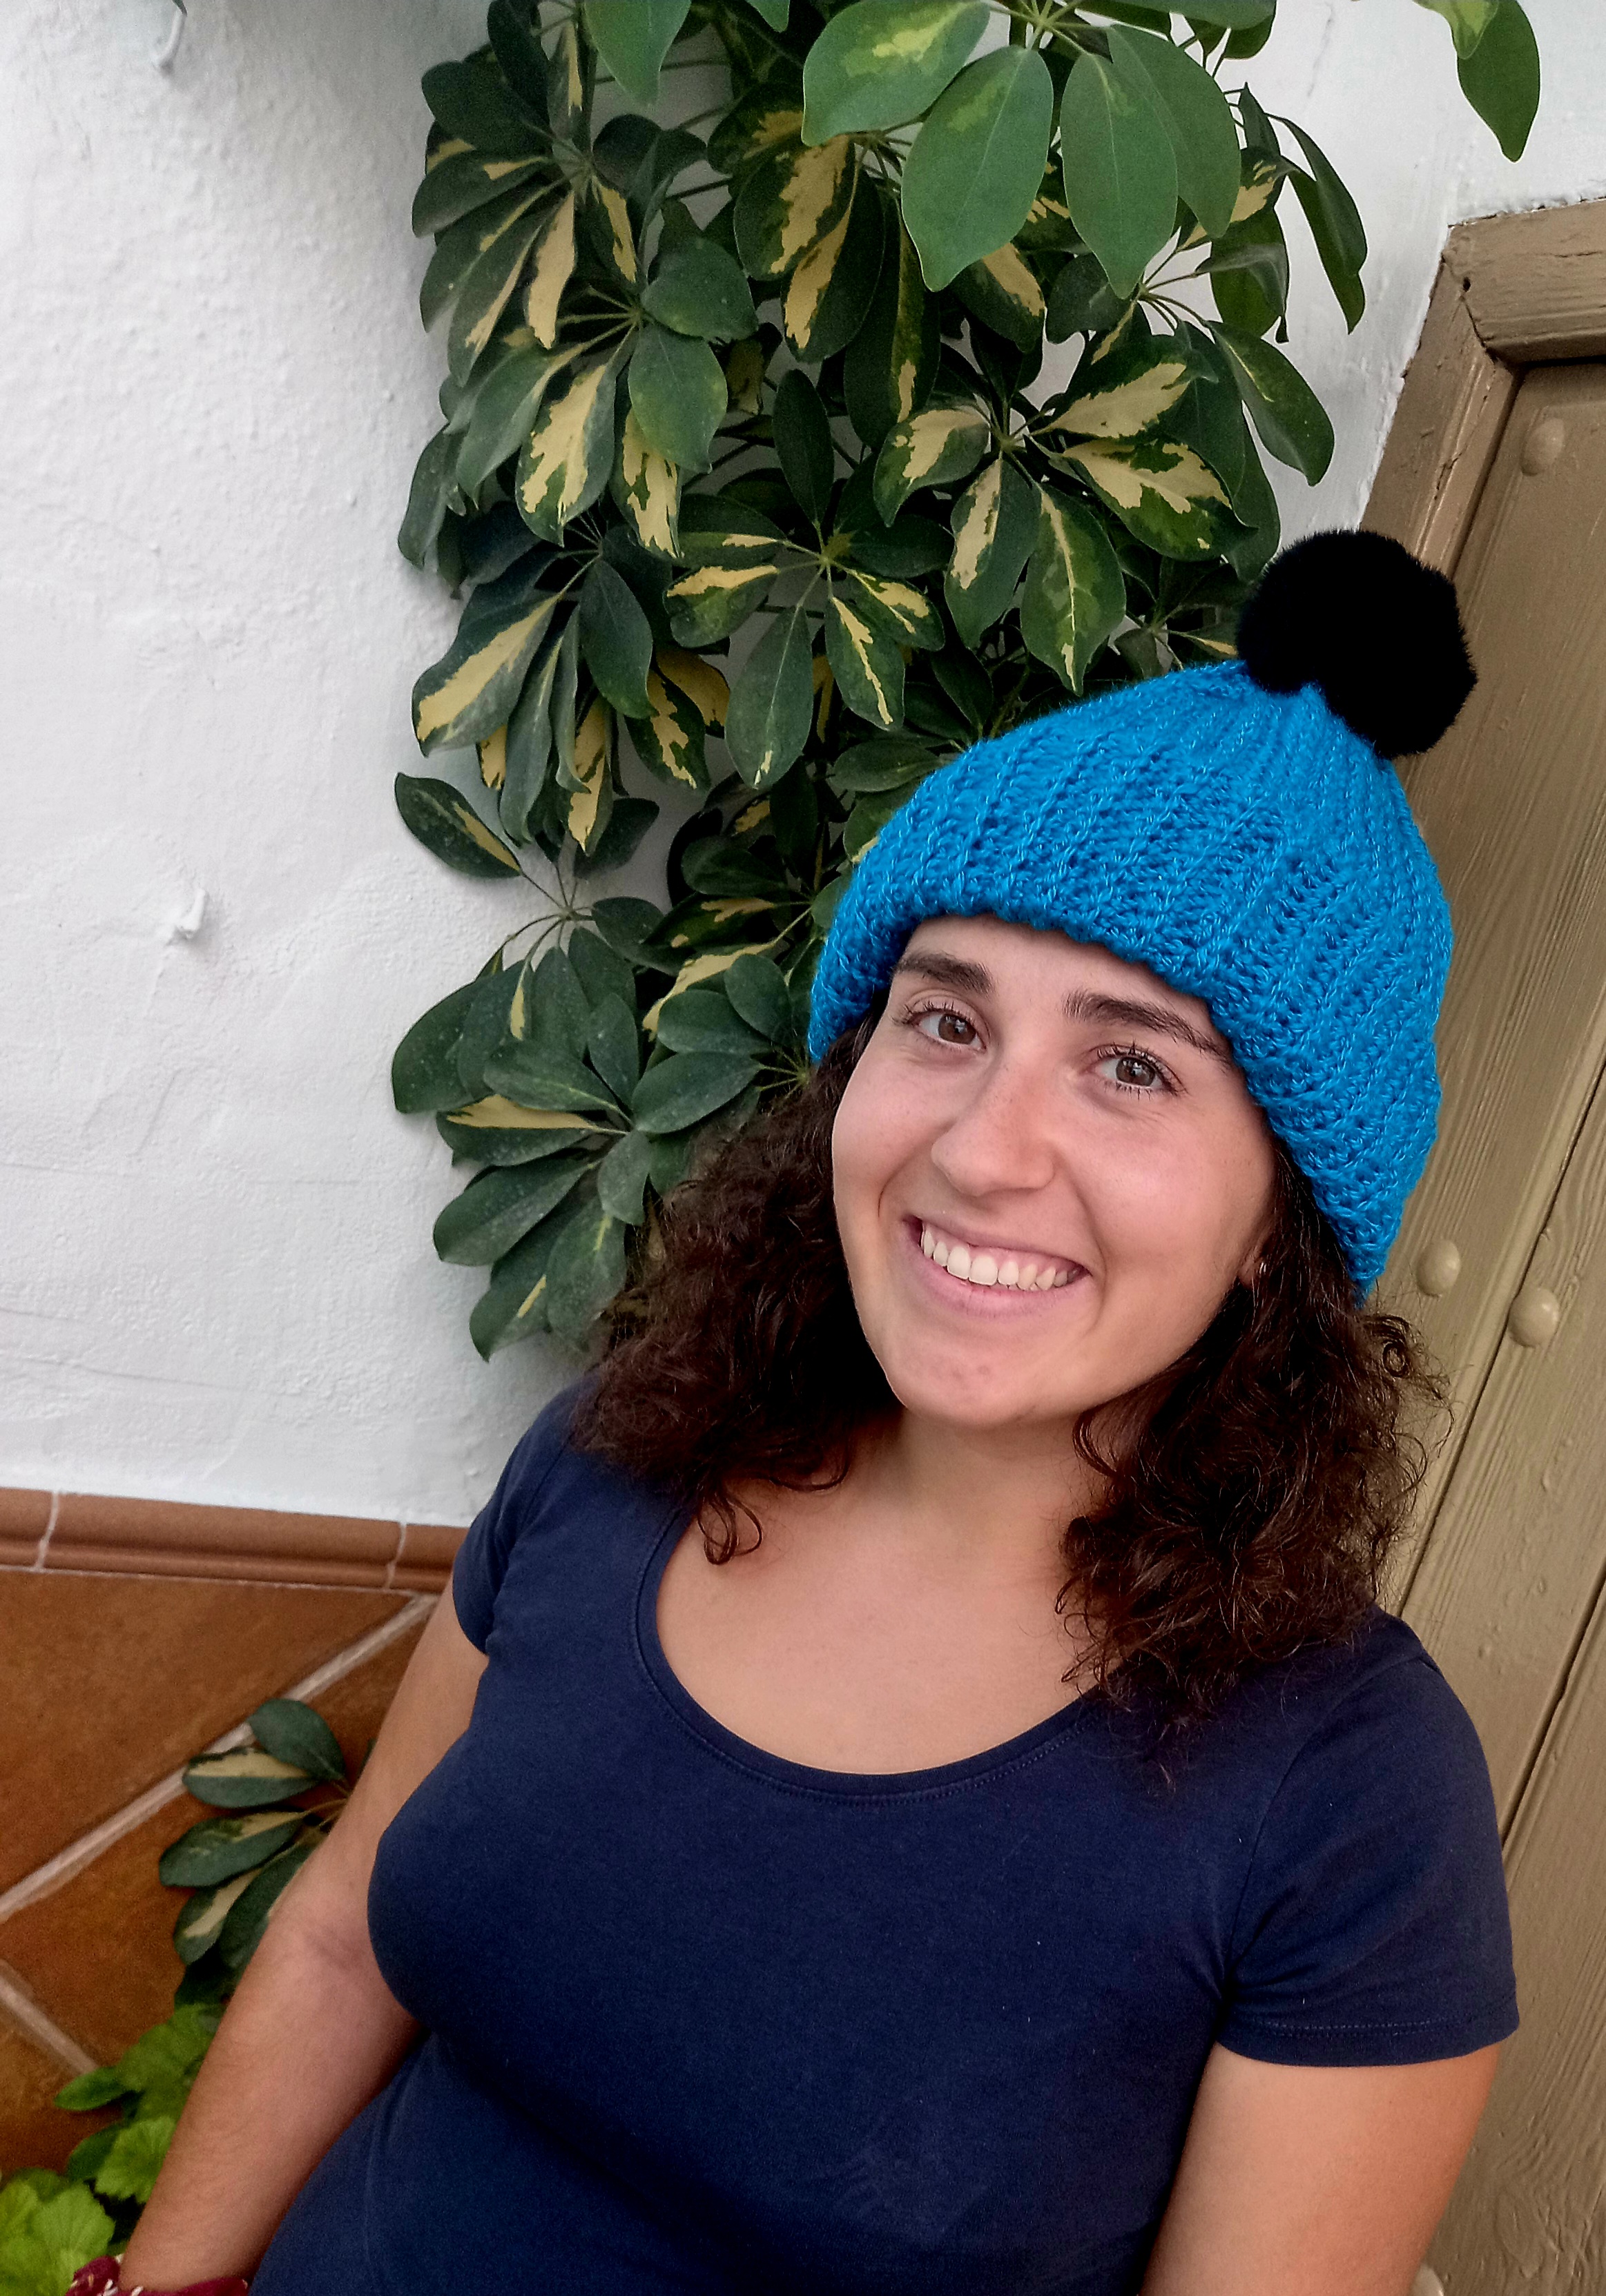
This is the result of my beautiful creation, it was beautiful 😍 and very flexible
I await your comments and suggestions to improve my content, thank you very much for being in my space, I leave you a big hug and infinite blessings
See you next post
The content of this publication belongs to the author @norelysgp, photographs taken from my Samsung A32 mobile and translated from Google
Hola queridos lectores, les deseo un bonito fin de semana a todos las abejitas de colmena en especial a esta hermosa comunidad needleworkmonday
En esta ocasión quiero comprartirles esta hermosa creación a propósito de acercarse la temporada fría, quise practicar comenzando por este gorro a crochet para mi hija, les confieso que no tenía idea de como hacerlo, pero todo es cuestión de voluntad y seguir algunos consejos de quines ya tienen experiencias, espero les guste el resultado tanto como a mi 🤭 con mucho cariño para ustedes
Materiales de uso:
♡ Un rollo de hilo de lana nr 5
♡ Un estuche nr 3.5
Comencemos:
Haremos una cadeneta de 50 puntos, que seria la altura de nuestro gorro.
Al terminar vamos por la primera vuelta y esta corresponde un punto alto en cada espacio tomando el hilo del extremo para darle el acabado acanalado que deseamos
Y así de la misma manera y con el mismo punto continuaremos haciendo las vueltas, sólo que al llegar al final de cada una volteamos y continuamos nuestro procedimiento, es muy fácil de hacer y queda super lindo.
Y así sucesivamente hasta hacer 35 vueltas que sería lo ancho de nuestro gorro
Luego doblamos y cerramos ambos extremos con el mismo punto de tejido
Y así va tomando forma nuestro tejido
Este paso no estaba en mis planes pero consideré mejor hacerlo con esta aguja y coser por los puntos extremos y luego arruchar y atar ambas puntas para darle el acabado en la parte de arriba de la cabeza
Luego me di cuenta que le faltaba algo y fui por un pompo negro para cubrir la imperfección y lo coloqué en el centro cosiéndolo con el mismo hilo
Le hago un doblez hacia arriba doble porque me quedó un poco largo, así que si van a tomar este ejemplo, se haria la cadeneta de 35 o 40 puntos, para que no les pase lo que a mí
Este es el resultado de mi hermosa creación quedó bello 😍 y muy flexible
Espero sus comentarios y sugerencias para mejorar mis contenidos, muchas gracias por estar en mi eapacio, les dejo un gran abrazo e infinitas bendiciones
Hasta el próximo post
El contenido de esta publicación pertenece al autor @norelysgp, fotografías tomadas desde mi móvil Samsung A32 y traducido desde Google
If not that you just said it's your first crocheted headwormer I wouldn't have believed it thibk this your first crocheted project, cus it's so well crocheted and looks really neat it's had to believe it's actually your first time.....
@needlemover: Well, it is my first experience with this type of fabric... it is that when you want you can and everything that is done with love, turns out well. Thank you very much for commenting!
Thank you for sharing this amazing post on HIVE!
Your content got selected by our fellow curator @hafizullah & you just received a little thank you via an upvote from our non-profit curation initiative!
You will be featured in one of our recurring curation compilations and on our pinterest boards! Both are aiming to offer you a stage to widen your audience within and outside of the DIY scene of hive.
Join the official DIYHub community on HIVE and show us more of your amazing work and feel free to connect with us and other DIYers via our discord server: https://discord.gg/mY5uCfQ !
If you want to support our goal to motivate other DIY/art/music/homesteading/... creators just delegate to us and earn 100% of your curation rewards!
Stay creative & hive on!
Te felicito por tu primera creación a crochet 💐🌷🌸🌹 me gustó mucho cómo quedó!! también el color es muy bonito
@imena: Muchas gracias
If only I knew how to knit I would definitely make this one for my wife, it looks cute!
Yo te lo puedo hacer, cuebta conmigo!! @afterglow
¡Felicitaciones!
1. Invierte en el PROYECTO ENTROPÍA y recibe ganancias semanalmente. Entra aquí para más información.
3. Suscríbete a nuestra COMUNIDAD, apoya al trail de @Entropia y así podrás ganar recompensas de curación de forma automática. Entra aquí para más información sobre nuestro trail.
4. Creación de cuentas nuevas de Hive aquí.
5. Visita nuestro canal de Youtube.
Atentamente
El equipo de curación del PROYECTO ENTROPÍA
Dear @norelysgp, we need your help!
The Hivebuzz proposal already got important support from the community. However, it lost its funding a few days ago and only needs a few more HP to get funded again.
May we ask you to support it so our team can continue its work this year?
You can do it on Peakd, ecency, Hive.blog or using HiveSigner.
https://peakd.com/me/proposals/199
Your support would be really appreciated.
Thank you!