Semi realistic eye made with school colors !! [ENG/ESPÑ] - Ojo semi realista hecho con colores escolares !! [ENG/ESPÑ]
Hii beautiful Hive comutity, I hope you are very well.
Today I bring you one of my color realism practices, I still don't feel ready to do something very realistic, although I've already tried it, I'm not satisfied with the results
This is the first of two eye practices in this style, then I'll bring you another one.
I considered making eyes because within the elements of the face I consider that it is what makes the most impact, so I feel that I must master it perfectly before the other elements and then try to create the work that I have in mind.
I also plan to bring other elements such as lips, nose and hair...
As it was a practice, I did not think about taking photos for the process since I did not expect these results, which for myself were excellent. Even so, I think they deserve to be explained a little for those who are interested.
Hola hermosa comunidad de hive, espero que se encuentren muy bien.
El día de hoy les traigo una de mis prácticas de realismo a color, aun no me siento preparado para hacer algo muy realista aunque ya lo he intentado no me siento satisfecho con los resultados
Este es el primero de dos prácticas de ojos en este estilo, luego les traeré otro mas.
considere hacer ojos porque dentro de los elementos del rostro considero que es lo que mas impacta, por lo que siento que debo dominarlo a la perfección antes que los demás elementos para luego intentar crear la obra que tengo en mente.
También les pienso traer otros elementos como labios, nariz y cabello…
como fue una practica no pensé en tomar fotos para el proceso ya que no esperaba estos resultados que para mi mismo fueron excelentes. Aun asi creo que merecen que les explique un poco para los que estén interesados
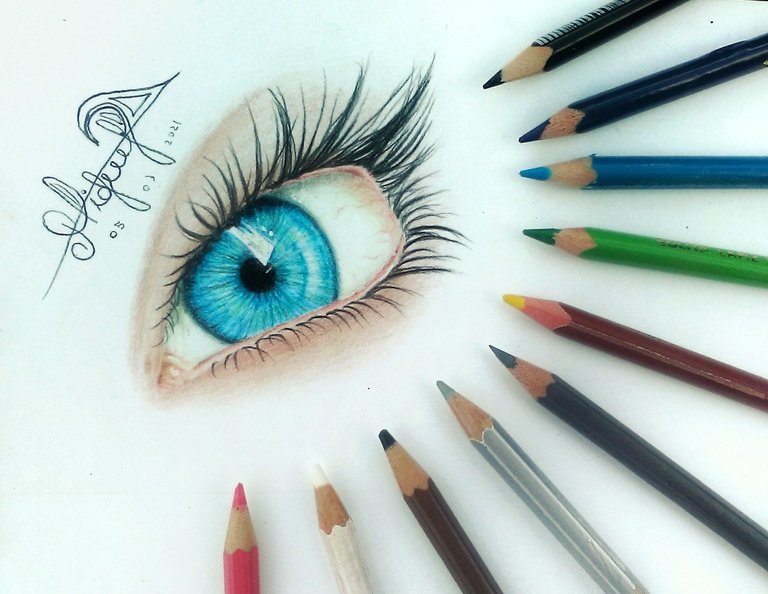
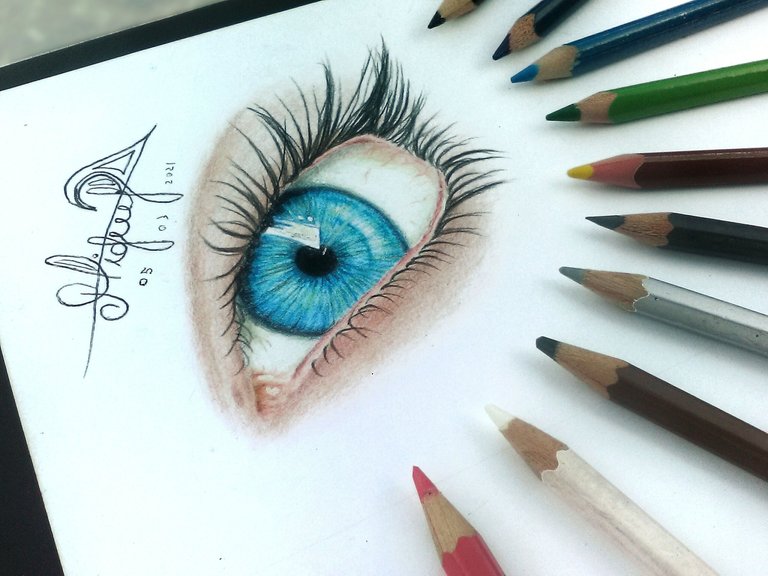
1 Sketch
I started by making a point which is the pupil, I enlarged it until it had the ideal size and then I made the circle of the iris completely, then I made the margins of the eyelid and then I made the edges of the tear duct and finally the eyelashes
1 Boceto
Empece por el hacer un punto el cual es de la pupila, lo agrande hasta que tuviera el tamaño ideal para luego hacer el circulo del iris completamente, luego hice los márgenes del parpado para luego hacer los bordes del lagrimal y por ultimo las pestañas
Eye coloring
1 Iris.
The first thing I did was apply the black color with all the pressure on the pupil, you can use a marker if you like since that area is completely black. Then I made the edges of the iris with this same black color, applying medium pressure and then combining it with dark blue and degrading it with light blue minimally outwards, also the same combination for the small shadow that this one has on top.
Later I made light lines with the blue color to make guides of the iris fabric then apply a light blue tone very softly on everything, then a dark whole, then a medium whole, and add details with the color black, dark blue, and green Finally, I sealed everything again using a light shade of blue so that the color mixture was compact.
In the reflection or shine I just left it white and I made small lines to give details, but if you have a white gel pencil it will give you a better result so use it, I don't use it because I don't have it for now.
1 Iris. lo primero que hice fue aplicar el color negro con toda la presión sobre la pupila, pueden usar un marcador si gustan ya que esa zona es completamente negra. Luego hice los bordes del iris con este mismo color negro, ejerciendo presión media para luego combinarlo con azul oscuro y degradarlo con azul claro mínimamente hacia afuera, también la misma combinación para la pequeña sombra que este tiene arriba.
Posteriormente hice líneas claras con el color azul para hacer guías del tejido del iris luego aplique un tono de azul claro muy suavemente en todo, luego un todo oscuro, luego un todo medio, y agregue detalles con el color negro, azul oscuro, y verde, por ultimo selle todo nuevamente usando un tono claro de azul para que la mezcla de colores fuera compacta.
En el reflejo o brillo solo lo deje en blanco y hice pequeñas líneas para dar detalles, pero si tienen un lápiz de gel blanco les dará mejor resultado así que úsenlo, yo no lo use porque no lo tengo por ahora.
2 Sclera.
For the sclera, first apply a white color above all, exerting little pressure so that the following colors do not stand out as strongly because the objective is to give certain reflections and a minimal yellowish opaque effect, then apply a little pink, degrading at the beginning of the tear duct and at the end, on top of it a bit of white, then a bit of yellow, and finally white again. Apply shadows with the color gray and silver and then seal them with White.
2 Esclerótica . Para la esclerótica primero aplique color blanco sobre todo ejerciendo poca presión para que los siguientes colores no se marcaran tan fuertes porque el objetivo es que de ciertos reflejos y un efecto opaco amarillento mínimo, luego aplique un poco de rosa degradando al inicio del lagrimal y al final, sobre este un poco de blanco, luego un poco de amarillo y al final blanco nuevamente. Aplique sombras con el color gris y plateado y luego las selle con blanco.
3 Lacrmal and Skin.
in the lacrimal and the inner area of the eyelid apply a light base with the pink, then terracotta in the darker areas, then a little light red, and then finish sealing with the pink, leaving a white space in the bright areas
For the skin, start with a fairly light brown layer which I repeated many times until the desired tone was achieved, then apply a little pink in the same way, then brown again, a little terracotta, and a little dark brown on the lower eyelid
Finally the eyelashes, start by making a sketch of these and then with a black color go over the lines exerting a lot of pressure since the darker they are the better, they must add enough to give them naturalness, and join them at the end in some cases
3 Lagrimal y piel. En el lagrimal y la zona interna del parpado aplique una clara base con el rosa, luego terracota en la zonas mas oscuras, luego un poco de rojo claro, y luego termine de sellar con el rosa, dejando un espacio en blanco en las zonas brillantes
Para la piel inicie con una capa de café bastante clara la cual fui repitiendo muchas veces hasta lograr el tono deseado, luego aplique un poco de rosa de la misma forma, luego café nuevamente, un poco de terracota, y un poco de café oscuro en el parpado inferior
Por ultimo las pestañas, inicie haciendo un boceto de estas y luego con un color negro repase las líneas ejerciendo bastante presión ya que mientras mas oscuras queden es mejor, deben agregar suficientes como para darles naturalidad, y unirlas al final en algunos casos.
AND READY!!
¡¡Y LISTO!!
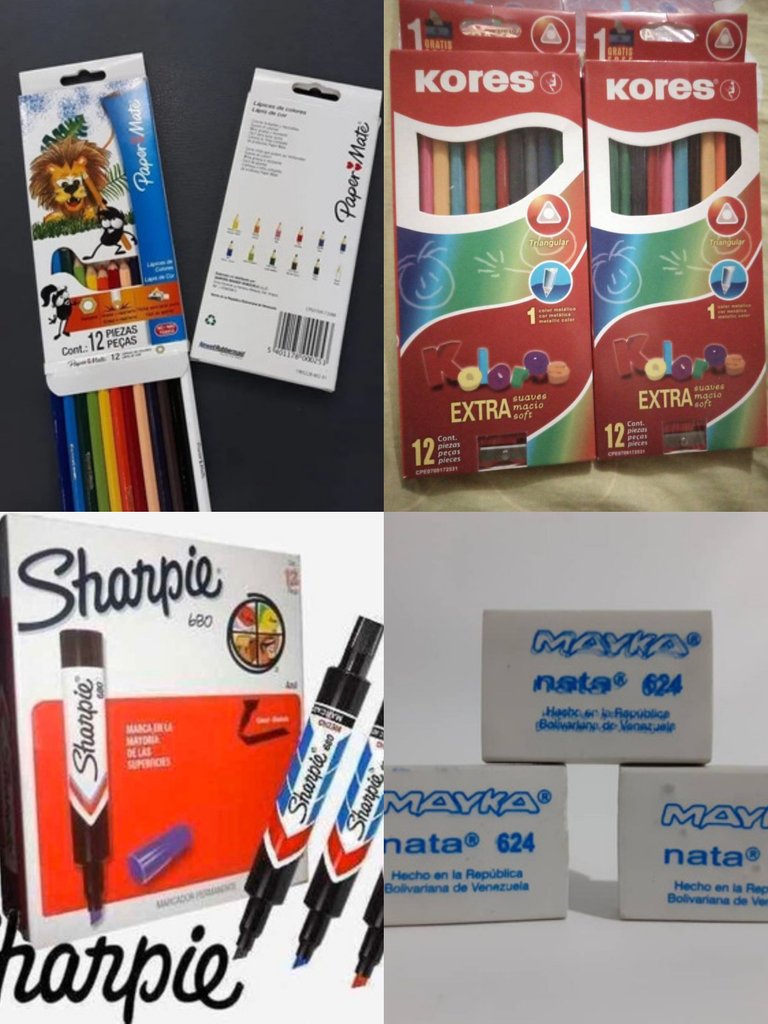
The materials I used are completely SCHOOL and all together they do not exceed 5 dollars
Los materiales que use son completamente ESCOLARES y todos juntos no superan los 5 Dólares
a little difficult to grasp, but remember that if you want a post with step-by-step images of how to make the eyes, you can ask for it in the comments and I will gladly bring it to you :D
un poco difícil de captar, pero recuerden que si quieren un post con imágenes paso a paso de como hacer los ojos puedes pedirlo en los comentarios y con gusto lo traeré para ustedes :D
I would have loved to see the step by step processes as you have written them.
Anyway, good job.
Hi friend
well the next post will be an eye tutorial, probably how to make them correctly in a sketch
to then make one of how to color them since I would like them to learn how to shape them first
if you are interested I wait for you in that publication
greetings <3