Splinterlands animated background [ENG-ESP]
(En español debajo)
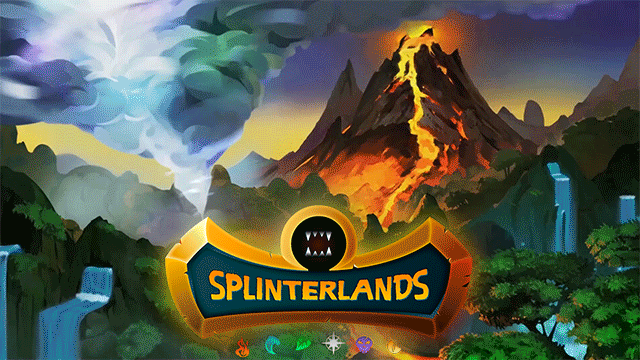
In the Town Hall before the Chaos Legion release (which I thought was great by the way, it worked perfectly!) Hardpoint mentioned that he would like to see a animated background of Splinterlands. I then shared the video that I had done with Yodin, that I was planning to separate the background in case someone was interested in using it.
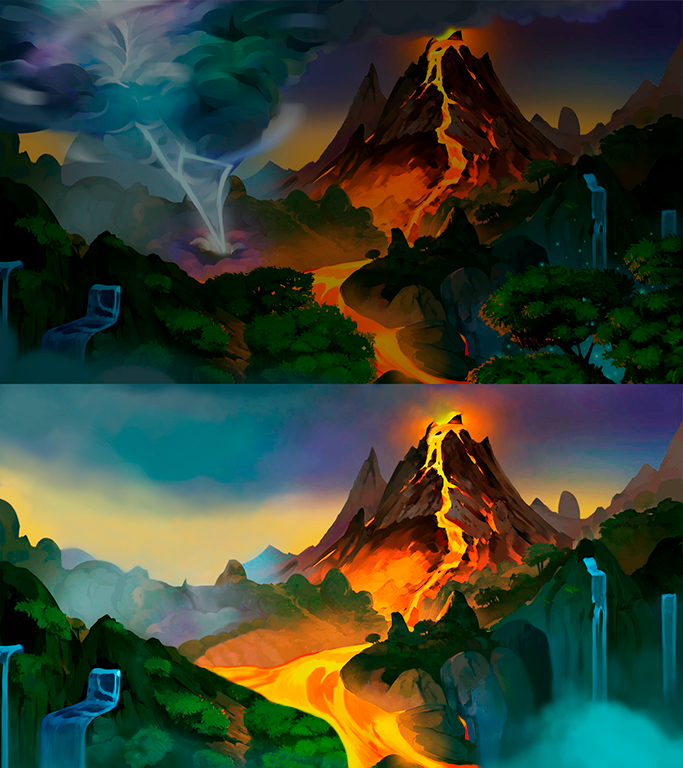
But then it seemed like a good idea to me to try to animate the original Splinterlands background, which we see on the battle screen and this is the result:
And this is the background I used in the previous animation of Yodin Zaku and the Splinterlands logo:
I already commented roughly the process of the previous video so let's see the steps to animate the original Splinterlands background:
1. First Download the original image and edit it in Photoshop.
I opened the image in Photoshop and with the "brightness and contrast" filter I adjusted those values.
Then with the filter "curves" I adjusted the values to give greater contrast until I was satisfied with the result.
2. Separate the image into layers to be able to animate it.
This part takes a little time since you have to go patiently trying to fill in the empty spaces left by the objects that are separated, which in turn require as much patience so as not to destroy the original image.
To do this I mainly used Photoshop's "spot heal brush" to remove small details. And then I painted with the basic brushes, looking to keep the same style of the original image, this task I did not delegate automatically (maybe it works better in photographs of real objects) with tools such as the correction brush or the patch.
The method I feel most comfortable with in these cases is duplicate the image and erase (with the fuzzy circular brush) what I don't need from that layer.
Another way to do it is with the lasso selection tool, first make a general selection and refine it by holding down Shift to add content to the selection or Alt to subtract.
Then go to Selection > Modify > Expand > 2 or 3 pixels.
3. Import to After Effects
In After Effects you have to select when importing "Composition - retain layer size", this is important mainly so that the preview looks more fluid since it will create a composition where each layer will be the size of the occupied pixels of that image.
Then I created a new composition with the dimensions of full HD (1920x1080px) as the original image differs a bit. Allowing me to scale everything to 141% as the image quality was sufficient to do this without losing quality.

4. Animate with the puppet pin
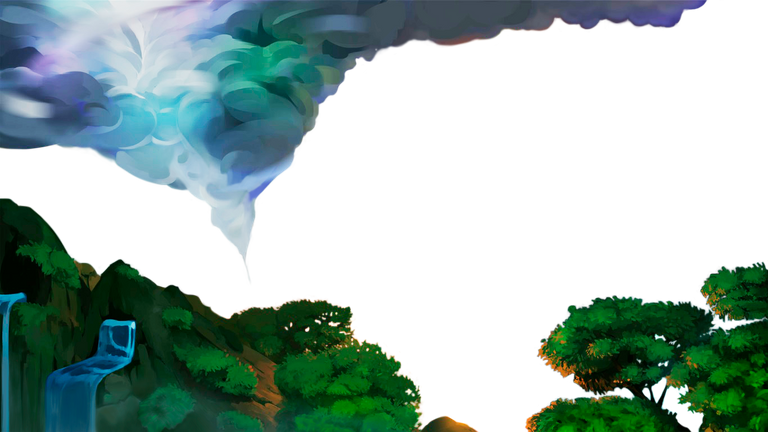
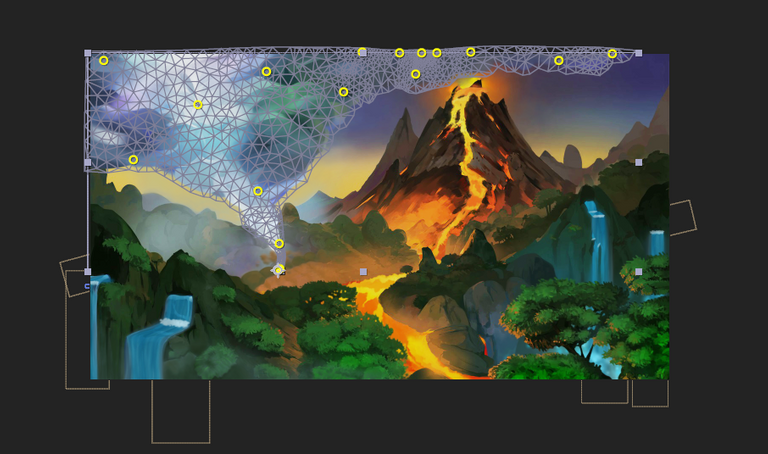
The first thing to do was to animate the treetops, so with several puppet pins strategically placed (no missing pins, but above all no extra pins).
Then the same process, but for the clouds. At this point I also had to consider that the cropped image is not visible, so I had to add several more pins to keep it in place. Also for that the "starch" pins can be used but it is more practical for me to directly place the position pins since they will not be animated.
5. Create the storm
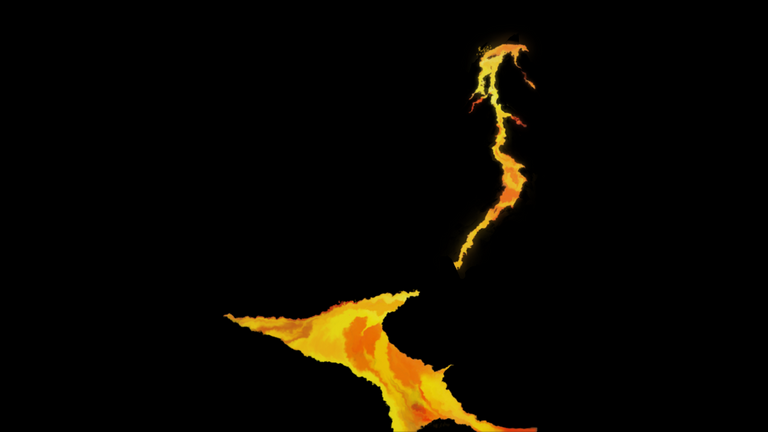
After animating the clouds and what would be the tornado, I had to add the lightning, speed lines to give a sense of movement and some earth rising by the wind at the base. In addition to earth detaching and flying with each impact of the lightning.
For the lightning I downloaded a free image from pexels.com (excellent free image bank). It is a real photo of a lightning bolt that when retouching it in Photoshop I left it completely black and white with a lot of contrast.
Then the trick is to select the "screen" mode on that layer in After Effects. In this way, it will treat black as alpha, leaving the background transparent and showing only the ray.
Speed lines are achieved by applying the "Fractal noise" effect to a solid and animating its evolution. For this case I used 2 turns in 5 seconds. I also used the "Fast Blur" effect. I modified those values a bit until I was satisfied with the result.
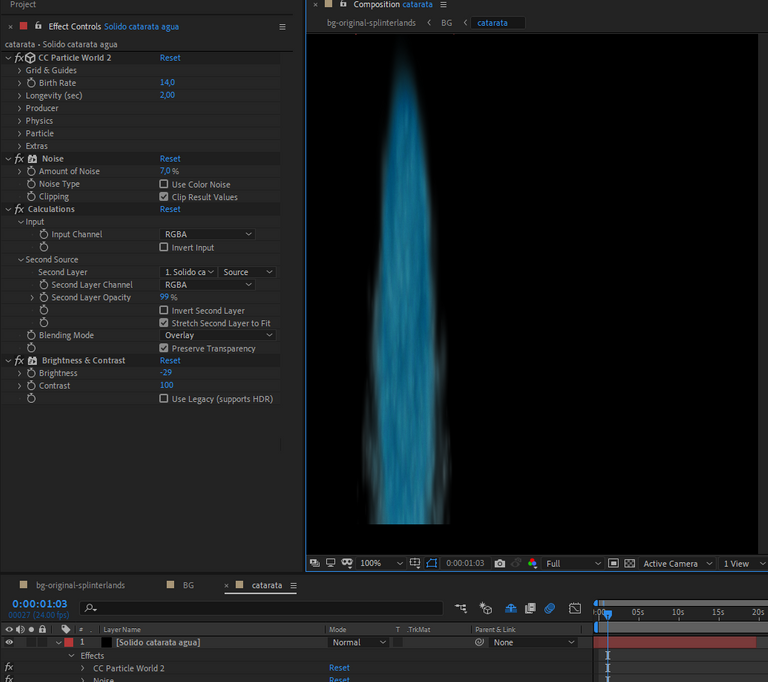
For the earth that rises with the lightning strike I also used a solid, but I applied the "Particle World" effect and in this case it was a bit more complex to configure the values to obtain a good result.
6. Create the water
For the water of the falls I used the same composition that I had already made for the previous video. But I made some modifications to respect the original color of the background. It couldn't be very white. In addition I added foam, also with a process similar to the earth that was lifted by applying the "Particle World" effect. The trick in this case was to set the floor to "ice" in this way the particles when dying slide on this floor, that is to say, the water current.
7. Create the lava
In this case I had not separated the lava from the background in Photoshop so I applied a mask in After Effects with the pen, on a duplicate layer of the background. I animated it with the "fractal noise" effect and in this case I raised the complexity value. Then I animated the evolution to give a sense of movement. I also added the "glow" effect, since it is fire after all.
I thought it was a good idea to also add small splashes of lava following a similar procedure to that of the earth that rises.
8. Create the Loop
Well, it's all set up, animated and ready, now what?
Now something very important remained, create a perfect 5 second loop.
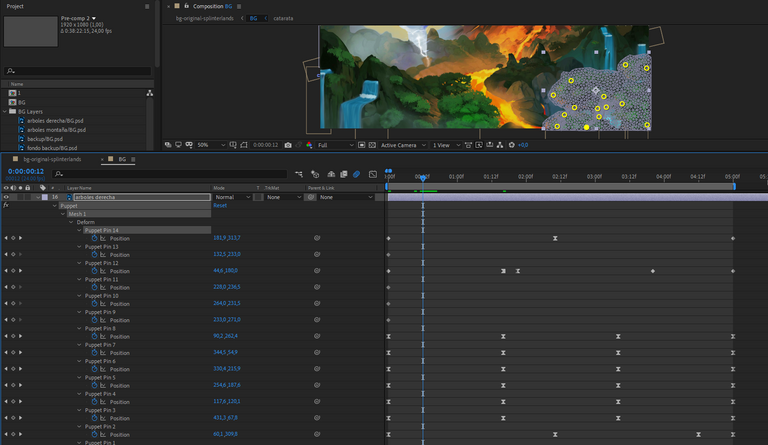
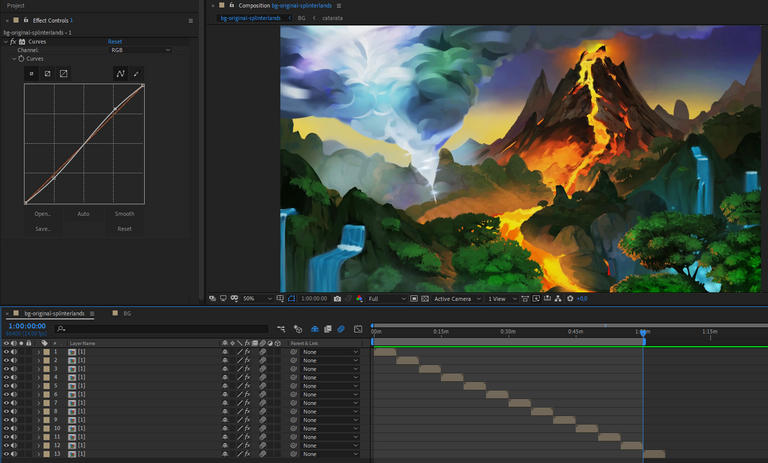
To achieve this I discovered that the best way in this case was splitting the composition in half, bringing the second half to the beginning and the first half at the end. Then create a two second transition between the two layers. As seen in the capture image.
This is very important for continuity as these are effects that result in random movements.
In the case of the background that I had made previously, a transition of one second was enough since there was nothing evident repeating itself, but in this case it had the lightning and several elements following one direction, there could be no sudden changes, much less every 5 seconds.

9. Export the file
To export the file I used the 5 second section, rendering it with Adobe Media Encoder.
To that file I applied the "curves" effect to retouch the grayscale and improve the contrast.
Then I duplicated it many times up to an hour long (the original idea was two hours but I had to cut it to one hour because the file was too heavy).
I selected all the layers > right click > Keyframe Assistant > Sequence Layers and again to render the whole file.
10. Create the GIF
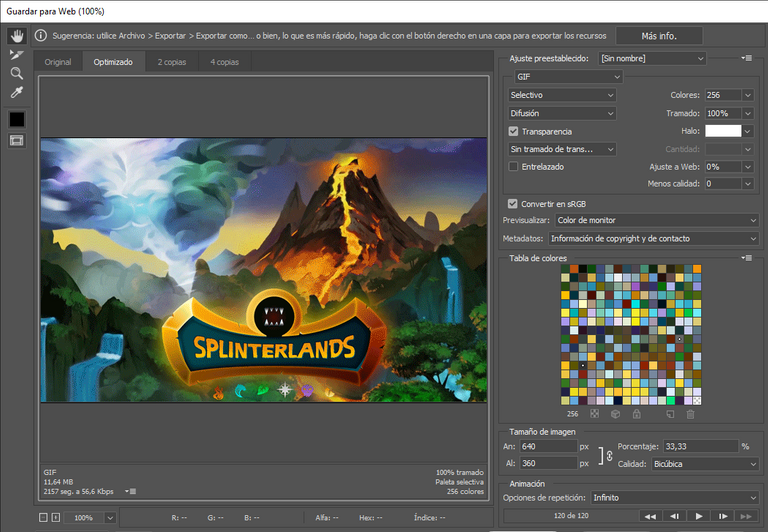
I opened the video file in Photoshop and resized it to 640x360px and then exported it as .gif. I also added the Splinterlands logo.
For this you have to select:
File > Export > Save for web.
The options that come by default are the ones that give the best result, just confirm that the "repeat options" box is set to "infinity" to create the loop.
This would be all, I hope it is useful to you. The ideal would be to play the video in a loop, since there are no jumps between the beginning and the end in any of the videos.
If you have any suggestions, requests or questions, leave your comment!
Splinterlands

En el Town Hall anterior a la salida de Chaos Legion (que me pareció genial por cierto, ¡funcionó todo perfecto!) Hardpoint mencionó que le gustaría ver un fondo animado de Splinterlands. Yo entonces le compartí el video que había hecho de Yodin, que estaba en mis planes separar el fondo por si a alguien le interesaba utilizarlo.
Pero luego me pareció buena idea intentar animar el fondo original de Splinterlands, que vemos en la pantalla de batalla y este es el resultado:
Y este es el fondo que utilicé en la animación anterior de Yodin Zaku y el logo de Splinterlands:
Ya comenté a grandes rasgos el proceso del anterior video así que vamos a ver los pasos para animar la imagen original de Splinterlands:
1. Primero Descargar la imagen original y retocarla en Photoshop.
Abrí la imagen en Photoshop y con el filtro de "brillo y contraste" ajusté esos valores.
Luego con el filtro "curvas" ajusté los valores para dar mayor contraste hasta que quedé satisfecho con el resultado.
2. Separar la imagen en capas para poder animarla.
Esta parte lleva un poco de tiempo ya que se debe ir con paciencia tratando de completar los espacios vacíos que dejan los objetos que se separan, que a su vez requieren otro tanto de paciencia para no destruir la imagen original.
Para hacer esto usé principalmente el "pincel corrector puntual" de Photoshop para quitar pequeños detalles. Y luego pinté con los pinceles básicos, buscando conservar el mismo estilo de la imagen original, esta tarea no la delegué de forma automática (tal vez sí funciona mejor en fotografías de objetos reales) con herramientas como el pincel corrector o el parche.
El método con el que me siento más cómodo en estos casos es duplicar la imagen y borrar (con el pincel circular difuso) lo que no necesito de esa capa.
Otra manera de hacerlo es con la herramienta de selección lazo, hacer primero una selección general y refinarla manteniendo presionado Shift para agregar contenido a la selección o Alt para restar.
Luego ir a Selección > Modificar > Expandir > 2 o 3 pixeles.
3. Importar a After Effects
En After Effects hay que seleccionar al importar "Composición - conservar tamaño de capa", esto es importante principalmente para que la previsualización se vea más fluida ya que creará una composición en donde cada capa será del tamaño de los pixeles ocupados de esa imagen.
Luego creé una nueva composición con las dimensiones de full HD (1920x1080px) ya que la imagen original difiere un poco. Permitiéndome escalar todo a %141 ya que la calidad de la imagen era suficiente como para hacer esto sin perder calidad.
4. Animar con el puppet pin
Lo primero era animar la copa de los arboles, así que con varios puppet pins colocados de forma estratégica (que no falten, pero sobretodo que no sobren).
Luego lo mismo, pero para las nubes. En este punto debía considerar además que no se vea la imagen recortada, así que debí agregar varios pins más para mantenerla en su lugar. También para eso pueden utilizarse los pins "starch" pero me resulta más practico directamente colocar los pines de posición ya que no serán animados.
5. Crear la tormenta
Luego de animar las nubes y lo que sería el tornado debía agregar el rayo, líneas de velocidad para dar sensación de movimiento y algo de tierra levantándose por el viento en la base. Además de tierra desprendiéndose y volando con cada impacto del rayo.
Para el rayo descargué una imagen libre desde pexels.com (excelente banco de imágenes libres). Es una foto real de un rayo que al retocarla en Photoshop la dejé completamente en blanco y negro con mucho contraste.
Luego el truco consiste en seleccionar el modo "screen" en esa capa en After Effects. De esta forma tratará al negro como alpha, quedando transparente el fondo y mostrando sólo el rayo.
Las líneas de velocidad se logran aplicando sobre un sólido el efecto "Fractal noise" y animando su evolución. Para este caso utilicé 2 vueltas en 5 segundos. Además utilicé el efecto "Fast Blur". Modifiqué un poco esos valores hasta que quedé satisfecho con el resultado.
Para la tierra que se levanta con el golpe del rayo también utilicé un solido, pero apliqué el efecto de "Particle World" y en este caso sí fue un tanto más complejo configurar los valores para obtener un buen resultado.
6. Crear el agua
Para el agua de las cataratas utilicé la misma composición que ya había realizado para el anterior video. Pero hice unas modificaciones para respetar el color original del fondo. No podía ser muy blanca. Además agregué espuma, también con un proceso parecido a la tierra que se levantaba aplicando el efecto "Particle World". El truco en este caso fue establecer el piso en "ice" de esta forma las partículas al morir se deslizan sobre este suelo, es decir la corriente de agua.
7. Crear la lava
En este caso no había separado la lava del fondo en Photoshop así que apliqué una mascara en After Effects con la pluma, en una capa duplicada del fondo. La animé con el efecto "fractal noise" y en este caso subí el valor de complejidad. Luego animé la evolución para dar sensación de movimiento. Además añadí el efecto "glow", ya que después de todo se trata de fuego.
Me pareció buena idea agregar además pequeñas salpicaduras de lava siguiendo un procedimiento similar al de la tierra que se levanta.
8. Crear el Loop
Bueno, está todo armado, animado y listo ¿y ahora qué?
Ahora restaba algo muy importante, crear un loop perfecto de 5 segundos. Para esto descubrí que la mejor forma de lograrlo en este caso fue partiendo la composición por la mitad, llevar la segunda mitad al principio y la primera mitad al final. Luego crear una transición de dos segundos entre las dos mitades. Como se ve en la imagen.
Esto es muy importante para lograr continuidad ya que se tratan de efectos que dan como resultado movimientos azarosos.
Para el caso del fondo que había realizado anteriormente bastó una transición de un segundo ya que no había nada evidente repitiéndose, pero en este caso tenía el rayo y varios elementos siguiendo una dirección, no podía haber cambios bruscos, mucho menos cada 5 segundos.
9. Exportar el archivo
Para exportar el archivo utilicé la sección de 5 segundos, renderizándolo con Adobe Media Encoder.
A ese archivo le apliqué el efecto "curves" para retocar la escala de grises y mejorar el contraste.
Luego lo dupliqué muchas veces hasta llegar a una hora de duración (la idea original eran dos horas pero tuve que recortarlo a una hora porque quedaba demasiado pesado el archivo).
Seleccioné todas las capas > click derecho > Keyframe Assistant > Sequence Layers y nuevamente a renderizar todo el archivo.
10. Crear el GIF
Abrí el archivo de video en Photoshop y lo redimensioné a 640x360px para luego exportarlo como .gif. Además agregué el logo de Splinterlands.
Para esto hay que seleccionar:
Archivo > Exportar > Guardar para web.
Las opciones que vienen por defecto son las que mejor resultado dan, basta confirmar que la casilla de "opciones de repetición" se encuentre en "infinito" para crear el loop.
Esto sería todo, espero que les sea de utilidad. Lo ideal sería reproducir el video en loop, ya que no hay saltos entre el principio y final en ninguno de los videos.
Si tienen alguna sugerencia, solicitud o pregunta, ¡dejen su comentario!
Congratulations @memiliano! You have completed the following achievement on the Hive blockchain and have been rewarded with new badge(s):
Your next target is to reach 100 comments.
You can view your badges on your board and compare yourself to others in the Ranking
If you no longer want to receive notifications, reply to this comment with the word
STOPTo support your work, I also upvoted your post!
Check out the last post from @hivebuzz:
Support the HiveBuzz project. Vote for our proposal!
Thanks for sharing! - castleberry#6859
