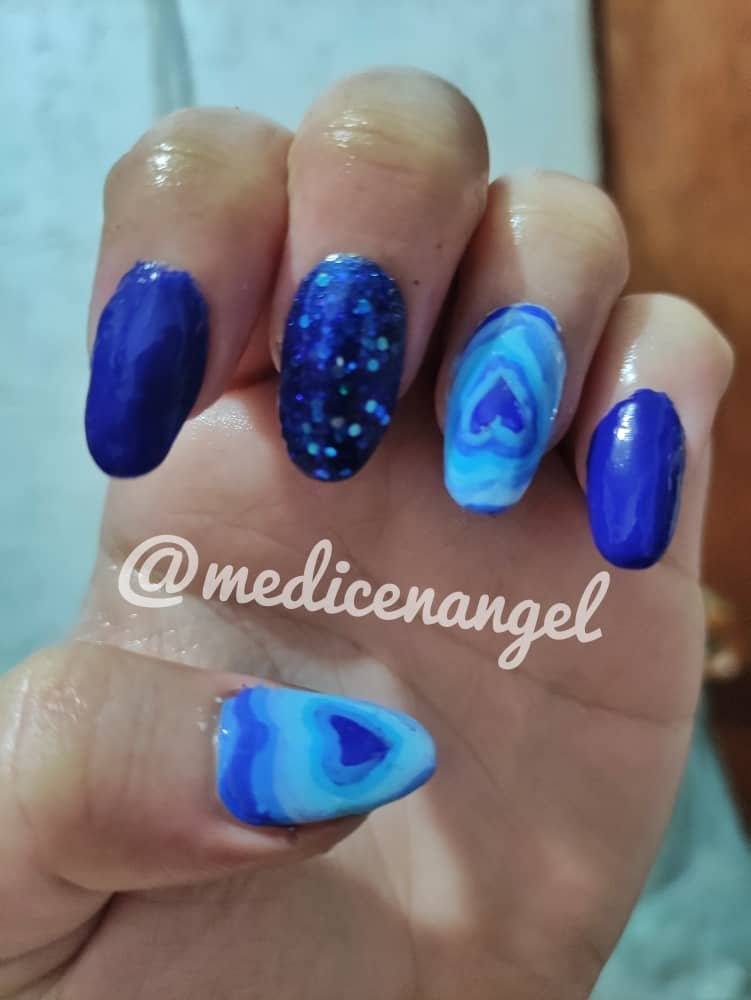
Diseño de uñas de moda fácil y bonito 💅🏻 /Easy and beautiful fashion nail design 💅🏻
Hola soy Ángel! Y en este post aprenderemos juntos a realizar este diseño de uñas en tendencia de corazones “aesthetic” que ha llamado bastante mi atención, yo lo
estaré realizando en tonos azules, desde azul rey hasta el
celeste, pero tú lo puedes recrear en los colores que te
gusten, lo ideal es que hagan contraste para que los
corazones se vean más llamativos, pues la idea principal
del diseño es ir creando varios bordes para simular que el
corazón va cambiando de tamaño, mientras más
diferente sean los tonos o los colores va a resaltar mucho
más, sin más preámbulo comencemos.
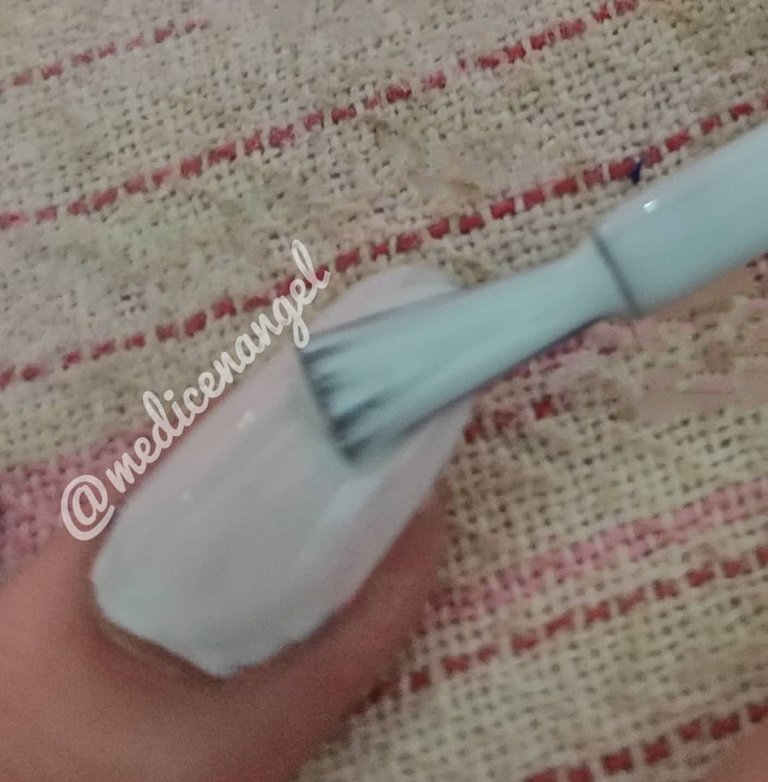
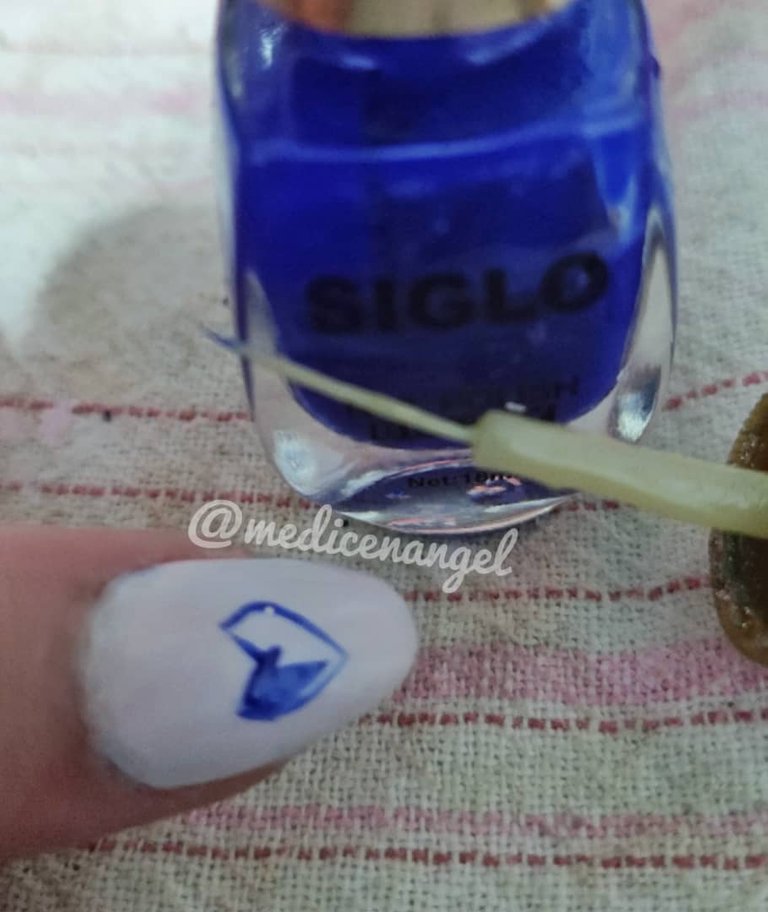
Recuerda que previo a esto deberás realizar la manicura y colocar base para esmaltes, dicho esto comenzaremos colocando los colores principales en las uñas: El primer esmalte que utilizaré es de valmy en el tono “Mónaco 242” es un azul cielo muy claro, lo estaré colocando en las uñas del pulgar y el anular, en estas uñas realizaremos el diseño de los corazones, así que este color será nuestro lienzo. Ten en cuenta que puedes cambiarlo por cualquier tono claro que tengas, pues solo lo utilizaremos como base para poder dibujar mejor los trazos.
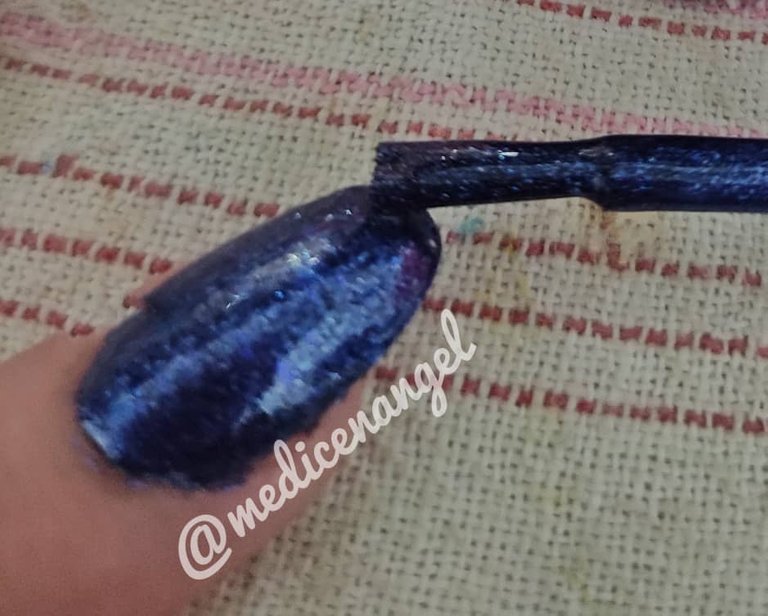
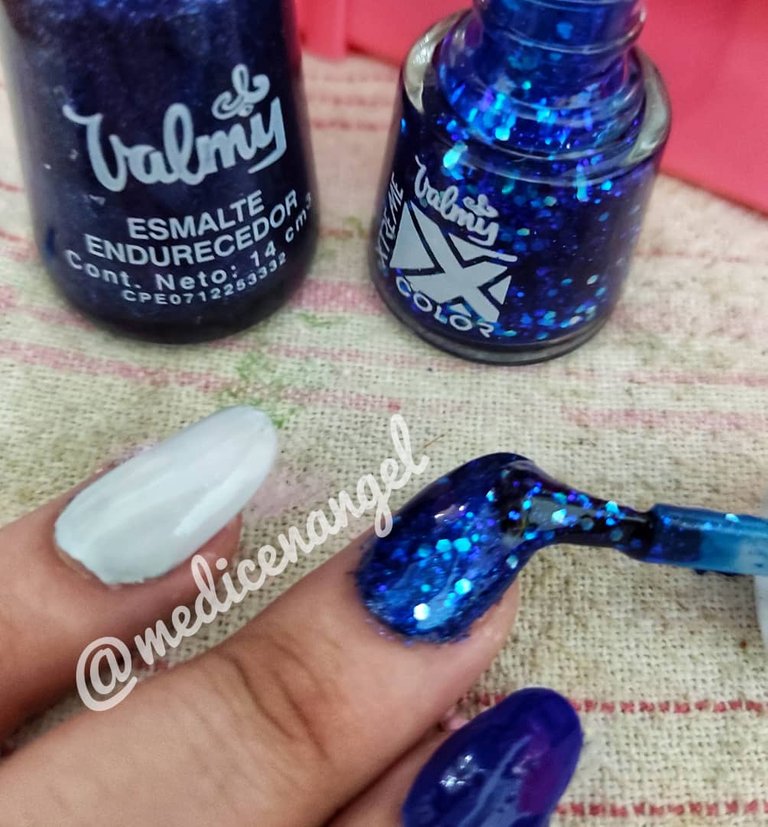
El siguiente color es el tono número 7 de valmy esmalte endurecedor en el dedo medio, este esmalte es azul escarchado pero puedes optar por cambiar este esmalte brilloso por uno de color mate. A mi particularmente me encantan las uñas con escarcha, siento que le dan un toque diferente a la manicura, pero si no es de tu agrado, lo puedes cambiar, pues no es algo indispensable en este diseño.
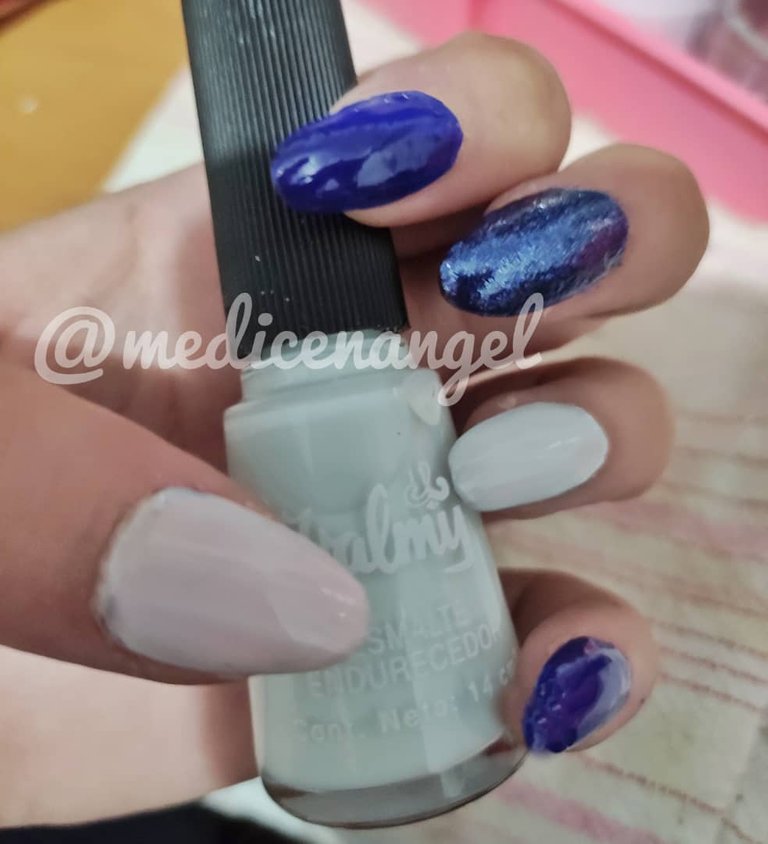
Y por último colocaremos en el meñique y en el índice un azul obscuro sin colocarle más detalles para que no se vea muy sobrecargado. Utilizaré la tonalidad número 069 de la marca siglo, este es de mis esmaltes favoritos es un azul rey muy vibrante.
Luego, para darle un toque extra le agregue a la uña del dedo medio un esmalte azul translucido con brillos de diferentes tamaños, utilice el tono nailbook 03 de la colección xtreme color de valmy.
Posteriormente comenzaremos con el protagonista de este diseño que son los corazones, primero haremos la silueta de un corazon con un pincel fino de uñas (si no tienes uno puedes usar la brocha que viene en los esmaltes nail art, solo debes limpiarla con un poco de acetona y ya quedara lista para usarse con múltiples colores) y el esmalte del color que hayamos seleccionado. Iniciaremos trazando la silueta de un corazón pequeño en el centro de nuestra uña y lo rellenaremos del mismo color que utilizamos previamente para el dibujo, no te frustres si no te sale a la primera, a mí me llevo varios intentos, pero más adelante podremos corregir los bordes, pues el siguiente paso es hacer nuevas pinceladas rodeando el corazón para crear el efecto que buscamos.
A continuación, iremos dibujándole contornos al corazón cambiando las tonalidades o ir cambiando los colores del esmalte que estemos empleando, lo podemos lograr combinándolos con blanco o entre los mismos colores que tengamos. Esto lo haremos hasta que la uña este completamente cubierta, yo hice 8 bordes alrededor del corazón. Este diseño lo repetiremos en el dedo anular, yo decidí cambiar la dirección del corazón y alterne de una manera diferente los colores para lograr que las uñas se vieran un poco distintas pero que siguieran combinando con el diseño original.

Cuando hayamos finalizado con las pinceladas colocaremos una o dos capas de brillo transparente para uñas o top coat para sellar el diseño, dejaremos secar en lámpara o al aire por unos cuantos minutos y ya nuestro diseño estaría listo.
Todavía estoy aprendiendo sobre este extenso arte de la manicura, pero quise compartir con ustedes mi avance en los diseños de uñas a mano alzada y así aprender y mejorar juntos en esta difícil técnica.
Ayúdame a mejorar dejando tus recomendaciones en los
comentarios, y si hiciste el diseño dime que te pareció.
¡Gracias por leerme nos vemos en el siguiente post!
Recuerda que previo a esto deberás realizar la manicura y colocar base para esmaltes, dicho esto comenzaremos colocando los colores principales en las uñas: El primer esmalte que utilizaré es de valmy en el tono “Mónaco 242” es un azul cielo muy claro, lo estaré colocando en las uñas del pulgar y el anular, en estas uñas realizaremos el diseño de los corazones, así que este color será nuestro lienzo. Ten en cuenta que puedes cambiarlo por cualquier tono claro que tengas, pues solo lo utilizaremos como base para poder dibujar mejor los trazos.
El siguiente color es el tono número 7 de valmy esmalte endurecedor en el dedo medio, este esmalte es azul escarchado pero puedes optar por cambiar este esmalte brilloso por uno de color mate. A mi particularmente me encantan las uñas con escarcha, siento que le dan un toque diferente a la manicura, pero si no es de tu agrado, lo puedes cambiar, pues no es algo indispensable en este diseño.
Y por último colocaremos en el meñique y en el índice un azul obscuro sin colocarle más detalles para que no se vea muy sobrecargado. Utilizaré la tonalidad número 069 de la marca siglo, este es de mis esmaltes favoritos es un azul rey muy vibrante.
Luego, para darle un toque extra le agregue a la uña del dedo medio un esmalte azul translucido con brillos de diferentes tamaños, utilice el tono nailbook 03 de la colección xtreme color de valmy.
Posteriormente comenzaremos con el protagonista de este diseño que son los corazones, primero haremos la silueta de un corazon con un pincel fino de uñas (si no tienes uno puedes usar la brocha que viene en los esmaltes nail art, solo debes limpiarla con un poco de acetona y ya quedara lista para usarse con múltiples colores) y el esmalte del color que hayamos seleccionado. Iniciaremos trazando la silueta de un corazón pequeño en el centro de nuestra uña y lo rellenaremos del mismo color que utilizamos previamente para el dibujo, no te frustres si no te sale a la primera, a mí me llevo varios intentos, pero más adelante podremos corregir los bordes, pues el siguiente paso es hacer nuevas pinceladas rodeando el corazón para crear el efecto que buscamos.
A continuación, iremos dibujándole contornos al corazón cambiando las tonalidades o ir cambiando los colores del esmalte que estemos empleando, lo podemos lograr combinándolos con blanco o entre los mismos colores que tengamos. Esto lo haremos hasta que la uña este completamente cubierta, yo hice 8 bordes alrededor del corazón. Este diseño lo repetiremos en el dedo anular, yo decidí cambiar la dirección del corazón y alterne de una manera diferente los colores para lograr que las uñas se vieran un poco distintas pero que siguieran combinando con el diseño original.
Cuando hayamos finalizado con las pinceladas colocaremos una o dos capas de brillo transparente para uñas o top coat para sellar el diseño, dejaremos secar en lámpara o al aire por unos cuantos minutos y ya nuestro diseño estaría listo.
Todavía estoy aprendiendo sobre este extenso arte de la manicura, pero quise compartir con ustedes mi avance en los diseños de uñas a mano alzada y así aprender y mejorar juntos en esta difícil técnica.
English
Hi I'm Angel, and in this post we will learn together how to make this nail design in the "aesthetic" hearts trend that has caught my attention, I will be doing it in shades of blue, from royal blue to blue and blue to blue.
I'll be doing it in shades of blue, from royal blue to light blue, but you can
blue, but you can recreate it in the colors you like, the ideal
you like, the ideal is that they make contrast so that the hearts look more
the hearts look more striking, as the main idea of the design is to create several
of the design is to create several borders to simulate that the heart is changing
the heart is changing size, the more different the
different are the tones or colors will highlight much more, without more
without further ado, let's start.
Remember that prior to this you must perform a manicure and apply a nail polish base. and place the base for nail polish, that said we will begin by placing the main colors on the nails: The first polish I will use is from valmy in the shade. "Monaco 242" is a very light sky blue, I will be putting it on the thumb nails. I will be applying it on the thumb and ring fingernails, on these nails we will do the hearts the design of the hearts, so this color will be our canvas. color will be our canvas. Keep in mind that you can change it for any light tone you have, because we will only use it as a base to as a base to be able to draw better the strokes. strokes.
The next color is the shade number 7 of valmy enamel hardener on the hardener on the middle finger, this polish is frosted blue, but you can blue frosting, but you can choose to change this glossy polish for a matte color. for a matte color. I particularly love frosted nails love nails with frosting, I feel it gives a different touch to the manicure different touch to the manicure, but if you don't like it, you can change it, you can change it, because it is not a must in this design. design.
And finally we will place on the little finger and on the index finger a dark blue without placing more details so it doesn't look too overloaded. overloaded. I will use the shade number 069 of the brand siglo. this is one of my favorite glazes, it is a very vibrant king blue. very vibrant royal blue.
Then, for an extra touch I added a translucent blue polish with glitter to the middle a translucent blue nail polish with glitters of different sizes, use the different sizes, I used nailbook shade 03 from valmy's xtreme color xtreme color collection by valmy.
Then we will start with the protagonist of this design, which are the hearts. the hearts, first we will make the silhouette of a heart with a fine silhouette of a heart with a thin nail brush (if you don't have one you can use the have one you can use the brush that comes in the nail art polish nail art enamels, just clean it with a little acetone and it will be ready acetone and it will be ready to be used with multiple colors) and the colors) and the nail polish of the color we have selected. We will start by tracing the silhouette of a small heart in the center of thethe center of our nail and fill it with the same color we previously color that we previously used for the drawing, do not get frustrated if it does not don't get frustrated if you don't get it right the first time. attempts, but later on we will be able to correct the edges, because the next step is to make new brush strokes around the surrounding the heart to create the effect we are looking for.
Next, we will draw the outlines of the heart by changing the changing the tonalities or changing the colors of the enamel we are enamel that we are using, we can achieve this by combining them with with white or between the same colors that we have. we have. We will do this until the nail is completely covered. completely covered, I did 8 borders around the heart. heart. We will repeat this design on the ring finger, I decided to change the direction of the heart and I decided to change the direction of the heart and altered the colors in a different the colors in a different way to make the nails look a little bit different but still different but still matching the original design. original design.

When we have finished with the brushstrokes we will apply one or two coats of clear nail polish or top coat to seal the top coat to seal the design, let it dry in a lamp or in the air for a few air dry for a few minutes and our design is ready. design is ready.
I'm still learning about this vast art of manicure, but I wanted to share my progress in manicure art, but I wanted to share with you my progress in freehand nail freehand nail designs and thus learn and improve together in this learn and improve together in this difficult technique.
Help me to improve it by leaving your recommendations in the comments, and if you
comments, and if you did the design let me know what you thought.
Thanks for reading, see you in the next post!
Remember that prior to this you must perform a manicure and apply a nail polish base. and place the base for nail polish, that said we will begin by placing the main colors on the nails: The first polish I will use is from valmy in the shade. "Monaco 242" is a very light sky blue, I will be putting it on the thumb nails. I will be applying it on the thumb and ring fingernails, on these nails we will do the hearts the design of the hearts, so this color will be our canvas. color will be our canvas. Keep in mind that you can change it for any light tone you have, because we will only use it as a base to as a base to be able to draw better the strokes. strokes.
The next color is the shade number 7 of valmy enamel hardener on the hardener on the middle finger, this polish is frosted blue, but you can blue frosting, but you can choose to change this glossy polish for a matte color. for a matte color. I particularly love frosted nails love nails with frosting, I feel it gives a different touch to the manicure different touch to the manicure, but if you don't like it, you can change it, you can change it, because it is not a must in this design. design.
And finally we will place on the little finger and on the index finger a dark blue without placing more details so it doesn't look too overloaded. overloaded. I will use the shade number 069 of the brand siglo. this is one of my favorite glazes, it is a very vibrant king blue. very vibrant royal blue.
Then, for an extra touch I added a translucent blue polish with glitter to the middle a translucent blue nail polish with glitters of different sizes, use the different sizes, I used nailbook shade 03 from valmy's xtreme color xtreme color collection by valmy.
Then we will start with the protagonist of this design, which are the hearts. the hearts, first we will make the silhouette of a heart with a fine silhouette of a heart with a thin nail brush (if you don't have one you can use the have one you can use the brush that comes in the nail art polish nail art enamels, just clean it with a little acetone and it will be ready acetone and it will be ready to be used with multiple colors) and the colors) and the nail polish of the color we have selected. We will start by tracing the silhouette of a small heart in the center of thethe center of our nail and fill it with the same color we previously color that we previously used for the drawing, do not get frustrated if it does not don't get frustrated if you don't get it right the first time. attempts, but later on we will be able to correct the edges, because the next step is to make new brush strokes around the surrounding the heart to create the effect we are looking for.
Next, we will draw the outlines of the heart by changing the changing the tonalities or changing the colors of the enamel we are enamel that we are using, we can achieve this by combining them with with white or between the same colors that we have. we have. We will do this until the nail is completely covered. completely covered, I did 8 borders around the heart. heart. We will repeat this design on the ring finger, I decided to change the direction of the heart and I decided to change the direction of the heart and altered the colors in a different the colors in a different way to make the nails look a little bit different but still different but still matching the original design. original design.
When we have finished with the brushstrokes we will apply one or two coats of clear nail polish or top coat to seal the top coat to seal the design, let it dry in a lamp or in the air for a few air dry for a few minutes and our design is ready. design is ready.
I'm still learning about this vast art of manicure, but I wanted to share my progress in manicure art, but I wanted to share with you my progress in freehand nail freehand nail designs and thus learn and improve together in this learn and improve together in this difficult technique.
0
0
0.000
Congratulations @medicenangel! You have completed the following achievement on the Hive blockchain and have been rewarded with new badge(s):
Your next payout target is 50 HP.
The unit is Hive Power equivalent because post and comment rewards can be split into HP and HBD
You can view your badges on your board and compare yourself to others in the Ranking
If you no longer want to receive notifications, reply to this comment with the word
STOPTo support your work, I also upvoted your post!
Check out the last post from @hivebuzz:
Support the HiveBuzz project. Vote for our proposal!
thank you!
You're welcome @medicenangel! Have a nice day 😊👍