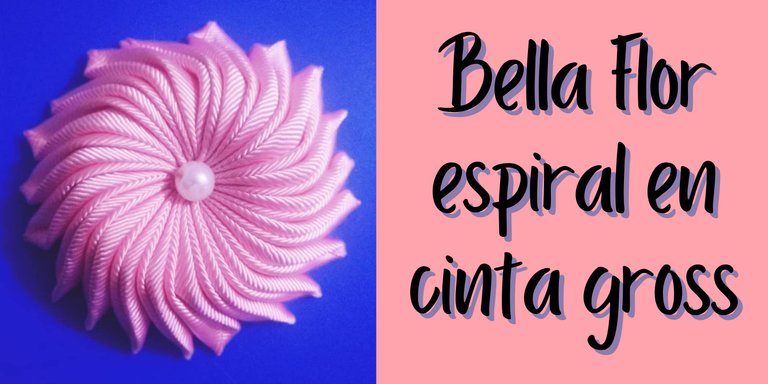
(ESO-ENG) 🌼Bella Flor espiral en cinta Gross🌼⇌ Beautiful spiral flower on Gross ribbon
Gente bonita, familia hermosa un placer saludarles esperando que estén muy bien. Yo bien también gracias a Dios y contenta de estar por aquí nuevamente compartiendo parte de mi trabajo, y otra vez les traigo algo que me gusta mucho ya saben las flores y esta vez una distinta, es una flor espiral en cinta gross. Por favor vengan conmigo a ver cómo se realiza y espero les guste mucho como a mi.
Beautiful people, beautiful family, a pleasure to greet you, I hope you are very well. I am also well thanks to God and happy to be here again sharing part of my work, and again I bring you something that I like very much, you know the flowers and this time a different one, it is a spiral flower in gross ribbon. Please come with me to see how to make it and I hope you like it as much as I do.

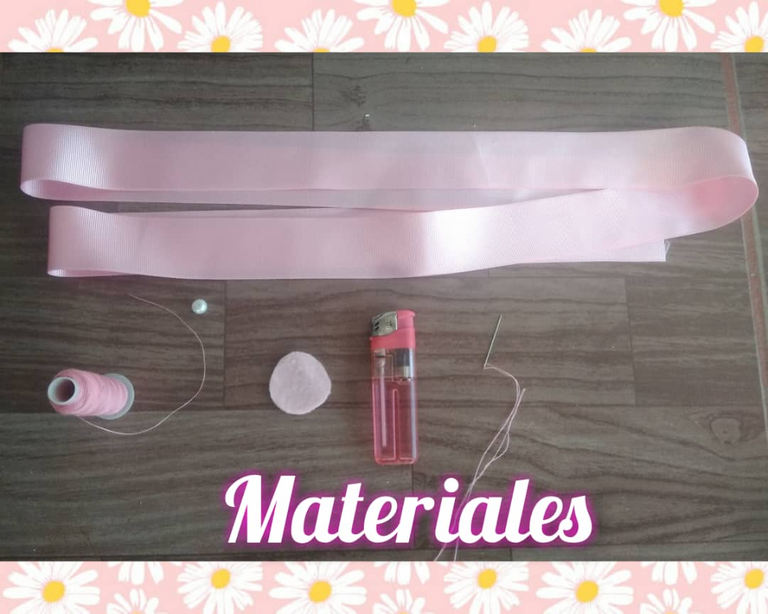
Materiales:
- 1 1/2 mts de Cinta gross.
- Hilo y aguja. Una perla.
- Fieltro.
- Yesquero
Materials:
- 1 1/2 mts of gross tape.
- Thread and needle. A pearl.
- Felt.
- Tinder
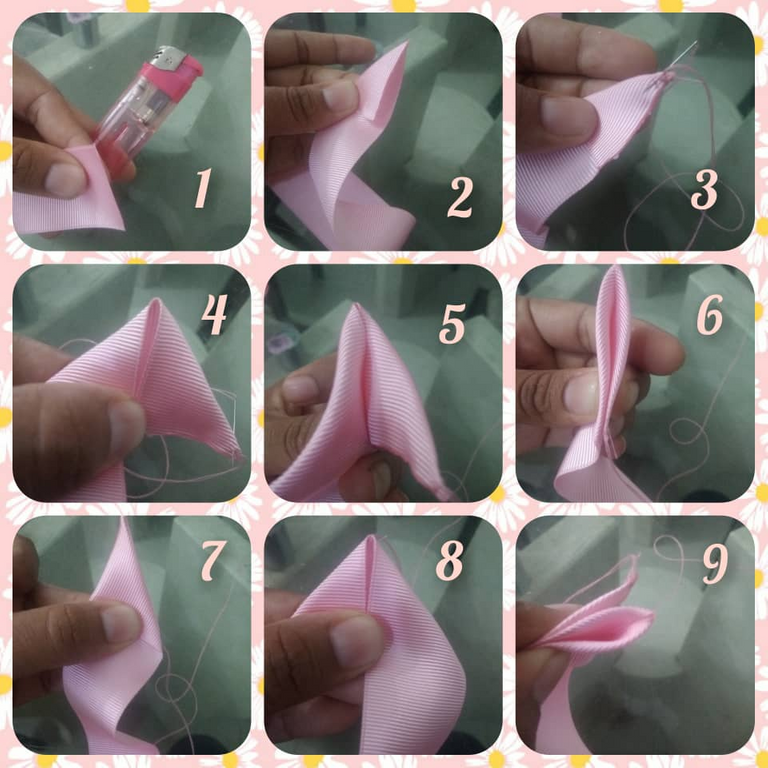
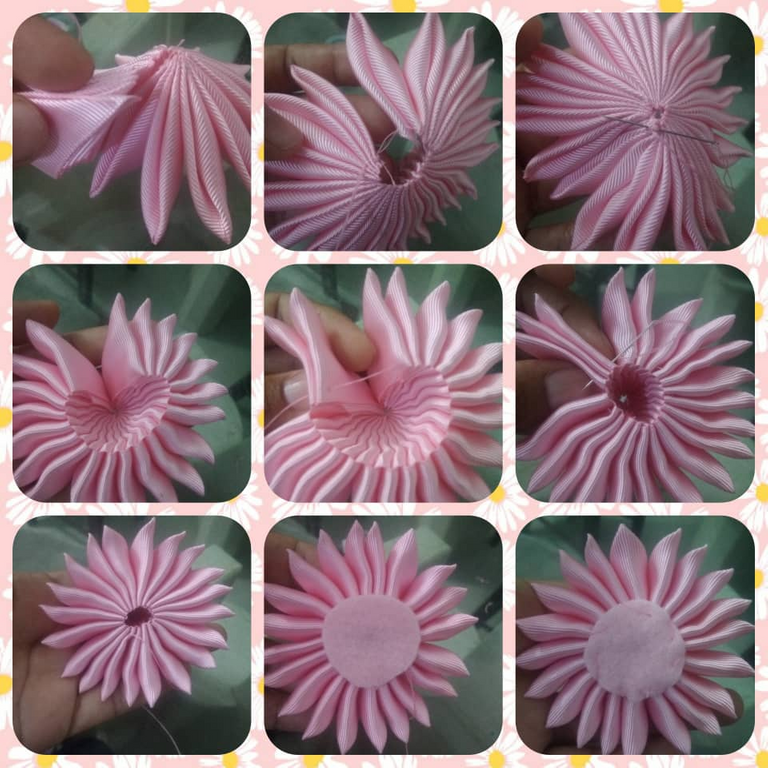
Paso 1 lo primero que vamos hacer es sellar la cinta con el yesquero para que no se hilache, luego doblamos una de las puntas haciendo como un triángulo e insertamos la aguja con el hilo. Luego doblamos el otro lado de la cinta como haciendo un triángulo más grande al unir los dos pequeños como muestra la imagen 4, después cerramos como muestra la imagen 5 y 6 y mantenemos ahí sin soltar, volvemos a doblar al contrario siempre haciendo como un triángulo y cuando forme el triángulo grande o doble unimos y allí va quedando formado los pétalos, al ir quedado formado los pétalos vamos cosiendo en la punta para unirlos, pero solo por la punta dónde iniciamos con la aguja ya que los pétalos me dan dos puntas pero solo vamos a unir por dónde iniciamos la primera punta.
Step 1 the first thing we are going to do is to seal the ribbon with the tinder so that it does not fray, then we fold one of the ends making a triangle and insert the needle with the thread. Then we fold the other side of the tape as if making a larger triangle by joining the two small ones as shown in image 4, then close as shown in image 5 and 6 and hold there without releasing, we fold again the other way around always making a triangle and when the large triangle or double form and there we join together and there will be formed the petals, when the petals are formed, we sew the tip to join them, but only at the point where we started with the needle because the petals give me two tips but we are only going to join where we started the first tip.
Paso 2:
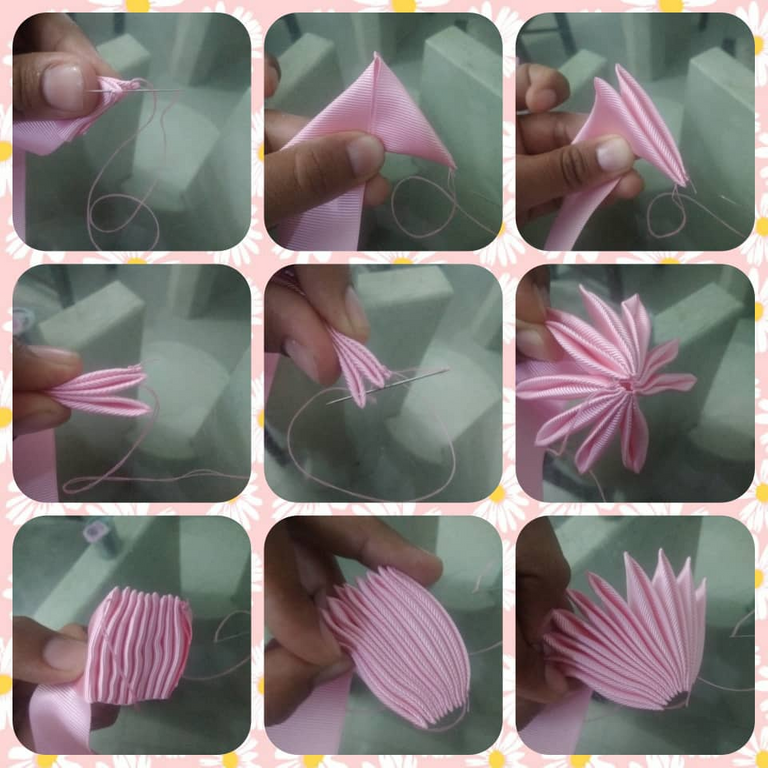
Como decía en el primer paso vamos cosiendo para unir las puntas, solo por la punta que se inicio, vamos a ir repitiendo este proceso hasta completar 20 pétalos, los pétalos que contamos son los que quedan con la punta hacia afuera. En la imagen vemos cómo va quedando al ir doblando, como forma de acordeón por dentro y con la puntas hacia afuera.
Step 2 As I said in the first step we will sew to join the ends, only by the tip that started, we will repeat this process until completing 20 petals, the petals that we count are those that are left with the tip facing out. In the image we can see how it is folded, like an accordion shape on the inside and with the tips facing out.
Paso 3:
Al finalizar el pétalo número 20 unimos la última punta con la primera como muestra la imagen y halamos el hilo para cerrarla y hacemos un nudo para que no se suelte, luego volteamos la flor y unimos también por la parte de abajo cosiendo alrededor y halando el hilo para cerrar un poco, no tanto como arriba pero si cerrando un poco el centro. Y luego colocamos el fieltro y cosemos ya saben para tener un trabajo limpio.
Step 3: At the end of the petal number 20 we join the last tip with the first as shown in the picture and pull the thread to close it and make a knot so that it does not come loose, then we turn the flower and also join the bottom sewing around and pulling the thread to close a little, not as much as above but closing the center a little. And then we place the felt and sew you know to have a clean job.

Paso 4 Ya al tener nuestra puntas cerradas tanto arriba como abajo, la colocamos en un mesa y con el dedo hundimos el centro de arriba hacia abajo y ella sola da la forma espiral. Insertamos la aguja con hilo en el centro y llevamos había abajo y unimos con el fieltro para que se mantenga así hacia abajo y en forma espiral, por último cosemos la perla en el centro de la flor como muestra la imagen.
Paso 4: Once we have our tips closed both above and below, we place it on a table and with our finger we sink the center from top to bottom and it alone gives the spiral shape. Insert the needle with thread in the center and take it down and join with the felt to keep it down and spiral shape, finally sew the pearl in the center of the flower as shown in the image.
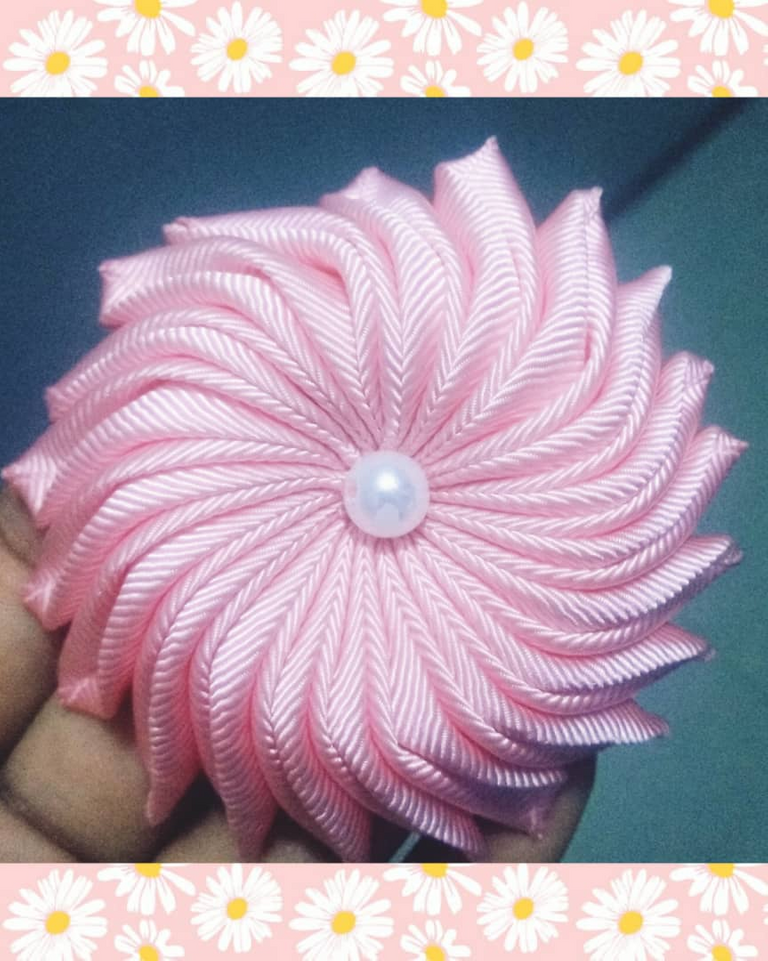
Y así obtenemos nuestra flor espiral en cinta gross. Hermosa y muy útil.
And so we get our spiral flower in gross tape. Beautiful and very useful.
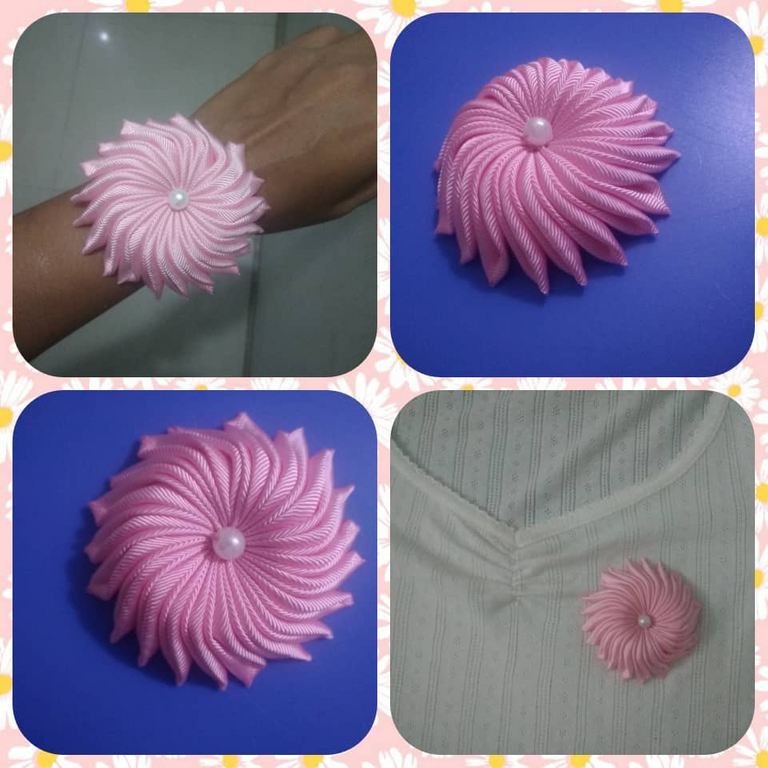
Cómo siempre podemos combinar con muchas cosas hasta de pulsera podemos usarla. Gracias por acompañarme hasta aquí, espero que sea de su agrado.
As always we can combine it with many things, we can even use it as a bracelet. Thank you for joining me here, I hope you enjoy it.
Todas las imagenes son de mi autoria y tomadas desde mi tlf android y editadas de la app InCollage y Canva.
Traduccion: DeepL.com

Wawow...... 🙀 so amazing,very neat and outstanding 👍
Gracias por tu comentario, es muy saber que le gusta.
Me gustó mucho tu paso a paso. Hermoso e impecable trabajo
Muchas gracias amor, que bueno que te haya gustado.
Hola @maryoris.marcano me encantó esta flor, el color y la forma son totalmente hermosas. Debo decir que tu publicación está muy bien organizada con excelentes fotografías. Me agrada ver tu avance y también tus lindas creaciones. Te felicito!
Muchísimas gracias, lo hago con mucho entusiasmo esperando que le guste. Gracias por su comentario 😃
🤗
Congratulations @maryoris.marcano! You have completed the following achievement on the Hive blockchain and have been rewarded with new badge(s) :
Your next target is to reach 3250 upvotes.
You can view your badges on your board and compare yourself to others in the Ranking
If you no longer want to receive notifications, reply to this comment with the word
STOPque hermosa te quedó. felicitaciones.
Gracias bella.
This is so gorgeous