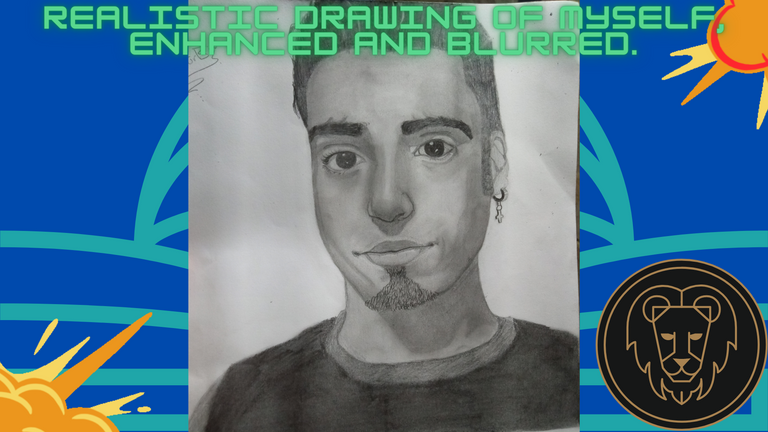
Realistic drawing of myself, enhanced and blurred / Drawing with graphite pencils / (ENG/ESP)

Bienvenidos mis queridos amigos amantes del arte y artistas.
El día de hoy les vengo a compartir un dibujo realista de mí mismo, honestamente no me ha quedado tan similar a la foto, pero como dice el dicho, la práctica hace al maestro, últimamente no le he podido dedicar el tiempo debido a mis dibujos, pero comenzaré a trabajar más de lleno en ellos, ya que me gusta mucho dibujar, y nada mejor que realista.
Para poder hacer un buen dibujo realista hay que dedicarle tiempo, cosa que últimamente no lo he hecho, ya que me agota un poco la vista y que regularmente me ha dado dolores de cabeza, pero debe ser algún virus que está dando por donde vivo como la gripe.
Welcome my dear friends, art lovers and artists.
Today I come to share with you a realistic drawing of myself, honestly I have not been so similar to the photo, but as the saying goes, practice makes perfect, lately I have not been able to dedicate the time to my drawings, but I will begin to work more fully on them, because I really like to draw, and nothing better than realistic.
To be able to make a good realistic drawing you have to dedicate time to it, something that lately I have not done, since it exhausts my sight a little and that regularly has given me headaches, but it must be some virus that is going around where I live like the flu.
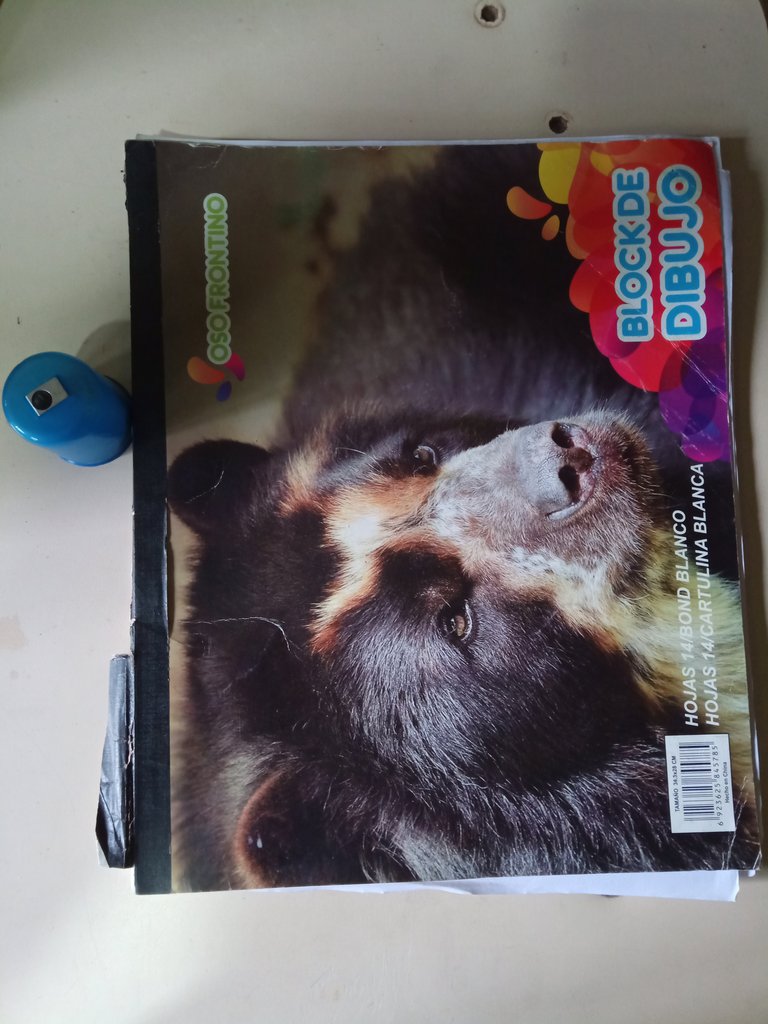
Antes de comenzar a hacer un dibujo realista necesitaremos los siguientes materiales:
*Bloc de Dibujo, no importa el tamaño por el hecho de que eso dependerá que tan grande quieras el dibujo, pero recuerda una cosa, cuanto más grande es el dibujo más complicado será.
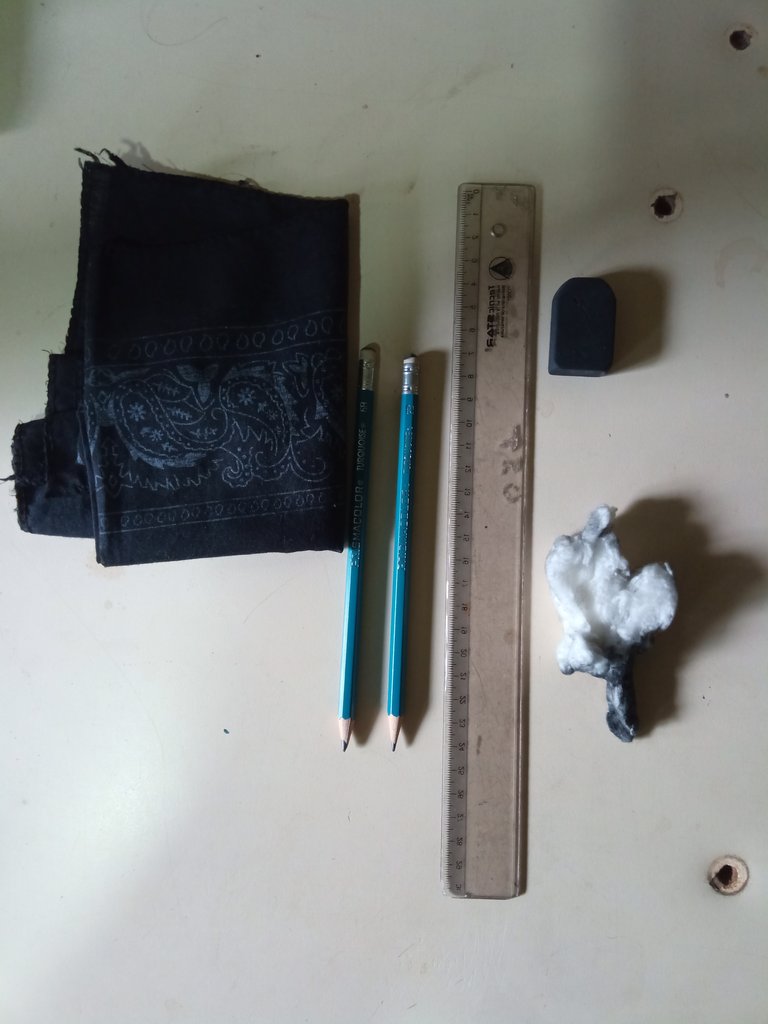
*Sacapuntas con depósito, así para no tener que levantarnos cada momento para sacarle punta a nuestros lápices.
*Pañuelo, lo podemos utilizar para poner nuestra mano sobre él a la hora de dibujar, para no manchar nuestro dibujo, también lo podemos usar para limpiar nuestro borrador.
*Regla para detallar si nuestro dibujo está en una buena posición.
*Borrador, tiene que ser un borrador lo bastante bueno y que no esté vencido para poder ajustar cualquier imperfección que podamos cometer en el proceso.
*Algodón, este material lo podemos utilizar para crear un difuminado excelente, aunque también podemos usar un pincel, pero la calidad no sería la misma, pero eso depende de gustos.
*Lápices de grafito 2B y 6B
Before starting to make a realistic drawing we will need the following materials:
*Drawing pad, it doesn't matter the size for the fact that it will depend on how big you want the drawing, but remember one thing, the bigger the drawing the more complicated it will be.
*Pencil sharpener with reservoir, so we don't have to get up every moment to sharpen our pencils.
*Handkerchief, we can use it to put our hand on it at the time of drawing, so as not to stain our drawing, we can also use it to clean our eraser.
*Ruler to detail if our drawing is in a good position.
*Eraser, it has to be a good enough eraser and that is not expired to be able to adjust any imperfection that we can commit in the process.
*Cotton, we can use this material to create an excellent blur, although we can also use a brush, but the quality would not be the same, but that depends on taste.
*Graphite pencils 2B and 6B


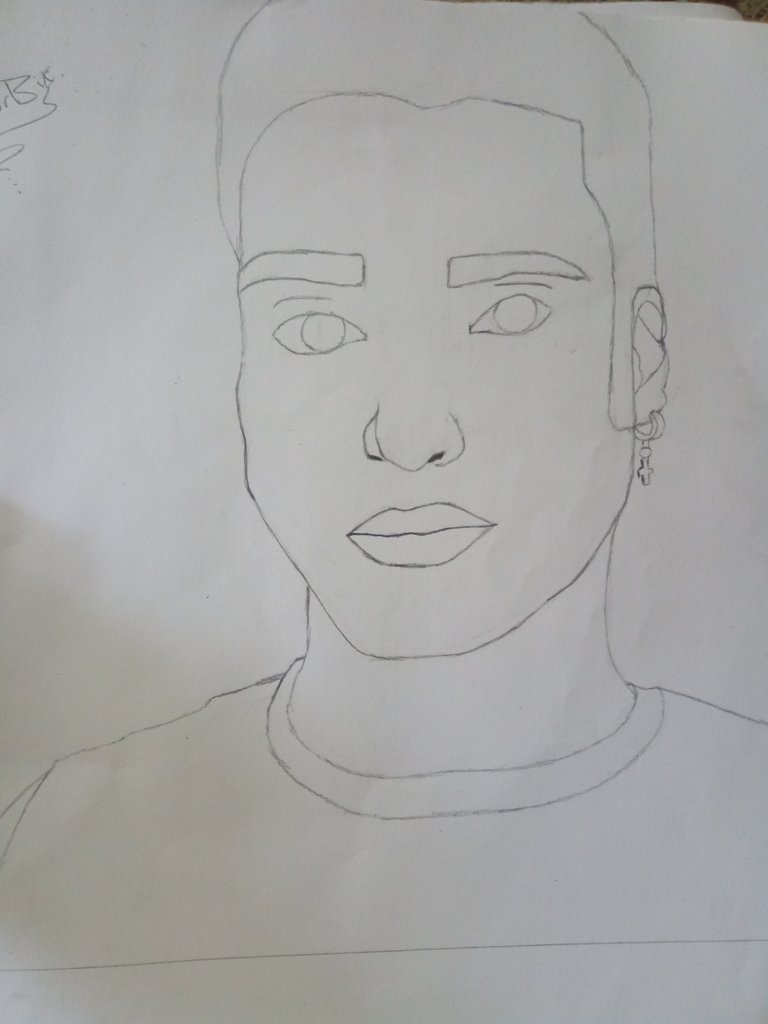
Primero comenzamos a observar nuestra imagen de referencia, que en mi caso yo estoy utilizando una foto de mí mismo, para los que no conocían mi rostro, pues aquí se los presento al final de la publicación.
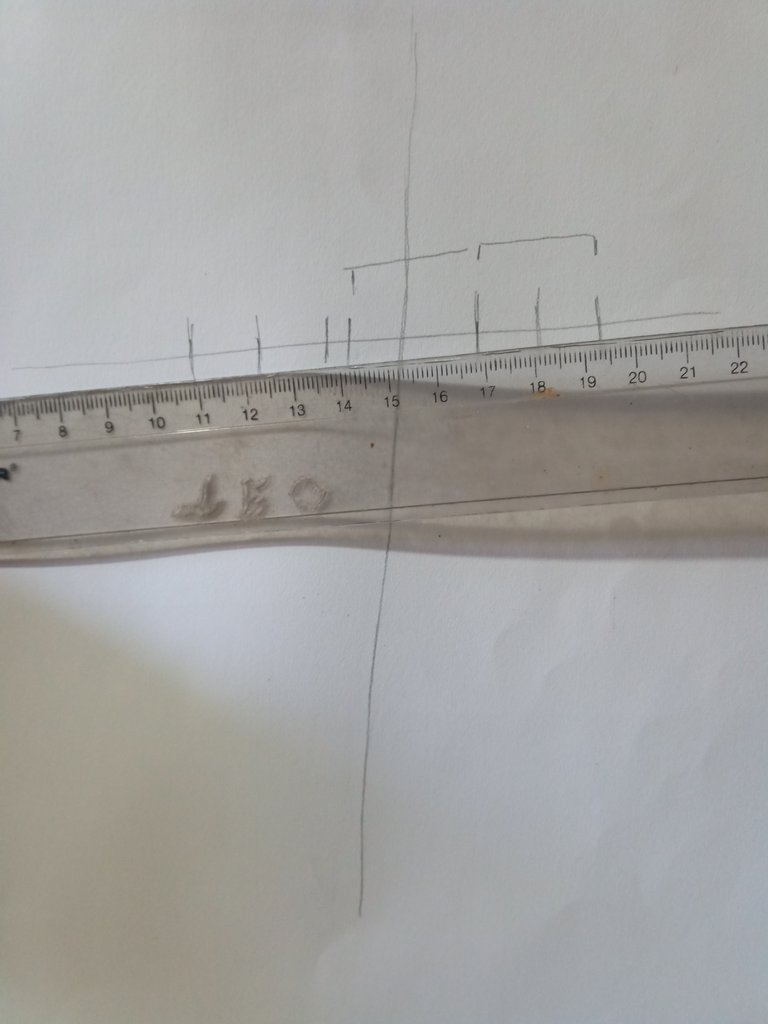
Después comenzamos a trazar dos líneas, una vertical y otra horizontal, en este caso según la foto en referencia tiene una posición casi de 3/4.
Después comenzamos a crear nuestro primer ojo, así que antes debemos pensar que tan grande será nuestro dibujo, hacemos las mediciones con nuestro lápiz y nuestro pulgar como les he mostrado en anteriores publicaciones de dibujo, honestamente había tomado la foto de cómo hacerlo, pero accidentalmente se me borraron algunas fotos luego de haber terminado con el dibujo al 100%.
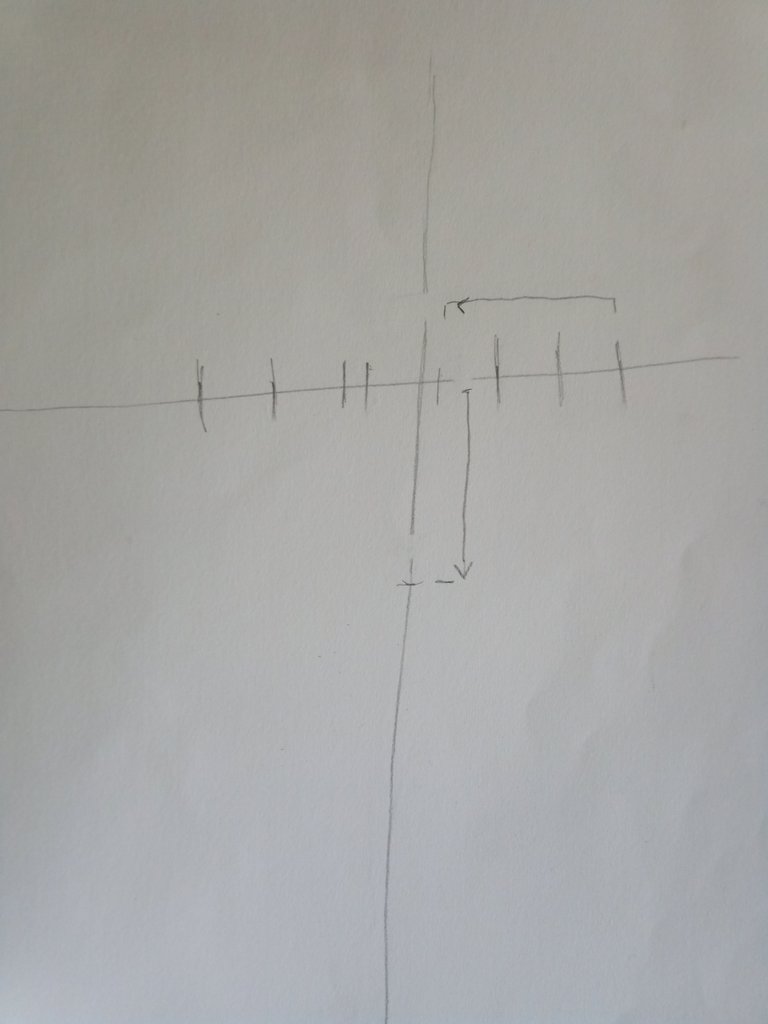
Luego de tener la separación de los ojos, el siguiente paso será crear y medir la separación entre los ojos y la punta de la nariz, en este caso según la foto la separación de los ojos a la nariz es un poco más grande que el ojo derecho, en la imagen inferior de este texto podemos observar la separación que hice midiendo la distancia del ojo y la nariz marcado con unas flechas.
First we begin to observe our reference image, which in my case I am using a photo of myself, for those who did not know my face, here I present it at the end of the publication.
Then we start to draw two lines, one vertical and one horizontal, in this case according to the reference photo it has a position of almost 3/4.
Then we start to create our first eye, so before we must think how big our drawing will be, we make the measurements with our pencil and our thumb as I have shown you in previous drawing posts, honestly I had taken the picture of how to do it, but accidentally I deleted some pictures after I had finished with the drawing 100%.
After having the separation of the eyes, the next step will be to create and measure the separation between the eyes and the tip of the nose, in this case according to the photo the separation from the eyes to the nose is a little bigger than the right eye, in the image below this text we can see the separation I made by measuring the distance from the eye and the nose marked with arrows.
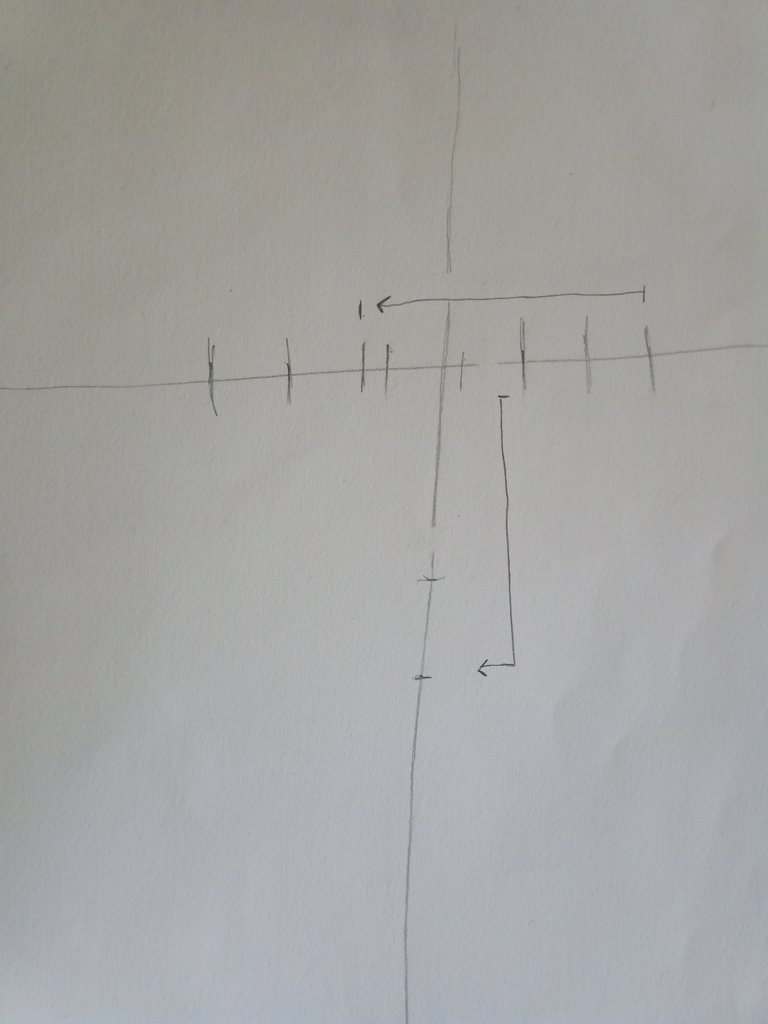

Ahora para saber cuál es la distancia de la nariz a los labios debemos observar nuestra imagen de referencia, según mi foto la separación es desde donde comienza el ojo derecho hasta donde comienza el ojo izquierdo, luego comenzamos a medir desde la línea de en medio de ambos ojos hasta después de la nariz, como podrán observar en la primera imagen superior de este texto.
Luego comenzamos a hacer nuestro ojo para poder medir el resto del rostro mejor, para poder crear el labio superior e inferior nos dirigimos como siempre a nuestra imagen de referencia.
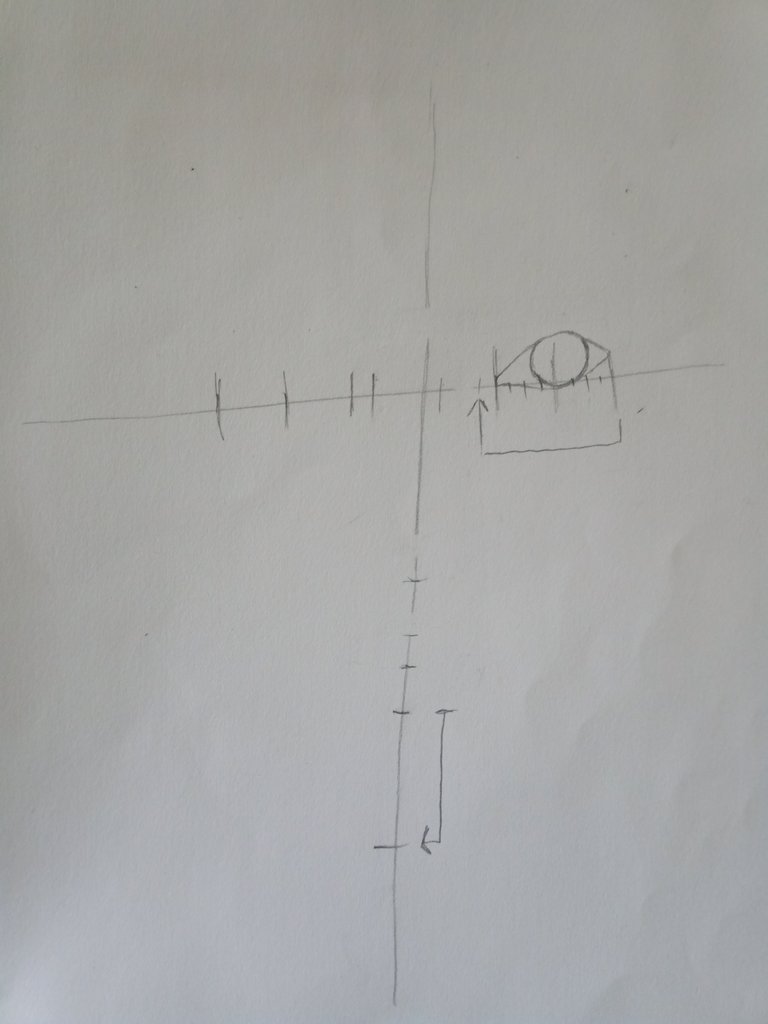
Según la foto, me dice que la distancia del labio inferior es desde donde comienza el ojo derecho hasta donde comienza el iris, y el labio superior es desde donde comienza el ojo derecho hasta un poco más hacia la izquierda donde comienza el iris.
Ahora la de la barbilla es desde donde comienza el ojo derecho hasta un poco más hacia la izquierda desde donde finaliza el ojo derecho.
Now to know what is the distance from the nose to the lips we must observe our reference image, according to my photo the separation is from where the right eye begins to where the left eye begins, then we start to measure from the middle line of both eyes to after the nose, as you can see in the first image above of this text.
Then we start to make our eye to be able to measure the rest of the face better, to be able to create the upper and lower lip we go as always to our reference image.
According to the picture, it tells me that the distance of the lower lip is from where the right eye starts to where the iris starts, and the upper lip is from where the right eye starts to a little more to the left where the iris starts.
Now the chin is from where the right eye starts to a little further to the left from where the right eye ends.
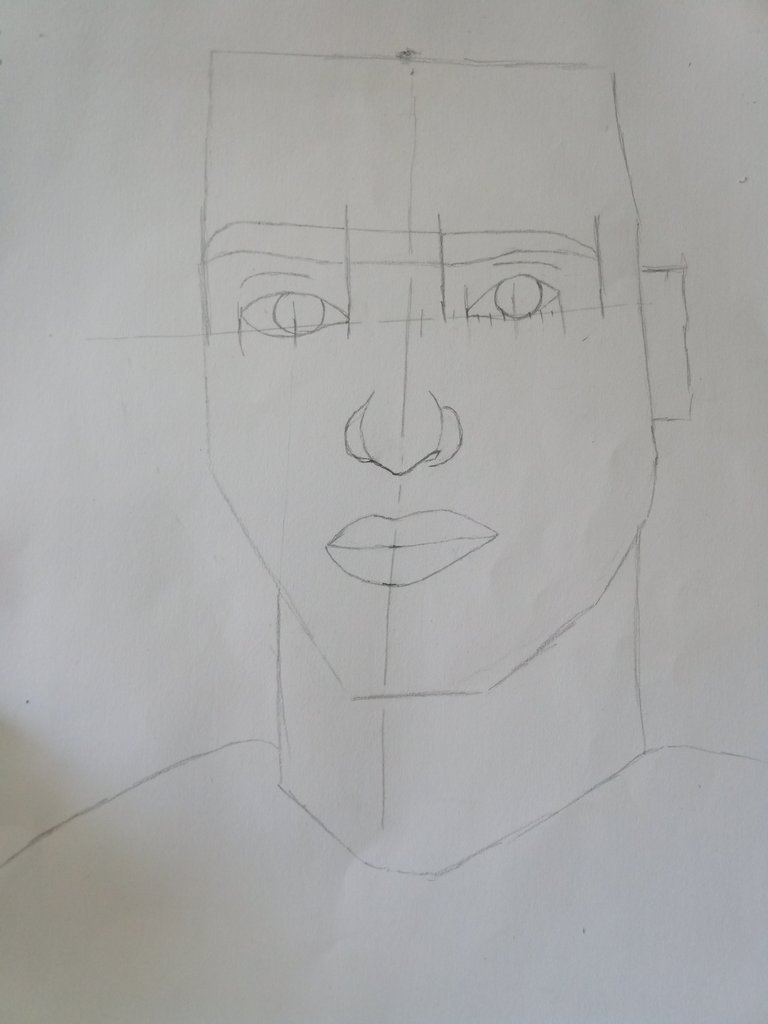
Luego de este proceso comenzamos a crear el resto del rostro, en esta parte no hice mediciones, solo cree el resto del rostro según a mi percepción de la foto.
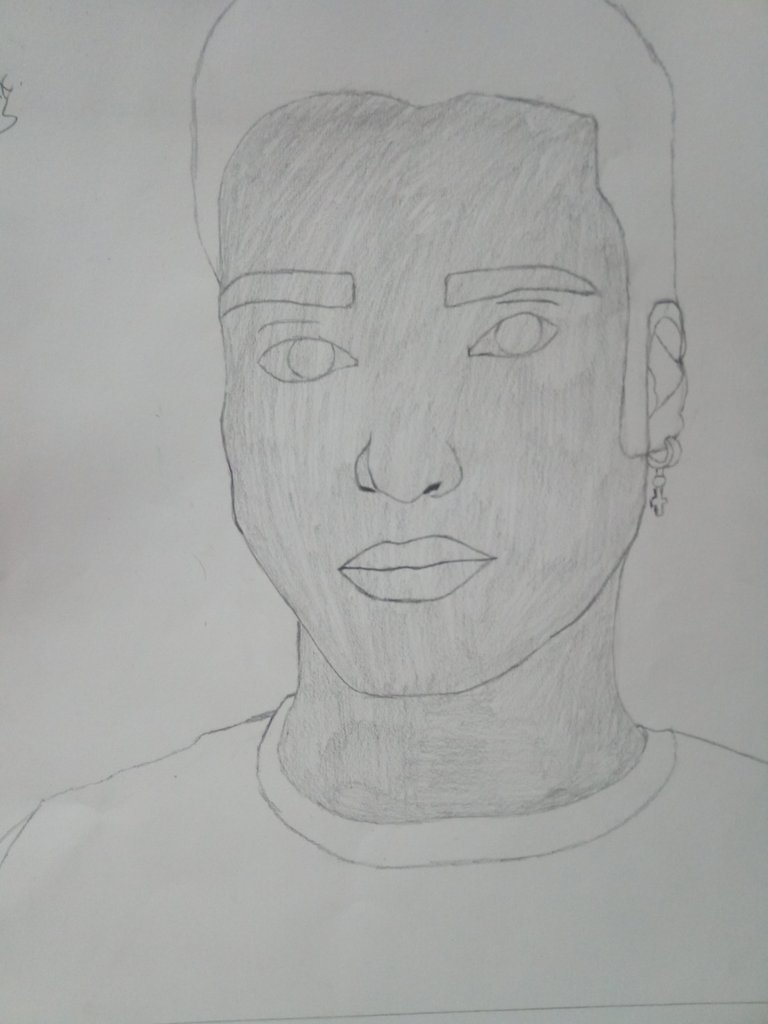
Después comencé a borrar todos los márgenes y las líneas que me sirvieron de guía para el dibujo, también remarqué un poco todo el dibujo para ajustarlo un poco más.
Más adelante comenzamos a darle valorizado al dibujo, utilizando nuestro lápiz 2B sin afincarlo, para este proceso podemos tomar el lápiz desde la punta donde se encuentra el borrado y comenzamos a darle valor.
After this process we started to create the rest of the face, in this part I didn't make any measurements, I just created the rest of the face according to my perception of the photo.
Then I started to erase all the margins and the lines that served me as a guide for the drawing, I also remarked a little bit the whole drawing to adjust it a little more.
Later we begin to give value to the drawing, using our 2B pencil without sharpening it, for this process we can take the pencil from the tip where the erasing is, and we begin to give value to it.
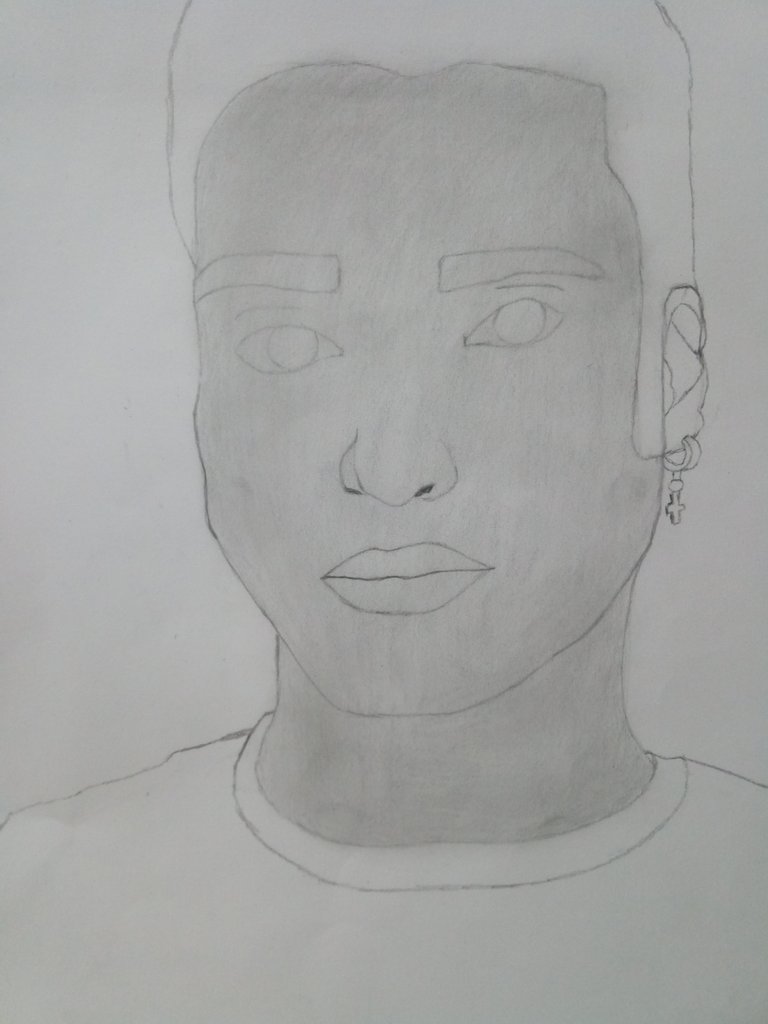
Después con la ayuda de nuestro algodón podemos difuminarlo, pasándolo por todo el lugar al que le dimos valorizado, podremos notar que el dibujo comienza a tener forma nada más con darle la primera capa, un dato muy importante que destacaré en los dibujos, es que todo dibujo está creado con paciencia y con muchas capas.
Luego del difuminado comencé a trabar por partes en la segunda capa, así que decidí trabajar primero con la zona izquierda del rostro, capa por capa y difuminándolo para que quede lo más realista posible, honestamente hice este trabajo muy rápido, por ese motivo no me quedo tan realista o tan parecida a la imagen de referencia, así que en el próximo dibujo prometo dedicarle más tiempo y trabarlo mucho mejor que antes.
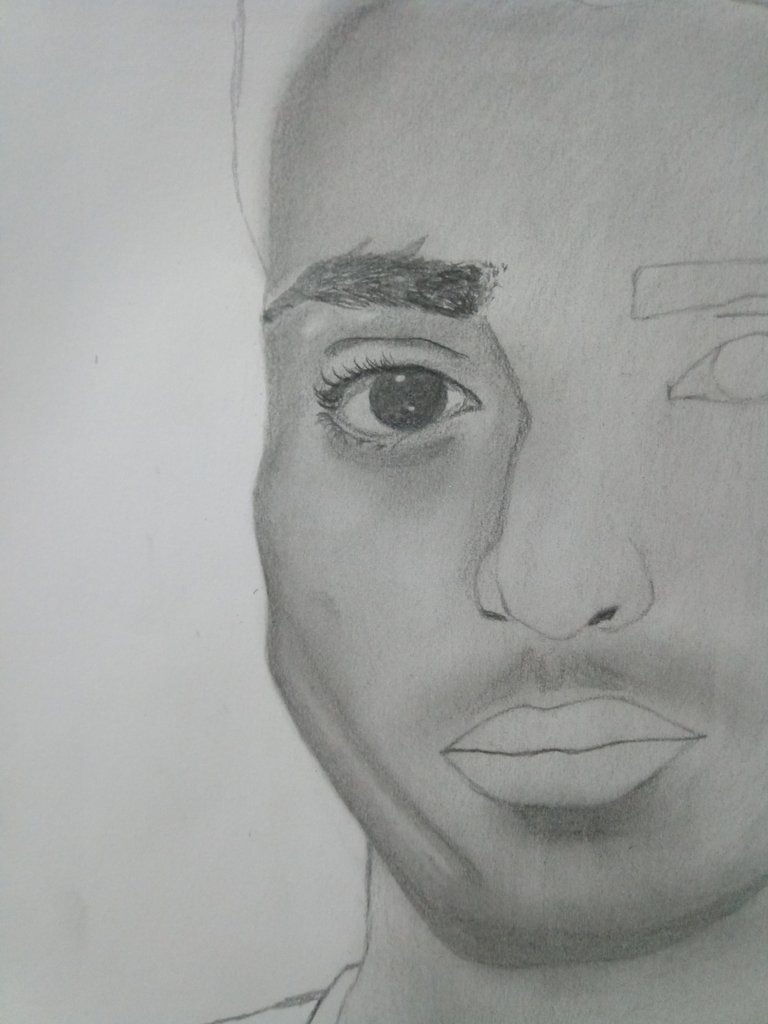
Seguidamente, comencé con la parte derecha del rostro, para hacer le barba es necesario crear pequeños trazos sin importar en qué dirección.
Then with the help of our cotton we can blur it, passing it all over the place to which we gave it valorized, we can notice that the drawing begins to take shape just by giving it the first layer, a very important fact that I will emphasize in the drawings, is that every drawing is created with patience and with many layers.
After the blurring I began to work by parts in the second layer, so I decided to work first with the left zone of the face, layer by layer and blurring it to make it as realistic as possible, honestly I did this work very fast, for that reason it is not so realistic or so similar to the reference image, so in the next drawing I promise to dedicate more time and to work it much better than before.
Next, I started with the right part of the face, to make the beard it is necessary to create small strokes no matter in which direction.
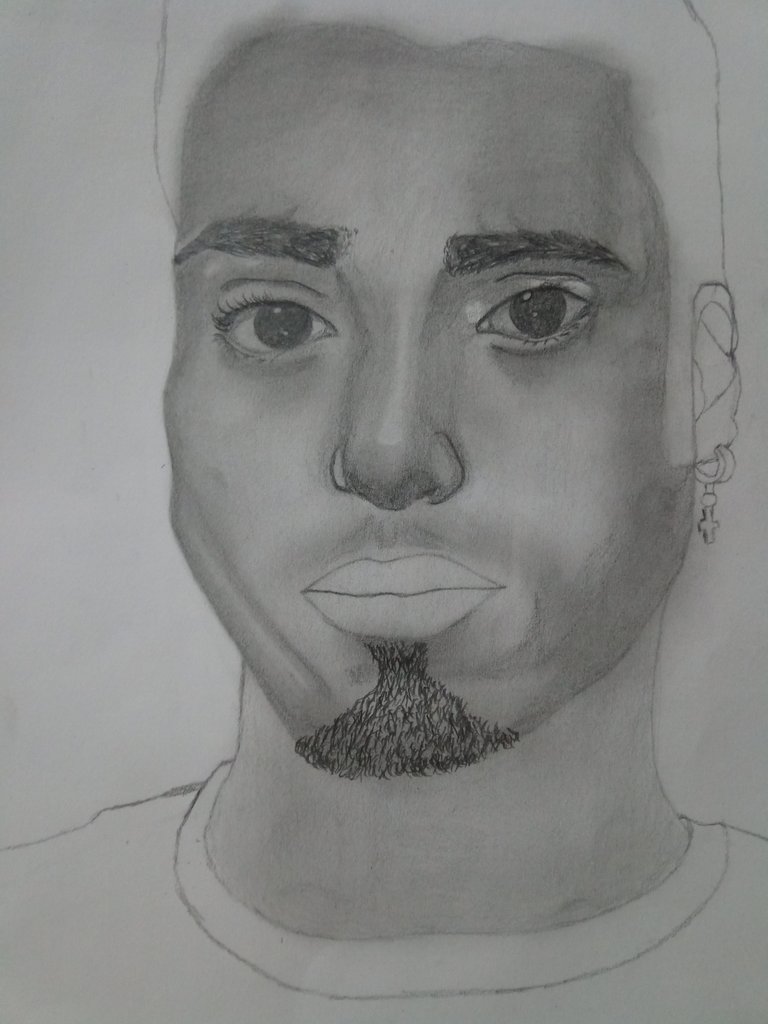
Y por último comencé a darle los últimos retoques al dibujo, de hecho, he tenido que ajustar un poco el ojo derecho, ya que lo tenía muy desproporcionado, luego ajuste los labios, ya que lo tenía muy grande, este tipo de cosas suceden porque el ojo que utilice como guía para medir el resto del rostro estaba puesto en una posición errónea, pero nada que no se pueda arreglar.
Incline el ojo derecho un poco más hacia abajo para que quede lo más parecido a la imagen de referencia.
And finally I started to give the last touches to the drawing, in fact, I had to adjust a little the right eye, because I had it very disproportionate, then adjust the lips, because I had it too big, this kind of things happen because the eye that I used as a guide to measure the rest of the face was placed in the wrong position, but nothing that can not be fixed.
Tilt the right eye down a little more so that it is as close as possible to the reference image.
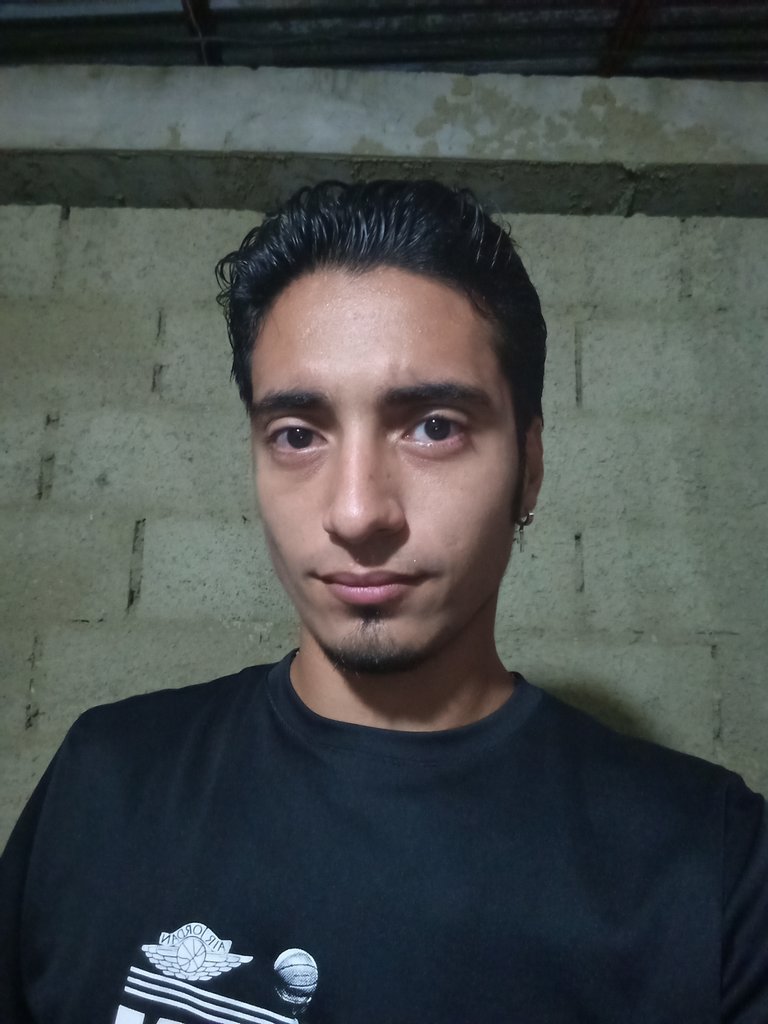
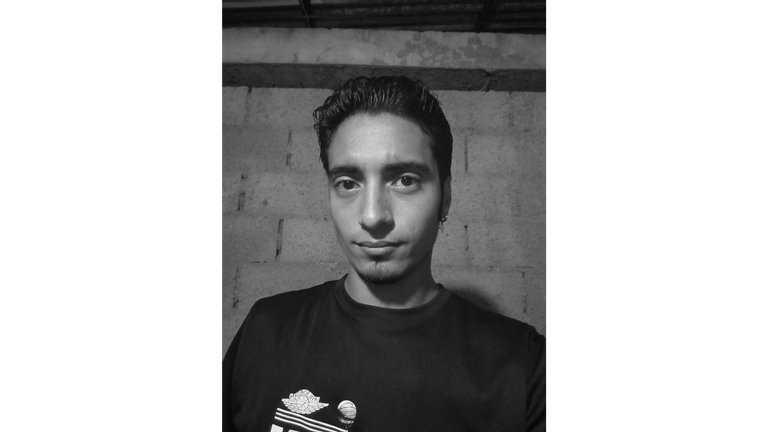
A continuación, les mostraré la foto que utilice de referencia de mí mismo, y también la misma foto, pero en blanco y negro para detectar mejor la profundidad de cada parte del rostro.
Así concluye la publicación de hoy amigos, espero les sea de su agrado y que hayan aprendido algo nuevo hoy con mi dibujo, nos vemos en otra publicación de dibujo, hasta la próxima.
Las fotos fueron tomadas con la ayuda de mi teléfono Bison X Designed By Umidigi.
Next, I will show you the photo I used as a reference of myself, and also the same photo, but in black and white to better detect the depth of each part of the face.
This concludes today's publication friends, I hope you like it and that you have learned something new today with my drawing, see you in another drawing publication, see you next time.
The photos were taken with the help of my phone Bison X Designed By Umidigi.

Source / Fuente Castle of Castlevania
Source / Fuente Terra Blade of Terraria
Los separadores son de mi autoría, los captures son realizados desde mi perfil de jugador en mi ordenador, las ediciones del gif son creados por mí.
The separators are of my authorship, the captures are made from my player profile on my computer, the gif edits are created by me.
Programas que utilicé para crear mi diseño es este:
This is the program I used to create my design:
Gif y portada cortesía de Canva
Gif and cover courtesy of Canva
Traducido por Deepl

Oh wow! That looks so realistic! You draw so well and thank you for the step by step guide! Hehehe
I'm glad you liked the publication, greetings.
Has sido votado por
PROYECTO ENLACE
'Conectando Ideas y Comunidades'
PROYECTO ENLACE es un proyecto de curación de habla hispana enfocado en recompensar contenido de calidad y apoyar autores en su proceso de crecimiento en HIVE.
Creemos y apostamos por el futuro de esta gran plataforma, y estamos muy emocionados de poder hacerla crecer junto a esta comunidad. Así que te invitamos a usar nuestra etiqueta ENLACE y estar atento a todas las actividades que tenemos preparadas y que estaremos publicando en breve.
¿QUIERES AUTOMATIZAR TUS GANANCIAS DE CURACIÓN? SE PARTE DEL PROYECTO ENLACE APOYANDO A NUESTRO TRAIL EN HIVE.VOTE INGRESA AQUÍ PARA CONOCER LOS DETALLES.
¿QUIERES INVERTIR ENLACE? DESCUBRE COMO HACERLO Y GENERAR INGRESOS DE FORMA SEMANAL MEDIANTE TU DELEGACIÓN DE HP AQUÍ TE EXPLICAMOS COMO.
Te invitamos a participar en nuestro servidor de Discord: https://discord.gg/3S9y7BbWfS
Atentamente
EQUIPO ENLACE 2022
¡Enhorabuena!
✅ Has hecho un trabajo de calidad, por lo cual tu publicación ha sido valorada y ha recibido el apoyo de parte de CHESS BROTHERS ♔ 💪
♟ Te invitamos a usar nuestra etiqueta #chessbrothers y a que aprendas más sobre nosotros.
♟♟ También puedes contactarnos en nuestro servidor de Discord y promocionar allí tus publicaciones.
♟♟♟ Considera unirte a nuestro trail de curación para que trabajemos en equipo y recibas recompensas automáticamente.
♞♟ Echa un vistazo a nuestra cuenta @chessbrotherspro para que te informes sobre el proceso de curación llevado a diario por nuestro equipo.
Cordialmente
El equipo de CHESS BROTHERS
Thank you for sharing this amazing post on HIVE!
Your content got selected by our fellow curator @rezoanulvibes & you just received a little thank you via an upvote from our non-profit curation initiative!
You will be featured in one of our recurring curation compilations and on our pinterest boards! Both are aiming to offer you a stage to widen your audience within and outside of the DIY scene of hive.
Join the official DIYHub community on HIVE and show us more of your amazing work and feel free to connect with us and other DIYers via our discord server: https://discord.gg/mY5uCfQ !
If you want to support our goal to motivate other DIY/art/music/homesteading/... creators just delegate to us and earn 100% of your curation rewards!
Stay creative & hive on!