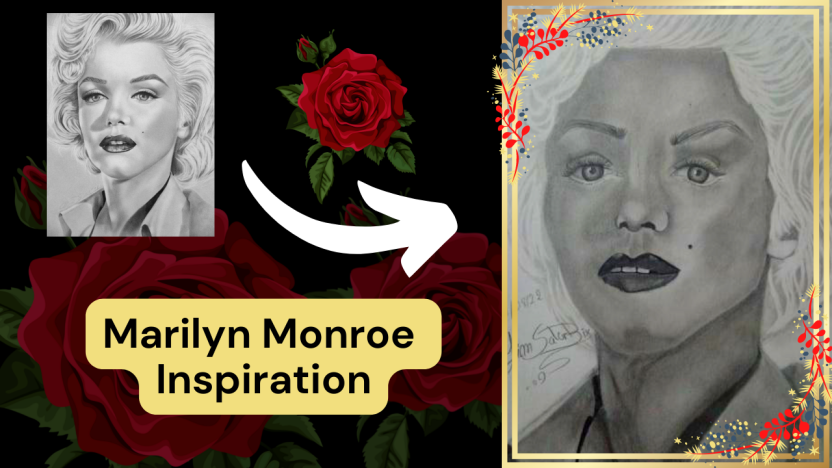
Marilyn Monroe Inspiration / (ENG/ESP)

Bienvenidos mis queridos amigos amantes del arte y artista.
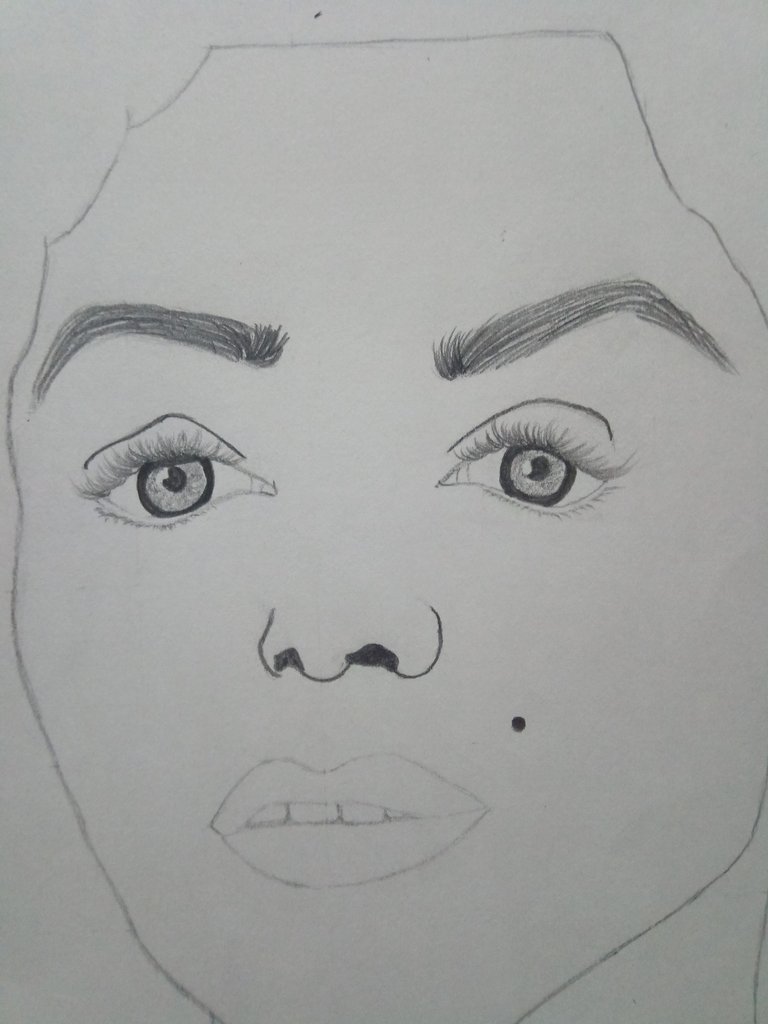
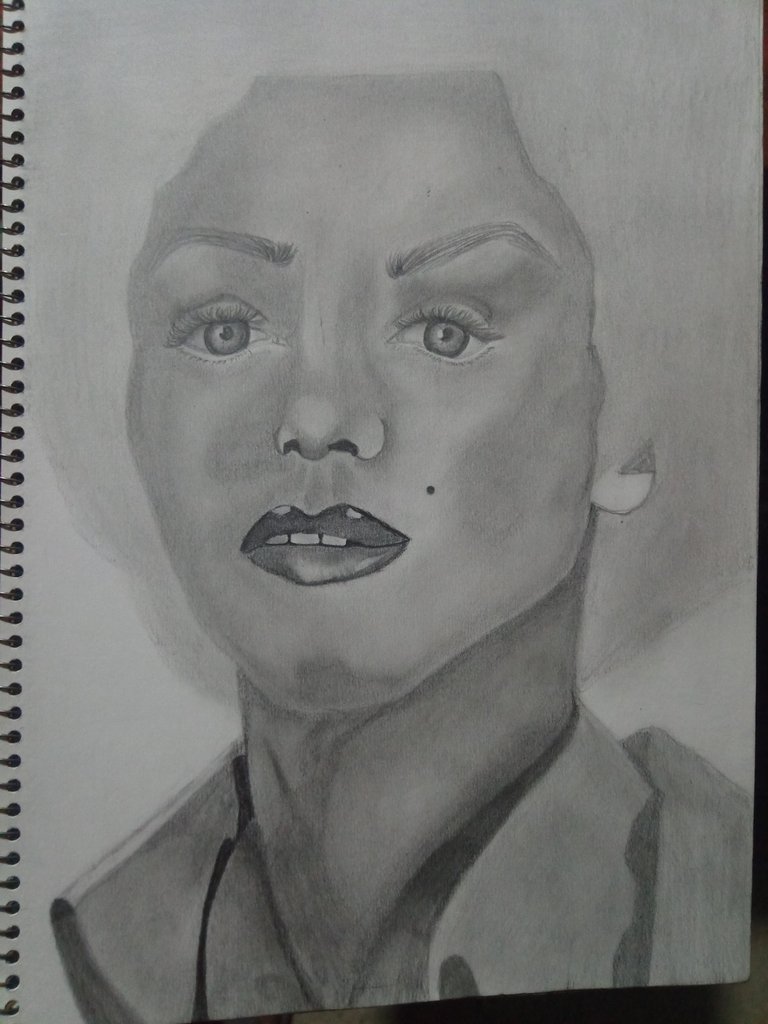
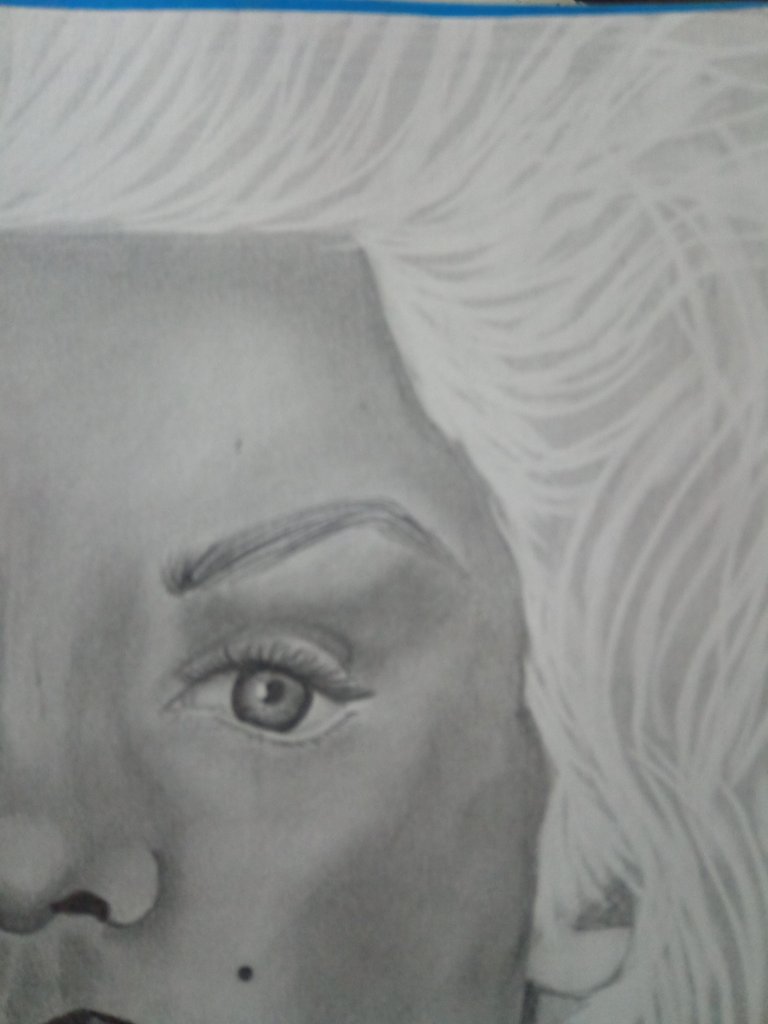
Reciban todos un cordial saludo, el día de hoy les presentó un dibujo a blanco y negro con lápices de grafito 2B y 6B marca prismacolor de una de las mujeres en la antigüedad consideradas la más hermosa del mundo llamada marilyn monroe.
Este dibujo no ha sido nada fácil de realizar, puesto que he tenido que tener mucho cuidado con cada una de las partes que este rostro tiene, también aprendí a realizar un nuevo estilo de cabello, por lo que me gusto mucho, ya que es fácil y le da más belleza y volumen a nuestros dibujos.
Al igual que en la mayoría de mis dibujos, las imágenes que utilizo en referencia son sacados de una gran página de ideas y diseños llamada Pinterest.
Welcome my dear friends, art lovers and artists.
Receive all a cordial greeting, today I present a black and white drawing with graphite pencils 2B and 6B prismacolor brand of one of the women in antiquity considered the most beautiful in the world called marilyn monroe.
This drawing has not been easy to make, since I had to be very careful with each of the parts that this face has, I also learned to make a new style of hair, so I liked it very much, because it is easy and gives more beauty and volume to our drawings.
As in most of my drawings, the images I use in reference are taken from a great page of ideas and designs called Pinterest.
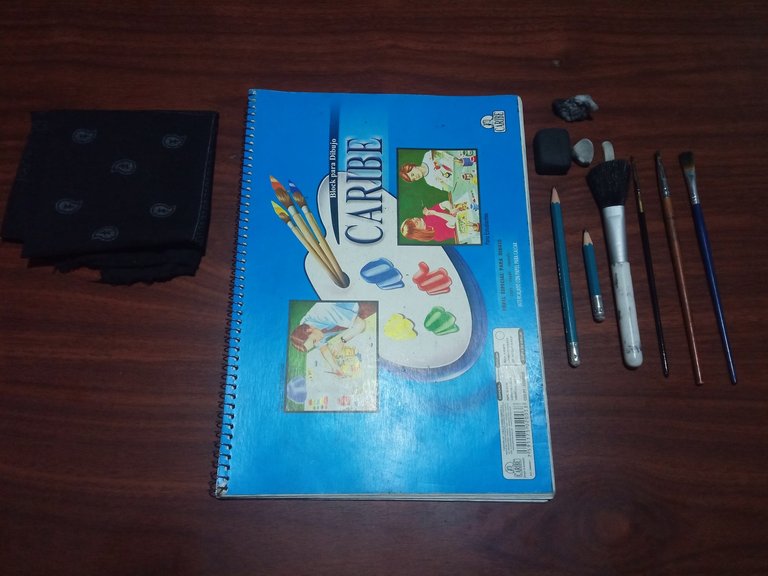
Los materiales que vamos a necesitar para elaborar nuestro dibujo son los siguientes:
*Un block de dibujo marca Caribe.
*Lápiz de grafito 2B y 6B
*Sacapuntas con depósito.
*Borrador.
*Pañuelo.
*Regla.
*Algodón.
Como siempre, en la gran mayoría de mis dibujos desde que adquirí esta nueva técnica, comencé a hacer las líneas guías llamada cuadrículas, las cuales tienen un tamaño de 4 centímetros de Largo por 4 centímetros de ancho.
Posteriormente, comencé a agregarle las partes que este rostro tiene, como los ojos, la nariz, la boca, entre otros, esta técnica nos permitirá que nuestros dibujos no queden desproporcionados, tengo entendido que en la valoración también lo hacen con esta técnica, pero honestamente no me gusta mucho, tal vez sea porque necesite perfeccionar más mi técnica de dibujo antes de experimentar con eso.
Cuando menciono VALORACIÓN, quiere decir que es una manera de decir colorear en nuestros dibujos, solo que como es con lápices de grafito, se les dice Valorizar, cuando es a color se les dice colorear, ya que el negro y blanco, no es un color sino un tono o un degradado.
The materials that we are going to need to elaborate our drawing are the following:
*A Caribe sketch pad.
*2B and 6B graphite pencils.
*Pencil sharpener with reservoir.
*Pencil eraser.
*Handkerchief.
*Ruler.
*Cotton.
As always, in most of my drawings since I acquired this new technique, I began to make the guide lines called grids, which have a size of 4 centimeters long by 4 centimeters wide.
Later, I began to add the parts that this face has, such as eyes, nose, mouth, among others, this technique will allow us that our drawings are not disproportionate, I understand that in the valuation also do it with this technique, but honestly I do not like it much, maybe it's because I need to perfect my drawing technique before experimenting with that.
When I mention VALUATION, it means that it is a way of saying coloring in our drawings, only that as it is with graphite pencils, they are called Valorize, when it is in color they are called coloring, since the black and white, is not a color but a tone or a gradient.
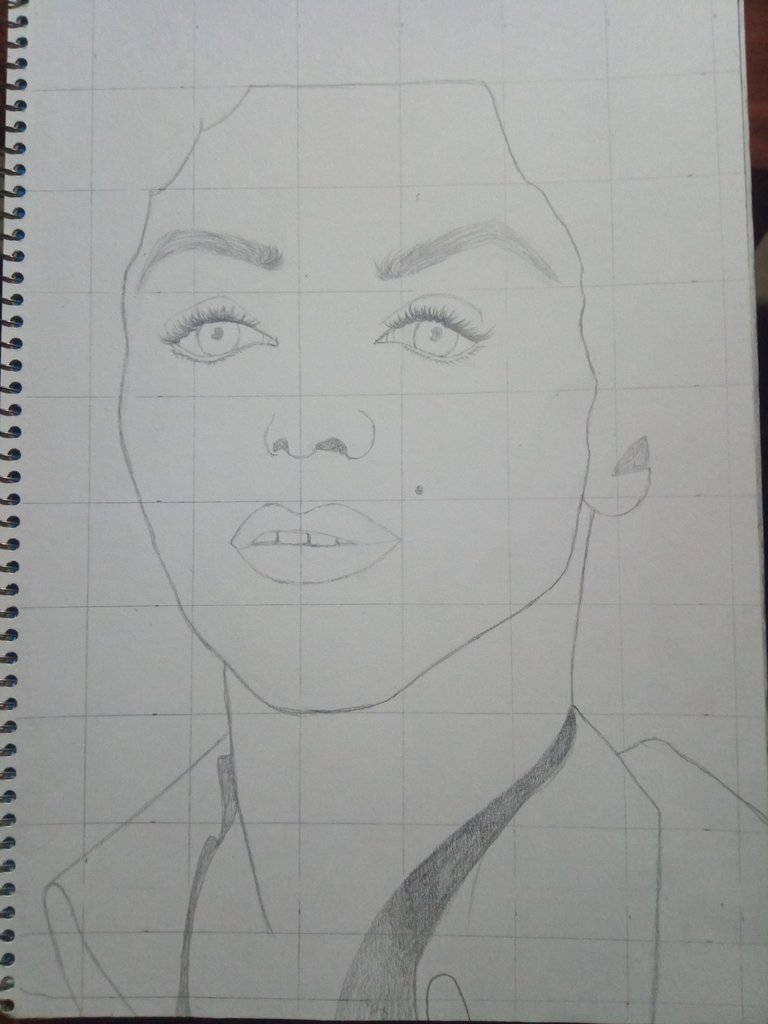
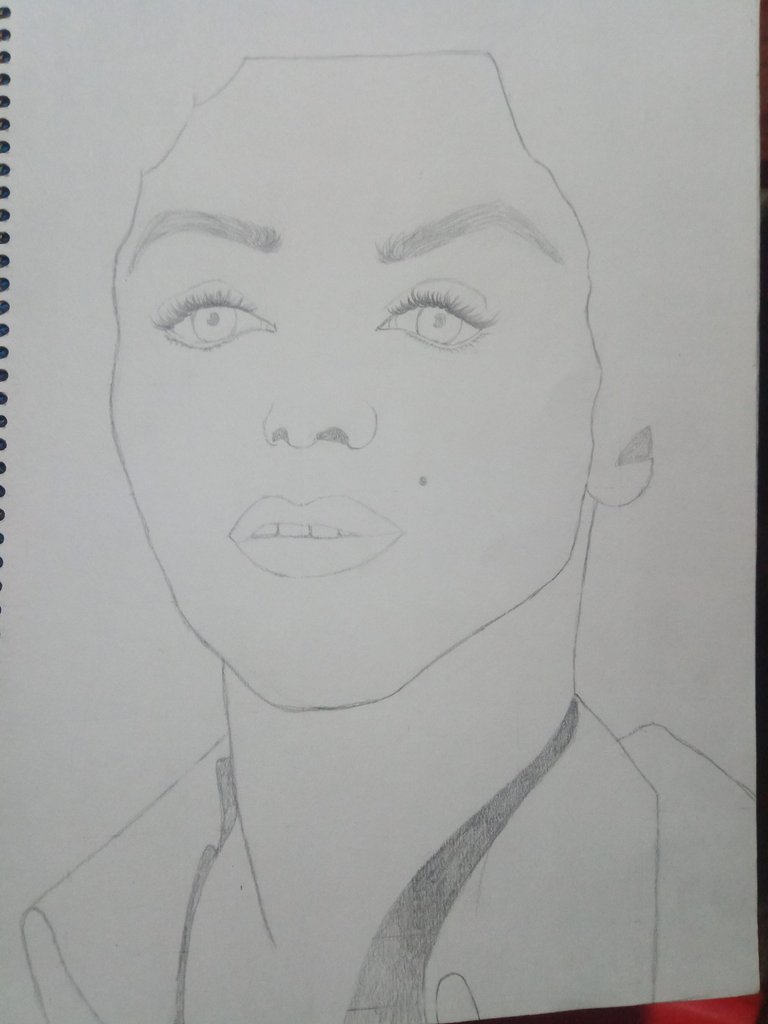
Luego de finalizar con nuestro dibujo con las líneas guías, comencé a borrar dichas líneas con la ayuda de un borrador superfinito para no borrar las partes del rostro que anteriormente había dibujado, por lo que he necesitado picar un poco uno de mis borradores para poder borrar estas líneas, no me gusta mucho crear tantos borrones, por ese motivo, las líneas guías las dibuje sin afincar mucho el lápiz.
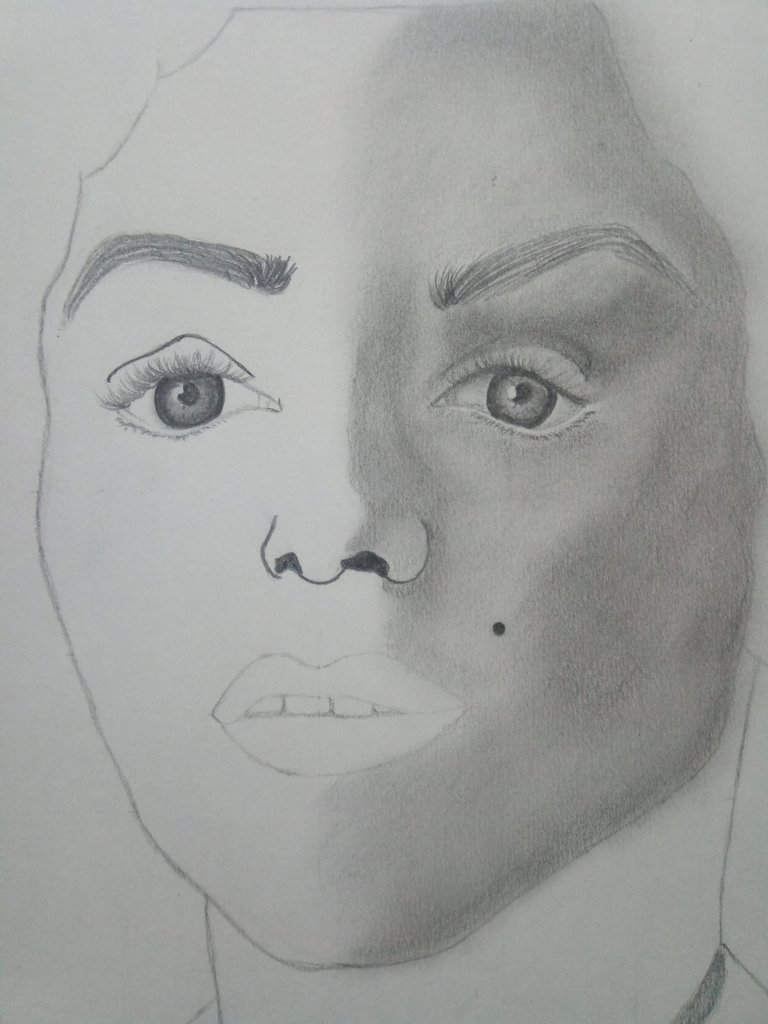
Una de las cosas que más me parecieron extrañas fueron los ojos, ya que los tiene muy decaídos, quiere decir que esta mujer tenía los ojos como deprimidos, esto no quiere decir que haya estado deprimida cuando le tomaros esa foto, quiere decir que la forma de los ojos es natural, por lo que tuve que hacer lo más parecido posible, cabe destacar, que mis dibujos no los trato de hacer igual que el de la imagen de referencia, sino que se vea lo más parecido posible y lo más realista, ya que me gusta tener mi propio estilo, aunque a la técnica que quiero llegar aún no la he dominado, pero seguiré practicando para podérselos mostrar.
Más adelante comencé a trabajar con las cejas y los ojos, remarcando algunas líneas como la rugosidad que se encuentra en cima del ojo, también hice lo mismo con el iris y la pupila, sin tocar la esclerótica del ojo.
After finishing our drawing with the guide lines, I began to erase these lines with the help of a superfinite eraser so as not to erase the parts of the face that I had previously drawn, so I needed to chop a little one of my erasers to erase these lines, I don't like to create so many erasures, for that reason, I drew the guide lines without sharpening the pencil too much.
One of the things that seemed the strangest to me were the eyes, since she has them very depressed, it means that this woman had eyes like depressed, this does not mean that she was depressed when you took that picture, it means that the shape of the eyes is natural, so I had to do the most similar as possible, It is worth mentioning that I don't try to make my drawings the same as the reference image, but to make it look as similar as possible and as realistic as possible, because I like to have my own style, although I haven't mastered the technique I want to reach yet, but I will keep practicing to be able to show it to you.
Later I started to work with the eyebrows and the eyes, highlighting some lines like the roughness at the top of the eye, I also did the same with the iris and the pupil, without touching the sclera of the eye.
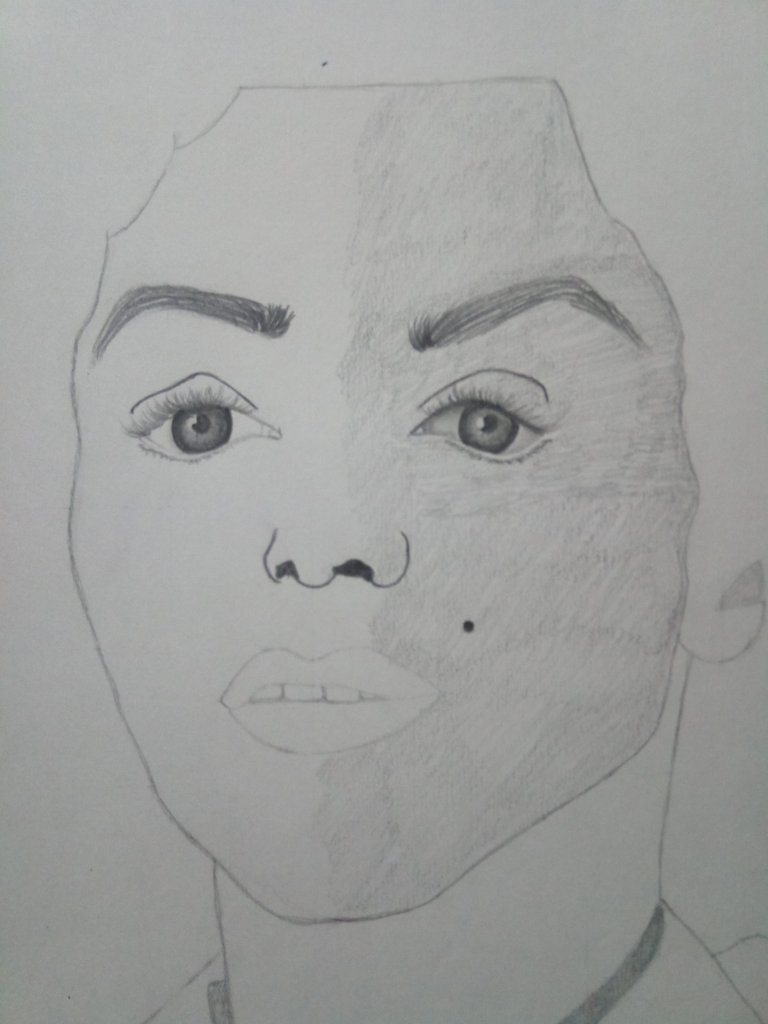
Para el valorizado comencé primero con la mitad del rostro derecho, también le di más volumen a los ojos hasta llegar al valorizado final, aunque aún me faltan algunos detalles que agregar, había olvidado mencionar que esta mujer posee un lunar, incluso actualmente se les considera una marca de belleza.
Posteriormente, al haber terminado de agregar el valorizado en la mitad del rostro, con la ayuda de un pincel comencé a difuminar toda el área en la que había pasado el lápiz de grafito, esto me ayudo a tapar el resto de los poros que en la hoja de trabajo se encuentran, más adelante con la ayuda de un algodón, lo pase suavemente en forma circular para terminar de rellenar los espacios vacíos de esta parte del rostro.
For the highlighting I started first with the right half of the face, I also gave more volume to the eyes until I reached the final highlighting, although I still have some details to add, I had forgotten to mention that this woman has a mole, even nowadays they are considered a beauty mark.
Later, when I finished adding the highlighting in the middle of the face, with the help of a brush I began to blur all the area where I had passed the graphite pencil, this helped me to cover the rest of the pores that are on the worksheet, later with the help of a cotton, I passed it gently in a circular way to finish filling the empty spaces in this part of the face.
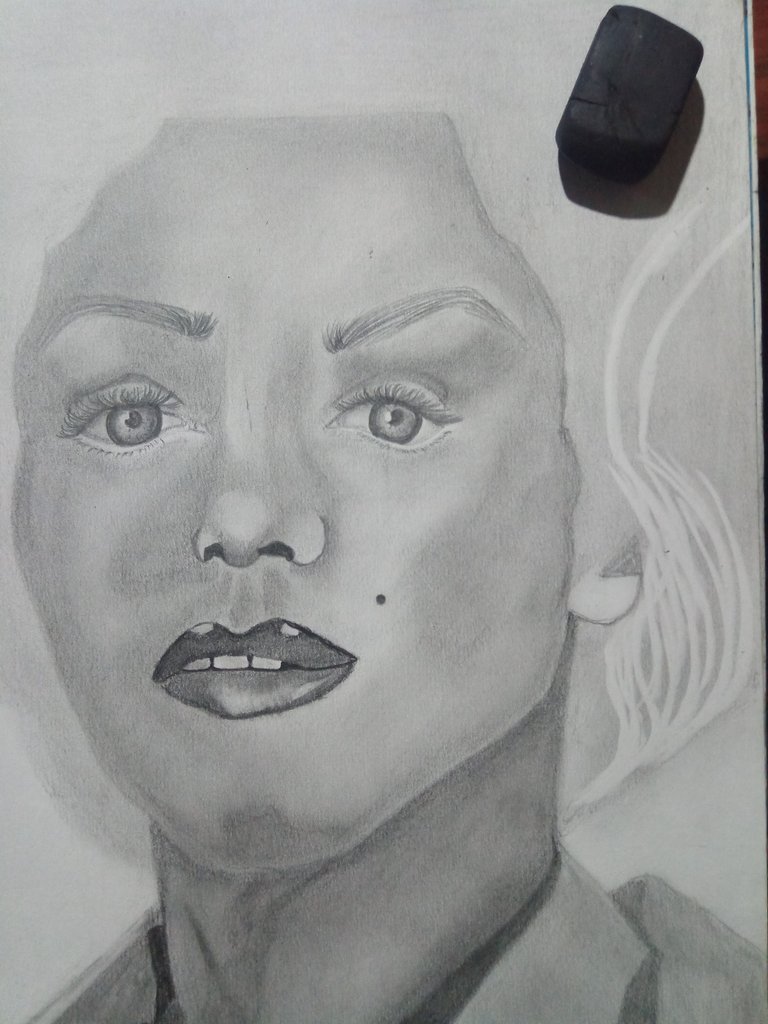
Después con la ayuda del mismo lápiz 2B, comencé a crear los espacios donde se encuentra la sombra y profundidad del rostro, use el mismo lápiz 2B porque el 6B últimamente me está dejando los rostros muy oscuros, por lo que al momento de difuminarlo me oscurecía demasiado los dibujo, por lo que tome la decisión de usar el 2B, ya que es un tomo más claro.
Luego volví a usar el pincel y el algodón para difuminar las partes que anteriormente había valorizado, en al parte de la rugosidad que se encuentra en cima del ojo o debajo de la ceja, me había dado cuenta de que estaba muy levantado, por lo que lo baje un poco más y luego lo fui difuminando para que me quedara perfecto.
Then with the help of the same pencil 2B, I began to create the spaces where the shadow and depth of the face is, I used the same pencil 2B because the 6B lately is leaving me very dark faces, so when I blurred it, it darkened too much the drawing, so I decided to use the 2B, since it is a lighter color.
Then I went back to using the brush and cotton to blend the parts that I had previously highlighted, in the part of the roughness that is at the top of the eye or under the eyebrow, I had noticed that it was too high, so I lowered it a little more and then I was blurring it to make it look perfect.
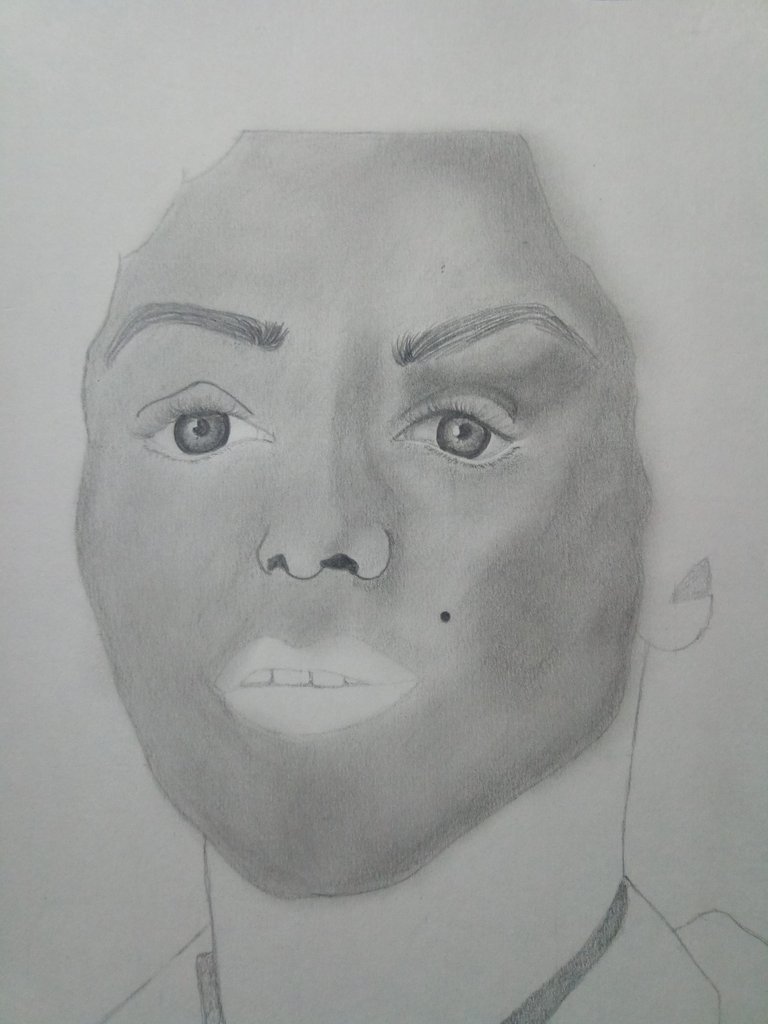
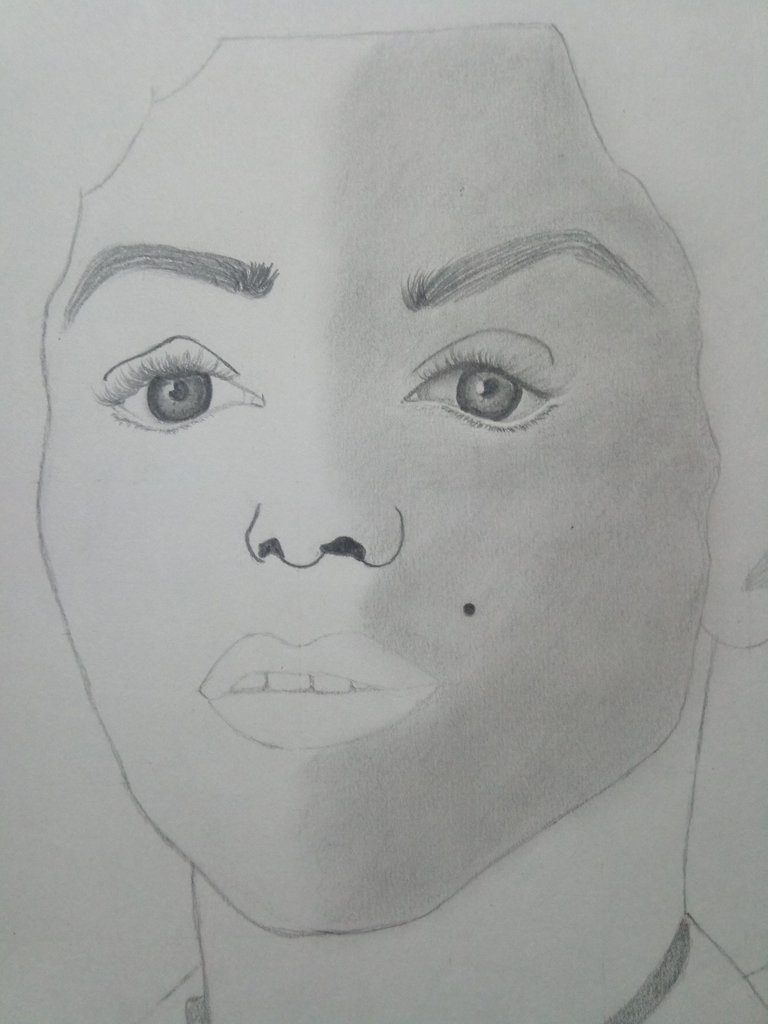
Luego comencé a hacer lo mismo con la otra mitad del rostro, agregando la primera capa de valorizado, luego el pincel y por último el algodón.
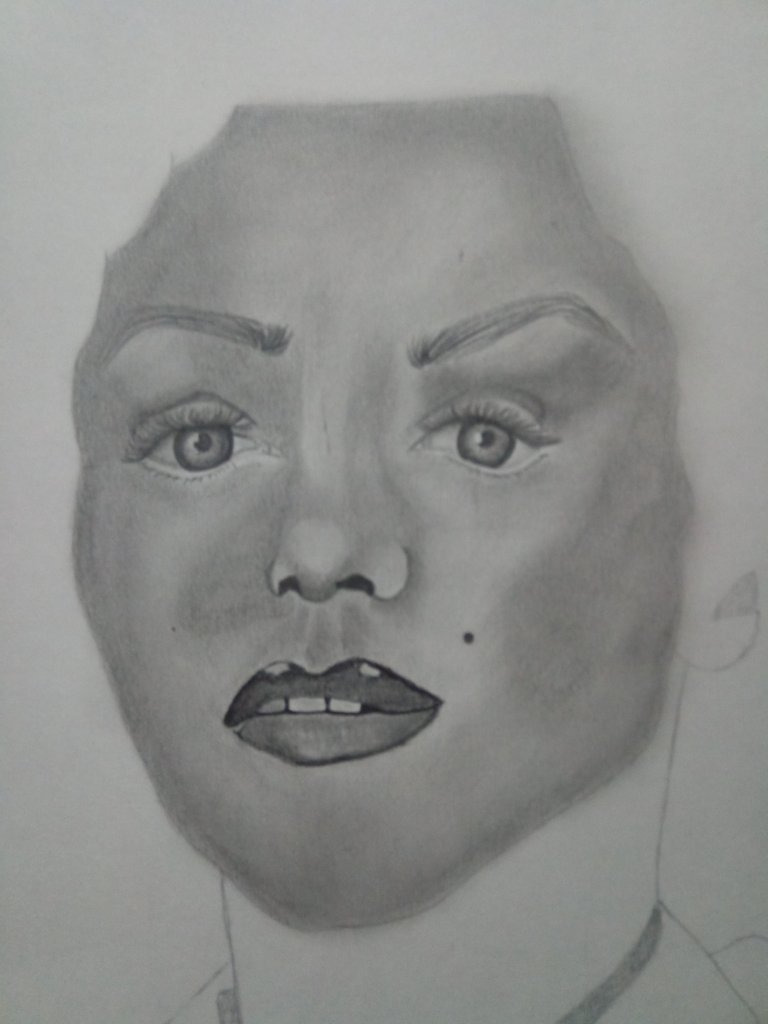
Al igual que le agregué más capas de sombreado y profundidad, después comencé a valorizar los labios, por lo que en esta parte comencé a usar el lápiz 6B, ya que los labios son más oscuros según nuestra imagen de referencia, en la nariz fue un poco fácil agregarle el efecto de profundidad, por lo que finalmente no tuve problemas con esta parte ni con los labios.
Poco a poco voy mejorando mi técnica, después comencé a trabajar con el cuello y la camiseta que se puede apreciar en la imagen de referencia, para las partes más claras use el 2B y para las partes más oscuras use el 6B.
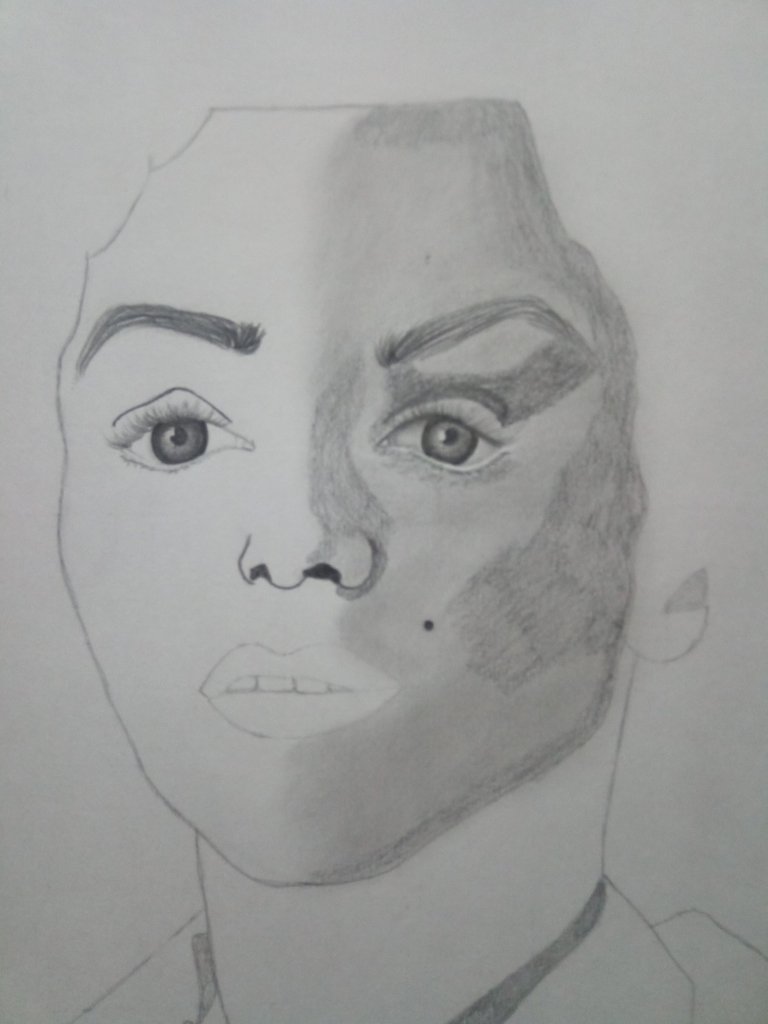
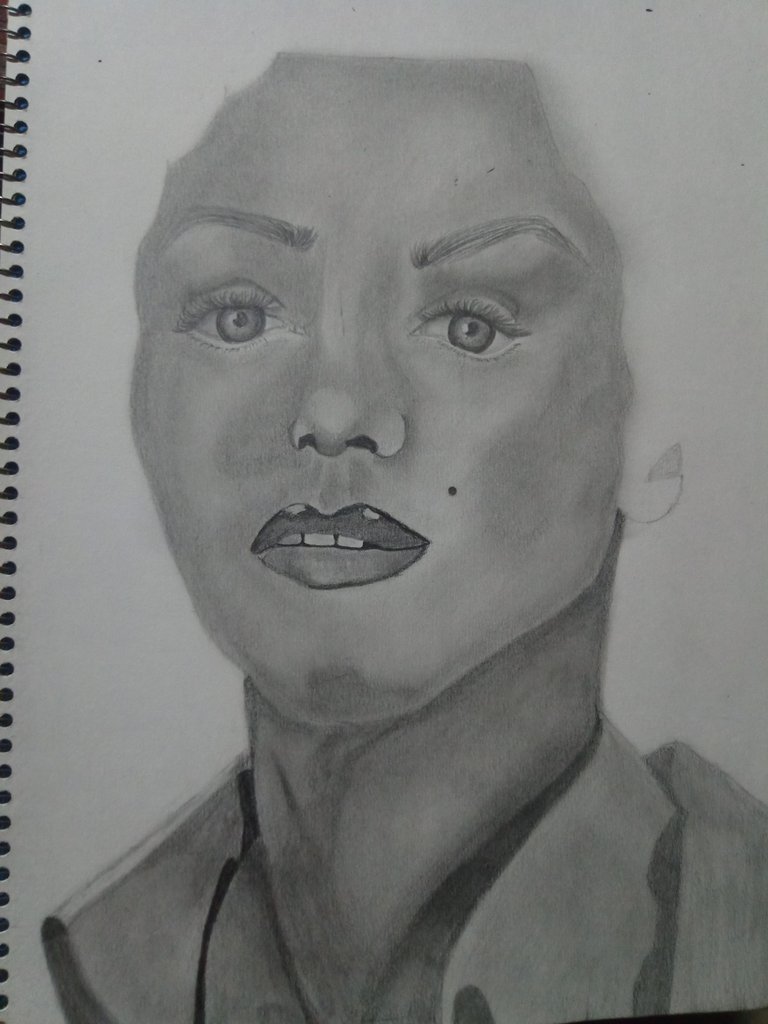
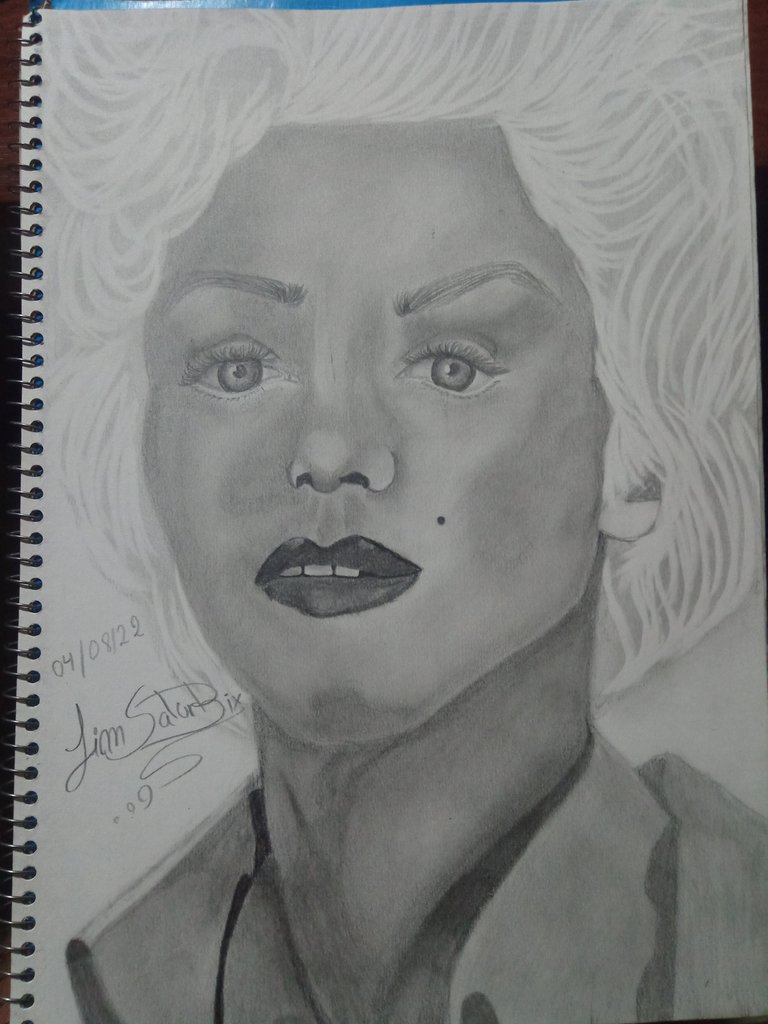
Para poder hacer el cabello y fue la parte más interesante para mí, ya que estoy practicando una nueva técnica para hacer el cabello de la mejor manera que en mi anterior post de dibujo, por la parte externa del rostro, comencé a valorizar el espacio donde se encuentra el cabello de esta mujer, luego use él pince y el algodón para difuminarlo y tapar los poros, también oscurecí un poco más los labios.
Después con la ayuda de un borrador, el más suave que tengamos, comencé a trazar líneas con el borrador de forma ondulada, ya que según en nuestra imagen de referencia, esta mujer tiene el cabello ondulado, luego repetí el mismo proceso hasta terminar con el cabello en su totalidad, podemos observar en la última fotografía como me quedo este espectacular dibujo.
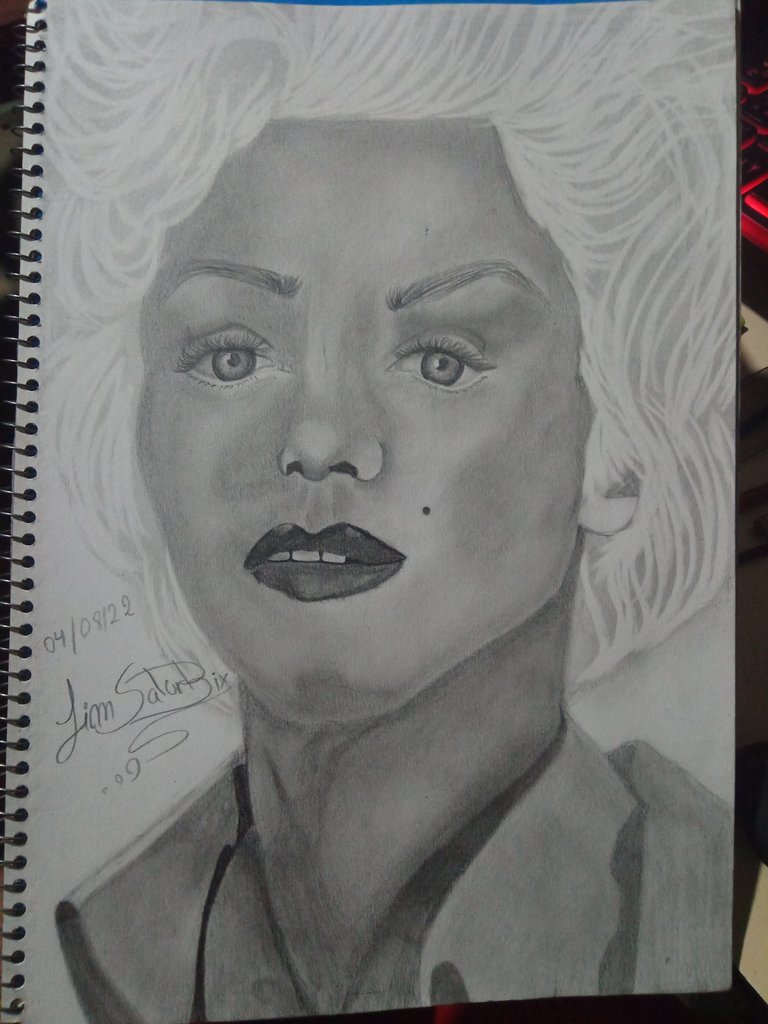
También podemos notar en otra fotografía como quedo el cabello, por si acaso en la foto del rostro completo no se pueda apreciar bien.
Las fotos fueron tomadas con la ayuda de mi teléfono Bison X Designed By Umidigi.
La imagen de referencia se encuentra en la parte inferior de este texto, debajo de ella podrán encontrar la fuente de la misma, el cual los llevara a la página que utilizo para encontrar las imágenes en referencia que uso para dibujar.
Y Así finaliza la publicación de hoy amigos, espero les sea de su agrado y que hayan aprendido algo nuevo el día de hoy con mi publicación, hasta la próxima.
Then I started to do the same with the other half of the face, adding the first layer of highlighting, then the brush and finally the cotton.
Just as I added more layers of shading and depth, then I started to valorize the lips, so in this part I started using the 6B pencil, since the lips are darker according to our reference image, on the nose it was a little easy to add the depth effect, so finally I had no problems with this part nor with the lips.
Little by little I am improving my technique, then I started to work with the neck and the shirt that you can see in the reference image, for the lighter parts I used the 2B and for the darker parts I used the 6B.
In order to make the hair and it was the most interesting part for me, since I am practicing a new technique to make the hair in the best way than in my previous post of drawing, for the external part of the face, I began to value the space where the hair of this woman is, then I used the brush and the cotton to blur it and cover the pores, I also darkened a little more the lips.
Then with the help of an eraser, the softest we have, I began to draw lines with the eraser in a wavy way, because according to our reference image, this woman has wavy hair, then I repeated the same process until I finished with the hair in its entirety, we can see in the last picture how I got this spectacular drawing.
We can also notice in another picture how the hair is, just in case the photo of the full face can not be appreciated well.
The photos were taken with the help of my phone Bison X Designed By Umidigi.
The reference image is at the bottom of this text, below it you can find the source of it, which will take you to the page I use to find the reference images I use to draw.
And so ends today's publication friends, I hope you like it and that you have learned something new today with my publication, until next time.

Source / Fuente Castle of Castlevania
Source / Fuente Terra Blade of Terraria
Los separadores son de mi autoría, la imagen de referencia tiene su fuente, las ediciones del GIF son creados por mí.
The separators are my authorship, the reference image has its source, the GIF edits are created by me.
Programas que utilicé para crear mi diseño es este:
This is the program I used to create my design:
Gif y portada cortesía de Canva
Gif and cover courtesy of Canva
Traducido por Deepl


No conocía el término de valorizar, gracias por hacer la referencia. El cabello se ve bastante bien, siga perfeccionándose amigo. Espero verle llegar lejos.
Gracias hermano, me alegra siempre verte por aqui, saludos.
excelente trabajo!! te quedo hermosa!! debes seguir perfeccionando tu técnica!! sigue asi !!
Gracias, amiga, me alegra que te haya gustado, efectivamente tengo que seguir practicando jajaja