Great improvement in my drawings thanks to the brush / (ENG/ESP)

Bienvenidos amigos amantes del arte y artistas.
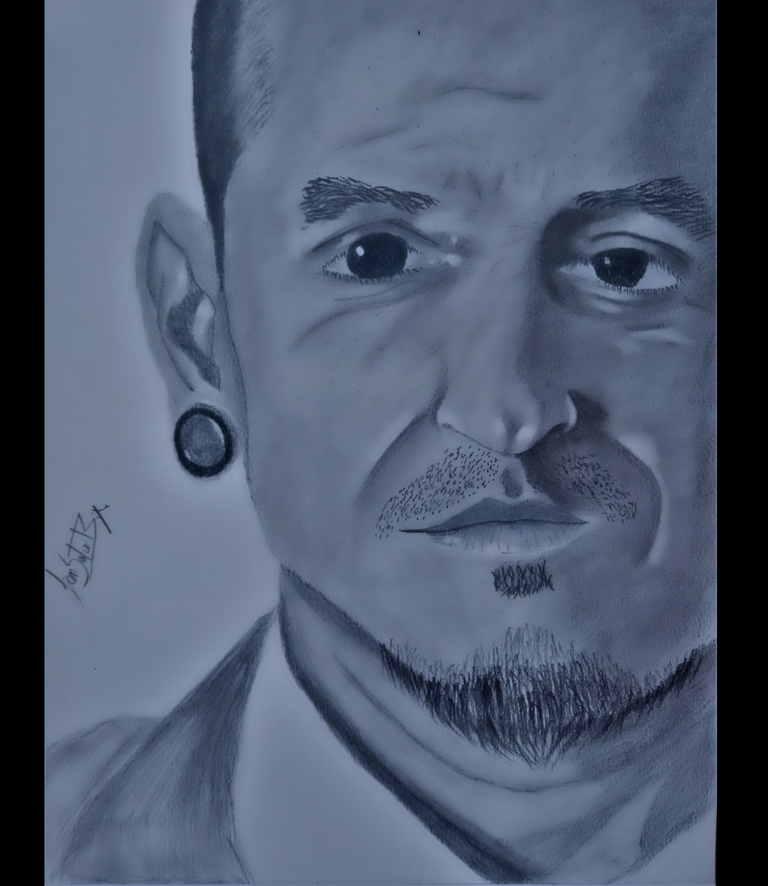
El día de hoy les presentó un dibujo realista que he creado de uno de mis vocalistas favoritos en el mundo de Nu-Metal llamado Chester Bennington, hace algunos días retome el mundo del dibujo realista, donde en mi publicación anterior les mostraba uno de mis dibujos, donde use por primera vez una difuminadora.
Había comentado que el próximo dibujo sería sin la difuminadora, donde usaría la técnica del pincel para poder difuminar mis dibujos y ver cuál es la diferencia y cuál se viera mejor, en esta publicación lo descubriremos.
Welcome friends art lovers and artists.
Today I present you a realistic drawing that I have created of one of my favorite vocalists in the Nu-Metal world called Chester Bennington, a few days ago I returned to the world of realistic drawing, where in my previous publication I showed you one of my drawings, where I used for the first time a blurring machine.
I had commented that the next drawing would be without the blurring machine, where I would use the brush technique to blur my drawings and see what is the difference and which one looks better, in this publication we will discover it.
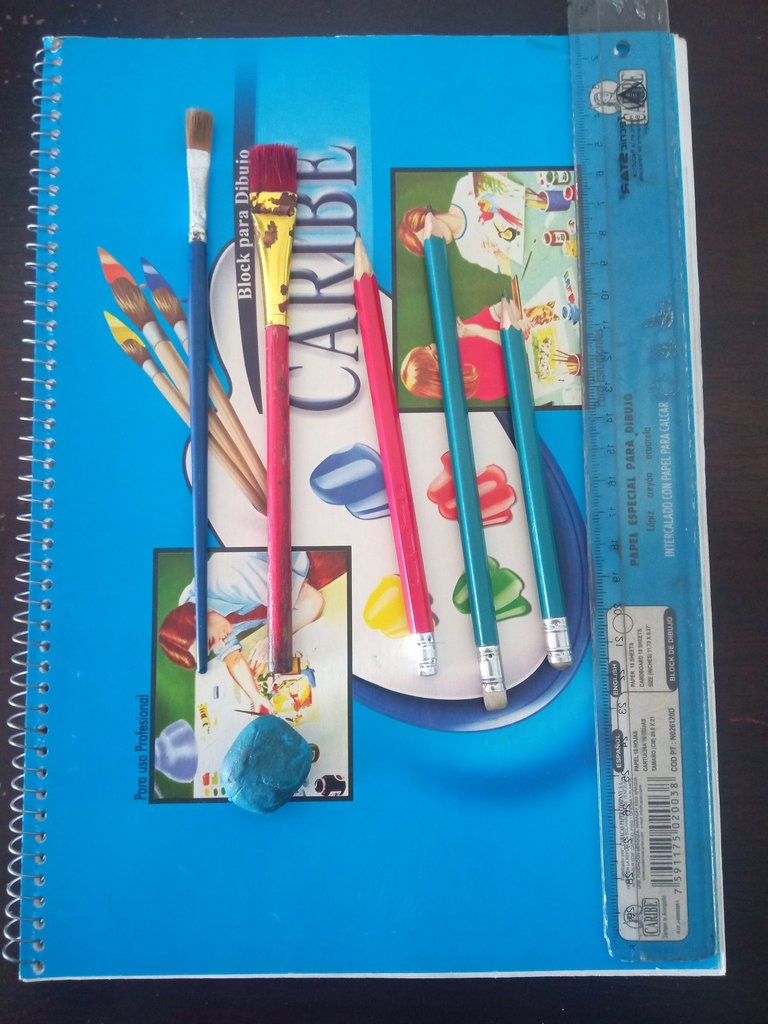
Estas fueron mis herramientas de dibujo:
Lápiz de grafito, 2B y 6B.
Pinceles.
Block de dibujo.
Regla.
Borrador moldeable.
Borrador.
Sacapuntas.
Pañuelo.
These were my drawing tools:
Graphite pencil, 2B and 6B.
Brushes.
Drawing block.
Ruler.
Moldable eraser.
Eraser.
Pencil sharpener.
Handkerchief.
 |  |
|---|
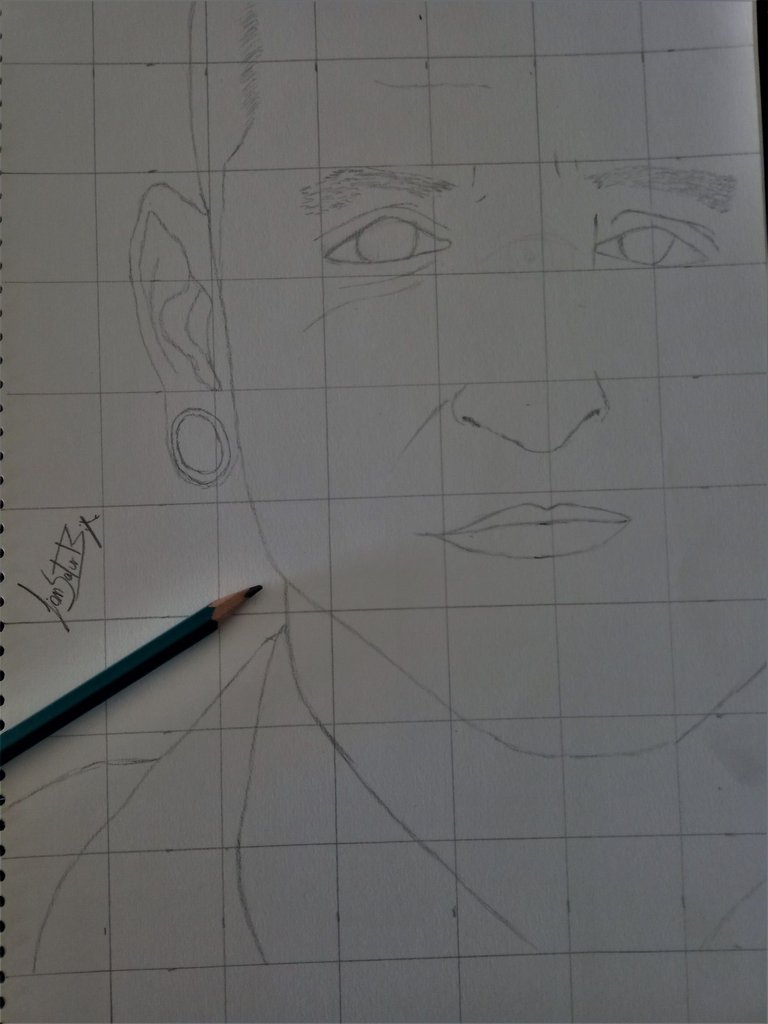
Como siempre en la mayoría de mis dibujos desde que comencé a usar esta técnica, use el efecto cuadricula para crear la base inicial de mi dibujo, los mismos tienen una separación de 4 centímetros de largo por alto.
Cabe destacar que la posición de este dibujo será frontal, semi inclinada, es por eso que el dibujo queda como que un poco inclinada, más de un lado que para el otro.
También quise hacer este dibujo un poco más grande, algo que me permitiera agregar más detalle en los volúmenes y de cada profundidad del rostro, cada parte del rostro fue creado con la ayuda del lápiz de grafito 2B.
Después de terminar con todo el rostro, borre las líneas que use como guía.
As always in most of my drawings since I started using this technique, I used the grid effect to create the initial base of my drawing, they have a separation of 4 centimeters long by high.
It is worth mentioning that the position of this drawing will be frontal, semi inclined, that's why the drawing is a little bit inclined, more on one side than the other.
I also wanted to make this drawing a little bigger, something that would allow me to add more detail in the volumes and each depth of the face, each part of the face was created with the help of the 2B graphite pencil.
After finishing with the whole face, I erased the lines I used as a guide.
 |  |
|---|
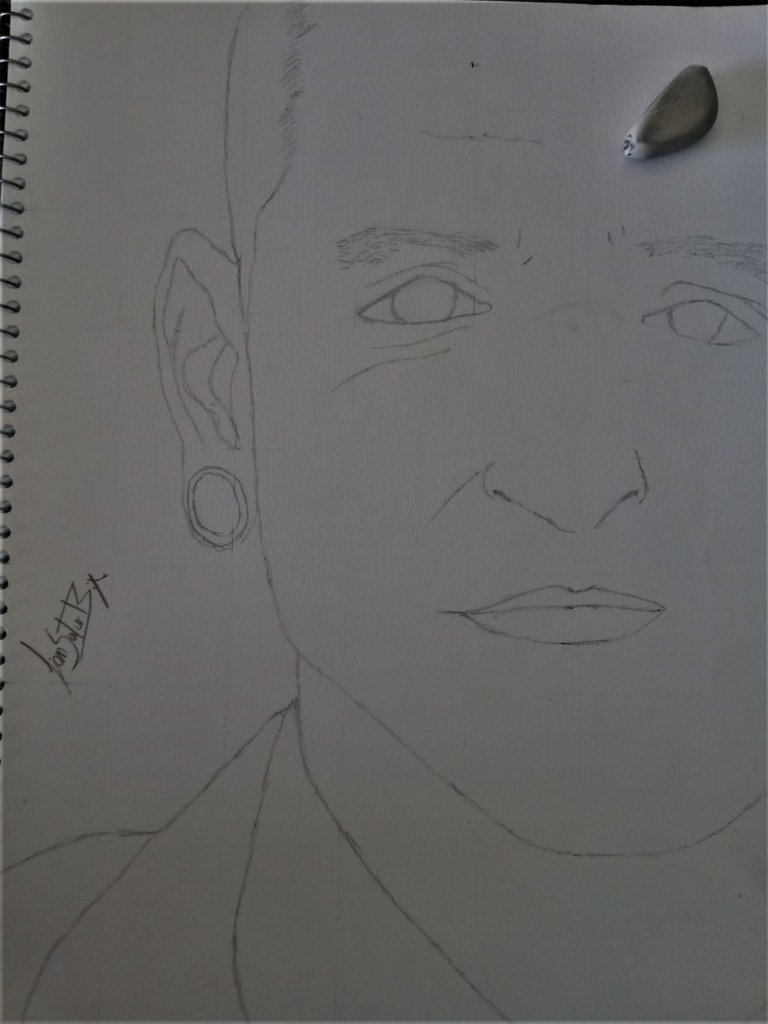
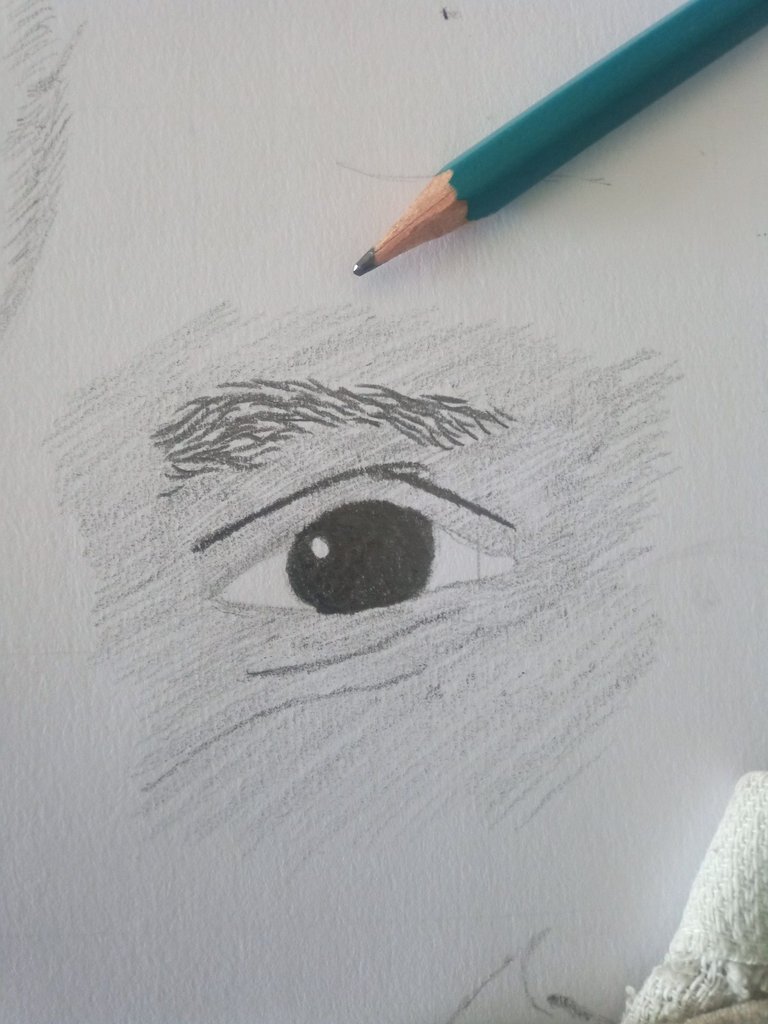
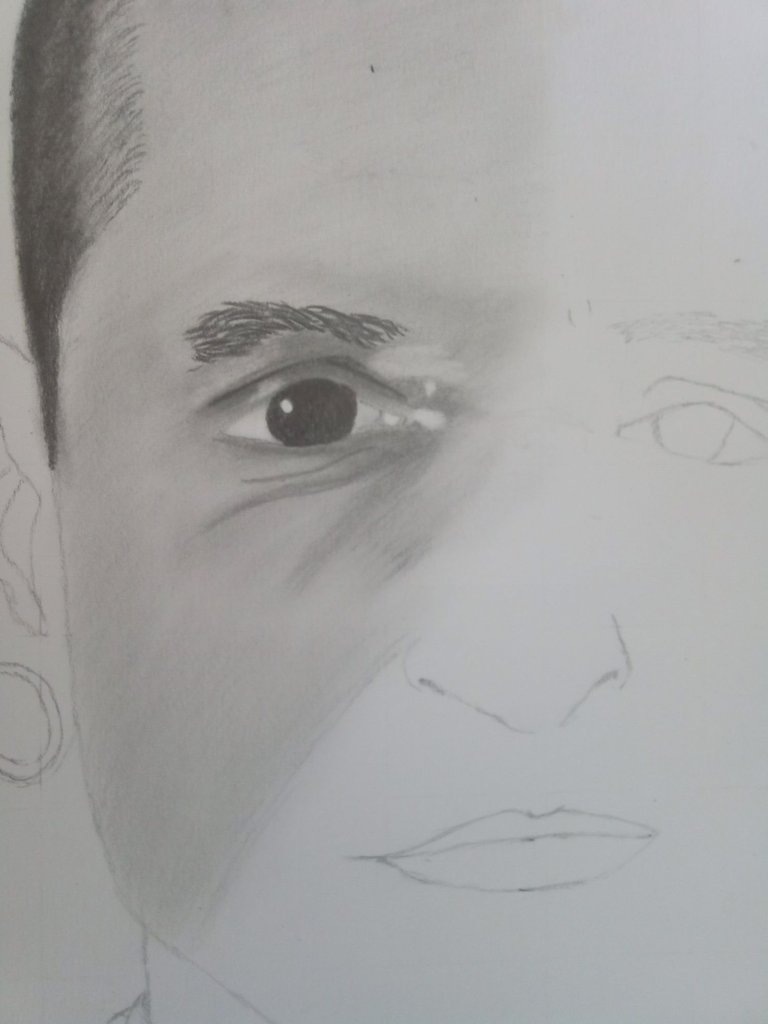
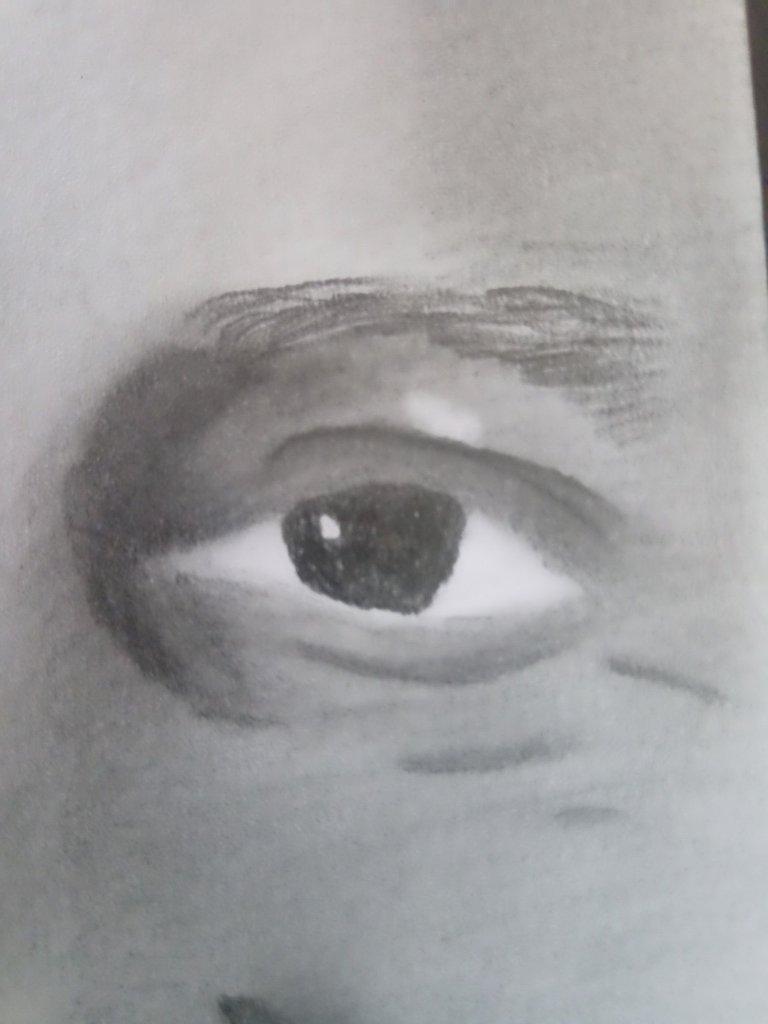
Posteriormente, comencé a trabajar en el ojo izquierdo, agregando una pequeña capa de valorizado, remarque las arrugas faciales y la de los ojos, lugar que me servirá de guía para agregar las profundidades.
Con la ayuda del pincel, comencé a frotarlo suavemente por todas las partes que anteriormente había rellenado con el lápiz, deje la parte de la esclerótica de blanco para ajustarle el volumen más adelante, cuando el rostro tenga varía capas de valorizado.
Afterwards, I started to work on the left eye, adding a small layer of highlighting, highlighting the facial wrinkles and the wrinkles of the eyes, a place that will serve as a guide to add the depths.
With the help of the brush, I began to rub it softly over all the parts that I had previously filled with the pencil, I left the part of the sclera in white to adjust the volume later, when the face has several layers of highlighting.
 |  |
|---|
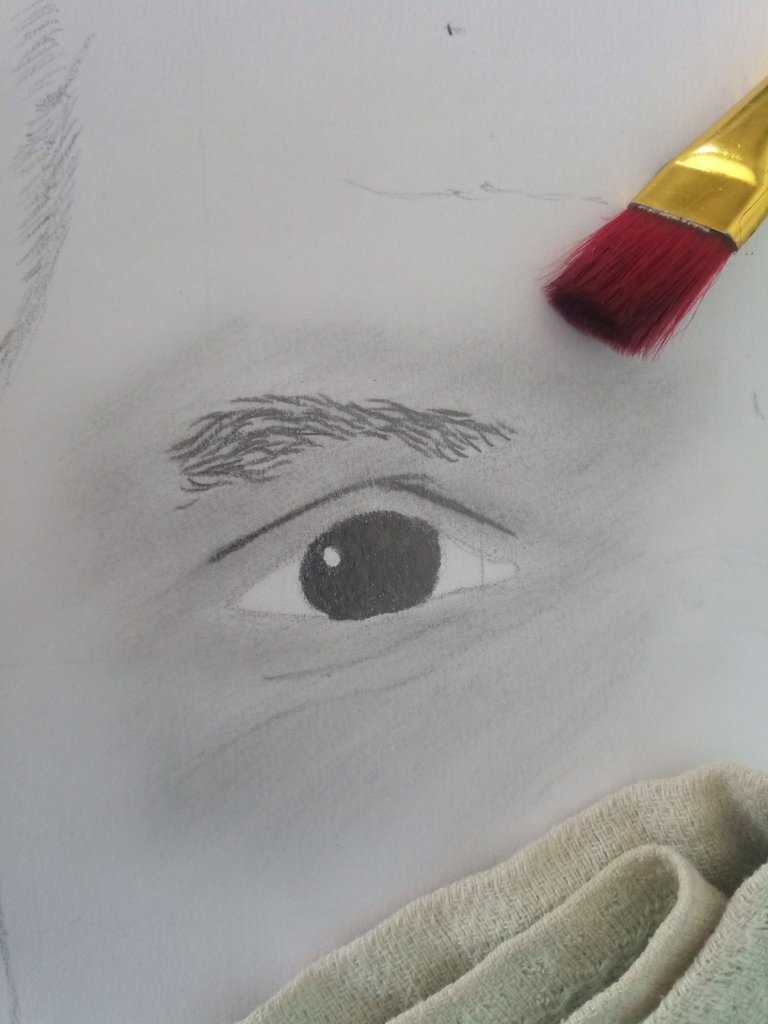
Luego de terminar con la primera capa de valorizado en el ojo izquierdo, comencé agregar la segunda capa en los lugares donde hay sombreado, seguidamente con la ayuda del borrador moldeable comencé a borrar los pequeños espacios donde la iluminación es más fuerte.
También remarqué un poco las expresiones faciales y las arrugas, las mismas fueron difuminadas con la ayuda de un pincel más pequeño.
Después de terminar con la primera parte del rostro, comencé a valorizar el resto del rostro del lado izquierdo, esto lo hago para poder ir valorizando y difuminando a medida que valle avanzando en mi dibujo, también porque hay partes del rostro que requiere que trabaje en las áreas a su alrededor para poderlas trabajar de manera fácil.
Después lo difuminé con la ayuda de un pincel un poco más grande para que la piel no me quedara tan oscura, el tamaño del pincel es muy importante, ya que dependiendo de su tamaño el difuminado será más intenso o más débil.
After finishing with the first layer of highlighting in the left eye, I started to add the second layer in the places where there is shading, then with the help of the moldable eraser I started to erase the small spaces where the illumination is stronger.
I also highlighted a little bit the facial expressions and wrinkles, these were blurred with the help of a smaller brush.
After finishing with the first part of the face, I started to highlight the rest of the face on the left side, I do this in order to be able to highlight and blur as I progress in my drawing, also because there are parts of the face that requires me to work on the areas around it to be able to work them in an easy way.
Then I blurred it with the help of a slightly larger brush so that the skin would not be so dark, the size of the brush is very important, because depending on its size the blurring will be more intense or weaker.
 |  |
|---|
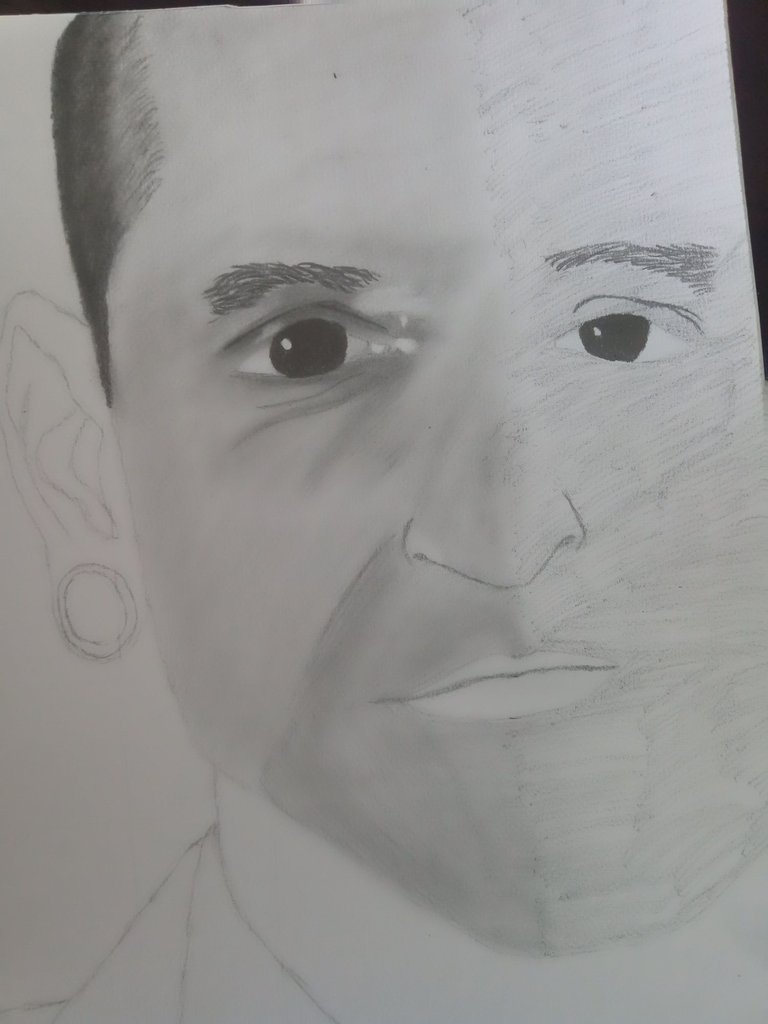
Una vez terminado de trabajar con las primeras capas del lado izquierdo del rostro, comencé a trabajar con el lado derecho, agregue una capa clara en el resto del rostro y luego lo difumine, después agregue la segunda capa en los lugares done hay más profundidad y oscuridad según me muestra la imagen de referencia y por último lo volví a difuminar.
Once I finished working with the first layers on the left side of the face, I started to work with the right side, I added a light layer on the rest of the face and then I blurred it, then I added the second layer in the places where there is more depth and darkness as shown in the reference image and finally I blurred it again.
 |  |
|---|
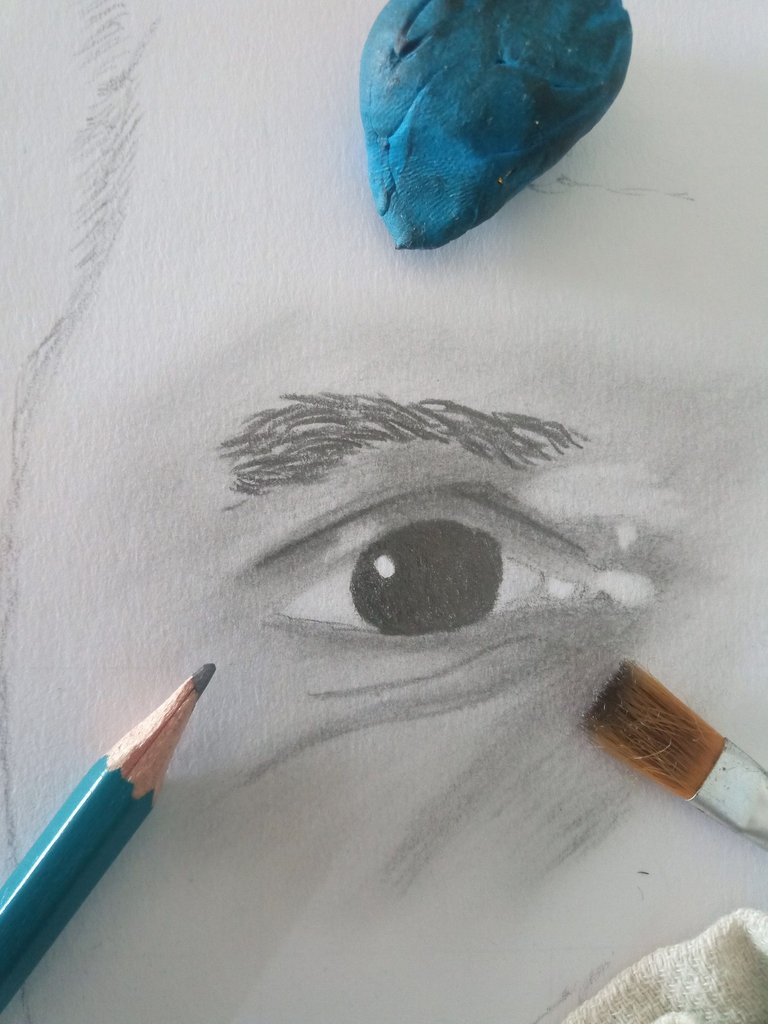
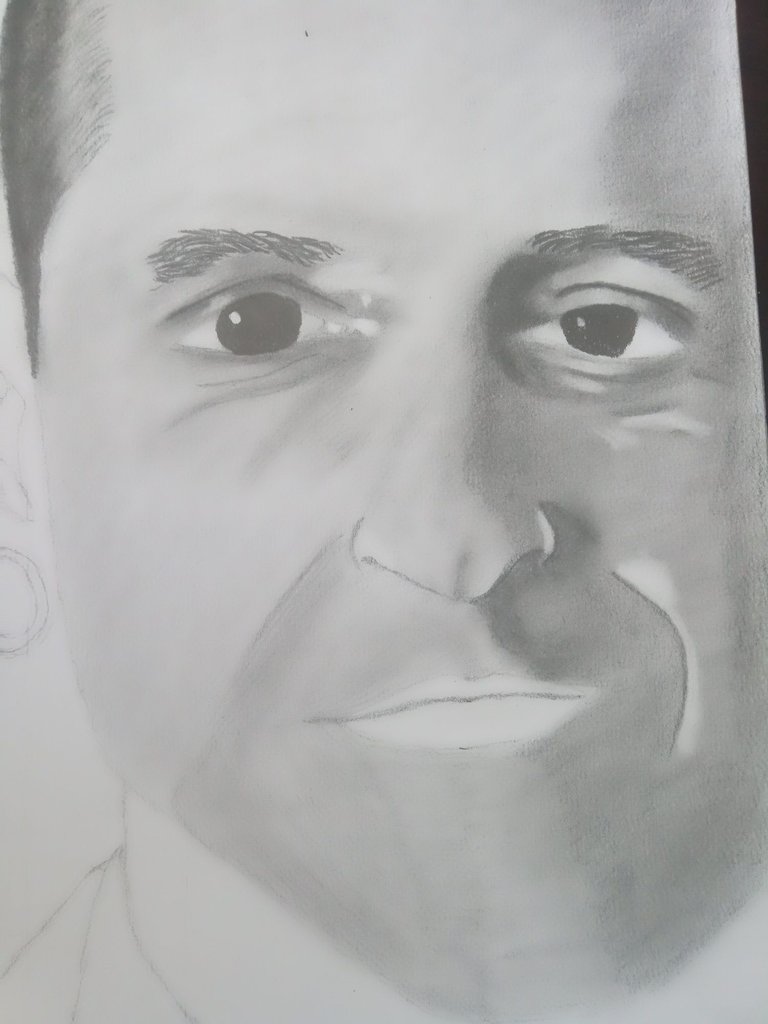
Después comencé a trabajar un poco más a fondo la estructura del ojo, agregándole más volumen a las sombras y profundidades, también la iluminación de algunas partes y continúe difuminando hasta que haya ese degradado de lo más oscuro a lo más claro.
Trabaje en las arrugas que se encuentran cerca de los labios y retoque algunas partes donde va la iluminación, en el mundo del dibujo realista siempre es importante tener paciencia, ya que estos dibujos toman su tiempo, me tomo todo un día en hacerlo, no fue fácil, pero me divertía con cada uno de los pasos, por el hecho de que esto te relaja.
Al terminar con el ojo comencé a trabajar con las arrugas y expresiones faciales, las mismas difuminé con la ayuda de un pincel fino, ya que estas áreas no requieren ser eliminadas del todo, dejar como una especie de mancha que sirva como líneas de expresión.
Then I started to work a little more in depth the structure of the eye, adding more volume to the shadows and depths, also the illumination of some parts and continue blurring until there is that gradient from the darkest to the lightest.
I worked on the wrinkles that are near the lips and retouched some parts where the lighting goes, in the world of realistic drawing is always important to have patience, as these drawings take time, it took me a whole day to do it, it was not easy, but I had fun with each of the steps, for the fact that this relaxes you.
When I finished with the eye I started to work with the wrinkles and facial expressions, I blurred them with the help of a fine brush, since these areas don't need to be eliminated completely, I left a kind of stain that serves as expression lines.
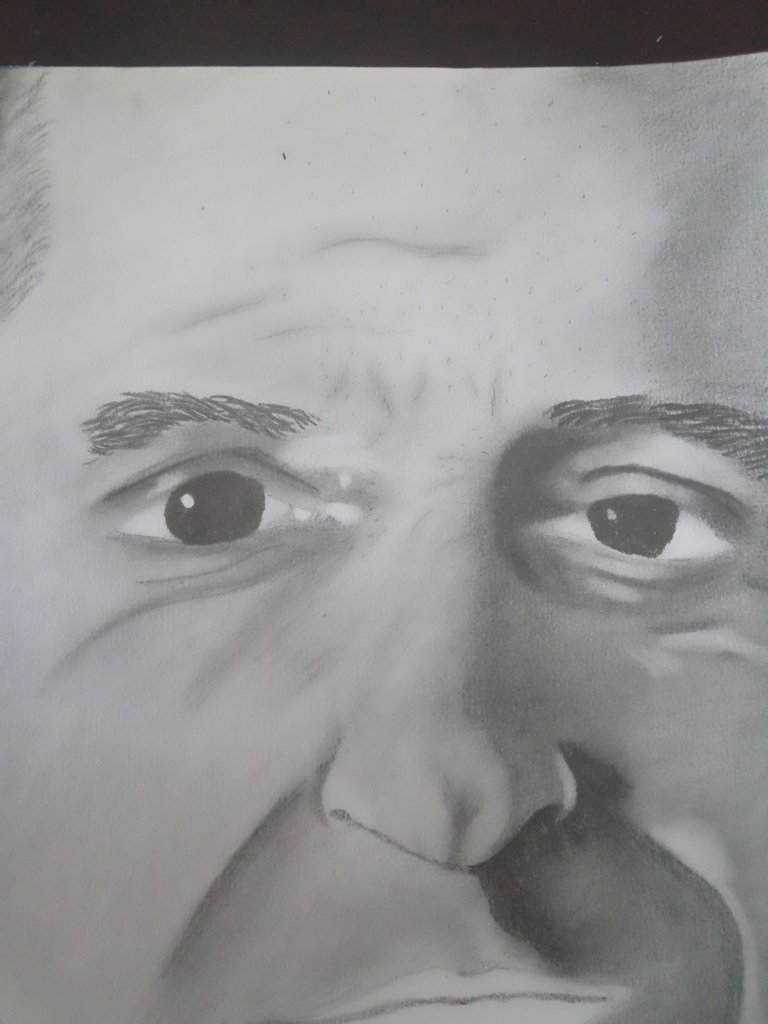
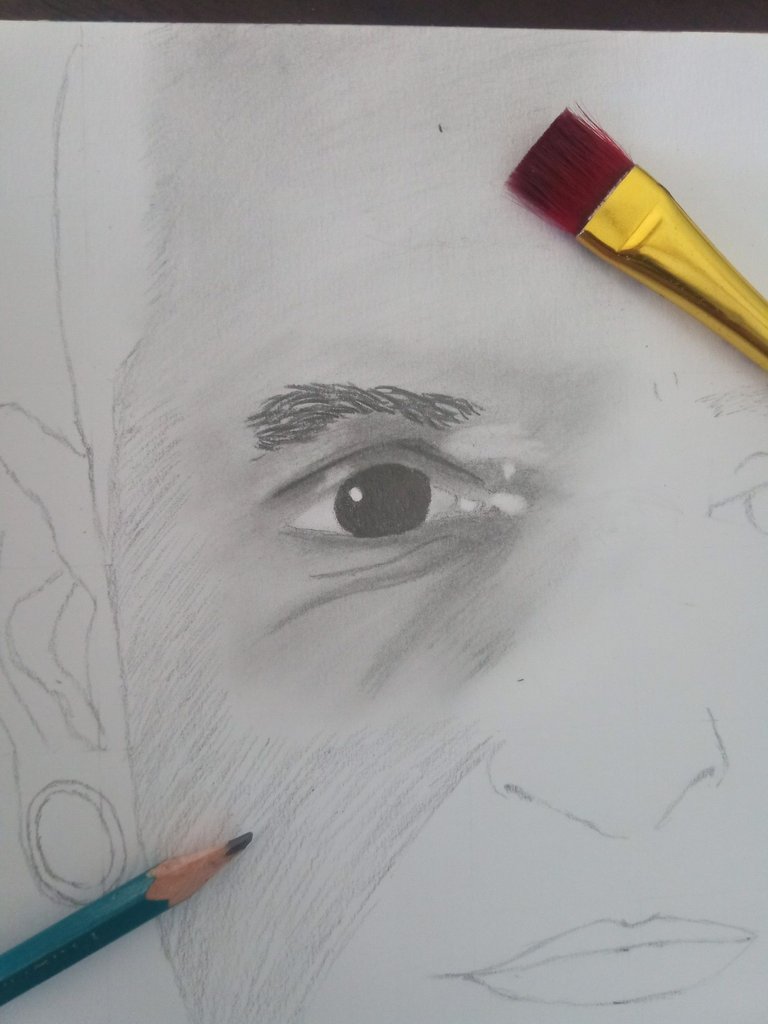
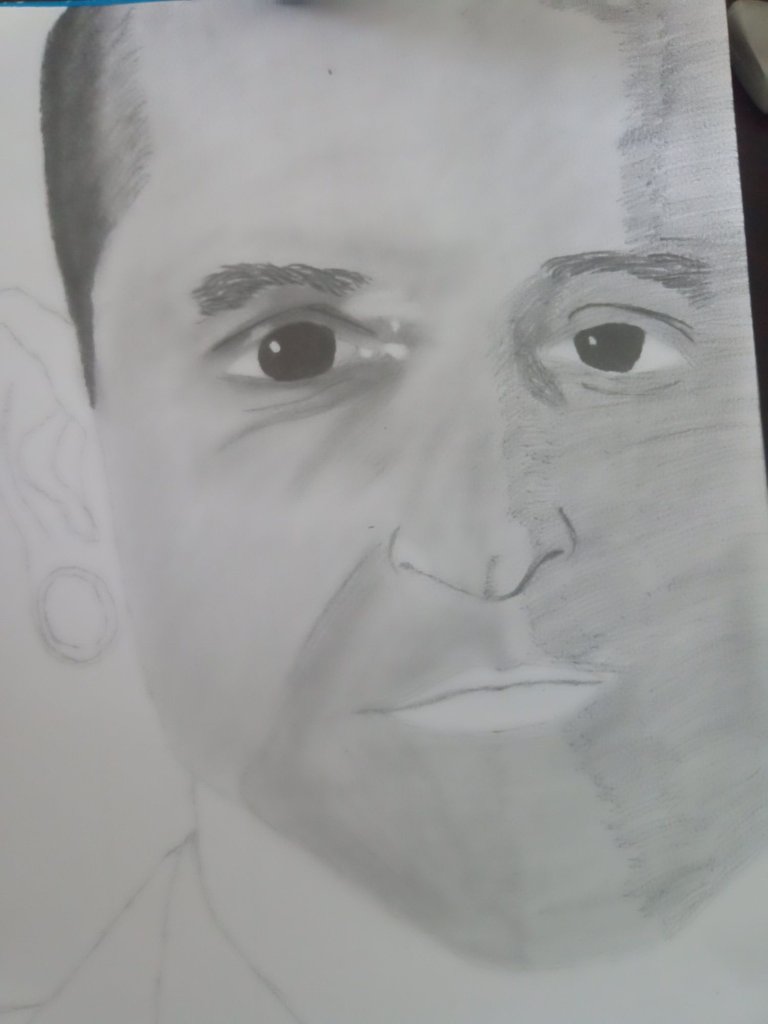
Después comencé a trabajar en la oreja, tuve que hacer una pequeña separación entre la oreja y el rostro, esto es debido a que se me mezclaba un poco la oreja del rostro y creaba una imagen plana, así que remarque un poco los bordes para poder crear esa separación.
Por último, como fase final del rostro, retoque algunas partes con el lápiz 6B para darle un poco más de oscuridad a las sombras y así hacer que se pueda notar en su totalidad las diferentes capas que me ayudaron a crear estas profundidades y sombras del rostro, usando también el borrador moldeable para eliminar el exceso de valorizado en las partes donde hay iluminación.
Seguidamente, comencé a trabajar los labios, los mismos finalmente no se me hizo complicado, todo fue trabajado con mucha paciencia, también agregué el bigote y parte de la barba inferior del rostro.
Then I started to work on the ear, I had to make a small separation between the ear and the face, this is because I was blending a little the ear of the face and created a flat image, so I remarked a little the edges to create that separation.
Finally, as a final phase of the face, I retouched some parts with the 6B pencil to give a little more darkness to the shadows and thus make it possible to notice in its entirety the different layers that helped me to create these depths and shadows of the face, also using the moldable eraser to eliminate the excess of valorized in the parts where there is illumination.
Next, I started to work on the lips, the lips were not complicated, everything was worked with a lot of patience, I also added the mustache and part of the lower beard of the face.
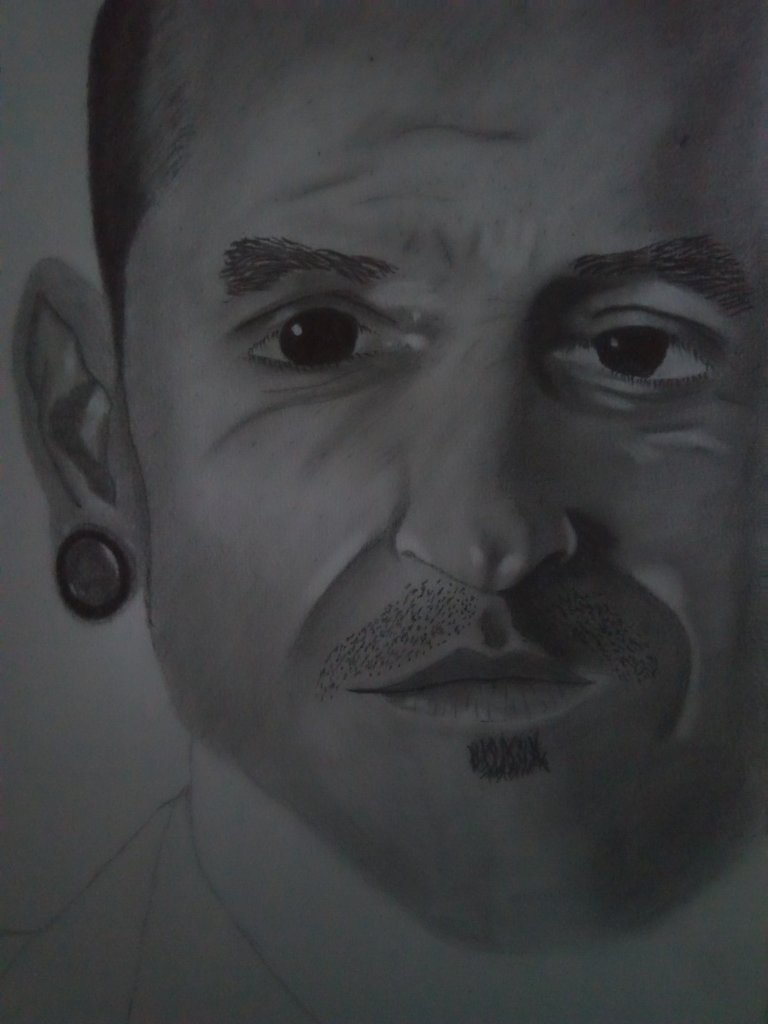

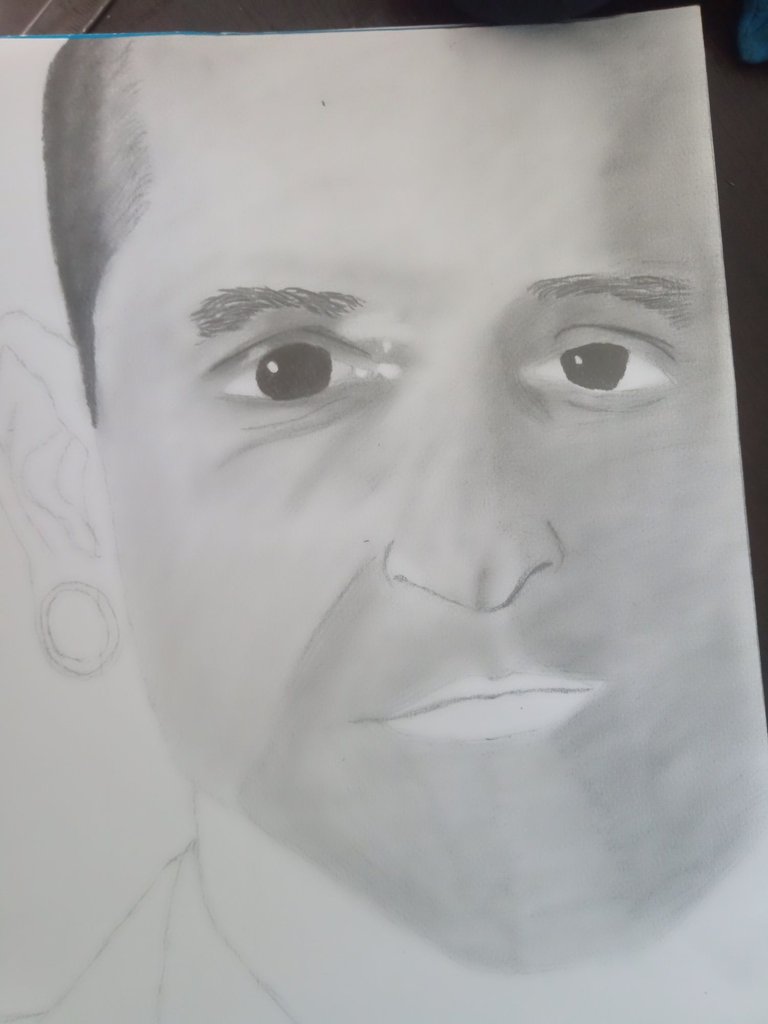
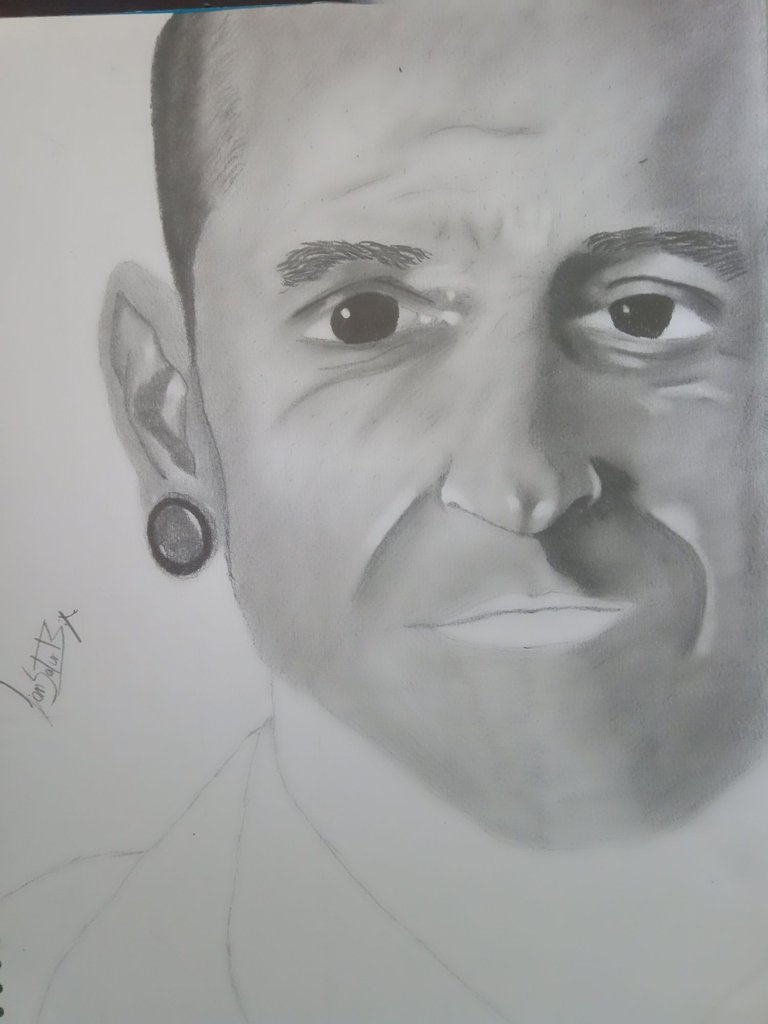
De esta forma pude culminar mi dibujo, no fue una tarea rápida, ya que tomo mucho su tiempo y dedicación, inmediatamente se puede notar la diferencia de usar una difuminadora a un pincel, y sinceramente considero que difuminar con pincel es mucho mejor que usar una difuminadora, te deja el rostro mucho más limpio y se crea ese realismo que tanto buscaba en mis dibujos.
Quise dibujar a Chéster porque como les comente, es uno de mis vocalistas favoritos, de hecho se encuentra en mi top 1, fue una experiencia muy gratificante, e interesante, trabajar en las arrugas y expresiones del rostro nunca había sido tan divertido e interesante en un dibujo.
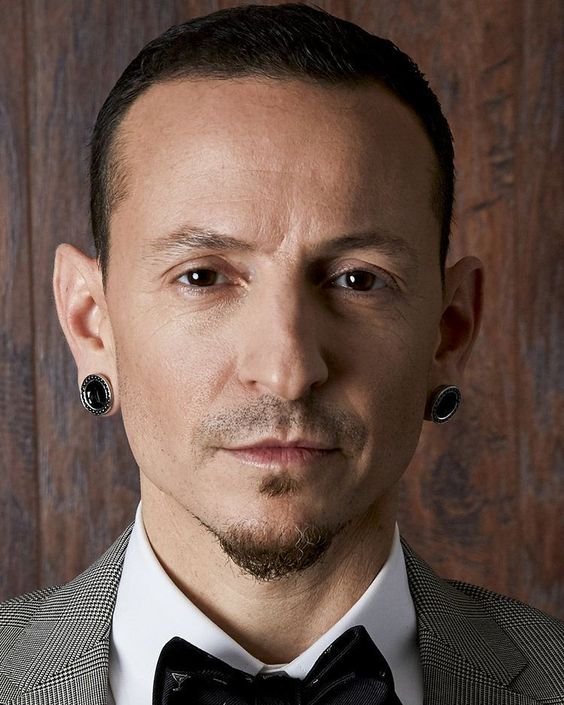
A continuación te presentó la diferencia entre mi dibujo y la imagen que use de referencia.
This way I was able to finish my drawing, it was not a quick task, it took a lot of time and dedication, you can immediately notice the difference between using a blender and a brush, and I sincerely consider that blurring with a brush is much better than using a blender, it leaves the face much cleaner and creates that realism that I was looking for in my drawings.
I wanted to draw Chéster because as I told you, he is one of my favorite vocalists, in fact he is in my top 1, it was a very rewarding and interesting experience, working on the wrinkles and expressions of the face had never been so fun and interesting in a drawing.
Here is the difference between my drawing and the image I used as a reference.
|  |
|---|
Reference image / Imagen de referencia
|  |
|---|
De verdad pude notar una gran diferencia en comparación a mi dibujo anterior, donde difumine con una difuminadora en lugar del pincel, esto demuestra que las técnicas que comencé a implementar el día de hoy con mis dibujos son mejores.
Muchas gracias por llegar hasta aquí en mi publicación, espero que te haya gustado, hasta la próxima.
I could really notice a big difference in comparison to my previous drawing, where I blurred with a blender instead of the brush, this shows that the techniques that I started to implement today with my drawings are better.
Thank you very much for coming this far in my publication, I hope you liked it, see you next time.

![]()

Discord LionSaturBix#7545

Source / Fuente Castle of Castlevania
Source / Fuente Terra Blade of Terraria
Los separadores son de mi autoría, las fotografías fueron toadas con la ayuda de mi telefono Bison X Umidigy, las ediciones del GIF son creados por mí.
The separators are my authorship, the pictures were taken with the help of my Bison X Umidigy phone, the GIF editions are created by me.
Programas que utilicé para crear mi diseño es este:
This is the program I used to create my design:
Gif y portada cortesía de Canva
Gif and cover courtesy of Canva
Traducido por Deepl


You draw very beautifully, I love it, I see that you are focusing a lot on your art, you are really doing a successful job.🙂
Thank you very much for your comment, I'm glad you liked it, I've been practicing a little and I feel much improvement in it, thanks to your nice words I feel more motivated.
I really admire people who draw and i must say that your drawing was splendid. You replicated the original version very well.
!diy
Thank you very much for the support, I'm glad you liked my drawing, that's what it's all about, to make the drawing as close as possible, I have a goal in mind and I would like to reach that, greetings.
I hope you reach your goal soon enough
You can query your personal balance by
!DIYSTATSYour drawing looks so real and beautiful.!DIY
Thanks dude
You can query your personal balance by
!DIYSTATSExcelente dibujo y gran homenaje a Chester
Gracias por tu comentario, fue un gran tipo, saludos