[ESP-ENG] Aprende y recicla "Cartuchera realizada con material de provecho". Concurso.

BIENVENIDOS A MI BLOG
¡Holaaaa, holaaaaa! Amigos de creativos y creadores de Hive Diy. El regreso a clases en Venezuela significa empezar como cada nuevo año con la rutina después de un largo período de vacaciones,comenzar con la organización uniformes y los útiles escolares, tener el desayuno o la lonchera lista, pero creo que lo más difícil de esta jornada, es luchar con los niños para que se despierten. Creo que a todas nos ha pasado, es una ardua tarea retomar el horario habitual cuando tienen un horario matutino, tanto a la hora de dormir como al levantarse, cuando están en edad escolar, ya con los que asisten a la universidad es otra cosa, ya deben ser chicos bien responsables y asumir el compromiso que tienen con su futuro, pero desde cualquier punto de vista, es duro después de unos meses de inactividad escolar.
Muchas veces, días antes del comienzo a clases, las mamás nos ocupamos de organizar los útiles que podrían ser reutilizados en el próximo año. Y por lo general, quienes más sufren desgaste y deterioro, son las loncheras, los morrales y las cartucheras y por ende, deben ser reemplazadas.
Mi propuesta para este concurso se trata de una cartuchera realizada con envases plásticos. Esta cartuchera podría tener la ventaja de poder ser utilizada por más de un período académico, ya que el material es resistente y que podremos asear con frecuencia. Otra de las ventajas, es que estamos reutilizando materiales, que de seguro está destinados a formar parte de la contaminación ambiental, ya que, como sabemos, en Venezuela, todavía falta mucha concientización en cuanto a la recolección y clasificación de los desechos sólidos, y éste sería mi pequeño aporte para evitar más daños ambientales.
Aprovecho para hacer una cordial invitación a @vicmito74 y a @marytp20 a participar en este divertido concurso. Espero les sea de agrado. Comencemos.
WELCOME TO MY BLOG
Hellooooo, hellooooooo! Friends of creatives and Hive Diy creators. Going back to school in Venezuela means starting like every new year with the routine after a long period of vacation, starting with organizing uniforms and school supplies, having breakfast or the lunch box ready, but I think the most difficult thing about this day , is fighting with the children to wake them up. I think it has happened to all of us, it is an arduous task to return to the usual schedule when they have a morning schedule, both at bedtime and when they get up, when they are of school age, and with those who attend university it is something else, They should already be very responsible kids and assume the commitment they have to their future, but from any point of view, it is hard after a few months of school inactivity.
Many times, days before the start of school, we mothers take care of organizing the supplies that could be reused in the next year. And generally, those who suffer the most wear and tear are the lunch boxes, backpacks and pencil cases and therefore, they must be replaced.
My proposal for this contest is a pencil case made with plastic containers. This pencil case could have the advantage of being able to be used for more than one academic period, since the material is resistant and we can clean it frequently. Another advantage is that we are reusing materials, which are surely destined to form part of environmental pollution, since, as we know, in Venezuela, there is still a lack of awareness regarding the collection and classification of solid waste, and This would be my small contribution to avoid further environmental damage.
I take this opportunity to extend a cordial invitation to @vicmito74 and @marytp20 to participate in this fun contest. I hope you like it. Let's get started.
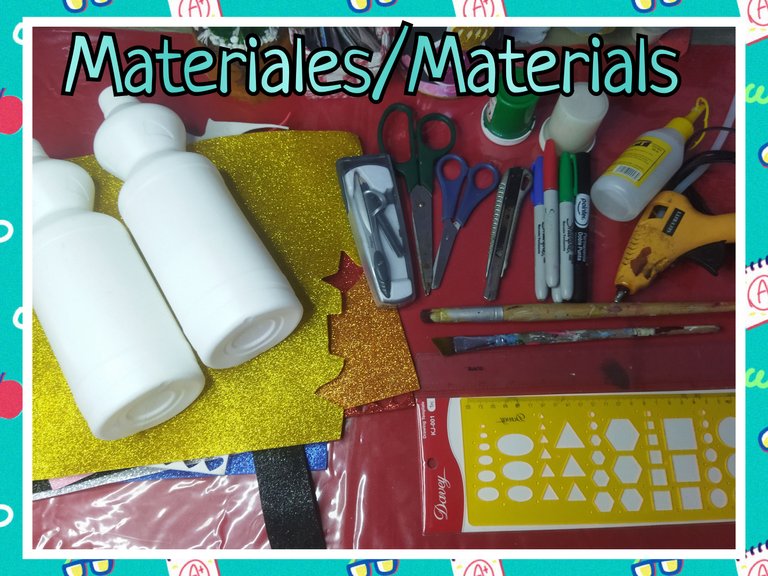
MATERIALES
- 2 Envases plásticos
- Foami mate y escarchado
- Pintura al frío
- Gel escarchado
- Pinceles
- Marcadores
- Silicón líquido y en barra
- Pistola de silicón
- 4 cm de cierre mágico
- Compás
- Cinta métrica
- Regla
- Regla de formas geométricas
- Tijeras
- Cortador
MATERIALS
- 2 plastic containers
- Matte and frosted foami
- Cold paint
- Frosty Gel
- Brushes
- Markers
- Liquid and stick silicone
- Silicone gun
- 4 cm magic closure
- Compass
- Measuring tape
- Ruler
- Geometric shapes ruler
- Scissors
- Cutter
STEP BY STEP // PASO A PASO
**CORTE Y ENSAMBLAJE DE LA CARTUCHERA****
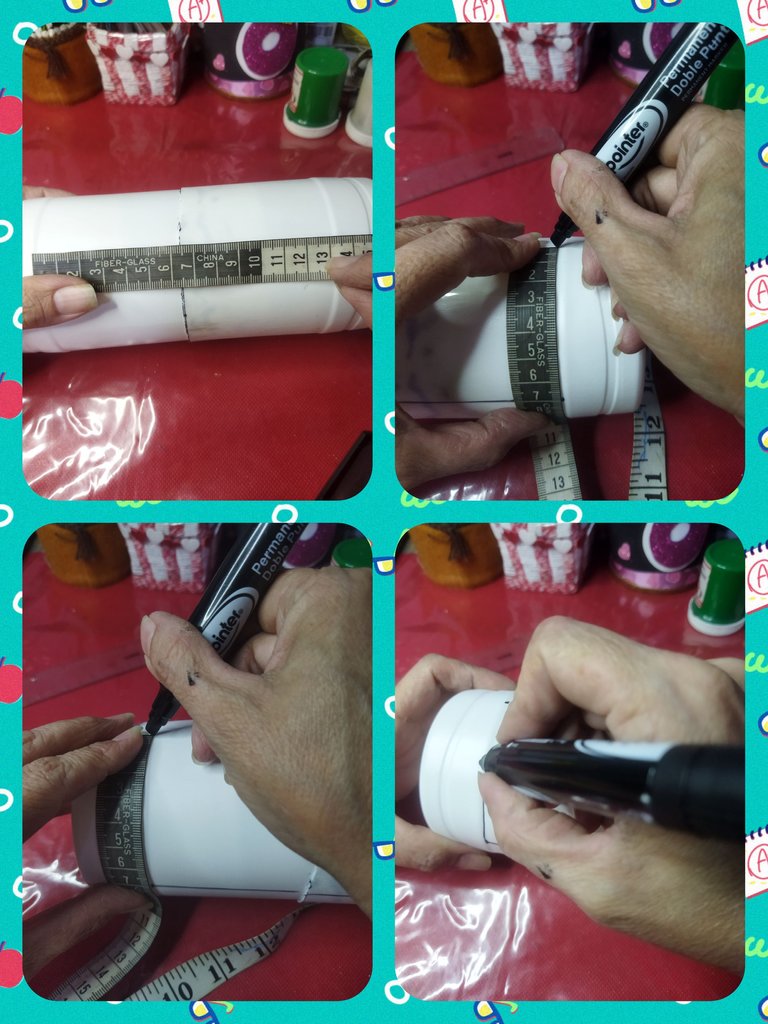
- Lavamos bien los envases y secamos. Tomamos el primer envase y cortamos por la línea que divide del pico. Tiene una medida de 14 cm exactos.
- Tomamos el segundo envase y medimos 10 cm desde abajo, marcamos con ayuda de la cinta métrica y lugo cortamos, tratando de que quede lo más recto posible.
**CUTTING AND ASSEMBLY OF THE CARTRIDGE****
- We wash the containers well and dry. We take the first container and cut along the line that divides the spout. It has a measurement of exactly 14 cm.
- We take the second container and measure 10 cm from the bottom, mark with the help of the measuring tape and then cut, trying to make it as straight as possible.
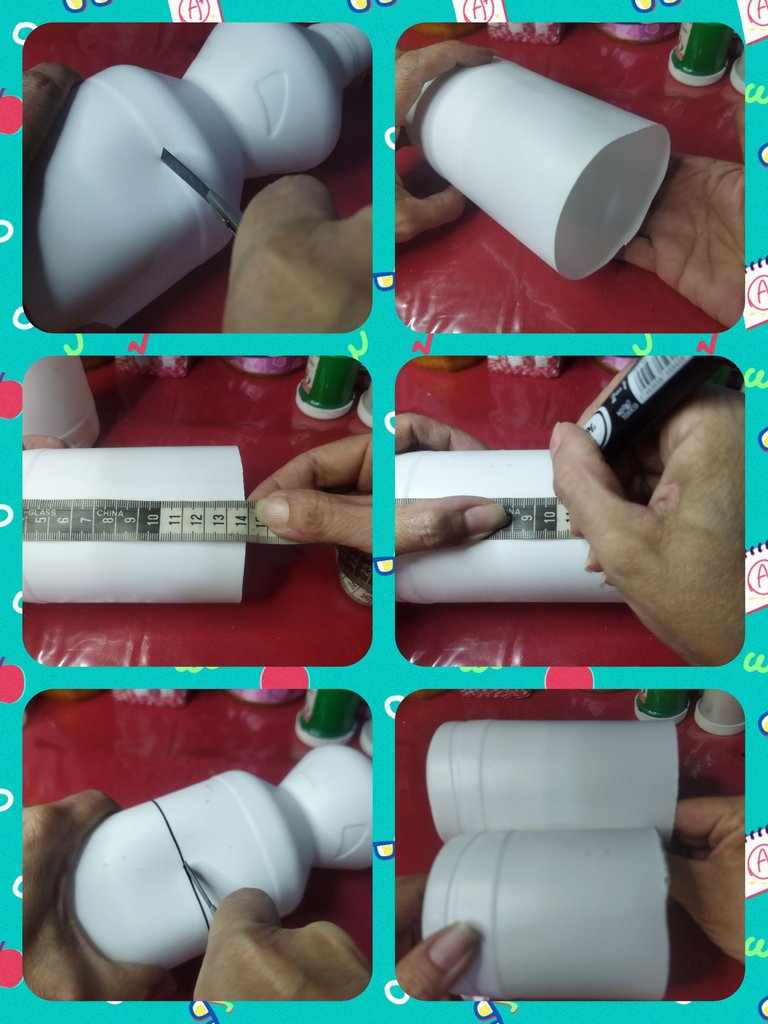
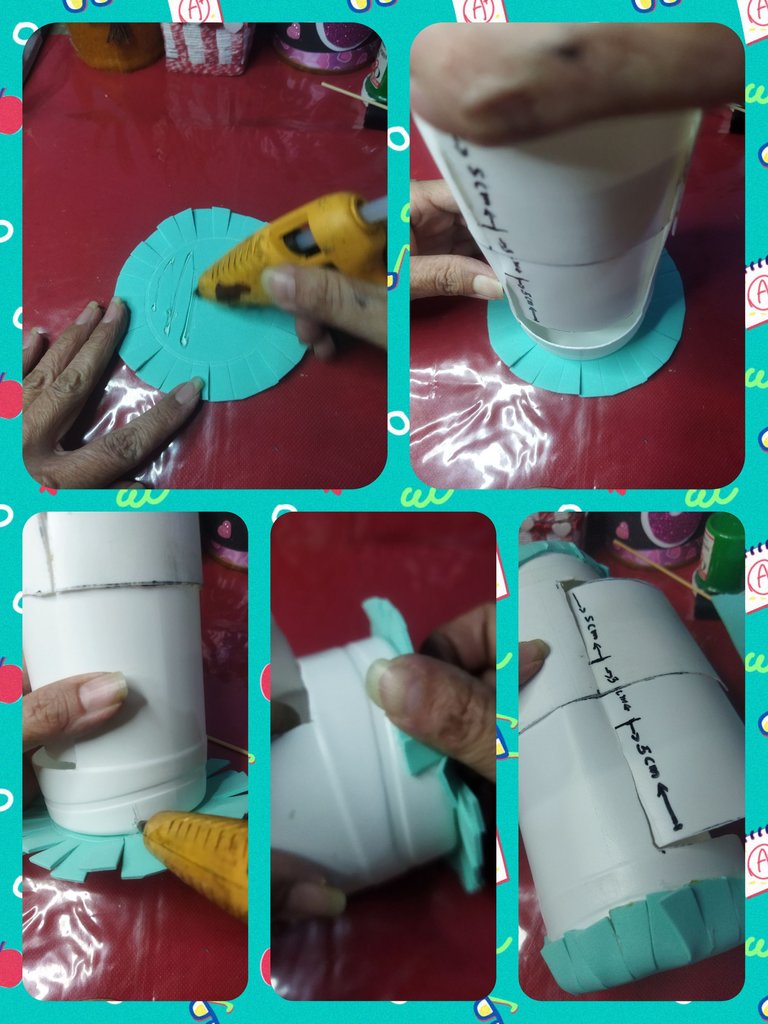
Tomamos ambos cilindros e introducimos el más largo dentro del más corto y con la cinta métrica medimos hasta lograr formar un cilindro de 20 cm.
Justo donde se une ambas piezas, vamos a trazar una linea de marca para guiarnos.
We take both cylinders and insert the longest one into the shortest one and with the measuring tape we measure until we form a 20 cm cylinder.
Right where both pieces join, we are going to draw a mark line to guide us.
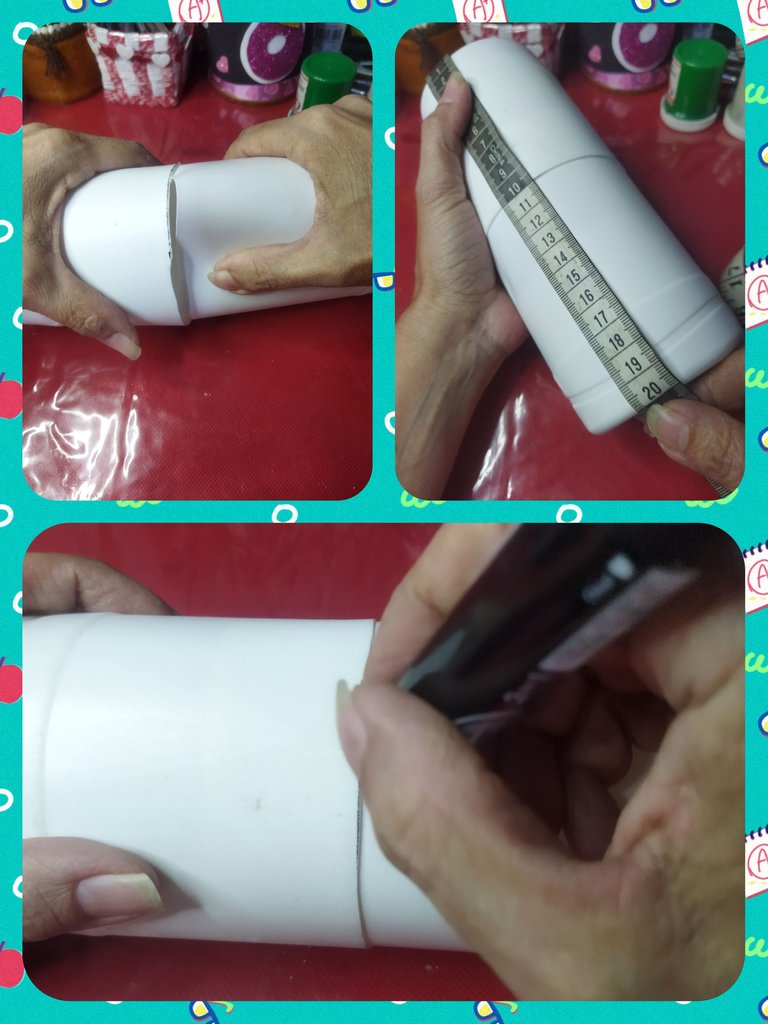
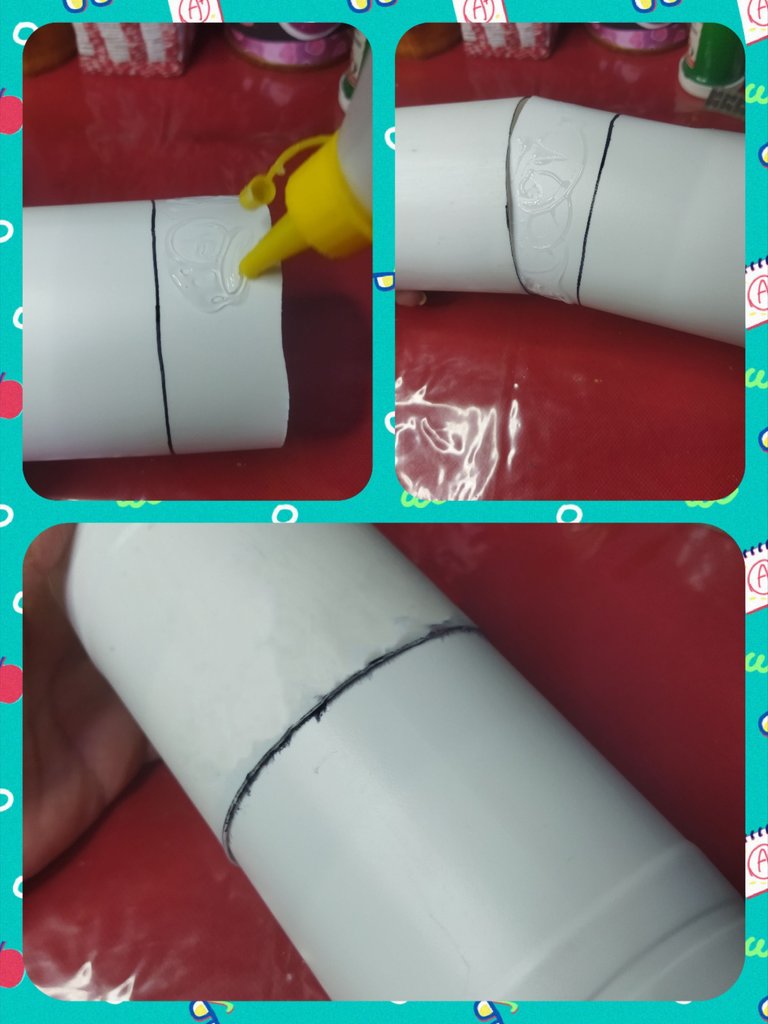
Separamos las piezas y agregamos silicón líquido en la pieza más larga justo antes de la línea que marcamos. Debemos cubrir todo el contorno.
Luego introducimos nuevamente la pieza, realizando pequeños hundimientos por los lados a medida que metemos para que el pegamento no se corra.
We separated the pieces and added liquid silicone to the longest piece just before the line we marked. We must cover the entire contour.
Then we insert the piece again, making small indentations on the sides as we insert so that the glue does not run.
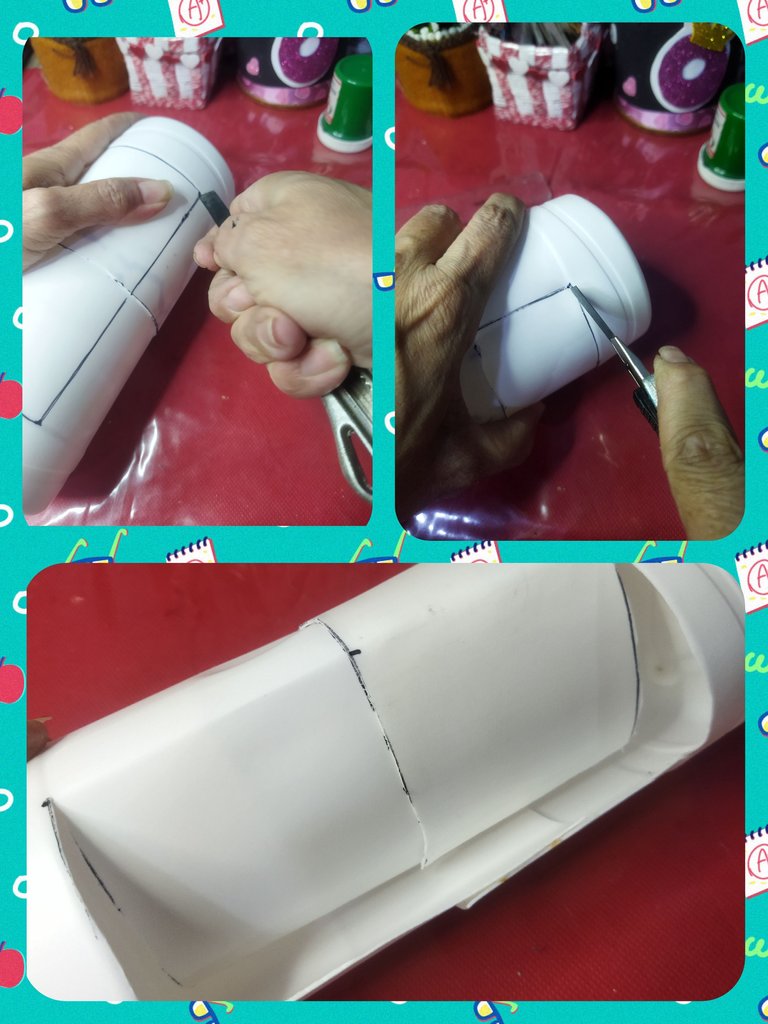
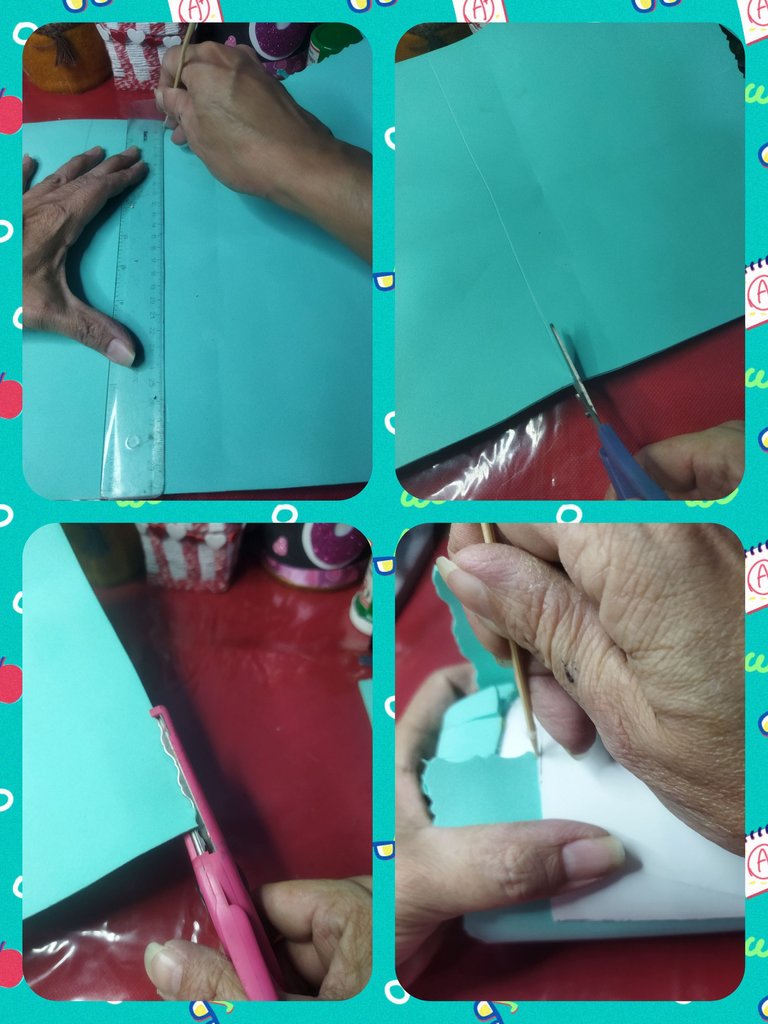
Ahora realizamos un rectángulo central de 7 cm x 13 cm para realizar la tapa.
Now we make a central rectangle of 7 cm x 13 cm to make the lid.
Vamos a cortar un lateral de 13 cm y los dos costados de 7 cm, de manera que podamos abrir y cerrar el cilindro.
We are going to cut one side of 13 cm and the two sides of 7 cm, so that we can open and close the cylinder.
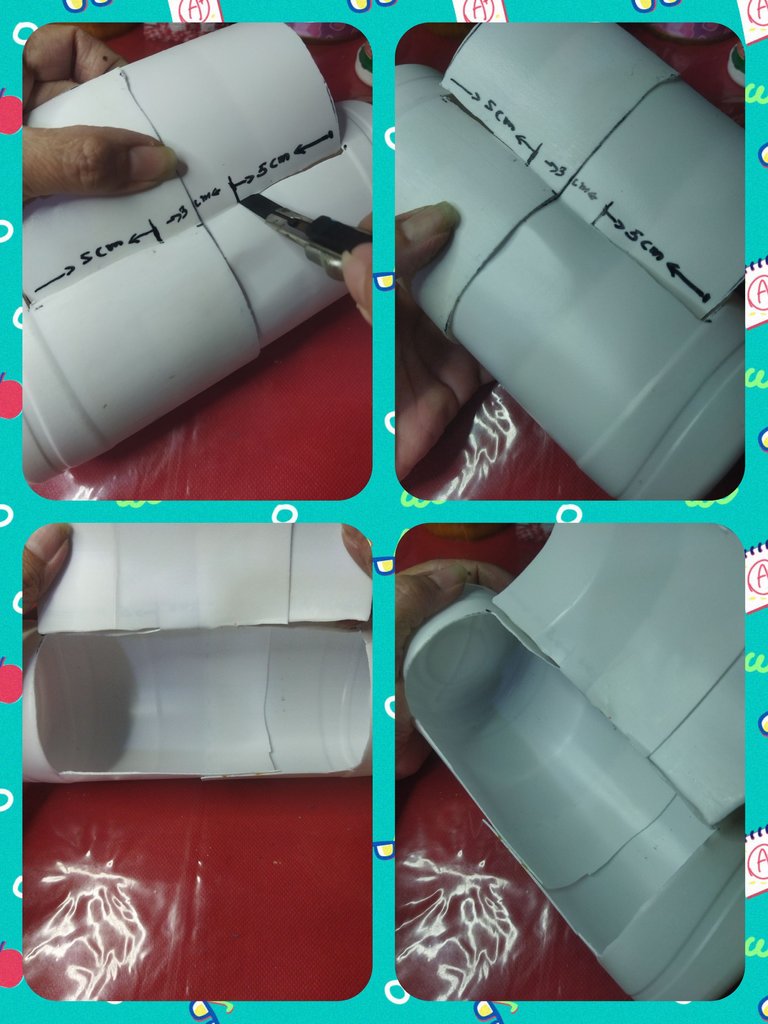
En el otro lateral de 13 cm, vamos a marcar 5 cm de cada lado, dejando 3 cm en el centro y cortamos hasta la marca. Esto es para facilitar el abrir y cerrar.
On the other 13 cm side, we are going to mark 5 cm on each side, leaving 3 cm in the center and we cut up to the mark. This is to facilitate opening and closing.
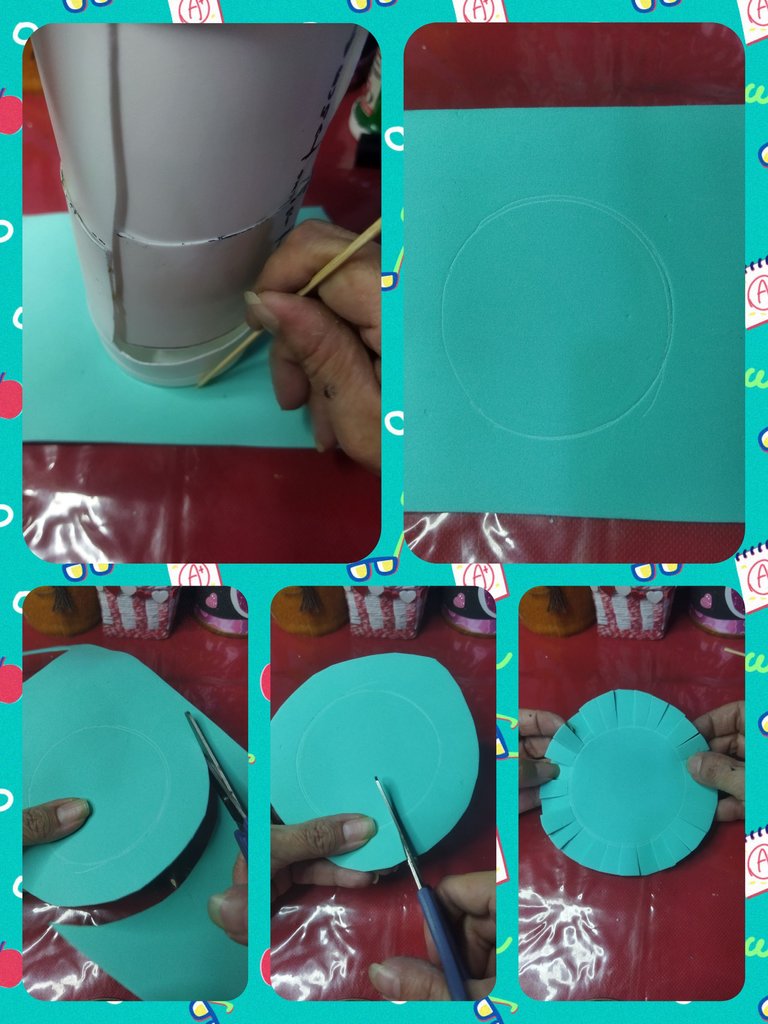
FORRO PERSONALIZADO
Para forrar la cartuchera, elegí foami mate color verde agua.
- Con el mismo cilindro realizamos dos círculos iguales para realizar la tapa de los laterales.
- Recortamos 2 o 3 cm más por fuera de la línea del círculo.
- Realizamos cortes de 2 cm alrededor de la circunferencia tratando de no pasarnos de la marca.
CUSTOM LINING
To line the holster, I chose aqua green matte foam.
- With the same cylinder we make two equal circles to make the side cover.
- We cut 2 or 3 cm more outside the circle line.
- We make 2 cm cuts around the circumference trying not to go over the mark.
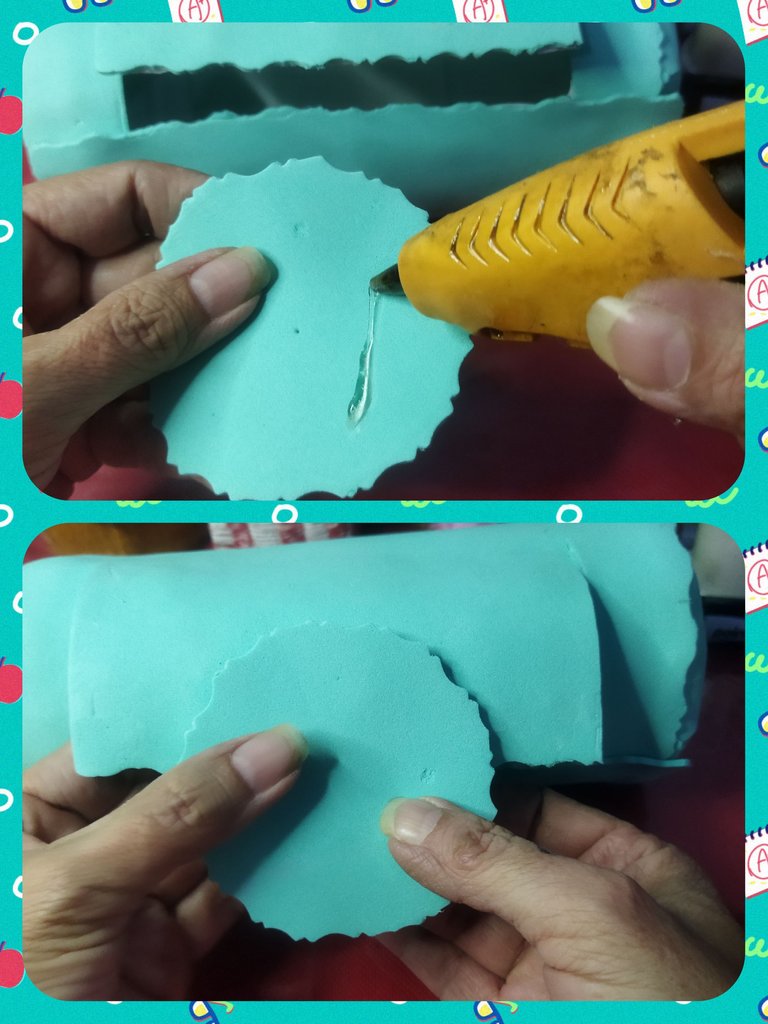
Agregamos silicón caliente en el centro del circulo y pegamos al lateral del cilindro. Ésto lo haremos de cada lado.
We add hot silicone in the center of the circle and glue it to the side of the cylinder. We will do this on each side.
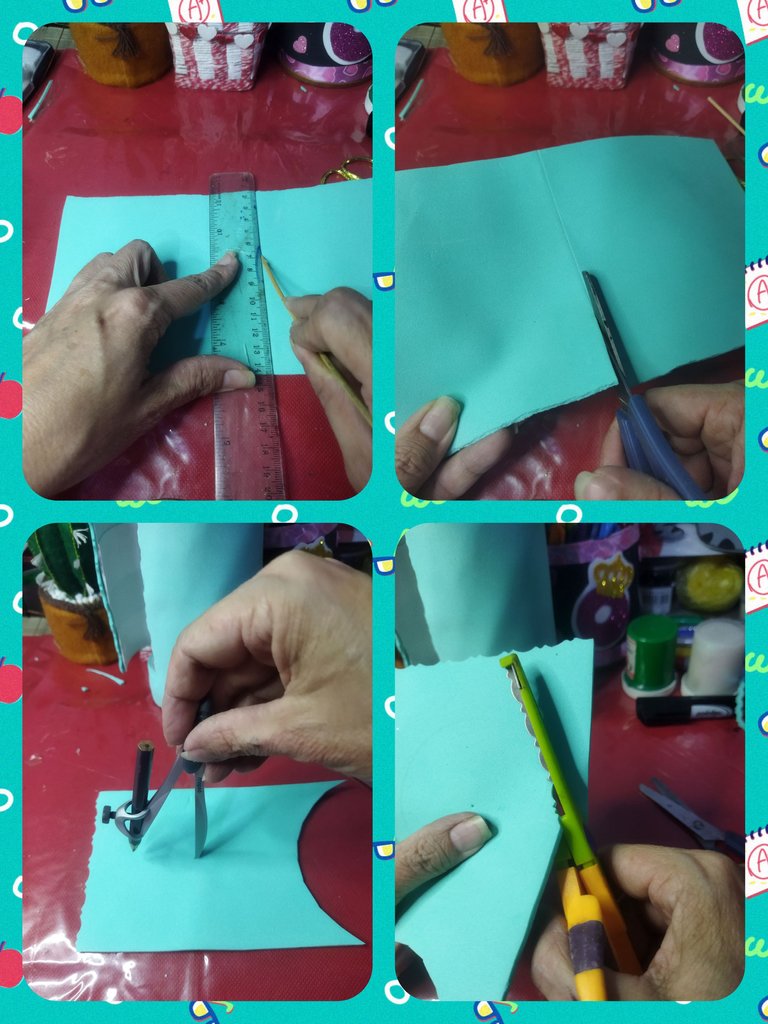
Ahora recortamos un rectángulo de 20 cm x 30 cm. Medimos en el cilindro y vamos a marcar con la misma tapa para luego recortar al ras. Con una tijera de formas cortamos los bordes.
Now we cut out a 20 cm x 30 cm rectangle. We measure on the cylinder and we are going to mark with the same cover and then trim flush. With shape scissors we cut the edges.
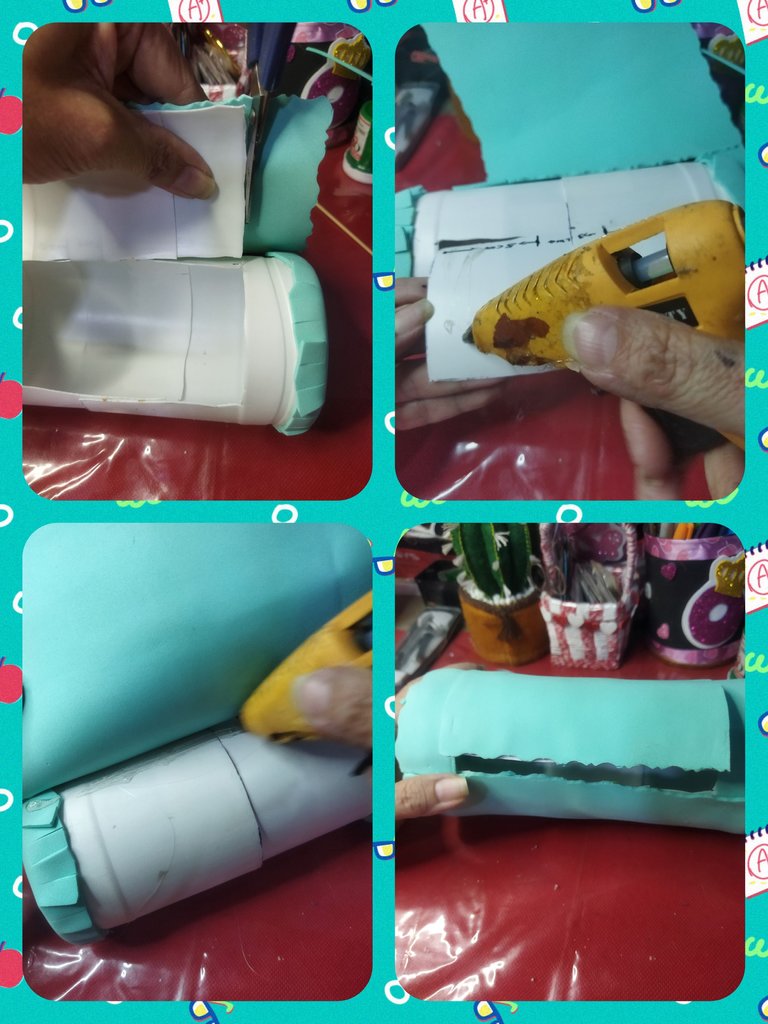
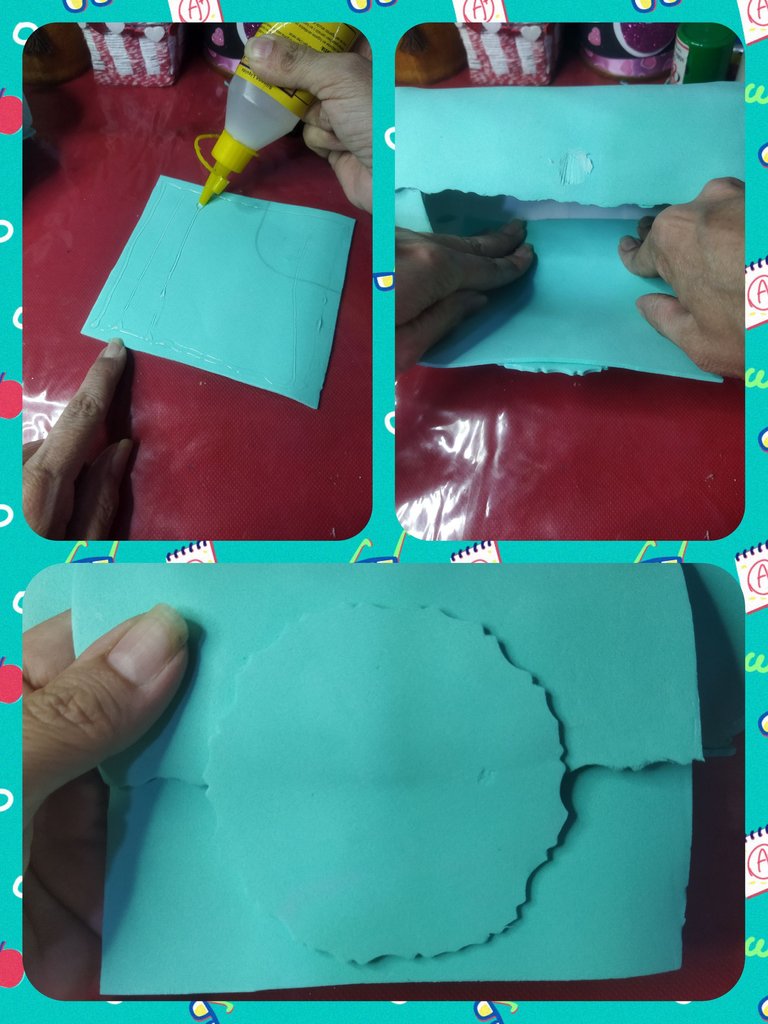
Pegamos el rectángulo con la pistola de silicón, agregando una cantidad moderada a medida que vamos colocando el foami, de manera rápida ya que este pegamento de fácil secado.
We glue the rectangle with the silicone gun, adding a moderate amount as we place the foam, quickly since this glue dries easily.
Para la parte posterior de la tapa recortamos un rectángulo de 13 cm x 10 cm y para decorar un círculo de 3 cm de diámetro.
Al círculo podemos darle forma también con la tijera.
For the back of the lid we cut out a 13 cm x 10 cm rectangle and to decorate a 3 cm diameter circle.
We can also shape the circle with scissors.
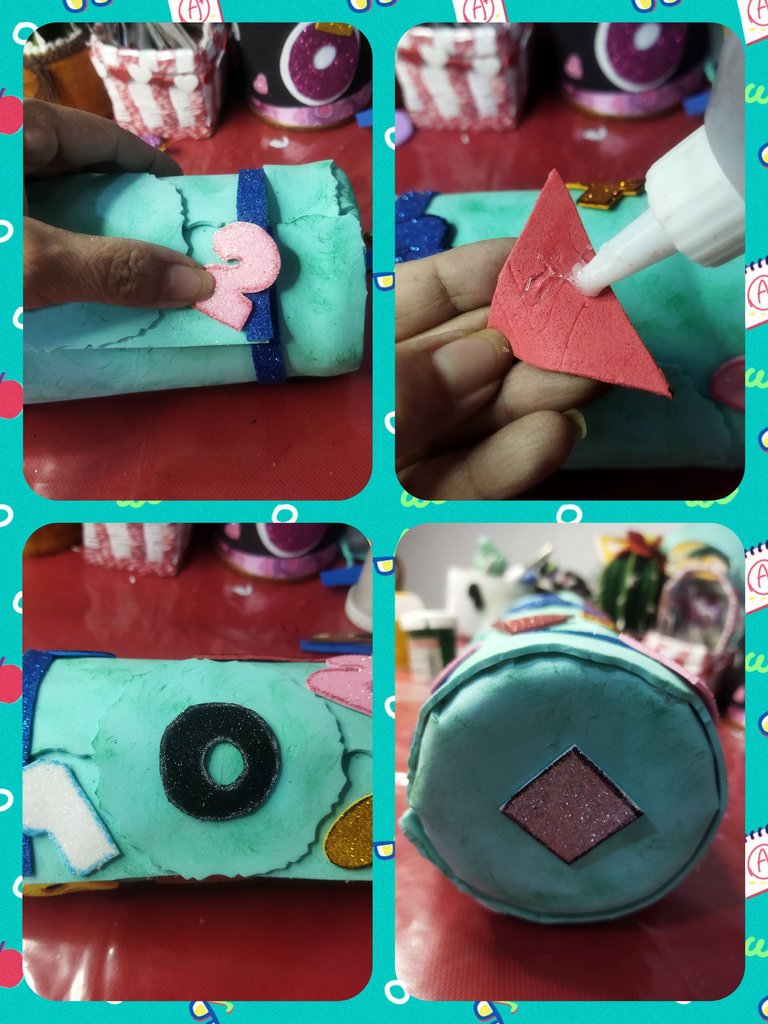
Agregamos silicón en la mitad del círculo y pegamos en el centro de la tapa.
We add silicone in the middle of the circle and glue it in the center of the lid.
Luego agregamos silicón en el rectángulo y pegamos a la parte posterior de la tapa y unimos al círculo.
Then we added silicone to the rectangle and glued it to the back of the lid and attached it to the circle.
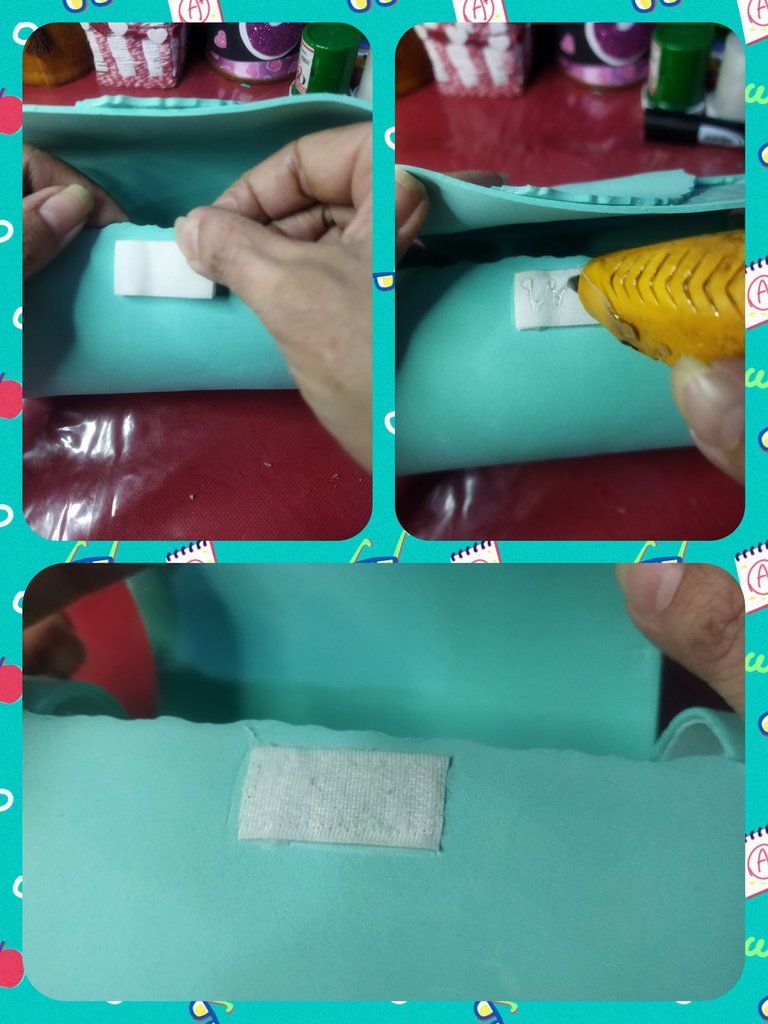
Para el cerrar la cartuchera vamos a utilizar 4 cm de cierre mágico que pegaremos con silicón caliente.
To close the pencil case we are going to use 4 cm of magic closure that we will glue with hot silicone.
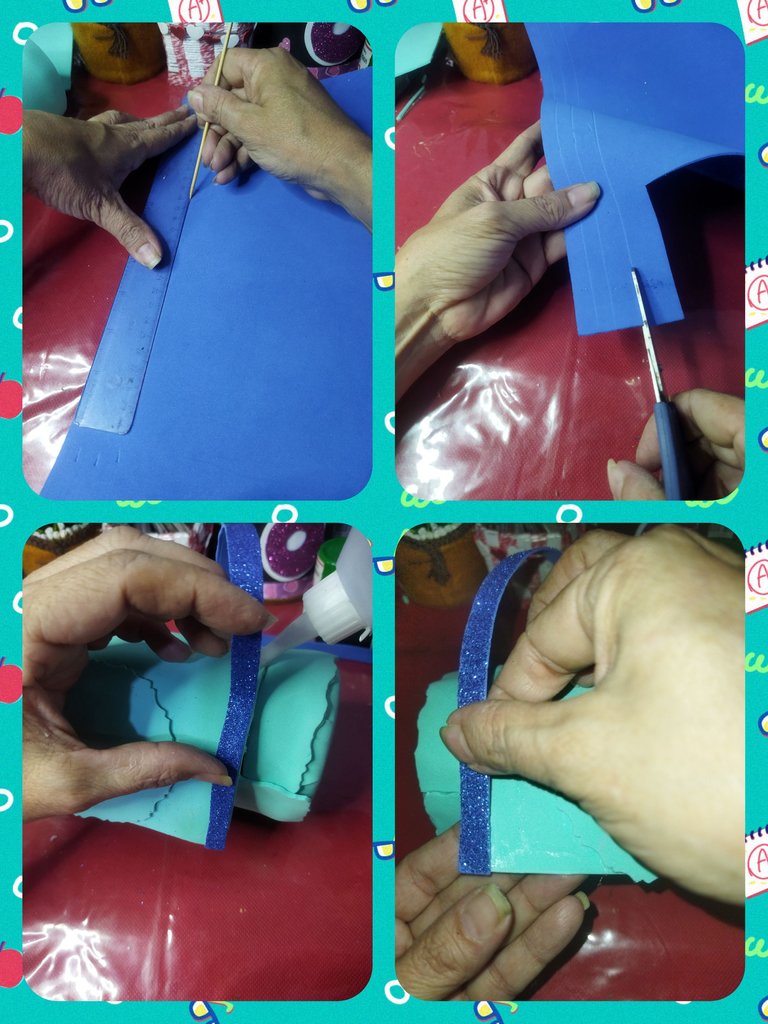
PERSONALIZACIÓN
Para personalizar la cartuchera realicé tiras de 1 cm de ancho por 30 cm de largo que pegué alrededor del cilindro a partir de la división de la tapa por ambos lados.
PERSONALIZATION
To personalize the pencil case I made strips 1 cm wide by 30 cm long that I glued around the cylinder starting from the division of the lid on both sides.
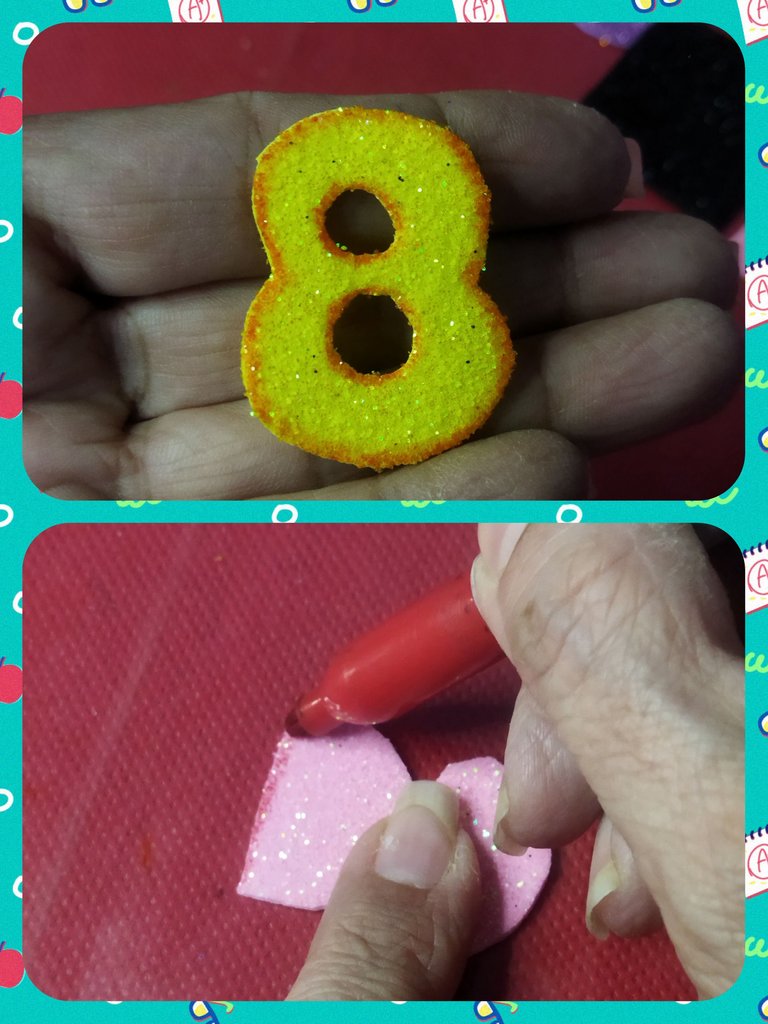
También realicé números del 0 al 9 en foami escarchado de colores variados y figuras geométricas con la regla de figuras.
I also made numbers from 0 to 9 in frosted foam of various colors and geometric figures with the figure ruler.

Con los marcadores realicé el sombreado de cada número y figura geométrica.
With the markers I shaded each number and geometric figure.
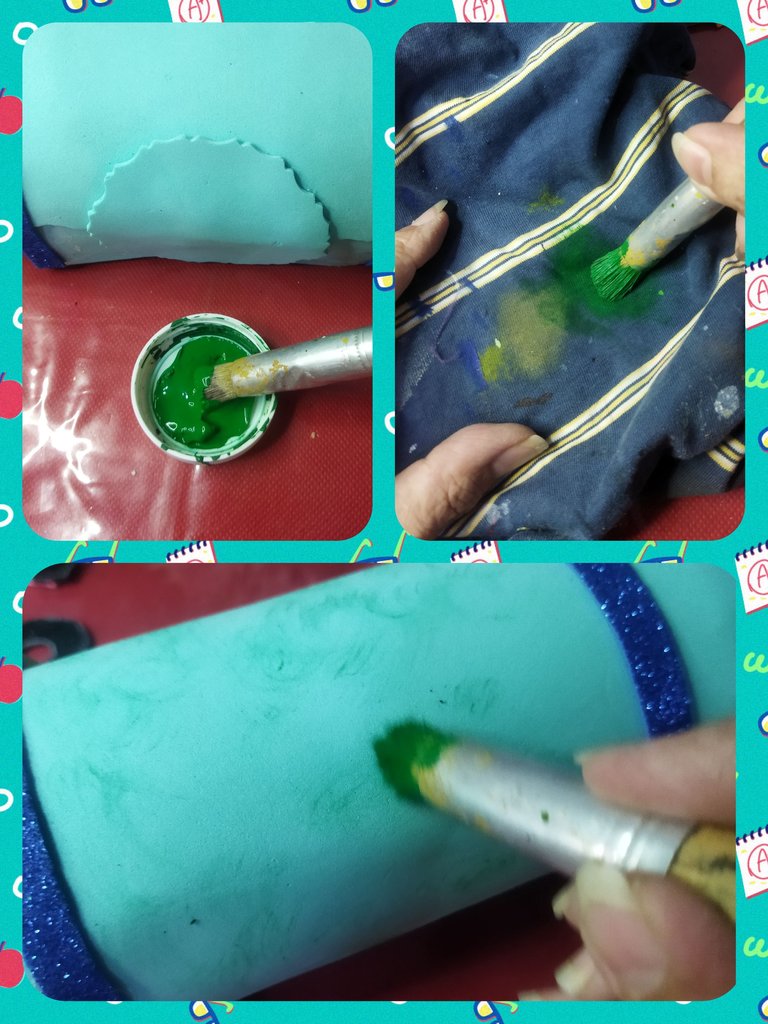
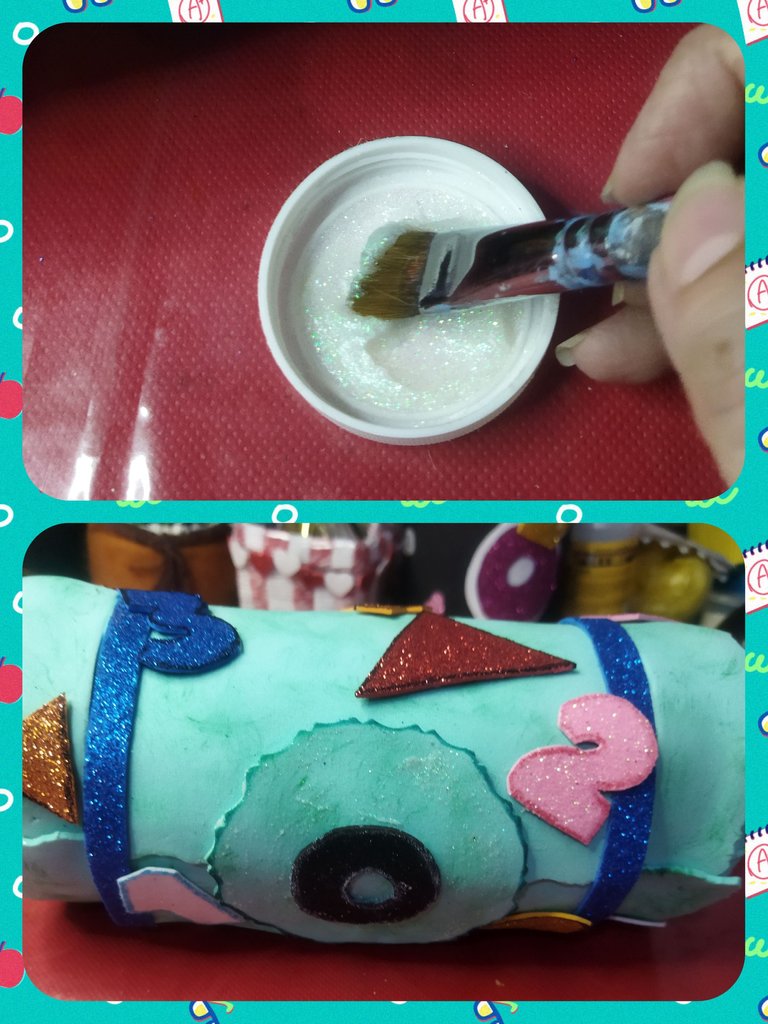
Y para matizar el color verde del forro utilicé pintura al frío verde y un pincel redondo y apliqué la técnica del difuminado que consiste en empapar el pincel de pintura, eliminar el exceso y luego pasar suavemente por toda la superficie del cilindro.
And to tone the green color of the lining, I used green cold paint and a round brush and applied the blending technique, which consists of soaking the paint brush, removing the excess, and then gently passing it over the entire surface of the cylinder.
Y finalmente, pegué de manera dispersa los números y figuras geométricas alrededor del cilindro.
And finally, I scattered the numbers and geometric figures around the cylinder.
Y con el gel escarchado resalté el centro circular de la tapa para resaltar los tonos matizados.
And with the frosting gel I highlighted the circular center of the lid to highlight the nuanced tones.
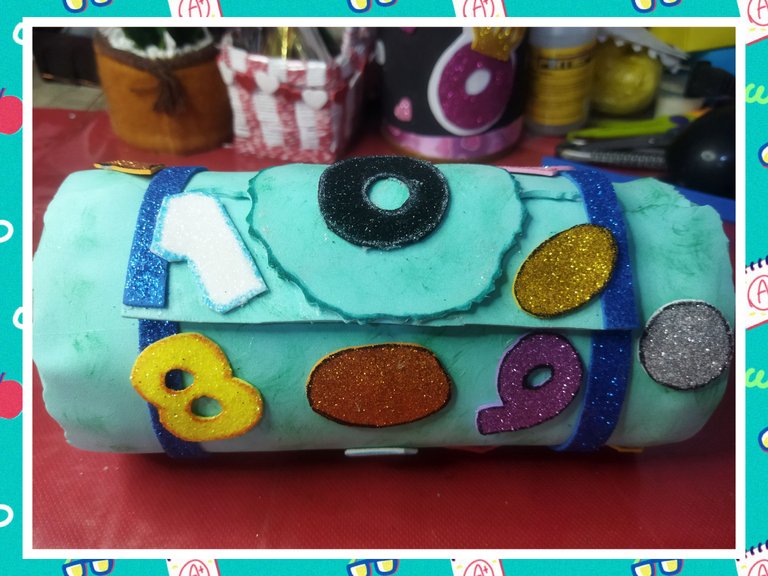
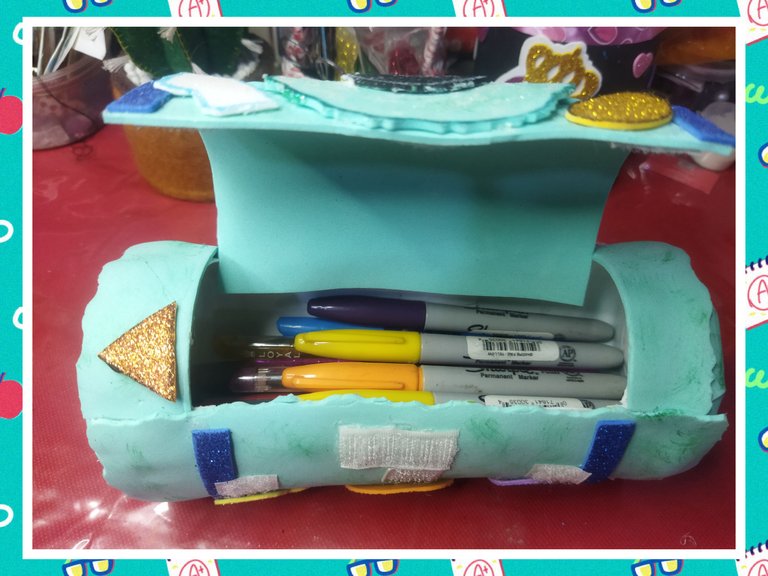
Y este es el resultado final. Una cartuchera colorida con un gran espacio de almacenamiento pensando en aquellos que les gusta tener mucha variedad entre lápices, crayones y marcadores. Siempre quise tener una cartuchera súper grande porque nunca era suficiente para guardar y llevar a la escuela todo lo que quería. Mi mamá siempre me regañaba porque no sólo llevaba los colores nuevos, sino los que me iban quedando de años anteriores para poder compartirlos con mis compañeros que no llevaban y como no entraban todos, tenía una cajita de galletas rectangular donde los guardaba.
Además es una linda forma de fomentar el reciclaje con la creación de objetos que podremos utilizar por mucho tiempo antes de ser desechados totalmente. Espero te haya gustado. Nos vemos en la próxima.
And this is the final result. A colorful pencil case with a large storage space for those who like to have a lot of variety between pencils, crayons and markers. I always wanted to have a super large pencil case because it was never enough to store and carry to school everything I wanted. My mother always scolded me because she not only brought the new colors, but also the ones I had left over from previous years so I could share them with my classmates who didn't have them and since not all of them fit, she had a rectangular cookie box where she kept them.
It is also a nice way to encourage recycling with the creation of objects that we can use for a long time before being completely discarded. I hope you liked it. See you next time.

Muy hermosa amiga, gracias por compartir esta gran idea. Abrazos suerte con tu entrada
Holaaaa, gracias por apoyar siempre mi contenido. Me alegro que guste. Un proyecto útil y práctico hecho con cariño.
Hola @linita 👋
Yo le pondría de nombre a esta cartuchera la Rayovad 🤪 porque desde aquí puedo notar la calidad que tiene. Más todo lo que tu explicas sé que durará una eternidad.
El color verde agua es muy bonito, me gustaría una así para mí. Los niños podrían preferir unos colores más oscuros ja ja ja. Para que la mamá no tenga que lavarla tan seguido.
Mucha 🍀 suerte.
Por supuesto, este es un proyecto que ser personalizado dependiendo de los requerimientos de cada usuario, pueden usar envases más delgados, más cortos o de otro tipo de material y la decoración también. Me alegro que te guste. Gracias por tu comentario. Saludos.
Amiga me gustó la forma y los materiales que usaste, hemos validado tu entrada <3
Ohhhh muchas gracias, aprecio tu atención.
La cosas que podemos hacer mediante el reciclaje son infinitas. Hay que ponerle ganas y creatividad, tu post es muestra de ello. Mucha suerte en el concurso. Saludos.