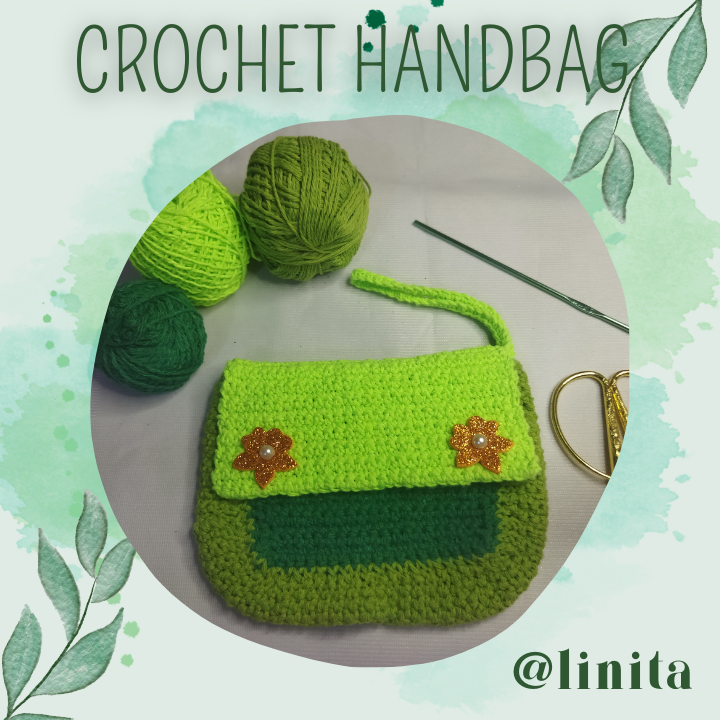
[ENG-ESP] Woven Tote Bag
WELCOME TO MY BLOG
Hellooooo, hellooooooo! Greetings my dear DiyHub creatives. Today's tutorial is about how to make a woven tote bag. Practical for when we have quick outings where it is not necessary to carry everything we have in our wallets. You know what I mean, hehehehehehe. So I hope you like it. Let's get started.
BIENVENIDOS A MI BLOG
¡Holaaaa, holaaaaa! Saludos mis estimados creativos de DiyHub. El tutorial de hoy trata de un cómo hacer un bolso de mano tejido. Práctico para cuando tenemos salidas rápidas que no es necesario llevar todo lo que tenemos en nuestras carteras. Sabes a lo que me refiero, jejejejejeje. Así que espero te guste. Comencemos.
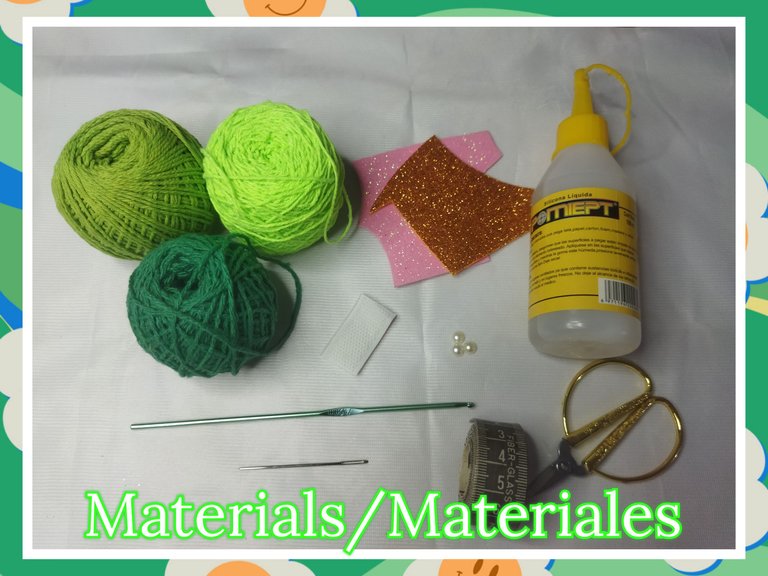
MATERIALS
- 1 mm green cotton threads
- 2.5 mm knitting needles
- Wool needle
- Scissors
- Frosted foam
- Half pearls
- Magic closure
- Liquid silicone
MATERIALES
- Hilos de algodón tonos verdes de 1 mm
- Agujas para tejer de 2,5 mm
- Aguja lanera
- Tijera
- Foami escarchado
- Medias perlas
- Cierre mágico
- Silicón líquido
STEP BY STEP // PASO A PASO
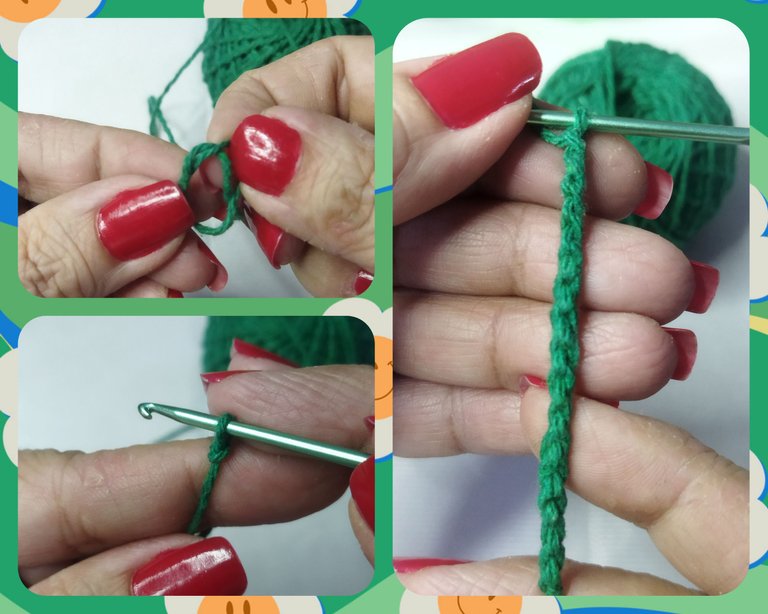
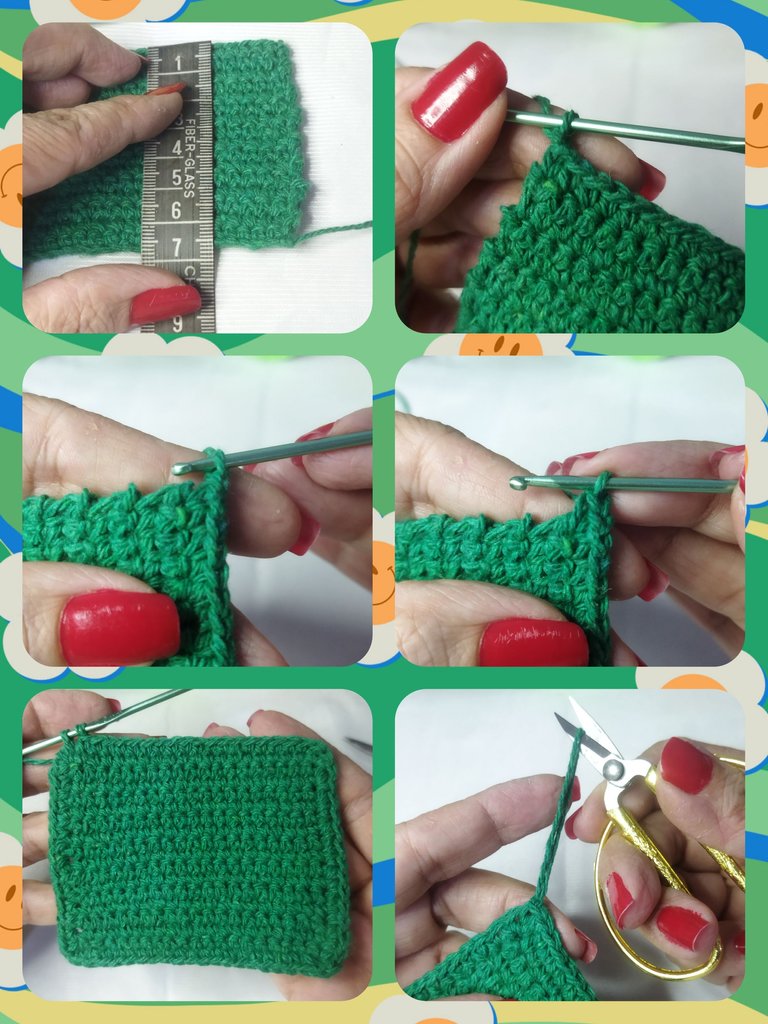
STEP Nº 1
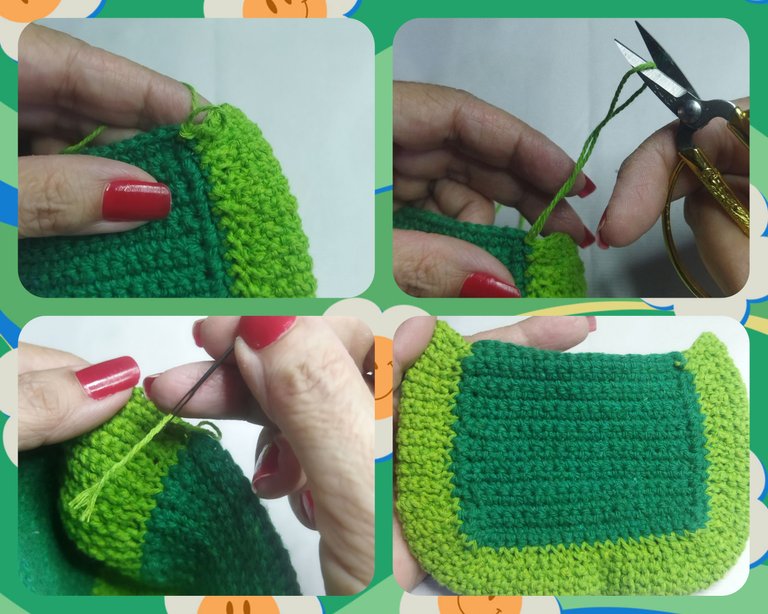
We will start by knitting the front and back of the bag. We will make two identical pieces. For this we are going to take the dark green cotton thread.
- We start with a slipped knot.
- We make a chain of 21 points.
PASO Nº 1
Comenzaremos tejiendo la parte frontal y posterior del bolsito. Haremos dos piezas iguales. Para esto vamos a tomar el hilo de algodón verde oscuro.
- Iniciamos con un nudo deslizado.
- Realizamos una cadena de 21 puntos.
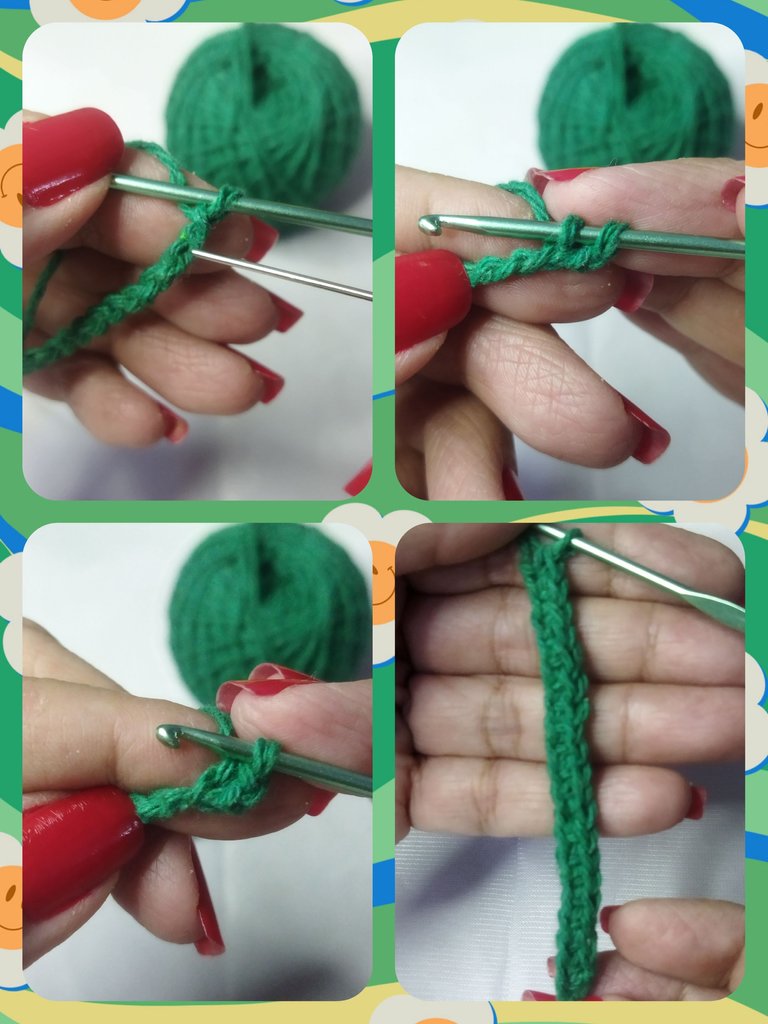
STEP Nº 2
At point 20 of the chain we will make a single crochet and repeat in each link until the end of the chain to obtain a total of 20 single crochets.
PASO Nº 2
En el punto 20 de la cadena realizaremos un punto bajo y repetimos en cada eslabón hasta el final de la cadena para obtener un total de 20 puntos bajos.
STEP Nº 3
At the end of the round we make a chain stitch and turn the fabric and repeat the previous step, a single crochet in each point of the previous round.
PASO Nº 3
Al finalizar la vuelta realizamos un punto cadena y giramos el tejido y repetimos el paso anterior, un punto bajo en cada punto de la vuelta anterior.

STEP Nº 4
We will make 18 laps or until we reach a measurement of 8 cm wide.
And to close the first square, at the end of round No. 18, we make a slipped stitch, then we make a chain stitch and begin to make single crochet stitches around the fabric. We close with a slipped stitch and cut.
PASO Nº 4
Realizaremos 18 vueltas o hasta alcanzar una medida de 8 cm de ancho.
Y para cerrar el primer cuadro, al finalizar la vuelta Nº 18, realizamos un punto deslizado, luego hacemos un punto cadena y comenzamos a realizar puntos bajos alrededor del tejido. Cerramos con un punto deslizado y cortamos.
STEP Nº 5
We make the second piece identical to the previous one, but before finishing the last single crochet we exchange the thread. We take the strand of lemon green thread and close the single crochet.
PASO Nº 5
Realizamos la segunda pieza idéntica a la anterior, pero antes de finalizar el último punto bajo intercambiamos el hilo. Tomamos la hebra del hilo verde limón y cerramos el punto bajo.
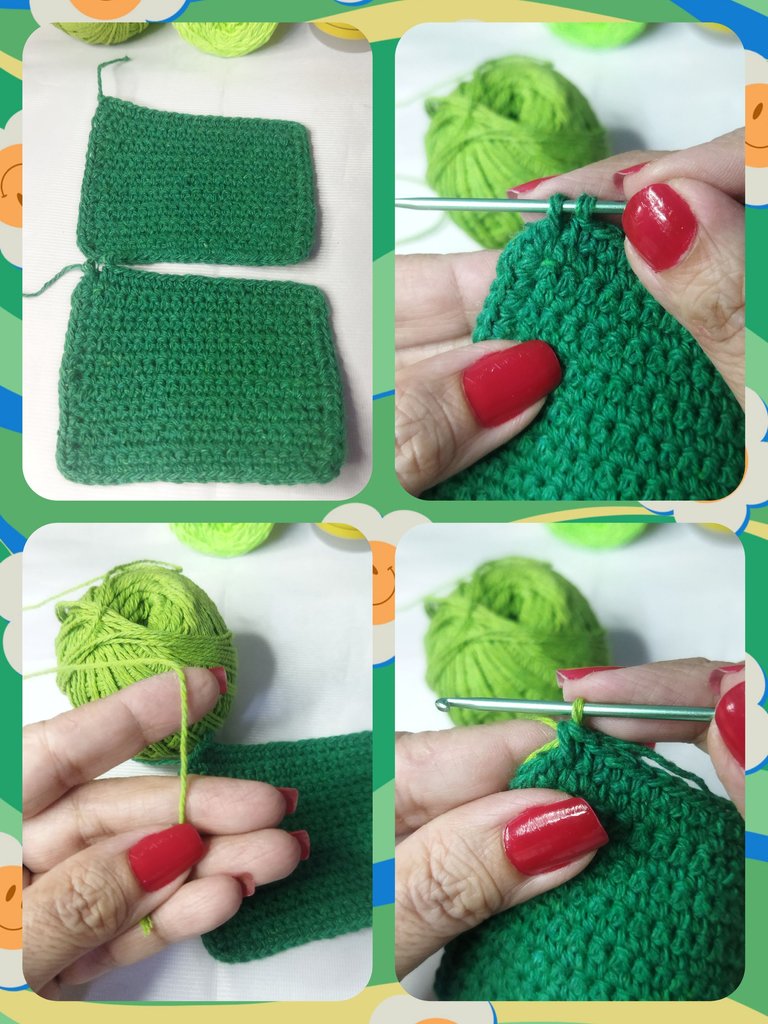
STEP Nº 6
In this step we are going to make a link between both parts and define the depth that the bag will have. Since what interests me is that I can put my identity document, bank card, keys and some other small things in it, I will make 10 chain stitches that will define the space and the guide to link the two pieces. . This space or depth is equivalent to 5 cm.
- We make the 10 chain stitches and we are going to insert the needle into the first stitch of the other piece and make a slip stitch. With this point we link both pieces.
- Next we will return to the other piece making two slipped stitches, one in each link of the chain, we continue with 6 single crochets and finish with two slipped stitches, to complete 10 stitches on the round.
PASO Nº 6
En este paso vamos a realizar un enlace de ambas parte y a definir la profundidad que tendrá el bolsito. Como a mi lo que me interesa es que en él pueda meter mi documento de identidad, la tarjeta bancaria, las llaves y alguna que otra cosa pequeña, realizaré 10 puntos de cadena que van a definir el espacio y la guía para enlazar las dos piezas. Este espacio o profundidad equivale a 5 cm.
- Realizamos los 10 puntos de cadena y vamos a insertar la aguja en el primer punto de la otra pieza y realizamos un punto deslizado. Con este punto enlazamos ambas piezas.
- Seguidamente nos regresaremos hasta la otra pieza realizando dos puntos deslizados, uno en cada eslabón de la cadena, continuamos con 6 puntos bajos y finalizamos con dos puntos deslizados, para completar 10 puntos en la vuelta.
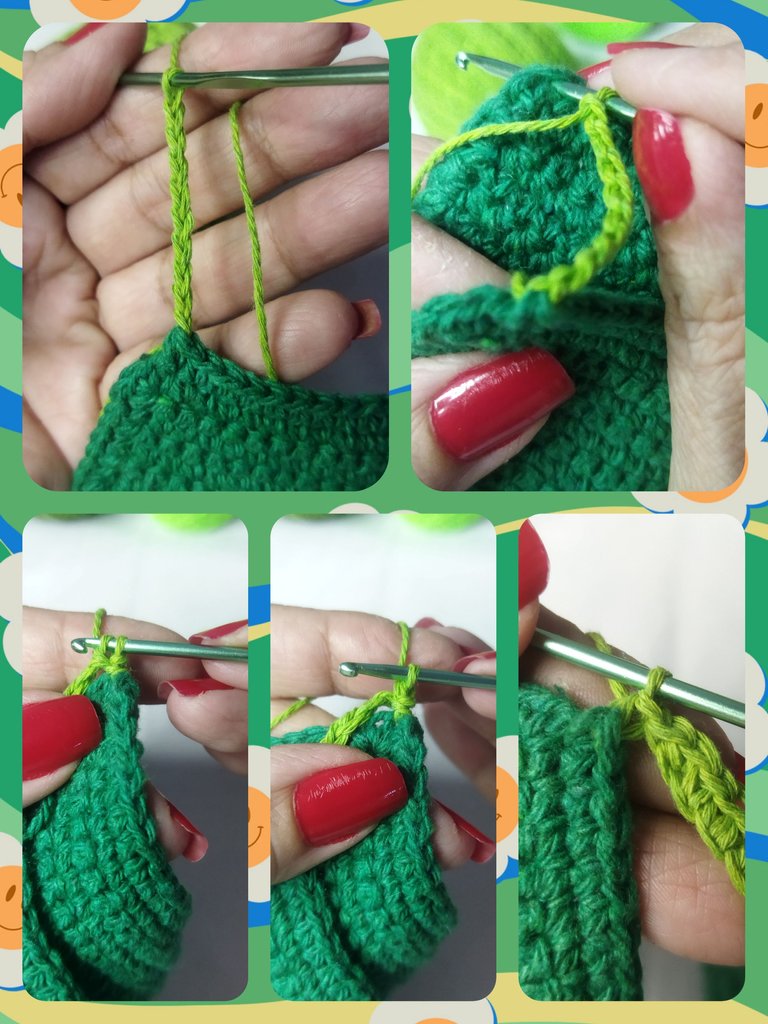
STEP Nº 7
We finish the round by inserting the needle into the next stitch in the square with a slipped stitch. We turn the fabric and repeat the entire previous round.
PASO Nº 7
Terminamos la vuelta introduciendo la aguja en el punto siguiente del cuadro con un punto deslizado. Giramos el tejido y repetimos toda la vuelta anterior.

STEP Nº 8
We will continue this process until we have joined both pieces in 3/4 parts of the fabric.
Once the weaving is finished, we make a slip stitch, we cut the thread leaving a long strand and then, with the wool needle, we hide the excess between the fabric.
PASO Nº 8
Este proceso o vamos a realizar hasta que hayamos unido ambas piezas en 3/4 partes del tejido.
Una vez finalizado el tejido, realizamos un punto deslizado, cortamos el hilo dejando una hebra larga para luego, con la aguja lanera, ocultamos el exceso entre el tejido.
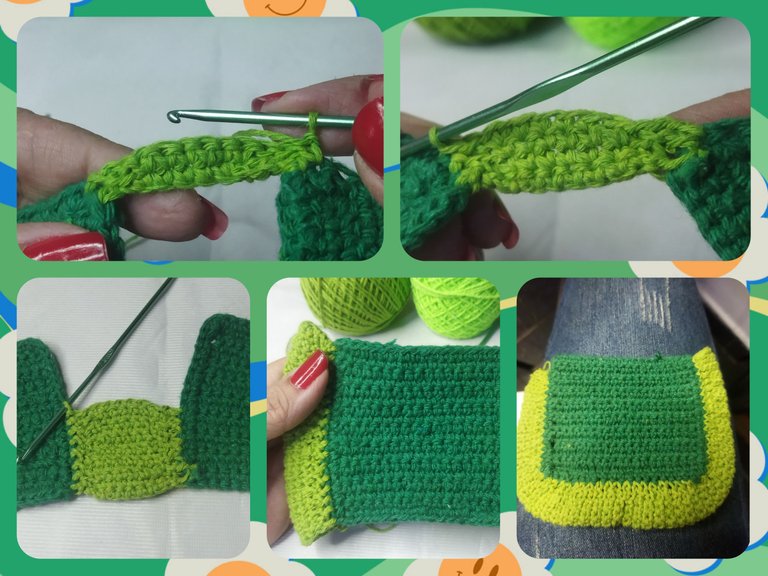
STEP Nº 9
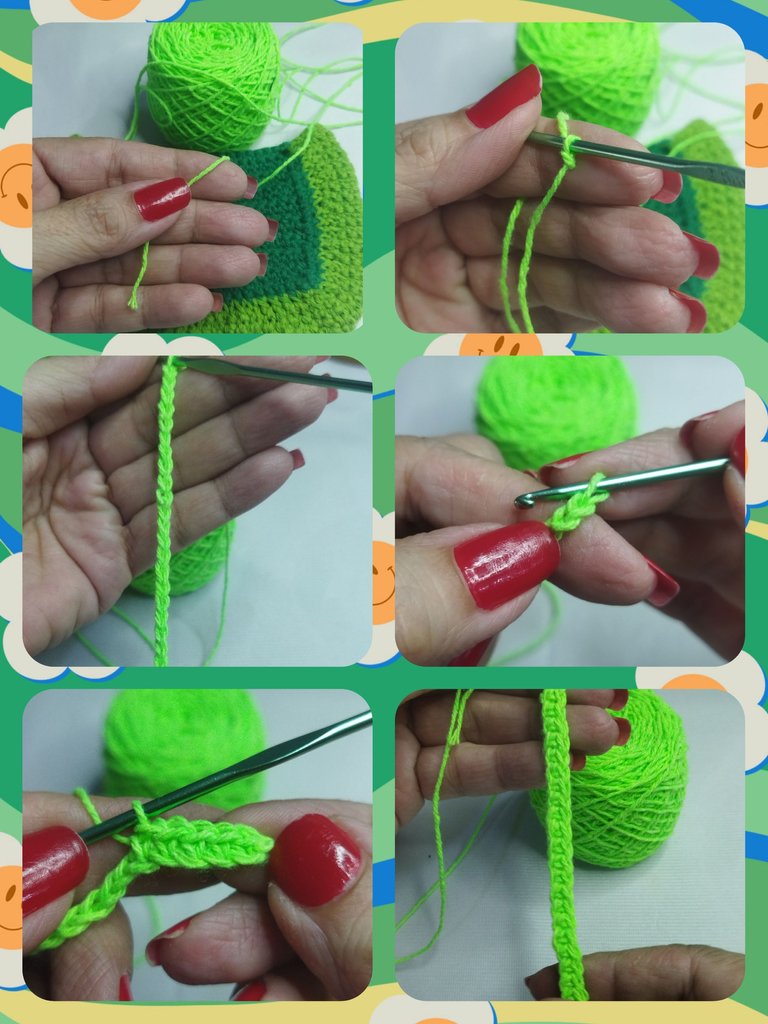
Now we are going to make the lid to close the bag. For this we will use the neon green thread.
- We make a slip knot and weave 31 chain stitches.
- Now we are going to crochet a single crochet in each link of the chain starting at the second link to obtain 30 single crochets.
- At the end, we make 1 chain stitch, turn the fabric and repeat the previous row.
PASO Nº 9
Ahora vamos a realizar la tapa para cerrar el bolso. Para ello utilizaremos el hilo verde neón.
- Realizamos un nudo corredizo y tejemos 31 puntos de cadena.
- Ahora vamos a tejer un punto bajo en cada eslabón de la cadena comenzando en el segundo eslabón para obtener 30 puntos bajos.
- Al finalizar, realizamos 1 punto de cadena, giramos el tejido y repetimos la vuelta anterior.
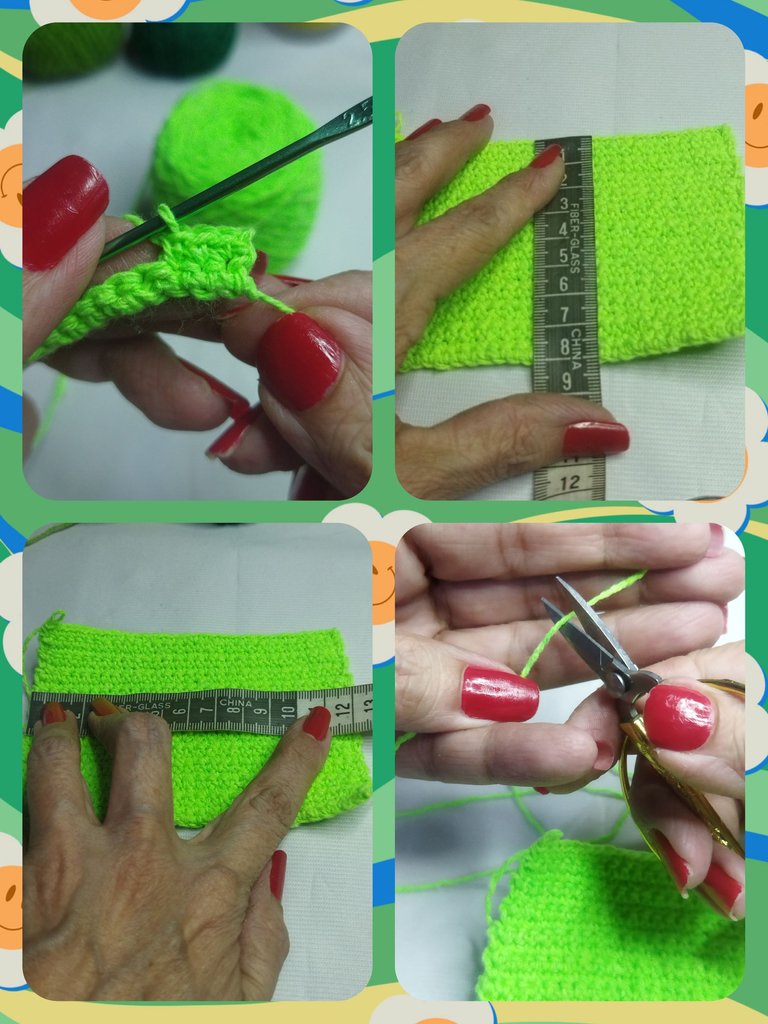
STEP Nº 10
Once we complete 24 loops or 8 cm wide, we cut the thread leaving a 50 cm strand.
PASO Nº 10
Una vez que completamos 24 vueltas u 8 cm de ancho, cortamos el hilo dejando una hebra de 50 cm.
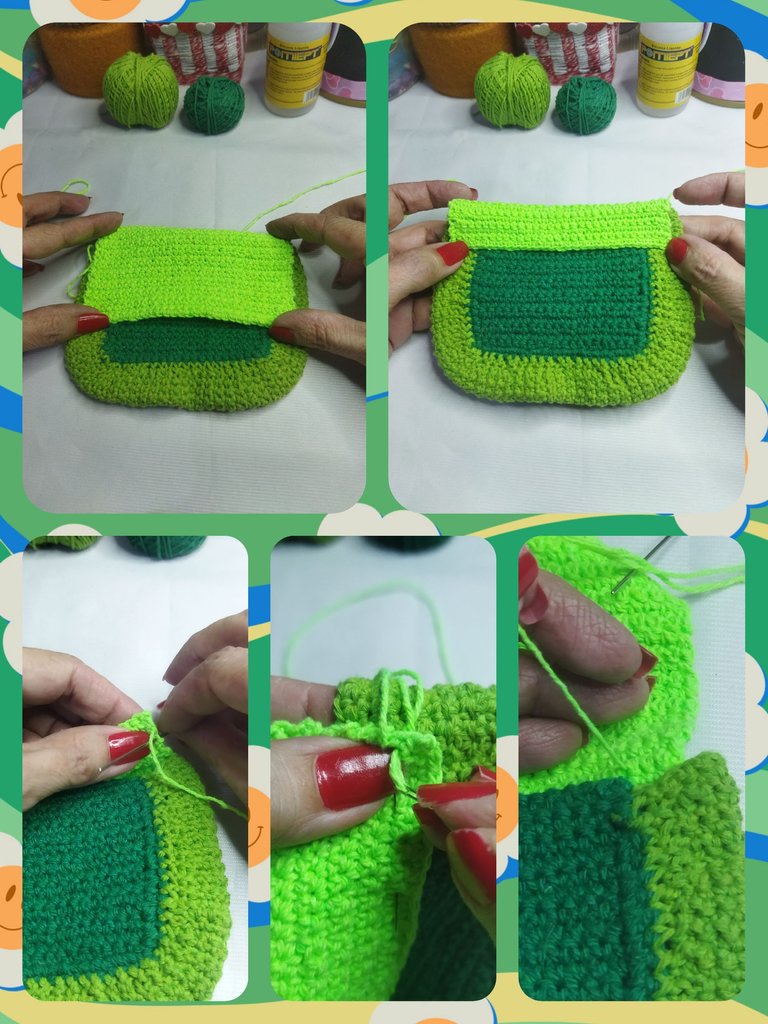
STEP Nº 11
We thread the thread on the wool needle and begin to glue the flap to the bag, leaving 2 cm on the back. We join by making the point known as the side stitch.
PASO Nº 11
Ensartamos el hilo en la aguja lanera y comenzamos a pegar la solapa al bolso dejando 2 cm en la parte posterior. Unimos realizando el punto conocido como punto de lado.
STEP Nº 12
For the closure we will use 6 cm of magic closure that we will divide into two 3 cm parts. We glue with silicone on the sides of the flap and then to the bag. If you want it more secure, you can sew with thread.
PASO Nº 12
Para el cierre utilizaremos 6 cm de cierre mágico que dividiremos en dos partes de 3 cm. Pegamos con silicón en los costados de la solapa y luego al bolso. Si lo quieres más seguro, puedes coser con hilo.
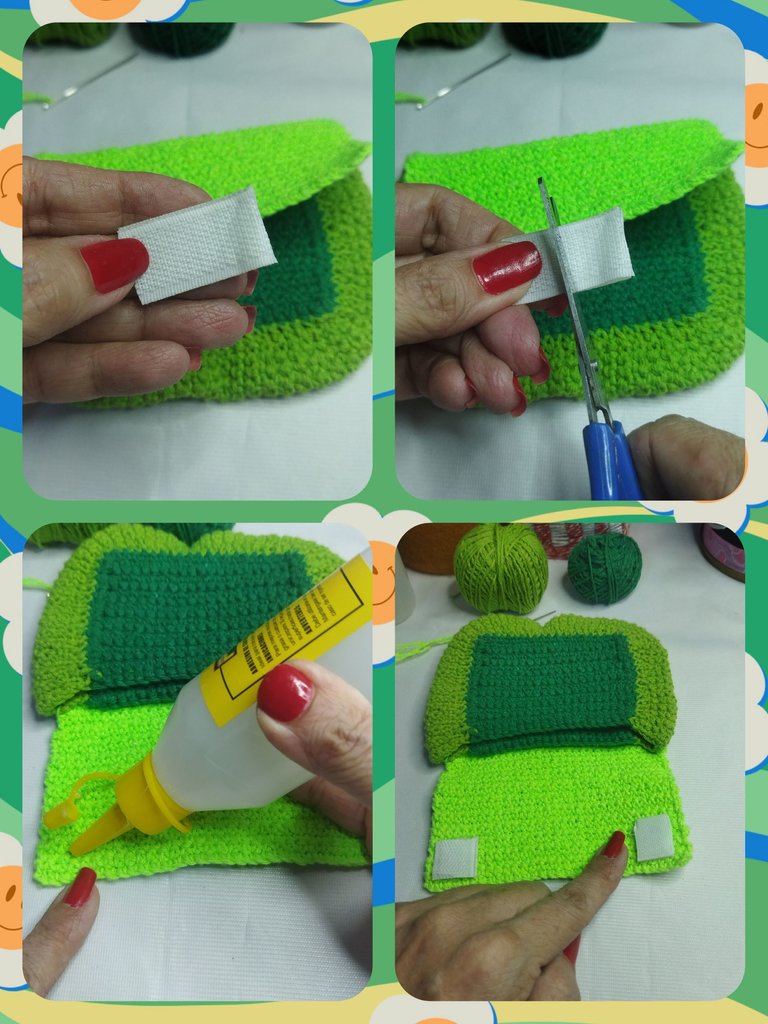
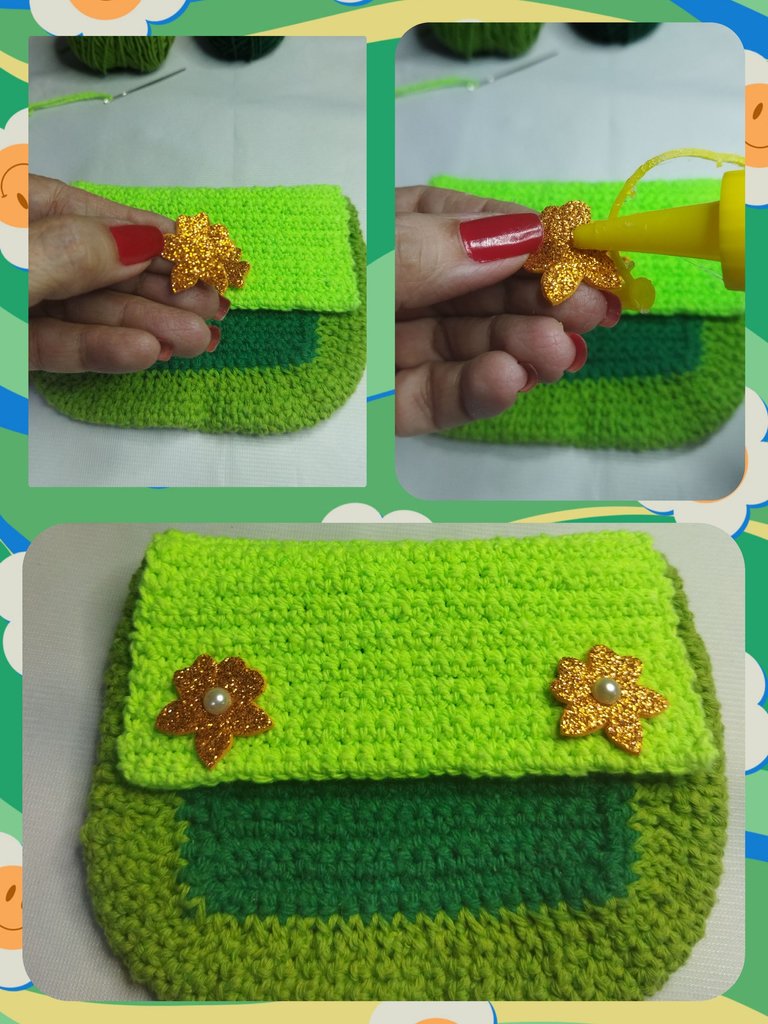
STEP Nº 13
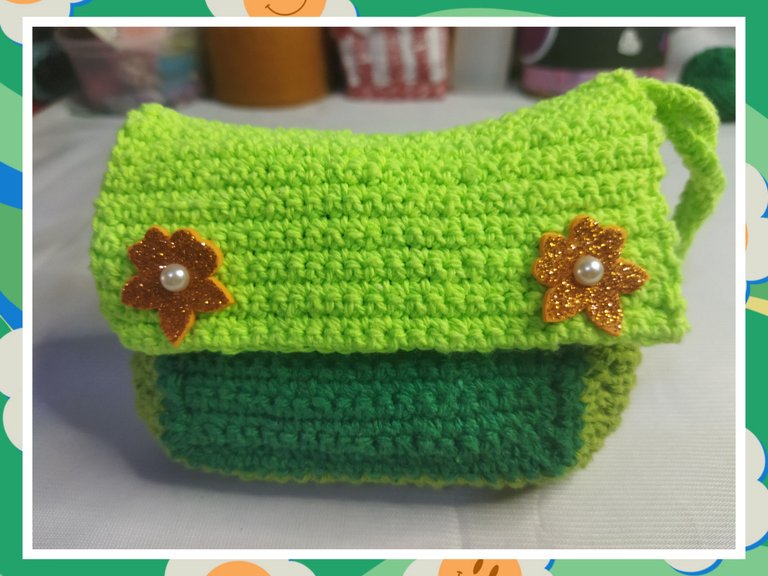
To decorate we make two small foam flowers and glue a half pearl in the center. Then we glue the front at the height of the closure.
PASO Nº 13
Para decorar realizamos dos flores pequeñas en foami pegamos una media perla en el centro. Luego pegamos en el frente a a altura del cierre.
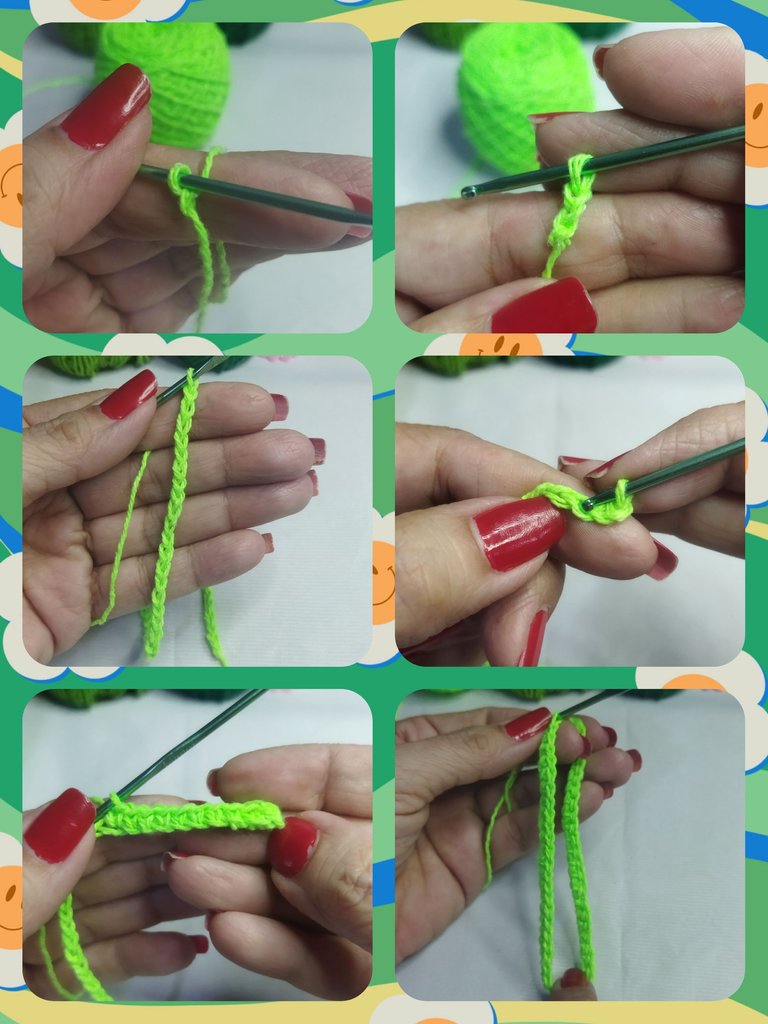
STEP Nº 14
And for the handle of the bag, we are going to make a chain of 51 stitches where we will highlight 50 single stitches starting from the second link of the chain. We close with a slipped stitch, leave a 15 cm thread and with a wool needle we sew in one of the ends of the bag. Whichever side you want.
PASO Nº 14
Y para el asa del bolso, vamos a realizar una cadena de 51 puntos donde realzaremos 50 puntos bajos a partir del segundo eslabón de la cadena, Cerramos con un punto deslizado, dejamos una hebra de 15 cm y con a aguja lanera cosemos en uno de los extremos del bolso. Del lado que desees.

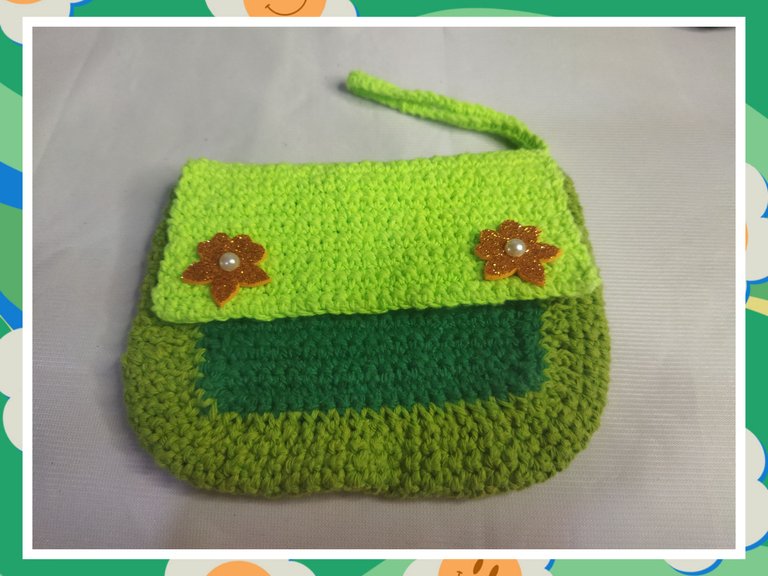
PROJECT COMPLETED
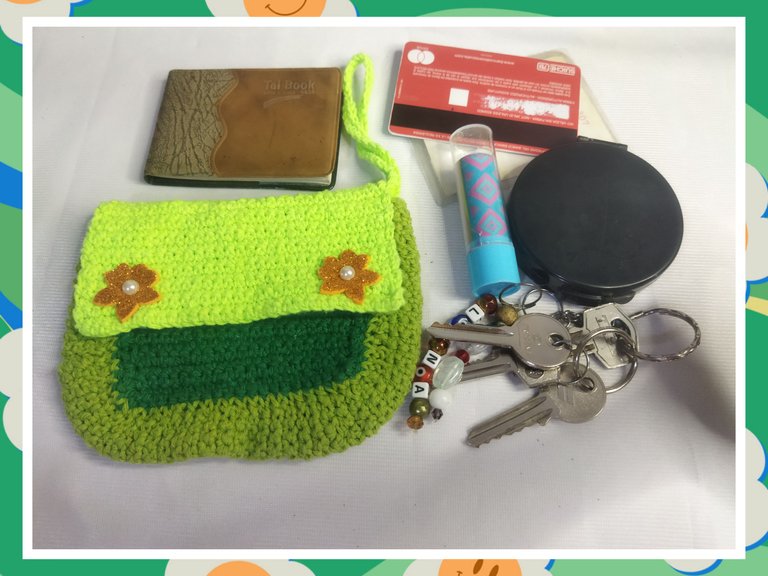
This is a small bag measuring 14 cm wide by 11 cm high, ideal for when we go out and don't want to carry a wallet that is usually loaded with things. In it we can put the house keys, cash, bank cards, a painting and even medicines if necessary. Knitting time depends on how much you put into it and how fast you are at knitting. It took me two days slowly. I hope you enjoy. See you.
PROYECTO FINALIZADO
Este es un bolso pequeño de 14 cm de ancho por 11 cm de alto, ideal para cuando salimos y no queremos llevar la cartera que por o general van cargadas de cosa. En {e podemos meter las llaves de a casa, dinero en efectivo, las tarjetas bancarias, una pintura y hasta las medicinas si es necesario. Se El tiempo de tejido depende de cuánto le dediques y lo rápido que seas para tejer. Yo tardé dos días pausadamente. Espero lo disfrutes. Nos vemos.
Two days of amazing work. Ideal bag for short outings and the likes. This is a really pretty bag. Very well done.
Very practical and comfortable, especially when we use public transport and we can protect it from pickpockets.
Muy lindo, de verdad me encantan las cosas tejidas 🥰
Congratulations, your post has been upvoted by @dsc-r2cornell, which is the curating account for @R2cornell's Discord Community.
Enhorabuena, su "post" ha sido "up-voted" por @dsc-r2cornell, que es la "cuenta curating" de la Comunidad de la Discordia de @R2cornell.