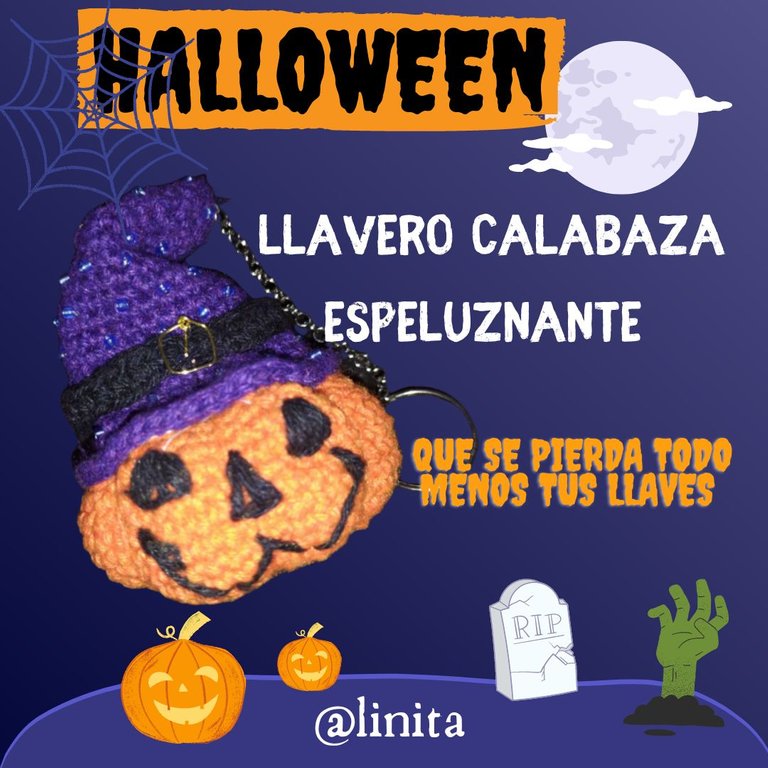
[ENG-ESP] SPOOKY PUMPKIN KEYCHAIN, CELEBRATING HALLOWEEN // LLAVERO CALABAZA ESPELUZNANTE, CELEBRANDO HALLOWEEN
WELCOME TO MY BLOG
Hellooooo, hello. How are you doing? Already celebrating Halloween? These festivities are widely celebrated in many countries. As you have already been able to find out, in Venezuela this is a recently acquired celebration and it is held in few places in the private sector, that is, it is not part of the national celebrations but a large part of the country celebrates it in their homes, in private places such as nightclubs, bars, restaurants and it is of great importance for the commercial sector because there are many supplies that can be purchased for the decorations of these places and many people dress up to visit these places. These celebrations are closely related to what is a national holiday in our country, the Day of the Dead, which is celebrated on November 1 of each year.
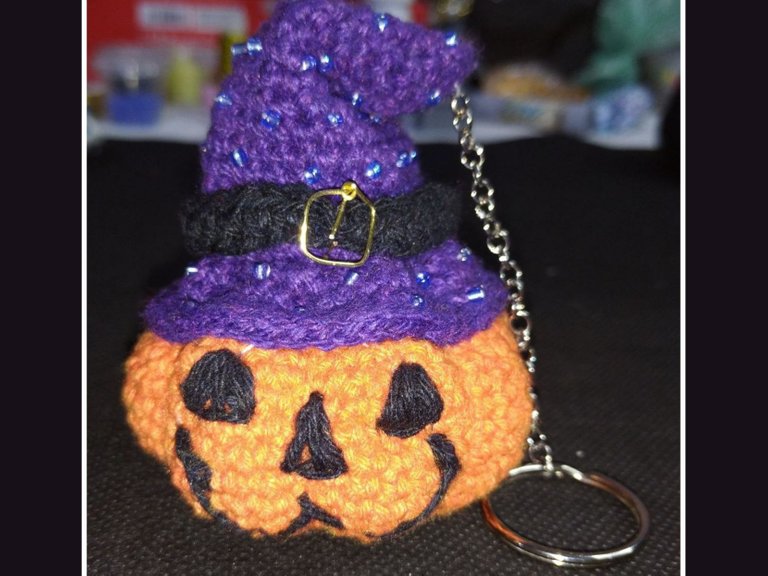
My husband works in these places entertaining these celebrations and he asked me to make him an amigurumi to exhibit it this weekend in his workplace. So I made him a pumpkin witch that will serve as a keychain and he can place it on his equipment while he works and in this way it does not clash with the parties. I would have liked to make it bigger but he asked me a little late and I didn't have enough threads to do it.
These projects represent a commitment to myself because amigurumis require a lot of patience and delicacy to make the small and narrow parts of the fabric. Until we begin to make one of these pieces, we do not understand the degree of difficulty they require. While I knit, I think of @creacioneslelys and @irenenavarroart and every day I admire their work and the care they put into each of their creations. I am still in that learning stage and sometimes it frustrates me to have to knit and unknit because I skip a stitch and I realize it at the end of the round, or the thread gets tangled, and many things that make me give up continuing, but I am persevering and every thing that I propose to do I do it even if it costs me and it fills me with satisfaction when I see it finished.
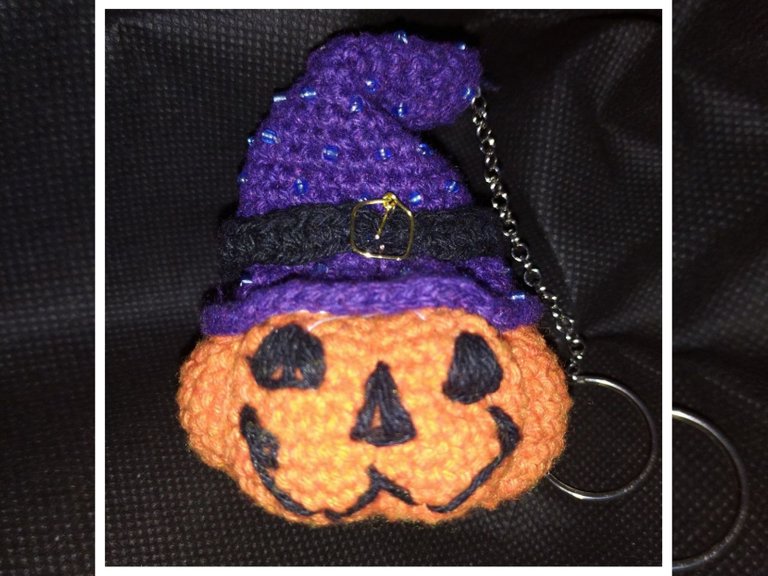
This zucchini measures approximately 12 cm and as small as it is, it took me 4 days to finish it. That little witch hat complicated my existence, it made my head, hands, neck ache, but I didn't give up and although I know it wasn't perfect, I finished it and gave it to my husband so he can wear it tomorrow and all the weekend in their presentations. Something good must come out of there, right? Well, enough talk. Now I explain to you how I did it.
BIENVENIDOS A MI BLOG
Holaaaaa, holaaaaa. Cómo les va? Ya celebrando Halloween? Estas festividades se celebra en grande en muchos países. Como ya se han podido enterar, en Venezuela esta es una celebración adquirida recientemente y se realiza en pocos lugares del sector privado, es decir, no forma parte de las celebraciones patrias pero gran parte del país lo celebran en sus hogares, en lugares privados como discotecas, tascas, restaurantes y es de gran importancia para el sector comercial porque son muchos los insumos que se pueden comprar para las decoraciones de dichos lugares y muchas personas se disfrazan para visitar estos sitios. Estas celebraciones guardan estrecha relación con la que sí es festivo patrio en nuestro país, el día de los muertos, que se celebra el 1º de noviembre de cada año.
Mi esposo trabaja en estos lugares amenizando estas celebraciones y me pidió que le realizara un amigurumi para exhibirlo este fin de semana en u sitio de trabajo. Así que le realicé una bruja calabaza que le servirá de llavero y podrá colocarlo sobre sus equipos mientras trabaja y de esta forma no desentona con las fiestas. Me hubiera gustado hacerlo más grande pero me lo pidió un poco tarde y no contaba con la cantidad suficiente de hilos para hacerlo.
Estos proyectos representan un compromiso conmigo misma porque los amigurumis requieren mucha paciencia y delicadeza para realizar las partes pequeñas y angostas del tejido. Hasta que no comenzamos a realizar una pieza de éstas no comprendemos el grado de dificultad que requieren. Mientras tejo, pienso en @creacioneslelys y @irenenavarroart y cada día más admiro sus trabajos y el esmero que ponen en cada una de sus creaciones. Todavía estoy en esa etapa de aprendizaje y a veces me frustra tener que tejer y destejer porque me salto algún punto y me doy cuenta ya al finalizar la vuelta, o se me enreda el hilo, y muchas cosas que hacen que desiste de continuar, pero soy perseverante y cada cosa que me propongo a hacer la hago así me cueste y me llena de satisfacción cuando lo veo terminado.
Esta calabacita mide 12 cm aproximadamente y así de pequeña como es me quitó 4 días terminarla. Ese sombrerito de bruja me complicó la existencia, me hizo doler la cabeza, las manos, la cervical, pero no me rendí y aunque se que no quedó perfecta, la terminé y se la dí a mi esposo para que la luzca mañana y todo el fin de semana en sus presentaciones. Algo bueno debe salir de allí, verdad? Bueno, basta de cháchara. Ahora les explico, cómo la hice.
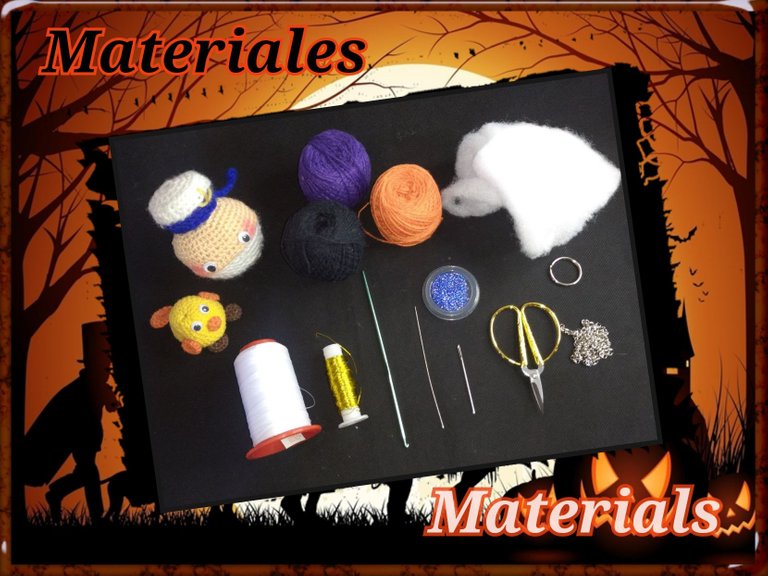
MATERIALS
- Cotton threads (wick) orange, purple and black colors
- Crochet hook #2.5
- Wool needle
- Synthetic padding or wadding
- Keychain ring
- String
- purple mustard
- Mostacilla needle
- White upholstery thread
- Scissors
- Golden thread
- Gold pipe cleaner
MATERIALES
- Hilos de algodón (pabilo) colores naranja, morado y negro
- Aguja de crochet #2,5
- Aguja lanera
- Relleno sintético o guata
- Aro de llavero
- Cadena
- Mostacilla morada
- Aguja para mostacilla
- Hilo blanco de tapicería
- Tijera
- Hilo dorado
- Limpia pipa dorado
STEP BY STEP
HOW TO MAKE THE PUMPKIN
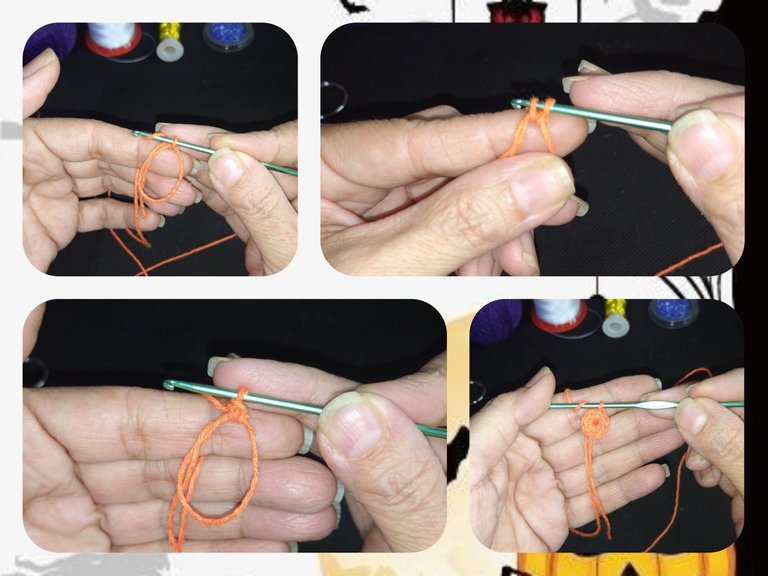
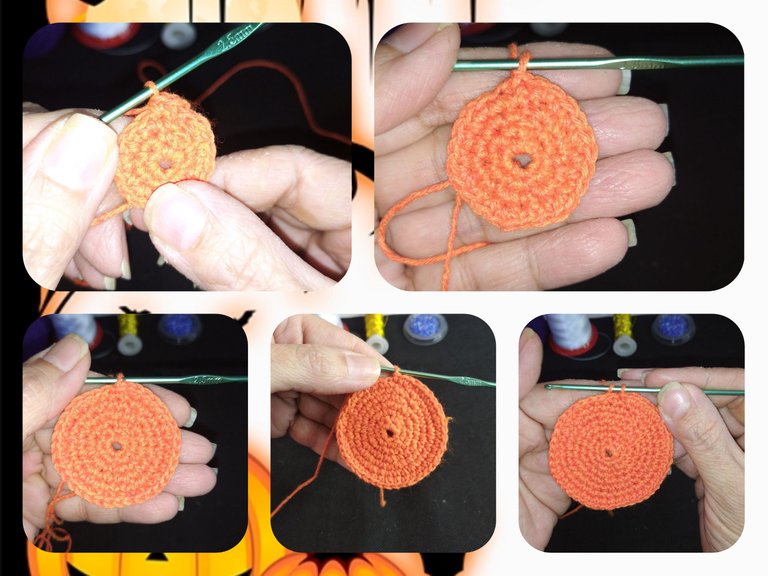
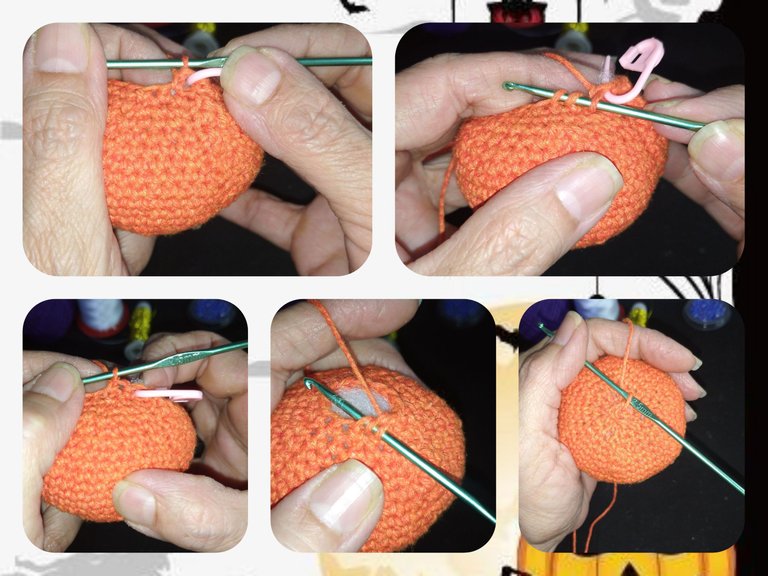
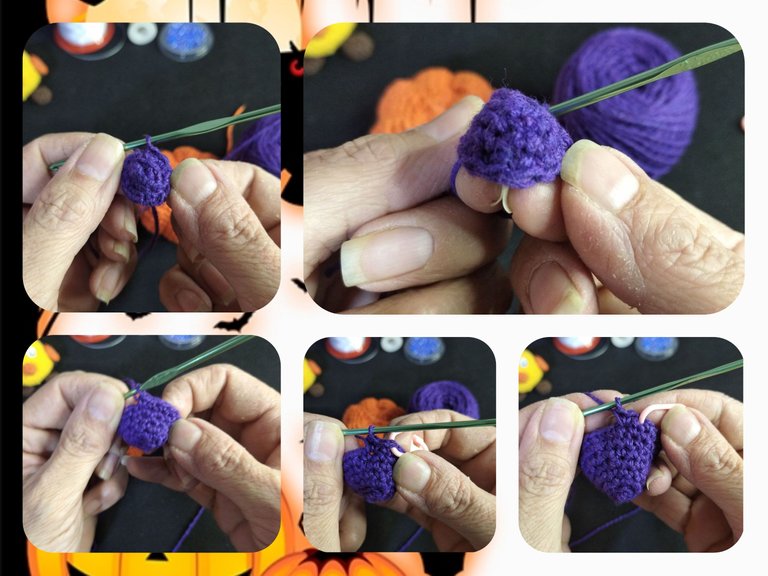
- FIRST ROUND: We start by making a magic ring in which we will crochet 6 single crochets and when we finish the stitches we pull the thread to close the round with a slip stitch.
PASO A PASO
CÓMO HACER LA CALABAZA
- PRIMERA VUELTA: Comenzamos realizando un anillo mágico en el que tejeremos 6 puntos bajos y al terminar los puntos halamos el hilo para cerrar la vuelta con un punto deslizado.
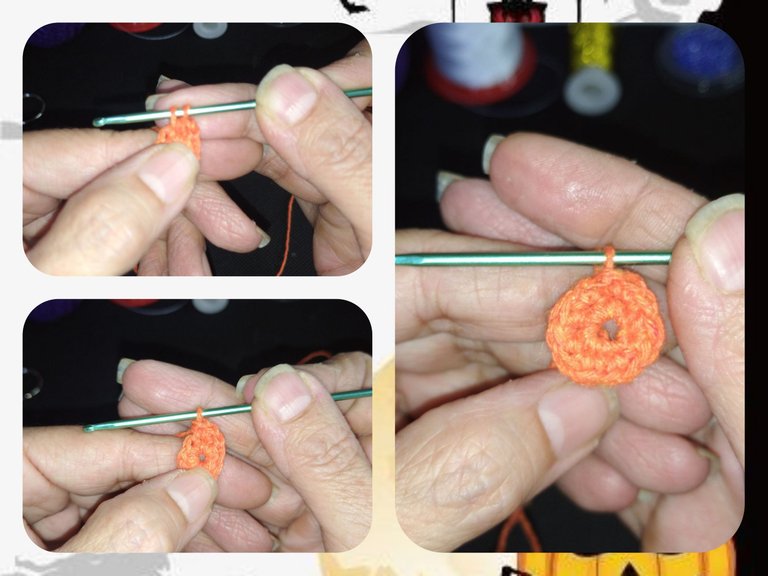
- SECOND ROUND: We make an increase in each stitch of the previous round to get 12 stitches.
- SEGUNDA VUELTA: Realizamos un aumento en cada punto de la vuelta anterior para conseguir 12 puntos.
- THIRD ROUND: We make a single crochet in the first point and in the next we make an increase and so on until the end of the round to have 18 single crochet.
- TERCERA VUELTA: Hacemos un punto bajo en el primer punto y en el siguiente realizamos un aumento y así sucesivamente hasta terminar la vuelta para tener 18 puntos bajos.

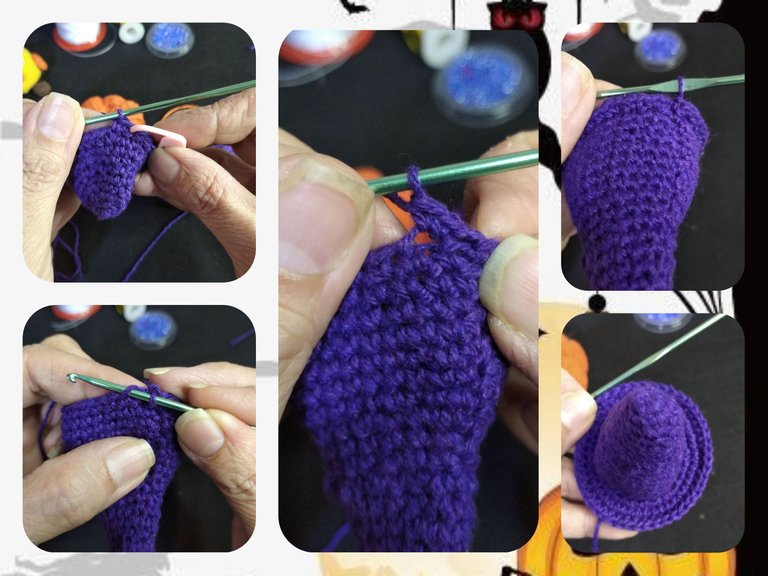
FROM THE FOURTH ROUND TO THE NINTH ROUND: We will make single crochet and increases progressively until the end of each of the rounds, that is, we will increase the beginning of each round with an additional single crochet accompanied by an increase.
4th round: two single crochet and an increase.
5th round: three single crochet and an increase.
Round 6: four single crochet and one increase.
Round 7: five single crochet and one increase.
Round 8: six single crochet and one increase.
DESDE LA CUARTA VUELTA A LA NOVENA VUELTA: Realizaremos puntos bajos y aumentos progresivamente hasta terminar cada una de las vueltas, es decir, iremos aumentado el inicio de cada vuelta con un punto bajo adicional acompañado de un aumento.
4ta vuelta: dos puntos bajos y un aumento.
5ta vuelta: tres puntos bajos y un aumento.
6ta vuelta: cuatro puntos bajos y un aumento.
7ta vuelta: cinco puntos bajos y un aumento.
8ta vuelta: seis puntos bajos y un aumento.
From round 9 to round 14, we will make a single crochet in each stitch of the previous round. In each of these rounds we must have 48 single crochet.
Desde la vuelta 9 hasta la vuelta 14, haremos un punto bajo en cada punto de la vuelta anterior. en cada una de estas vueltas debemos tener 48 puntos bajos.
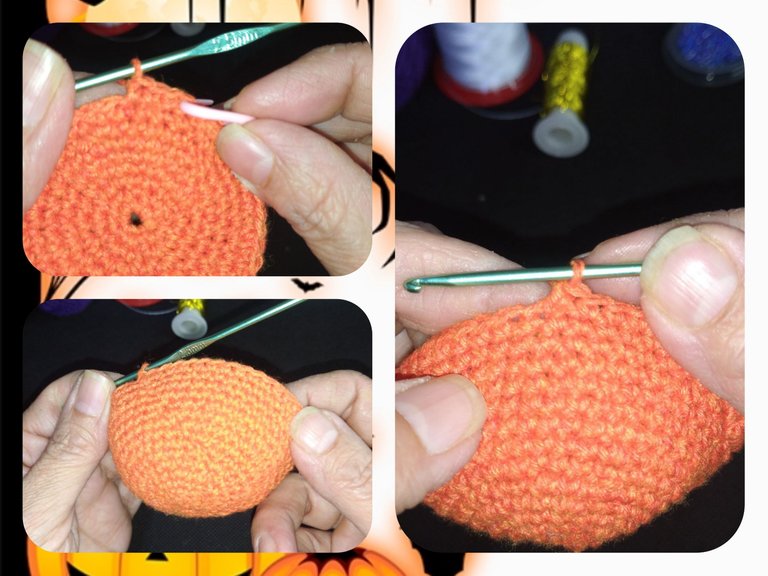
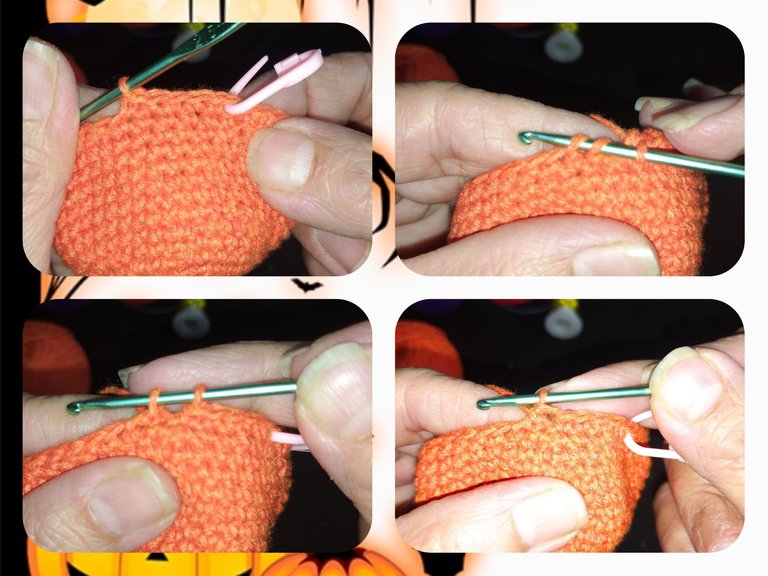
Already up to round 14 we have achieved the opening and height necessary to form the pumpkin. Then we will close until the ball is complete and then fill it and shape it into a pumpkin. Now we will do it in the opposite way and instead of increasing we will make reductions. From round 15 to round 21, which we will finish with a slip stitch.
Round 15: six single crochet and one reduction.
Round 16: five single crochet and one reduction.
Round 17: four single crochet and one reduction.
Round 18: three single crochet and one reduction.
Round 19: two single crochet and one reduction.
Round 20: a single crochet and a reduction.
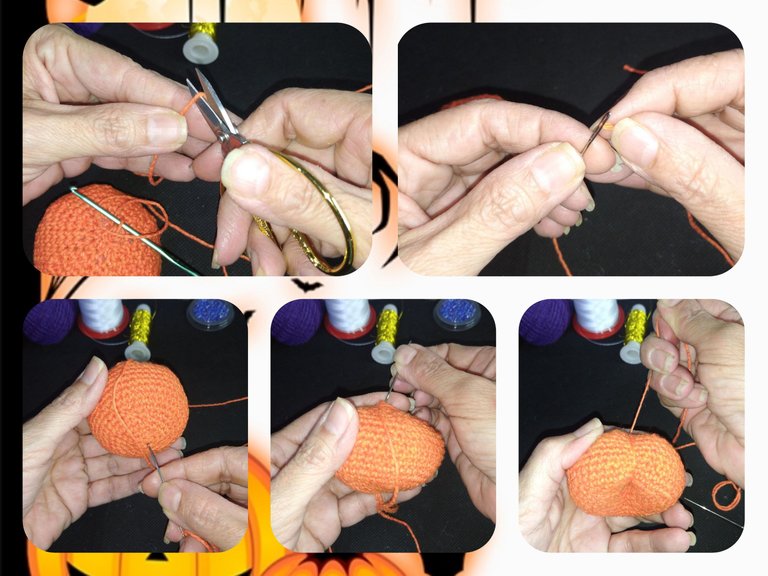
Round 21: we make six reductions and close with a slip stitch, pull the thread and cut leaving 15 cm to give it a pumpkin shape.
Ya hasta la vuelta 14 hemos conseguido la abertura y altura necesaria para formar la calabaza. A continuación iremos cerrando hasta completar la bolita para luego rellenar y darle forma de calabaza. Ahora lo haremos de forma contraria y en vez de aumento haremos reducciones. Desde la vuelta 15 hasta la vuelta 21, que la terminaremos con un punto deslizado.
Vuelta 15: seis puntos bajos y una reducción.
Vuelta 16: cinco puntos bajos y una reducción.
Vuelta 17: cuatro puntos bajos y una reducción.
Vuelta 18: tres puntos bajos y una reducción.
Vuelta 19: dos puntos bajos y una reducción. En esta vuelta realizaremos el relleno para facilitar la labor, luego continuamos cerrando.
Vuelta 20: un punto bajo y una reducción.
Vuelta 21: realizamos seis reducciones y cerramos con un punto deslizado, halamos el hilo y cortamos dejando 15 cm para darle forma de calabaza.
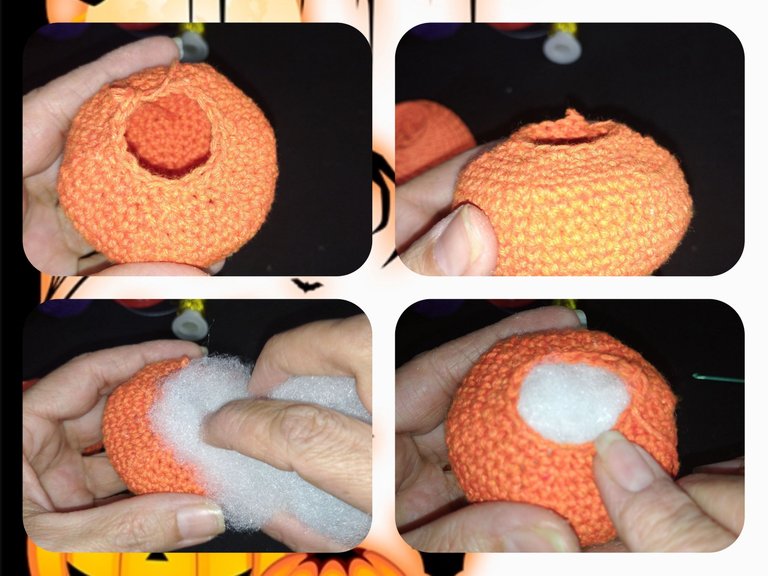
We take the thread we left and thread the wool needle. We introduce it through the center of the opposite part of the ball and pull until we form a division, then we do the same way on the opposite side and so on until we form the divisions that we want.
Tomamos la hebra que dejamos y enhebramos la aguja lanera. La introducimos por el centro de la parte contraria de la bola y halamos hasta formar una división, luego hacemos de igual manera en el lado contrario y así hasta formar las divisiones que queramos.
HOW TO MAKE THE HAT
Like the pumpkin, we start with a magic ring and five single crochets, pull the yarn through and close with a slip stitch.
CÓMO HACER EL SOMBRERO
Al igual que la calabaza, comenzamos con un anillo mágico y cinco puntos bajos, halamos el hilo y cerramos con un punto deslizado.
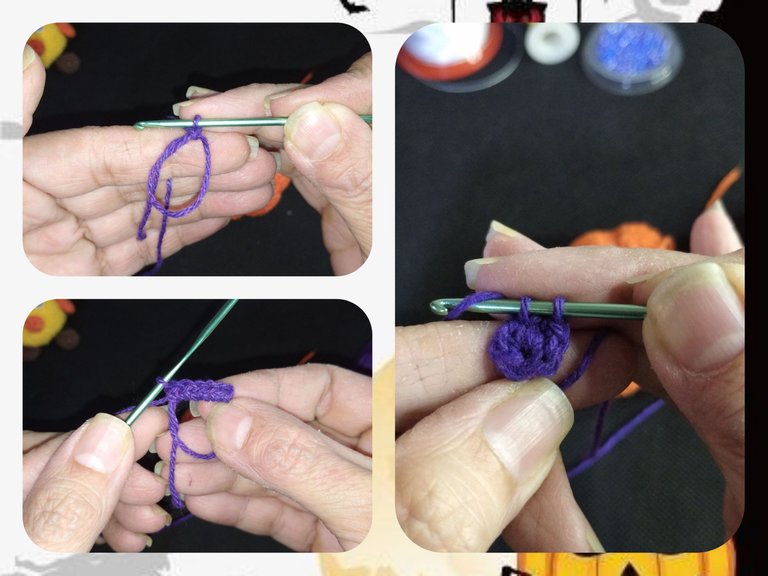
On the second round we make a single crochet in each previous stitch.
On the third round we will increase each stitch to get 10 single crochet.
On the fourth and fifth round we make a single crochet in each stitch.
On round six we make two stitches and an increase to get 13 stitches.
On round seven we make a single crochet in each of the previous round.
En la segunda vuelta realizamos un punto bajo en cada punto anterior.
En la tercera vuelta realizaremos un aumento en cada punto para obtener 10 puntos bajos.
En la cuarta y quinta vuelta realizamos un punto bajo en cada punto.
En la vuelta seis realizamos dos puntos y un aumento para obtener 13 puntos.
En la vuelta siete realizamos un punto bajo en cada uno de la vuelta anterior.
En la vuelta ocho realizamos un punto y un aumento para 19 puntos.
En la vuelta nueve y diez realizamos un punto en cada vuelta.
En la vuelta once repetimos la vuelta 8, un punto y un aumento.
Desde la vuelta 12 hasta la vuelta 18 hacemos realizamos un punto bajo en cada punto anterior.
En la vuelta 19 realizaremos un punto y un aumento, pero realizaremos el aumento tomando una sola hebra, la del lado afuera, esto se realiza para que el tejido forme el doblez del sombrero.
En la vuelta 20 y 21 realizamos un punto bajo en cada punto de la vuelta anterior.
En la vuelta 22 realizamos puntos deslizados sobre los puntos de la vuelta anterior, cerramos y cortamos el hilo.
On round eight we make a stitch and an increase for 19 stitches.
On round nine and ten we make a stitch on each round.
On round eleven we repeat round 8, one stitch and one increase.
From round 12 to round 18 we make a single crochet in each previous stitch.
On round 19 we will make a stitch and an increase, but we will make the increase taking a single strand, the one on the outside, this is done so that the fabric forms the fold of the hat.
On round 20 and 21 we make a single crochet in each stitch of the previous round.
On round 22 we make slip stitches over the stitches from the previous round, we close and cut the thread.
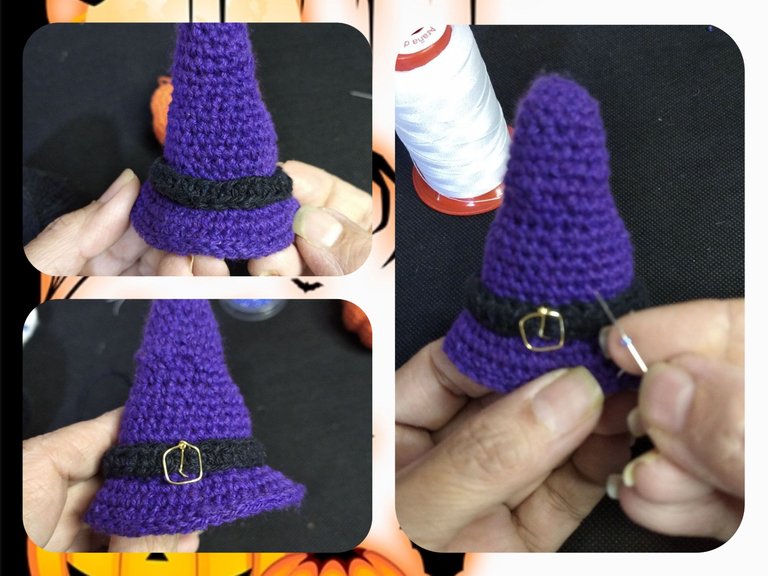
Now we make the belt that the hat wears. We make as many chains to measure with the hat and close in circumference. I crocheted 30 chains then closed with a slip stitch. On the next round I made a single crochet in each stitch of the chain. We close with a slip stitch and cut the thread.
Ahora realizamos el cinturón que lleva el sombrero. Realizamos tantas cadenas hasta medir con el sombrero y cierre en circunferencia. Yo tejí 30 cadenas luego cerré con un punto deslizado. En la siguiente vuelta realicé un punto bajo en cada punto de la cadena. Cerramos con un punto deslizado y cortamos el hilo.

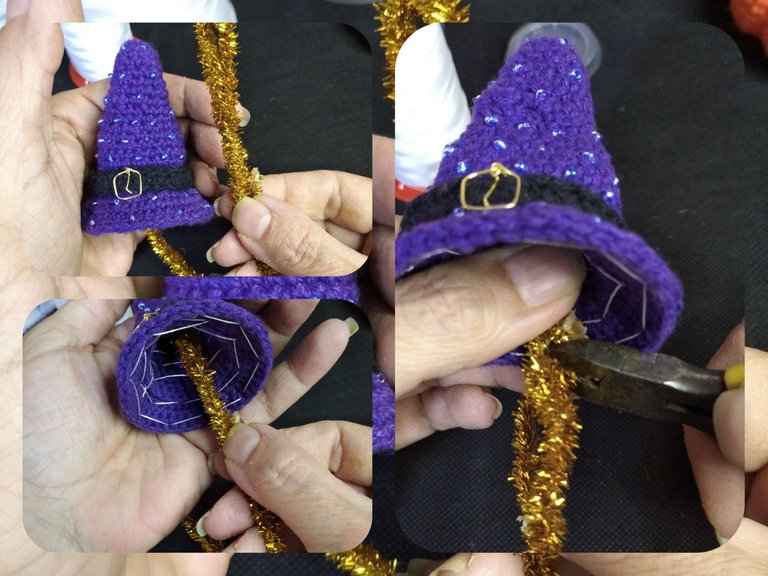
We decorate the hat with the purple beads and on the turns we fix the hat with small stitches. I made the belt buckle with jewelry wire.
Decoramos el sombrero con las mostacillas moradas y en las vueltas fijamos el sombrero con pequeñas puntadas. La hebilla del cinturón la realicé con alambre de bisutería.
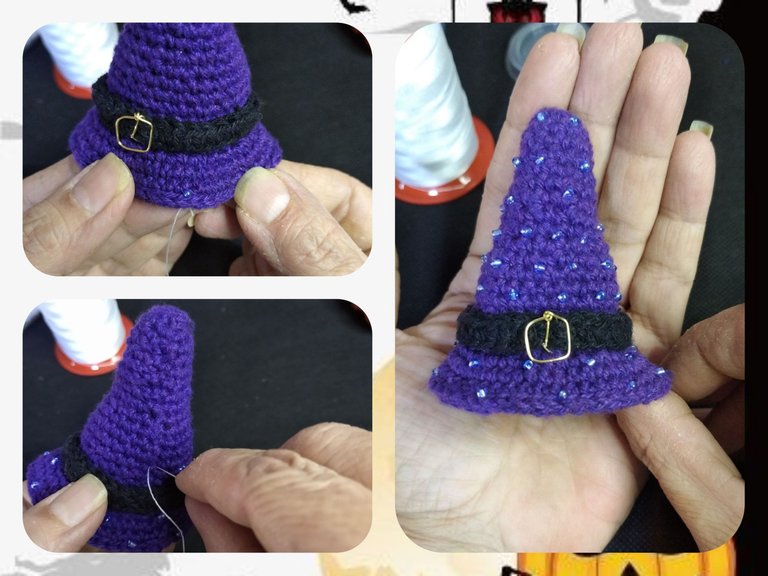
If we want to fold the hat, we use pipe cleaners. We take the necessary measure with the double pipe cleaner and cut the excess. We fix it with silicone inside the hat and mold to taste.
Si queremos realizar el doblez al sombrero, utilizamos limpia pipas. Tomamos la medida necesaria con el limpia pipas doble y cortamos el sobrante. Lo fijamos con silicón por dentro del sombrero y moldeamos al gusto.
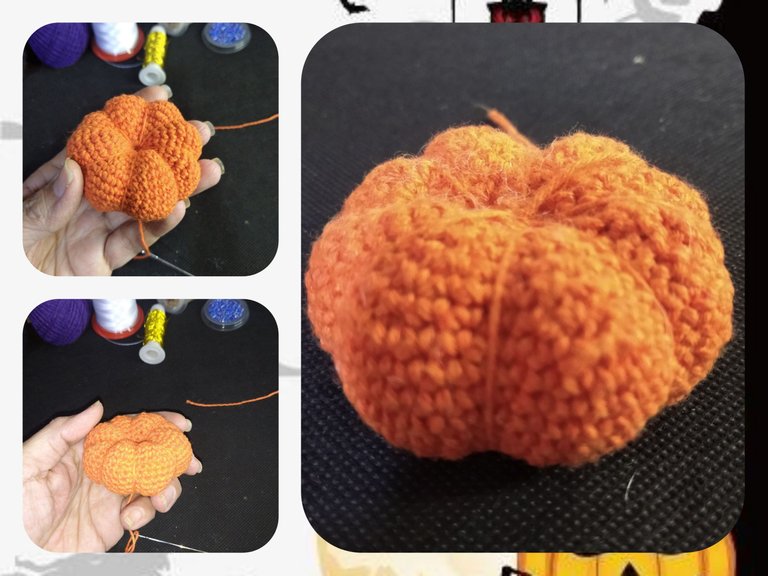
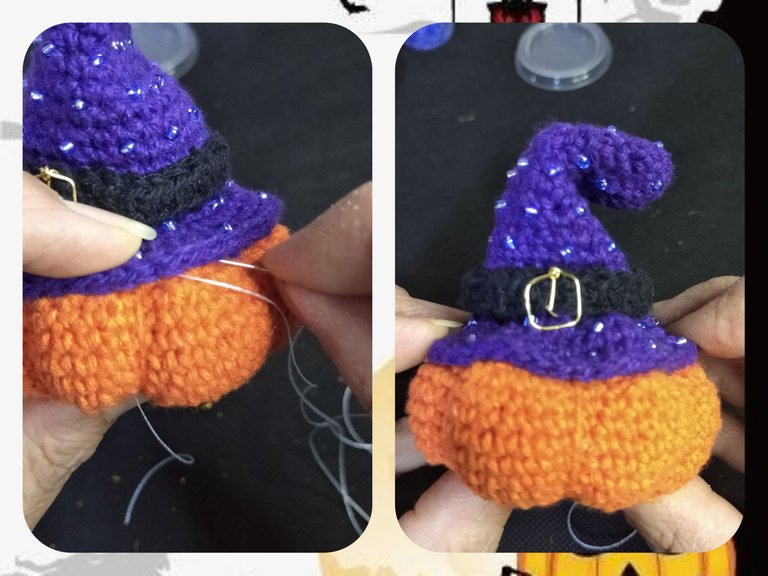
We join the pumpkin and the hat making small stitches so that it is not noticeable.
Unimos la calabaza y el sombrero realizando puntadas pequeñas para que no se note.
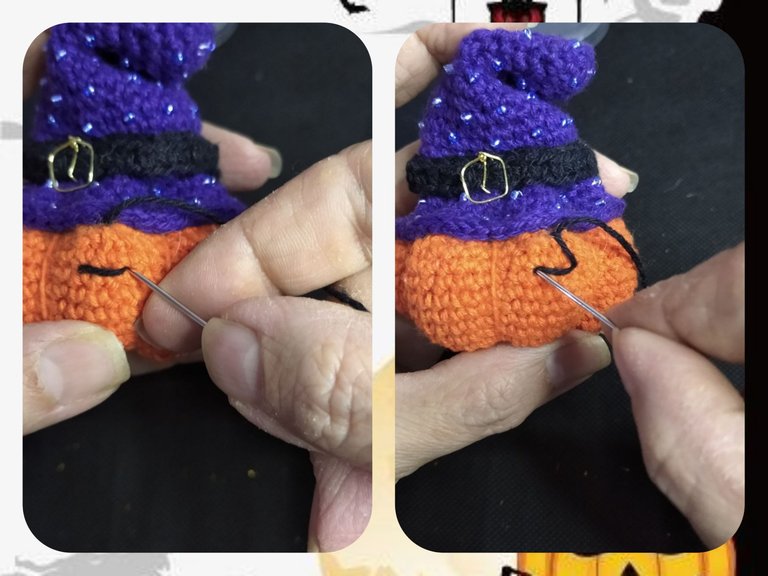
Now we embroider the face of the pumpkin with the black thread.
Ahora bordamos la cara de la calabaza con el hilo negro.
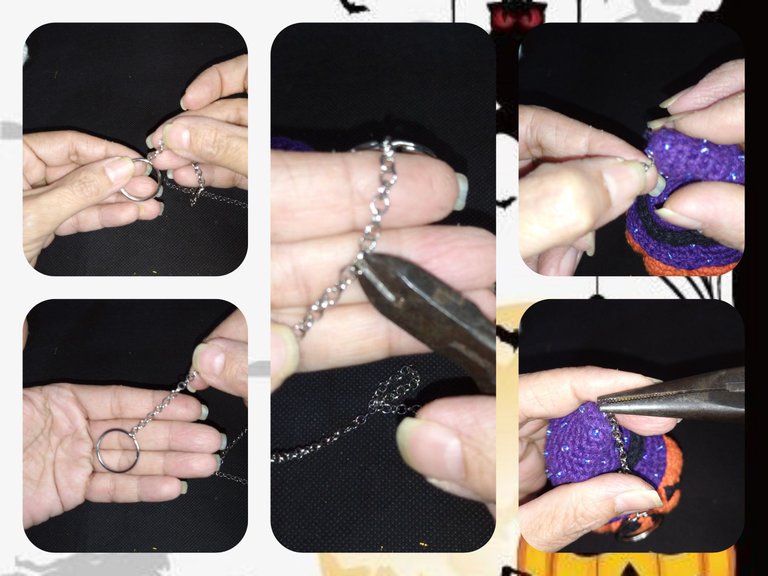
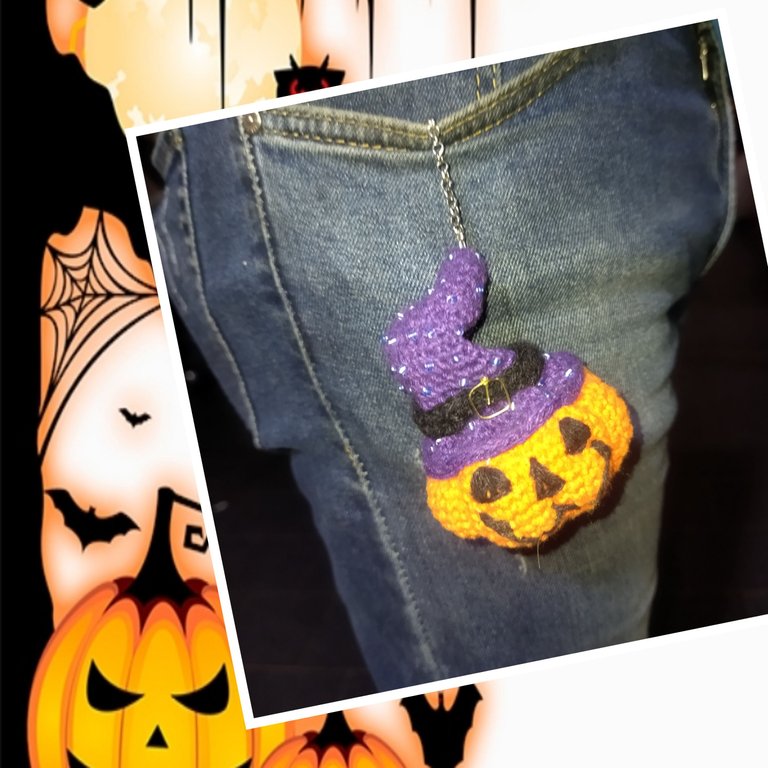
And finally, we put the ring and the chain to form this cute Halloween keychain.
Y por último, colocamos el aro y la cadena para así formar este lindo llavero de Halloween.
FINISHED PROJECT
I hope this keychain is the sensation of my husband's weekend and that for once in his life the keys make it back home hahahaha. The truth, true, is that he is Mr. Clueless and more than for decoration, I beg him to be of great help, although thinking about it, it may even be a bad idea for him to put the keys because the pumpkin turned out so pretty and attracts so much attention that it might stop at another place. It's not okay, seriously speaking, I hope he fulfills his mission all weekend. It was a pleasure to show this step by step. See you next time.
PROYECTO FINALIZADO
Espero que este llavero sea la sensación del fin de semana de mi esposo y que por una vez en su vida las llaves logren regresar a casa jajajaja. La verdad, verdadera es que él es el Sr. Despistado y más que de adorno ruego que sea de gran ayuda, aunque pensándolo bien hasta será mala idea que coloque las llaves porque quedó tan bonita la calabaza y llama tanto la atención que quizás pare en otro lugar. No vale, ya hablando en serio, espero que cumpla su cometido todo el fin de semana. Fue un placer mostrar este paso a paso. Nos vemos en la próxima.
Portando su llavero
Hola 🙋 Tu esposo será el atractivo de la fiesta porque todos tendrán que ver con su llavero. Te quedó muy lindo. Me encantó el detalle de las mostacillas en el sombrero de brujas.
La explicación del proceso también lo hiciste muy bien. Aprender a tejer es cuestión de constancia, seguir insistiendo hasta estar cómodas con lo que hacemos. Pronto lograrás alcanzar el nivel de concentración que necesitas para que no destejas, ya lo verás.
Que precioso te quedó gracias por compartir 😻
Ay que precioso proyecto, espero a tu esposo le traiga buena suerte la compañía de la brujita calabaza, te quedo muy bonita, la puntada se ve cerradita y eso es lo más importante en todo amigurumi. Te deseo muchos éxitos 🤗