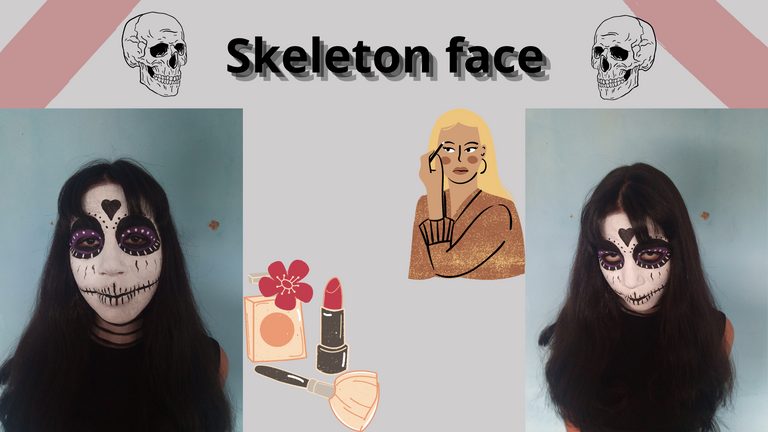
Skeleton make-up with cold paints / (ENG/ESP)

Sean todos bienvenidos a mi publicación.
Presento ante esta comunidad artística, mi nombre es Laura, el día de hoy les presento el primer maquillaje en un rostro que hice hace algunos días, no ha sido fácil, ya que necesité la ayuda de mi hija María Celeste para poderla maquillar como ella quiere.
A ella le gusta mucho la cultura oscura, por lo que quería que le hiciera un maquillaje de estos, por lo que desate mi creatividad según a los criterios de ella, los materiales que use para hacer este trabajo no son tóxicos para la cara, por lo que solamente son pinturas al frío no tóxicas, por lo que hay que tener mucho cuidado a la hora de hacer este arte en el rostro de una persona.
Las fotografías que verán a continuación, fueron tomadas con mi teléfono modelo Alcatel_5044R.
A continuación, les presentaré el proceso de elaboración que implemente para realizar este dibujo.

Welcome to my publication.
I introduce myself to this artistic community, my name is Laura, today I present to you the first makeup on a face that I did a few days ago, it has not been easy, since I needed the help of my daughter Maria Celeste to be able to make her makeup as she wants.
She really likes the dark culture, so she wanted me to do a makeup of these, so I unleashed my creativity according to her criteria, the materials I used to do this work are not toxic to the face, so they are only non-toxic cold paints, so you have to be very careful when doing this art in the face of a person.
The pictures you will see below, were taken with my phone model Alcatel_5044R.
Next, I will show you the elaboration process that I implemented to make this drawing.


Paso 1
El cabello de mi hija es muy largo, por lo que recurrí a amarrarle el cabello con un paño largo para que me ayudara a sostenerle hasta el flequillo.
Ahora bien, antes de hacer este maquillaje, es importante que el rostro esté bien limpio sin ningún tipo de grasa corporal de la piel, por lo que es bueno lavarse el rostro con jabón azul de panela para eliminar todo tipo de grasa que el rostro de la persona pueda tener.
Los ojos de mi hija son un poco cerrados, por lo que he tenido que decir que abriera bien los ojos para poderle tomar la foto y se pudiera apreciar mucho mejor cada uno de los pasos de este maquillaje.
Step 1
My daughter's hair is very long, so I resorted to tying her hair up with a long cloth to help me hold it up to her bangs.
Now before doing this makeup, it is important that the face is well cleaned without any body oil from the skin, so it is good to wash the face with blue panela soap to remove any oil that the person's face may have.
My daughter's eyes are a little closed, so I had to tell her to open her eyes wide to be able to take the picture and to be able to appreciate each of the steps of this make-up much better.
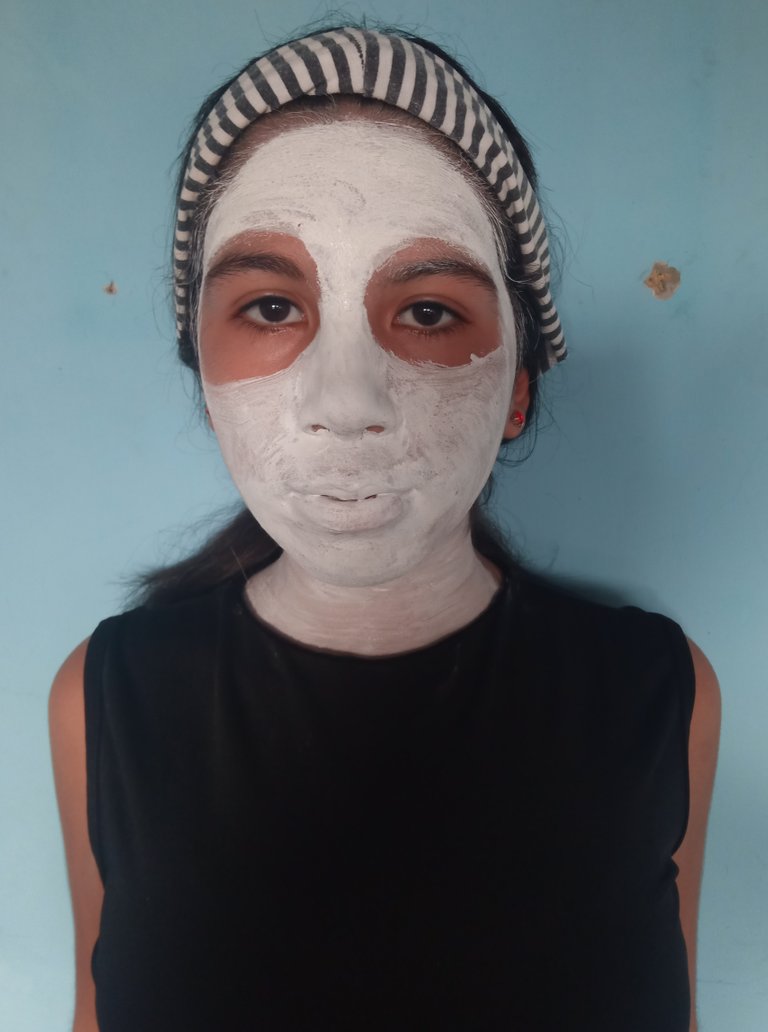
PASO 2
El estilo de maquillaje será del tipo noche de brujas, por lo que el rostro es de una calavera maquillada (todo el maquillaje fue sacado de mi mente y el de mi hija), Con la ayuda de pintura al frío de color blanco, comencé a pintarle todo el rostro de mi hija con una brocha para rostro que ya no estaba utilizando.
Esta brocha para rostros suele utilizarse para esparcir polvo de rubor en el maquillaje de la mujer, por supuesto esto daña la brocha, pero como ya no lo necesitaba porque tenía otro use este, porque un pincel me tomaría mucho tiempo, también le cubrí todo el rostro hasta el cuello
STEP 2
The make up style will be of the witches night type, so the face is of a made up skull (all the make up was taken from my mind and my daughter's), With the help of white colored cold paint, I started to paint all my daughter's face with a face brush that I was not using anymore.
This face brush is usually used to spread blush powder on a woman's makeup, of course this damages the brush, but since I didn't need it anymore because I had another one I used this one, because a brush would take too much time, I also covered all her face up to her neck.
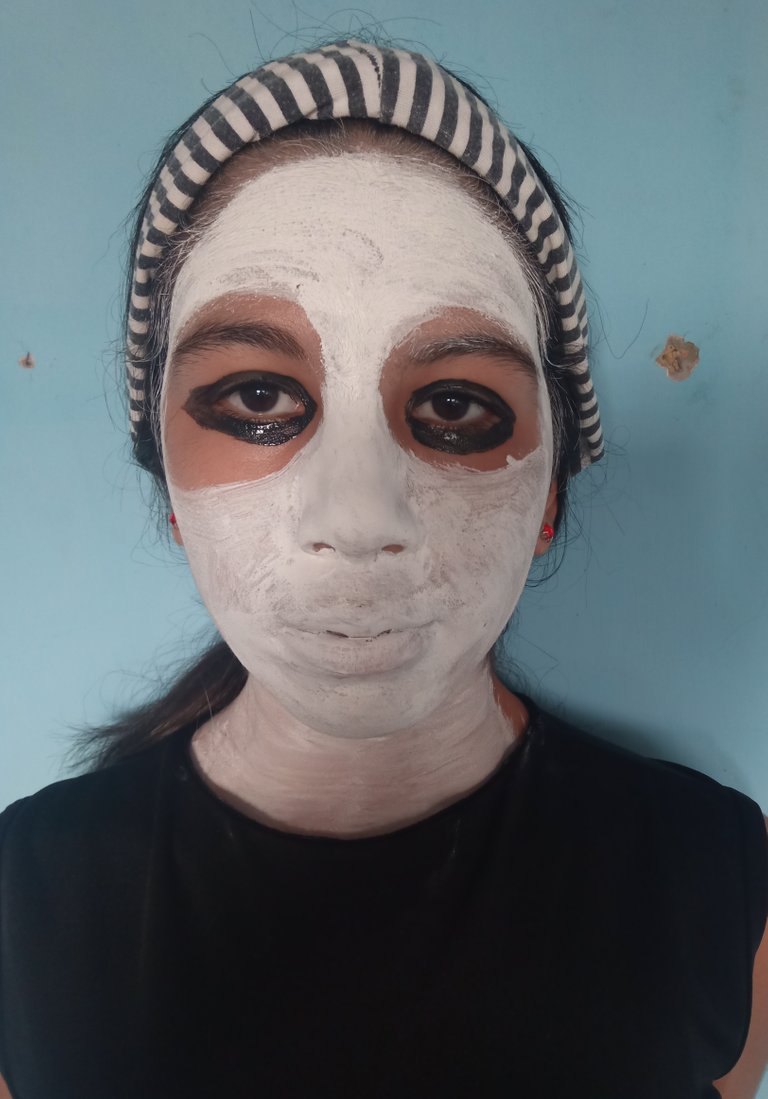
PASO 3
Para sombrear los ojos, use la pintura al frío de color negro con la ayuda de un pincel, esta parte es muy delicada, ya que la pintura puede caer dentro del ojo, por supuesto la pintura no es toxica, pero es mejor tener mucho cuidado con cada una de estas partes.
Él pince que utilice es uno con la punta fina, así para no abarcar tanto espacio, en todos y cada uno de los pasos que vayamos a hacer para maquillar un rostro, es que la persona que se esté maquillando no debe tener ningún tipo de efecto de estado de humor en el rostro, no puede reiré ni mucho menos hablar, ya que esto creara grietas en la pintura cuando esté seca, de lo contrario debemos de agregar otra capa de pintura en el rostro para tapar las grietas que se ocasionaron, y no específicamente en las grietas, sino en todo el rostro, de lo contrario se observaran partes más oscuras que otras.
Se los digo por experiencia propia, a mi hija le causo un poco de riza cuando la estaba maquillando, por lo que he tenido que pintarle todo el rostro por segunda vez.
STEP 3
To shade the eyes, use the cold black paint with the help of a brush, this part is very delicate, because the paint can fall into the eye, of course the paint is not toxic, but it is better to be very careful with each of these parts.
The brush that I use is one with a fine tip, so as not to cover so much space, in each and every one of the steps that we are going to do to make up a face, is that the person who is making up should not have any kind of mood effect on the face, can not laugh much less talk, otherwise we must add another layer of paint on the face to cover the cracks that were caused, and not specifically in the cracks, but throughout the face, otherwise parts will be observed darker than others.
I tell you from my own experience, my daughter got a little curly when I was applying her make-up, so I had to paint her face a second time.
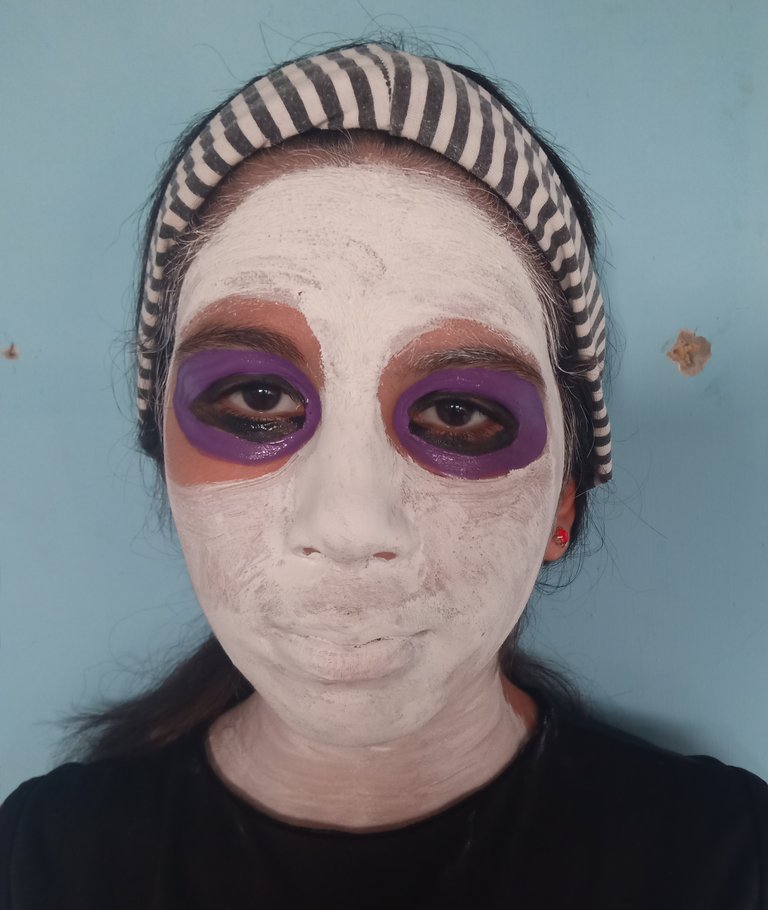
PASO 4
Más adelante, por los alrededores de los ojos, use una pintura al frío de color morado, esto es para darle un efecto lindo a los ojos y sea un poco más llamativo, en ocasiones suele pasar que tanto los dibujos como maquillaje no sean llamativos, por lo que es importante que, entre tantos colores, haya uno que logre captar la atención del que esté viendo las fotografías e imágenes.
Porque para hacerla más llamativa, usé el color morado en esta ocasión, en esta parte tuve que tener bastante pulso para no pintar las otras zonas que anteriormente había pintado.
Para ser honesta hay que tener mucho pulso, como fue la primera vez que hago este maquillaje en un rostro me costó mucho, pero poco a poco iré perfeccionando mi técnica para pintar un rostro, la verdad no me lo hice a mi misma porque es muy complicado, por lo que le pedí a mi hija que me ayudara.
STEP 4
Further on, around the eyes, I used a purple cold paint, this is to give a nice effect to the eyes and be a little more striking, sometimes it happens that both the drawings and makeup are not striking, so it is important that, among so many colors, there is one that manages to capture the attention of those who are viewing the photographs and images.
Because to make it more striking, I used the color purple on this occasion, in this part I had to have enough pulse not to paint the other areas that I had previously painted.
To be honest you have to have a lot of pulse, as it was the first time I do this makeup on a face it cost me a lot, but little by little I will be perfecting my technique to paint a face, the truth is I did not do it myself because it is very complicated, so I asked my daughter to help me.

PASO 5
Luego comencé a pintar por los alrededores de la zona donde había pintado de color morado, una zona me quedo un poco más cerrada que la otra, pero eso es parte del maquillaje y de la posición que tenía mi hija.
STEP 5.
Then I started to paint around the area where I had painted the purple color, one area was a little more closed than the other, but that is part of the makeup and the position that my daughter had.
PASO 6
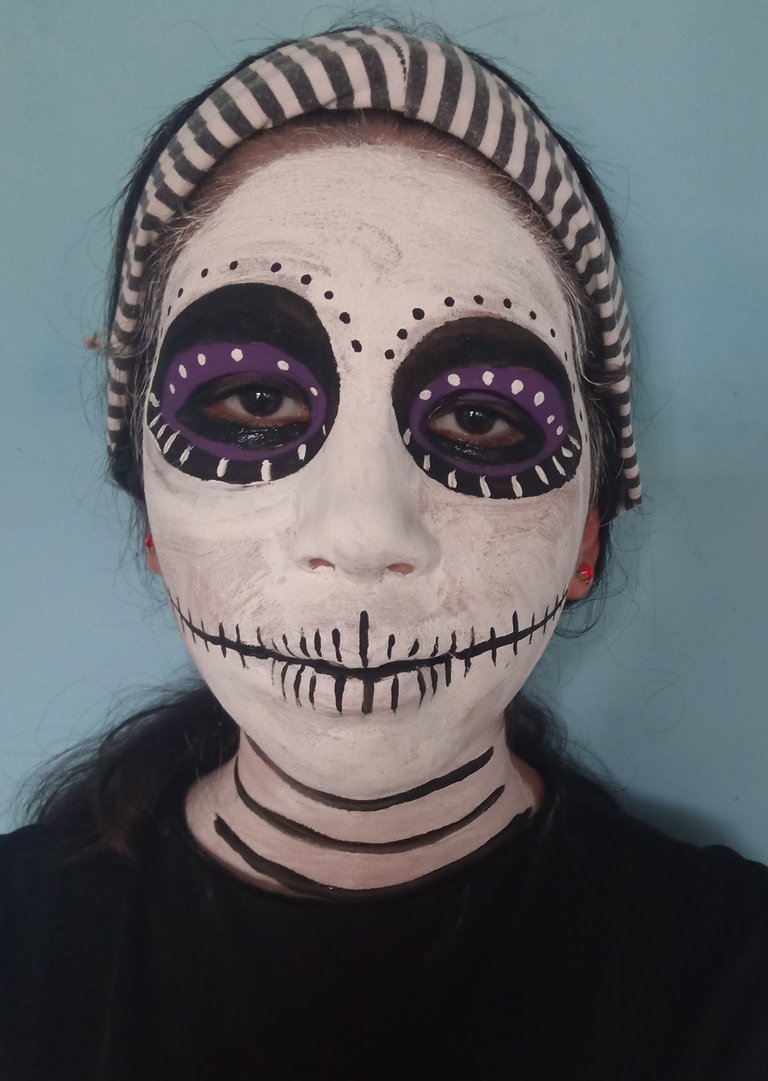
Después comencé a agregar algunos puntos de blanco por la zona de color morado, también agregué líneas de color blanco para las partes negras, puntos negros en la parte superior de las cejas y marcas de costura en la boca.
Desde la parte céntrica de los labios hasta la parte final de la mandíbula, trace una línea horizontal de color negro, luego trace líneas verticales a lo largo de la línea horizontal, esto crea un efecto de costura.
Seguidamente, trace líneas horizontales de color negro en el cuello, para simular un poco a un rostro esquelético.
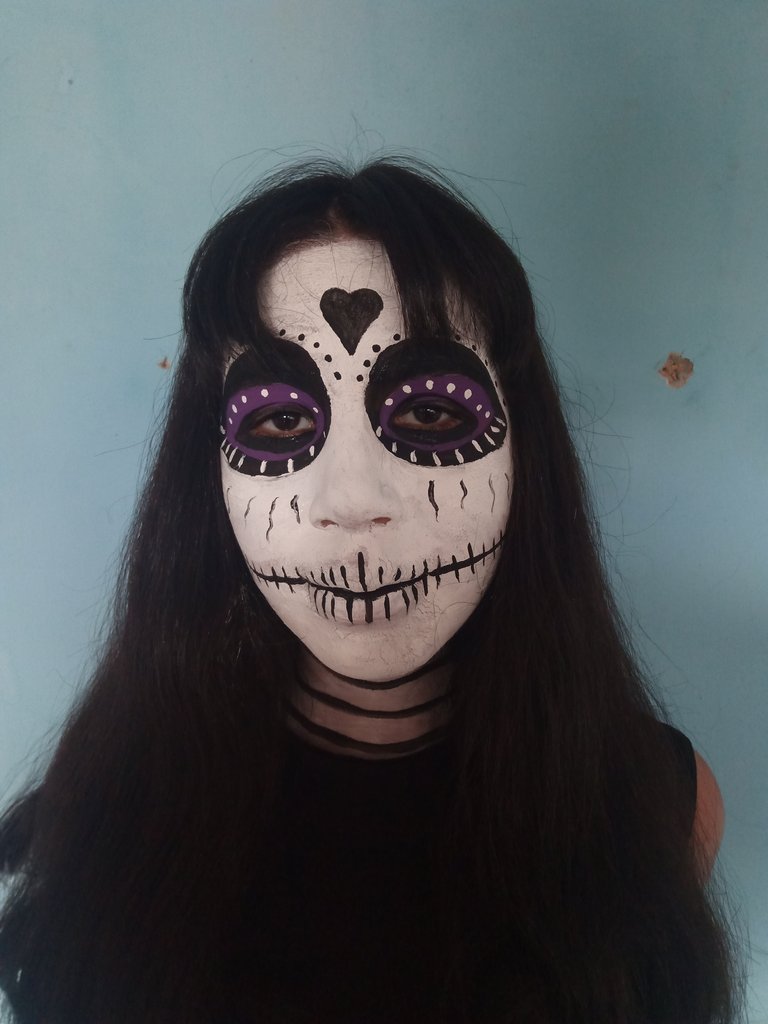
Luego del paso anterior, agregué algunas líneas onduladas debajo de los ojos, y por último en la frente hice un corazón, ya que a mi hija le encantan los corazones. Le solté el cabello para que así se pueda apreciar mejor la fotografía y el maquillaje con su hermoso y largo cabello, un poco gótico para ser honesta jajaja.
La verdad es que me encanto, para ser la primera vez siento que me quedo bien.
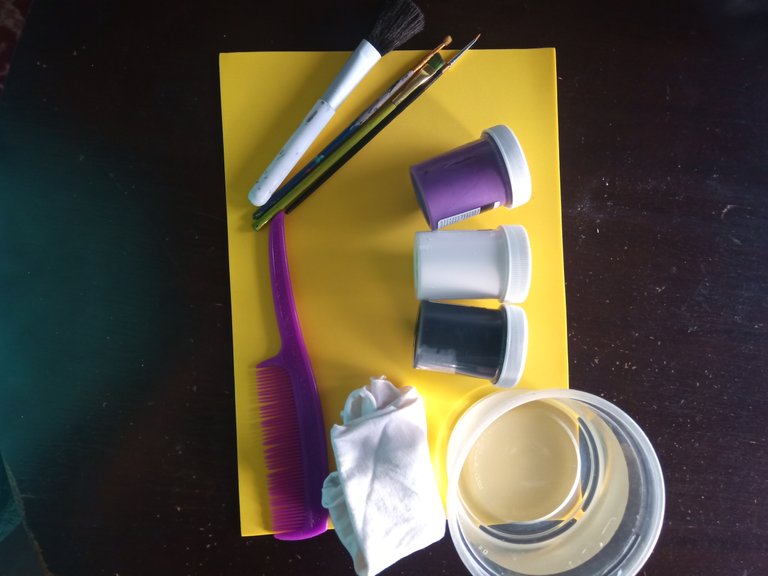
Los materiales que utilice para mi Títere son los siguientes.
Materiales:
Pinceles.
Brocha de maquillaje.
Pinturas al frío como negro, blanco y morado.
Peine para arreglar el cabello.
Pañuelo para limpiar la pintura.
Un pote con agua para limpiar los pinceles.
De esta manera concluyo la publicación de hoy amigos, espero que te haya gustado este maquillaje y disfrutes el momento realizando muchas cosas aplicando maquillaje en los rostros.
Nos veremos en otra publicación basada en el hermoso mundo del arte, manualidades y maquillaje.
STEP 6
Next I started to add some white dots along the purple area, I also added white lines for the black parts, black dots on the top of the eyebrows and stitch marks on the mouth.
From the central part of the lips to the end of the jaw, draw a horizontal black line, then draw vertical lines along the horizontal line, this creates a stitching effect.
Next, draw horizontal black lines on the neck, to simulate a bit of a skeletal face.
After the previous step, I added some wavy lines under the eyes, and finally on the forehead I made a heart, since my daughter loves hearts. I let her hair down so you can better appreciate the picture and the makeup with her beautiful long hair, a bit gothic to be honest hahaha.
The truth is that I loved it, for the first time I feel that it fit me well.
The materials I used for my Puppet are the following.
Materials:
Brushes.
Makeup brush.
Cold paints like black, white and purple.
Comb to fix the hair.
Handkerchief to clean the paint.
A pot with water to clean the brushes.
In this way I conclude today's publication friends, I hope you liked this makeup and enjoy the moment doing many things applying makeup on the faces.
See you in another publication based on the beautiful world of art, crafts and makeup.

social networks / redes sociales
![]()
![]()
Traductor Deepl
Translated Deepl
Ediciones Canva
Editions Canva

Your level lowered and you are now a Red Fish!
Check out the last post from @hivebuzz:
Support the HiveBuzz project. Vote for our proposal!