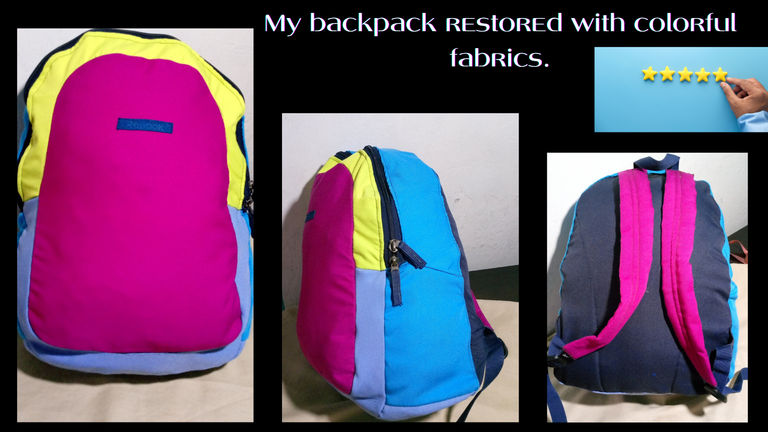
My backpack restored with colorful fabrics (ESP/ENG)

Hola mi gente linda, emprendedora, amante de los hilos, agujas y telas, todos artesanos unidos con el corazón para crear las más hermosas ideas que se nos ocurran cada día, así nos pasemos varios días realizando una, no nos detenemos hasta ver el resultado, y ese es mi caso el día de hoy.
Hoy vengo a compartir con todos ustedes, un morral que quise restaurar, ya que hace un tiempo no me he podido comprar un morral nuevo, este es el de uso diario, y ya se estaba viendo algo desteñido y un poco despegado; sin embargo, estaba todavía dispuesto aguantar un tiempo más si le cosía algunas costuras sueltas.
Este morral es de muy buena calidad para el tiempo que tiene, es por ello que quise arriesgarme a restaurarlo, sin pensar que se me haría más complicado de lo que pensé.
Aun así decidí no rendirme y seguir con este proyecto, si es parte de mi proyecto del año porque me propuse hacer varios bolsos, y como me gusta retarme dije que podía lograr restaurar mi mochila y así fue amigos, lo que no fue fácil, y es que me tomo una semana terminarlo, casi tire la toalla, como dice un dicho, jajaja, pero no quería perder mi morral tan querido.
Después que descosí las costuras del morral fue donde empezó lo bueno. Pero finalmente pude lograrlo que es la buena noticia.
Sin más preámbulos, mis estimados amigos, los invito a que me acompañen con este proceso de restauración de mi morral con unos nuevos y vivos colores para alegrar los días, para llevarlo de paseo al parque y para llevarlo al gym.
Las fotografías que verán a continuación, fueron tomadas con mi teléfono modelo TECNO SPARK GO 2023.

Hello my beautiful, enterprising people, lovers of threads, needles and fabrics, all artisans united with the heart to create the most beautiful ideas that we come up with every day, even if we spend several days making one, we do not stop until we see the result, and that's my case today.
Today I come to share with all of you, a backpack that I wanted to restore, since some time ago I have not been able to buy a new backpack, this is the one for daily use, and it was already looking a little faded and a little unstuck; however, I was still willing to hold a while longer if I sewed some loose seams.
This backpack is of very good quality for its age, that's why I wanted to take the risk of restoring it, not thinking that it would be more complicated than I thought.
Even so I decided not to give up and continue with this project, yes it is part of my project of the year because I proposed to make several bags, and as I like to challenge myself I said that I could restore my backpack and so it was friends, which was not easy, and it took me a week to finish it, I almost threw in the towel, as the saying goes, hahaha, but I did not want to lose my beloved backpack.
After I unpicked the seams of the backpack was where the good part started. But I finally made it, which is the good news.
Without further ado, my dear friends, I invite you to join me in this process of restoring my backpack with new and vivid colors to brighten up the days, to take it for a walk to the park and to take it to the gym.
The pictures you will see below were taken with my phone model TECNO SPARK GO 2023.

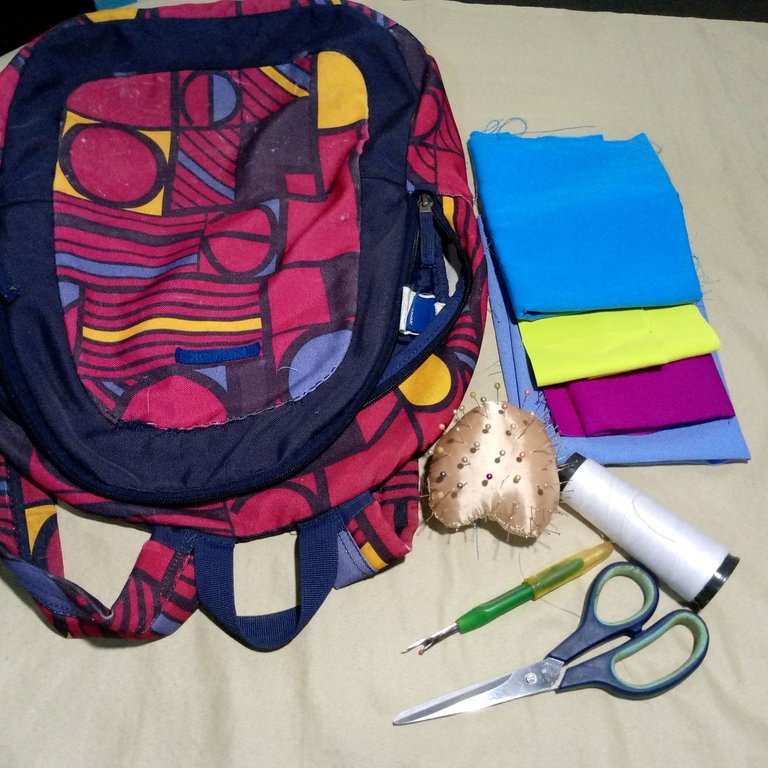
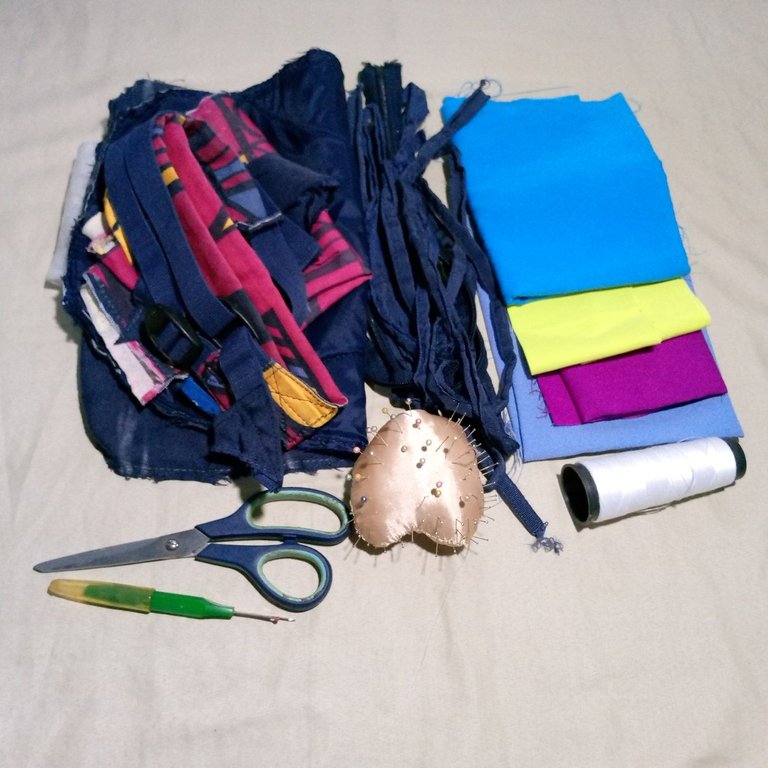
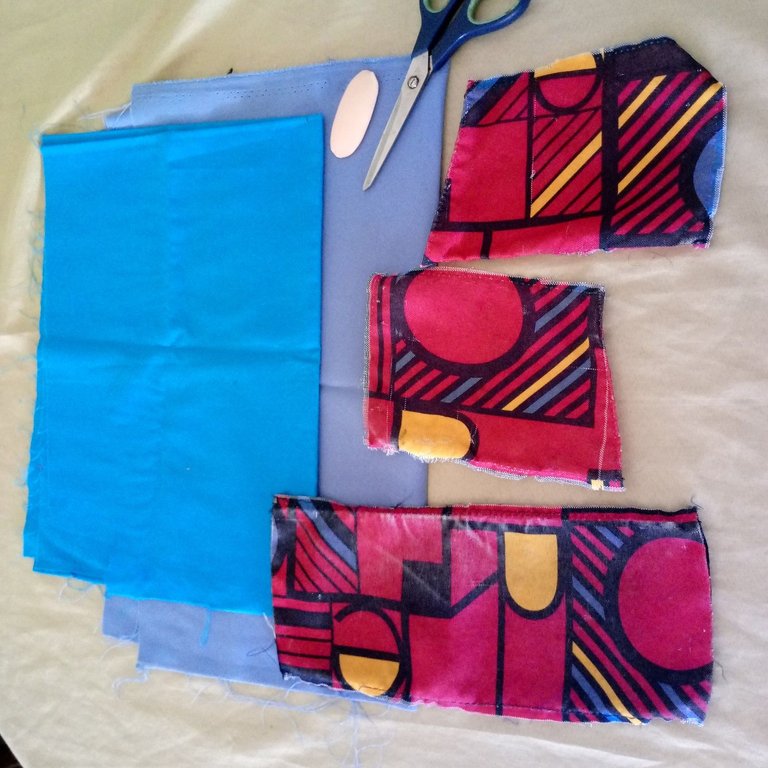
Materiales:
- Morral
- 4 trozos de tela de colores diferente
- Hilos
- Alfileres
- Cinta métrica
- Tijera
- Jabón seco para marcar
- Descosedor de costuras
- Plancha
- Máquina de coser doméstica
Materials:
- Backpack
- 4 pieces of fabric of different colors
- Threads
- Pins
- Tape measure
- Scissors
- Dry soap for marking
- Seam stitch remover
- Iron
- Domestic sewing machine
 |  |  |
|---|
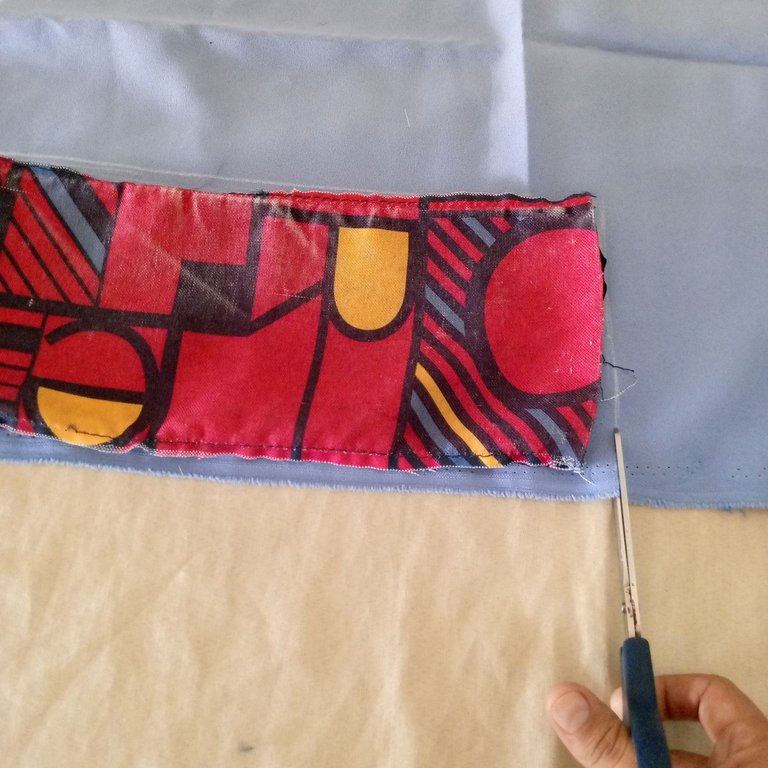
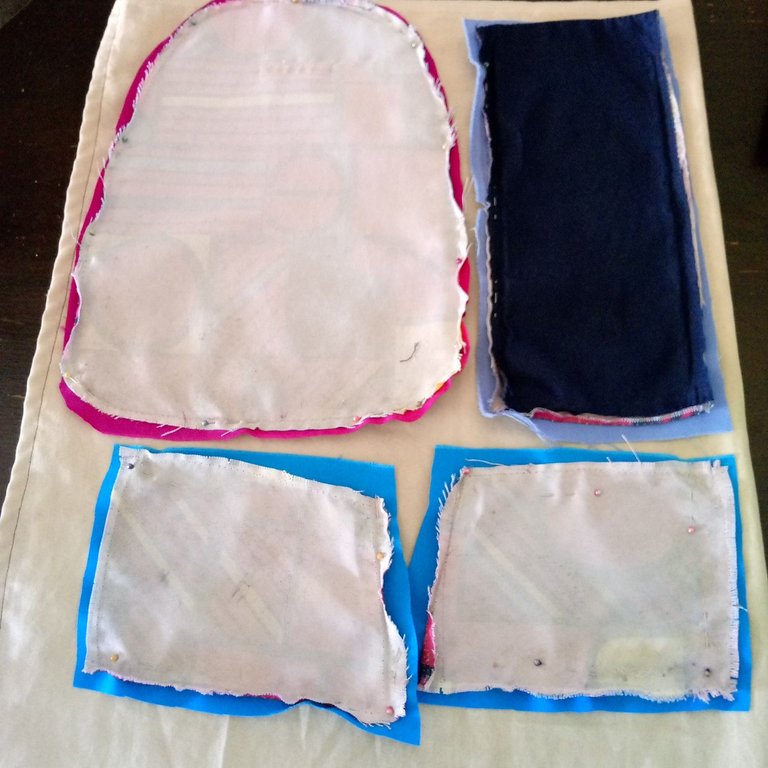
Comencé seleccionando un morral que ya estaba bastante desteñido, por ser mi morral de uso diario, mi favorito.
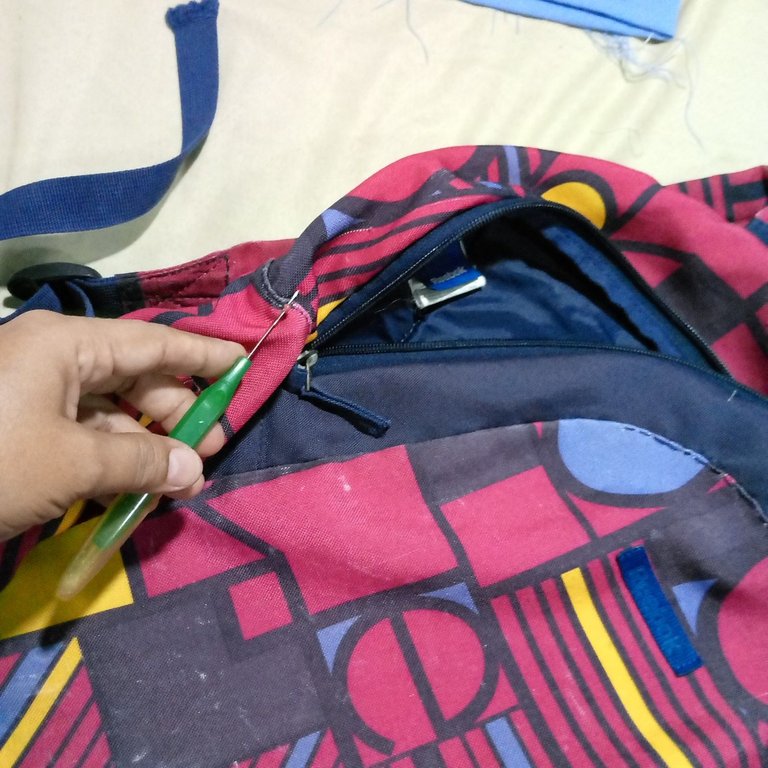
Lo primero que hice fue descoser todas las costuras del morral, separando las piezas, notando muy bien como iba cada pieza para no equivocarme al momento de volver a coser.
Este proceso me tomo mucho trabajo porque la costura estaba bastante fuerte, el morral fue uno de mis mejores.
Sin embargo, poco a poco logré la primera meta, esto me hizo pensar, si esto iba a resultar, y si no adiós morral favorito y telas dañadas jajaja creo que a mis amigos en algún momento les ha pasado esto, pensar si algo les va a salir como quieren o fallarían en el intento.
I started by selecting a backpack that was already quite faded, as it was my favorite backpack for daily use.
The first thing I did was to unpick all the seams of the backpack, separating the pieces, noting very well how each piece was going so I wouldn't make a mistake when sewing again.
This process took me a lot of work because the seam was quite strong, the backpack was one of my best.
However, little by little I achieved the first goal, this made me think, if this was going to work, and if not bye bye favorite backpack and damaged fabrics hahaha I think my friends at some point this has happened to them, thinking if something is going to come out as they want or they would fail in the attempt.
 |  |  |
|---|
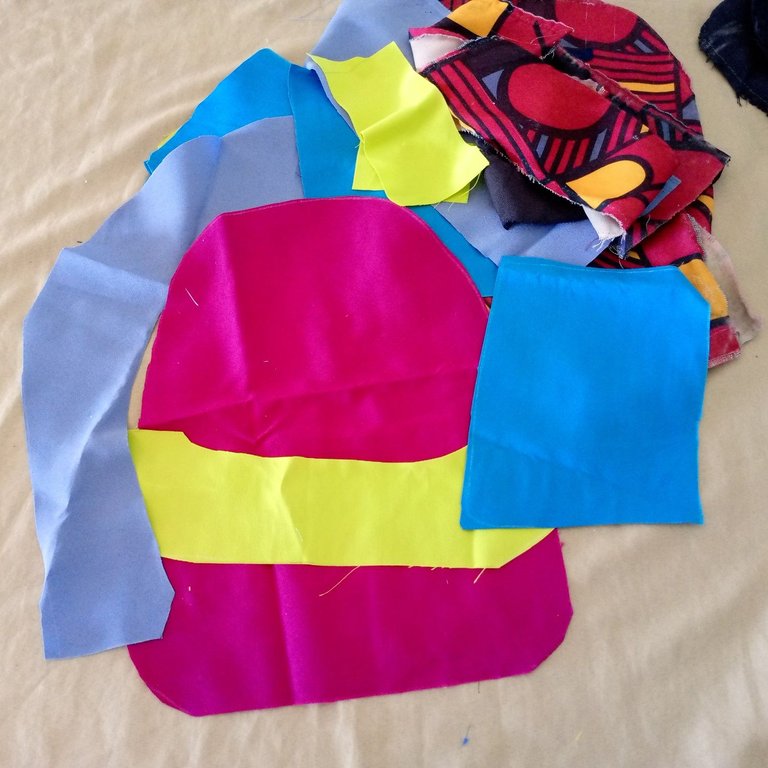
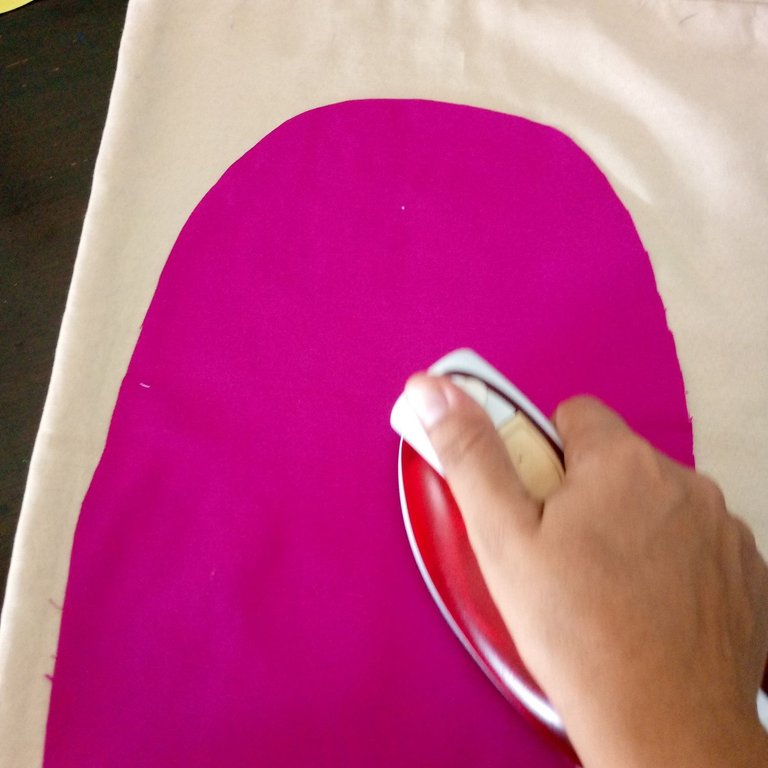
Comencé arriesgar mis telas, porque ya mi morral estaba en riesgo, de no recuperación.
Lo primero que hice fue colocar una de las telas, y sobre esta coloque la pieza guía, la marque con el jaboncillo y corte, dejando 1 cm adicional por los bordes de las líneas de corte, para prevenir alguna falla al momento de coserlo.
De la misma manera corte todas las piezas con las telas de colores variados, luego planche cada pieza para facilitar mi trabajo.
I began to risk my fabrics, because my backpack was already at risk of not recovering.
The first thing I did was to place one of the fabrics, and on it I placed the guide piece, I marked it with the soap and cut, leaving 1 cm extra on the edges of the cutting lines, to prevent any failure when sewing it.
In the same way I cut all the pieces with the fabrics of different colors, then I ironed each piece to make my work easier.
 |  |  |
|---|
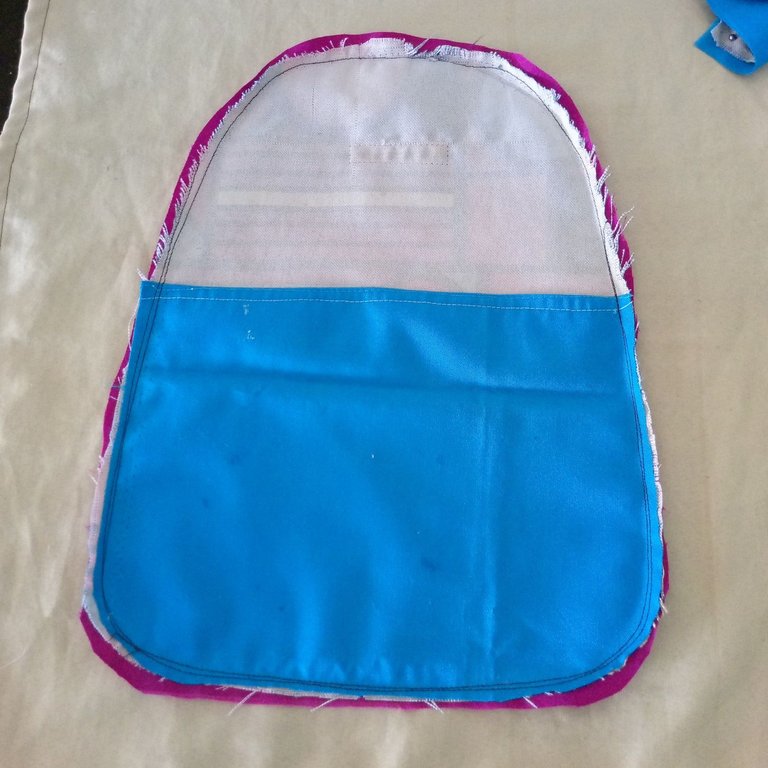
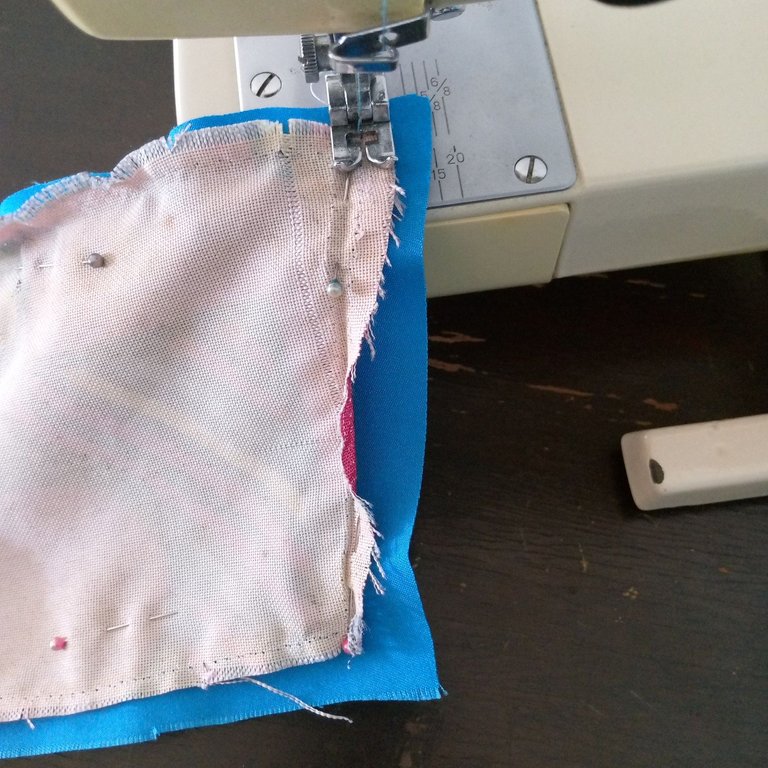
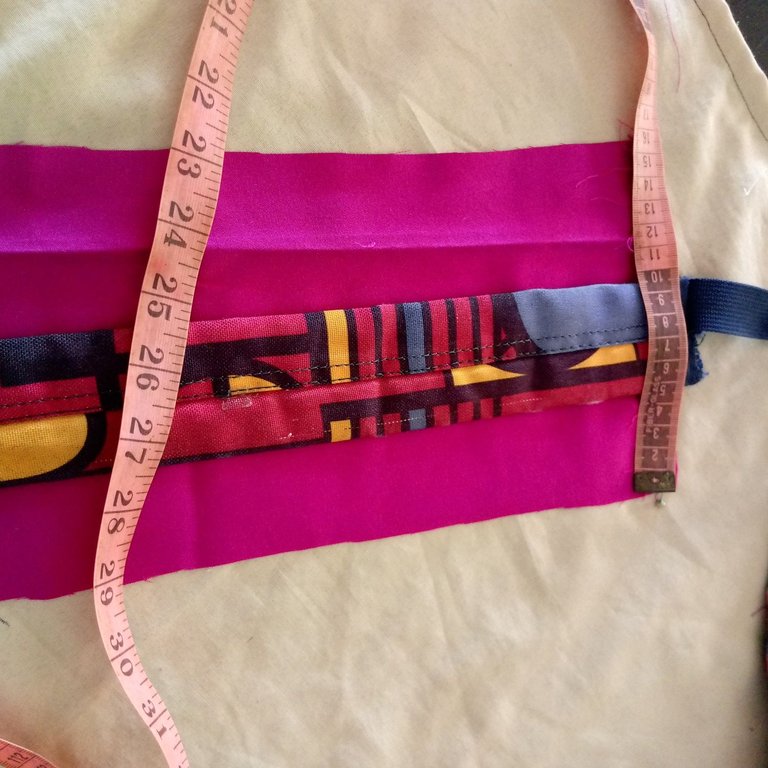
Luego de planchar todas las piezas y posicionarlas sobre las piezas originales del morral, las fije con alfileres y comencé a coser en la máquina con hilo común, me habría gustado tener un hilo más fuerte, pero para el momento no logre conseguirlo, así que pase varias costuras para fijar bien, y evitar que se despeguen las costuras.
En este paso también corte un bolsillo para colocarlo en la cara principal del morral por el lado interno, ya que el original no tenía bolsillos internos, es un diseño sencillo, pero de excelente material, me duro intacto por años y vale la pena restaurarlo para seguir usándolo, con nuevos colores vibrantes.
After ironing all the pieces and positioning them on the original pieces of the backpack, I fixed them with pins and started sewing on the machine with common thread, I would have liked to have a stronger thread, but for the moment I could not get it, so I sewed several seams to fix well, and prevent the seams from peeling off.
In this step I also cut a pocket to place it on the main side of the backpack, since the original one did not have internal pockets, it is a simple design, but of excellent material, it lasted intact for years and it is worth restoring it to continue using it, with new vibrant colors.
 |  |  |
|---|
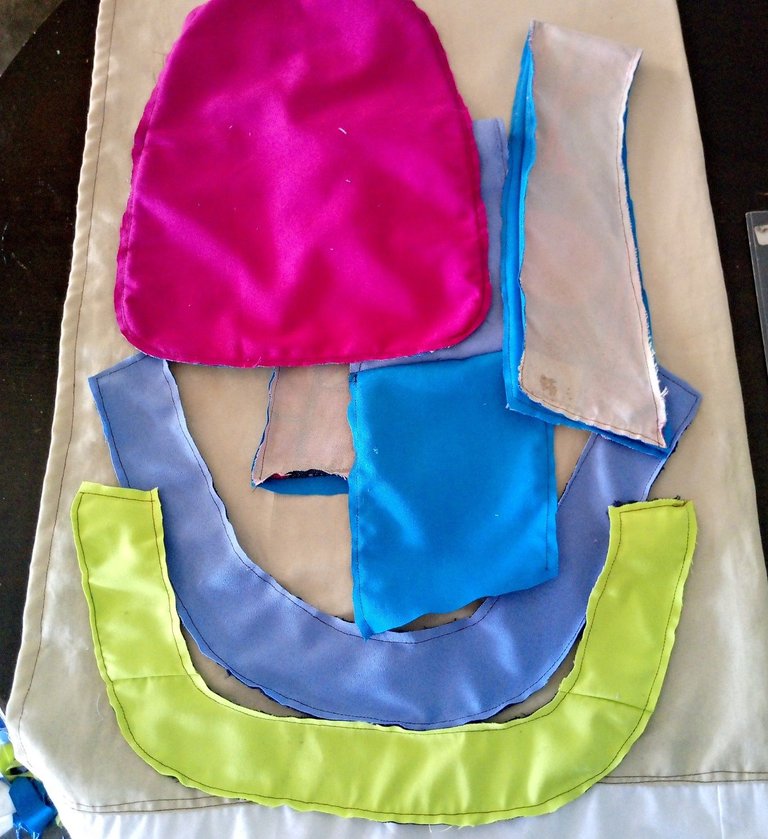
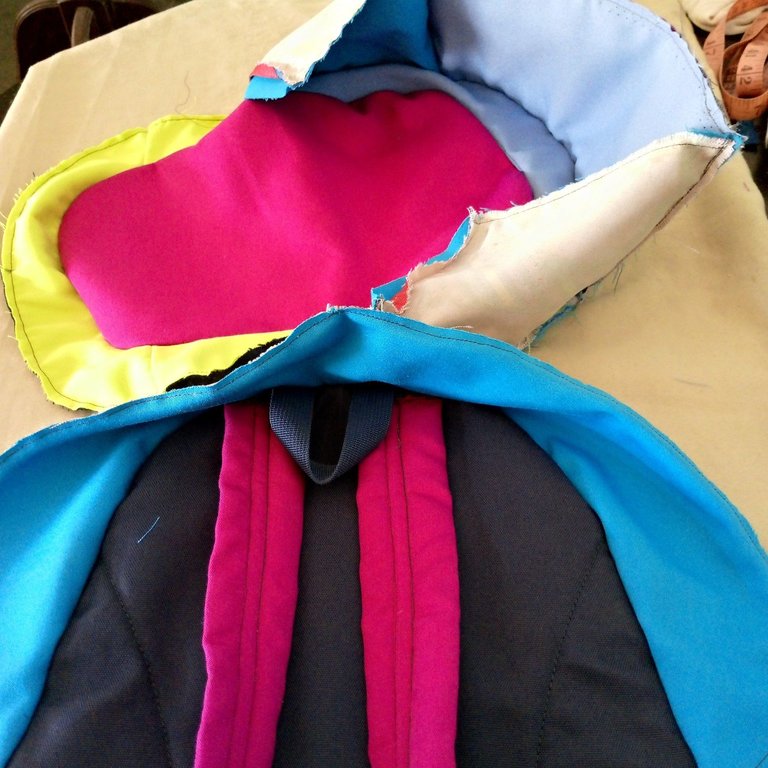
Después de coser cada una de las piezas, recorte los excedentes de tela que había dejado para prevenir, pero como todo salió bien, las retire y comencé a coser las piezas, esta vez para unirlas y comenzar a ver si la idea me estaba resultando.
Efectivamente, dio un buen resultado la unió de las piezas, sin embargo, en el proceso hubo momentos donde había colocado piezas por el lado equivocado, que notaba una vez que le daba la vuelta a las piezas, esto me obligaba a descoser buscarle la mejor posición y volver a coser, a pesar de que había colocado todo con los alfileres para asegurarme que todo iba bien, resultaba que al estar cosidas en costura de la máquina no encajaban como debería, en este momento me pareció un juego de rompe cabezas, estas piezas se veían deformes y torcidas uuff.
Para completar la máquina me partió alrededor de 5 agujas, y comenzó a fallar, aquí tuve que dejarlo así para relajarme y continuar el día siguiente con más calma, aunque tenía tantas ganas de ver pronto el resultado final, esa tarde me paso lenta, pero debía descansar para evaluar que estaba pasando.
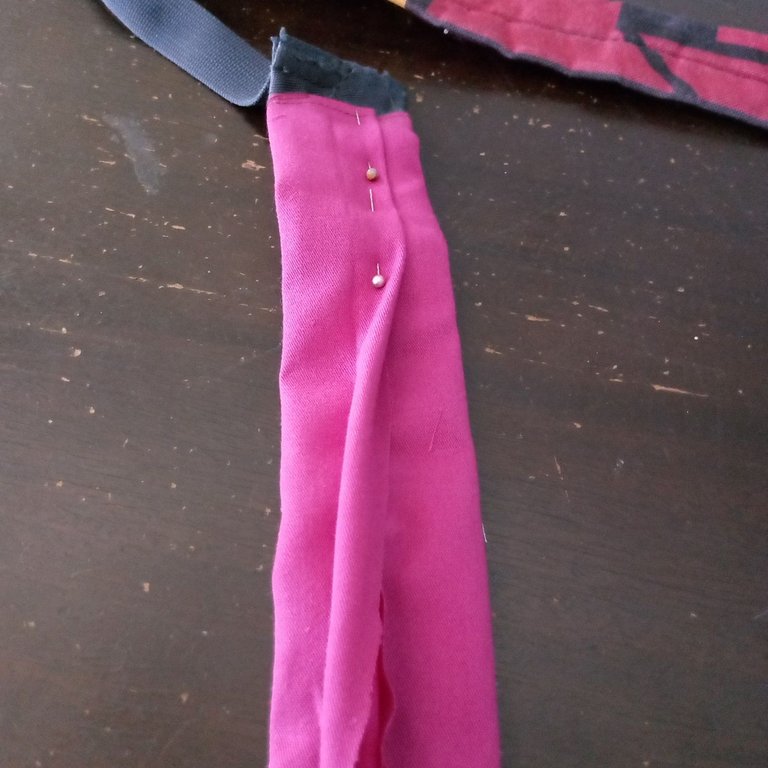
Sin embargo, como no podía coser, me dispuse a seleccionar la tela para las trenzas del morral, y de qué forma iba a colocarlas, en eso se me ocurrió la idea para hacerlo más fácil.
Aquí me ahorré descoser, lo que hice fue cortar un rectángulo del largo de las trenzas más 1 cm para doblar en cada extremo, midiendo la tela de forma horizontal, por un lado, 5 cm y por el otro 7 cm, esto para doblar un extremo de la tela dentro del otro, para darle un buen detallado a estas trenzas, así que uni la tela en el centro de la trenza y subí 1 cm centrado, sobre esta doble el otro lado de la tela a 2 cm fije para luego coser con la máquina.
After sewing each of the pieces, I cut the excess fabric that I had left to prevent, but as everything went well, I removed them and began to sew the pieces together, this time to join them and start to see if the idea was working.
Indeed, it gave a good result joining the pieces, however, in the process there were times where I had placed pieces on the wrong side, which I noticed once I turned the pieces over, this forced me to unpick to find the best position and sew again, although I had placed everything with the pins to make sure everything went well, it turned out that being sewn in the machine seam did not fit as it should, at this time it seemed to me a game of head breakers, these pieces looked deformed and twisted uuff.
To complete the machine broke about 5 needles, and began to fail, here I had to leave it like that to relax and continue the next day more calmly, although I was so eager to see the final result soon, that afternoon passed slowly, but I had to rest to evaluate what was happening.
However, since I couldn't sew, I set out to select the fabric for the braids of the backpack, and how I was going to place them, that's when I came up with the idea to make it easier.
Here I saved myself unpicking, what I did was to cut a rectangle of the length of the braids plus 1 cm to fold at each end, measuring the fabric horizontally, on one side, 5 cm and on the other 7 cm, this to fold one end of the fabric inside the other, to give a good detail to these braids, so I joined the fabric in the center of the braid and went up 1 cm centered, on this fold the other side of the fabric to 2 cm fixed to then sew with the machine.
 |  |  |
|---|
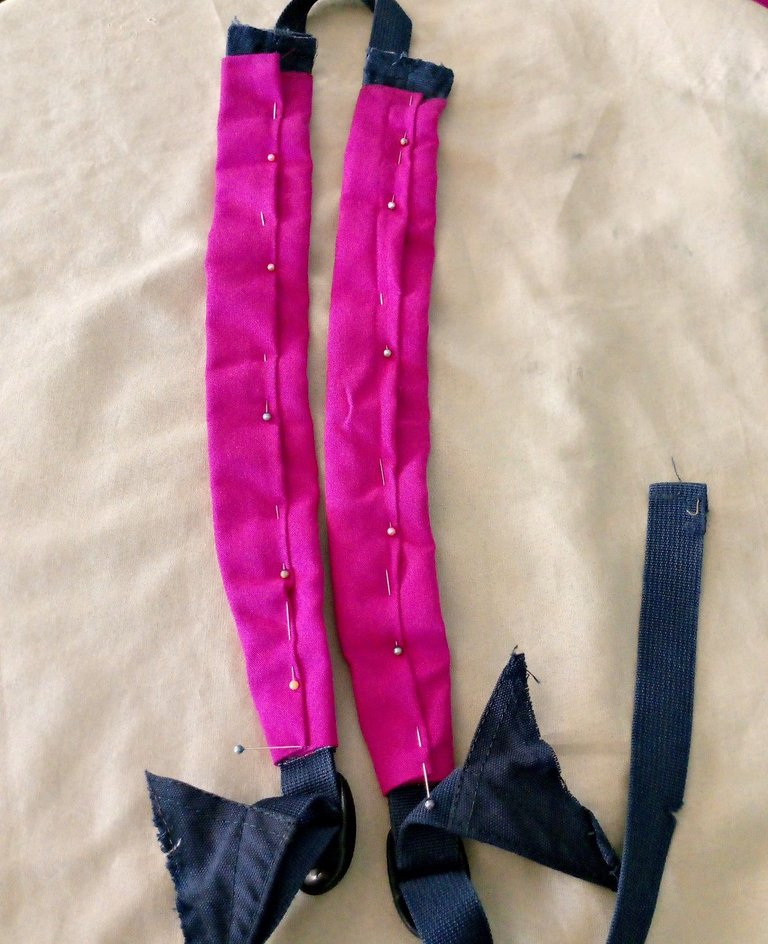
En mi otro día, este día continúe mi proyecto, para corregir la falla de las agujas, llame un técnico que me pudo solucionar y me dio algunas instrucciones para evitar que las agujas se partieran.
Como Ya parte de las piezas estaban adelantadas, comencé a coser las trenzas, las mismas quedaron muy bien, así que las posicione sobre la pieza trasera del morral, que antes de descoserlas había marcado con jabón, donde estaba cosida cada una de ellas, esto me ayudo mucho para que las trenzas quedasen bien colocadas y evitar que se viera un morral torcido.
On my other day, this day I continued my project, to correct the failure of the needles, I called a technician who was able to solve it and gave me some instructions to prevent the needles from breaking.
As part of the pieces were already advanced, I began to sew the braids, they were very well, so I positioned them on the back piece of the backpack, which before unpicking them I had marked with soap, where each one of them was sewn, this helped me a lot so that the braids were well placed and to avoid a crooked backpack.
 |  |  |
|---|
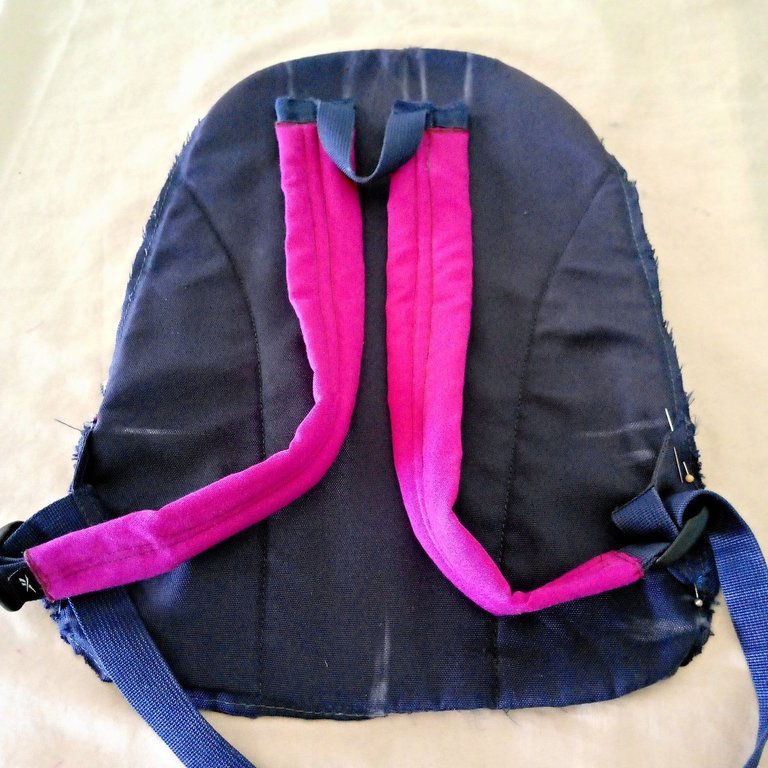
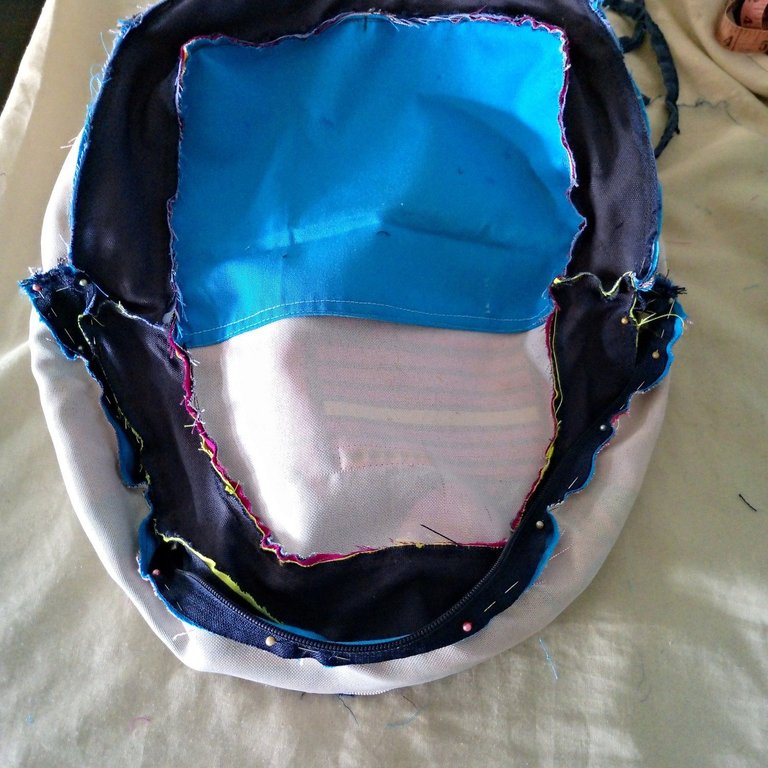
Continuando con la unión de piezas, todo me fue saliendo muy bien, en este momento selle todas las costuras para luego fijar el cierre y los bies para darle un mejor detallado. Esta mochila solo lleva un cierre doble, fácil de colocar, esto me pareció un paso bastante sencillo.
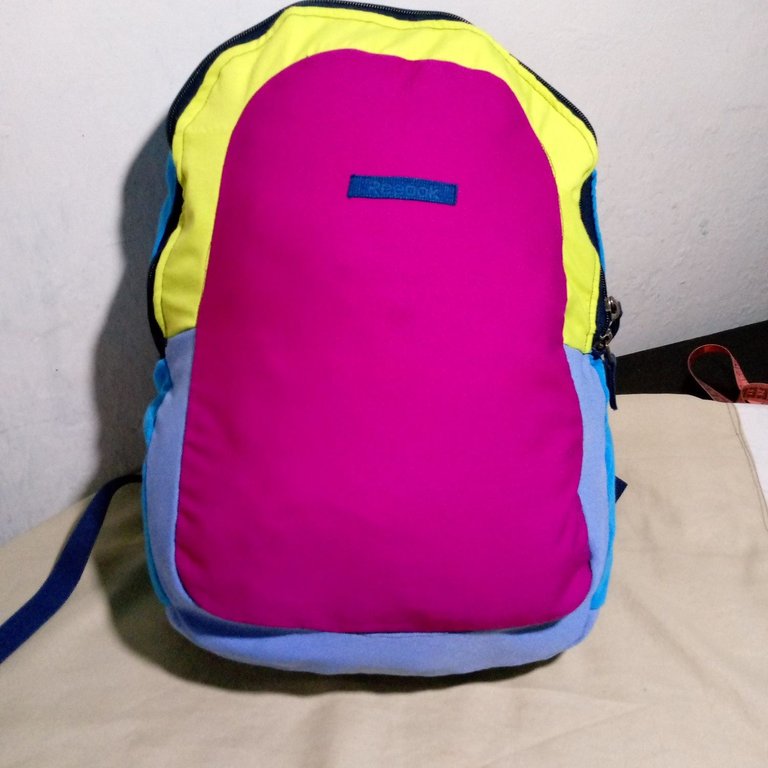
Para terminar, después que le di la vuelta al morral, quise detallarlo con una sobre costura externa de color azul oscuro, por todo los bordes, pensando que se vería mejor.
Tuve un error después que había pasado las costuras, el morral se veía horrible jajajaja por lo que debí quitárselas con el descosedor esto me tomo la mitad del día siguiente casi ocasiono daños de roturas de tela a pesar de haberlo hecho con sumo cuidado no fue fácil la costura estaba fuerte, esto me deja un aprendizaje para reflexión, muchas veces necesitamos experimentar, arriesgando, para poder aprender, siempre haciendo las cosas con precaución para evitar daños irreparables.
Este ha sido mi trayecto de trabajo de estos días, que pese a todo me siento muy satisfecha con el resultado.
Espero que hayan sido parte de mi experiencia leyendo mi publicación, gracias por venir acompañarme, espero que todos se encuentren bien en cualquier lugar del planeta que residan, los quiero inmenso, deseo que tengan mucho éxito y prosperidad en todo lo bueno que hagan.
Continuing with the joining of pieces, everything was going very well, at this moment I sealed all the seams to then fix the zipper and the bias binding to give it a better detail. This backpack only has a double zipper, easy to place, this seemed to me a very simple step.
Finally, after I turned the backpack inside out, I wanted to detail it with a dark blue overstitching all around the edges, thinking it would look better.
I had a mistake after I had passed the seams, the backpack looked horrible hahahaha so I had to remove them with the unstitcher, this took me half of the next day almost caused damage of fabric tears despite having done it with great care was not easy the seam was strong, this leaves me a learning for reflection, many times we need to experiment, risking, to learn, always doing things with caution to avoid irreparable damage.
This has been my work journey these days, and despite everything I feel very satisfied with the result.
I hope you have been part of my experience reading my publication, thank you for joining me, I hope you are all well wherever you live on the planet, I love you immensely, I wish you all success and prosperity in everything good you do.
social networks / redes sociales
![]()
![]()
Traductor Deepl
Translated Deepl
Ediciones Canva
Editions Canva


Wow, @lauracraft - this is a really major renovation of your rucksack: it is most impressive! I repaired a very old rucksack a year or so ago, and I didn't have to do such a big repair, but it was particularly satisfying, to make it new and solid once more, so that I could use it for shopping and travelling, and not worry about the zip being stuck or things falling out of it! Backpacks can have such a lot of memories attached to them: mine is one that my mum bought for me back in 2004, just a couple of years before she died - it holds a particular importance to me 😇 and I hope to keep renovating all my life! 😍 Thanks for sharing such lovely work!
Hello dear friend @clareartista, thank you for commenting on my work, this backpack also has a very special sentimental value for me, that's why it is my favorite, and I want to keep it for a long time, it is resistant, ideal to go on a trip without worrying that it will keep breaking and something will be lost.
How nice that you also do this kind of renovations of garments that didn't seem to have much chance and with this idea we give them a good time to last. Thanks for visiting my post.🫶🙂🤗
wow, what a painstaking and difficult job! The backpack is great!
It was a job of great dedication 💪🫶.
Good one
Thank you for your appreciation 🤗.
🙂
Me parece una idea excelente restaurar los morrales, alargar la vida útil de las prendas y accesorios es también una forma de contribuir al planeta. Saludos 😊
Amiga esto es muy cierto, es una forma de contribuir a la conservación de la vida en el planeta, es parte del reciclaje útil. Gracias por comentar.🤗❤️
Hola @lauracraft hiciste un muy buen trabajo al restaurar este morral, los colores que usaste son muy alegres y bonitos. Te felicito, Saludos!
Hola querida amiga @kattycrochet, gracias que bueno que te haya gustado.🫶❤️ Tenía tiempo con esas telas hasta que ya pude darle el uso correcto 🙂
!giphy great
@sagarkothari88 reward 0.05 HP
Via Tenor
🙌👍
💐 🎁 Gift 🎁 💐
Empowering NeedleWorkMonday
Upvote This Comment
Please 🙇♂️ Support Me Back 🙏 - Vote for me
Thank you my friend 🤗🙂
Felicitaciones, pasaste el reto. Muy buen trabajo. Hay morral para rato. Saludos.
Gracias amiga, cierto ahora sí tengo un morral más presentable jajajaja 🤗🤗🤗🤗🤗
Le quedo bastante bien, y es cierto al restaurar algunas veces tenemos la duda de saber si todo saldrá bien o perderemos los materiales.
Luce muy bonito el resultado, le felicito por eso, tengo un par de morrales que les vendría bien algo de atención y cariño, pero tendré que coser a mano, no tengo máquina para hacer la costura.
También lo puedes lograr @soltecno
con mucha constancia, si sabes coser bien a mano, y tienes paciencia harás un excelente trabajo y tendrás morral nuevo y más resistente. Gracias por visitar mi post y dejar un excelente comentario 😊🤗
Congratulations @lauracraft!
You raised your level and are now a Minnow!
Check out our last posts:
Hola amiga, te quedó hermoso, yo también necesito uno.
Hola amiga, te quedó hermoso, yo también necesito uno.