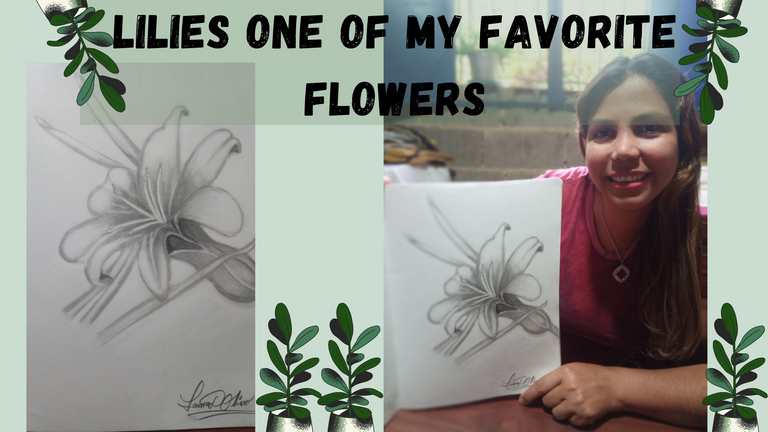
Lilies One Of My Favorite Flowers / Drawing / (ENG/ESP)

Saludos amigos y bienvenidos a mi post.
Hoy les vengo a presentar uno de mis nuevos proyectos que he estado trabajando mucho últimamente, se trata de que estoy practicando dibujo, ya que me ha llamado mucho la atención algunos dibujos de flores y animales que he visto por internet, no solo eso, soy amante de las flores, así que siempre voy a estar compartiendo con ustedes este tipo de dibujos, donde no faltan las flores o algún animal tierno.
Comencé a practicar dibujo como método de relajación y de verdad es una excelente opción para relajarse y evitar el estrés, es muy terapéutico.
Las fotografías que verán a continuación, fueron tomadas con mi teléfono modelo Alcatel_5044R.
Sin más preámbulos comencemos con la publicación.

Greetings friends and welcome to my post.
Today I come to present you one of my new projects that I have been working a lot lately, I am practicing drawing, since I have been very interested in some drawings of flowers and animals that I have seen on the internet, not only that, I am a flower lover, so I will always be sharing with you this kind of drawings, where there is no lack of flowers or some cute animal.
I started to practice drawing as a relaxation method and it is really an excellent option to relax and avoid stress, it is very therapeutic.
The pictures you will see below were taken with my Alcatel_5044R.
Without further ado, let's start with the publication.


Paso 1
Gracias a una página que me recomendaron mucho por internet, una plataforma llamada Pinterest, donde puedo encontrar todas las ideas que necesito para poder hacer un dibujo, en este momento elegí una de una flor llamada lirio, una de las más hermosas flores como son los lirios.
He estado viendo tutoriales por YouTube para aprender a dibujar, según lo que he aprendido, todo dibujo es implementado a base de figuras geométricas, donde en este caso mi primer paso fue dividir la hoja del blog en cuatro partes como guía para iniciar este hermoso dibujo.
Después comencé a elaborar algunas figuras geométricas, como en este caso pueden notar círculos, triángulos y rectángulos, para posteriormente dibujar los pétalos del lirio.
Step 1
Thanks to a page that was highly recommended to me online, a platform called Pinterest, where I can find all the ideas I need to be able to make a drawing, at this moment I chose one of a flower called lily, one of the most beautiful flowers such as lilies.
I have been watching tutorials on YouTube to learn how to draw, according to what I have learned, all drawing is implemented based on geometric figures, where in this case my first step was to divide the blog page into four parts as a guide to start this beautiful drawing.
Then I started to elaborate some geometric figures, as in this case you can notice circles, triangles and rectangles, to later draw the petals of the lily.

Paso 2
Una vez de haber terminado de hacer los pétalos del lirio, mi siguiente paso es eliminar todas las líneas que utilice como guía, entre ellas las figuras geométricas.
Es muy importante que cuando vayamos a borrar nuestras líneas guías, no vayamos a borrar el dibujo que ya comenzamos hacer, para luego no perdernos o comentar una equivocación.
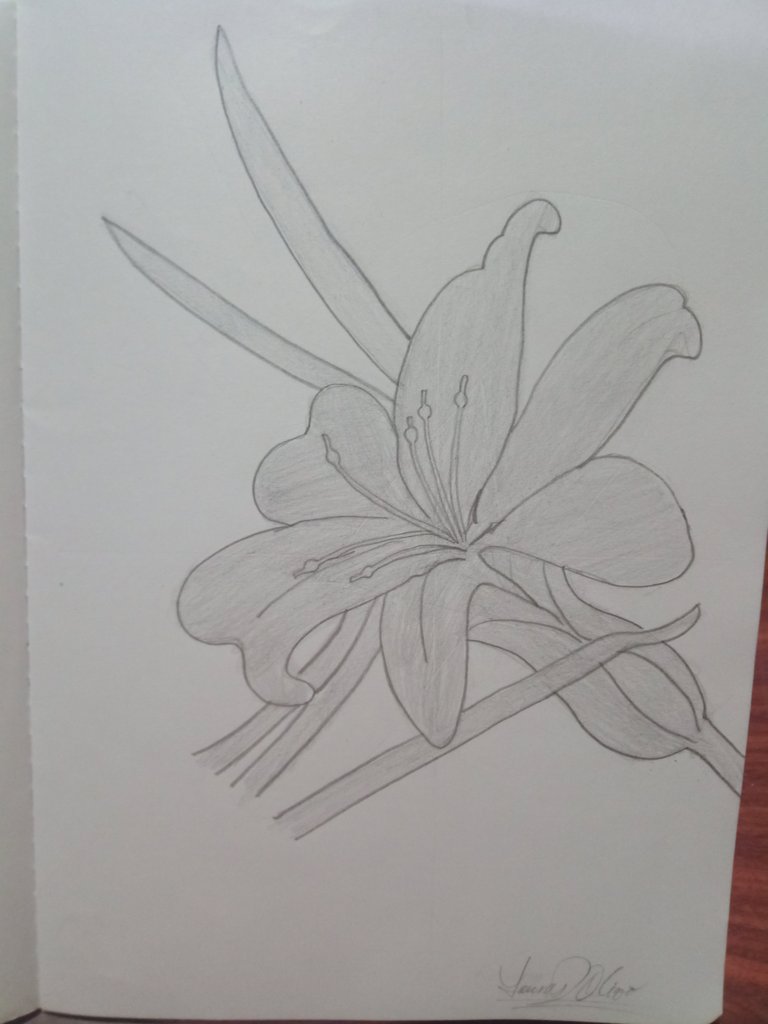
Mi objetivo en este dibujo es hacerlo casi igual o mejor a la de la imagen de referencia.
Step 2
Once I have finished making the petals of the lily, my next step is to erase all the lines that I used as a guide, including the geometric figures.
It is very important that when we are going to erase our guide lines, we are not going to erase the drawing that we have already started to make, so that we don't get lost or make a mistake.
My goal in this drawing is to make it almost the same or better than the reference image.

Paso 3
Después de haber terminado de limpiar un poco mi dibujo, comencé a remarcar todo el lirio, agregando también los pistilos del lirio y agregando algunas plantas que están alrededor de la flor.
Hacer el efecto de dobladura en los pétalos es un poco complicado, ya que debemos tener en cuanta hacia dónde va a caer los pétalos de la flor para agregarle el efecto de caída que queremos.
Step 3
After I finished cleaning up my drawing a little bit, I started to highlight the whole lily, adding also the pistils of the lily and adding some plants that are around the flower.
Making the bending effect on the petals is a bit complicated, since we must take into account where the petals of the flower will fall to add the falling effect we want.
Paso 4
Ahora viene mi parte favorita, el cual es darle la primera capa de coloreado del dibujo, aunque les parezca un poco extraño, el gris, el negro y el blanco son un color, o al menos eso es lo que he leído en algunos libros o algunas páginas por internet.
Luego comencé a remarcar todos los bordes del lirio para utilizarlos como guía para colorear toda la flor dentro de las líneas, a simple vista ya comenzamos a notar como está quedando nuestro dibujo.
Si nos fijamos bien, podremos notar como en algunas partes que coloree con mi lapiz están en blanco, pero eso está a punto de acomodarse en el siguiente paso.
Step 4
Now comes my favorite part, which is to give the first layer of coloring of the drawing, although it may seem a little strange, gray, black and white are one color, or at least that's what I've read in some books or some pages on the internet.
Then I began to highlight all the edges of the lily to use them as a guide to color the whole flower inside the lines, at first glance we already begin to notice how our drawing is turning out.
If we look closely, we can notice how some of the parts that I colored with my pencil are blank, but that is about to settle in the next step.

Paso 5
La herramienta Algodón
Un buen consejo que vi en YouTube a la hora de hacer que las líneas que quedaron blancas cuando coloree el dibujo, es que podemos utilizar algunas herramientas como, algodón, cotonetes, pinceles, papel higiénico, servilletas, he incluso un paño de algodón muy suave.
Esto es para hacer a lo que llaman los artistas el difuminado, nos ayudara a eliminar todas las partes que quedaron en blanco cuando coloreamos nuestro dibujo, aunque esto solo funciona cuando trabajamos con lápices de dibujo, o bien de grafito.
Incluso una vez que difuminemos para conseguir los resultados deseados, podemos difuminar varias veces hasta conseguir las sombras, las luces y eliminar las líneas, para darle ese estilo realista al dibujo.
Step 5.
The Cotton tool.
A good tip that I saw on YouTube when it comes to make the lines that were white when coloring the drawing, is that we can use some tools such as cotton, cotton swabs, brushes, toilet paper, napkins, and even a very soft cotton cloth.
This is to do what the artists call the blurring, it will help us to eliminate all the parts that were left in white when we colored our drawing, although this only works when we work with drawing pencils, or graphite pencils.
Even once we blur to get the desired results, we can blur several times until we get the shadows, the lights and eliminate the lines, to give that realistic style to the drawing.

Paso 6
Saber en dónde vamos a colocar las sombras y profundidades de nuestro dibujo
Cuando nosotros dibujamos debemos colocarle ese detalle de iluminación.
¿Cómo se lo colocamos?
Como estamos aprendiendo, vamos a colocar la luces y sombreado según la posición de nuestra imagen de referencia, según el realismo que queremos conseguir con las técnicas aplicadas.
Así que primero comencé a darle los sombreados desde la parte inferior del lirio, honestamente esta la primera vez que hago un dibujo, me encanta, nunca pensé que aria algún dibujo, estudiar como se elabora un dibujo de este estilo es muy emocionante, mi meta es llegar a un nivel de dibujo realista de manera profesional.
Step 6
Know where we are going to place the shadows and depths of our drawing.
When we draw, we must place that lighting detail.
How do we place it?
As we are learning, we are going to place the lights and shading according to the position of our reference image, according to the realism we want to achieve with the applied techniques.
So first I started to give the shading from the bottom of the lily, honestly this is the first time I make a drawing, I love it, I never thought I would make a drawing, studying how to elaborate a drawing of this style is very exciting, my goal is to reach a level of realistic drawing in a professional way.

Paso 7
El valorizado del dibujo por capas
Aquí es donde empezamos a notar los volúmenes y las diferentes formas y efectos que optan las figuras del dibujo, a esto me refiero a los efectos de iluminado, curvaturas, los efectos del sombreado y profundidad que poseen todos los dibujos.
En este paso una de las herramientas más utilizadas es el borrador, porque con él podemos agregarle a nuestro dibujo todos los detalles finales.
Agregarle el efecto de profundidad en la parte de en medio del lirio fue muy complicada, ya que tenía que tener en cuenta que no solo se basa en oscurecer la parte del centro y listo, sino que también hay que hacerlo por capa he ir difuminando constantemente para poder realizar este efecto, sin embargo, tuve que borrar mucho para poder lograr el efecto.
Step 7.
Layering the drawing by layers.
Here is where we start to notice the volumes and the different shapes and effects that the figures of the drawing have, by this I mean the effects of lighting, curvatures, the effects of shading and depth that all drawings have.
In this step one of the most used tools is the eraser, because with it we can add to our drawing all the final details.
Adding the depth effect in the middle part of the lily was very complicated, because I had to take into account that it is not only based on darkening the center part and that's it, but also you have to do it by layer and blurring constantly to achieve this effect, however, I had to erase a lot to be able to achieve the effect.

Paso 8
Hacer que las líneas base se desaparezcan
Esta parte es muy importante en el dibujo, ya que si nuestra meta es hacer un dibujo realista, nuestro objetivo es hacer que no se note ninguna línea que usemos como guía, un buen ejemplo sería los bordes del lirio.
Todas las líneas que se notan por demás debo eliminarlas y hacer que el dibujo no se vea plano, para lograr esto, debemos darles color a esas líneas sin afincar mucho el lápiz, luego comenzamos a difuminarlo con nuestro algodón o cualquier otra herramienta que utilicemos para difuminar.
Step 8
Make the base lines disappear.
This part is very important in the drawing, because if our goal is to make a realistic drawing, our goal is to make not to notice any line that we use as a guide, a good example would be the edges of the lily.
All the lines that are too noticeable I must eliminate them and make the drawing not look flat, to achieve this, we must give color to those lines without sharpening the pencil too much, then we start to blur it with our cotton or any other tool we use to blur.

Paso 9
El brillo de los pétalos
Luego de haber coloreado una y otra vez que dibujo, difuminándolo en el proceso, nuestro último paso sería darle los efectos de iluminación de nuestro Lirio, para eso utilice el borrador para aclarar los pétalos sin borrar el borde de la flor.
Step 9.
The brightness of the petals.
After having colored over and over again that drawing, blurring it in the process, our last step would be to give it the lighting effects of our Lily, for that use the eraser to lighten the petals without erasing the edge of the flower.

Y de esta forma concluyo la publicación de hoy, espero sea de tu agrado, como mencione anteriormente, este es el primer dibujo que hago, gracias a las investigaciones que hecho y los videos que visto, he podido aprender mucho, lo suficiente para poder realizar este dibujo.
Las herramientas que utilice para mi dibujo son:
Block de dibujo.
Sacapuntas.
Borradores.
Cotonetes.
Pinceles.
Paño.
La imagen de referencia posee su fuente, es una imagen sacada de Pinterest.
And in this way I conclude today's publication, I hope you like it, as I mentioned before, this is the first drawing I do, thanks to the research I did and the videos I watched, I have been able to learn a lot, enough to be able to make this drawing.
The tools I used for my drawing are:
Drawing pad.
Pencil sharpener.
Erasers.
Cotton swabs.
Brushes.
Cloth.
The reference image has its source, it is an image taken from Pinterest.


social networks / redes sociales
![]()
![]()
Traductor Deepl
Translated Deepl
Ediciones Canva
Editions Canva


Congratulations, your post has been upvoted by @dsc-r2cornell, which is the curating account for @R2cornell's Discord Community.
Me gusta mucho el manejo de la sombras que usas.
Congratulations @lauracraft! You have completed the following achievement on the Hive blockchain and have been rewarded with new badge(s):
Your next target is to reach 60 posts.
You can view your badges on your board and compare yourself to others in the Ranking
If you no longer want to receive notifications, reply to this comment with the word
STOPTo support your work, I also upvoted your post!
Support the HiveBuzz project. Vote for our proposal!
Muy bello dibujo... Te felicito.
🎆🎇🎉🎊🌧️💐✨🌾🌱🌹🌙🌿🍃🥀⚡🌺☘️🍀🌈🌷⭐🪴🌵🌸🌟💮🌴🌳💫☀️💮☔🌲🌳🌍🌌🌠☄️🏵️🐝🌻🌼🍄🐞🦋💙☕💜🍍🎆🎇🎉🎊