drawing a beautiful sunflower with school colors / Drawing / (ENG/ESP)

Reciban todos un cordial saludo, mis queridos amigos amantes del arte.
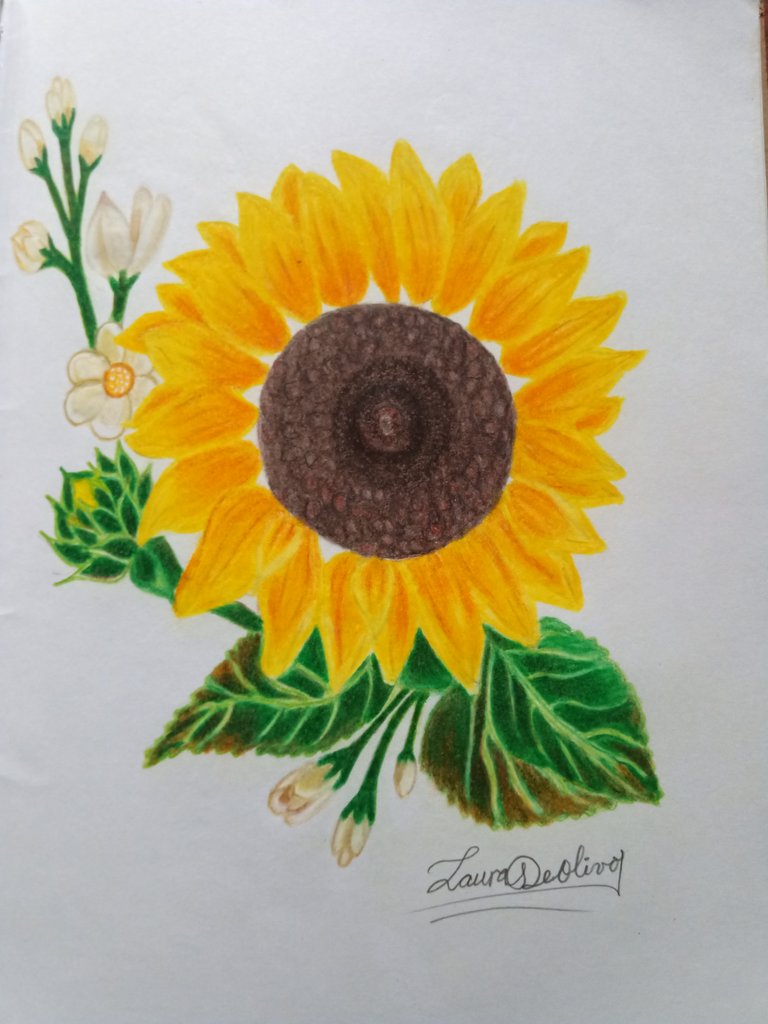
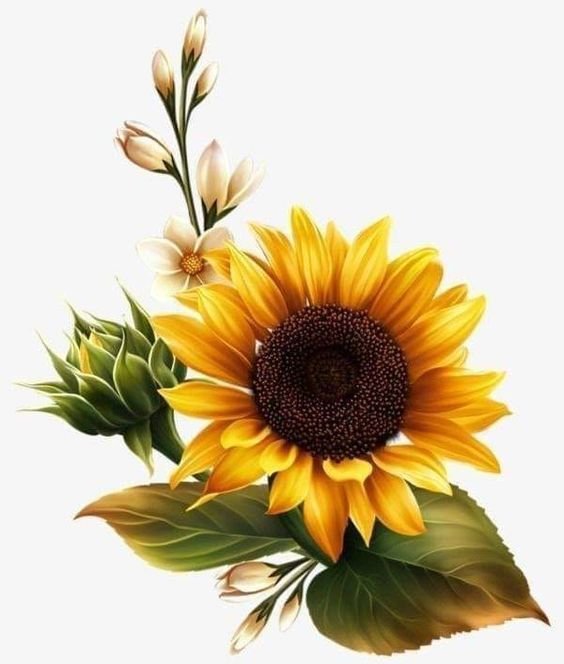
En esta oportunidad les presento un dibujo que realice, inspirada en un hermoso girasol, aquí les estaré explicando el proceso de creación para realizar el dibujo y la forma de colorear, para conseguir las tonalidades más similares a un girasol real.
Destaco que este dibujo lo he realizado a base de colores escolares, los cuales hay que tomar en cuenta que sea colores suaves y muy brillantes, lo que nos ayudara a que nuestro trabajo quede hermoso.
Las fotografías que verán a continuación, fueron tomadas con mi teléfono modelo Alcatel_5044R.
A continuación, les presentaré el proceso de elaboración que implemente para realizar este dibujo.

Receive all a cordial greeting, my dear art-loving friends.
In this opportunity I present a drawing that I made, inspired by a beautiful sunflower, here I will be explaining the process of creation to make the drawing and the way of coloring, to get the most similar tonalities to a real sunflower.
I emphasize that this drawing I have made it based on school colors, which must be taken into account that it is soft and very bright colors, which will help us to make our work beautiful.
The pictures you will see below were taken with my Alcatel_5044R model phone.
Next, I will show you the elaboration process that I implemented to make this drawing.

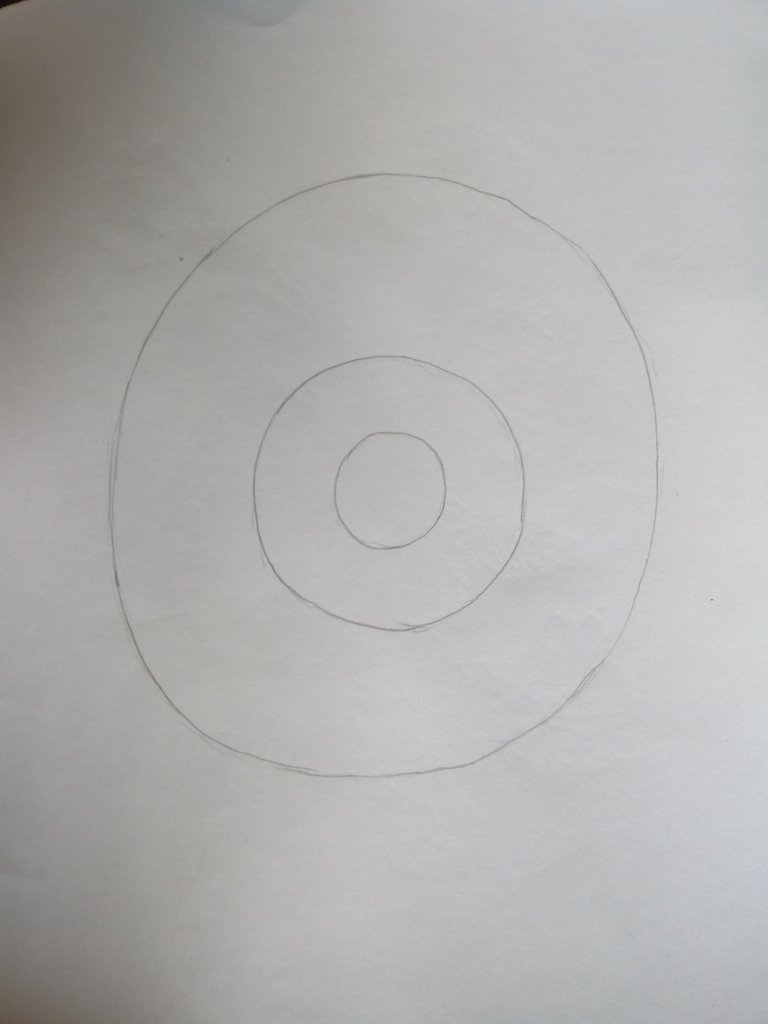
Paso 1
BOCETO
Iniciamos formando tres circunferencias de menor a mayor, los cuales nos servirán para guiarnos en nuestro dibujo.
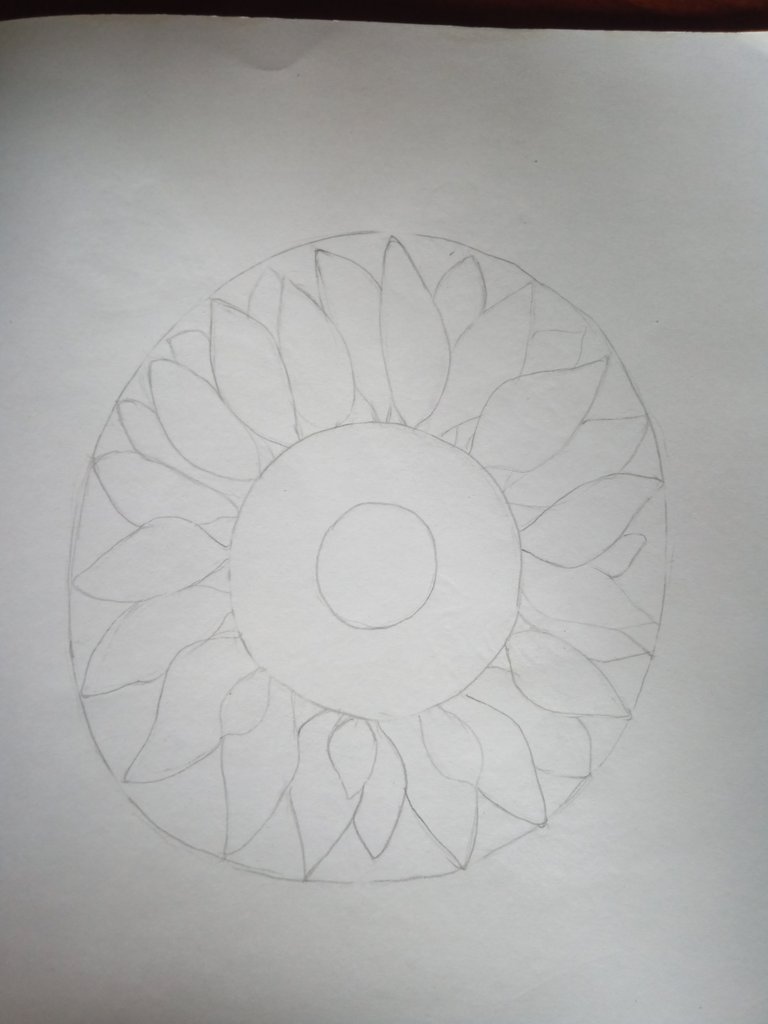
PASO 2
PRIMERAS FIGURAS
Formaremos los pétalos por todos los contornos de la circunferencia más grande, los pétalos no son exactamente iguales, realizamos unos más grandes y unos más pequeños, como entrelazados unos con otros.
Después de tener todos los pétalos listos, procedemos a borrar las líneas guías de la circunferencia.
Step 1.
SKETCH.
We start by forming three circles from smallest to largest, which will serve to guide us in our drawing.
STEP 2
FIRST FIGURES
We will form the petals along all the contours of the largest circle, the petals are not exactly the same, we make some larger and some smaller, as if intertwined with each other.
After having all the petals ready, we proceed to erase the guide lines of the circumference.
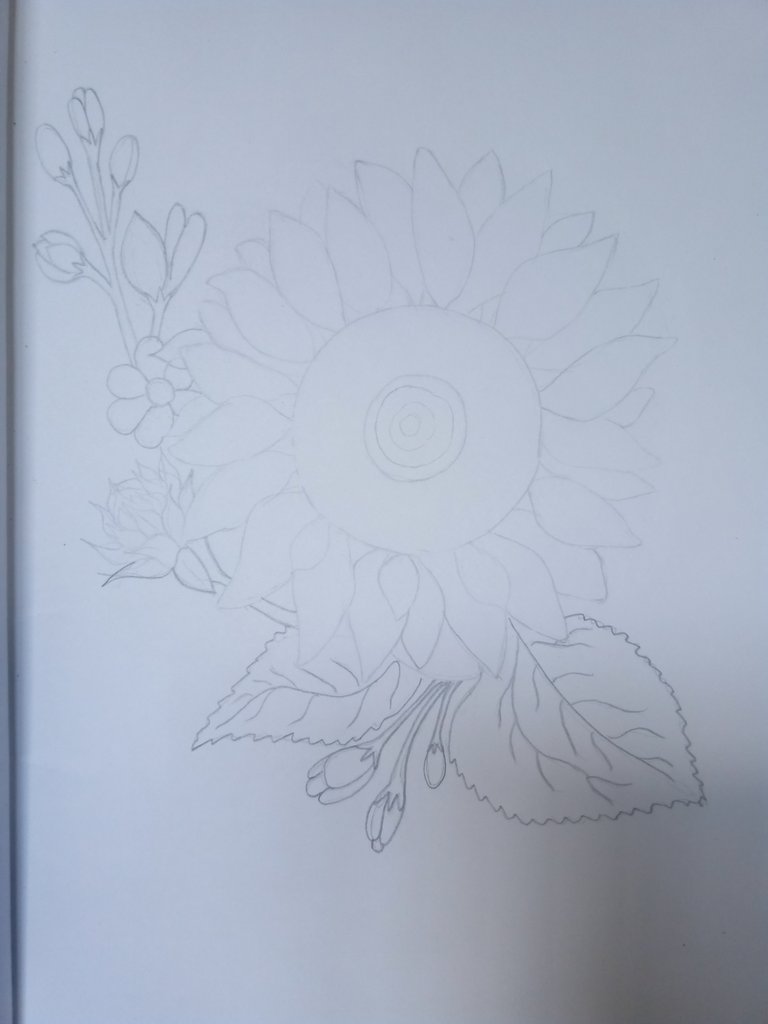
PASO 3
FORMA COMPLETA DEL DIBUJO
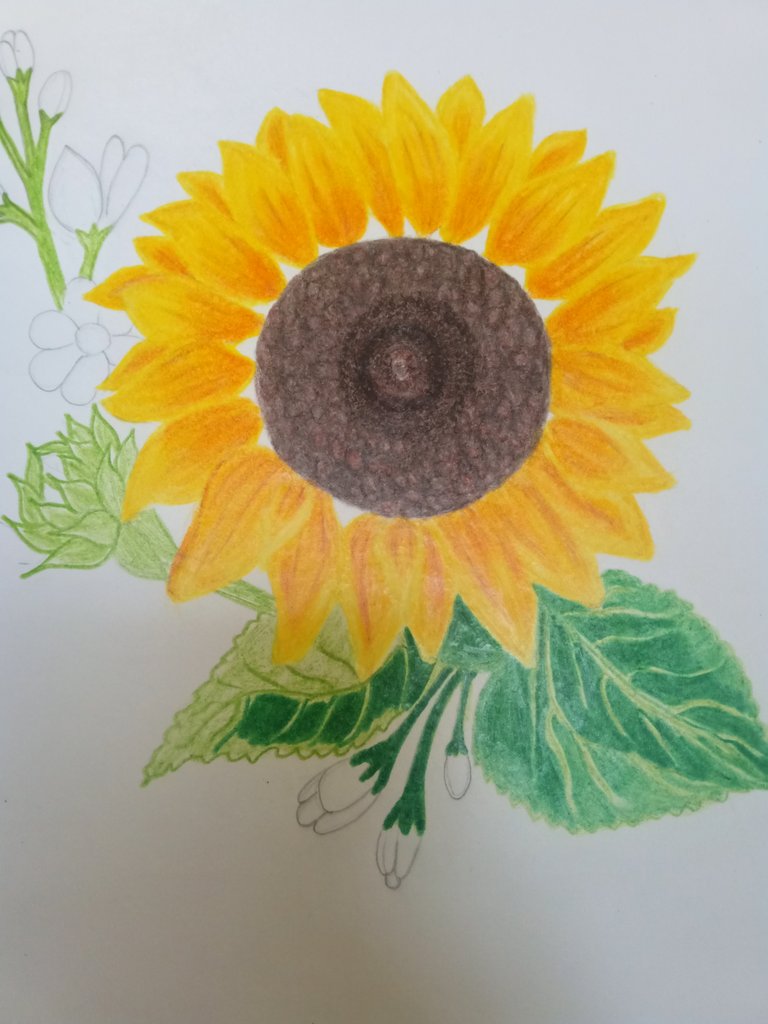
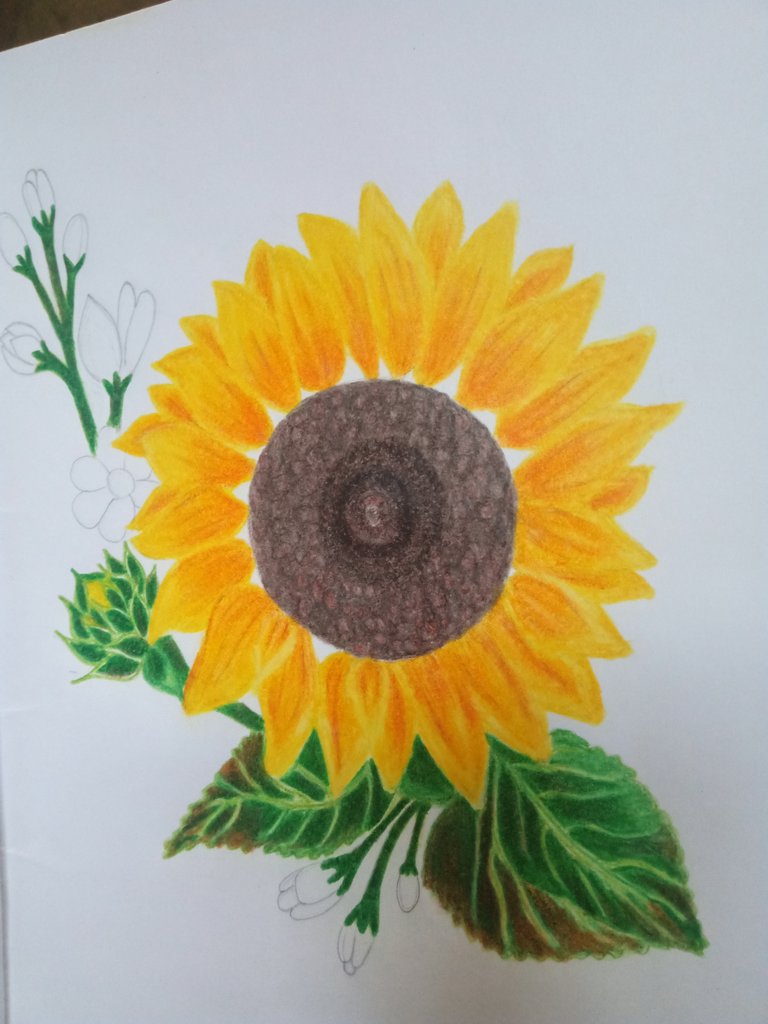
Luego de terminar de dibujar nuestra figura completa, podremos visualizar como nos está quedando nuestro dibujo, para posteriormente agregarle color y también es mi parte favorita.
PASO 4
PRIMERAS CAPAS DE COLOR
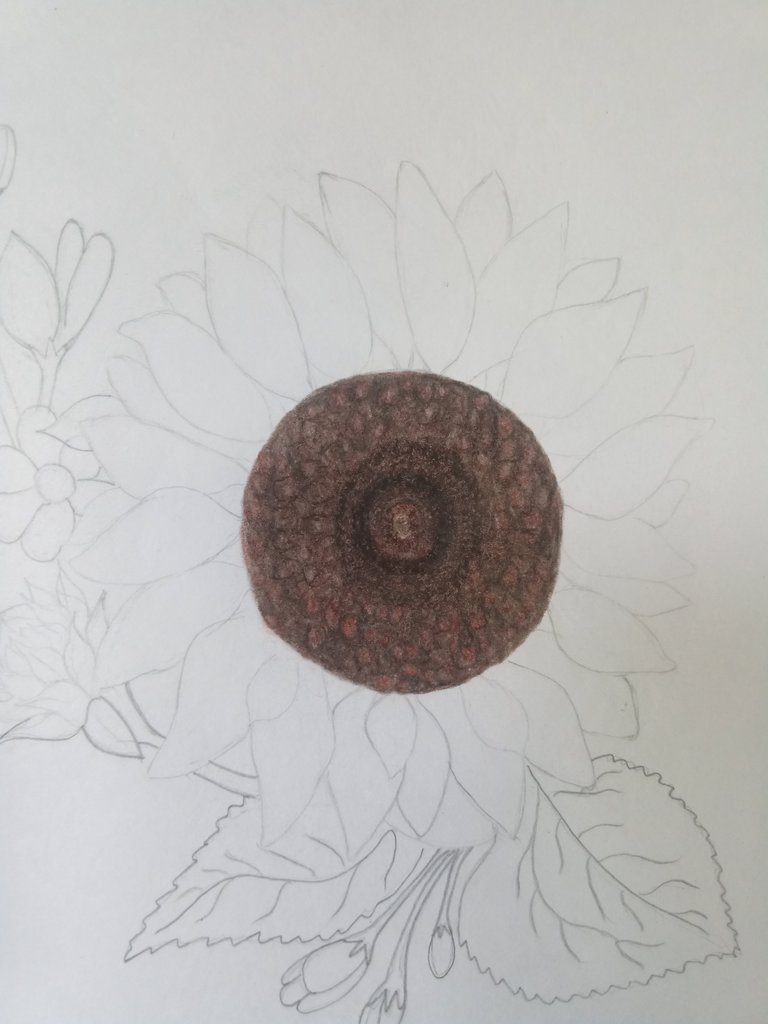
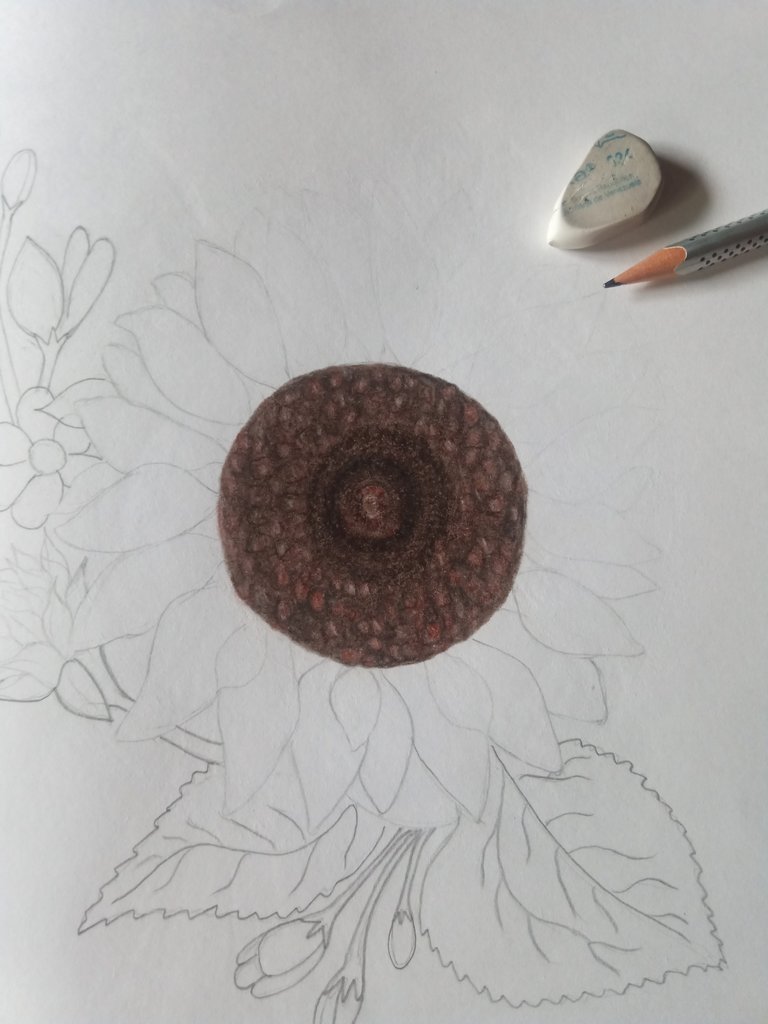
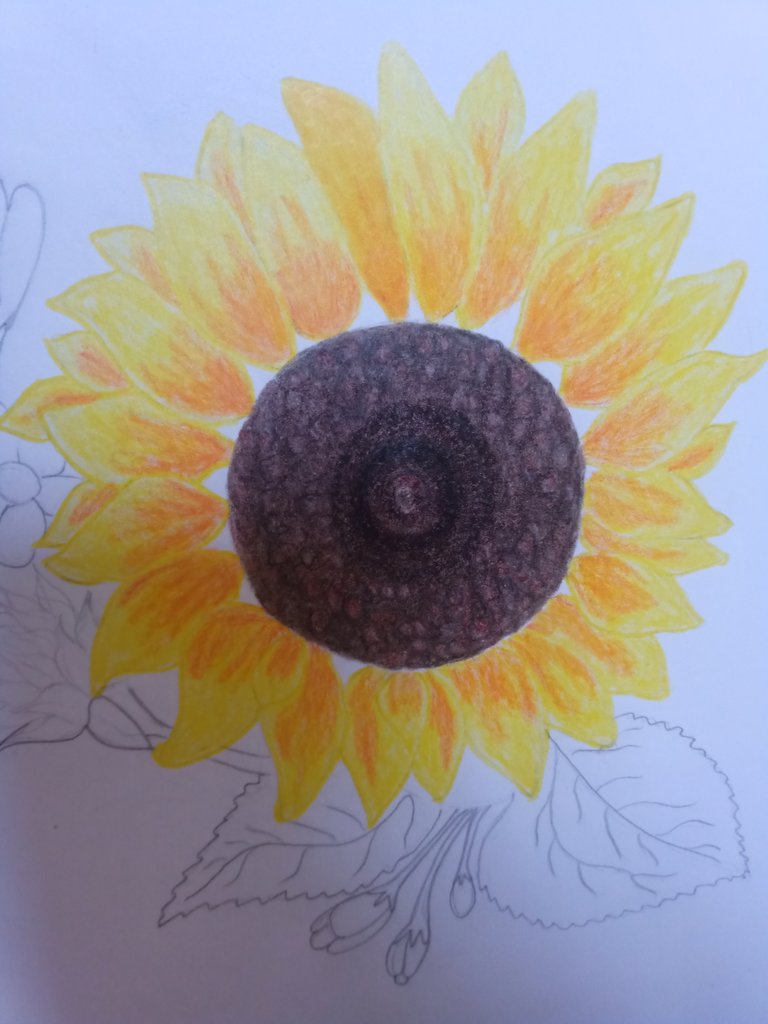
Para realizar el centro del girasol, utilice una capa del color marrón café oscuro, sobre esta agregue una capa de color marrón claro, en el centro realice unas líneas circulares con el uso del color negro, y sobre este agregue el color marrón oscuro, para hacer el efecto de profundidad, luego en el centro coloque unos puntos marrón claro y sobre los puntos coloque algunas manchas de color blanco para crear un poco de volumen, y este es el resultado final para realizar el centro de esta hermosa flor.
STEP 3
COMPLETE SHAPE OF THE DRAWING.
After we finish drawing our complete figure, we will be able to visualize how our drawing is looking like, and then we can add color to it. This is also my favorite part.
STEP 4
FIRST LAYERS OF COLOR.
To make the center of the sunflower, use a layer of dark brown color, on this add a layer of light brown color, in the center make some circular lines with the use of black color, and on this add the dark brown color, to make the effect of depth, then in the center place some light brown dots and on the dots place some white spots to create a little volume, and this is the final result to make the center of this beautiful flower.

PASO 5
LOS PÉTALOS
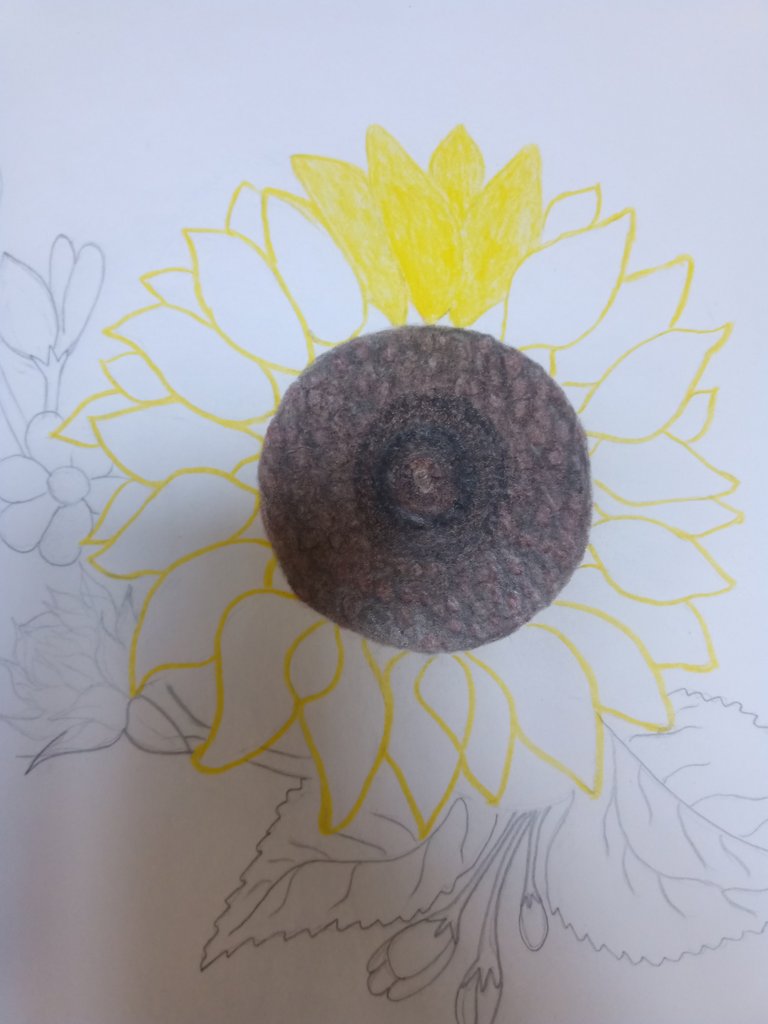
Seguido a este paso vamos a colorear los pétalos de esta flor, agregando como primera capa el color amarillo, pero antes de agregar dicho color, debemos ir borrando las líneas del lápiz de dibujo que habíamos implementado anteriormente en los pétalos, para evitar un color muy fuerte y se vea como manchado, de esta manera vamos a ir eliminando el grafito y subrayando los bordes de los pétalos con el color amarillo.
Luego de subrayar cada pétalo, vamos a rellenar uno por uno hasta completar la flor, después de colorear todos los pétalos con el color amarillo.
STEP 5
THE PETALS
Following this step we are going to color the petals of this flower, adding as first layer the yellow color, but before adding this color, we must erase the lines of the drawing pencil that we had previously implemented in the petals, to avoid a very strong color and it looks like stained, in this way we are going to eliminate the graphite and underline the edges of the petals with the yellow color.
After underlining each petal, we are going to fill in one by one until completing the flower, after coloring all the petals with the yellow color.
PASO 6
MEZCLA DE COLORES
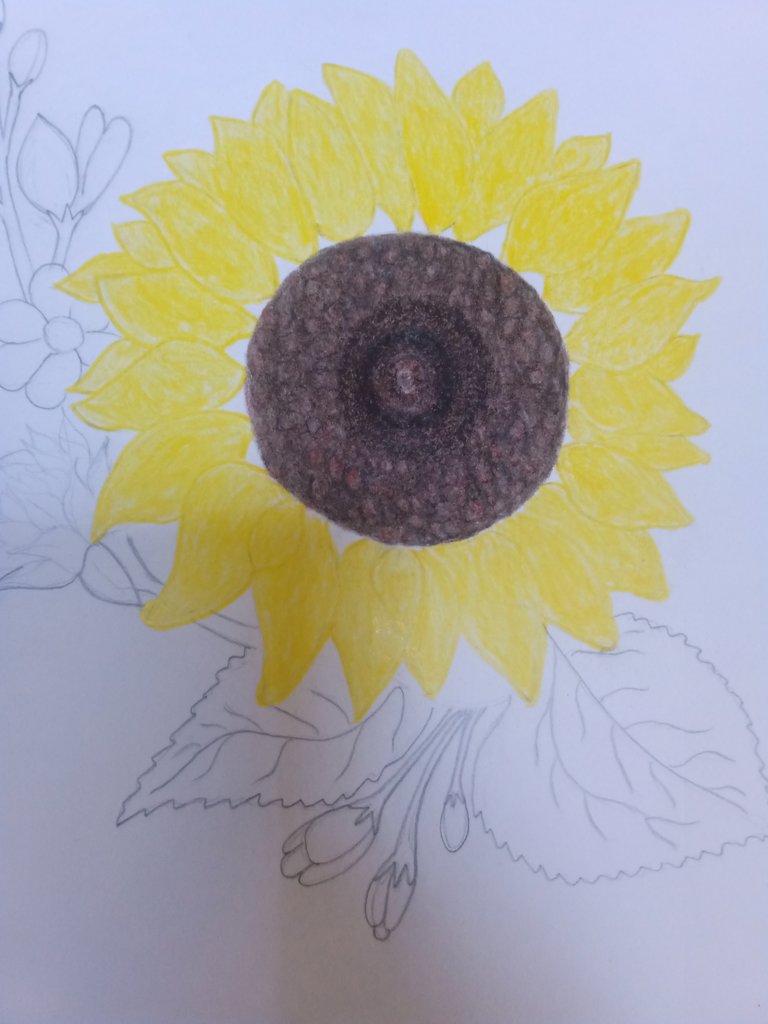
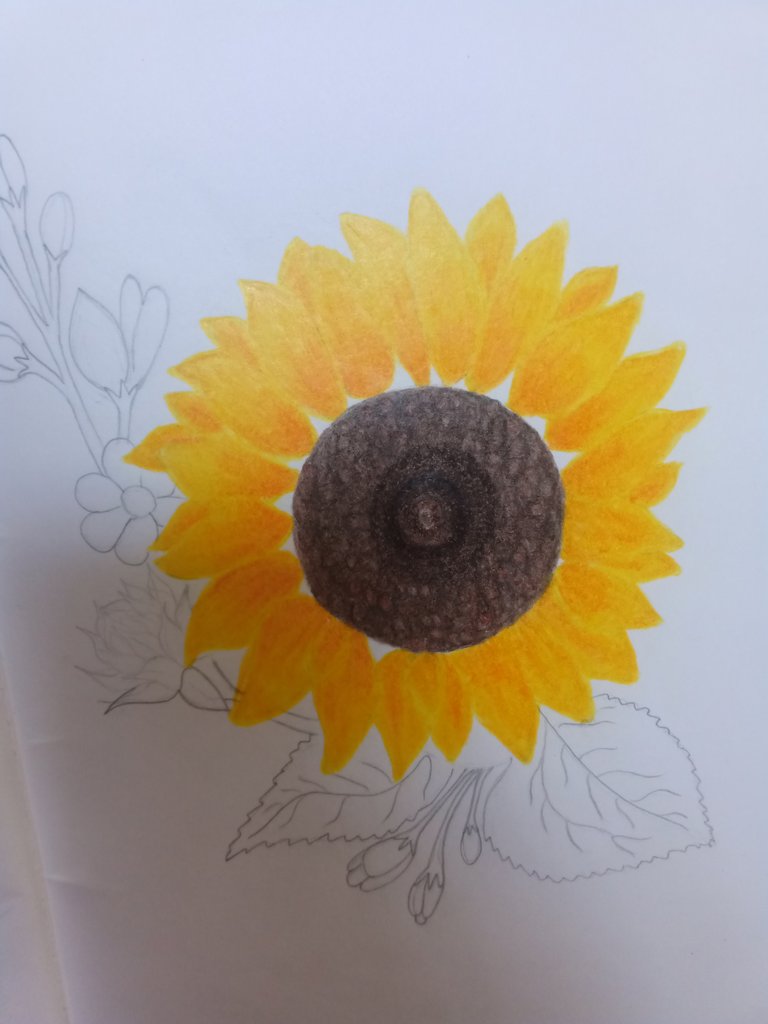
Después de haber agregado todo el color amarillo en esta flor, vamos a colocar la próxima capa que seria con un color anaranjado, esta la vamos a colocar desde la parte base del pétalo hasta aproximadamente la mitad de cada pétalo.
Sobre este color anaranjado y sobre todo el pétalo completo, vamos a pintar todos los pétalos con el color amarillo cromo, sobre este aremos algunas tonalidades con el color marrón claro y un suave blanco por los bordes y centros para darle iluminación a los pétalos.
Y este es el resultado de las capas aplicadas para poder obtener el color que deseamos.
STEP 6.
MIXING COLORS
After having added all the yellow color in this flower, we are going to place the next layer that would be with an orange color, this we are going to place it from the base of the petal until approximately the half of each petal.
Over this orange color and over the whole petal, we are going to paint all the petals with the chrome yellow color, over this we are going to make some shades with the light brown color and a soft white for the edges and centers to give illumination to the petals.
And this is the result of the layers applied to obtain the color we want.
PASO 7
LAS HOJAS
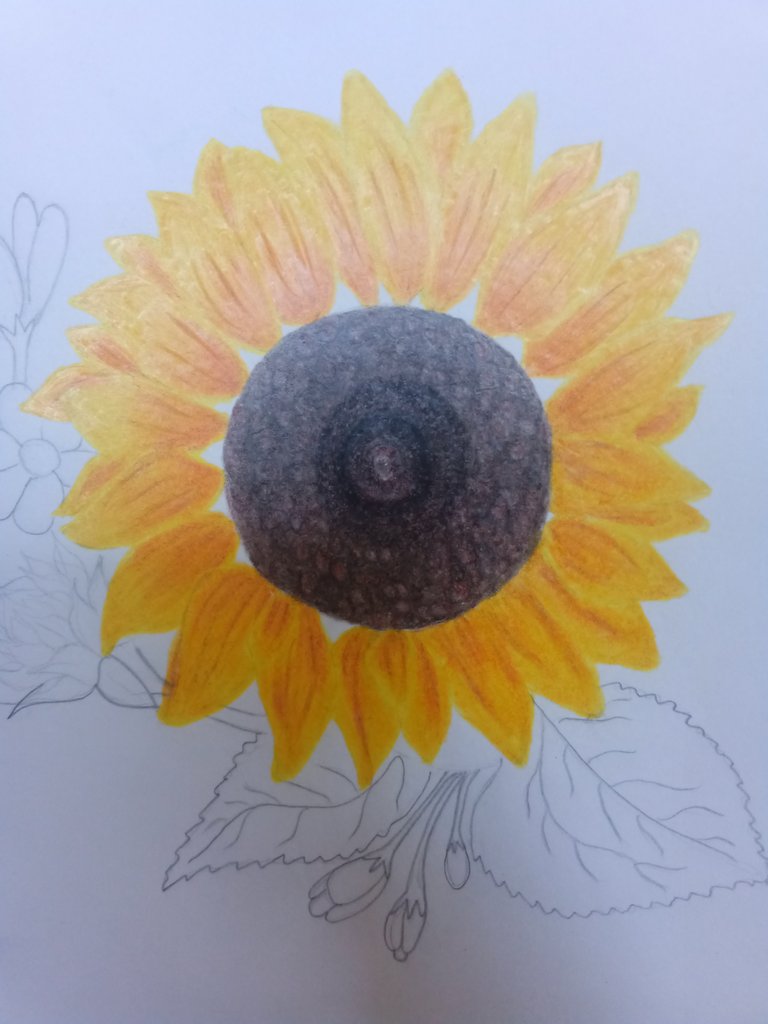
Antes de empezar a pintar las hojas, eliminaremos las líneas como anteriormente les había explicado, siempre dejando visible para luego delinear los bordes y agregarle las capas correspondientes.
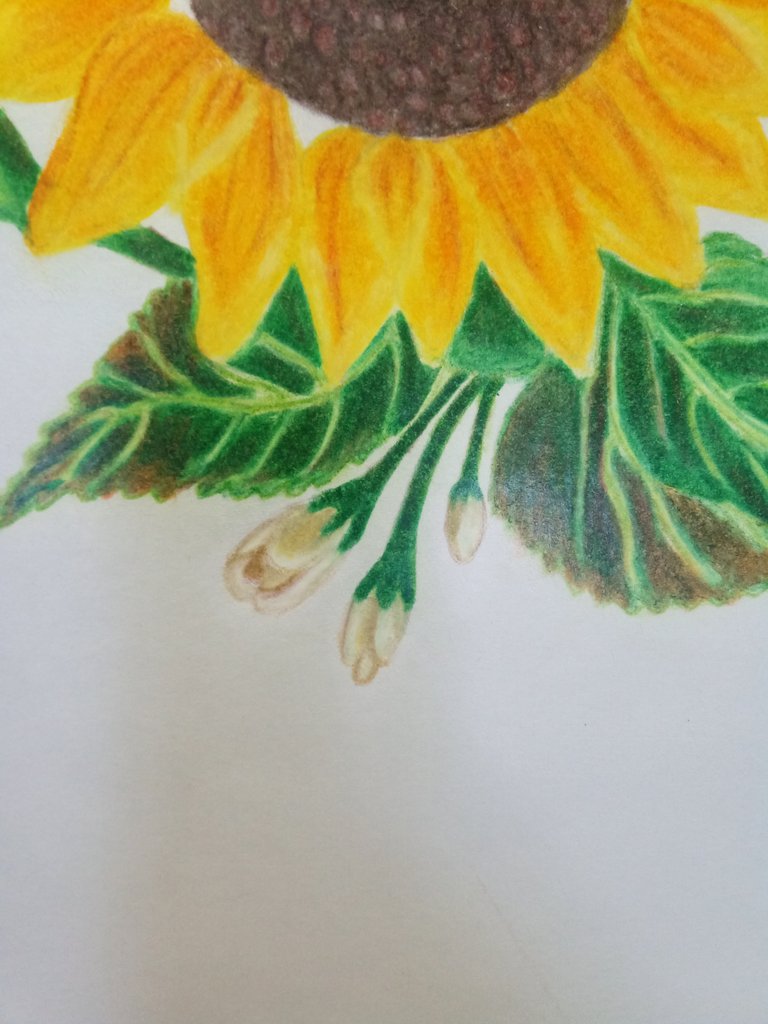
Como primera capa para las hojas, pintaremos con el color verde claro toda la hoja y los tallos, seguido a esto usaremos el color verde más oscuro donde necesitamos darle efecto de profundidad a estas hojas, dejando unas pequeñas líneas sin colorear, que serian las venas de las hojas.
STEP 7
THE LEAVES
Before starting to paint the leaves, we will remove the lines as I explained before, always leaving them visible and then outline the edges and add the corresponding layers.
As the first layer for the leaves, we will paint with the light green color all the leaf and the stems, followed by using the darker green color where we need to give depth effect to these leaves, leaving some small lines without coloring, which would be the veins of the leaves.
PASO 8
AGREGANDO OTROS TONOS
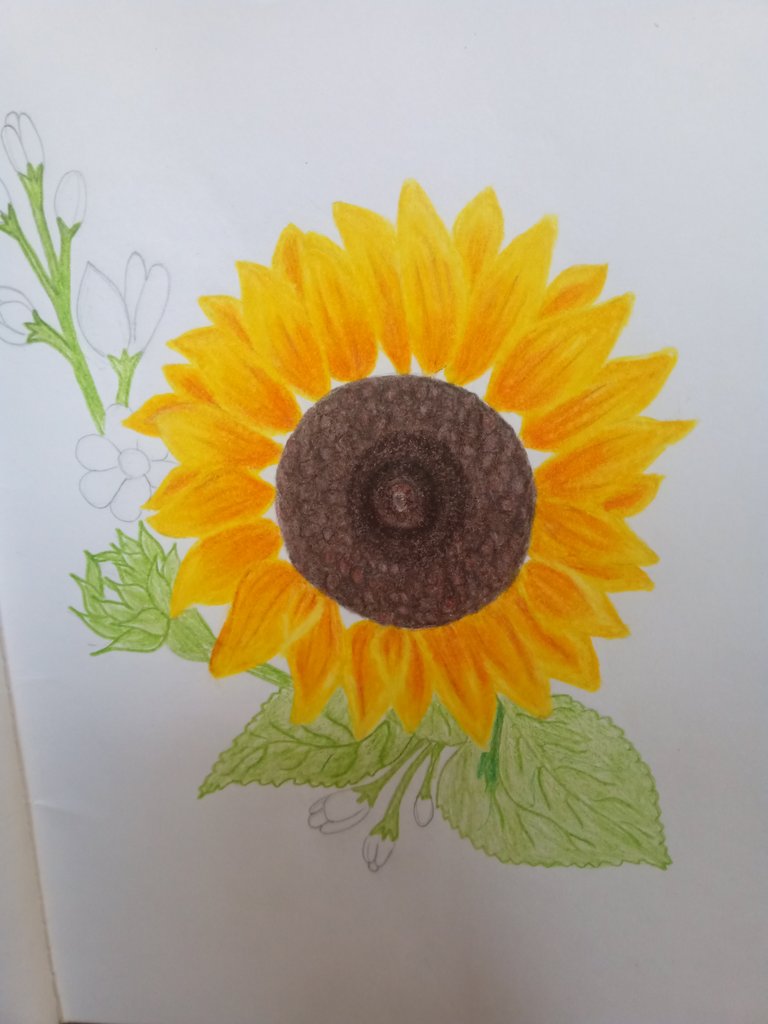
Después de haber coloreado las hojas, agregamos unas tonalidades por los bordes de las hojas con el color anaranjado y un poco de color marrón claro sobre el anaranjado para darle un aspecto de una hoja en proceso de secarse.
Culminando las hojas realizaremos el coloreado del resto de las flores, para este procedimiento, usaremos los siguientes colores:
Ocre quemado, blanco, marrón y amarillo cromo.
En los pétalos blancos agregaremos en los bordes y un poco en el centro de los pétalos el color ocre quemado, luego unas tonalidades de color marrón en las puntas de las flores, junto con algunas tonalidades de amarillo en los pétalos, y sobre estos colores agregue color blanco para fusionar todos estos colores.
Para el centro de la flor blanca que está abierta, coloque un poco del color anaranjado con amarillo cromo, dejando algunos puntos en blanco, y de esta forma culmina el proceso de creación de este dibujo.
STEP 8
ADDING OTHER SHADES
After having colored the leaves, we add some shades along the edges of the leaves with the orange color and a little bit of light brown color over the orange to give it the appearance of a leaf in the process of drying.
Culminating the leaves we will color the rest of the flowers, for this procedure, we will use the following colors:
Burnt ochre, white, brown and chrome yellow.
In the white petals we will add in the edges and a little in the center of the petals the color burnt ocher, then some shades of brown color in the tips of the flowers, along with some shades of yellow in the petals, and on these colors add white color to merge all these colors.
For the center of the white flower that is open, place some orange color with chrome yellow, leaving some white dots, and this way the process of creating this drawing is finished.
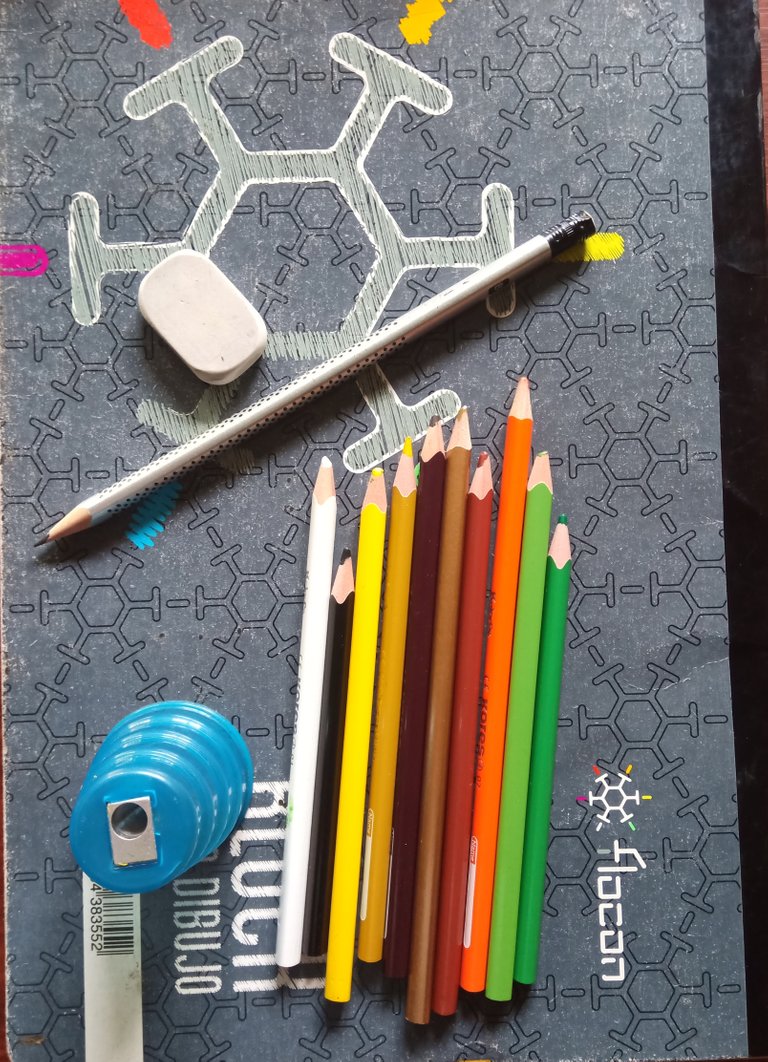
MATERIALES
BLOC DE DIBUJO.
BORRADOR.
SACAPUNTAS.
LÁPIZ DE DIBUJO.
COLORES:
Amarillo.
Amarillo cromo.
Anaranjado.
Marrón claro.
Marrón oscuro.
Negro.
Blanco.
Ocre quemado.
Verde claro.
Verde oscuro.
La imagen que utilice en referencia posee su fuente, puesto que es una imagen sacada de Pinterest, de donde estoy sacando todas las imágenes que uso para realizar mis dibujos.
Así culmina el proceso de dibujar un girasol, espero que les guste mucho mi publicación y pongan en práctica las técnicas del paso a paso que aquí les presente, gracias por visitar mi post, siempre es un placer para mí compartir con ustedes este tipo de contenido.
Nos veremos en otra publicación basado en el hermoso mundo del arte del dibujo.
MATERIALS.
SRAWING PAD.
DRAWING BOARD.
SONG PENCIL.
DRAWING PENCIL.
COLORS:
Yellow.
Chrome yellow.
Orange.
Light brown.
Dark brown.
Black.
White.
Burnt ochre.
Light green.
Dark green.
The image that I used in reference has its source, since it is an image taken from Pinterest, where I am getting all the images that I use to make my drawings.
Thus culminates the process of drawing a sunflower, I hope you like my publication and put into practice the step by step techniques that I present here, thank you for visiting my post, it is always a pleasure for me to share with you this type of content.
See you in another publication based on the beautiful world of the art of drawing.
social networks / redes sociales
![]()
![]()
Traductor Deepl
Translated Deepl
Ediciones Canva
Editions Canva


Hola! Ya he visto varios de tus dibujos. Está genial que te fijes en modelos para hacer el tuyo, eso nos hace tener una idea de qué debemos hacer para mejorar nuestro trabajo. Recuerdo que así hacía yo con mis esculturas, me fijaba en otras esculturas y aplicaba las mismas técnicas y cosas.
Una de las cosas que me inspiró en querer hacer algo fue una escultura de predator de 30 cm que vi que alguien hizo de plastilina, así que la inspiración que recibimos de otros puede ser muy buena para nosotros.
Continúa dibujando, lo haces genial.
Gracias gabo, las imágenes en referencia nos ayudan mucho a adquirir nuestro propio estilo de dibujo, incluso nos ayuda a tener la creatividad de hacer nuestros propios dibujos sacados de la mente.
Congratulations @lauracraft! You have completed the following achievement on the Hive blockchain and have been rewarded with new badge(s):
Your next target is to reach 9000 upvotes.
You can view your badges on your board and compare yourself to others in the Ranking
If you no longer want to receive notifications, reply to this comment with the word
STOPSupport the HiveBuzz project. Vote for our proposal!