Drawing a beautiful landscape of a house next to a lighthouse / Drawing / (ENG/ESP)

Saludos, mis estimados amigos, sean bienvenidos a una publicación más de dibujo que he venido realizando, inspirada en algunas imágenes de una página de internet, mis dibujos se basan tanto en blanco y negro como a color.
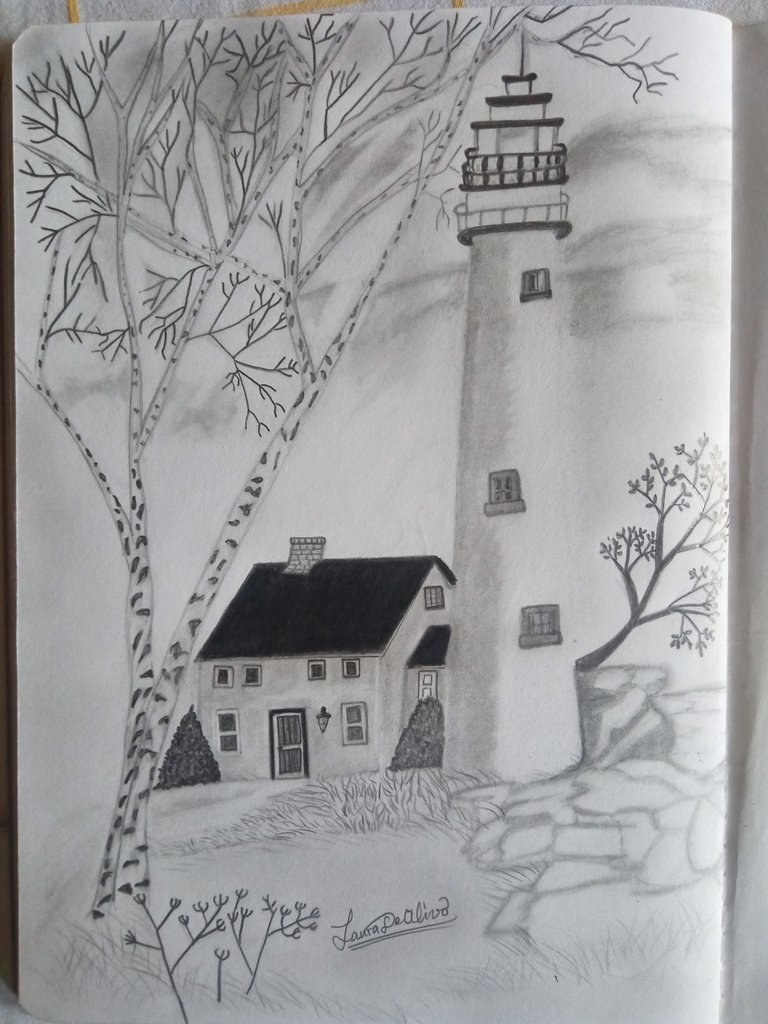
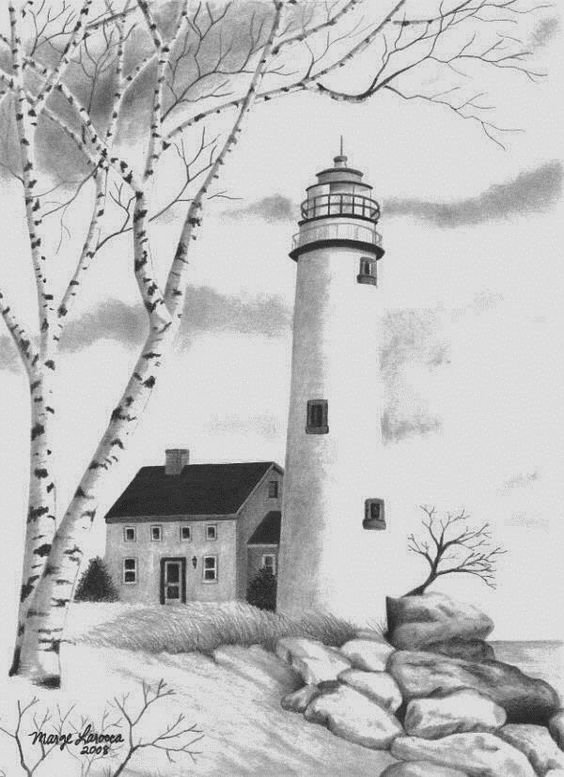
Hoy les vengo a presentar un paisaje de una casa que está al lado de un faro, me gusto mucho este paisaje, ya que transmite mucha tranquilidad, me llamo mucho la atención de dibujar un faro porque siempre trae mucha curiosidad y me inspire mucho realizarlo, no se me hizo fácil, pero logre alcanzar la meta de hacerlo lo más similar a mi imagen de referencia.
Las fotografías que verán a continuación, fueron tomadas con mi teléfono modelo Alcatel_5044R.
A continuación, les presentaré el proceso de elaboración que implemente para realizar este dibujo.

Greetings, my dear friends, welcome to another drawing publication that I have been doing, inspired by some images from a web page, my drawings are based on both black and white and color.
Today I come to present a landscape of a house that is next to a lighthouse, I really liked this landscape, because it transmits a lot of tranquility, I called my attention to draw a lighthouse because it always brings a lot of curiosity and I was very inspired to do it, it was not easy, but I managed to achieve the goal of making it as similar to my reference image.
The pictures you will see below were taken with my phone model Alcatel_5044R.
Next, I will show you the elaboration process that I implemented to make this drawing.

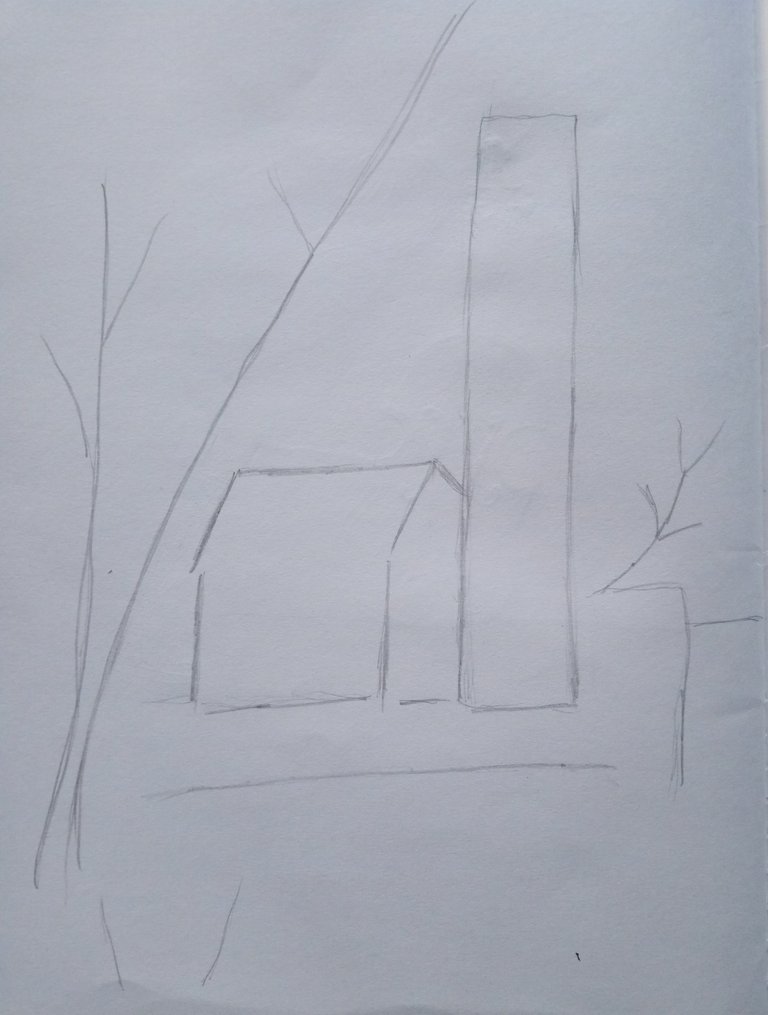
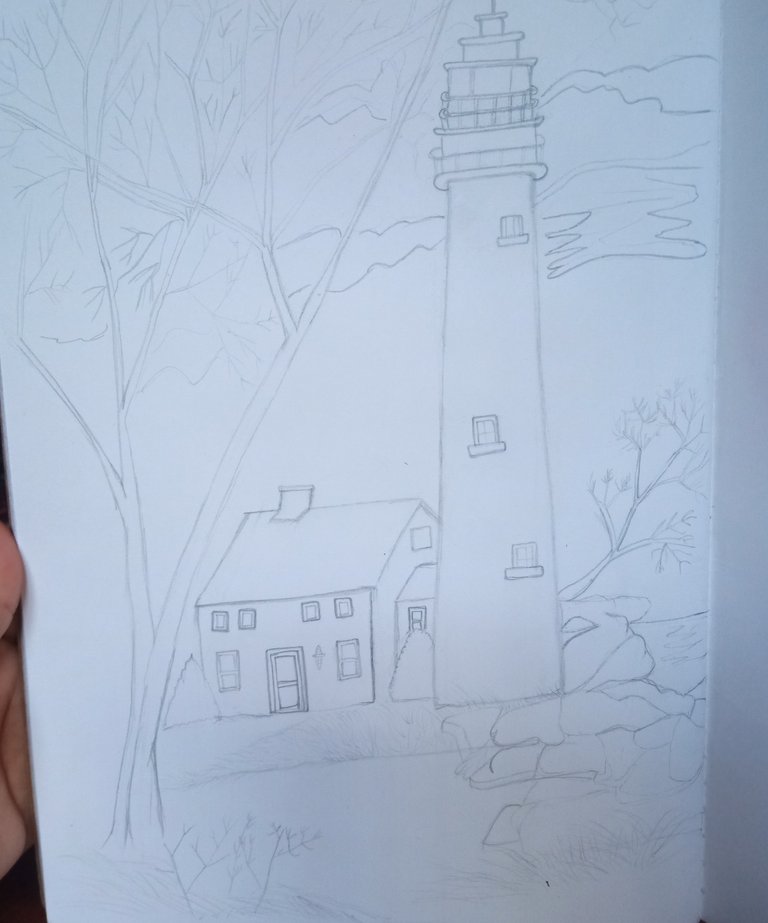
Paso 1
LÍNEA DE INICIO COMO PUNTO DE PARTIDA PARA EMPEZAR ESTE PAISAJE
Estas figuras pueden notar que se ven un poco desproporcionadas, no hay problema porque a medida que vayamos avanzando en nuestro dibujo, iremos corrigiendo los detalles, estas figuras son una guía de como se verá la ubicación de las diferentes áreas del dibujo.
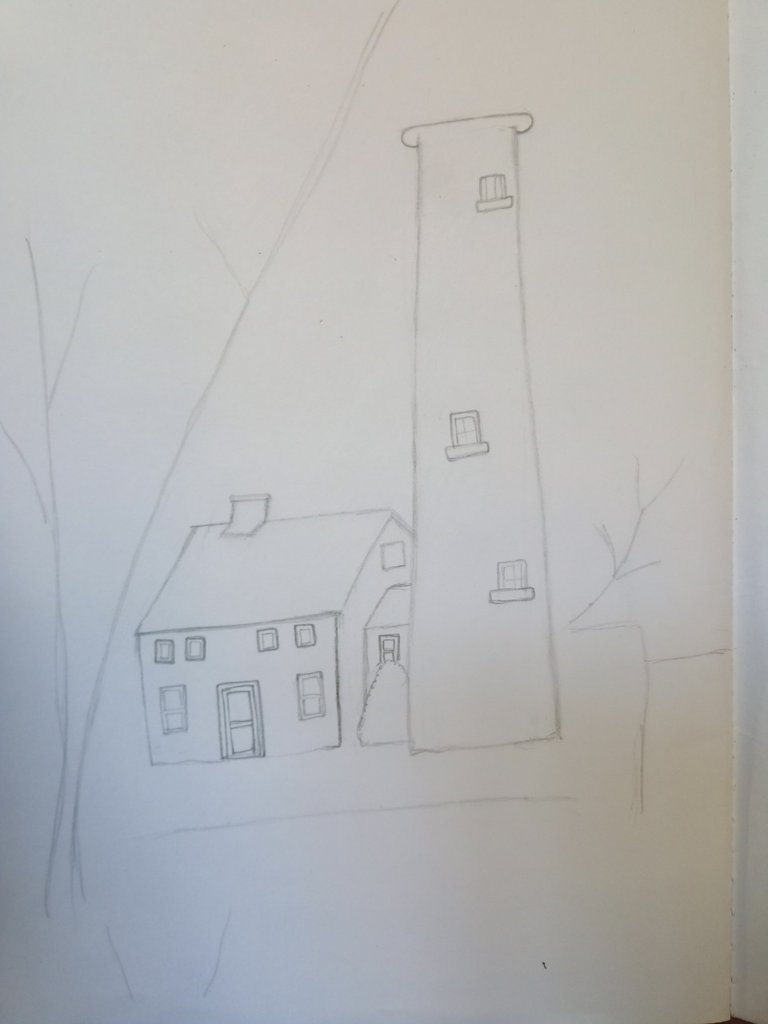
PASO 2
DIBUJANDO LA CASA Y PARTE DEL FARO
En esta segunda parte comenzamos a darle forma a la casa y al faro, podemos notar que la casa está un poco inclinada hacia la izquierda, por lo que se puede apreciar un poco la parte trasera del mismo, así que comencé a trabajar en la casa de primero para posteriormente trabajar con el faro.
Para la parte de las ventanas del faro también se puede apreciar que estas ventanas no están proporcionadas, ya que como el mismo no es cuadrado, más adelante se le agregaran más capas de color para darle ese efecto de dimensiones que el faro posee, ya que el mismo es un óvalo.
Step 1.
STARTING LINE AS A STARTING POINT TO BEGIN THIS LANDSCAPE.
These figures you may notice that they look a little disproportionate, no problem because as we move forward in our drawing, we will be correcting the details, these figures are a guide of how the location of the different areas of the drawing will look like.
STEP 2
DRAWING THE HOUSE AND PART OF THE LIGHTHOUSE.
In this second part we start to shape the house and the lighthouse, we can notice that the house is a little bit tilted to the left, so you can see a little bit the back part of it, so I started to work on the house first to later work with the lighthouse.
For the part of the windows of the lighthouse you can also appreciate that these windows are not proportionate, since the lighthouse is not square, later more layers of color will be added to give that effect of dimensions that the lighthouse has, since it is an oval.
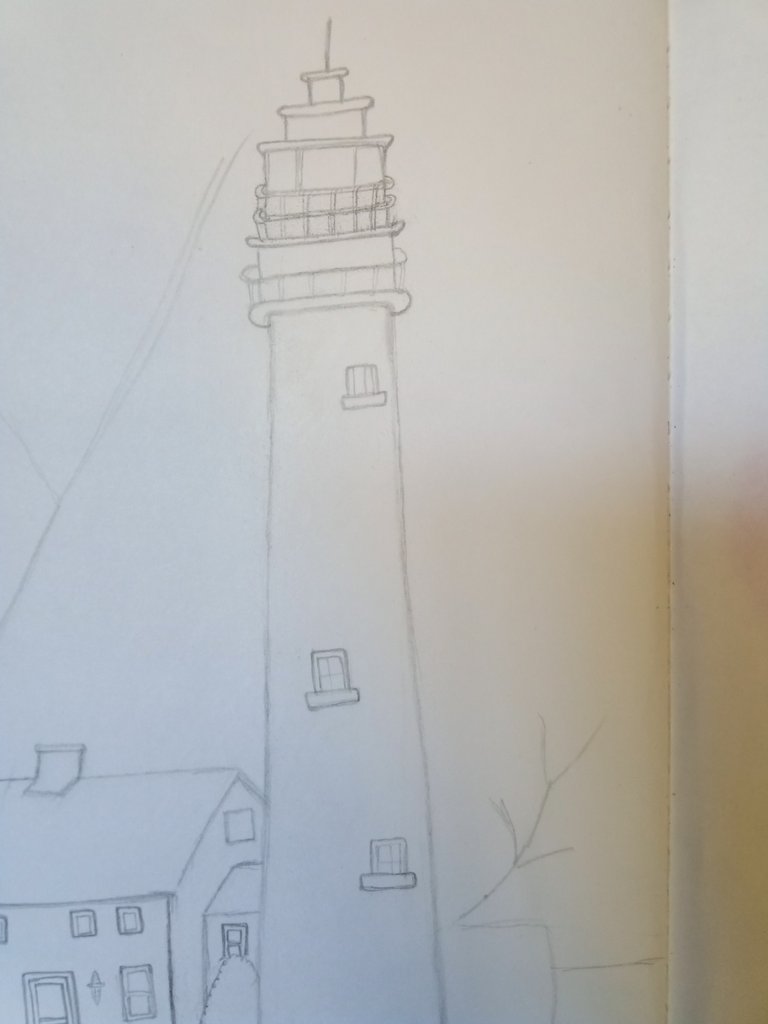
PASO 3
LA PUNTA DEL FARO
Realizar la punta del faro no fue fácil, ya que darle el efecto de dimensiones cuesta mucho trabajo y perspectiva, pero al final lo pude lograr, todo está en las curvaturas que le agreguemos a las barandas que el mismo posee.
PASO 4
EL AMBIENTE
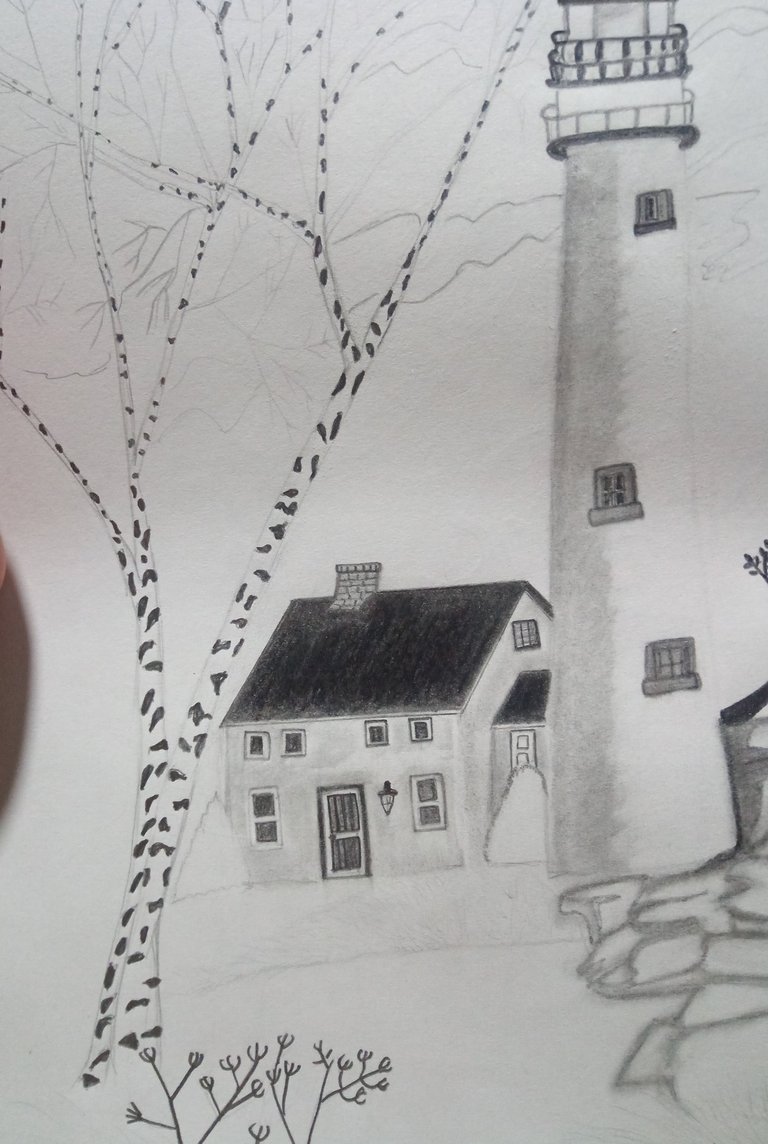
Después de terminar la casa y el faro, realizaremos los alrededores de la casa donde se observan piedras, vegetación, un lago, árboles y algunas nubosidades, primero comencé por las piedras, las vamos a hacer como cuando hacemos nubes, una junto a la otra, luego aremos la vegetación como imaginando una brisa que llega desde el lago y hace que las gramas estén en un poco inclinadas por el viento.
Para realizar los árboles fue necesario hacer varias líneas verticales, curvas, inclinadas, posteriormente realicé unas ramas menores más finas en los ápices del árbol, además de este tipo de árbol alto, también está una especie de pinos que están cerca de las ventanas de esta casa, los mismos se realizaron como una forma de triángulo y por las orillas se dibujó unas formas como corrugadas que simulan las hojas de los pinos.
PASO 3
THE TIP OF THE LIGHTHOUSE
Making the tip of the lighthouse was not easy, since giving the effect of dimensions costs a lot of work and perspective, but in the end I was able to achieve it, everything is in the curvatures that we add to the rails that it has.
STEP 4
THE ENVIRONMENT.
After finishing the house and the lighthouse, we will make the surroundings of the house where we can see stones, vegetation, a lake, trees and some clouds, first I started with the stones, we will make them as when we make clouds, one next to the other, then we will make the vegetation as imagining a breeze that comes from the lake and makes the grasses a little bit inclined by the wind.
To make the trees it was necessary to make several vertical lines, curves, inclined, then I made some smaller branches thinner at the apexes of the tree, in addition to this type of tall tree, there is also a kind of pine trees that are near the windows of this house, they were made as a triangle shape and the edges were drawn as corrugated shapes that simulate the leaves of the pines.
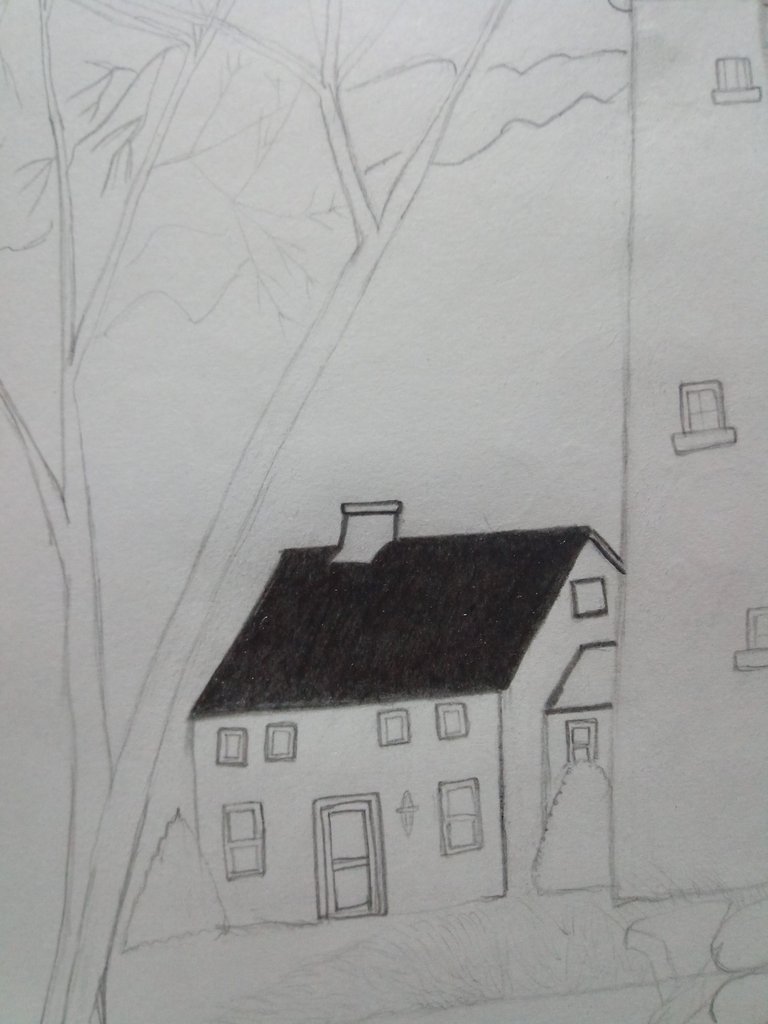
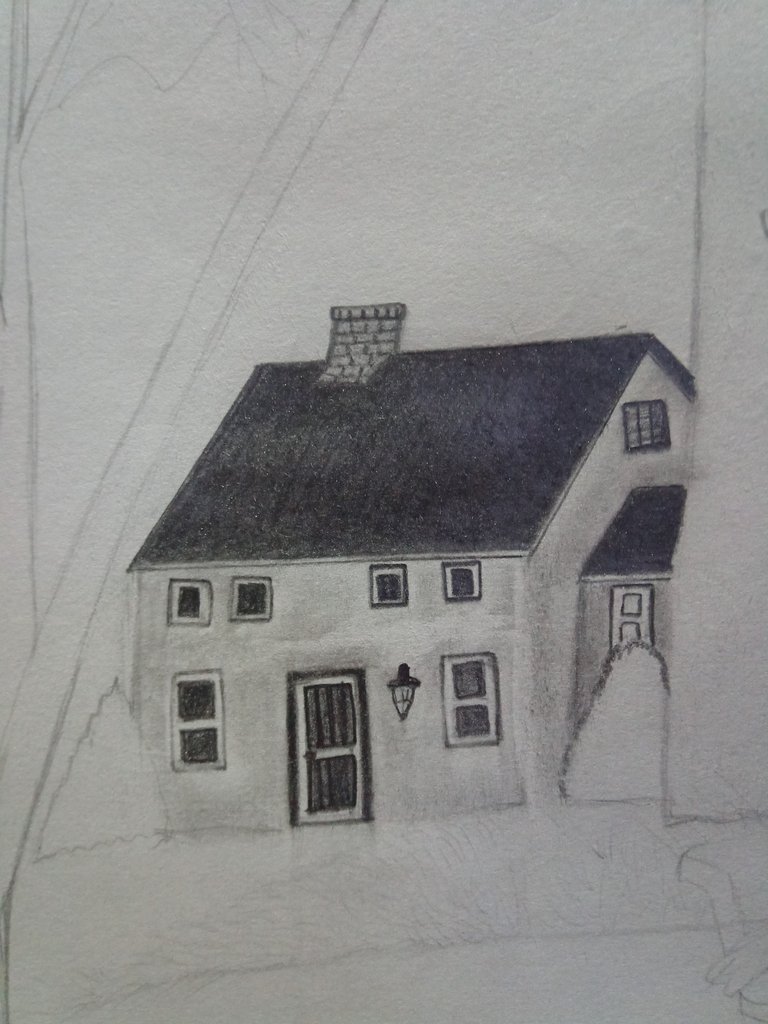
PASO 5
CAPAS OSCURAS DE LA CASA
Con la ayuda de mi lápiz de grafito negro oscuro, comencé a rellenar el techo de la casa desde la parte de arriba de forma vertical de arriba hacia abajo, desde la izquierda hacia la derecha para evitar manchar otras áreas, también realizaremos un borde más claro por los lados del techo con la punta fina del lápiz, también pintaremos las ventanas y puertas de la casa.
Después de pintar el techo y ventanas, comencé a darle color a las otras áreas en la casa, para lograr este efecto de profundidad, primero pase suavemente el lápiz de dibujo por las paredes y posteriormente con la ayuda de un algodón comencé afrontarlos en las paredes muy suavemente para no oscurecer y dejar un efecto lo más parecido a la imagen de referencia, después con la ayuda de un borrador le di ese efecto de brillo en algunas áreas de esta pared para hacer que se vea lo más realista posible.
STEP 5
DARK LAYERS OF THE HOUSE.
With the help of my dark black graphite pencil, I started to fill in the roof of the house from the top vertically from top to bottom, from the left to the right to avoid staining other areas, we will also make a lighter edge along the sides of the roof with the fine tip of the pencil, we will also paint the windows and doors of the house.
After painting the ceiling and windows, I began to give color to the other areas in the house, to achieve this effect of depth, first pass gently the drawing pencil on the walls and then with the help of a cotton ball I began to face them on the walls very gently to not darken and leave an effect as close as possible to the reference image, then with the help of an eraser I gave that effect of brightness in some areas of this wall to make it look as realistic as possible.
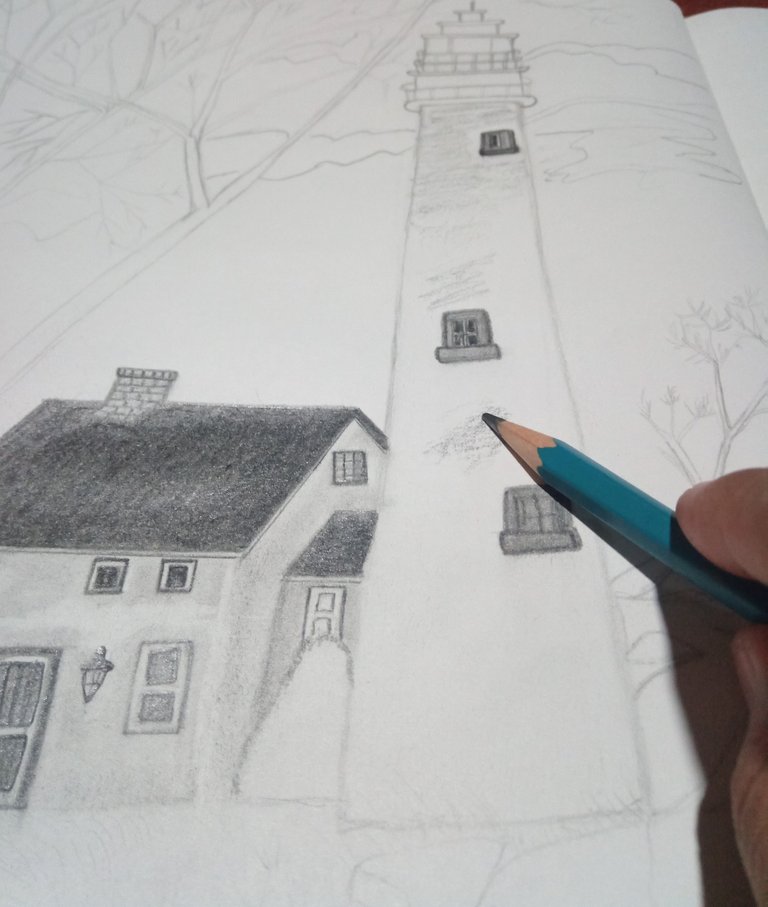
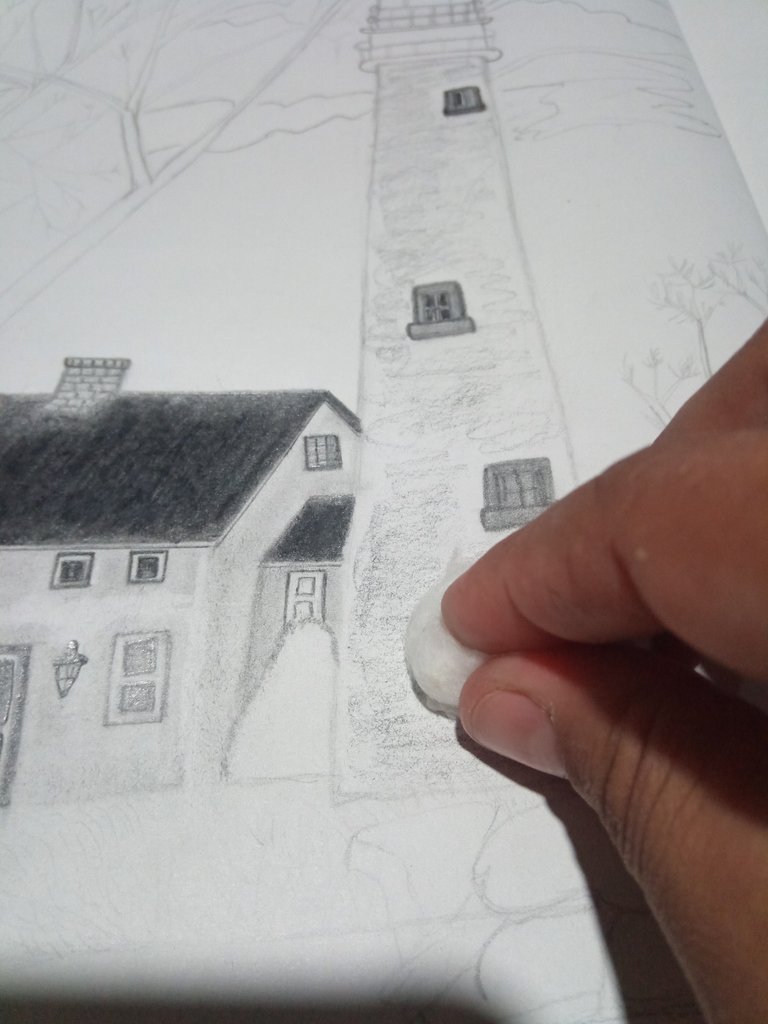
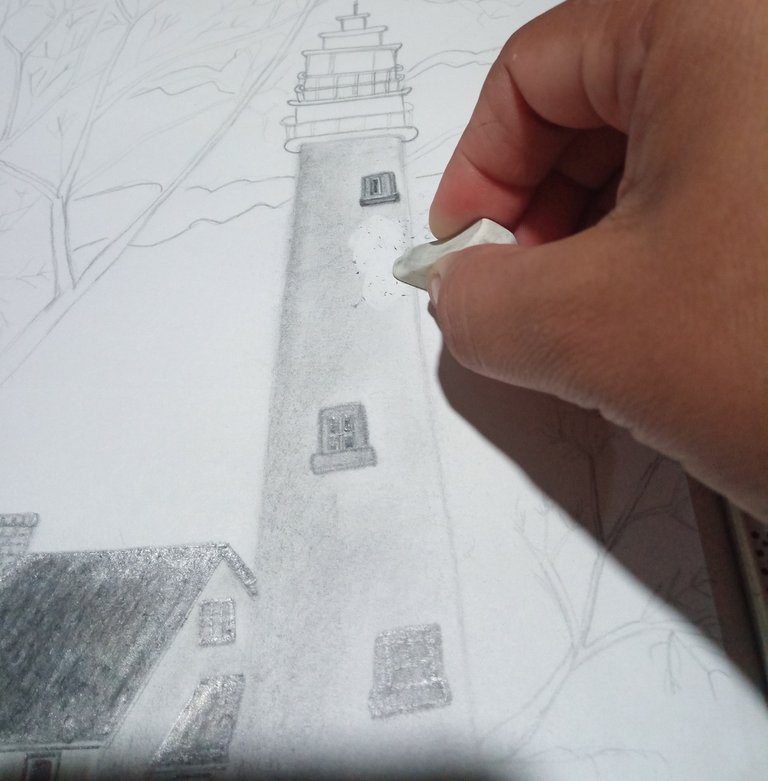
PASO 6
ILUMINACIÓN DEL FARO
Después de haber realizado el difuminado en el área de las paredes de la casa voy a darle color al faro iniciando por las ventanas, con el uso del lápiz de dibujo voy a oscurecer las ventanas para luego hacer algunas sombras oscuras en las paredes del faro.
Luego de eso utilice el algodón para pasarlo por toda el área del faro sin tocar las ventanas para que estas no me mancharan el dibujo, posteriormente le agregue una segunda capa de oscuridad a la mitad del faro y lo volví a difuminar, como mencione anteriormente el faro está dividido en dos partes, una parte oscura y otra parte más clara, aclare la otra mitad del faro con la ayuda del borrador, después comencé a borrar desde la parte de arriba hacia abajo.
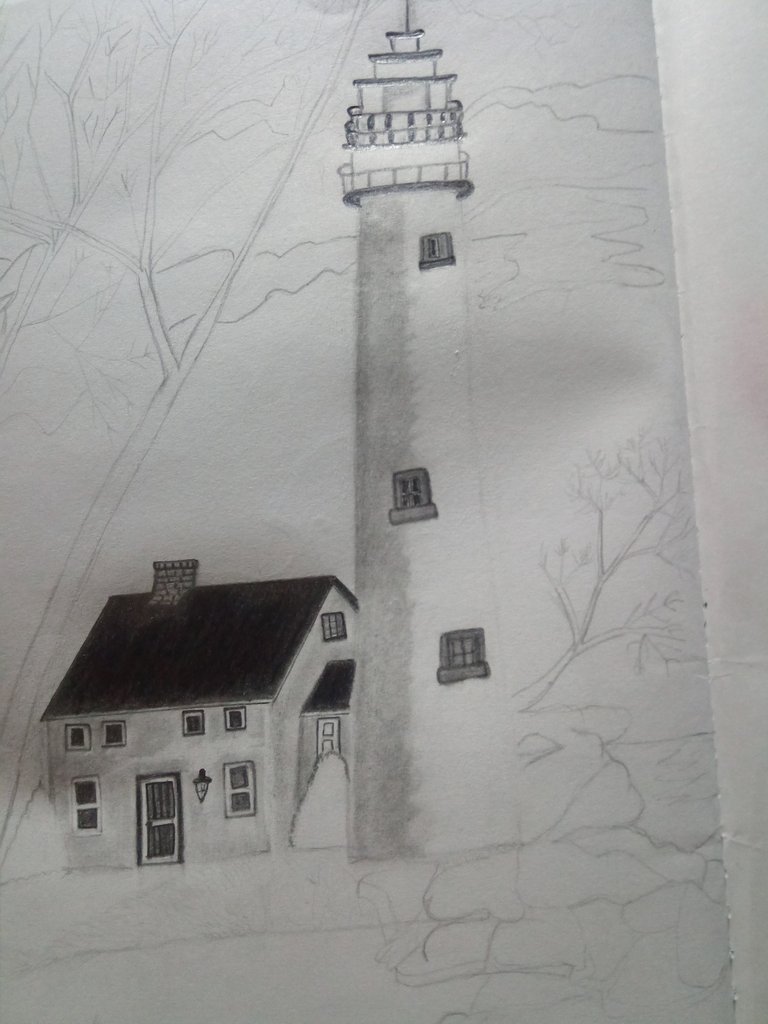
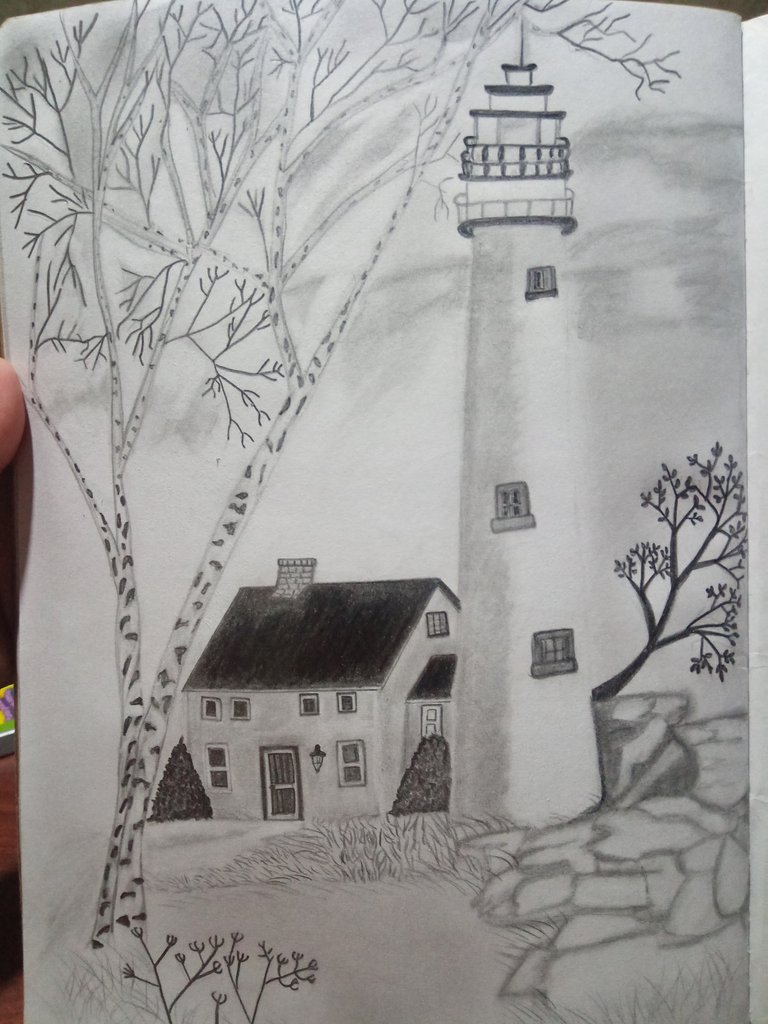
Y de esta forma nos vendría quedando nuestro hermoso faro, podrán notar que tiene el efecto de sombreado en el punto exacto del mismo y hace que destaque incluso la casa que tiene al lado.
STEP 6
LIGHTING THE LIGHTHOUSE.
After having done the blurring in the area of the walls of the house I am going to give color to the lighthouse starting with the windows, with the use of the drawing pencil I am going to darken the windows and then make some dark shadows on the walls of the lighthouse.
After that I used the cotton to pass it by all the area of the lighthouse without touching the windows so that these did not stain the drawing, later I added a second layer of darkness to the half of the lighthouse and I blurred it again, as I mentioned before the lighthouse is divided in two parts, a dark part and another lighter part, I lightened the other half of the lighthouse with the help of the eraser, then I began to erase from the top downwards.
And this way we would have our beautiful lighthouse, you will be able to notice that it has the effect of shading in the exact point of the same one and it makes stand out even the house that has next to it.
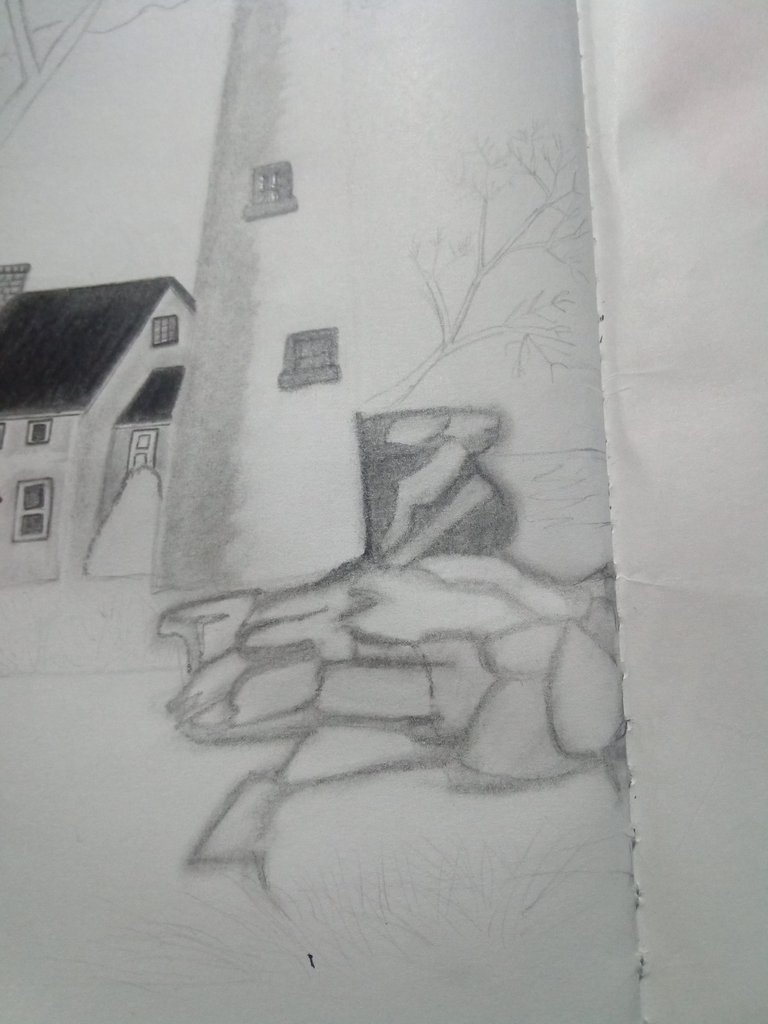
PASO 7
LAS PIEDRAS
Para realizar el pintado de las piedras subraye todos los bordes con el lápiz de dibujo, haciendo unos bordes más oscuros que otros, para luego difuminarlas con el algodón.
PASO 8
EL ÁRBOL
Para el árbol, le agregué muchos puntos negros en sus ramas, luego con un cotonete, difumine muy cuidadosamente sobre los puntos negros de todo el árbol.
STEP 7
STONES
To paint the stones, underline all the edges with the drawing pencil, making some edges darker than others, and then blend them with the cotton.
STEP 8
THE TREE
For the tree, I added many black dots on its branches, then with a cotton swab, very carefully blend over the black dots all over the tree.
PASO 9
DETALLES FINALES
Utilice la punta finas de mi lápiz para realizar las gramas en sentido del viento, y para finalizar realice unas sombras entre el faro y los árboles para simular las nubes de este ambiente y para las nubes utilice un algodón que ya estaba usado y lleno de grafito de nuestro lápiz de tanto difuminar, lo pase por las partes de las nubes para darle ese ambiente de cielo nublado a este lindo paisaje, de esta forma habremos finalizado nuestro dibujo.
STEP 9.
FINAL DETAILS.
I used the fine tip of my pencil to make the scales in the direction of the wind, and to finish I made some shadows between the lighthouse and the trees to simulate the clouds of this environment and for the clouds I used a cotton that was already used and full of graphite of our pencil from so much blurring, I passed it through the parts of the clouds to give that atmosphere of cloudy sky to this beautiful landscape, in this way we will have finished our drawing.
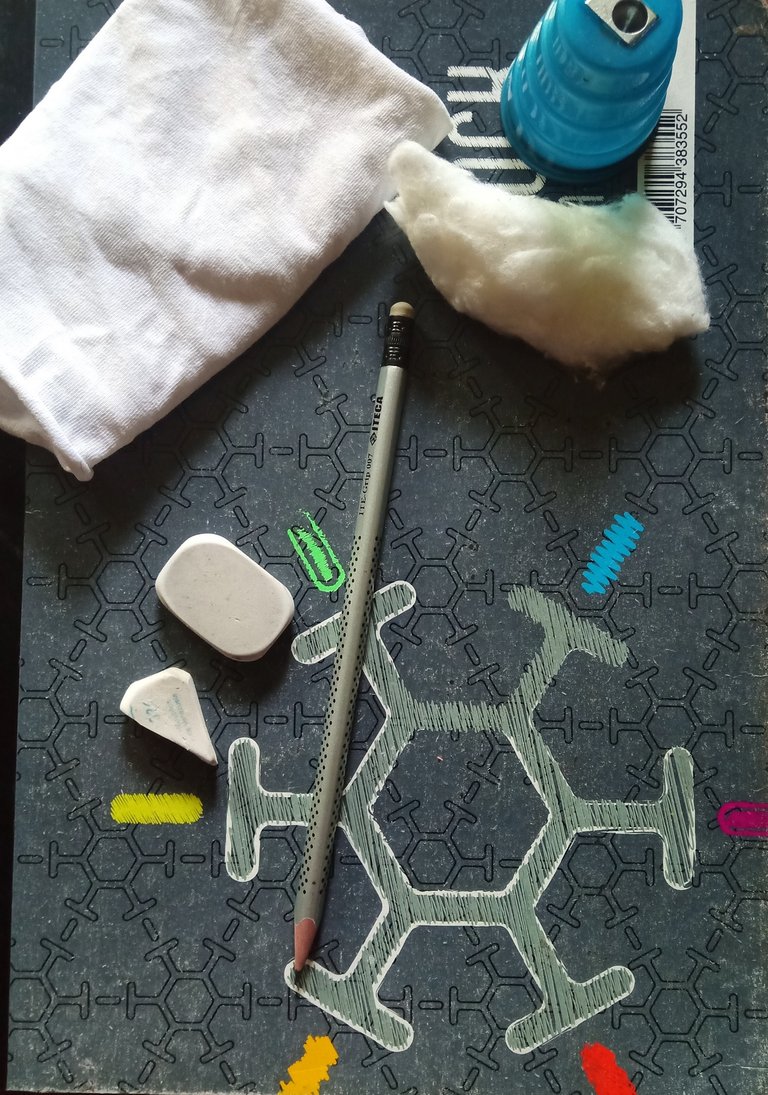
MATERIALES
BLOC DE DIBUJO.
BORRADOR.
SACAPUNTAS.
LÁPIZ DE DIBUJO.
PAÑUELO.
ALGODÓN.
COTONETE.
La imagen que utilice en referencia posee su fuente, puesto que es una imagen sacada de Pinterest, de donde estoy sacando todas las imágenes que uso para realizar mis dibujos.
Así culminamos la publicación amigos, espero que te haya gusto y hayas aprendido algo nuevo el día de hoy con mi publicación de dibujo.
Nos veremos en otra publicación basa en el hermoso mundo del arte del dibujo.
MATERIALS.
SKETCH PAD.
DRAFT.
PENCIL SHARPENER.
DRAWING PENCIL.
SCARF.
COTTON.
COTONET.
The image I used in reference has its source, since it is an image taken from Pinterest, where I am getting all the images I use to make my drawings.
So we culminate the publication friends, I hope you liked it and have learned something new today with my publication of drawing.
See you in another publication based on the beautiful world of the art of drawing.
social networks / redes sociales
![]()
![]()
Traductor Deepl
Translated Deepl
Ediciones Canva
Editions Canva


Te quedó genial!
Los dibujos a blanco y negro son especialmente difíciles de hacer porque no hay colores con los cuales embellecerlos, solo usamos el grafito para crear profundidad, para que no quede plano nuestro dibujo.
Tu aplicaste sombras y lo hiciste bien, eso se puede ver espeialmente en la casa,oscurecida por la sombra que produce el faro.
Geniales tus dibujos, sigue así.
Gracias gabo, me alegro de que te haya gustado el dibujo, ciertamente tienes razón con los dibujos en blanco y negro, son muy difíciles de hacer, por lo mismo que mencionas, gracias por tu apoyo😇.
👍💪🇦🇷
🤗
I love this @lauracraft it has the feeling of the american painter Grandma Moses and I love anything by the sea.
I'm glad you liked it my friend, this drawing is very beautiful, the feeling and the landscape that this drawing transmits is very beautiful.
Beautiful sketch 👌 ♥
thanks my friend
Lots of love ❤
Hola @lauracraft gracias por compartir el paso a paso, me dieron ganas de dibujar, así que me puse en marcha y seguí tus indicaciones. El asunto es que tenía muucho tiempo que no lo hacía que el resultado no es digno de ser mostrado, pero eso sí, disfruté mucho haciéndolo.
Nuevamente gracias por compartirlo.
Que bueno amiga que mi post te haya servido de inspiración, a veces me pasa cuando hago un dibujo para compartirlo, pero no me termina gustando, así que hago otro y así voy hasta hacer uno digno de compartir, saludos
Te felicito, es un trabajo estupendo. me identifico mucho con tu dibujo porque en estos momentos solo quiero paz.