DRAWING AN URBAN GIRL WITH A CAP│DIBUJANDO A UNA CHICA URBANA CON GORRO [ING - SPA]
English
Hello friends!
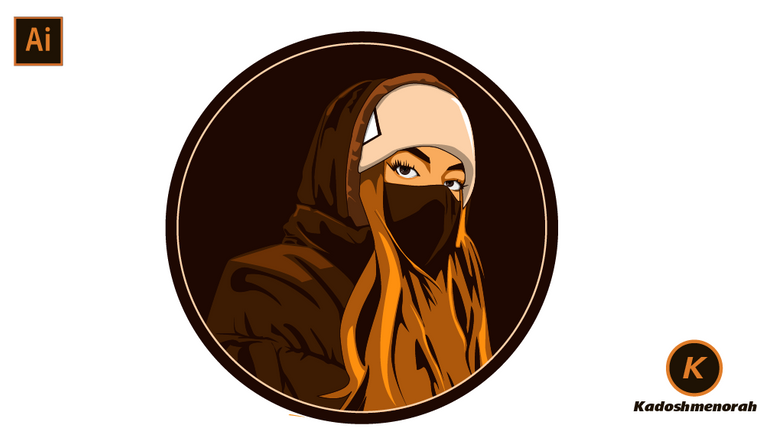
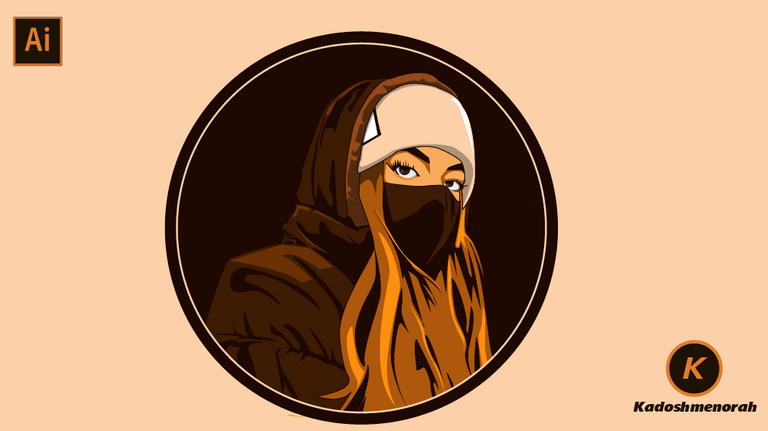
Happy Wednesday everyone. Today I have done a facial digitization job of a girl with beautiful eyes, and dressed in an urban-style jacket and hat.” The theme I used was monochrome with a range of color applied to it. Personally, I really like this style of drawing. Hope you like
Español
¡Hola amigos!
Feliz miércoles a todos. Hoy he realizado un trabajo de digitalización facial de una chica de ojo hermosos, y vestida con chaqueta y gorro al estilo urbano,”. La temática que use fue monocromática con aplicando una gama de color del mismo. En lo particular, me gusta mucho este estilo de dibujar. Espero que les guste

PROCESO / PROCESS
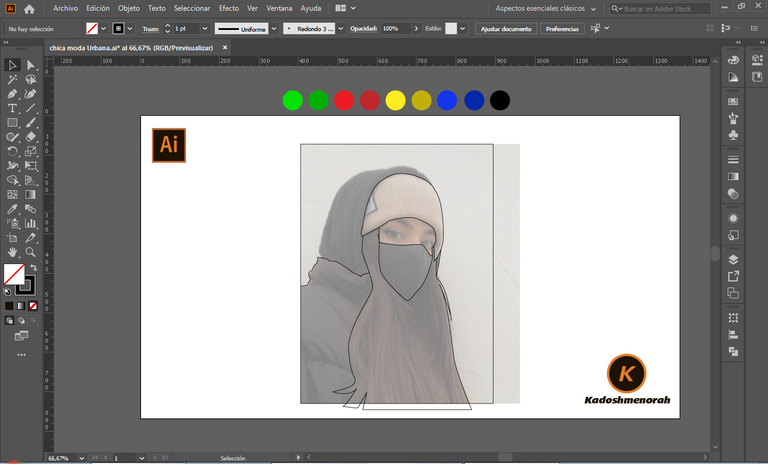
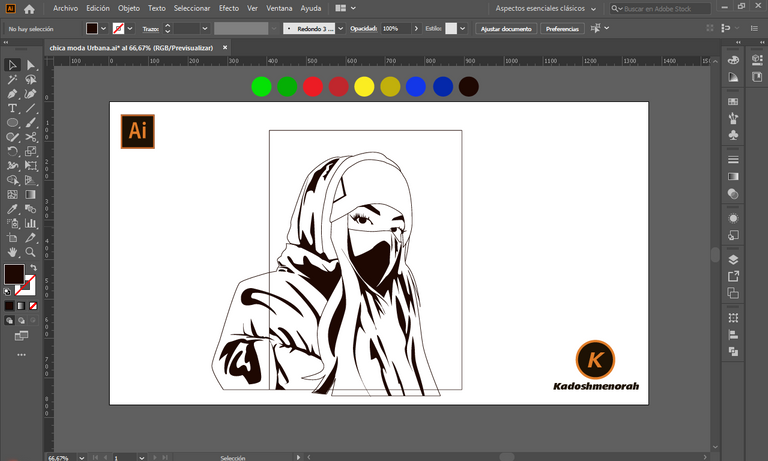
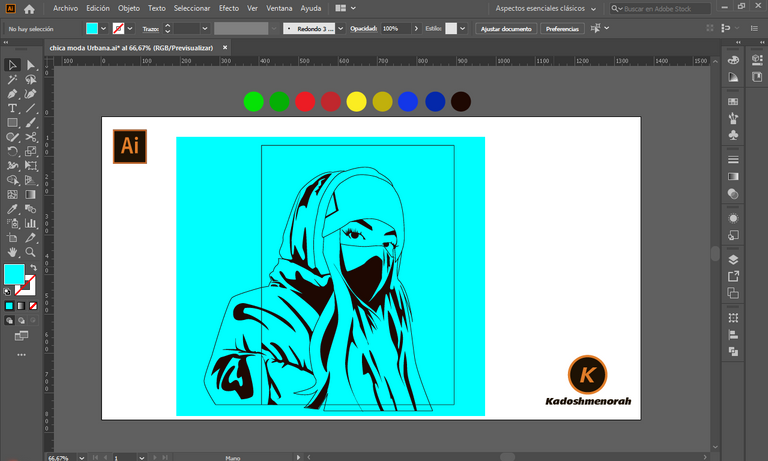
Lo primero que hice fue delinear lacara de la chica con ayuda de la herramienta pluma, y luego la chaqueta y gorro. Luego fui dibujando las zonas de sombras sobresalientes. Y por último dibuje los ojos y cejas.
The first thing I did was outline the girl's face with the help of the pen tool, and then the jacket and hat. Then I was drawing the areas of outstanding shadows. And finally draw the eyes and eyebrows.
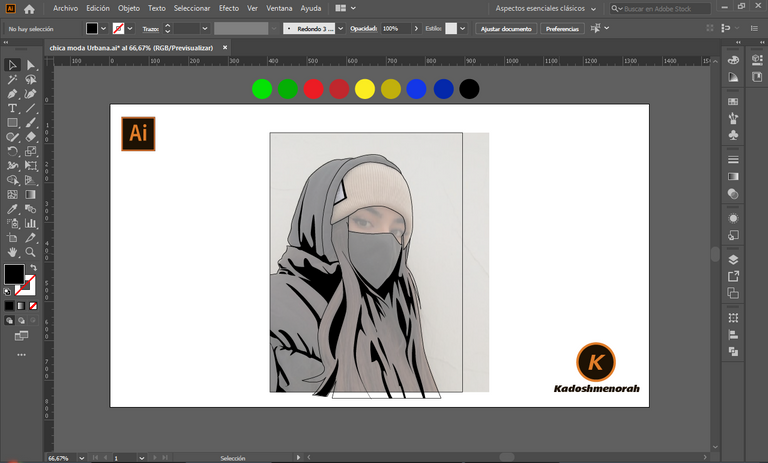
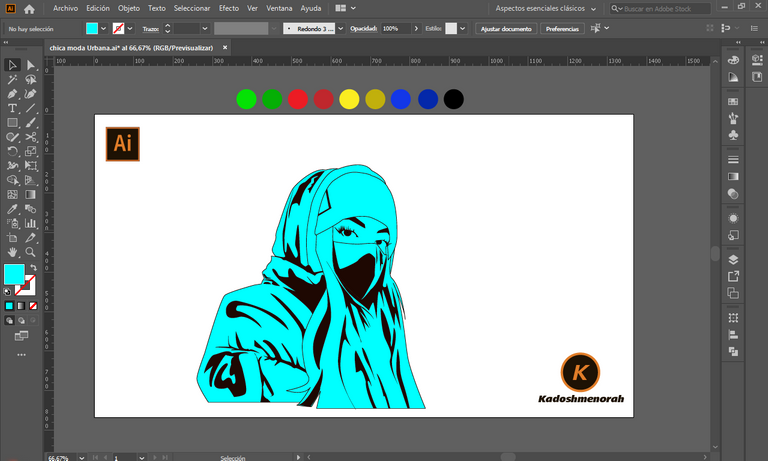
Luego dibuje un recuadro y lo envié atrás, seleccione todo y segmente con el buscatrazos para tener así cada una de las partes a colorear por separado, como si se tarace de piezas de un rompecabezas a armar. Bueno en esto de colorear hay mil y una formas de hacerlo, me gusta mucho esta.
Then draw a box and send it to the back, select everything and segment it with the pathfinder to have each of the parts to color separately, as if it were pieces of a puzzle to put together. Well in this coloring there are a thousand and one ways to do it, I really like this one.
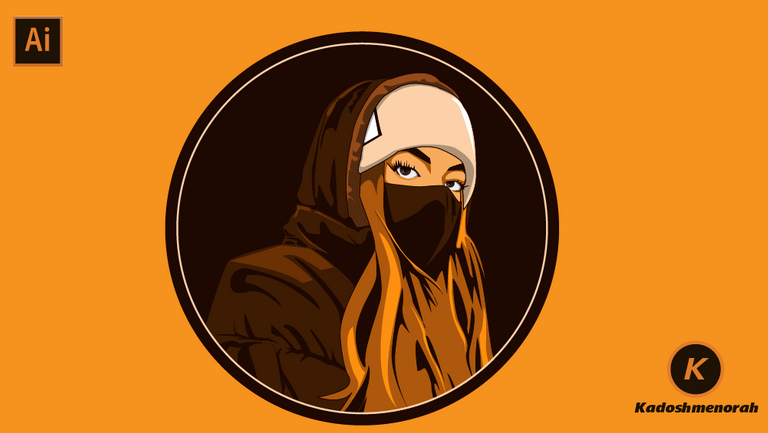
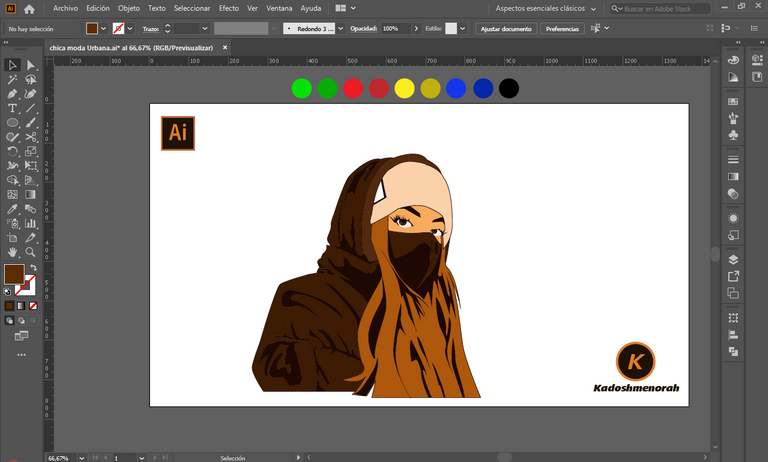
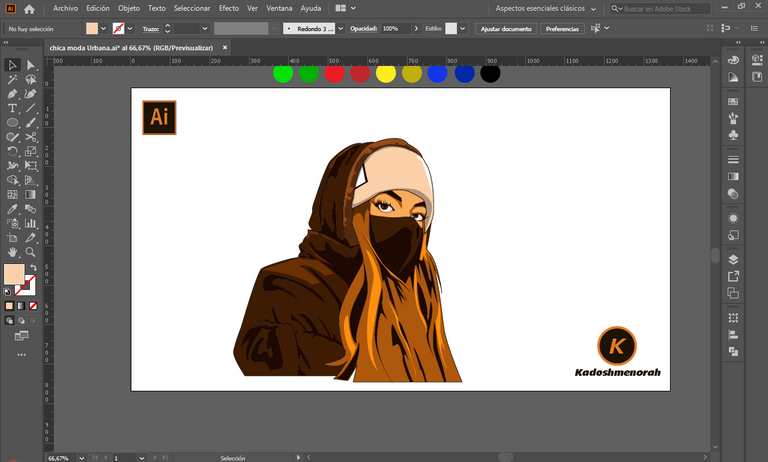
Después empecé a darle color a cada una de las partes partiendo como color base del naranja creando una gama de color claro y oscuro de este, así para las partes iluminadas de la chica use la tonalidad clara y para las zonas oscuras use una tonalidad oscura del naranja. Por ultimo para el acabado dibuje dos círculos para enmarcar nuestro dibujo y dejando a la ves varias presentaciones finales para compartirlas con ustedes.
Then I started to give color to each of the parts starting from orange as a base color creating a range of light and dark color from it, so for the illuminated parts of the girl I used the light tone and for the dark areas I used a dark tone of orange. orange. Finally, to finish, draw two circles to frame our drawing and leave several final presentations to share with you.
Arte Final/ Final Art
Resources:
Image: pinterest
Banner: Of my authorship
Adobe Illustrator: Descargar
Translator: DeepL Web Site
Recursos:
Imagen: pinterest
Banner: De mi autoria
Adobe Illustrator: Descargar
Traductor: DeepL Sitio Web
Soy kadoshmenorah y hasta una próxima oportunidad y no olvides dejar tus comentarios acá abajo.
Me pueden encontrar en las redes sociales:
 --- Abrazos ---
English
Hello friends!
Happy Wednesday everyone. Today I have done a facial digitization job of a girl with beautiful eyes, and dressed in an urban-style jacket and hat.” The theme I used was monochrome with a range of color applied to it. Personally, I really like this style of drawing. Hope you like
Español
¡Hola amigos!
Feliz miércoles a todos. Hoy he realizado un trabajo de digitalización facial de una chica de ojo hermosos, y vestida con chaqueta y gorro al estilo urbano,”. La temática que use fue monocromática con aplicando una gama de color del mismo. En lo particular, me gusta mucho este estilo de dibujar. Espero que les guste
PROCESO / PROCESS
Lo primero que hice fue delinear lacara de la chica con ayuda de la herramienta pluma, y luego la chaqueta y gorro. Luego fui dibujando las zonas de sombras sobresalientes. Y por último dibuje los ojos y cejas.
The first thing I did was outline the girl's face with the help of the pen tool, and then the jacket and hat. Then I was drawing the areas of outstanding shadows. And finally draw the eyes and eyebrows.
Luego dibuje un recuadro y lo envié atrás, seleccione todo y segmente con el buscatrazos para tener así cada una de las partes a colorear por separado, como si se tarace de piezas de un rompecabezas a armar. Bueno en esto de colorear hay mil y una formas de hacerlo, me gusta mucho esta.
Then draw a box and send it to the back, select everything and segment it with the pathfinder to have each of the parts to color separately, as if it were pieces of a puzzle to put together. Well in this coloring there are a thousand and one ways to do it, I really like this one.
Después empecé a darle color a cada una de las partes partiendo como color base del naranja creando una gama de color claro y oscuro de este, así para las partes iluminadas de la chica use la tonalidad clara y para las zonas oscuras use una tonalidad oscura del naranja. Por ultimo para el acabado dibuje dos círculos para enmarcar nuestro dibujo y dejando a la ves varias presentaciones finales para compartirlas con ustedes.
Then I started to give color to each of the parts starting from orange as a base color creating a range of light and dark color from it, so for the illuminated parts of the girl I used the light tone and for the dark areas I used a dark tone of orange. orange. Finally, to finish, draw two circles to frame our drawing and leave several final presentations to share with you.
Arte Final/ Final Art
Resources:
Image: pinterest
Banner: Of my authorship
Adobe Illustrator: Descargar
Translator: DeepL Web Site
Recursos:
Imagen: pinterest
Banner: De mi autoria
Adobe Illustrator: Descargar
Traductor: DeepL Sitio Web
Soy kadoshmenorah y hasta una próxima oportunidad y no olvides dejar tus comentarios acá abajo.
Me pueden encontrar en las redes sociales:
--- Abrazos ---
PROCESO / PROCESS
Lo primero que hice fue delinear lacara de la chica con ayuda de la herramienta pluma, y luego la chaqueta y gorro. Luego fui dibujando las zonas de sombras sobresalientes. Y por último dibuje los ojos y cejas.
The first thing I did was outline the girl's face with the help of the pen tool, and then the jacket and hat. Then I was drawing the areas of outstanding shadows. And finally draw the eyes and eyebrows.
Luego dibuje un recuadro y lo envié atrás, seleccione todo y segmente con el buscatrazos para tener así cada una de las partes a colorear por separado, como si se tarace de piezas de un rompecabezas a armar. Bueno en esto de colorear hay mil y una formas de hacerlo, me gusta mucho esta.
Then draw a box and send it to the back, select everything and segment it with the pathfinder to have each of the parts to color separately, as if it were pieces of a puzzle to put together. Well in this coloring there are a thousand and one ways to do it, I really like this one.
Después empecé a darle color a cada una de las partes partiendo como color base del naranja creando una gama de color claro y oscuro de este, así para las partes iluminadas de la chica use la tonalidad clara y para las zonas oscuras use una tonalidad oscura del naranja. Por ultimo para el acabado dibuje dos círculos para enmarcar nuestro dibujo y dejando a la ves varias presentaciones finales para compartirlas con ustedes.
Then I started to give color to each of the parts starting from orange as a base color creating a range of light and dark color from it, so for the illuminated parts of the girl I used the light tone and for the dark areas I used a dark tone of orange. orange. Finally, to finish, draw two circles to frame our drawing and leave several final presentations to share with you.
Resources:
Image: pinterest
Banner: Of my authorship
Adobe Illustrator: Descargar
Translator: DeepL Web Site
Recursos:
Imagen: pinterest
Banner: De mi autoria
Adobe Illustrator: Descargar
Traductor: DeepL Sitio Web
Soy kadoshmenorah y hasta una próxima oportunidad y no olvides dejar tus comentarios acá abajo.
--- Abrazos ---
Quedó súper fachero, me gustaron los colores finales.
Gracias amiga, saludos. Que bueno que te haya gustado,un abrazo!
Estás recibiendo un voto por parte del proyecto "HiveArte" (@hive-134572). Su publicación fue seleccionada para nuestro reporte de curación Semanal.🎨 Contáctenos para saber más del proyecto a nuestro servidor de Discord. Si deseas delegar HP al proyecto: Delegue 5 HP - Delegue 10 HP - Delegue 20 HP - Delegue 30 HP - Delegue 50 HP - Delegue 100 HP.
Gracias HiveArte
https://twitter.com/87438631/status/1587840882648178690
The rewards earned on this comment will go directly to the people( @kadoshmenorah ) sharing the post on Twitter as long as they are registered with @poshtoken. Sign up at https://hiveposh.com.