[ESP-ENG] Linda y Original Cesta Organizadora de Cocina, elaborado con material de reciclaje ♻️ Cute and Original Kitchen Organizer Basket made with recycling material
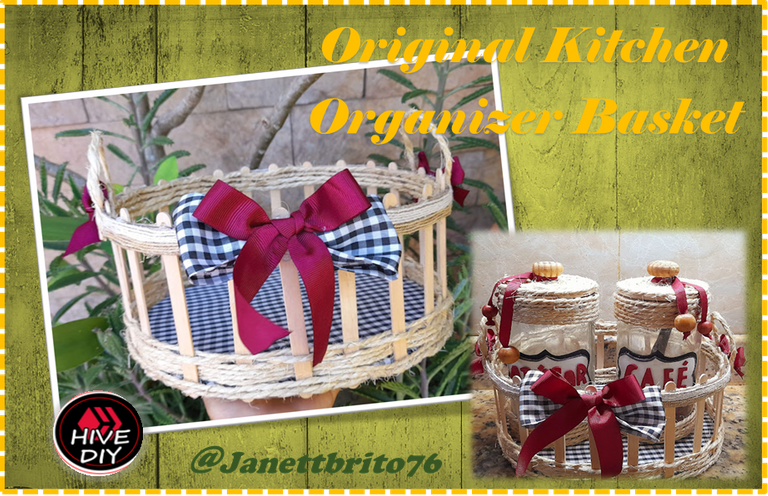

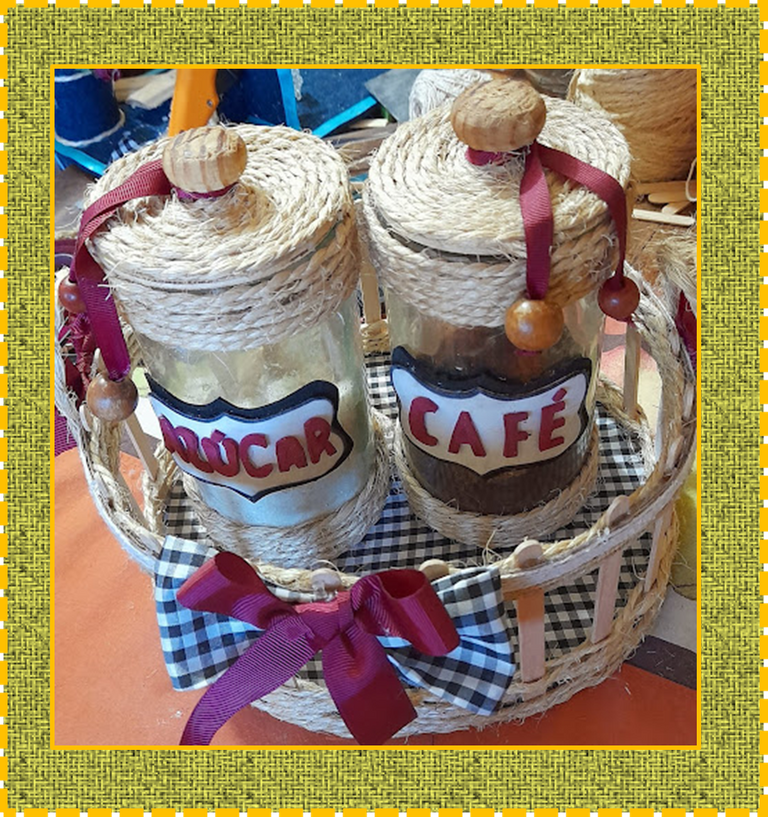
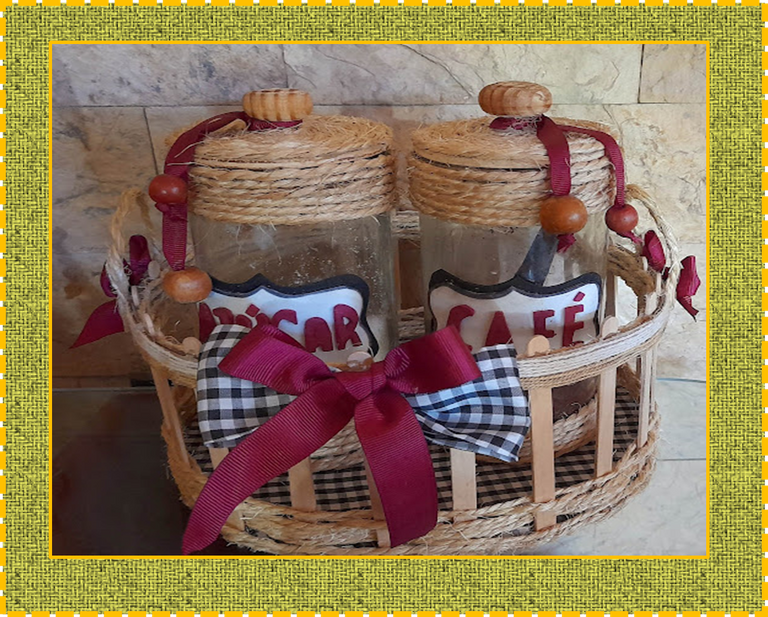
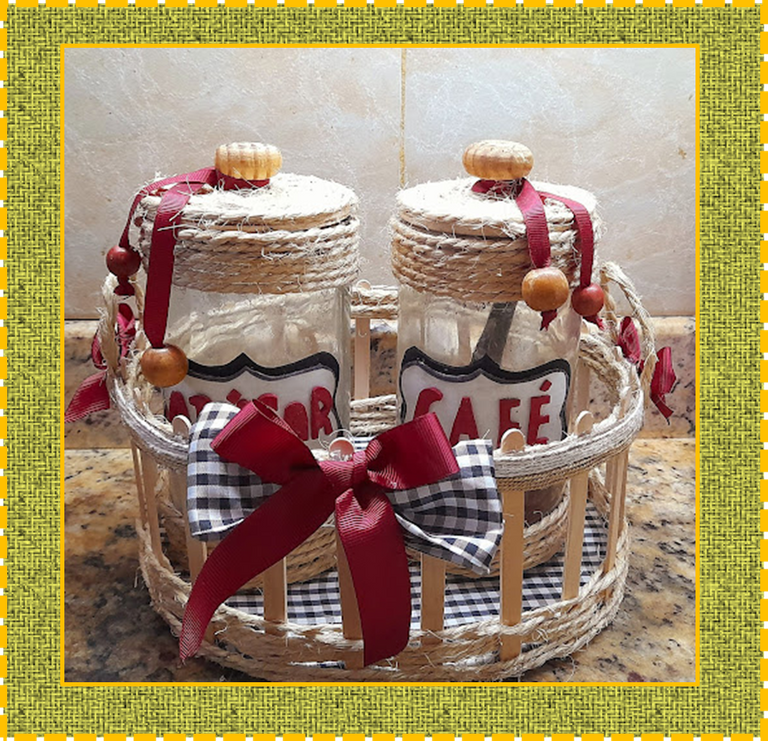
Saludos a todos mis queridos amigos, feliz Viernes, espero que hayan pasado un productivo día y que se encuentren llenos de salud y alegría. Bienvenidos nuevamente a mi blog. En esta noche les quiero compartir el paso a paso de como realizar una linda y original cesta organizadora para la cocina, la cual esta elaborada con material de reciclaje. Con esta cesta para la cocina podrás tener organizados los condimentos de diversos tamaños, como frascos de salsas, saleros, molinillos de pimienta,los envases del azúcar, el café entre otras cosas, aunque también lo puedes utilizar como organizador para el baño. Esta cesta organizadora para la cocina es fácil, practica y económica de realizar, ademas con ella podrás tener ordenada tu cocina, ganas un poco de espacio y lo mejor de todo es que tendrás todo a la mano a la hora de buscar algo.
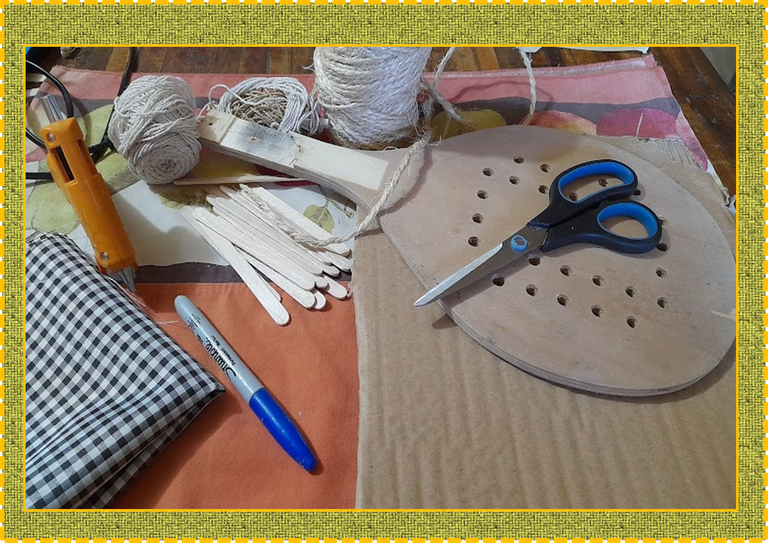
Para la realización de esta linda y original cesta organizadora utilice cartón, hilo pabilo, mecatillo, paletas,una base de una raqueta que ya estaba en desuso y lista para botar a la basura, tela y cinta para decorar. Bueno amigos no te pierdas el paso a paso para hacer esta linda cesta organizadora para la cocina. Vamos manos a la obra !!

Greetings to all my dear friends, happy Friday, I hope you have had a productive day and that you are full of health and joy. Welcome back to my blog. Tonight I want to share with you the step by step of how to make a beautiful and original organizing basket for the kitchen, which is made with recycled material. With this basket for the kitchen you can have condiments of various sizes organized, such as sauce jars, salt shakers, pepper mills, sugar containers, coffee, among other things, although you can also use it as an organizer for the bathroom. This kitchen organizer basket is easy, practical and cheap to make, plus with it you can keep your kitchen tidy, gain a little space and best of all, you'll have everything at hand when looking for something.
To make this beautiful and original organizing basket, I used cardboard, wick thread, mecatillo, palettes, a racket base that was already in disuse and ready to be thrown in the trash, fabric and ribbon to decorate. Well friends, do not miss the step by step to make this beautiful kitchen organizer basket. Let's get to work!!

- Raqueta en desuso
- Silicon
- Mecatillo
- Cinta vinotinto
- Cartón
- Tijera
- Tela
- Paletas
- Hilo pabilo
- Disused racket
- Silicon
- mecatillo
- burgundy ribbon
- Paperboard
- Scissor
- Cloth
- Palettes
- wick thread

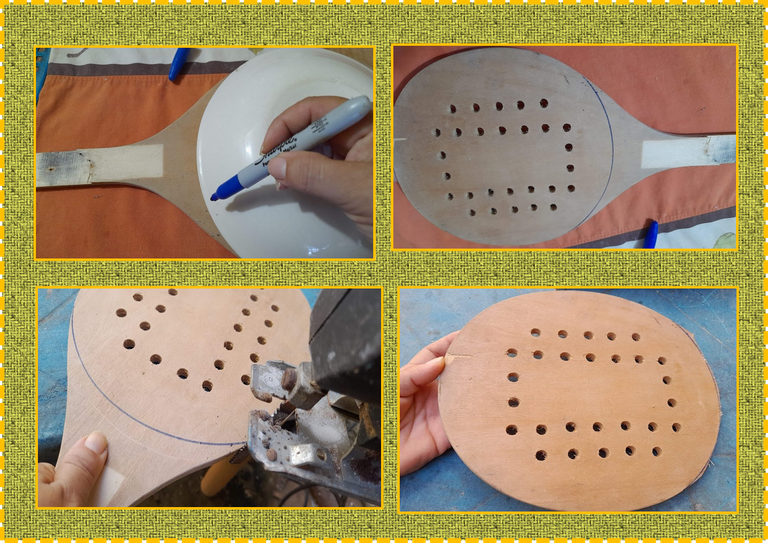
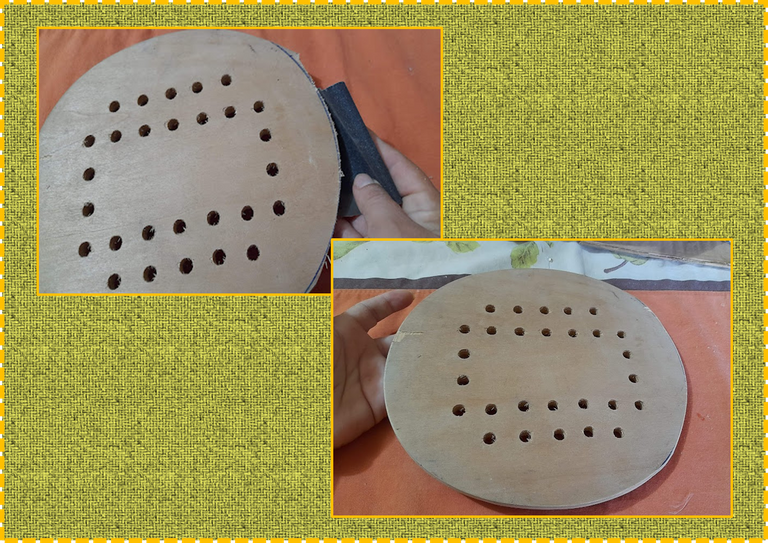
1: Tomamos la raqueta y con la ayuda de un plato le realice una curva para completar la circunferencia, luego con la caladora recortamos y con una lija le quitamos los excedentes.
1: We take the racket and with the help of a plate we make a curve to complete the circumference, then with the jigsaw we cut and with a sandpaper we remove the surplus.
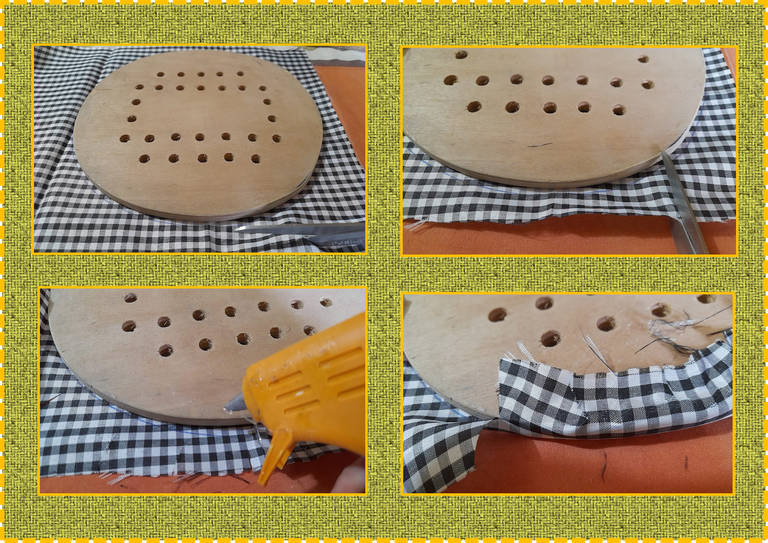
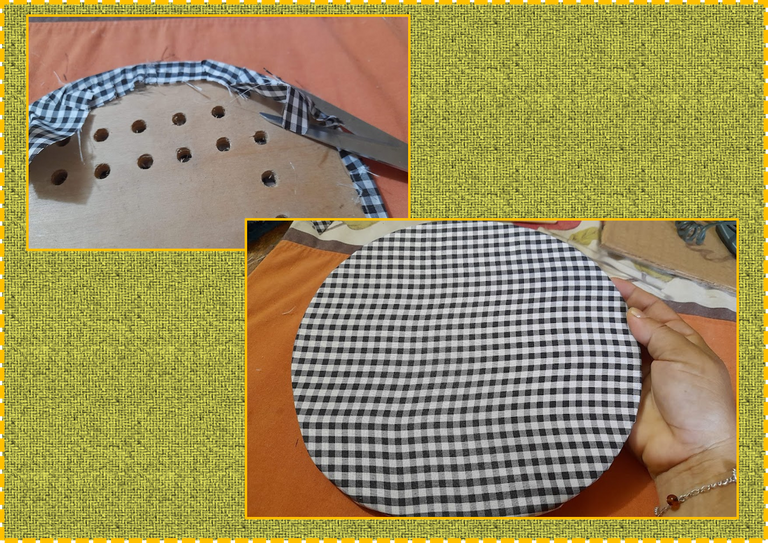
2: Luego para forrar nuestra base, procedemos a medir en la tela la cantidad necesaria para forrarla, luego le realizamos unos pequeños cortes con la tijera y procedemos a pegarla, seguidamente le recortamos los excedentes de tela que nos queda.
2: Then to cover our base, we proceed to measure the amount of fabric necessary to cover it, then we make some small cuts with scissors and proceed to glue it, then we cut off the excess fabric that we have left.
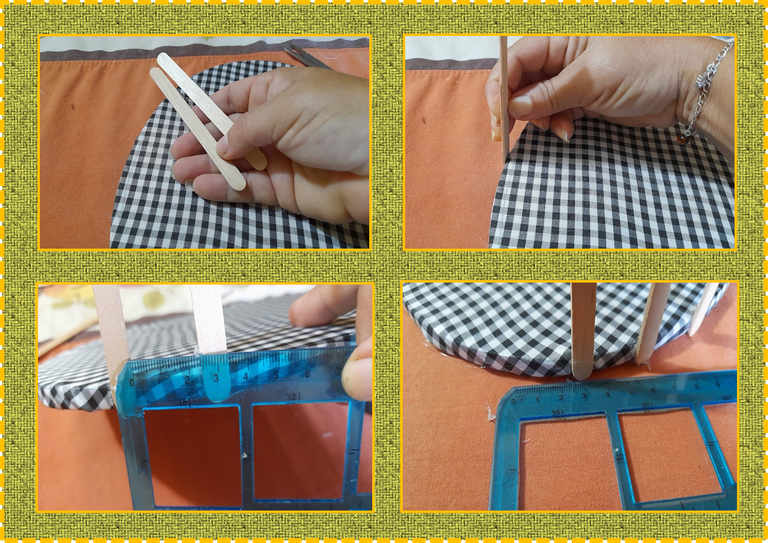
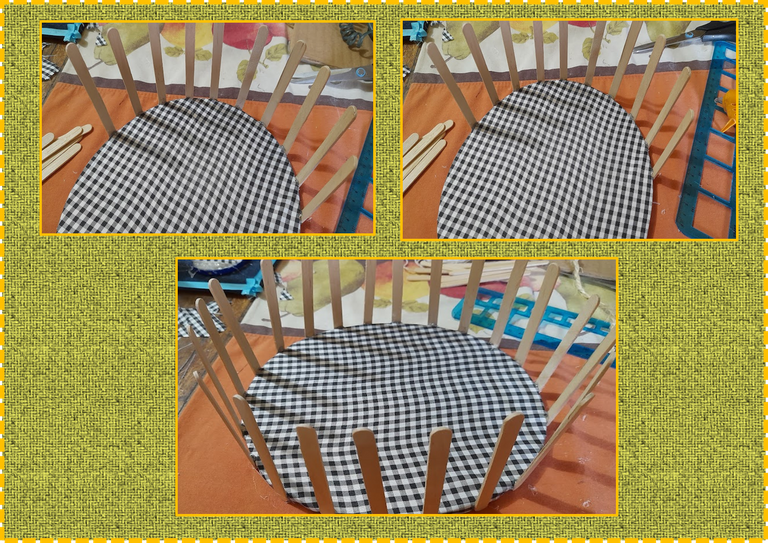
3: Tomamos las paletas y procedemos a pegarla una a una por todo el borde de la base dejando 2,5 cm de separación entre cada paleta, como se puede ver en la imagen.
3: We take the pallets and proceed to glue them one by one around the edge of the base, leaving 2.5 cm of separation between each pallet, as can be seen in the image.
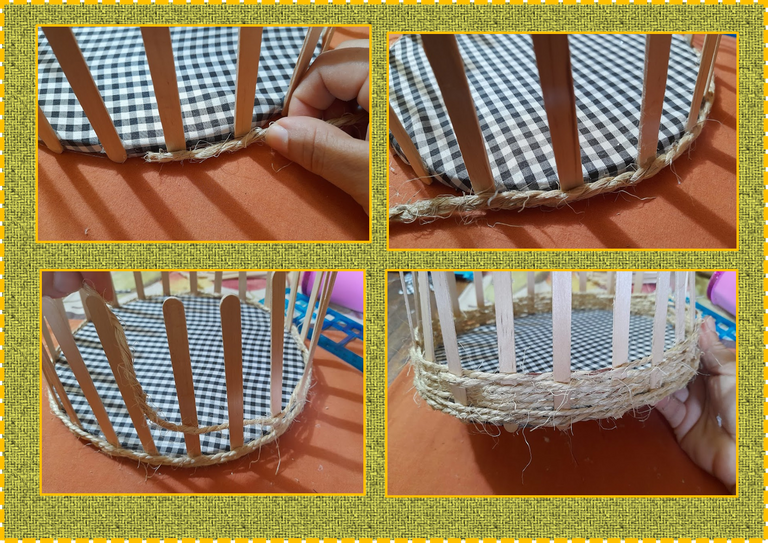
4: Una vez pegadas cada una de las paletas a la base procedemos a pegar el mecatillo en la parte inferior de la base dándole inicialmente dos vueltas, luego procedemos a tejer el mecatillo entre las paletas, este procedimiento lo realizamos 5 veces.
4: Once each of the palettes is glued to the base, we proceed to glue the string to the bottom of the base, initially giving it two turns, then we proceed to weave the string between the palettes, we do this procedure 5 times.
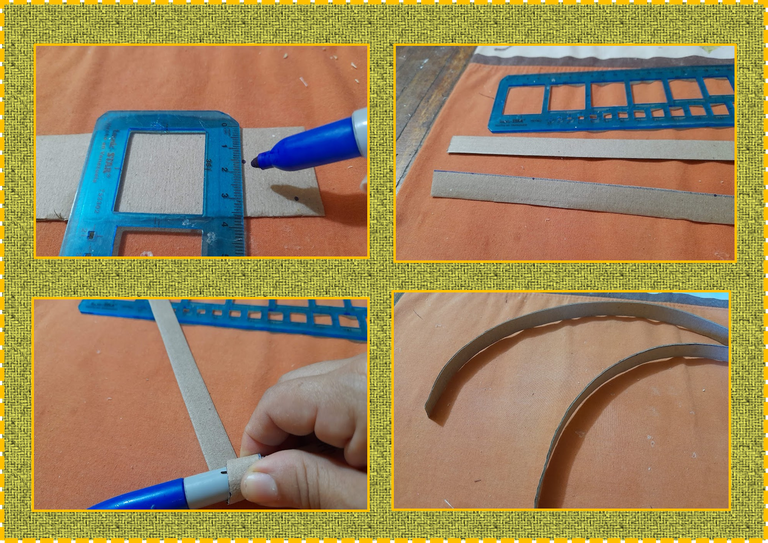
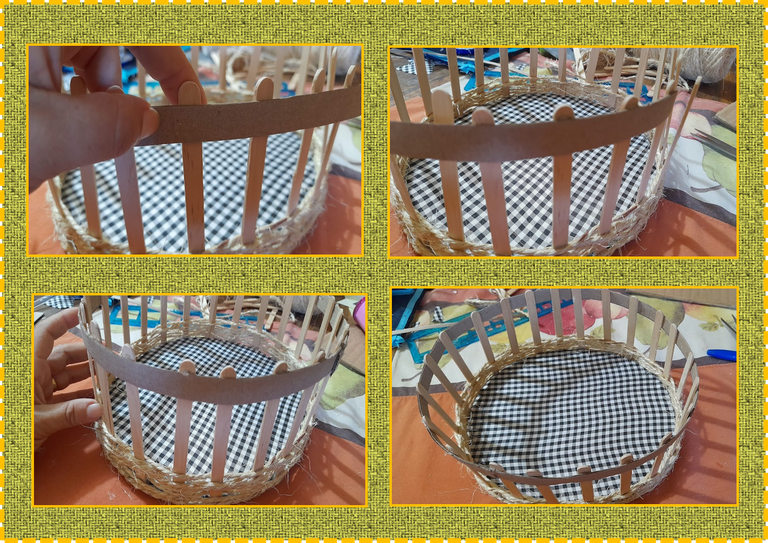
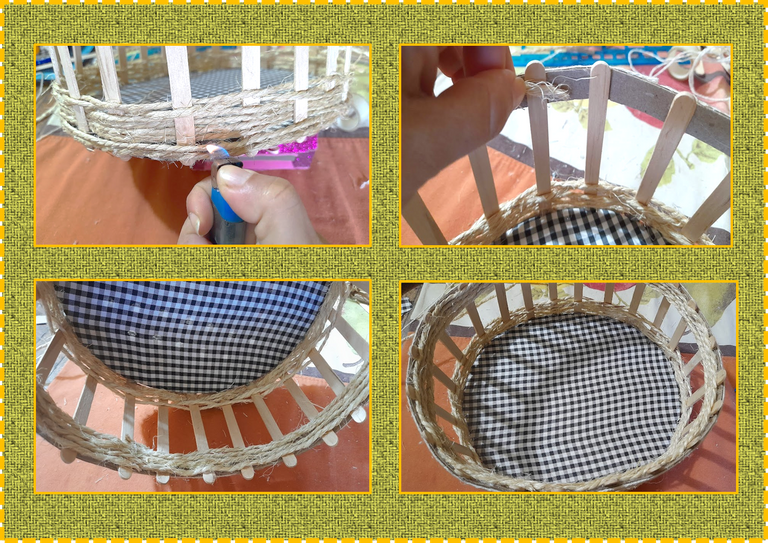
5: Ahora en el cartón marcamos dos tiras de 1,5 cm de ancho y luego recortamos y con la ayuda del marcador lo enrollamos para darle un poco de flexibilidad, seguidamente procedemos a pegarlo en la parte superior de las paletas.
5: Now on the cardboard we mark two 1.5 cm wide strips and then we cut it and with the help of the marker we roll it up to give it a little flexibility, then we proceed to stick it on the top of the pallets.
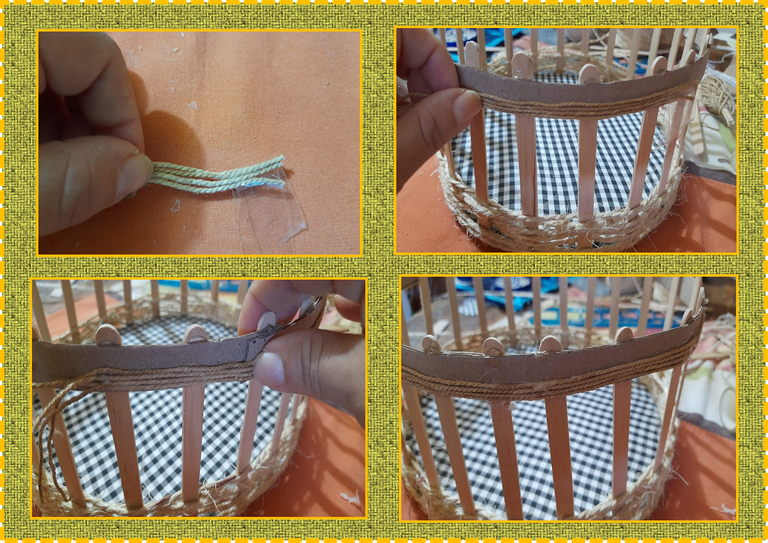
6: Tomamos el hilo pabilo marrón y blanco, luego procedemos a pegarlo por todo el borde de la parte superior de la cesta, después le pegamos el macatillo por la parte de adentro como pueden ver en las imágenes.
6: We take the brown and white wick thread, then we proceed to glue it around the edge of the upper part of the basket, then we glue the hammer on the inside as you can see in the images.

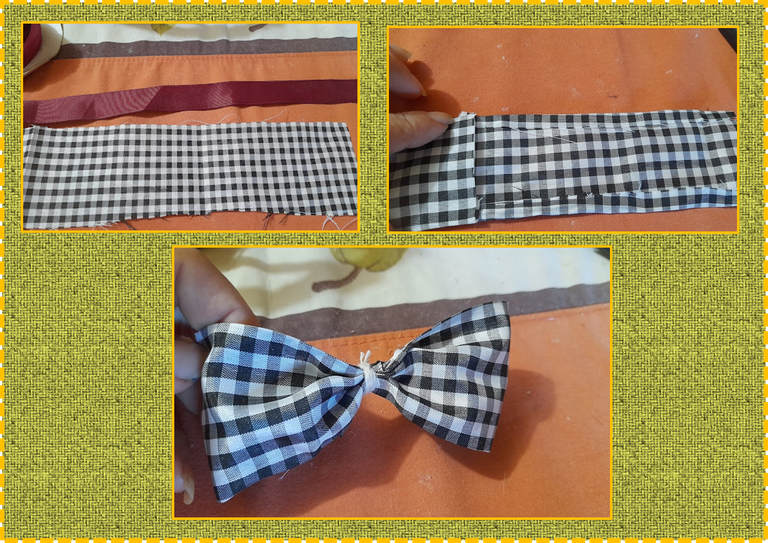
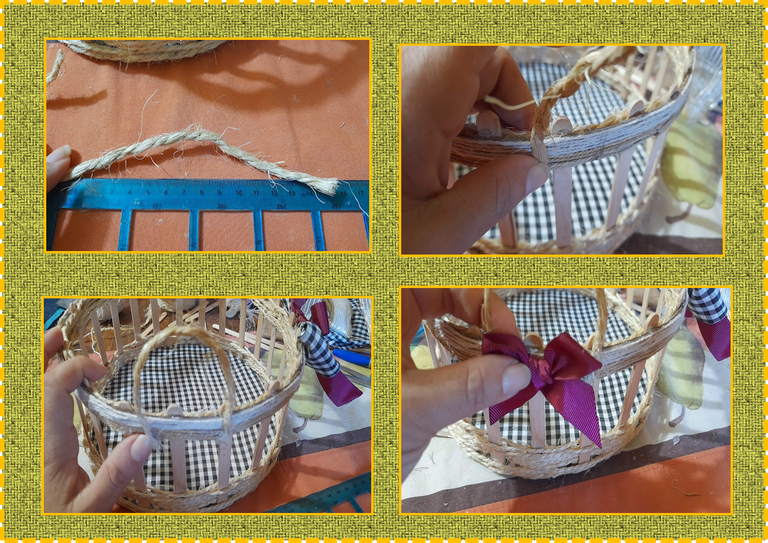
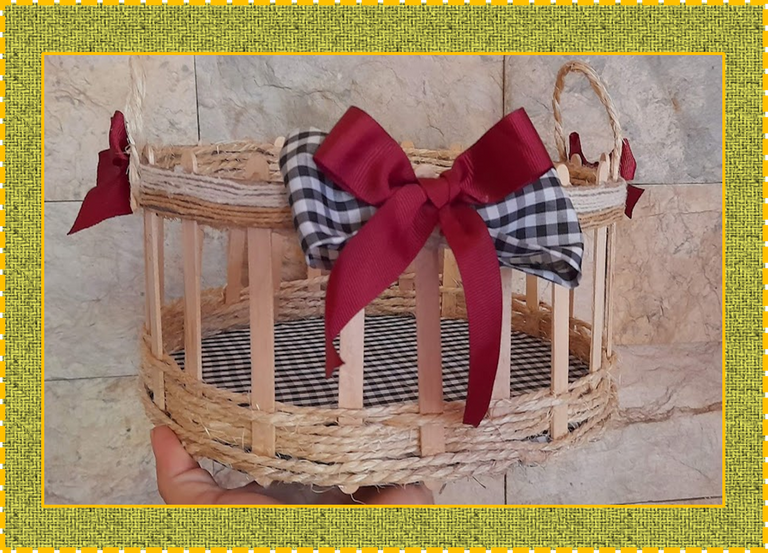
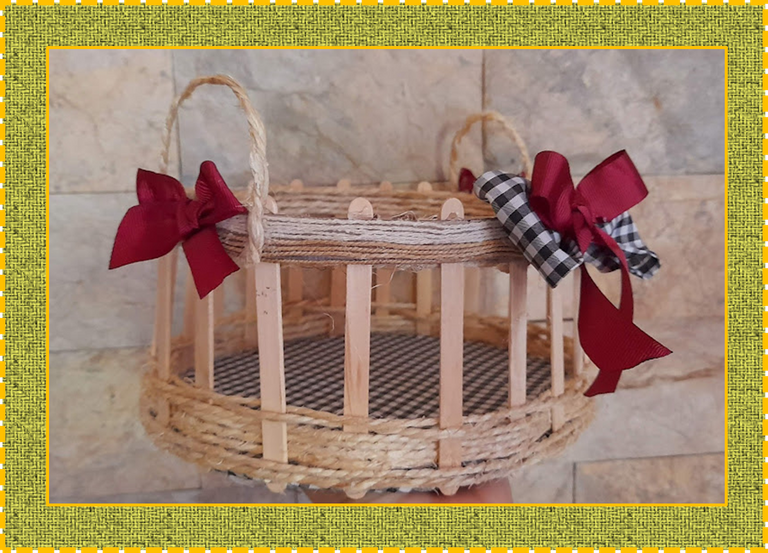
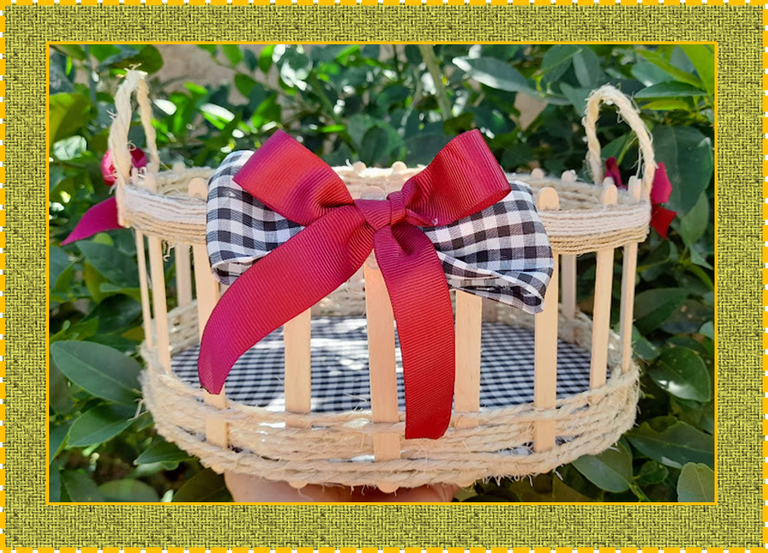
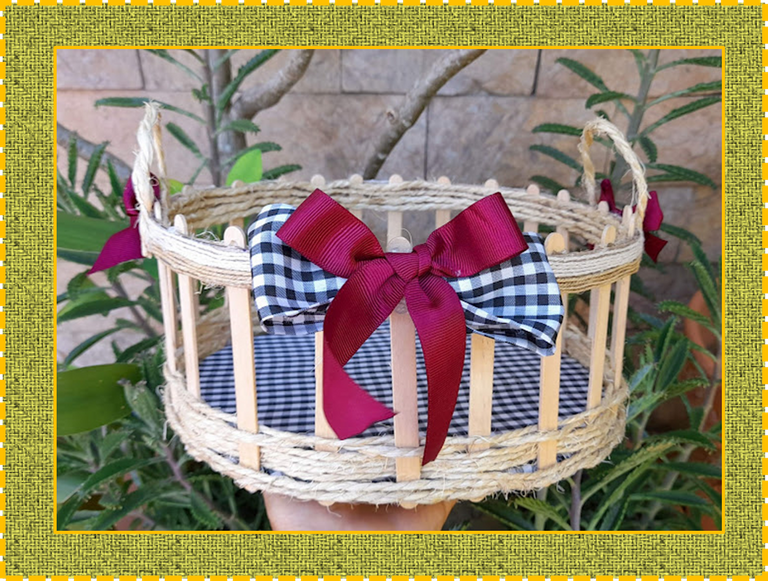
7: Ahora para decorar nuestra cesta procedemos a realizar unos lazos, primero realizamos uno con la tela de cuadro y otros con la cinta vinotinto, luego lo pegamos en el centro de la parte superior de nuestra cesta y para finalizar cortamos dos tiras de mecatillo de 15 cm de largo y formamos unas pequeñas asa seguidamente las pegamos a los laterales de la cesta decorándolos con unos pequeños lazos de cinta.
7: Now to decorate our basket we proceed to make some bows, first we make one with the checkered fabric and others with the burgundy ribbon, then we glue it in the center of the upper part of our basket and to finish we cut two 15 cm string strips long and form small handles, then glue them to the sides of the basket, decorating them with small ribbon bows.

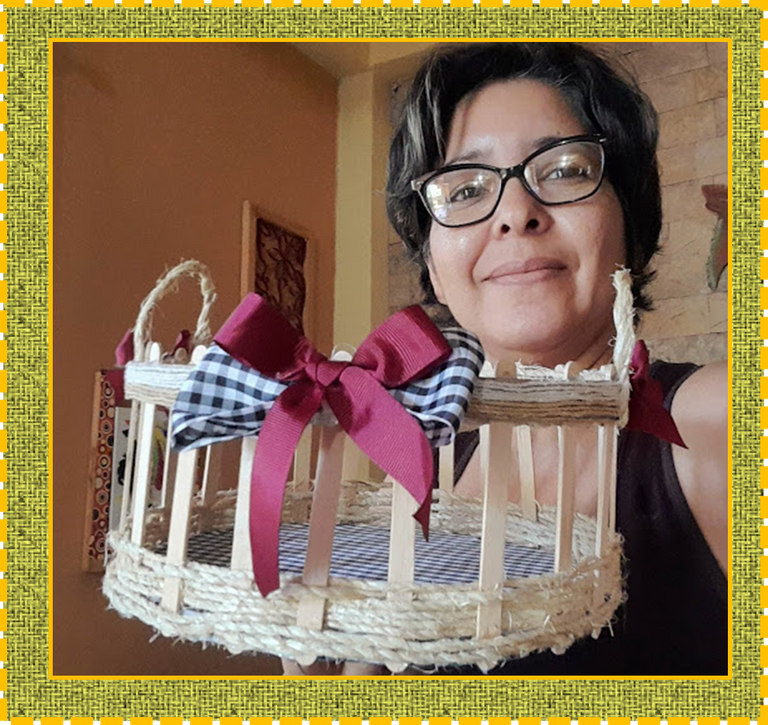
Listo, este es el resultado final de mi linda y original cesta organizadora para mi cocina elaborada con material de reciclaje. Espero se animen a realizar esta linda cesta.
¡Espero les haya gustado mi proyecto de hoy!!
¡Hasta una próxima publicación!
Done, this is the final result of my beautiful and original organizing basket for my kitchen made with recycling material. I hope you are encouraged to make this beautiful basket.
I hope you liked my project today!
Until a next publication!


Fuente portada
Fuente Separador


Las fotografías fueron tomadas con un teléfono inteligente Samsung A12, el texto fue traducido al ingles con el traductor de Google. link
El banner fue diseñado en canvas link
The photographs were taken with a Samsung A12 smartphone, the text was translated into English with the Google translator.
The banner was designed on canvas
Congratulations @janettbrito76! You have completed the following achievement on the Hive blockchain and have been rewarded with new badge(s):
Your next target is to reach 27000 upvotes.
You can view your badges on your board and compare yourself to others in the Ranking
If you no longer want to receive notifications, reply to this comment with the word
STOPTo support your work, I also upvoted your post!
Check out the last post from @hivebuzz:
Support the HiveBuzz project. Vote for our proposal!
Que lindo trabajo amiga @janettbrito76. Saludos 🤗💖
Hola @delvallecedeno que bueno que te gusto y gracias por leer y comentar. Saludos
Muy buen trabajo de reciclaje. Mis mejores deseos de salud y suerte.
Gracias. feliz noche
Muy linda y útil tu cesta Janett, me encanta.
Gracias amiga, me alegra que te haya gustado. Saludos
Que belleza amiga, está hermosa tu cesta y super campestre. Un gran abrazo, Dios te bendiga.
Que belleza amiga, está hermosa tu cesta y super campestre. Un gran abrazo, Dios te bendiga.
Esta muy bonita la cesta organizadora que nos regalas hoy. Que tengas un excelente día, saludos
Gracias amiga, igualmente para ti saludos
hola amiga te quedo muy linda.. bonito trabajo. te felicito.
Que hermosa, me encanto, gracias por compartir.
Thank you for sharing this amazing post on HIVE!
Your content got selected by our fellow curator @rezoanulvibes & you just received a little thank you via an upvote from our non-profit curation initiative!
You will be featured in one of our recurring curation compilations and on our pinterest boards! Both are aiming to offer you a stage to widen your audience within and outside of the DIY scene of hive.
Join the official DIYHub community on HIVE and show us more of your amazing work and feel free to connect with us and other DIYers via our discord server: https://discord.gg/mY5uCfQ !
If you want to support our goal to motivate other DIY/art/music/homesteading/... creators just delegate to us and earn 100% of your curation rewards!
Stay creative & hive on!