[ESP-ENG] Elegantes Aretes para un día Especial // Elegant earrings for a special day


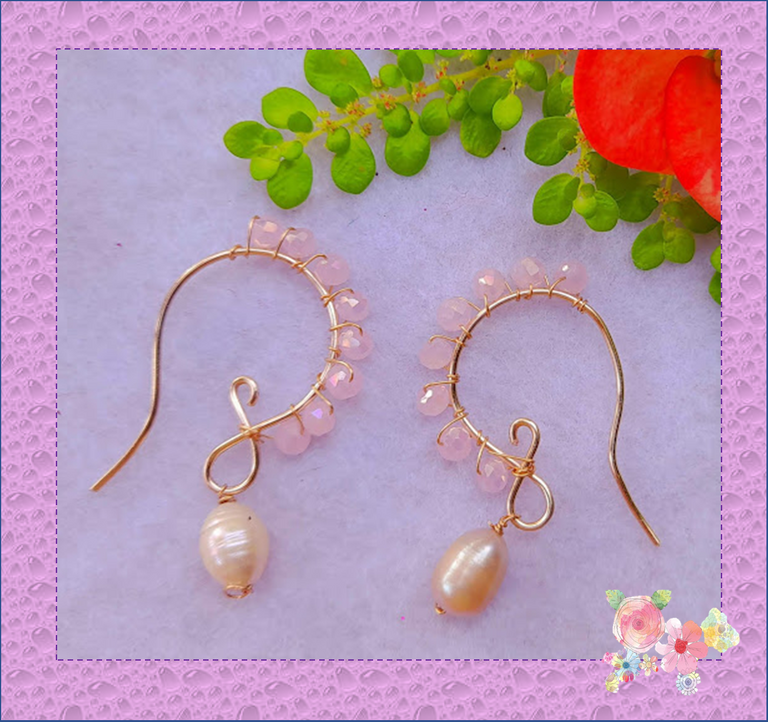
Feliz miércoles para todos los artesanos que hacemos vida en esta grandiosa comunidad de #HiveDiy, espero que hayan pasado un excelente día y que se encuentren llenos de salud y bendiciones. Una vez mas estoy aquí con ustedes. En esta oportunidad les voy a enseñar el paso a paso de como realizar unos elegantes aretes artesanales decorados con unos cristales checos rosados y unas hermosas perlas.
Como les he comentado en post anteriores los aretes artesanales se distinguen por que presentan un diseño único fuera de lo común, además estos aretes de alambre se ven muy bien en cualquier color, es por eso que los puedes usar en cualquier momento del día y siempre lucirás elegantes. Les cuento que los aretes son un de los accesorio con los que podemos hacer lucir más nuestro rostro, ya que esta es una de las piezas de joyería que puede ayudarnos a mejorar nuestra apariencia si utilizamos los aretes adecuados para nuestro tipo de cara. Estos aretes son ideales para obsequiar, vender o simplemente llamar la atención de todas tu amigas.
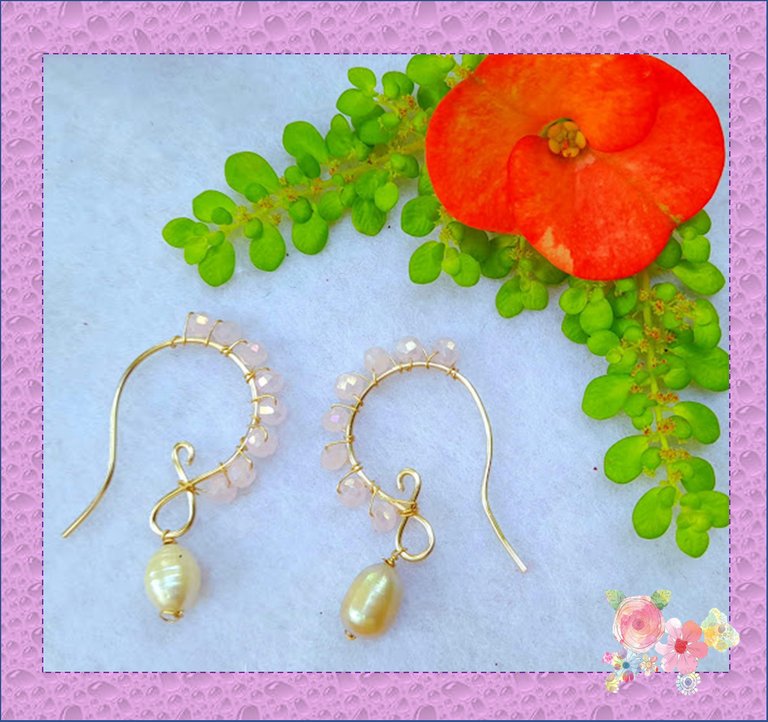
Además, hacer nuestros propios aretes nos ayuda a tener unos auténticos aretes artesanales, ya que los podemos adaptar a nuestros gusto y ocasiones y lo mejor de todo es que los podemos decorar con los cristales del color o colores que más nos gusten. Estos elegantes aretes son bonitos, se utiliza una técnica fácil, rápida y sencilla de realizar y estoy segura que les encantara la idea. Bueno amigos estos hermosos aretes los realice con mucho amor y cariño para una de mis sobrinas que va a cumplir sus 15 años dentro de dos meses, que más original que regalarle algo elaborado con mis propias manos… Entonces no se pierdan el paso a paso para hacer estos elegantes aretes. ¡¡Manos a la obra!!

Happy night friends of #HiveDiy
Happy Wednesday to all the artisans who make life in this great #HiveDiy community, I hope you had a great day and that you are full of health and blessings. Once again I am here with you. This time I am going to show you step by step how to make elegant handmade earrings decorated with pink Czech crystals and beautiful pearls.
As I have mentioned in previous posts, the handmade earrings are distinguished by the fact that they present a unique design that is out of the ordinary, in addition, these wire earrings look great in any color, that is why you can use them at any time of the day and always you will look elegant. I tell you that earrings are one of the accessories with which we can make our face look better, since this is one of the pieces of jewelry that can help us improve our appearance if we use the right earrings for our face type. These earrings are ideal to give away, sell or simply attract the attention of all your friends.
In addition, making our own earrings helps us to have authentic handmade earrings, since we can adapt them to our taste and occasions and best of all, we can decorate them with the crystals of the color or colors that we like the most. These elegant earrings are beautiful, they use an easy, quick and simple technique to make and I am sure they will love the idea. Well friends, I made these beautiful earrings with a lot of love and affection for one of my nieces who will be 15 years old in two months, what more original than giving her something made with my own hands... So don't miss the step by step to make these elegant earrings. Let's do it!!

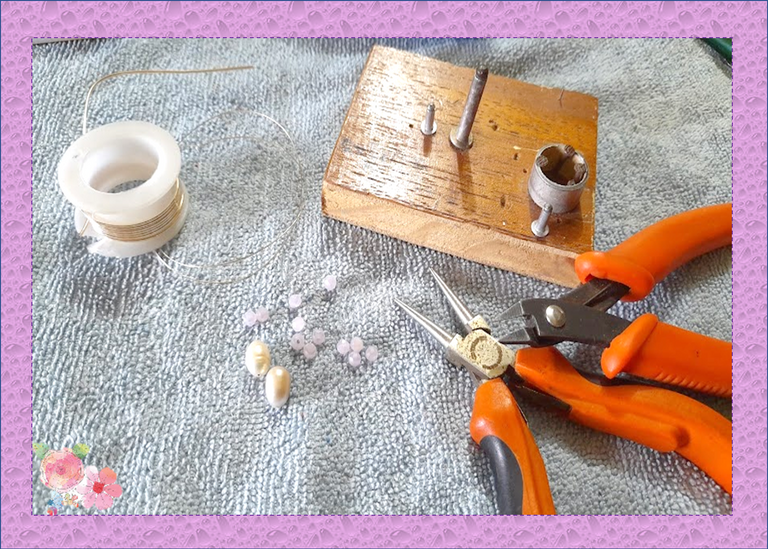
- Alambre calibre #20 y #28
- cristal checo rosado
- Perlas
- Alicate punta redonda
- Alicate de corte de alambre
- Molde
- #20 and #28 gauge wire
- pink czech glass
- pearls
- Round nose pliers
- Wire cutter
- mold

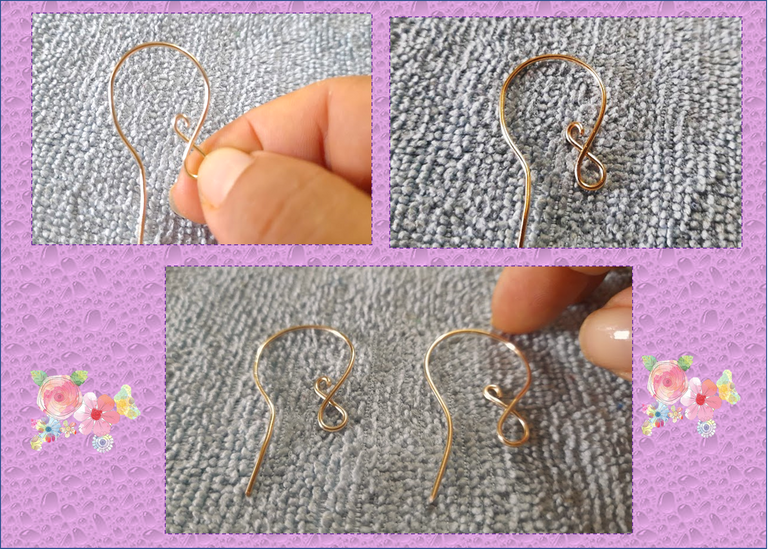
1: Tomamos el alambre #20 y con nuestro molde formamos una argolla, como pueden ver en la imagen.
1: We take the #20 wire and with our mold we form a ring, as you can see in the image.
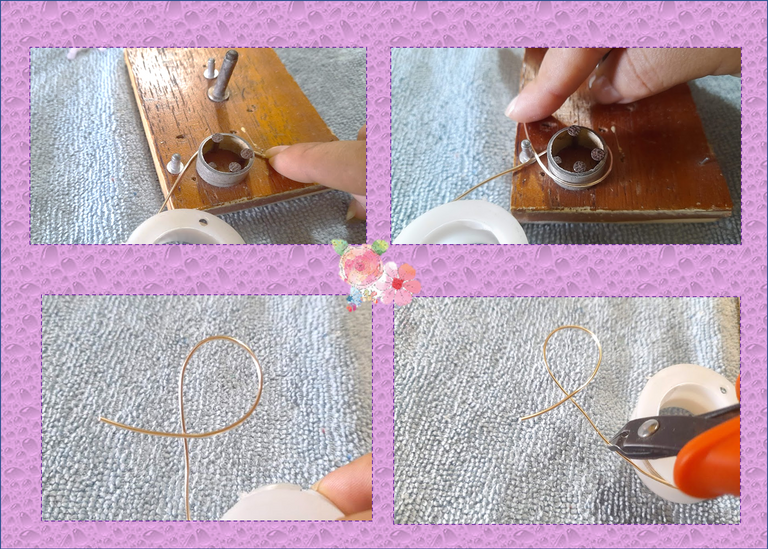
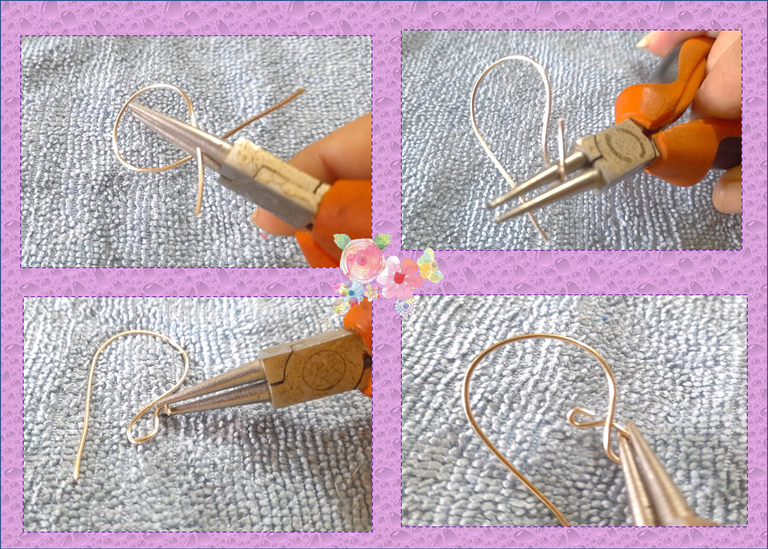
2: Luego en una de las puntas le realizamos una vuelta hacia arriba con la ayuda del alicate punta redonda, seguidamente le realizamos otra vuelta en la punta y luego la pasamos por detrás formando un ocho.
2: Then on one of the ends we make a turn upwards with the help of the round nose pliers, then we make another turn on the end and then we pass it from behind forming a figure eight.
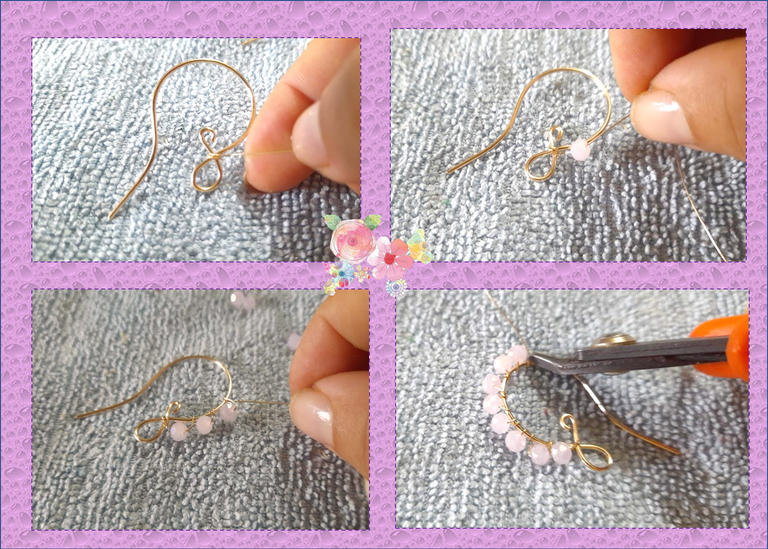
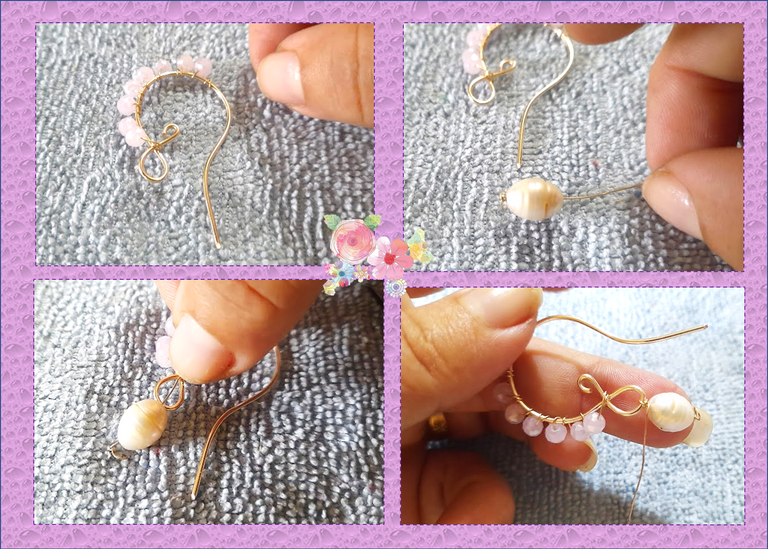
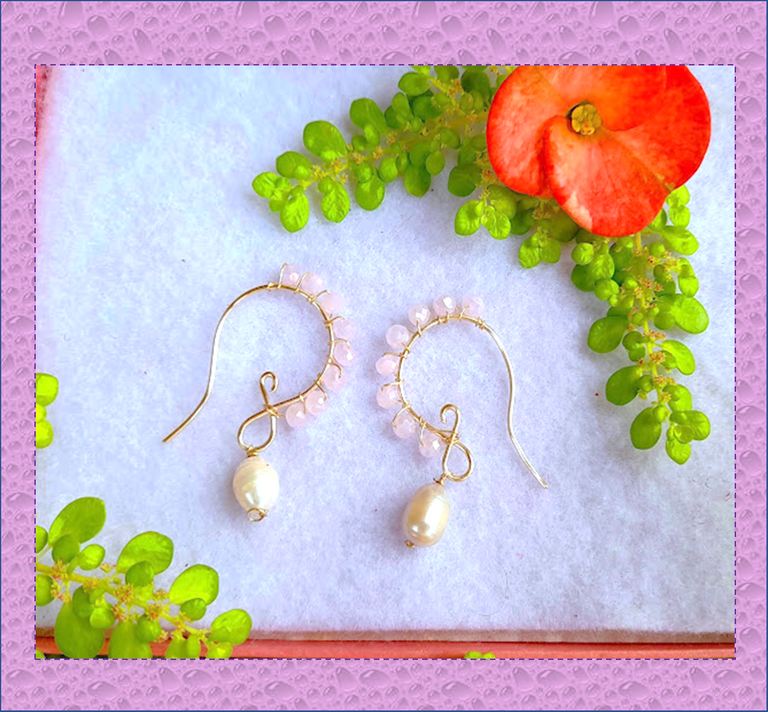
3: Ahora procedemos a decorar nuestros aretes, para eso tomamos el alambre #28 y entorchamos en la base, seguidamente vamos introduciendo los cristales rodados uno a uno hasta completar 8 cristales, luego tomamos la perla y le realizamos una argolla y seguidamente la entorchamos en el en la parte inferior de nuestro arete y listo.
3: Now we proceed to decorate our earrings, for that we take the #28 wire and twist it at the base, then we introduce the rolled crystals one by one until completing 8 crystals, then we take the pearl and make a ring and then we twist it on the the bottom of our earring and voila.
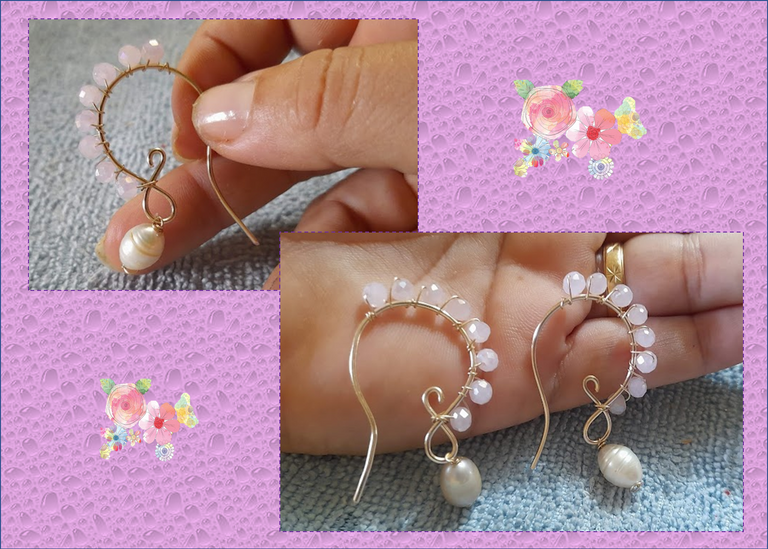
Listo, así de elegantes y originales me quedaron los aretes para obsequiárselos a Mi sobrina el día de sus 15 años ¡Espero les haya gustado mi proyecto de hoy y se animen a crear sus propios accesorios!
¡Hasta una próxima publicación!
Done, that's how elegant and original the earrings were to give them to my niece on her 15th birthday. I hope you liked my project today and are encouraged to create your own accessories!
Until a next post!
Fuente portada
Fuente Separador


Las fotografías fueron tomadas con un teléfono inteligente Samsung A12, el texto fue traducido al ingles con el traductor de Google.link
El banner fue diseñado en canvas link
The photographs were taken with a Samsung A12 smartphone, the text was translated into English with the Google translator.link
The banner was designed on canvas link
Que bellos!!
Gracias @dlizara, que chevere que te gustaron. Saludos
Que hermosos. Me encanta! tu creación @janettbrito76. Saludos.
Que hermosura amiga y cuánta delicadeza, los necesito para que hagan juego con un collar de perlitas cultivadas que tengo. Feliz noche 😘 y un fuerte abrazo.
Te felicito por la buena presentación de tu trabajo y el resultado de tus argollas expectacular😘☺👍