[ENG-SPA] ✂Cute fomi bookmarks/Lindos marcapáginas de fomi📎

I cordially welcome you to my blog, I wish you all a beautiful day, especially those of you who are part of the #HiveDIY community. Today I am excited to bring you this easy tutorial that you are not going to spend so much on materials and you can even use scraps of materials. Yesterday, after getting out of class and arriving home, I had a lot of ideas of what to post today, and since it was almost time for the kids to start school, I decided on this idea. If you are like me who likes to personalize things and even more if they are for school, I have always been like that since I entered elementary school and even in college I am, but sometimes I'm afraid of what people will say and I end up not using what I had personalized. At school I always came up with ideas and ended up wasting materials, because I must confess that at that time I did not know how to draw, nor did I know how to do anything and no matter how much effort I put into it, it was still horrible and I ended up breaking or throwing away craft materials that my mom bought. When I was in high school I was better at drawing, but I didn't like to personalize my school supplies as much unless it wasn't by decorating them with thousands of stickers. Nowadays, I like to paint the covers of my notebooks, although I haven't done that for a long time. Without further ado, let's get to the tutorial.
Sean cordialmente bienvenidos a mi blog, les deseo un hermoso día a todos, especialmente a los que forman parte de la comunidad #HiveDIY. Hoy estoy entusiasmada de traerles este fácil tutorial que no van a gastar tanto en materiales y hasta pueden usar retazos de materiales. Ayer, después de salir de clases y llegar a mi casa, tenía muchas ideas de que publicar hoy, y como ya casi se acerca el inicio de las clases escolares de los niños, me decidí por esta idea. Si ustedes son como yo que les gusta personalizar cosas y más si son para la escuela, siempre he sido así desde que entré a la primaria y aún en la universidad lo soy, pero a veces me da miedo del que dirán y termino sin utilizar lo que había personalizado. En la escuela siempre se me ocurrían ideas y terminaba desperdiciando materiales, porque debo confesar que en ese entonces yo no sabía dibujar, ni sabía hacer nada y por mucho empeño que yo le colocara de todos modos quedaba horrible y terminaba rompiendo o botando material de manualidades que mi mamá compraba. En la época de bachillerato dibujaba mejor, pero no me gustaba tanto personalizar mis útiles escolares, al menos que no fuese por decorarlo con miles de stickers. Actualmente, me gusta pintar las portadas de mis libretas, aunque tengo mucho tiempo que no hago eso. Sin más que agregar, vamos con el tutorial.

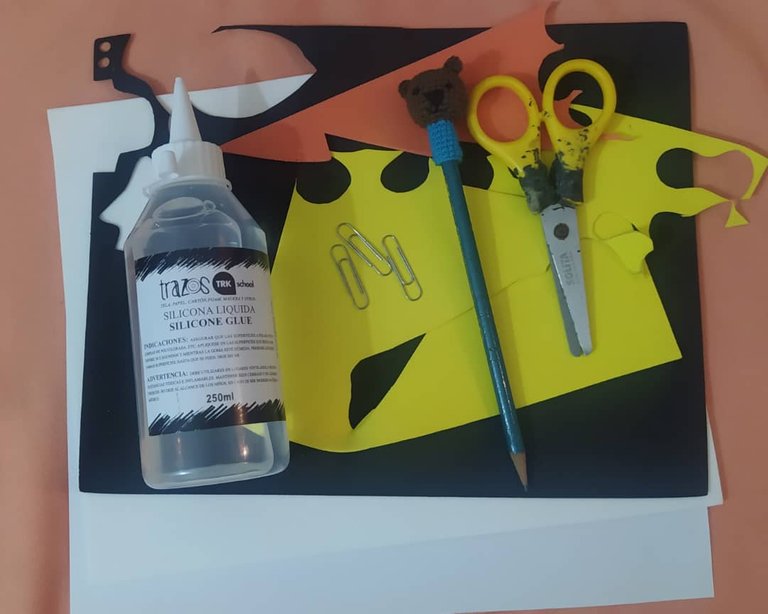
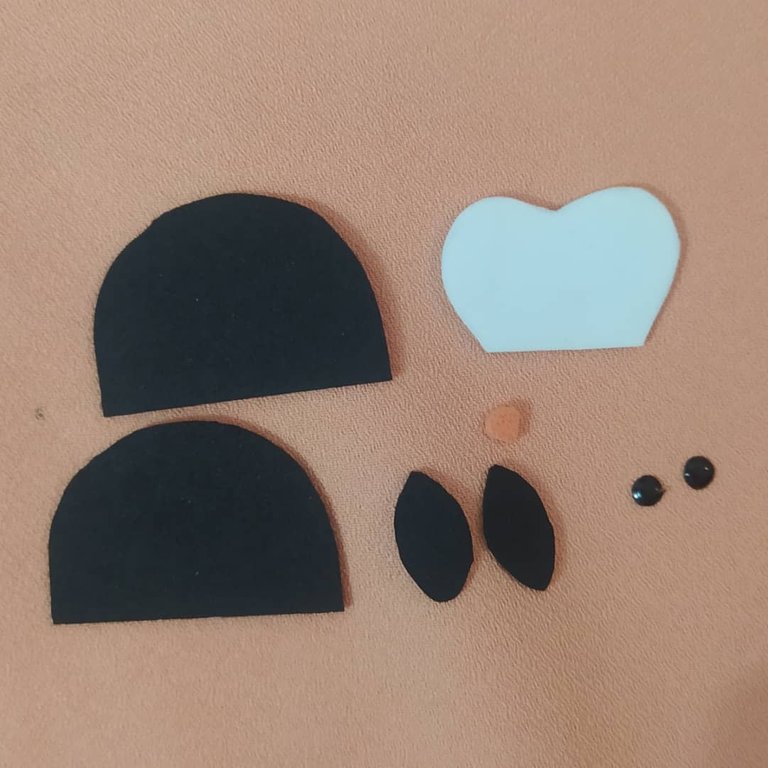
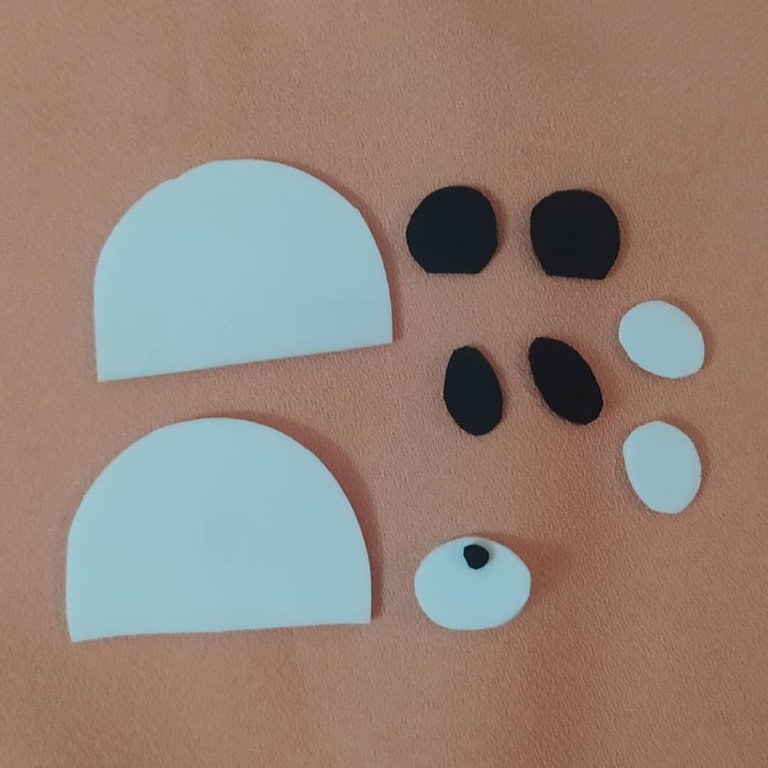
- Fomi (EVA rubber): black, white, yellow and orange.
- 3 standard paper clips.
- 3 pairs of plastic eyes.
- Cardboard to draw the mold.
- Pencil.
- Scissors.
- Liquid silicone.
- Fomi (goma EVA): negro, blanco, amarillo y anaranjado.
- 3 clips estándar para papel.
- 3 pares de ojos de plástico.
- Cartulina para dibujar el molde.
- Lápiz.
- Tijeras.
- Silicona líquida.

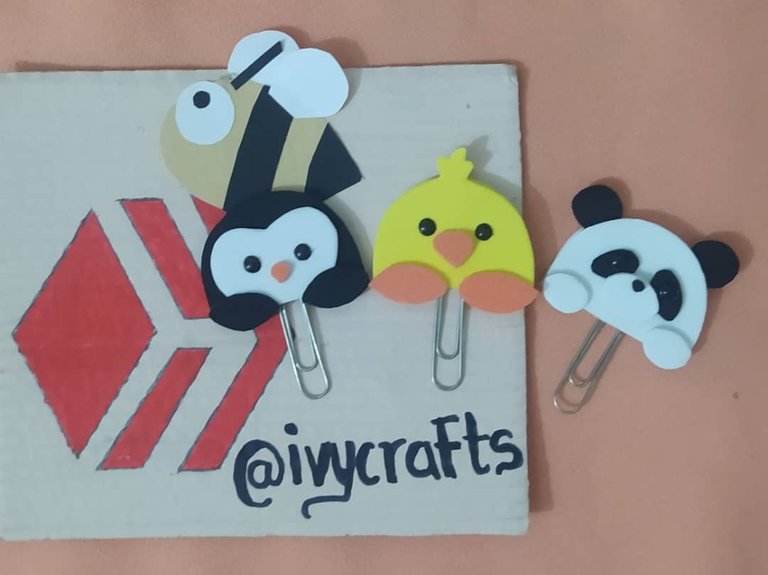
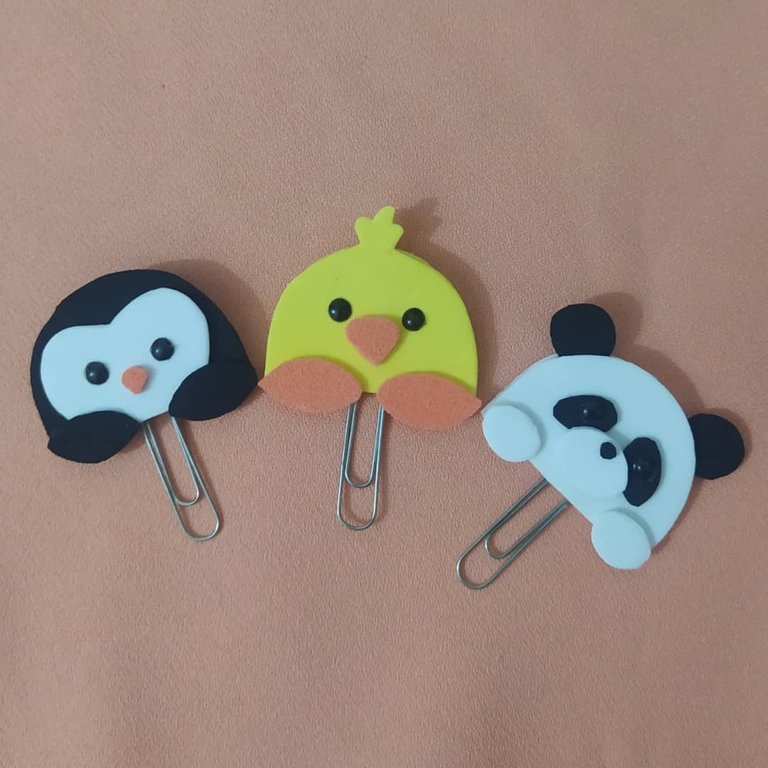
🐧Penguin/Pingüino:🐧
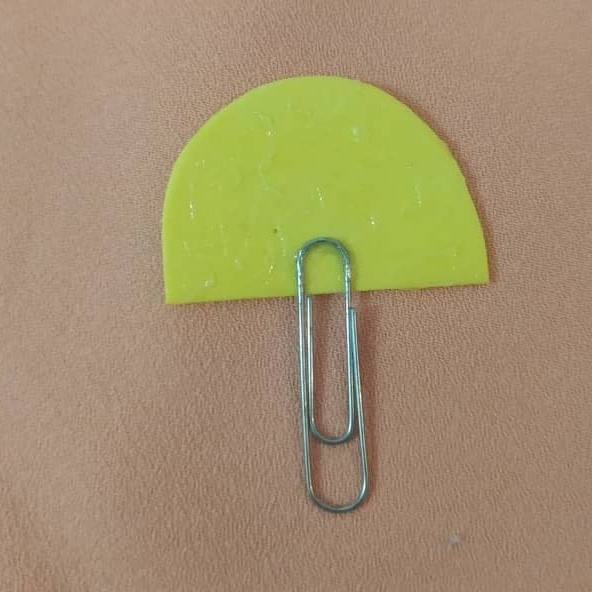
- We draw the following mold on the cardboard, then we cut it out.
- Dibujamos el siguiente molde en la cartulina, luego recortamos.
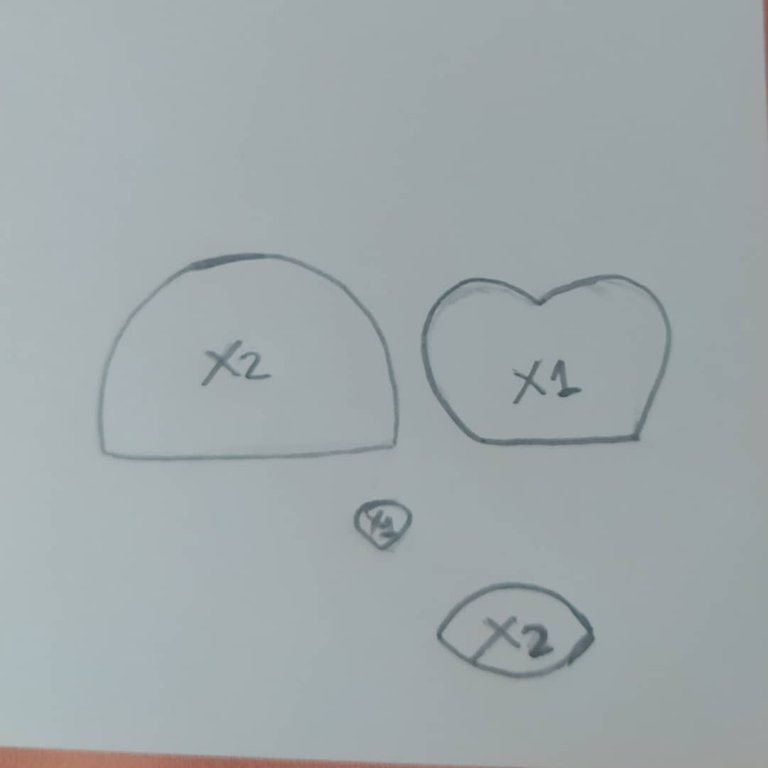
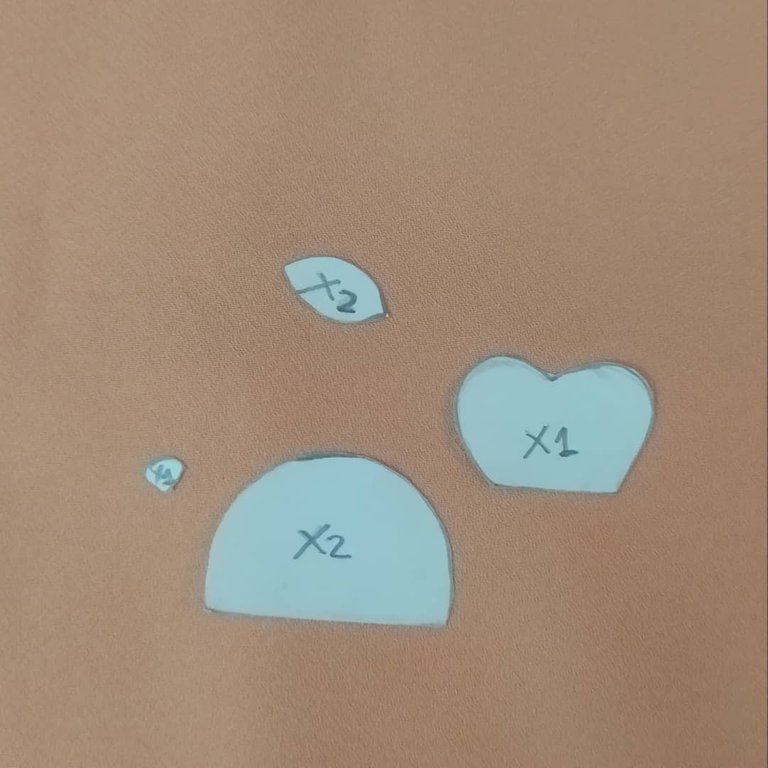
- Following the molds, we cut out the fomi pieces.
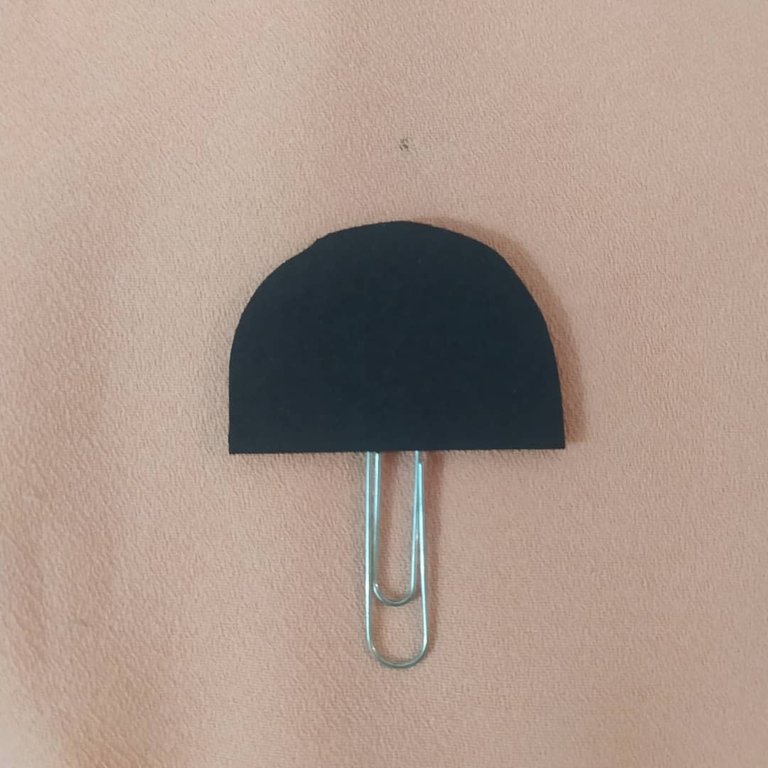
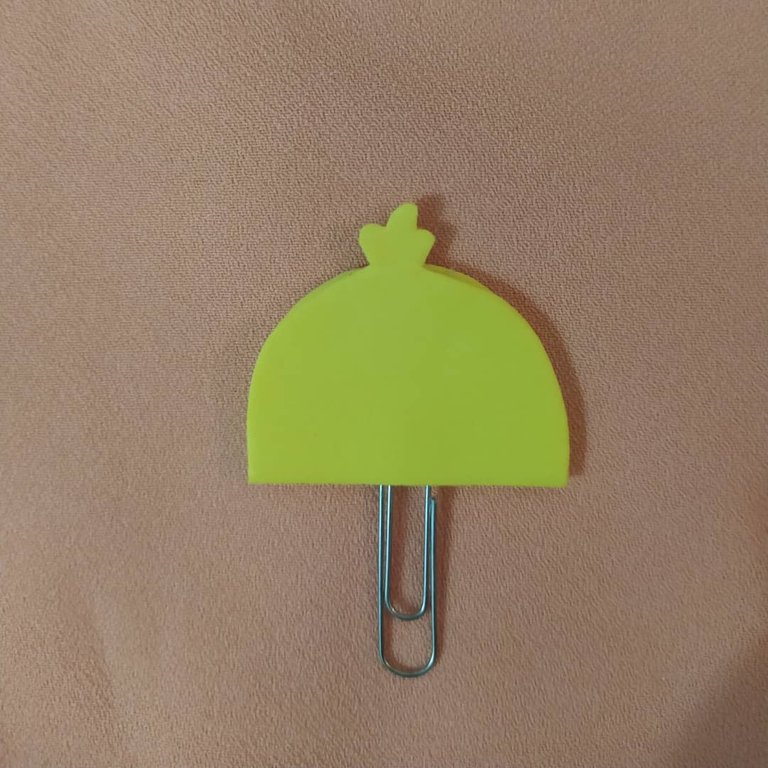
- Glue with the liquid silicone, face 1 and face 2 holding the clip.
- Siguiendo los moldes, recortamos las piezas de fomi.
- Pegamos con la silicona líquida, la cara 1 y cara 2 sosteniendo el clip.
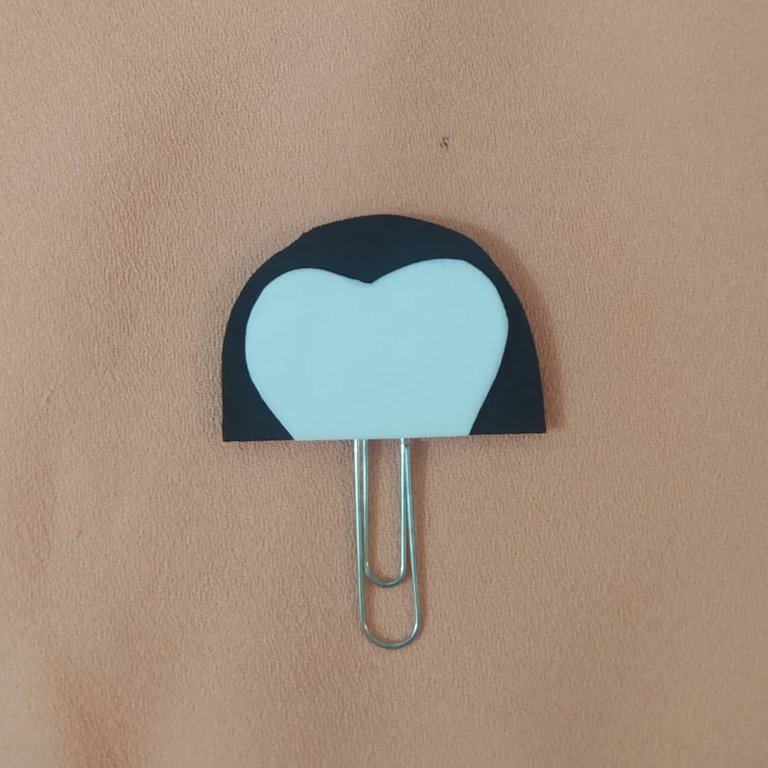
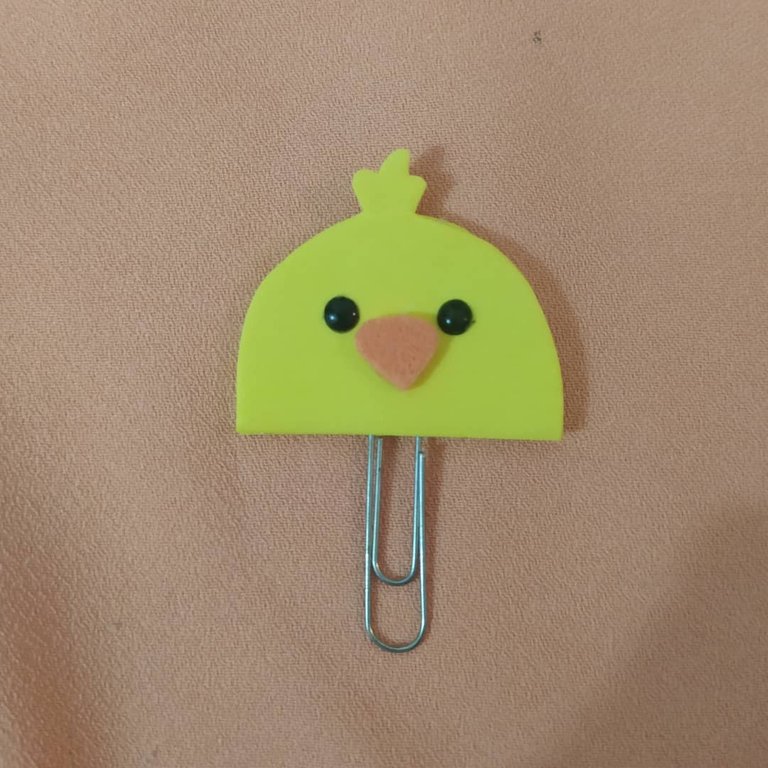
- Glue the white part of the face. Next, we also glue the eyes, the beak and the hands. And that's it, we have our first bookmark.
- Pegamos la parte de blanca de la cara. Seguidamente, pegamos también los ojos, el pico y las manos. Y listo, ya tenemos el primer marcapáginas.

🐥Chicken/Pollito:🐥
- We cut out the following figures, the head and arms are cut as well as the penguin mold.
- Recortamos las siguientes figuras, la cabeza y brazos se corta al igual que el molde del pingüino.
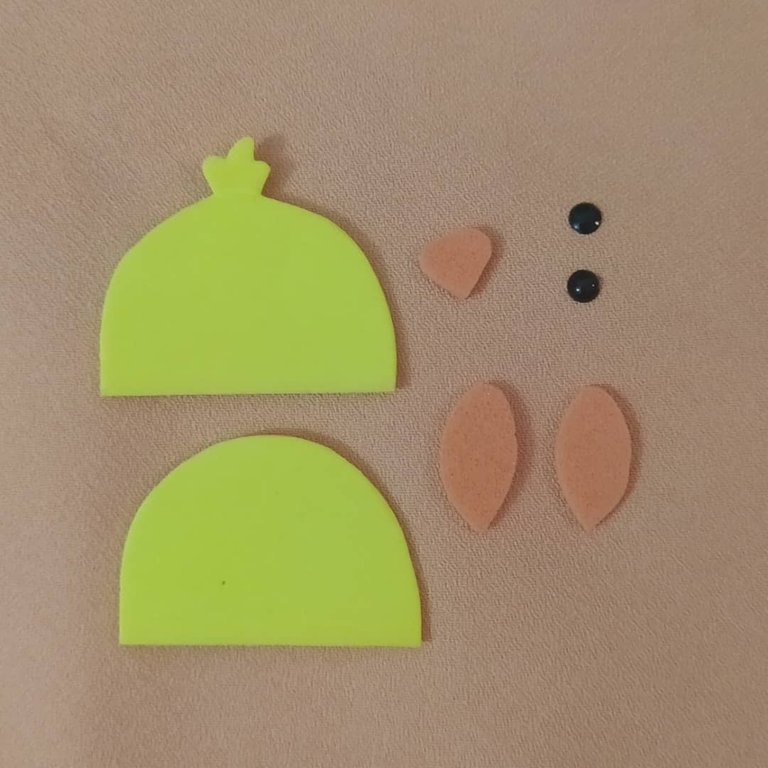
- On side 2, we glue the clip with liquid silicone.
- We place side 1 on top of side 2.
- En la cara 2, pegamos el clip con silicona líquida.
- La cara 1 la colocamos encima de la cara 2.
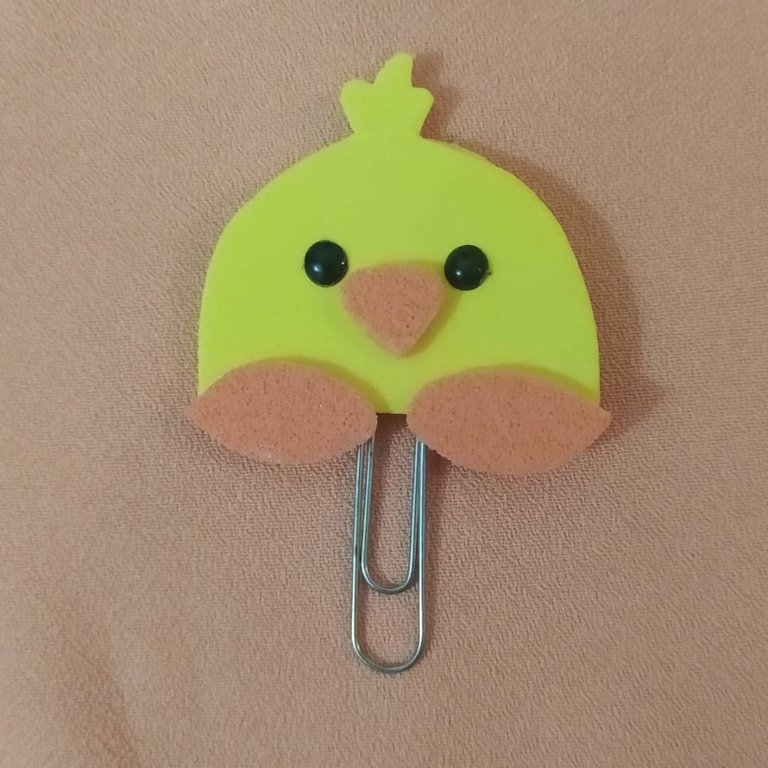
- Glue the eyes, the beak and the arms. And the bookmark in the shape of a chick is ready 🐥.
- Pegamos los ojitos, el pico y los brazos. Y ya tenemos listo el marcapáginas en forma de pollito 🐥.
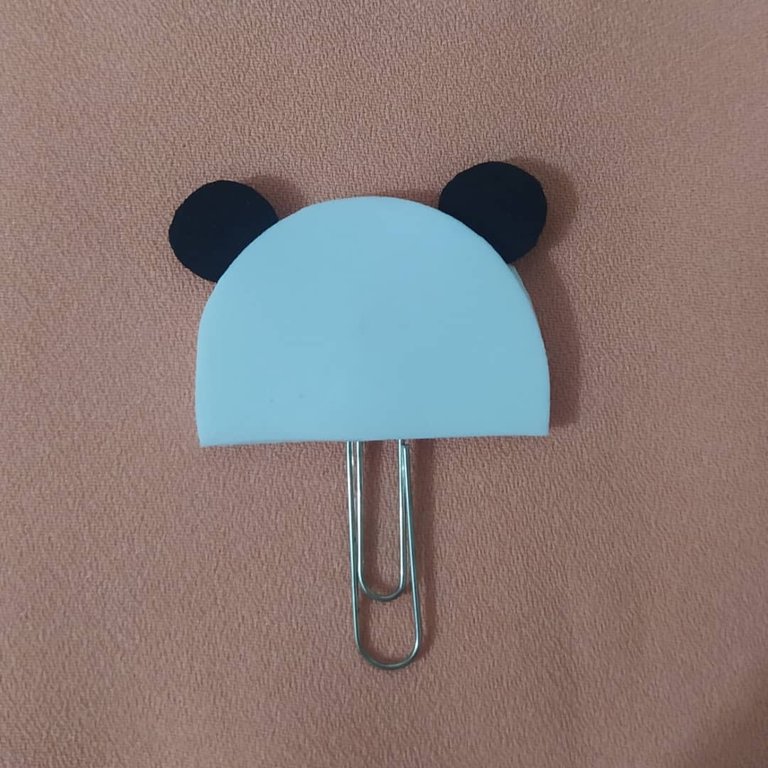
🐼Panda:🐼
- We cut out the following figures. The head is the same as the penguin bookmark mold, the rest varies.
- Glue the ears and the clip on side 2, and place side 1 on top of side 2.
- Recortamos las siguientes figuras. La cabeza es la misma a la del molde del marcapáginas en forma de pingüino, lo demás varía.
- Pegamos en la cara 2 las orejas y el clip, la cara 1 la colocamos encima de la cara 2.
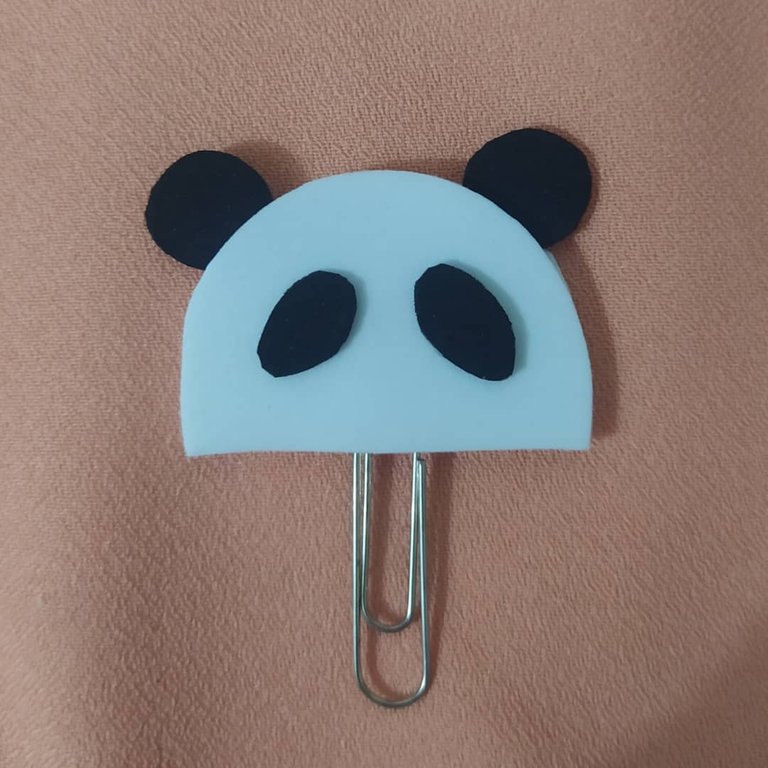
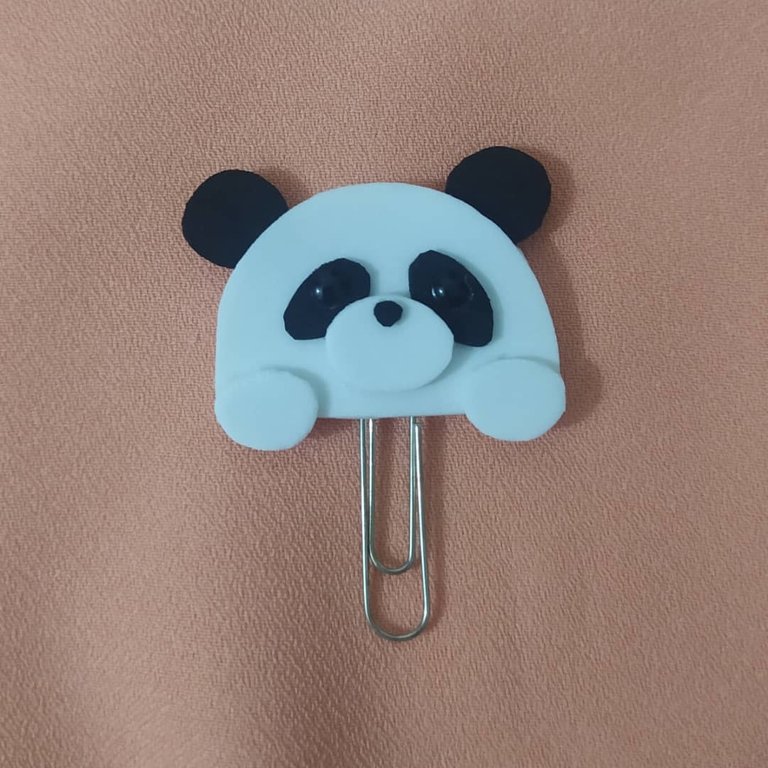
- Glue the eyes, nose and arms. And that's it, the third bookmark is finished.
- Pegamos los ojos, nariz y brazos. Y listo, ya terminamos el tercer marcapáginas.
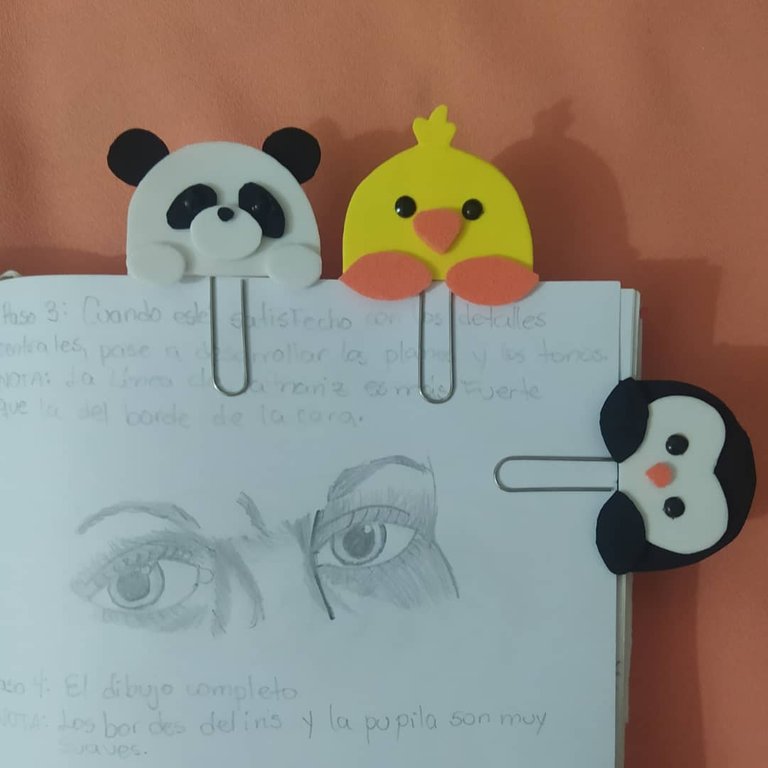
And this is how the beautiful bookmarks made with fomi turned out. I invite you to make them, either for your children, to give as gifts or to sell, they are very easy to make, you don't spend a lot of material and we give a second life to the paper clips turning them into something very nice and creative. I say goodbye, until next time, I hope you liked this tutorial. Happy thursday.
Y así quedaron los hermosos marcapáginas hechos con fomi. Les invito a realizarlos, ya sea para sus niños, para regalar o para vender, son muy fáciles de hacer, no se gasta mucho material y le damos una segunda vida a los clips convirtiéndolos en algo muy lindo y creativo. Me despido, hasta una próxima oportunidad, espero les haya gustado este tutorial. Feliz jueves.
You have reached the end of my post. Thanks for reading me❤️ Have a nice day 😊❤️ If you need help do not hesitate to write me on my Discord Ivycrafts#0396.❤️
Has llegado al final de mi publicación. Gracias por leerme❤️ Ten un lindo día 😊❤️ Si necesitas ayuda no dudes en escribirme a mi Discord Ivycrafts#0396.❤️
Text and photos are my authorship. Text translated with DeepL. Photos taken with my Xiaomi Redmi 8. Text separator created with Canva Pro.
Texto y fotos son de mi autoría. Texto traducido con DeepL. Fotos sacadas con mi Xiaomi Redmi 8. Separador de texto creado con Canva Pro.


https://twitter.com/IvyArtGurumi/status/1565330183531696128
The rewards earned on this comment will go directly to the people( @ivycrafts ) sharing the post on Twitter as long as they are registered with @poshtoken. Sign up at https://hiveposh.com.
Ay ñio mío no puedo con tanta cuchitura aquí. Te quedaron muy adorables.
Muchísimas gracias amiga 😊❤️
Te quedaron preciosos, el proceso es bastante sencillo, de verdad me encanta. Te deseo mucho éxito.
Sí, es sencillísimo. Muchas gracias por tu visita y apoyo amiga ❤️
Están super lindos... Me encantaron los colores, los diseños y lo fácil. Excelente 💯👏
Muchas gracias bella 😊❤️
Thank you for sharing this amazing post on HIVE!
Your content got selected by our fellow curator @hafizullah & you just received a little thank you via an upvote from our non-profit curation initiative!
You will be featured in one of our recurring curation compilations and on our pinterest boards! Both are aiming to offer you a stage to widen your audience within and outside of the DIY scene of hive.
Join the official DIYHub community on HIVE and show us more of your amazing work and feel free to connect with us and other DIYers via our discord server: https://discord.gg/mY5uCfQ !
If you want to support our goal to motivate other DIY/art/music/homesteading/... creators just delegate to us and earn 100% of your curation rewards!
Stay creative & hive on!
Me encantaron 🥰... Muy tiernos. Gracias por compartir.
🎆🎇🎉🎊🌧️💐✨🌾🌱🌹🌙🌿🍃🥀⚡🌺☘️🍀🌈🌷⭐🪴🌵🌸🌟💮🌴🌳💫☀️💮☔🌲🌳🌍🌌🌠☄️🏵️🐝🌻🌼🍄🐞🦋💙☕💜🍍🎆🎇🎉🎊
!PIZZA
Muchas gracias a tí por tu visita y apoyo ❤️
PIZZA Holders sent $PIZZA tips in this post's comments:
@chacald.dcymt(3/5) tipped @ivycrafts (x1)
Please vote for pizza.witness!
Thanks c:
Congratulations, your post has been upvoted by @dsc-r2cornell, which is a curating account for @R2cornell's Discord Community. We can also be found on our hive community & peakd as well as on my Discord Server
Felicitaciones, su publication ha sido votado por @dsc-r2cornell. También puedo ser encontrado en nuestra comunidad de colmena y Peakd así como en mi servidor de discordia