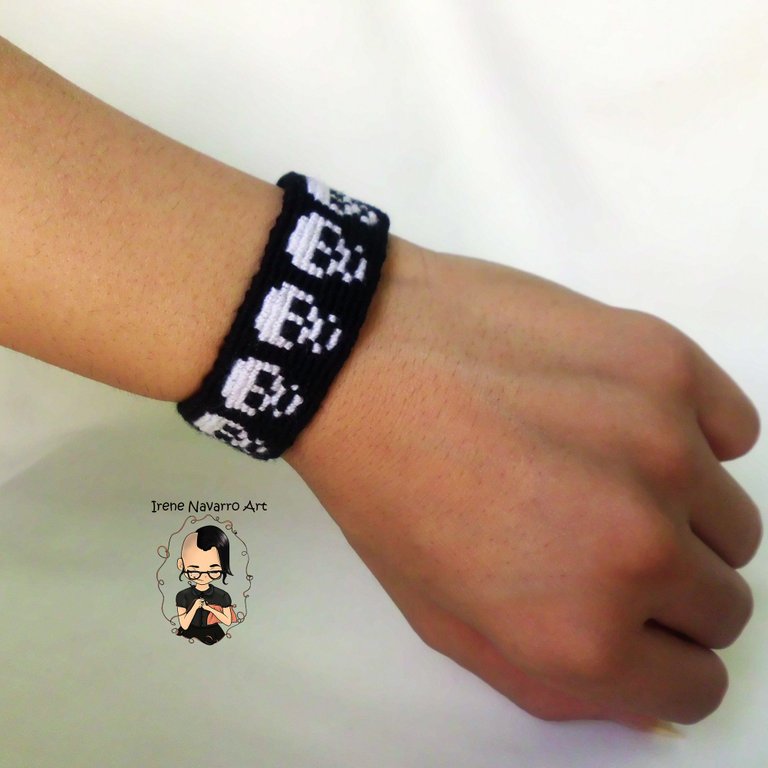
Pulsera de cráneos hecha con macramé / Skull bracelet made with macrame
Saludos querida comunidad, el día de hoy tengo el placer de compartirles mi segundo trabajo con la técnica del macramé, tejer con las manos me parece muy divertido, además que en esta técnica los nudos tienen la forma casi perfecta de un rectángulo por lo que el resultado es mucho más fiel al diseño del patrón, estuve investigando y hay otros tipos de nudos que son reversibles, sin embargo su forma no queda rectangular por lo que el diseño queda un poco distorsionado, creo que para hacer cosas que se vean por ambos lados está bien, pero para una pulsera que no es necesario hacerlo reversible por lo que este tipo nudo es mejor, también me emociona compartir el patrón que hice en Photoshop para todas aquellos que quieran intentarlo lo tengan disponible.
Greetings dear community, today I have the pleasure of sharing my second job with the macramé technique, knitting with my hands seems very fun, also that in this technique the knots have the almost perfect shape of a rectangle so the The result is much more faithful to the design of the pattern, I was investigating and there are other types of knots that are reversible, however their shape is not rectangular so the design is a bit distorted, I think to make things that are seen from both sides it's fine, but for a bracelet that doesn't need to be reversible so this type of knot is better, I'm also excited to share the pattern I made in Photoshop for all those who want to try it, have it available.
Proceso / Process
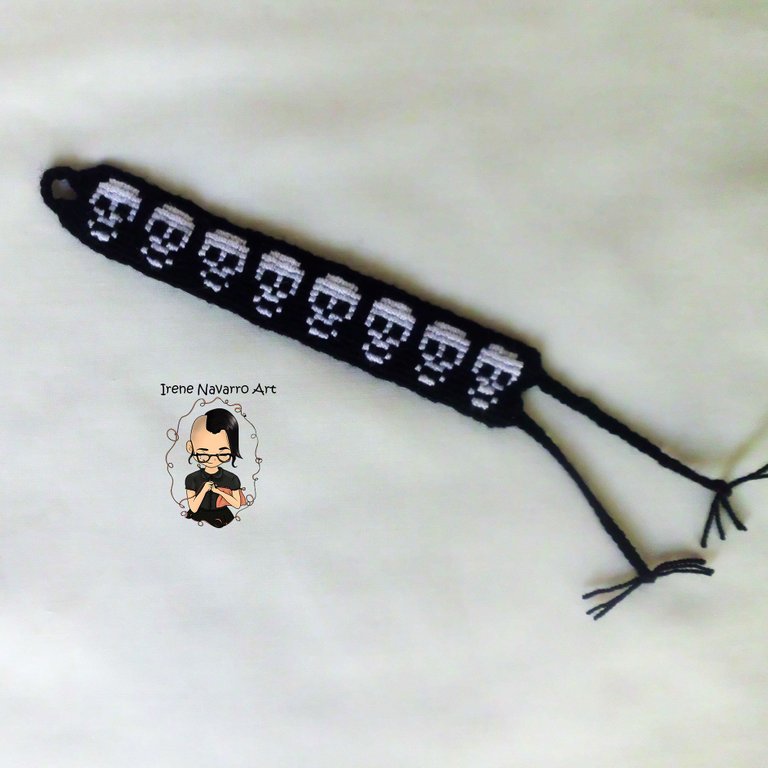
Lo primero que hice fue diseñar el patrón, al igual que patrón que hice para el llavero de Hive lo hice con base a 13 cuadros de forma horizontal, esto quiere decir que para comenzar se debe tener 13 hilos base, asimismo la longitud de la circunferencia de mi muñeca es pequeña por lo que solo hice 8 cráneos separados por dos rondas de nudos , sin embargo, si la muñeca de ustedes es más grande pueden agregar uno o dos cráneos mas o también pueden ampliar la longitud aumentado el numero de rondas de separación de color negro entre los cráneos, el patrón se lee de forma vertical.
The first thing I did was design the pattern, like the pattern I made for the Hive keychain, I did it based on 13 horizontal squares, this means that to start you must have 13 base threads, also the length of the circumference my wrist is small so I only made 8 skulls separated by two rounds of knots, however, if your wrist is larger you can add one or two more skulls or you can also extend the length by increasing the number of rounds of separation black in color between the skulls, the pattern reads vertically.

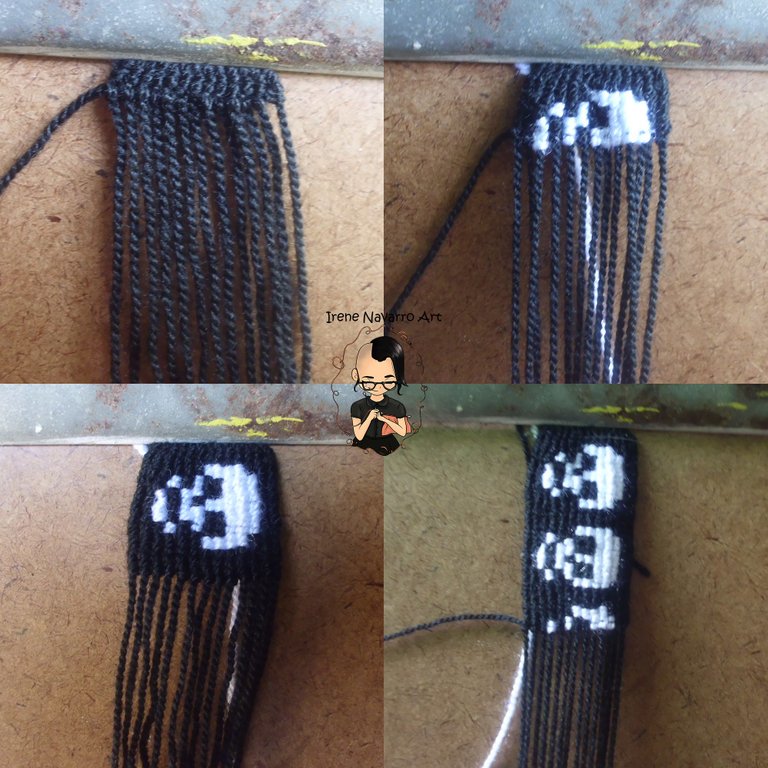
Para comenzar con los hilos de base usé hilo acrílico para crochet, también se puede usar hilo acrílico encerado pero yo no dispongo de este, corté 6 hebras de 60 centímetros y una hebra de 1 metro. Uní las puntas y coloqué el gancho sujetador de la tabla en la mitad de los hilos para hacer una pequeña trenza, luego aseguré la trenza con nudos.
To start with the base threads I used acrylic yarn for crochet, you can also use waxed acrylic yarn but I do not have this, I cut 6 strands of 60 centimeters and a 1 meter strand. I tied the ends together and placed the board fastener hook in the middle of the strands to make a small braid, then secured the braid with knots.

Al doblar los hilos para obtener el doble de hebras se debe asegurar que la hebra más larga quede de primero, puesto que esta servirá como primer hilo anudador, mientras que los otros 13 serán los hilos de base. Comenzar con nudos con el primer hilo negro, hacer dos rondas de nudos y en la tercera ronda se debe agregar el hilo blanco sujetado este por detrás con el gancho de la tabla. Seguir el patrón, cada cuadro del cráneo es un nudo en blanco. Cuando se acaba la hebra anudadora negra o blanca solo se debe agregar otra siempre por el lado de atrás.
When folding the threads to obtain double the threads, it must be ensured that the longest thread comes first, since this will serve as the first knotting thread, while the other 13 will be the base threads. Start with knots with the first black thread, make two rounds of knots and in the third round you must add the white thread, secured from behind with the hook of the table. Follow the pattern, each square of the skull is a blank knot. When the black or white knotting thread is finished, you should only add another one always from the back side.
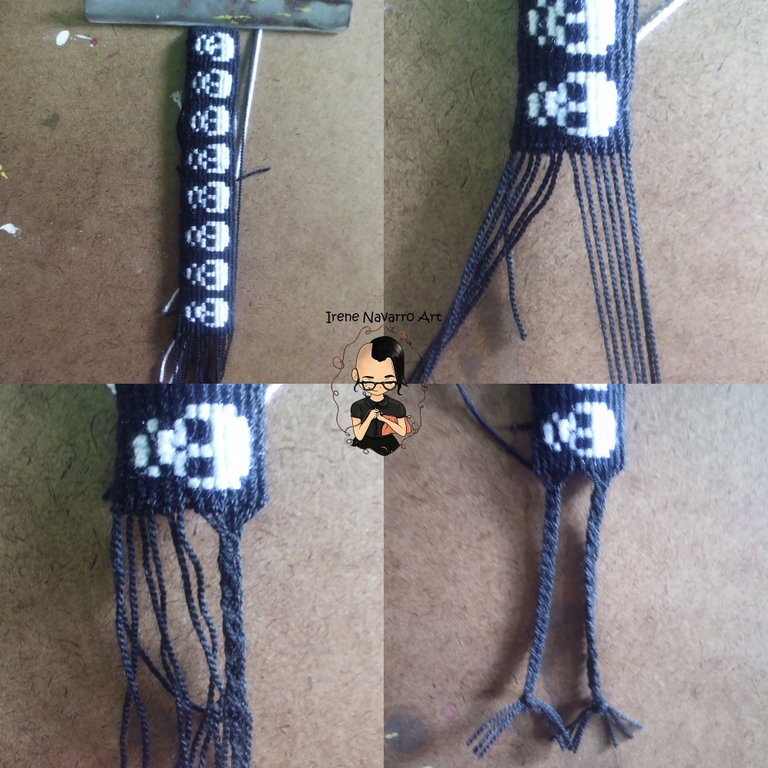
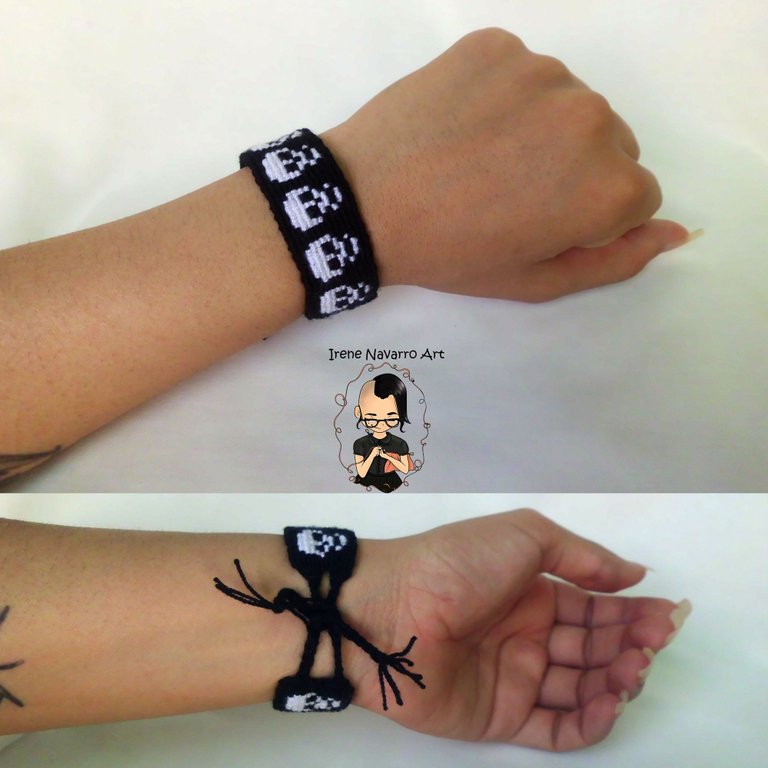
Continuar la secuencia del patrón hasta obtener los 8 cráneos, luego separar en dos el número de hebras y hacer dos trenzas, estas se deben asegurar con un nudo.
Continue the sequence of the pattern until the 8 skulls are obtained, then separate the number of strands in two and make two braids, these must be secured with a knot.
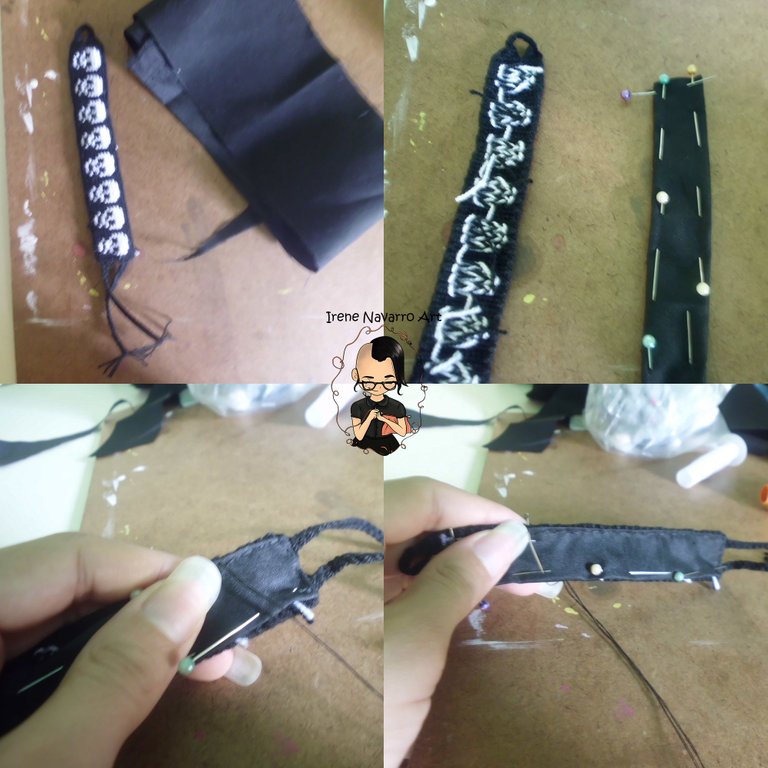
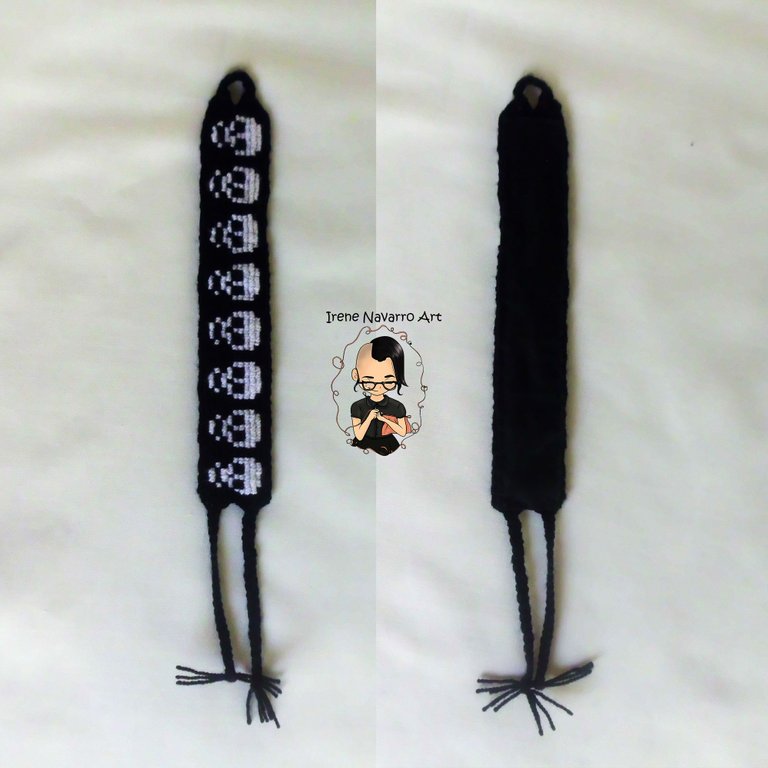
Cortar un pedazo de tela para coser por detrás de la pulsera, si es una tela que no se deshilache es mejor, en mi caso no dispondría de estas pero doblé los bordes de la tela y los aseguré con alfileres, con hilo y agua cosí por el lado de atrás haciendo una costura invisible del lado del frente.
Cut a piece of fabric to sew behind the bracelet, if it is a fabric that does not fray it is better, in my case I would not have these but I folded the edges of the fabric and secured them with pins, with thread and water I sewed by the back side by making an invisible seam on the front side.
Resultado / Result
Me siento muy feliz con mi nueva pulsera de cráneos, sé que debo hacer diseños un poco más versátiles pero quería darme el gusto de realizar este diseño para mí en primer lugar porque tenía muchas ganas de tener una pulsera de este tipo, siento que estaba en deuda conmigo misma y me he dado un regalo, espero que les guste y les sea de utilidad mi publicación y patrón.
I feel very happy with my new skull bracelet, I know that I must make designs a little more versatile but I wanted to give myself the pleasure of making this design for myself in the first place because I really wanted to have a bracelet of this type, I feel that I was in I am indebted to myself and I have given myself a gift, I hope you like it and my publication and pattern will be useful to you.
Imágenes tomadas con cámara Casio QV-R100 y editadas en Adobe Photoshop Cs6
Images taken with Casio QV-R100 camera and edited in Adobe Photoshop Cs6
Invítenme un Café/Support Me on Ko-Fi
Si te gusta mi contenido y quieres apoyarme a seguir dibujando, pintando, escribiendo y tejiendo puedes invitarme un Ko-fi en el enlace que les dejo aquí abajo, les recuerdo que es fácil, se usa Paypal y Tarjeta. ¡Muchas gracias a todos!
If you want to support my art you can also make donations for the value of a coffee (Ko-Fi) this uses Paypal, it is simple and with it I will be able to continue knitting and buying materials to create and share my publications

https://ko-fi.com/irenenavarroart
Espero les haya gustado. Les invito a leer mis próximas publicaciones y siempre estaré dispuesta a responder sus preguntas y comentarios, también pueden seguirme y contactarme en cualquiera de mis redes sociales. ¡Muchas gracias!
I hope you liked it. I invite you to read my next publications and I will always be willing to answer your questions and comments, you can also follow me and contact me on any of my social networks. Thank you!
Te ha quedado bellisimooo! 💖
Gracias ❤️
Muchas gracias @mayvil ❤️
Excelente , te quedó muy bonita, saludos
Muchas gracias 😊
Muchas gracias por el apoyo
Wow this is so beautiful thanks for sharing
Thank you @smilestitches 😊
You’re welcome @irenenavarroart
Congratulations, your post has been upvoted by @dsc-r2cornell, which is the curating account for @R2cornell's Discord Community.
Thank you so much 😊
Felicitaciones Irene! hermoso trabajo!
Muchas gracias @dru.munecas Saludos 😊
Se ve tan hermosa que quisiera tener una para mi pero con flores por favor. Creo que si sigues haciendo cosas así me voy a sentar aprender.
Muchas gracias vale, la proxima vez prometo que haré una con flores o un diseño colorido que se vea lindo, espero te animes a aprender 😊
Increíble! Quiero una 😂 en fucsia... Es un arte hacer esos tejidos...
Muchas gracias 😊
Excelente trabajo, te felicito.
Muchas gracias 😊
The bracelet is lovely, especially as you had the ingenious idea to sew fabric at its back. I think this gives it a very polished look. I never thought about creating such a pattern digitally, also very clever.
I remember knotting simpler varieties of these bracelets during my time at school and I had a friend who made them from sewing thread!!!!! Honestly she used the extremely thin sewing thread, no idea how she managed to get them finished and how she could see the tiny knots.
Wow with sewing thread that's amazing, I don't want to imagine the headache when a knot goes wrong 😅
Here in my country this technique is used a lot by the members of the Wayuú ethnic group in their crafts, they make very colorful grometric patterns, but I really don't know how they do to do it so quickly, they sell their bracelets at a very low price so I suppose that It is because they can do many in a short time, otherwise I do not understand why 🤔
Hola Ireneee! 🖤 🖤 🖤 (/o7o)/ que emoción verte usando técnica macramé. El patrón te quedó nené, yo usaba un cuaderno cuadriculado para hacerlos, de esos que venden para el colegio (para matemáticas), no es muy fancy pero me hacia no depender de la computadora cuando se iba la luz jajajaja. Me parece perfecto que primero pienses en ti y que estos inicios sean piezas a tu gusto 🙏 al final del día terminamos haciendo muchas cosas para los demás, y pocas para nosotras, o no tantas como la gente imagina ~
Yo usé hojas de cuadriculado para el diseño de mi trabajo de tesis, no se cuantas hojas se llevó pero fueron muchas , es que era un trabajo en dos aguas y el gráfico se hace practicamente igual, pero hacerlo digital era complicado asi que lo hice a mano con colores, la hermosa @yetsimar me ayudó a pintarlo, era enorme 😆
Para mi fue un gran honor contribuir un poco con tan hermosoo trabajo!😍
Wow el diseño de los craneos te quedó perfecto! Eres toda una artista en todos los proyectos que haces!!! Eres una sensei!
Ay muchas gracias @tibaire 😊