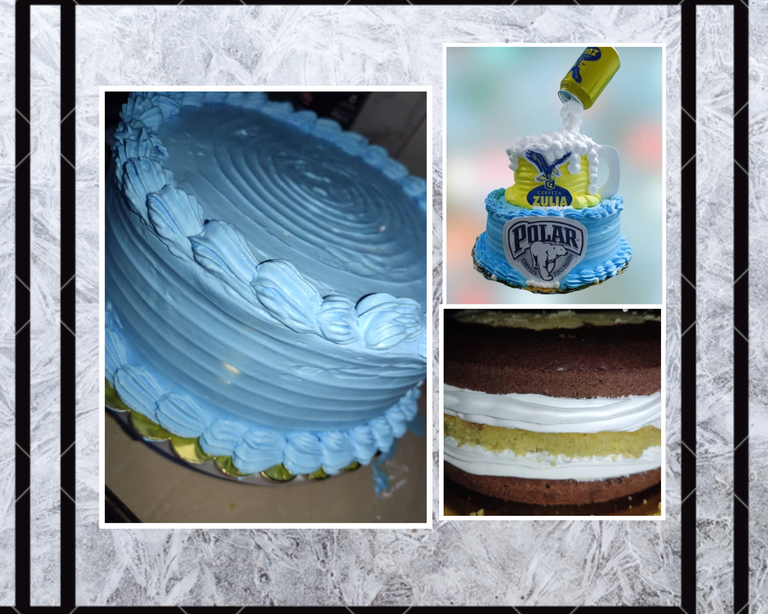
Torta ajedrez, rellena y decorada con chantilly / Chess cake, filled and decorated with whipped cream
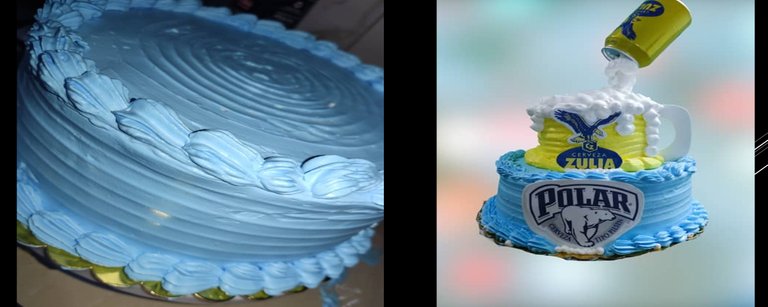
Esta semana realmente ha sido bastante ajetreada para mí, entre las cosas de la niña, las mías además de mis clases de repostería la verdad mi tiempo libre no es muchos, adema de mi emprendimiento de torta y dulces que, aunque tengo un poco descuidado aún sigue en pie, y estoy retomando poco a poco, porque realmente además de ser mi fuente de ingreso es mi pasión, así que esta semana una amiga me pidió para su esposo una torta con temática de cerveza la verdad me emocione porque nunca había hecho una así antes además de que me sirve de práctica, pero no le gusta el merengue, ni la crema de mantequilla, así que rápidamente le ofrecí la crema chantilly, porque es una crema que además de muy fácil de trabajar, es deliciosa y cremosa, obviamente la complemente ofreciéndole un diseño de torta ajedrez que le encanto.
La torta ajedrez es de mi favorita sobre todo cubierta y rellena de chocolate, de tal manera que en una oportunidad mi hermana me regalo un molde especial para hacerlo y que me facilitará la vida, y se convirtió en mi consentido, porque realmente da el efecto de tablero de ajedrez sin complicaciones, aunque también creo que en casa con acetato podemos hacerlo. Así que vamos con esta receta genial que les traigo hoy para que la disfruten .
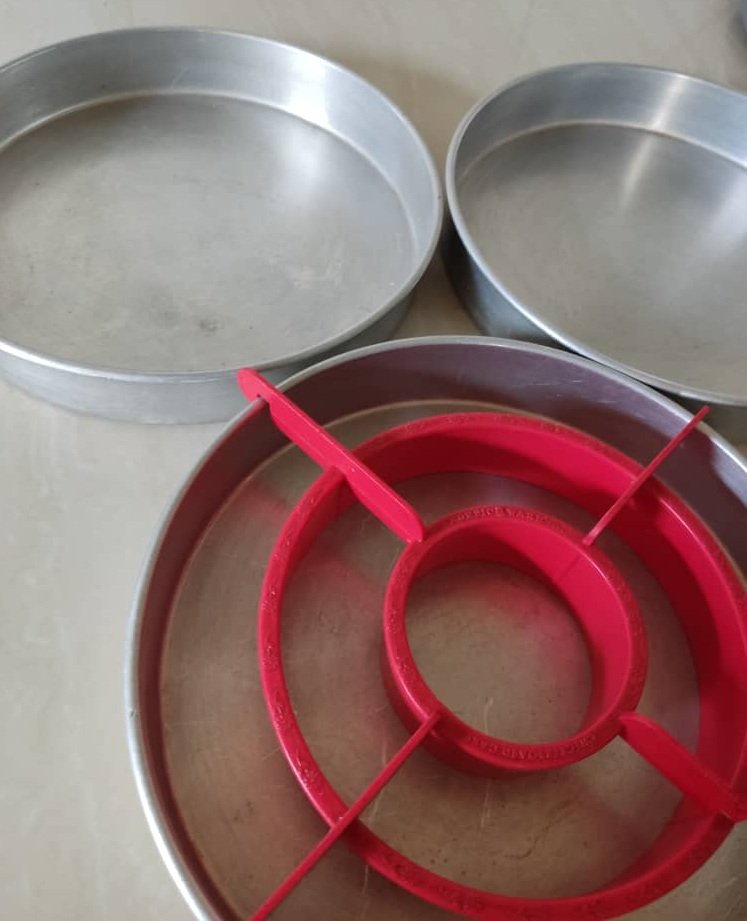


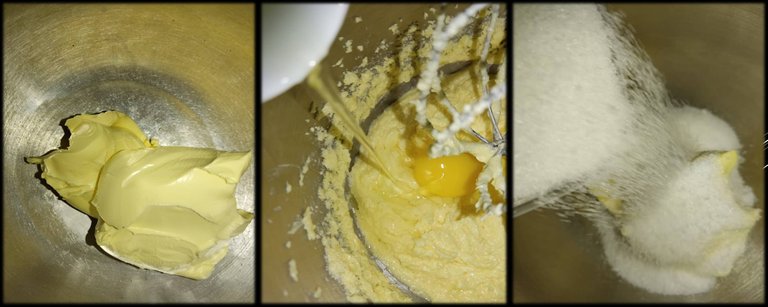
Primero que nada, Precalentaremos el horno a 180° y nuestro molde de 22cm, previamente engrasado y enharinado. En el caso de mis moldes especial para este tipo de torta no es necesario engrasarlos. En la batidora o con una paleta cremamos la margarina con el azúcar, hasta que la preparación tome un color blanquecino, vamos colocando los huevos uno por uno para ir incorporándolos a la mezcla.
Luego agregamos la esencia y batimos, incorporamos la leche y la harina por parte, integramos primero con la paleta o batidor de mano.
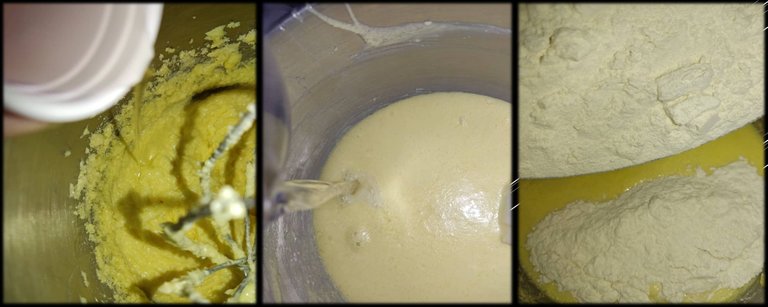
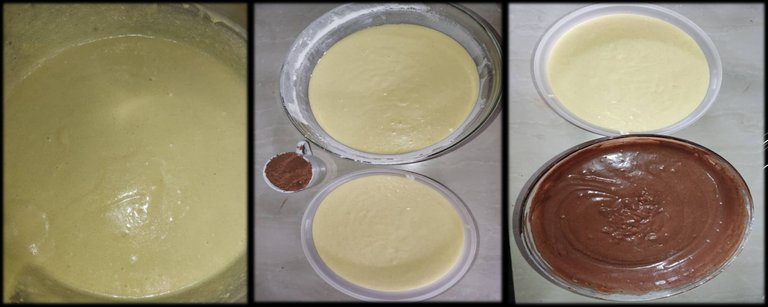
A continuación, con la batidora, batimos por 1 minuto y medio máximo para eliminar cualquier grumo. Pesamos y dividimos la mezcla en 2 partes iguales, en una de esas partes agregaremos el cacao y con un batidor de mano o paleta de madera lo incorporamos a la mezcla, si la mezcla queda muy densa podemos colocar 2 cucharadas de leches adicionales a esta mezcla de chocolate. Si la queremos de colores.
En nuestro molde colocamos la base para hacer nuestra torta damero y vamos colocando con una cucharilla la mezcla, primero chocolate, luego vainilla y por ultimo de nuevo chocolate, intercalada, sacamos nuestra base y cada mezcla se quedará en su sitio, no se preocupen que no se mezclaran durante el horneado. Realizaremos 2 moldes con la misma combinación y uno diferente, para que al armar la torta nos queden los cuadritos como si fuera un tablero de ajedrez.
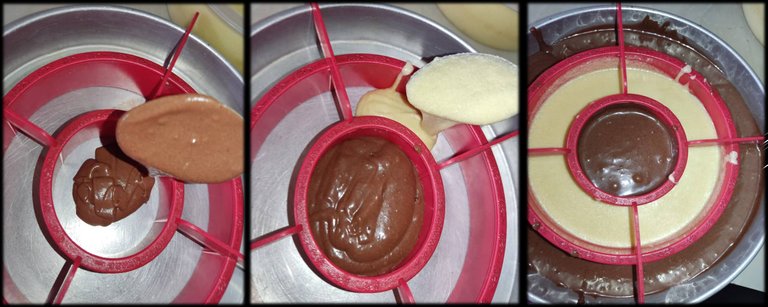
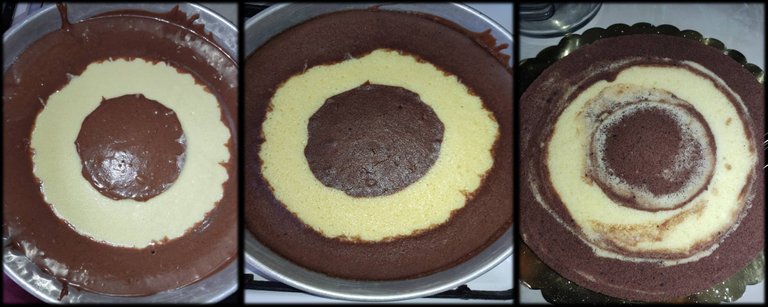
Tratamos de que los tres moldes tengan más o menos la misma proporción de mezcla cada uno. Esta se cocinará en un tiempo aproximado de 30 minutos. Recordemos que esto varía según nuestro horno. No abrir el horno durante la cocción, sabremos que nuestra torta está lista porque se desprende de las paredes del molde y tiene un color dorado, además de que seguro su olor estará expandido por todos lados. Al retirar del horno dejamos que se enfrié y desmoldamos preferiblemente en una rejilla, normalmente lo dejo reposar de un día para otro.
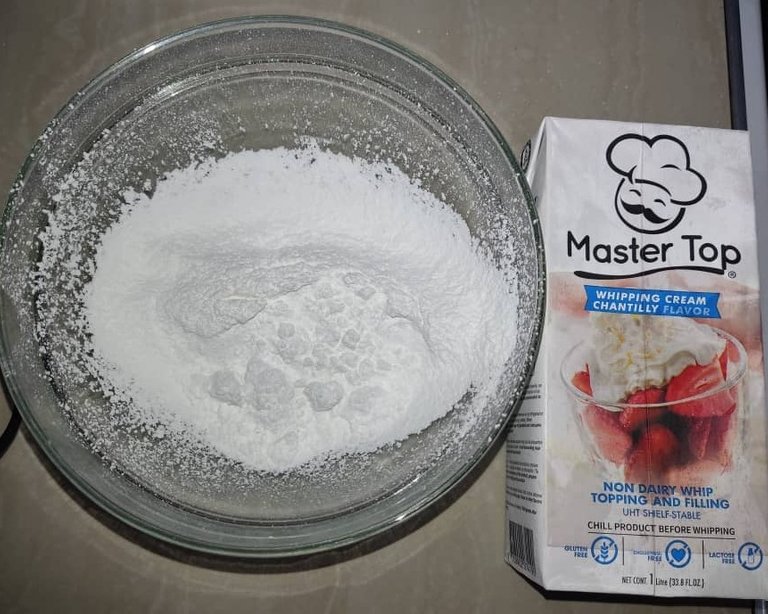
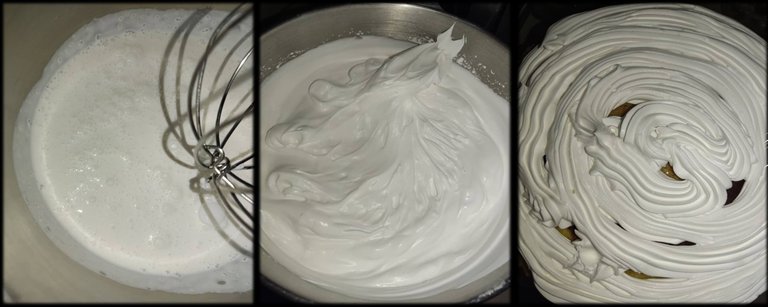
La crema chantilly liquida es bastante fácil y rápida de montar. Primero que nada, por lo menos 1 hora antes colocaremos todos los utensilios en el congelador, así como la crema todo debe estar bien frio. Ya teniendo todo frio, procedemos a colocar en nuestro bol, la crema chantilly con el azúcar impalpable poco a poco si no nos gusta tan duce le colocamos menos, comenzamos a batir a velocidad media, el tiempo varía según la batidora, batimos hasta que esté todo bien integrado. Evitemos de no sobre batir el chantilly porque se nos convierte en mantequilla. Pasamos a una manga y rellenamos a nuestro gusto.
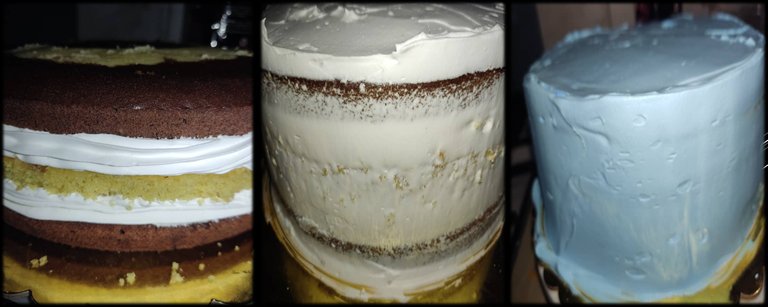
Así mismo después de rellenar nuestra torta, con nuestra crema en la manga empezamos a decorar, primero colocamos una capa recoge migaja para que no nos quede ninguna migaja en la decoración final, y luego otra capa final que alisamos y damos los detalles, podemos pintar el chantilly, incluso se pinta fácilmente, o con el aerógrafo también es buena opción.
Todas las imágenes son de mi propiedad, tomadas con la cámara de mi teléfono Poco X3 Pro y otras están publicadas en mis Instagram personal Valeria.sweet.and.cake. Traducido con https://www.deepl.com/es/translator

La torta ajedrez es de mi favorita sobre todo cubierta y rellena de chocolate, de tal manera que en una oportunidad mi hermana me regalo un molde especial para hacerlo y que me facilitará la vida, y se convirtió en mi consentido, porque realmente da el efecto de tablero de ajedrez sin complicaciones, aunque también creo que en casa con acetato podemos hacerlo. Así que vamos con esta receta genial que les traigo hoy para que la disfruten .
**Torta Ajedrez o torta Damero **
| Cantidad | Ingrediente | |
|---|---|---|
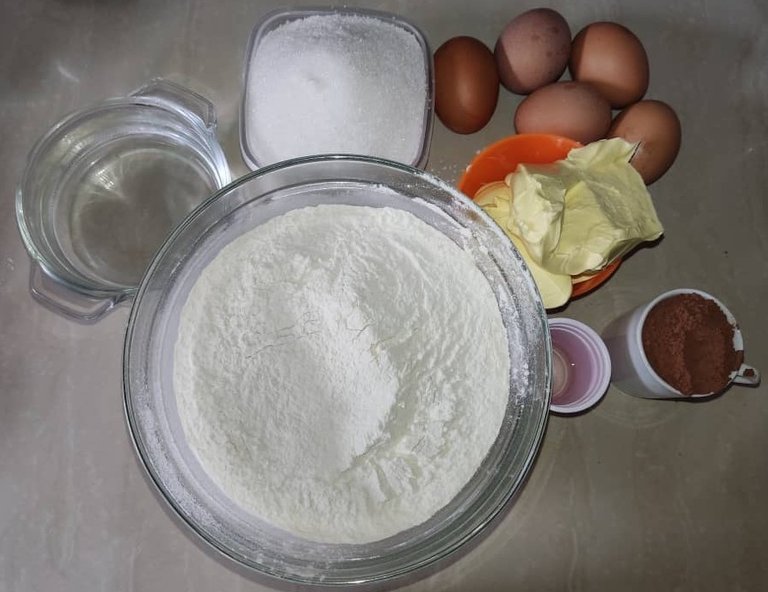
| 500 gramos | Harina | |
| 500 gramos | Azúcar | |
| 5 | Huevos | |
| 1 Cucharadita | Vainilla | |
| 250 Gramos | Margarina | |
| 250 Mililitros | Agua | |
| 50 gramos | Cacao |
Paso a paso
Primero que nada, Precalentaremos el horno a 180° y nuestro molde de 22cm, previamente engrasado y enharinado. En el caso de mis moldes especial para este tipo de torta no es necesario engrasarlos. En la batidora o con una paleta cremamos la margarina con el azúcar, hasta que la preparación tome un color blanquecino, vamos colocando los huevos uno por uno para ir incorporándolos a la mezcla.
Luego agregamos la esencia y batimos, incorporamos la leche y la harina por parte, integramos primero con la paleta o batidor de mano.
A continuación, con la batidora, batimos por 1 minuto y medio máximo para eliminar cualquier grumo. Pesamos y dividimos la mezcla en 2 partes iguales, en una de esas partes agregaremos el cacao y con un batidor de mano o paleta de madera lo incorporamos a la mezcla, si la mezcla queda muy densa podemos colocar 2 cucharadas de leches adicionales a esta mezcla de chocolate. Si la queremos de colores.
En nuestro molde colocamos la base para hacer nuestra torta damero y vamos colocando con una cucharilla la mezcla, primero chocolate, luego vainilla y por ultimo de nuevo chocolate, intercalada, sacamos nuestra base y cada mezcla se quedará en su sitio, no se preocupen que no se mezclaran durante el horneado. Realizaremos 2 moldes con la misma combinación y uno diferente, para que al armar la torta nos queden los cuadritos como si fuera un tablero de ajedrez.
Tratamos de que los tres moldes tengan más o menos la misma proporción de mezcla cada uno. Esta se cocinará en un tiempo aproximado de 30 minutos. Recordemos que esto varía según nuestro horno. No abrir el horno durante la cocción, sabremos que nuestra torta está lista porque se desprende de las paredes del molde y tiene un color dorado, además de que seguro su olor estará expandido por todos lados. Al retirar del horno dejamos que se enfrié y desmoldamos preferiblemente en una rejilla, normalmente lo dejo reposar de un día para otro.
Crema Chantilly
| Cantidad | Ingrediente | |
|---|---|---|
| 500 mililitros | Crema Chantilly | |
| 150 gramos | Azúcar impalpable |
Paso a paso
La crema chantilly liquida es bastante fácil y rápida de montar. Primero que nada, por lo menos 1 hora antes colocaremos todos los utensilios en el congelador, así como la crema todo debe estar bien frio. Ya teniendo todo frio, procedemos a colocar en nuestro bol, la crema chantilly con el azúcar impalpable poco a poco si no nos gusta tan duce le colocamos menos, comenzamos a batir a velocidad media, el tiempo varía según la batidora, batimos hasta que esté todo bien integrado. Evitemos de no sobre batir el chantilly porque se nos convierte en mantequilla. Pasamos a una manga y rellenamos a nuestro gusto.
Así mismo después de rellenar nuestra torta, con nuestra crema en la manga empezamos a decorar, primero colocamos una capa recoge migaja para que no nos quede ninguna migaja en la decoración final, y luego otra capa final que alisamos y damos los detalles, podemos pintar el chantilly, incluso se pinta fácilmente, o con el aerógrafo también es buena opción.
El resultado final
English
This week has really been quite busy for me, between the girl's things, mine and my baking classes the truth is that my free time is not much, besides my cake and candy business that, although I have a little neglected is still going on, and I'm taking it up again little by little, because really besides being my source of income is my passion, so this week a friend asked me for a beer themed cake for her husband, the truth is that I was excited because I had never made one like this before, but she does not like meringue or buttercream, so I quickly offered her the chantilly cream, because it is a cream that besides being very easy to work with, it is delicious and creamy, obviously I complemented it by offering her a chess cake design that she loved.
The chess cake is one of my favorite, especially covered and filled with chocolate, so that once my sister gave me a special mold to make it and that will make my life easier, and it became my favorite, because it really gives the chessboard effect without complications, although I also believe that at home with acetate we can do it. So let's go with this great recipe that I bring you today for you to enjoy.
First of all, preheat the oven to 180° and our 22cm cake pan, previously greased and floured. In the case of my special molds for this type of cake it is not necessary to grease them. In the mixer or with a paddle we cream the margarine with the sugar, until the preparation takes a whitish color, we put the eggs one by one to incorporate them to the mixture.
Then add the essence and beat, add the milk and the flour by parts, integrating first with the paddle or hand whisk.
Then, with the mixer, beat for 1 minute and a half maximum to eliminate any lumps. We weigh and divide the mixture into 2 equal parts, in one of these parts we will add the cocoa and with a whisk or wooden paddle we incorporate it to the mixture, if the mixture is too dense we can add 2 additional tablespoons of milk to this chocolate mixture. If we want it colored.
In our mold we place the base to make our checkerboard cake and we place with a spoon the mixture, first chocolate, then vanilla and finally chocolate again, interspersed, we take out our base and each mixture will stay in place, do not worry that they will not mix during baking. We will make 2 molds with the same combination and a different one, so that when we assemble the cake we have the squares as if it were a chessboard.
We try that the three molds have more or less the same proportion of mixture in each one. This will cook in approximately 30 minutes. Remember that this varies according to our oven. Do not open the oven during the baking, we will know that our cake is ready because it comes off the walls of the mold and has a golden color, besides its smell will surely be spread all over. When removing from the oven let it cool and unmold preferably on a wire rack, I usually let it stand overnight.
The liquid whipped cream is quite easy and quick to assemble. First of all, at least 1 hour before we will place all the utensils in the freezer, as well as the cream, everything must be very cold. Once everything is cold, we proceed to place in our bowl, the whipped cream with the powdered sugar little by little if we do not like it so hard we put less, we begin to beat at medium speed, the time varies according to the mixer, beat until everything is well integrated. Avoid over beating the whipped cream because it will turn into butter. Transfer to a piping bag and fill as desired.
Likewise after filling our cake, with our cream in the sleeve we begin to decorate, first we place a layer collect crumbs so that we do not have any crumbs in the final decoration, and then another final layer that we smooth and give the details, we can paint the whipped cream, even it is easily painted, or with the airbrush is also a good option.
All images are my own, taken with my Poco X3 Pro phone camera and others are posted on my personal Instagram Valeria.sweet.and.cake. Translated with https://www.deepl.com/es/translator
The chess cake is one of my favorite, especially covered and filled with chocolate, so that once my sister gave me a special mold to make it and that will make my life easier, and it became my favorite, because it really gives the chessboard effect without complications, although I also believe that at home with acetate we can do it. So let's go with this great recipe that I bring you today for you to enjoy.
**Chess cake or Damero cake**
| Quantity | Ingredient | ||
|---|---|---|---|
| 500 grams | Flour | ||
| 500 grams | Sugar | ||
| 5 | Eggs | ||
| 1 teaspoon | Vanilla | ||
| 250 grams | Margarine | ||
| 250 Milliliters | Water | ||
| 50 grams | Cocoa |
Step by step
First of all, preheat the oven to 180° and our 22cm cake pan, previously greased and floured. In the case of my special molds for this type of cake it is not necessary to grease them. In the mixer or with a paddle we cream the margarine with the sugar, until the preparation takes a whitish color, we put the eggs one by one to incorporate them to the mixture.
Then add the essence and beat, add the milk and the flour by parts, integrating first with the paddle or hand whisk.
Then, with the mixer, beat for 1 minute and a half maximum to eliminate any lumps. We weigh and divide the mixture into 2 equal parts, in one of these parts we will add the cocoa and with a whisk or wooden paddle we incorporate it to the mixture, if the mixture is too dense we can add 2 additional tablespoons of milk to this chocolate mixture. If we want it colored.
In our mold we place the base to make our checkerboard cake and we place with a spoon the mixture, first chocolate, then vanilla and finally chocolate again, interspersed, we take out our base and each mixture will stay in place, do not worry that they will not mix during baking. We will make 2 molds with the same combination and a different one, so that when we assemble the cake we have the squares as if it were a chessboard.
We try that the three molds have more or less the same proportion of mixture in each one. This will cook in approximately 30 minutes. Remember that this varies according to our oven. Do not open the oven during the baking, we will know that our cake is ready because it comes off the walls of the mold and has a golden color, besides its smell will surely be spread all over. When removing from the oven let it cool and unmold preferably on a wire rack, I usually let it stand overnight.
Chantilly Cream
| Quantity | Ingredient | ||
|---|---|---|---|
| 500 milliliters | Chantilly Cream | ||
| 150 grams | Impalpable sugar |
Step by step
The liquid whipped cream is quite easy and quick to assemble. First of all, at least 1 hour before we will place all the utensils in the freezer, as well as the cream, everything must be very cold. Once everything is cold, we proceed to place in our bowl, the whipped cream with the powdered sugar little by little if we do not like it so hard we put less, we begin to beat at medium speed, the time varies according to the mixer, beat until everything is well integrated. Avoid over beating the whipped cream because it will turn into butter. Transfer to a piping bag and fill as desired.
Likewise after filling our cake, with our cream in the sleeve we begin to decorate, first we place a layer collect crumbs so that we do not have any crumbs in the final decoration, and then another final layer that we smooth and give the details, we can paint the whipped cream, even it is easily painted, or with the airbrush is also a good option.
El resultado final
0
0
0.000
This dish look awesome such a great resul!!😍
Thank you!!! I love your comment. Regards ☺️