The Sculpture of a cute penguin
Hello to all art lovers!!! And what they think that the funniest bird of all are the penguins ^_^
I am taking several concerns about a big event that will take place on December 4 at my work, which gives me 3 weeks for my students to finish approximately 26 drawings, and since there are 2 classes a week that gives 5 classes to have everything ready to deliver the drawings in time for the video editor to make the projection of the cinerama of the work, and knowing how distracted and committed my students are, it is obvious that in the last week everything will be a disaster, I am already with the mentality: we will deliver the work, but since everything was done in a hurry it will not be pretty… but we deliver it. ^_^

To make a cute penguin
This project was another thing that I taught in the vacation plan, already knowing the limitations of children when following instructions, it occurred to me to teach them how to make a penguin from which I was inspired by an old program that I loved in stop motion about a little penguin.
Although the truth was this video was what motivated me to teach you how to make a penguin.
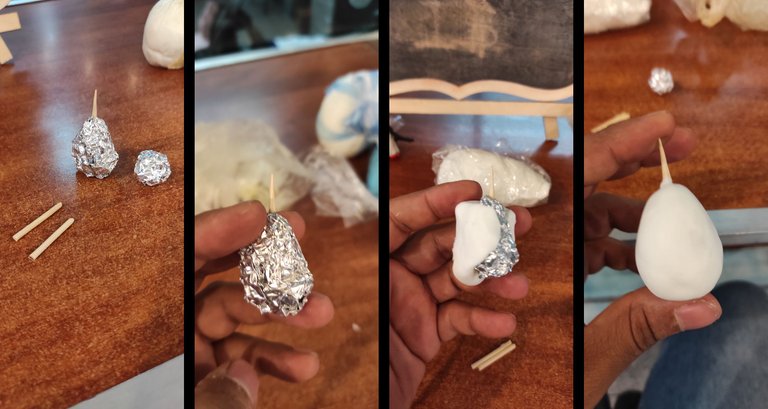
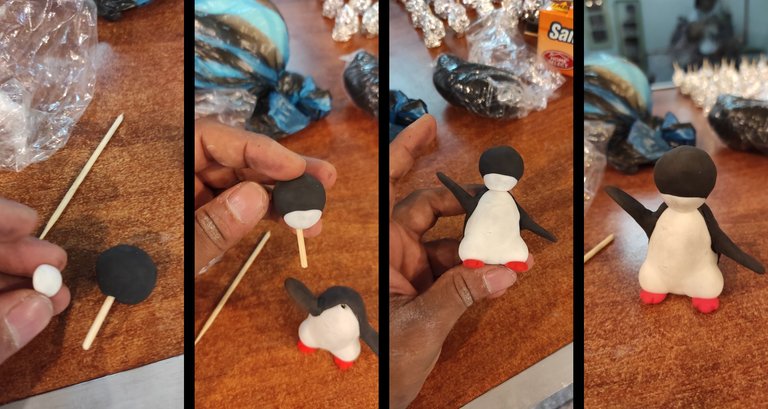
Unlike the others, the prototype of this flexible mass project was done at work and not at home, the first thing was to make the bases to support the body, this would cost 3 wooden sticks and 2 balls of aluminum foil, one one of them is larger and in the shape of an egg this will be used for the body, at the end I inserted one of the 3 wooden sticks to then cover it entirely with the white dough and further define the shape of an egg.
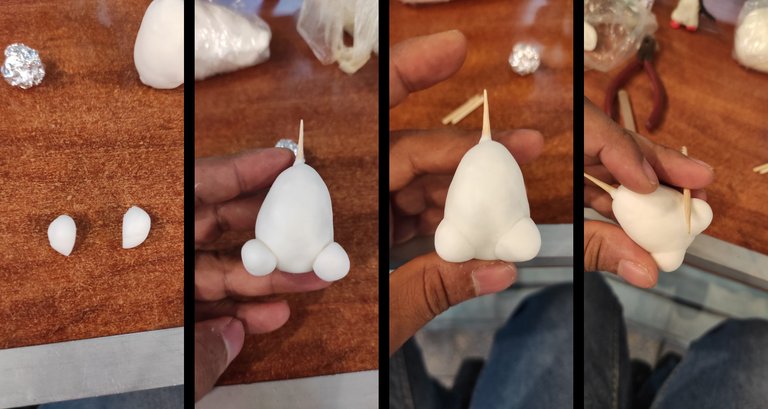
Then I took two small portions of white dough and gave them the shape of a drop, which I placed on both sides, but in front of the body, then joined them with the tip of a wooden stick until they were unified with the body.
Having the body with the thighs of the penguin ready, I continued to make the legs, for this I took a small portion of red dough and made a ball with it which I cut in half to have two equal pieces, which I returned to give a spherical shape , and then gently crush them with your fingers until they have the shape of coins.
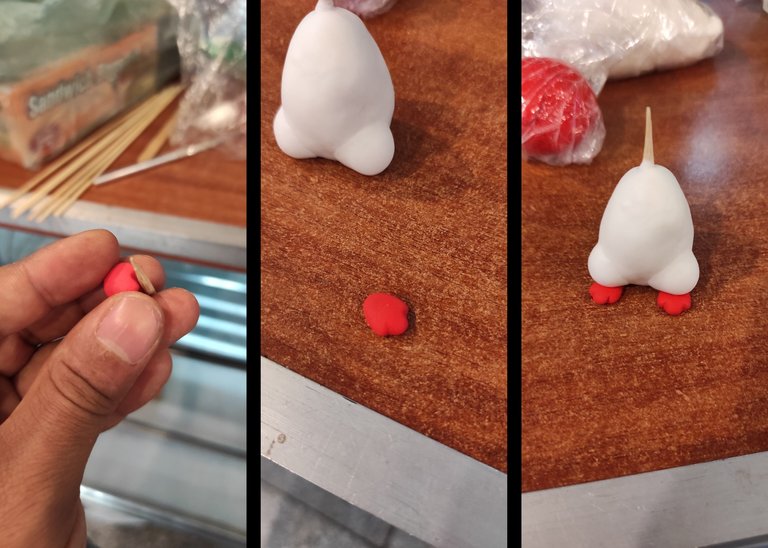
Then, with the tip of a stick, I made two marks on each of them to have a bird's foot with 3 toes, which I then placed under the thighs.
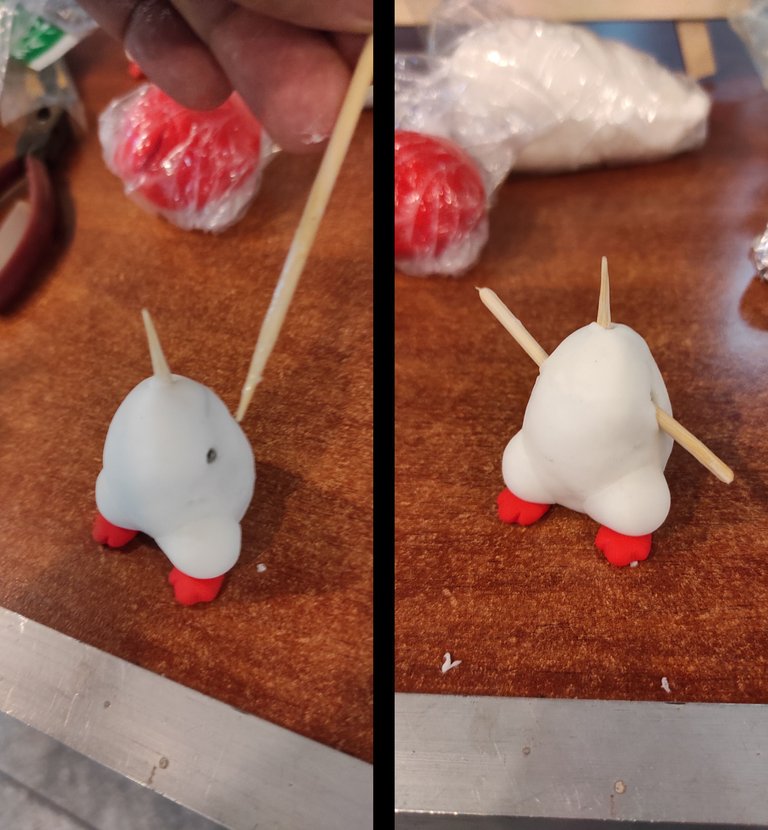
Finished the legs, I will continue with the fins (I think penguins have fins and not wings, anything they correct me in the comments) these will need structure to support them, so I opened 2 holes, one on each side to insert the 2 sticks that they will be the support of these, this penguin will be greeting for it a stick will go down and the other will go up.
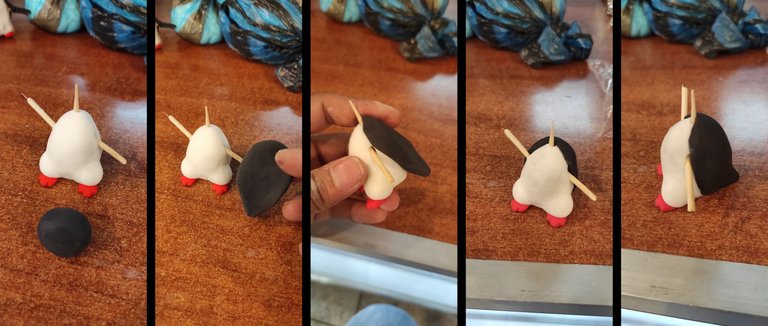
Before continuing with the fins, the body will be completed because the back and the tail are missing. To make this piece, take a good portion of black dough, which I stretched out until it was in the shape of a drop of water. flatten it enough I covered the whole back of the figure using the round part up and the tip down since this is the tail.

Now if I return the arms, for this I take two small portions of black dough, which I shape into a sausage and completely cover the wooden sticks and carefully join the black part of the back, being careful not to dirty the areas white.

I gently flatten both fins or arms with the tips of my fingers, so that they now look like the fins of a penguin.
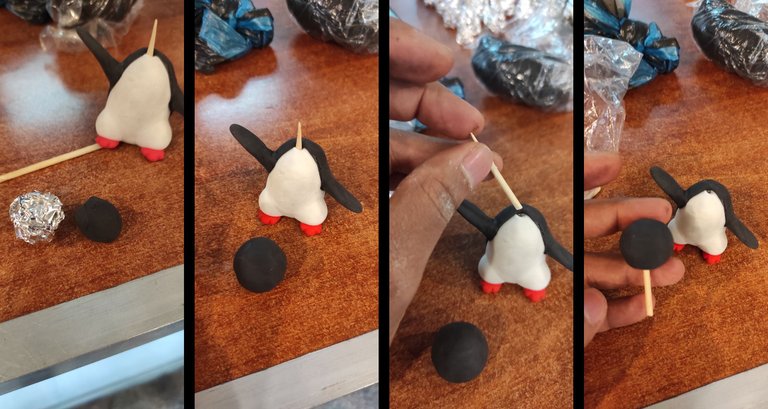
The whole body of the penguin is ready, only its head is missing. I covered the aluminum ball that I made previously with black mass until it formed a sphere, then I took the wooden stick out of the body and stuck the tip in the center of the sphere. to better manipulate the head.
Then take a small portion of white dough and make a small oval, which I flatten and join very close to the wooden stick to form the jowls of the head, with this ready place the head on the body.

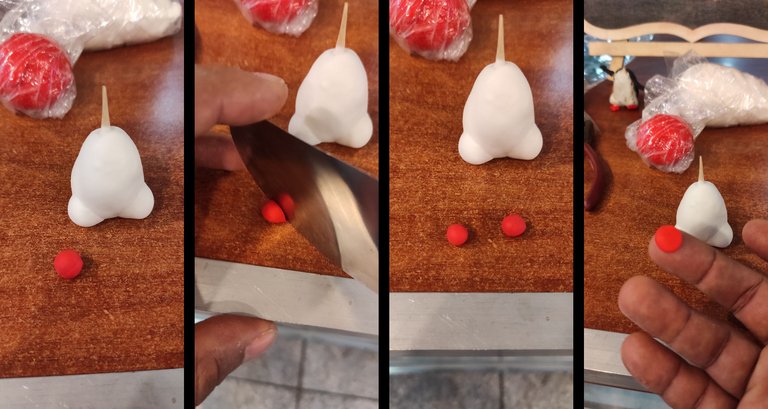
Then take a very small portion of red dough, shape it into a three-sided pyramid to form the beak, and place it in the center of the jowls, making sure that 2 of the points of the triangle touch the white part.
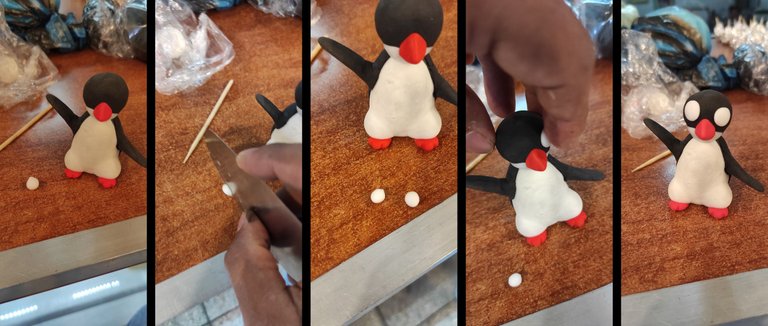
Now I take a small portion of white dough and as I did with the feet I divide it in half to have two spheres of the same size, which will be the eyes, I flatten them and stretch them until I have the desired round shape.
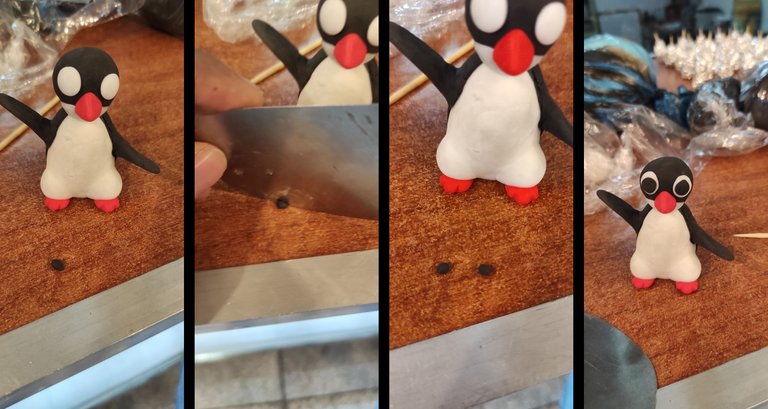
Then I repeat the same procedure, but with a black mass to make the pupils of the eyes, which should be large covering most of the white area.
And I repeat the same procedure twice more, but with a very, very small portion of white dough, to make the glitter of the penguin's eyes.
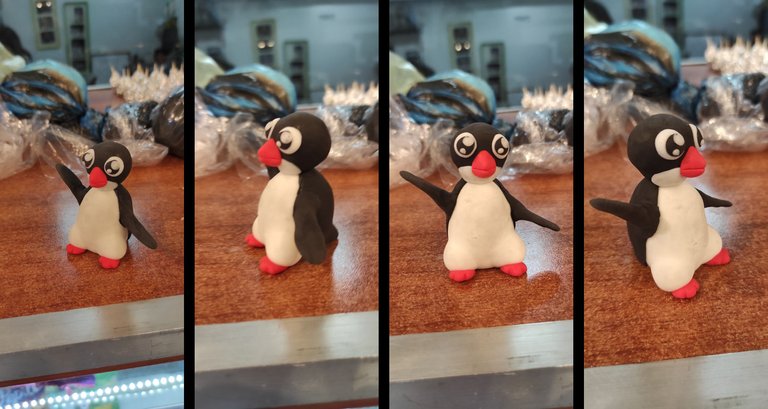
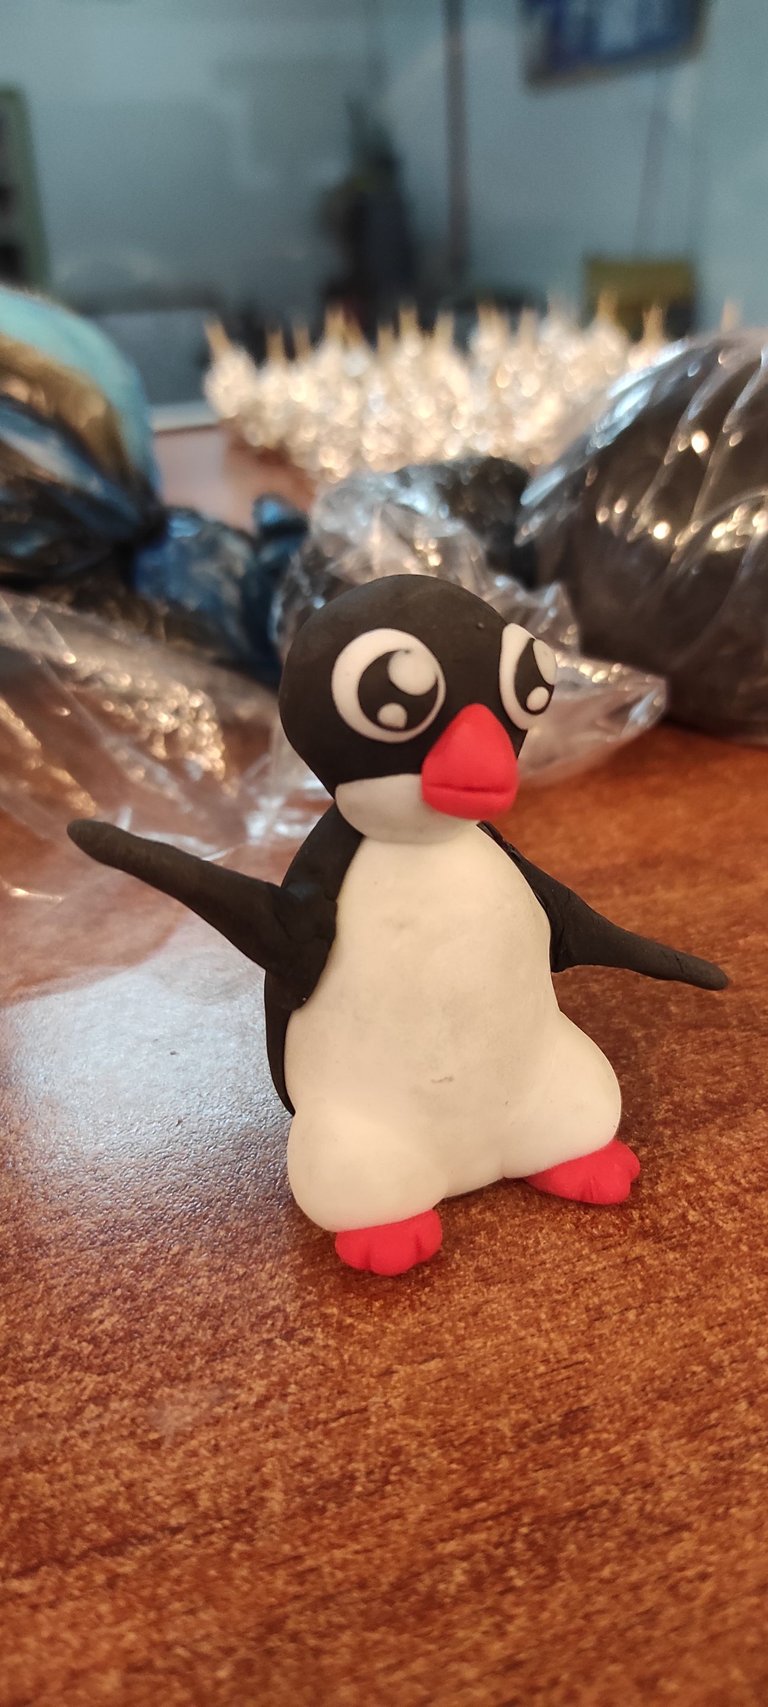
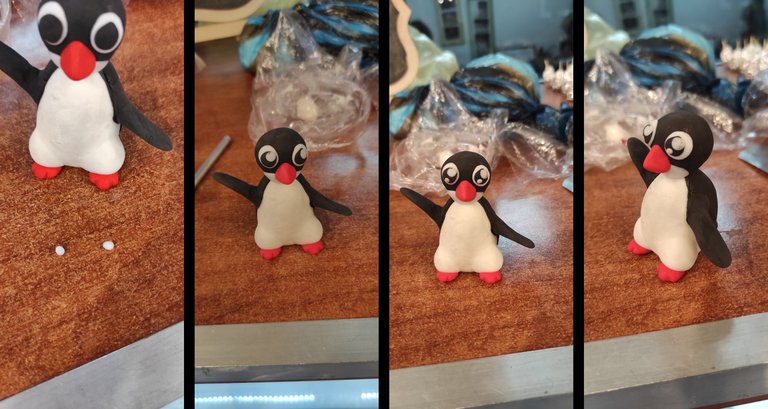
And this little and adorable penguin is totally ready, without a doubt this little guy was one of my favorites in this whole adventure that was the plasticine classes in the national plan to revive you.

Thank you very much for reading my post
I hope you liked this sculpture of a cute penguin
If you have any suggestions or advice
Write it in the comments that I will be reading them
See you in a next publication
Inu-Jim
Copyright @inu-jim –Allrightsreserved
I hope you liked this sculpture of a cute penguin
If you have any suggestions or advice
Write it in the comments that I will be reading them
See you in a next publication
Inu-Jim
Copyright @inu-jim –Allrightsreserved
https://twitter.com/1267870977788166144/status/1591142424839323648
The rewards earned on this comment will go directly to the people sharing the post on Twitter as long as they are registered with @poshtoken. Sign up at https://hiveposh.com.
Very cute. I love the eyes with the Manga reflections.