[Eng\Esp] A Rose, chocolate holder in Goma Eva.\ Una Rosa, porta bombón en Goma Eva.
Sometimes we have pieces of Goma Eva saved in our homes, and maybe we think of voting for them, because we say what we will do with this? Well, we are wrong because whether it is a large or small piece, we cannot throw it away, which at some point we will need it for some activity, as well as we can reuse it by giving it a second or third use. My friends in my case, I tell them that even if the piece of EVA foam is very small, I do not vote for it, I have saved many pieces and of various colors, because I know that at some point I will need them and I know that if I keep them there I will have them sort out. In this case, we are going to prepare a beautiful rose, Eva Goma chocolate holder, with recyclable material, to give as a gift on this very special date of Valentine's Day, a unique and special day, where we show love for a person or a beautiful friendship, Then I will leave you the materials to use and the step by step.
A veces tenemos en nuestros hogares retazos de Goma Eva guardados, y tal vez pensamos en votarlos, porque decimos que haremos con esto?. Pues nos equivocamos porque así sea un retazo grande o pequeño, no lo podemos botar a la basura, la cual en algún momento lo necesitaremos para alguna actividad, como también lo podemos reutilizar dándole un segundo o tercer uso. Mis amigos en mi caso, les cuento que así sea muy pequeñito el pedacito de Goma Eva no lo voto, yo tengo guardado muchos retazos y de varios colores, porque sé que en algún momento voy a necesitar y sé que si los guardo allí tendré para resolver. En este caso vamos a preparar una linda rosa, porta bombón de Goma Eva, con material de reciclable, para obsequiar en esta fecha tan especial de san Valentín, un día único y especial, donde demostramos el amor por una persona o una bonita amistad, a continuación les dejaré los materiales a utilizar y el paso a paso.

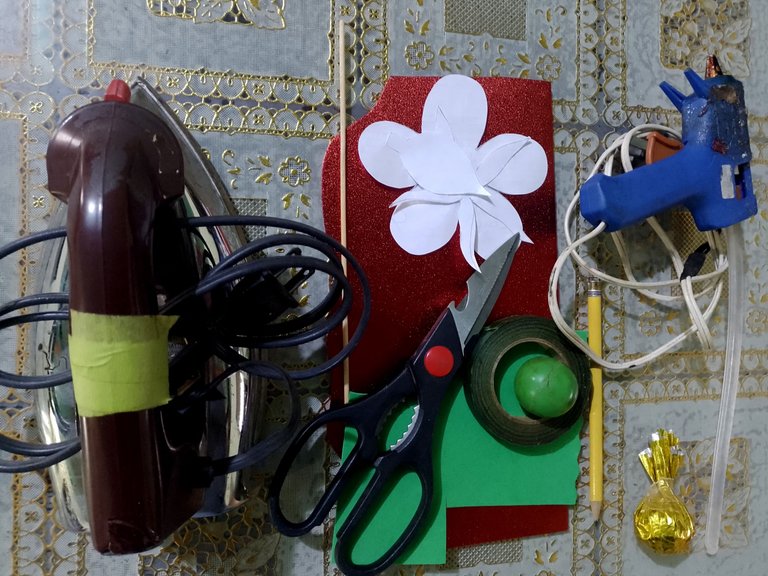
Materials:
√ 1 Bonbon.
√ Red metallic Eva rubber scrap.
√ Green EVA foam scrap.
√ Rose mold.
√ 1 height stick.
√ 1 Plastic ball.
√ Pencil.
√ Scissor.
√ Iron.
√ Silicone gun and bar.
√ Florist tape.
Materiales:
√ 1 Bombón.
√ Retazo de Goma Eva metalizado rojo.
√ Retazo de Goma Eva verde.
√ Molde de rosa.
√ 1 Palito de altura.
√ 1 Bolita plástica.
√ Lápiz.
√ Tijera.
√ Plancha.
√ Pistola de silicona y barra.
√ Cinta de floristería.
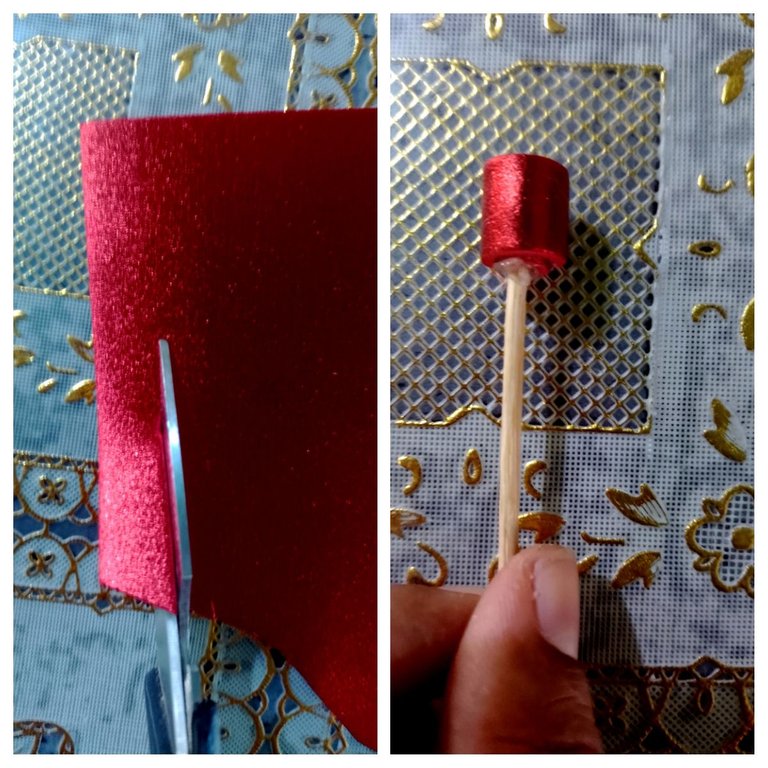
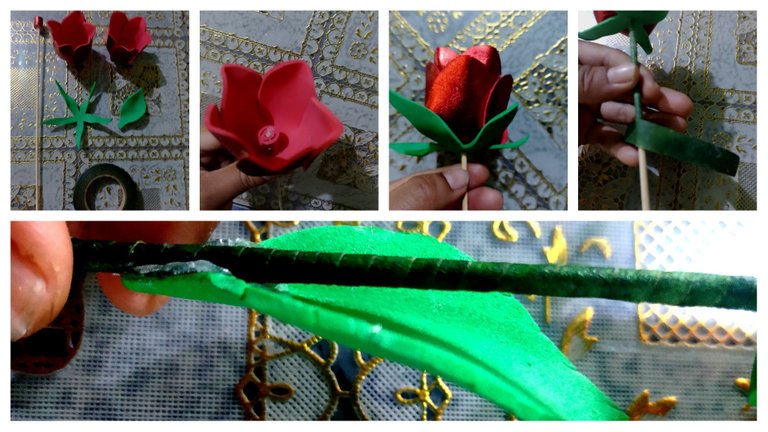
Step 1:
We cut a small strip of the red Eva Foam, what we will do with it is stick it on the tip of the height stick.
Paso 1:
Cortamos una tira pequeña de la Goma Eva rojo, lo que haremos con ella es pegarla en la punta del palito de altura.
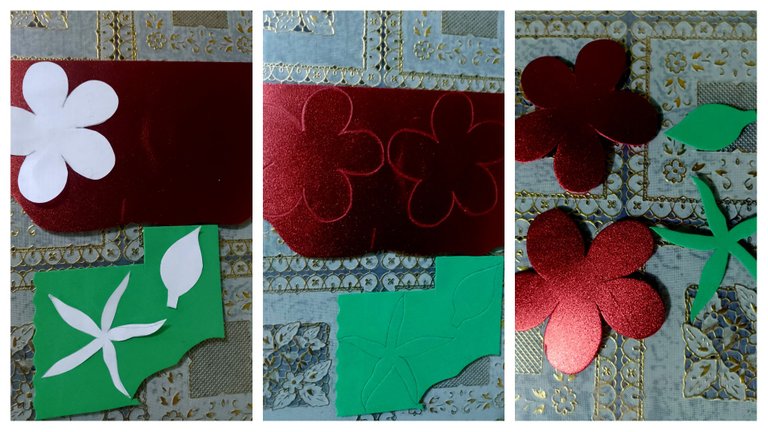
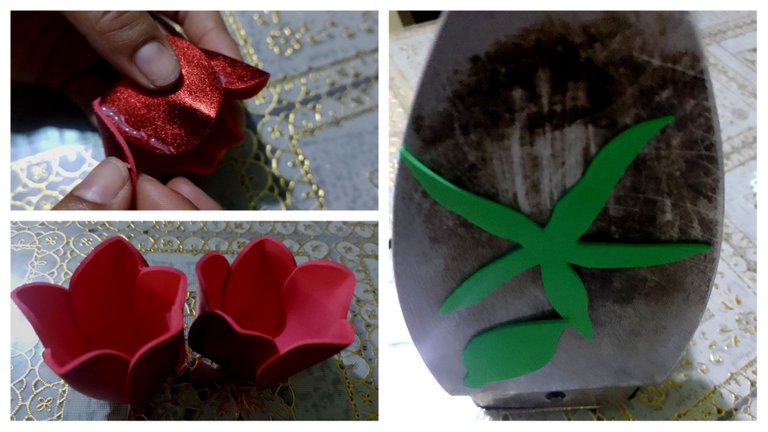
Step 2:
We place the mold of the rose on the red Eva Foam, to mark and remove 2 roses, then we do the same with the green Eva Foam, placing on it, the mold that has been the leaves of the rose, we mark and we cut.
Paso 2:
Colocamos el molde de la rosa sobre la Goma Eva rojo, para marcar y sacar 2 rosas, luego hacemos lo mismo con la Goma Eva verde, colocando sobre él, el molde que viene siendo las hojas de la rosa, marcamos y recortamos.
Step 3:
We proceed to place the mold of the rose already cut, on the iron, once it is hot, we introduce the plastic ball inside it, this is to give it the shape of a rose, now we mold the tip of the petals with the same iron, pressing a little with your fingers in the center.
Paso 3:
Procedemos a colocar el molde de la rosa ya cortada, sobre la plancha, una vez ya caliente introducimos dentro de ella la bolita plástica, esto es para darle la forma de rosa, ahora moldeamos la punta de los pétalos con la misma plancha, apretando un poquito con los dedos en el centro.
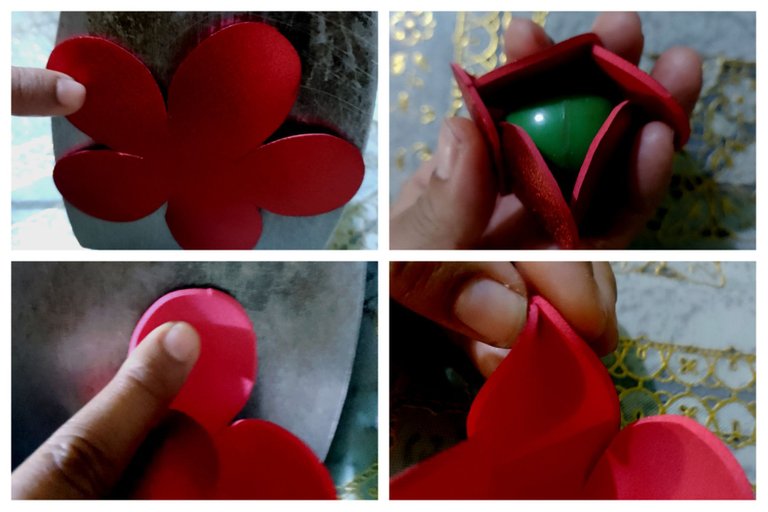
Now we are going to stick each of the petals one on top of the other and to conclude we place the leaves on the plate, to give it shape, shine and hardness.
Ahora vamos a ir pegando uno sobre otro cada uno de los pétalos y para concluir colocamos las hojas en la plancha, para darle forma, brillo y su dureza.
Step 4:
Having our complete materials, we proceed to puncture the center of the rose with the same stick, we put silicone on the tip of the stick and glue the rose, then we glue the part that comes after the rose which is one of the leaves . Now we are going to cover the stick with the tape and finally we place our last leaf.
Paso 4:
Teniendo nuestros materiales completos, procedemos a pinchar con el mismo palito el centro de la rosa, colocamos silicona en la punta del palito y pegamos la rosa, luego pegamos la parte que viene después de la rosa que es una de las hojas. Ahora vamos a forrar el palito con la cinta y por último colocamos nuestra última hoja.
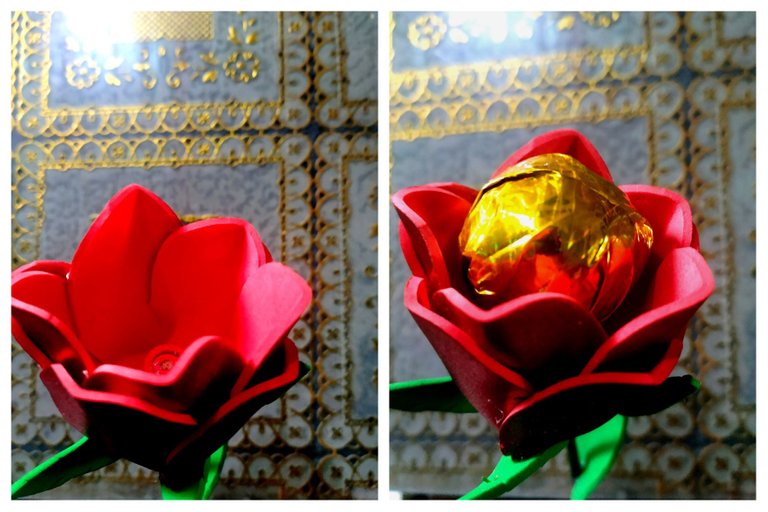
Our rose is ready, what we will do now is place the chocolate inside it, I hope you have loved the step by step.
Lista por terminada nuestra rosa, lo que haremos ahora es colocar dentro de ella el bombón, espero que le haya encantado el paso a paso.
My friends, I hope you can make many of these roses, to your liking, and thus be able to give them to your special person in your lives, on that beautiful and special day, the day of Love and Friendship.
Mis amigos, espero que puedan hacer muchas de estas rosas, a sus gustos y así puedan obsequiar a su persona especial en sus vidas, en ese día tan lindo y especial, día del Amor y la Amistad.
Collage making program: Fotojet Link
Translated from google translator Link
Photo editing program: PhotoFiltre 7
Las fotos fueron tomadas desde un Xiaomi Mi A2.
Programa para hacer el collage: Fotojet Enlace
Traducido del traductor de Google Enlace
Programa para editar fotos: PhotoFiltre 7
I say goodbye until another opportunity.
Thanks for your support.
Me despido hasta otra oportunidad.
Gracias por su apoyo.
Copyright @imargasa. All rights reserved.
Electronic-terrorism, voice to skull and neuro monitoring on Hive and Steem. You can ignore this, but your going to wish you didnt soon. This is happening whether you believe it or not. https://ecency.com/fyrstikken/@fairandbalanced/i-am-the-only-motherfucker-on-the-internet-pointing-to-a-direct-source-for-voice-to-skull-electronic-terrorism
Se ve sencillo de hacer y muy bonito queda.
Que hermoso y dedicado trabajo, amigx @imargasa especialmente en el día de hoy.