How to create a crypto exchange on the Ethereum blockchain using Node.js/React.js/Solidity - Part 4
Hello there, thanks for dropping by, welcome to the fourth post in a series of tutorials on how to create a crypto exchange on the Ethereum blockchain.
I'll leave links to previous posts at the end of this post.
This series was inspired by a similar series by Dapp University.
The crypto exchange will contain a buy/sell feature and will have Ethereum and ERC20 token pairs.
In the last post of this series we setup the smart contract for our token with most of its initial features to get it going, here in this post we are going to be adding tests for our exchange and token smart contracts so that we can know if the initial features we set up in the contracts are working correctly.
Tests
The smart contract for our exchange will be contained in the src/contracts/Exchange.sol file.
In the root directory of our project, we need to create a new sub-directory and name it test.
In the command line, run the following code
mkdir test
After creating the directory, navigate to the newly created folder and create a new file Exchange.test.js.
In order to start creating the test for our exchange, in Exchange.test.js add the following code
const  Token = artifacts.require("Token");
const  Exchange = artifacts.require("Exchange");

contract('Exchange', (accounts) => {

})
The function above will house all the code for testing the features of our exchange and tokens smart contract.
You will notice that just like we did in the migration files in our previous tutorials, we imported the Token and Exchange smart contracts here so that the test functions can access the smart
contracts for testing.
We are going to be using the testing libraries Mocha and Chai to test the Exchange functionalities.
Both modules and all their required sub-modules have been pre-installed on the project when we ran the npm install command at the beginning of building this project.
In order to configure Chai for the testing, add the following just above the contract() method in Exchange.test.js.
require('chai')
    .use(require('chai-as-promised'))
    .should()
Comparing contract names to determine if they were deployed
The first tests we'll be adding will help to check and confirm that the exchange and token smart contracts were truly deployed to the network.
To do that, replace the contract() method with the following code
contract('Exchange', (accounts) => {
    describe('Exchange deployment', async () => {
        it('contract has a name', async () => {
            exchange = await  Exchange.new()
            const  name = await  exchange.name()
            assert.equal(name, 'InstantChange ERC-20 token exchange')
        })
    })
})

describe('Token deployment', async () => {
    it('contract has a name', async () => {
        let  token = await  Token.new()
        const  name = await  token.name()
        assert.equal(name, "DApp Token")
    })
})
What the code above does is basically to check whether the name of the exchange and token smart contracts tallies with the ones deployed on the chain by Truffle.
In order to run the test, first make sure you have Ganache running on your PC, then run the following command in the console
truffle test
If the tests work out fine, you will see a result like this in the console
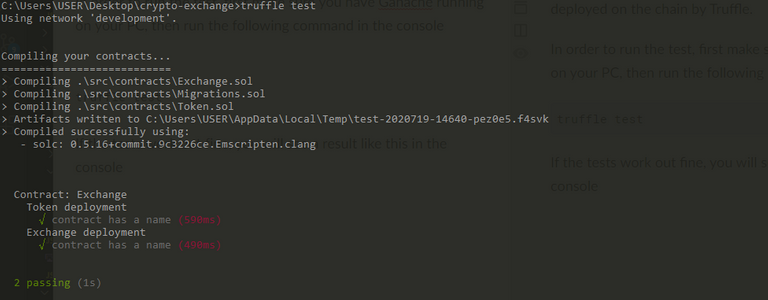
If you see something like that, it means that the tests were successful and no errors were encountered during the process. You can now proceed.
Checking exchange wallet to determine if the tokens are there
The next test we are going to write will be to ascertain that the Exchange account has tokens available in the wallet that we can sell.
In the method that houses the test for the 'Exchange deployment' below the first test block, add the following code
it('contract has tokens', async () => {
    let  token = await  Token.new()
    let  exchange = await  Exchange.new()
    await  token.transfer(exchange.address, '1000000000000000000000000')
    let  balance = await  token.balanceOf(exchange.address)
    assert.equal(balance.toString(), '1000000000000000000000000')
})
If you run the tests now using the command truffle test and you did everything correctly, you should have the following results in your console.

If your tests are now working fine, that means you have been able to successfully complete our objective for this post.
With that, we have come to the end of this tutorial, we can now move forward in the next tutorial post into developing the core smart contract features for the exchange.
@tipu curate
Upvoted 👌 (Mana: 24/32)
Congratulations @gotgame! You have completed the following achievement on the Hive blockchain and have been rewarded with new badge(s) :
You can view your badges on your board And compare to others on the Ranking
If you no longer want to receive notifications, reply to this comment with the word
STOPDo not miss the last post from @hivebuzz: