How to create a crypto exchange on the Ethereum blockchain using Node.js/React.js/Solidity - Part 2
Objective
In the first post of this series we set up the project and got the server running. In addition we downloaded tools that we will be need for this project like Ganache and Metamask.
I will leave a link to the previous post at the end of this post, you can check it out if this is your first time coming across this series.
Since we have set up a server and we have the homepage set up we are going to be delving deeper into the development of the smart contracts in this post and we might also be exploring some of the react components that make up this project.
In case you are lost on what this series is about, we will be building a crypto exchange on the Ethereum Blockchain. This series was inspired by a similar series by Dapp University.
The crypto exchange will contain a buy/sell feature and will have Ethereum and ERC20 token pairs.
Creating the exchange smart contract
In the root directory terminal of the project, we are going to create a file for the smart contract of our project, to do that we need to run the following code in the terminal
touch src/contracts/Exchange.Sol
We created a new file that we can locate in our project folder by visiting the src/contracts subdirectories in the project.
This new file will contain the code for the smart contract for our application.
We need to open the file we just created in the text editor and the first thing we want to do after creating the file is to declare the version of solidity that we desire to use.
Add the following as the first line of the file
pragma solidity ^0.5.0;
In order to create a smart contract, in Exchange.sol file, we will add the following code
contract  Exchange {
    string  public name = "Instant cryptocurrency exchange";
}
Then we are going to deploy our smart contract to the blockchain, in order to do that, we need to create a new file in the migrations sub-directory in the root folder and name it 2_deploy_contracts.js.
In the new file we just created add the following code
const  Exchange = artifacts.require("Exchange");

module.exports = function(deployer) {
    deployer.deploy(Exchange);
};
Basically, the code above looks for the contract we created earlier and deploys it on the blockchain.
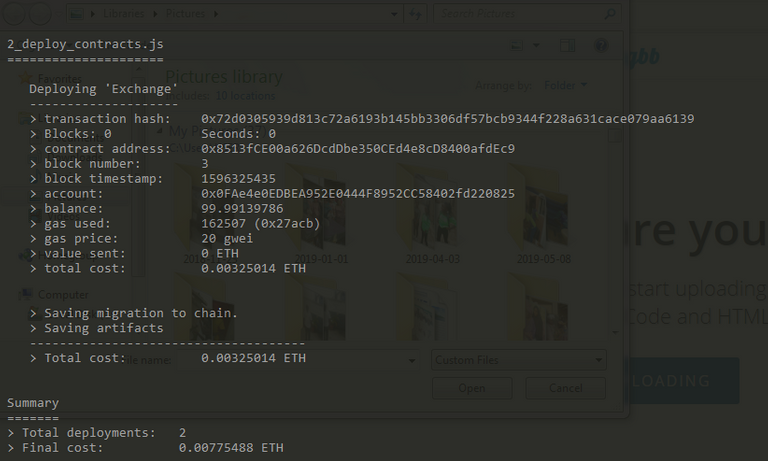
In order to deploy our new smart contract to the blockchain, in the terminal for our project root directory, run the following command
truffle migrate
If all of your packages are installed correctly you should see a result like the image below in the console.
I initially faced some issues while running the command, so if it happens that you are facing an issue with truffle after running the command, try to reinstall the latest versions of Node.js and npm.
Next we are going to interact with the smart contracts in our project directly from the console, to do that run the following command
truffle console
The result will be a prompt in the console where you will be able to type in JavaScript code that can interact with the smart contract.
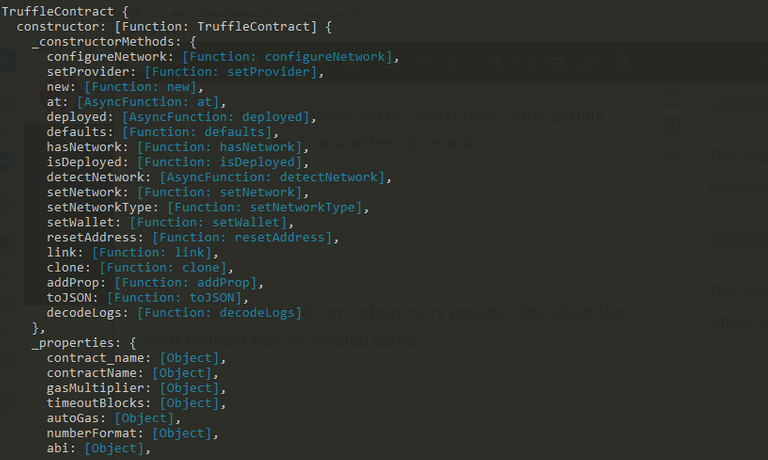
In order to access the smart contract we just created, add the following code in the console
contract = await Exchange.deployed()
The result of the code above will be undefined, after getting the result we can now run another command
contract
This new command will now return every possible data about the smart contract that we created earlier
The other image below shows some commands that you can run just for fun, they are self-explanatory

The smart contract Exchange that we created will basically help manage the buy and sell aspect of our exchange.
Now, we are going to create another smart contract for the token that we will be trading against Ethereum.
We need to create a new file for the smart contract in the src/contracts directory, let's name it Token.sol
We are going to use a premade token created by Dapp University for this project.
You can gain access to the smart contract for that token through this link
Copy the code from that page and paste it in Token.sol,
pragma solidity ^0.5.0;

contract Token {
    string public name = "DApp Token";
    string public symbol = "DAPP";
    uint256 public totalSupply = 1000000000000000000000000; // 1 million tokens
    uint8 public decimals = 18;

    event Transfer(
        address indexed _from,
        address indexed _to,
        uint256 _value
    );

    event Approval(
        address indexed _owner,
        address indexed _spender,
        uint256 _value
    );

    mapping(address => uint256) public balanceOf;
    mapping(address => mapping(address => uint256)) public allowance;

    constructor() public {
        balanceOf[msg.sender] = totalSupply;
    }

    function transfer(address _to, uint256 _value) public returns (bool success) {
        require(balanceOf[msg.sender] >= _value);
        balanceOf[msg.sender] -= _value;
        balanceOf[_to] += _value;
        emit Transfer(msg.sender, _to, _value);
        return true;
    }

    function approve(address _spender, uint256 _value)

    public returns (bool success) {
        allowance[msg.sender][_spender] = _value;
        emit Approval(msg.sender, _spender, _value);
        return true;
    }

    function transferFrom(address _from, address _to, uint256 _value) public returns (bool success) {
        require(_value <= balanceOf[_from]);
        require(_value <= allowance[_from][msg.sender]);
        balanceOf[_from] -= _value;
        balanceOf[_to] += _value;
        allowance[_from][msg.sender] -= _value;
        emit Transfer(_from, _to, _value);
        return true;
    }
}
Just like that we have created our own ERC-20 token that we can trade on our exchange.
Now we need to deploy this new smart contract to the blockchain and to do that, in migrations/2_deploy_contracts.js replace the present code with the following code.
const  Token = artifacts.require("Token");
const  Exchange = artifacts.require("Exchange");

module.exports = function(deployer) {
    deployer.deploy(Token);
    deployer.deploy(Exchange);
};
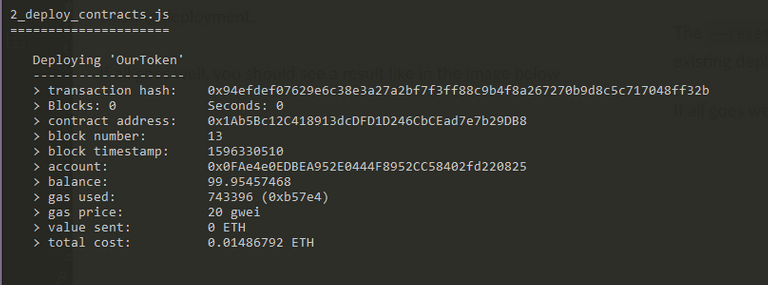
Save the file and run the following command in the root directory terminal
truffle migrate --reset
The --reset keyword is used specially for updating an already existing deployment.
If all goes well, you should see a result like in the image below
At this juncture, I am going to hang my hat for this post, the series will be continued in our next post.
Everything is very interesting, I am going to give this publication to a friend who is a programmer and he will surely appreciate this better than me, thanks for sharing
Appreciate that, thank you
Hello @gotgame.
Thank you for posting within our hive.
Please spare few minutes and read how project.hope is organized and learn about our economy.
That would help you understand more our goals and how are we trying to achieve them. Hopefully you will join our community and become strong part of it :)
Do you use telegram or discord? If you do then join our server and give me a shout. I would gladly share with you goals of our community and introduce to others from our team.
Our discord server: https://discord.gg/uWMJTaW
Regards, @juanmolina
@project.hope co-founder
Thank you for the comment, I know about Project HOPE and I have been a member of the community for a while now, thanks for reaching out.
Congratulations @gotgame! You have completed the following achievement on the Hive blockchain and have been rewarded with new badge(s) :
You can view your badges on your board And compare to others on the Ranking
If you no longer want to receive notifications, reply to this comment with the word
STOPDo not miss the last post from @hivebuzz: