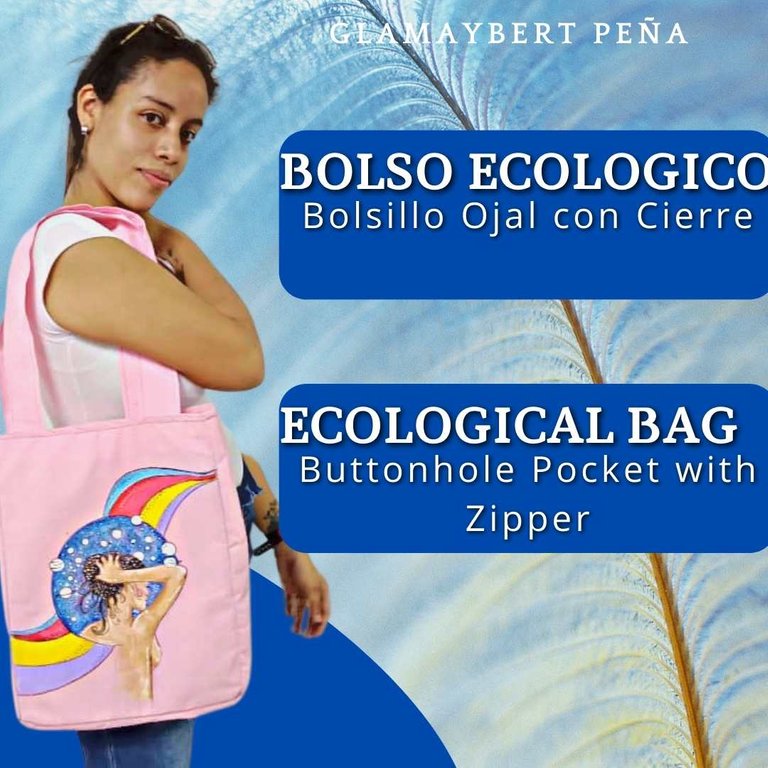
Bolso ecologico con bolsillo ojal y cierre personalizado//Ecological bag with welt pocket and personalized closure
bienvenidos❤️||welcome❤️
❤️
Hello my beautiful readers, first of all I wish you a happy start to the week I hope your day has been full of beautiful things and good vibes.
This time I bring you a beautiful bag (ecological of course), made in POP totally personalized to my style, I will show you how to make a buttonhole pocket with closure.
And I will also teach you the process that I apply to make the illustration and personalize my bag, each one can do it in their own style and in the technique they want (embroidered or even sublimated).
Usually I paint it because it is more my area, with the subject in intervention in materials and well that I love to paint.
Hola mis hermosos lectores, antes que nada les deseo un feliz inicio de semana espero que su dia haya estado lleno de cosas bonitas y buenas vibras.
En esta oportunidad les traigo un hermoso bolso (ecologico por supuesto), hecho en POP totalmente personalizado a mi estilo, Les enseñare como hacer un bolsillo ojal con cierre.
Y también les enseñare el proceso que aplique para hacer la ilustracion y personalizar mi bolso, cada uno lo podrá realizar a su estilo y en la técnica que deseen (bordado o sublimado incluso).
Por lo general yo lo pinto porque es mas mi área, con el tema en intervención en materiales y bueno que amo pintar.
How to make a personalized ecological bag! with buttonhole pocket and closes in a very simple way and few materials.
¡Como hacer un bolso ecológico personalizado! con bolsillo ojal y cierre de manera muy sencilla y pocos materiales.
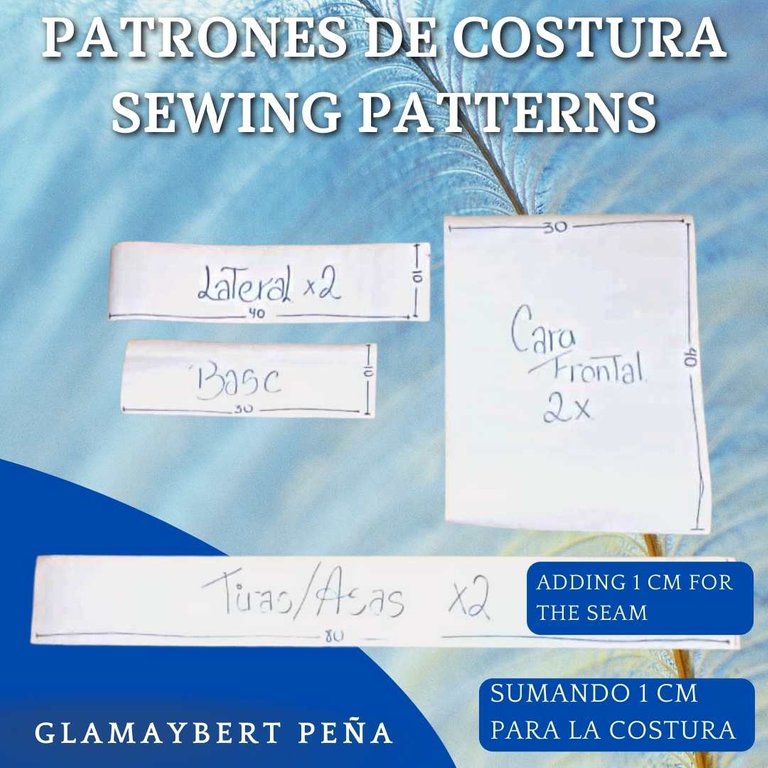
The bags are divided into the following parts:
- Front face
- Sides or bellows.
- Base
- Handles
and in this case we attach a buttonhole pocket with closure
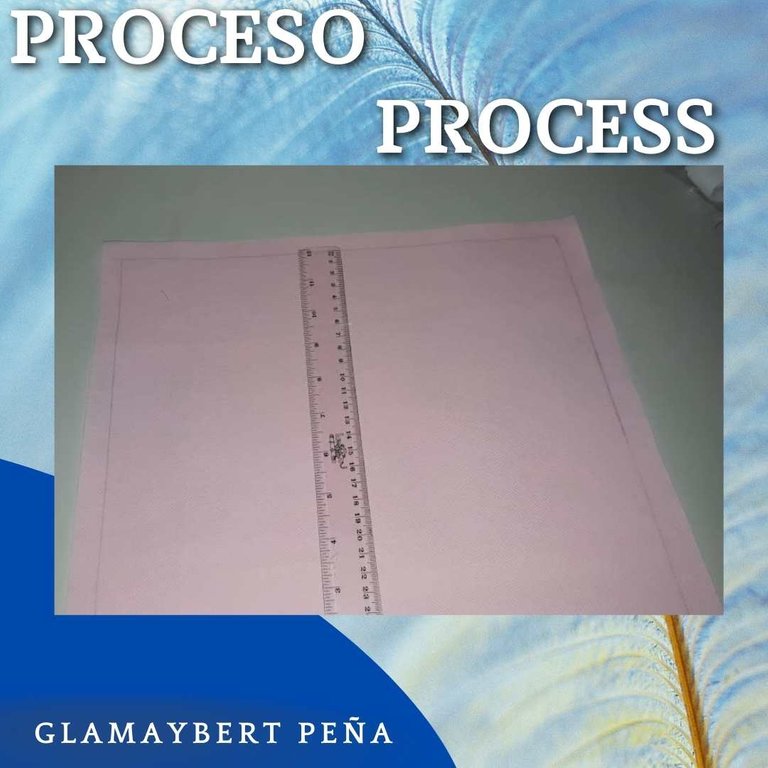
Knowing this, the first thing that we must get an idea of the measures in which we want to work our bag, in my case they have been the following.
los bolsos de dividen en las siguentes partes:
- Cara frontal
- Laterales o fuelle.
- Base
- Asas
y en este caso anexamos, un bolsillo ojal con cierre
Sabiendo esto lo primero que debemos hacernos una idea de las medidas en las que queremos trabajar nuestro bolso, en mi caso han sido las siguientes.
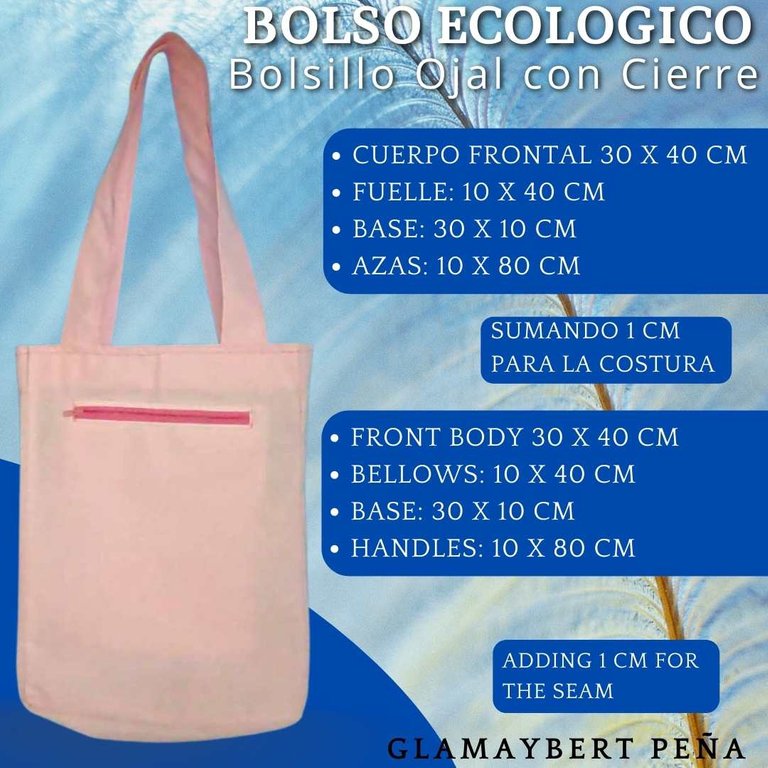
Being clear about the proportions in terms of the size of my bag, I took the bond paper and proceeded to make my patterns, I did them without adding the centimeter that we will leave around for sewing.
Teniendo claro las proporciones en cuanto al tamaño de mi bolso, tome el papel bond y procedí a hacer mis patrones yo los hice sin agregar el centímetro que dejaremos a los alrededores para la costura.
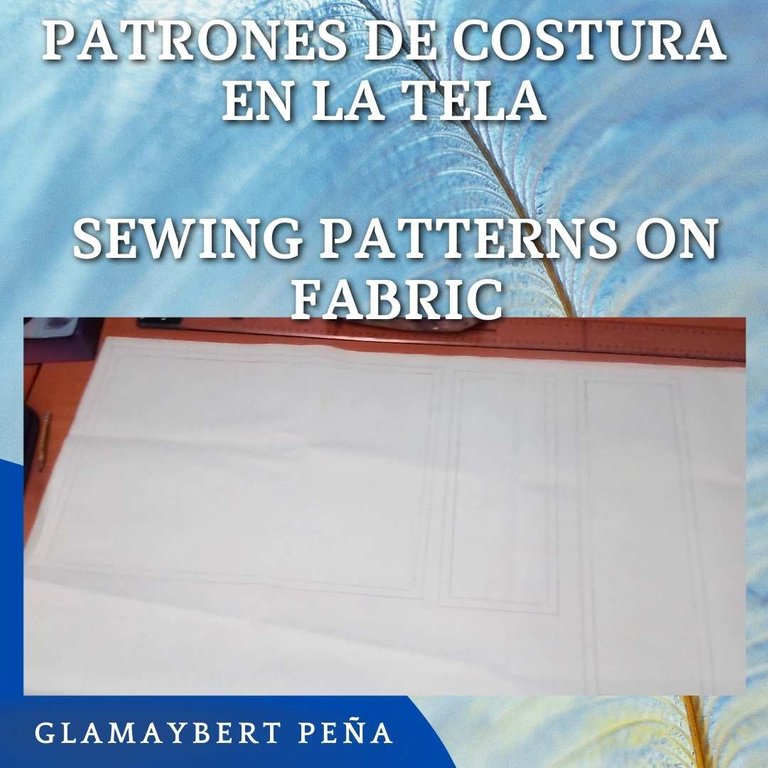
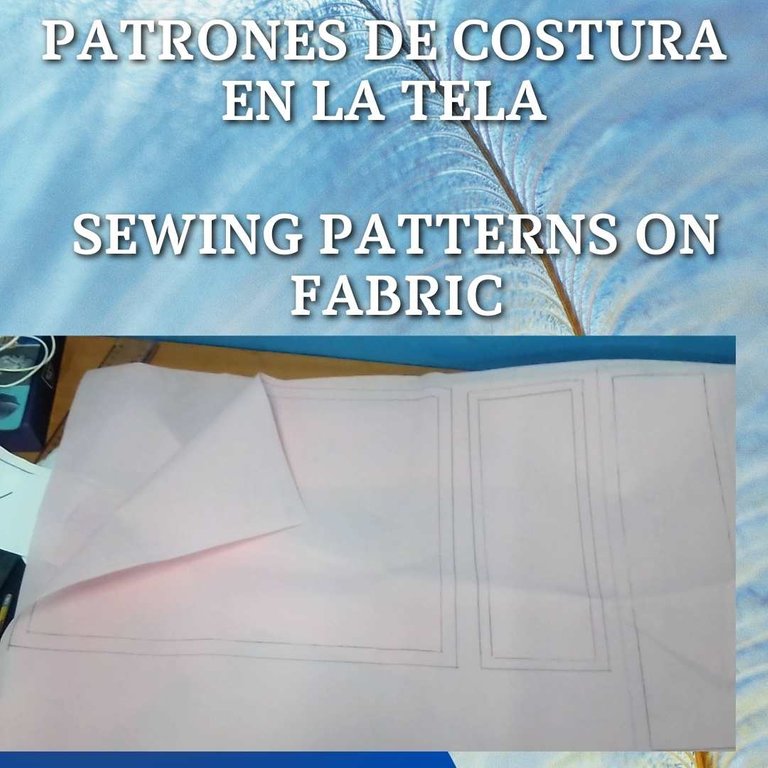
Already having our sewing patterns, I proceeded to transfer them to the fabric, this can be of your preference, as I mentioned earlier I use POP.
Ya teniendo nuestro patrones de costura, procedí a transferirlos a la tela, esta puede ser de su preferencia, como mencione anteriormente yo use POP.
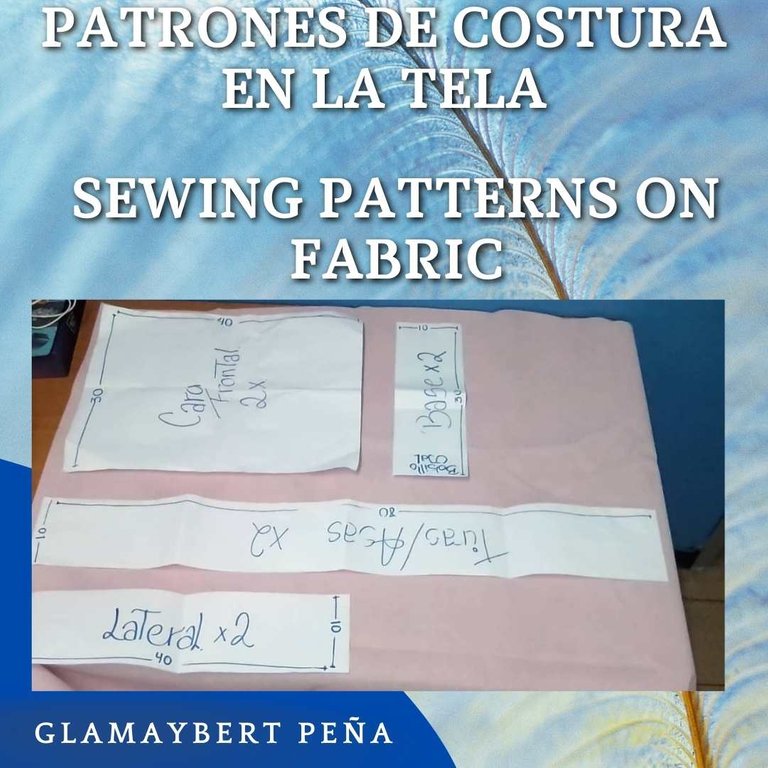
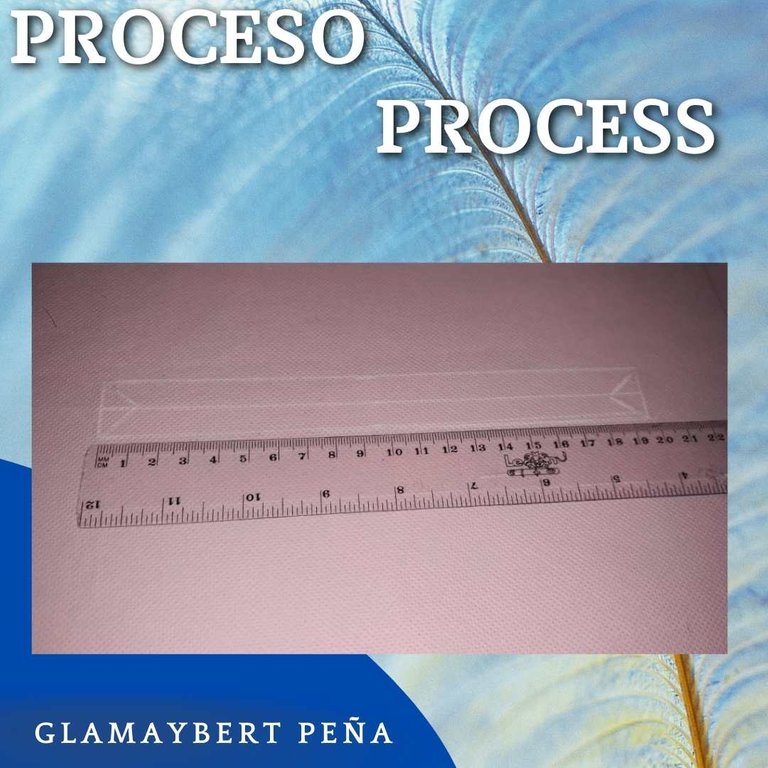
When marking them on the fabric, leave the centimeter for sewing, as a trick, fold the fabric in half, so when cutting, take out the pieces you need to proceed to assemble the bag, in the following images I show you the process.
A la hora de marcarlos en la tela deje el centímetro para la costura, como truco doble la tela a la mitad, por lo que cuando corte saque las piezas que necesitaba para proceder a armar el bolso, en las siguientes imágenes les muestro el proceso.
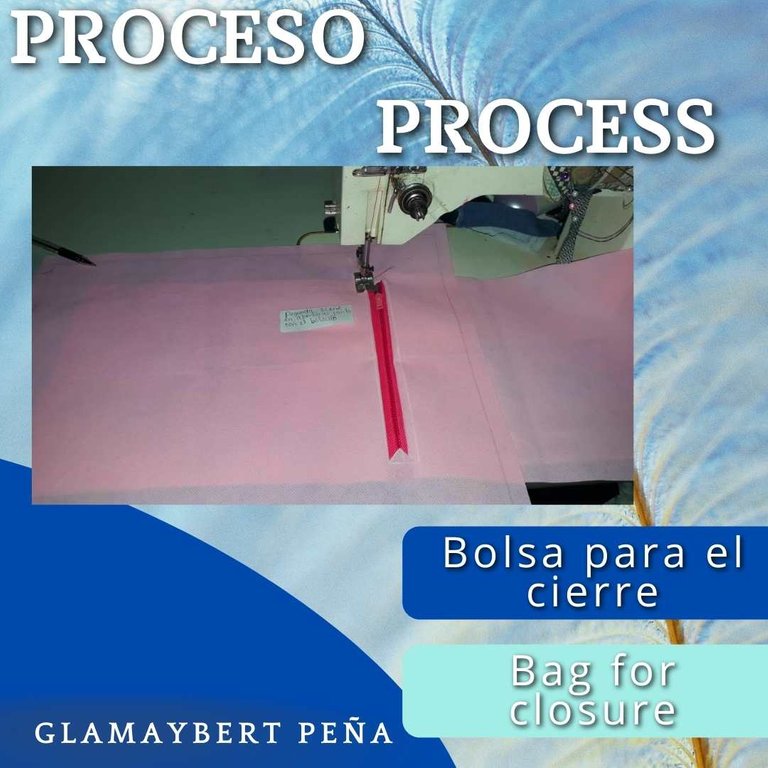
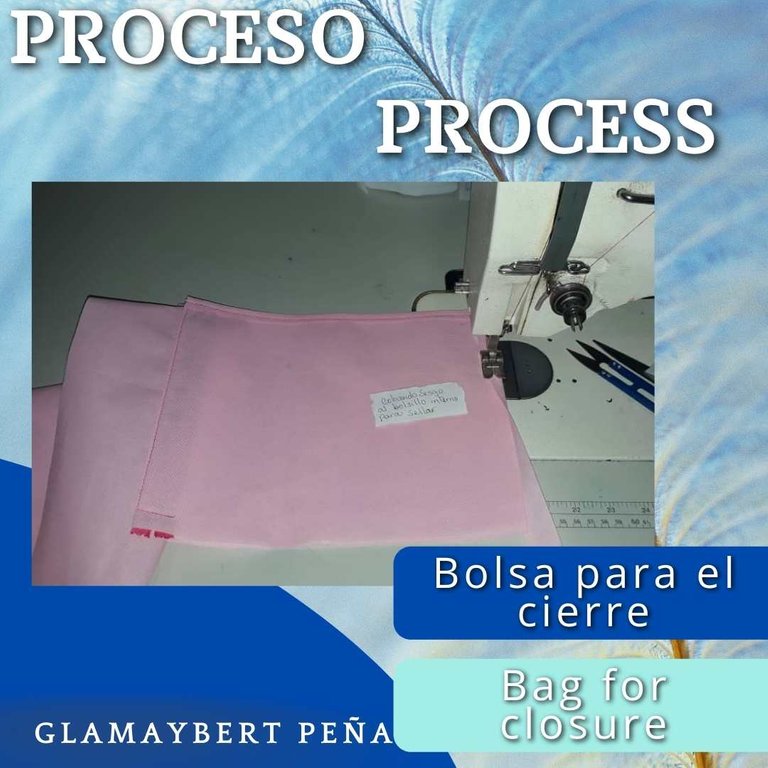
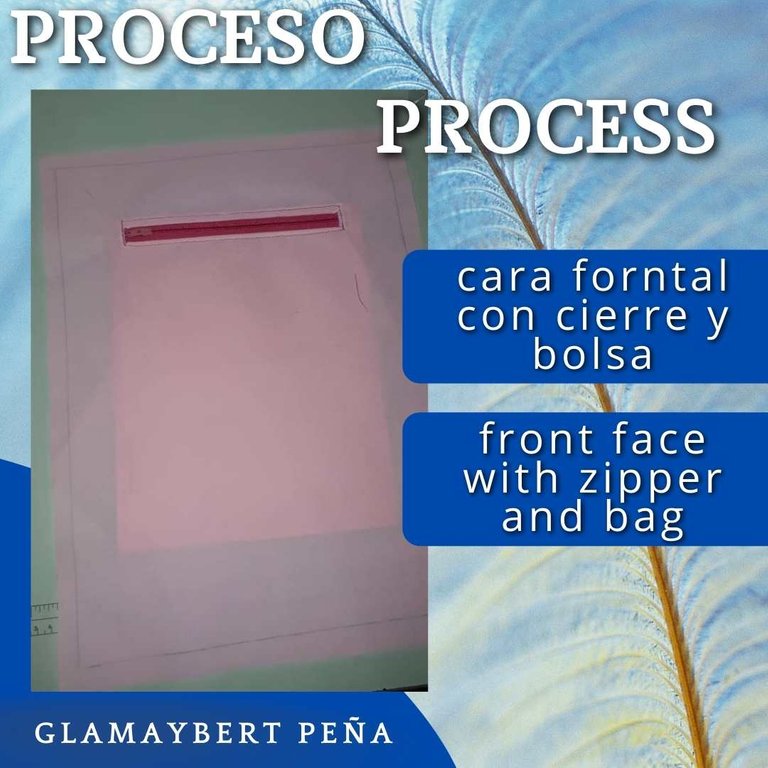
To make our buttonhole pocket with closure, we are going to take one of the front faces of what will be our bag.
We are going to measure 6 cm from the top and with a ruler we measure 20 cm to that central line we add 1 cm to both sides. At our center line between the square mark with 2 diagonal lines to the corners on both sides forming a triangle at our ends of the rectangle. We finish by sewing the edges of this piece with a few stitches on our sewing machine.
We open the pocket by cutting on our central line, and we also make cuts on our diagonal lines
We push the strip of edging fabric back, into the piece through the hole that we have cut.
We add our closure and begin to sew along the horizontal edge that is 20cm, we lift the foot of the machine and turn the fabric at 45 ° to make a single seam and the seam lock is aesthetically cleaner.
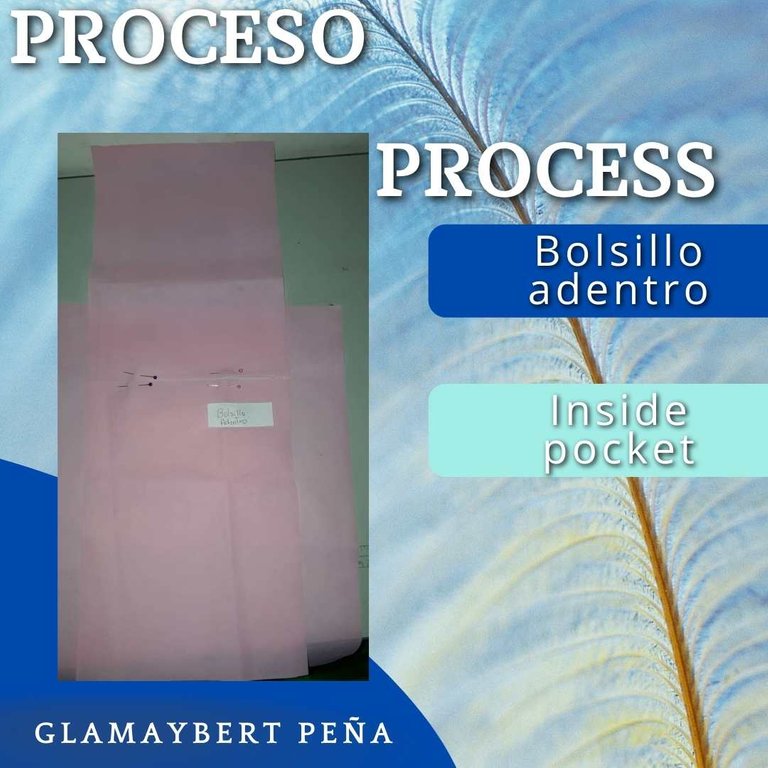
For the pocket we are going to take 20 cm of fabric by 30 cm, we make a mini bag joining the ends and we proceed to ilvanar on the front face of our bag where we put our closure.
In the following images I will show you the process.
Para hacer nuestro bolsillo ojal con cierre, vamos a tomar una de las caras frontales de lo que será nuestro bolso.
Vamos a medir 6 cm de la parte superior y con una regla medimos 20Cm a esa linea central le sumamos 1 cm a ambos lados. A nuestra línea central entre el cuadro marque con 2 líneas diagonales a las esquinas en ambos lados formando un triangulo a nuestros extremos del rectángulo. Terminamos cosiendo los bordes de esta pieza con unas puntada en nuestra maquina de coser.
Abrimos el bolsillo cortando en nuestra linea central, y tambien hacemos cortes en nuestras líneas diagonales
Empujamos la tira de tela de ribete hacia atrás, dentro de la pieza a través del agujero que hemos cortado.
Agregamos nuestro cierre y comenzamos a coser por el borde horizontal que es de 20cm, levantamos el pie de la maquina y giramos la tela a 45° para hacer una sola costura y quede estéticamente mas limpio el trabado de costura.
para el bolsillo vamos a tomar 20 cm de tela por 30 cm, hacemos un mini bolso uniendo los extremo y procedemos a ilvanar en la cara frontal de nuestro bolso en donde pusimos nuestro cierre.
en las siguientes imágenes les mostrare el proceso.
Having already made the pocket on one of the front faces of my bag, my next step was to join the already cut pieces.
First join the base with the two sides
Second: when the three previous pieces were sewn, I sewed the front face (which has the illustration)
Third: having completed the first two steps, I sewed the back of my bag, remaining pending to attach the azas.
Fourth: reinforce the edges with a piece of fabric before sewing the handles so that the bag is more strengthened.
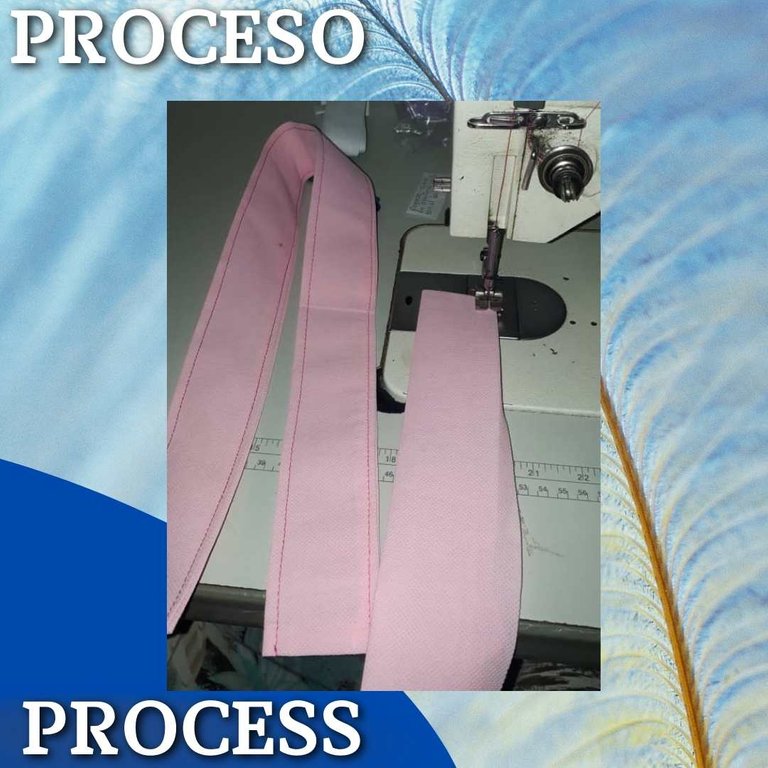
Fifth and last I sewed the two handles of my ecological bag.
Al ya haber hecho el bolsillo en una de las caras frontales de mi bolso mi siguiente paso fue unir las piezas ya cortadas.
Primero uni la base con los dos laterales
Segundo: al tener cosidas las tres anteriores piezas, cosi la cara frontal (que tiene la ilustracio)
Tercero: al haber completados los primeros dos pasos, cosi la cara trasera de mi bolso, quedandome en pendiente anexar las azas.
Cuarto: reforce con un trozo de tela los bordes antes de coser las azas para que el bolso este mas fortalecido.
Quinto y ultimo cosi las dos azas de mi bolso ecologico.
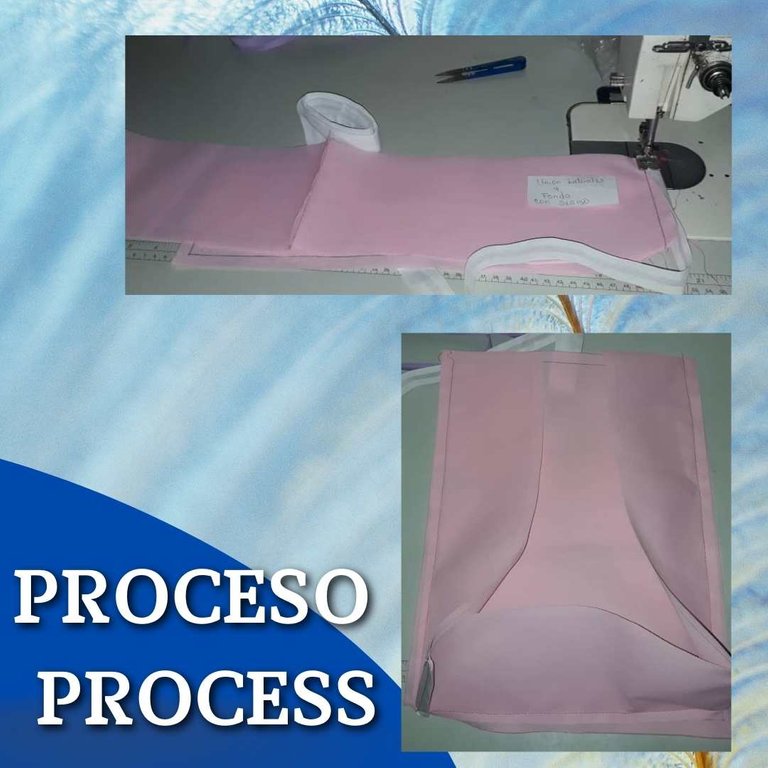
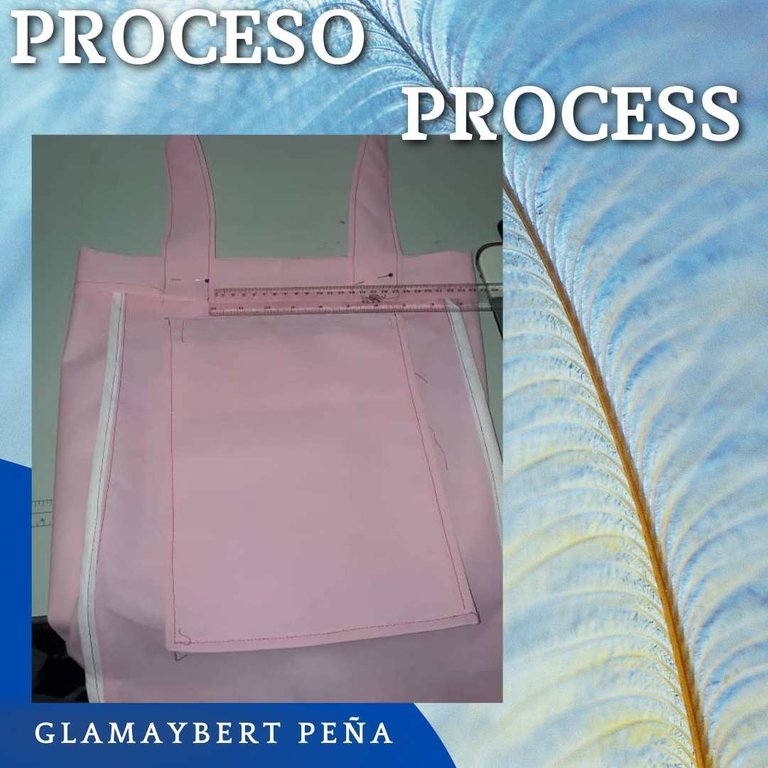
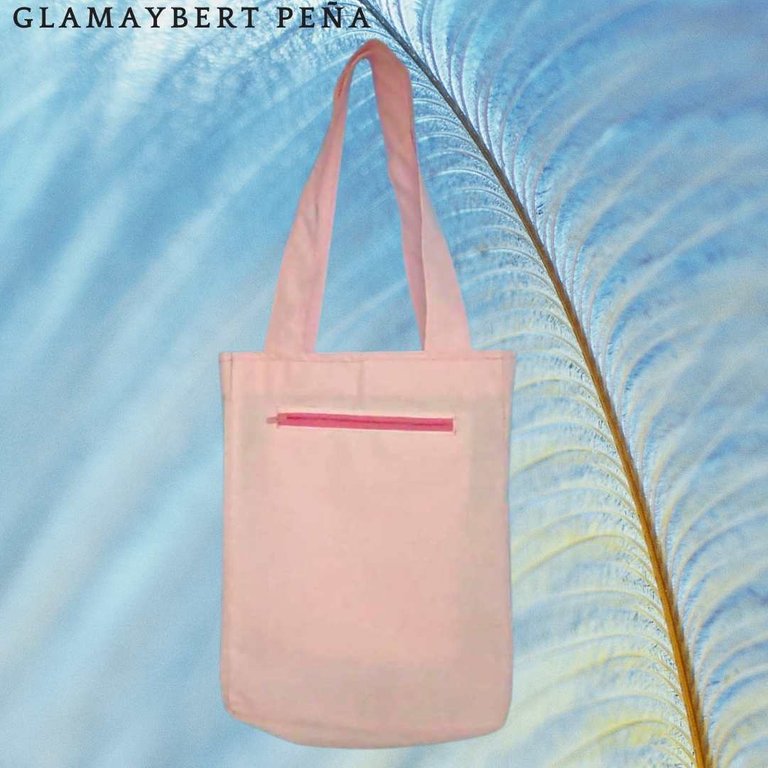
Al haber unido cada pieza ese ha sido el resultado del bolso
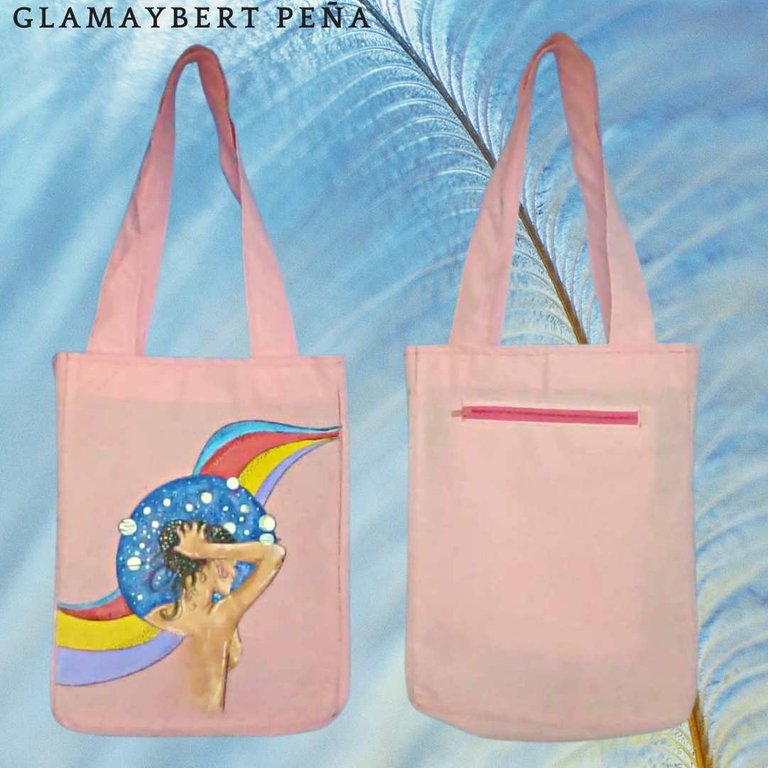
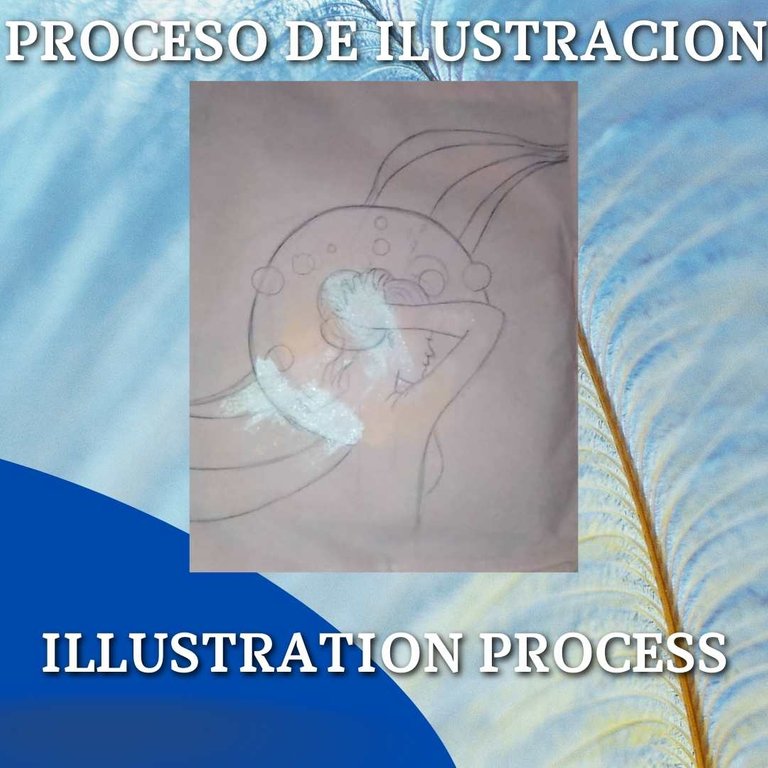
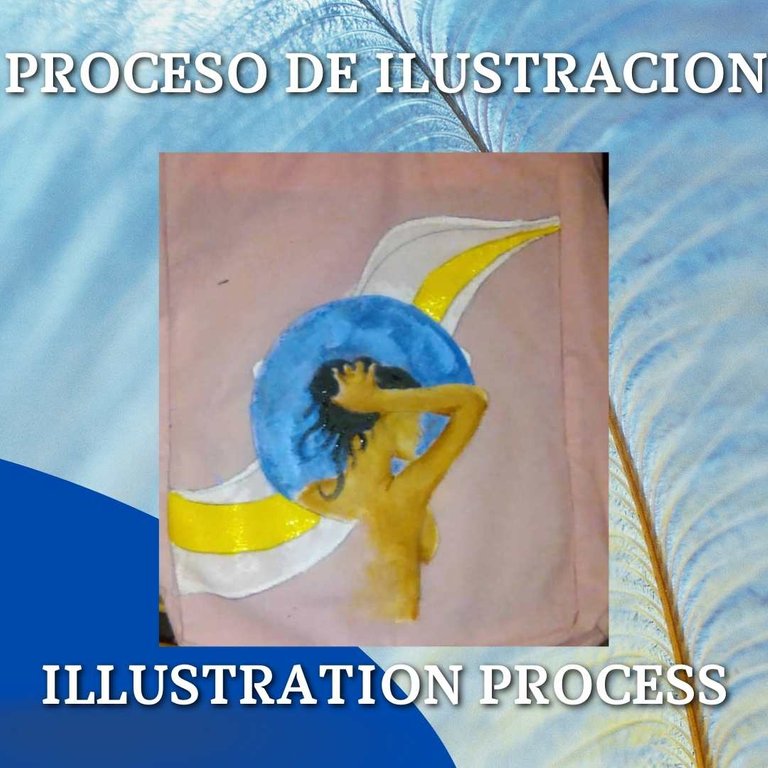
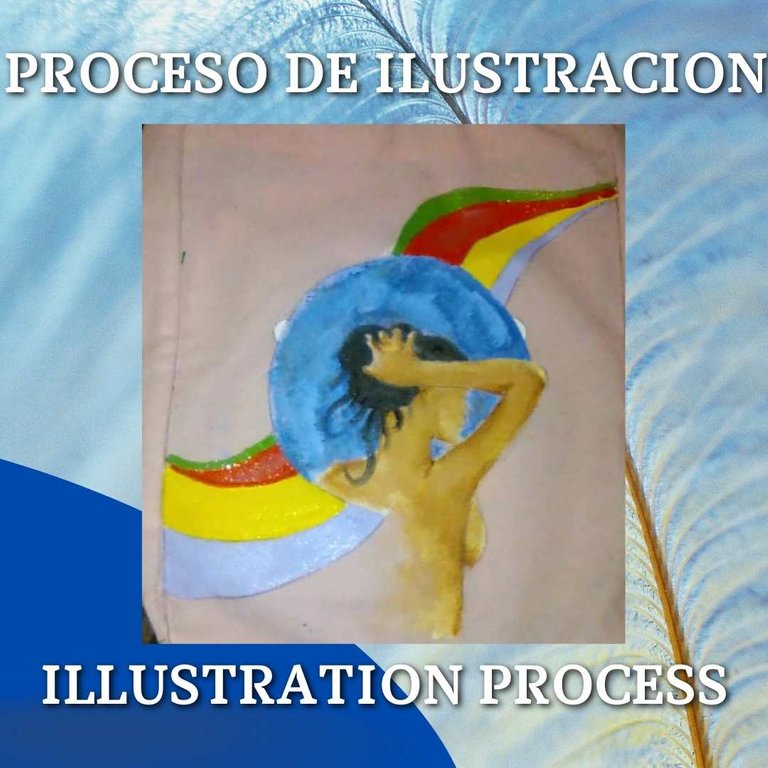
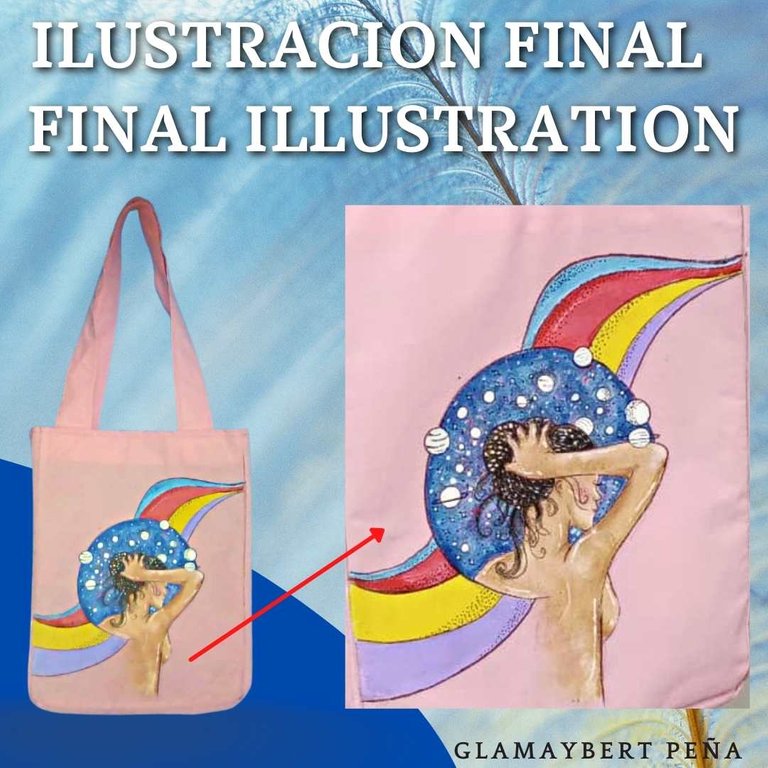
But as I love to intervene with paint, I proceeded to make an illustration on the front side, as opposed to where the closure is.
I will leave the process in the following images
Pero como me encanta intervenirlo con pintura, procedí a hacer una ilustracion en la cara frontal al contrario de donde esta el cierre.
Les dejare el proceso en las siguientes imagenes.

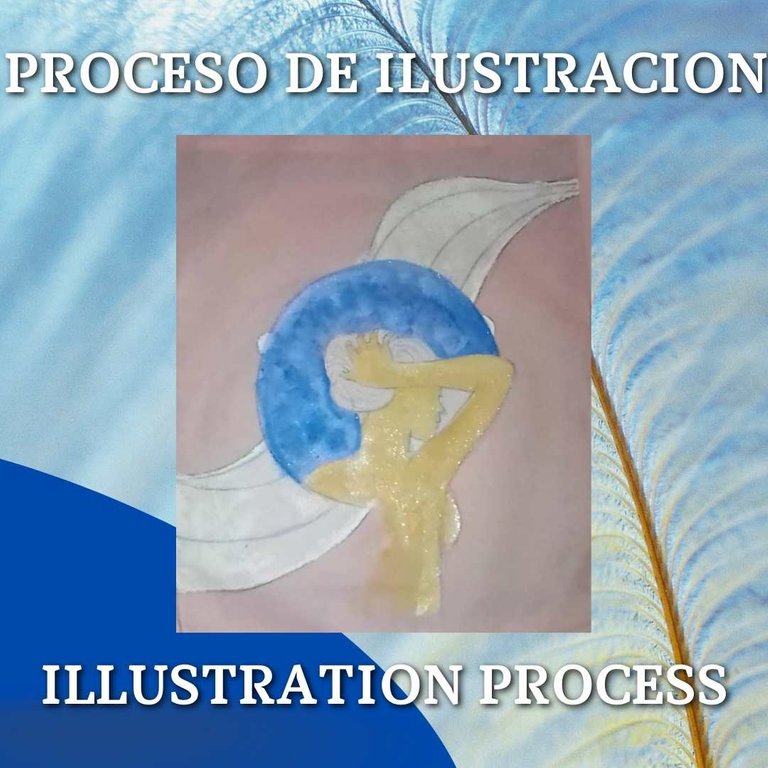
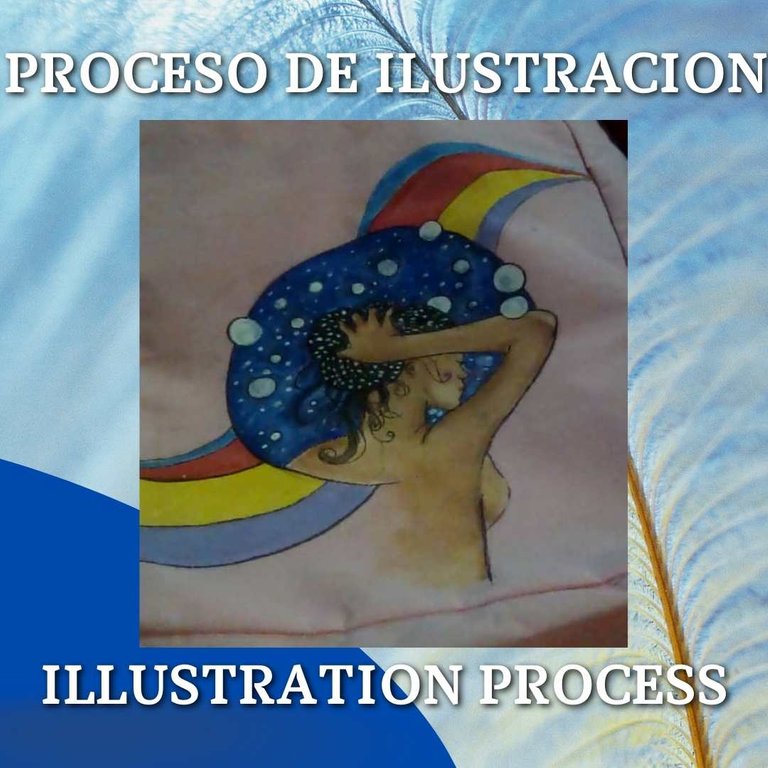
Let the paint dry for a whole day, and then make some details with a fine tip marker, on the edges to define and polish the lines, and make the colors stand out on the fabric.
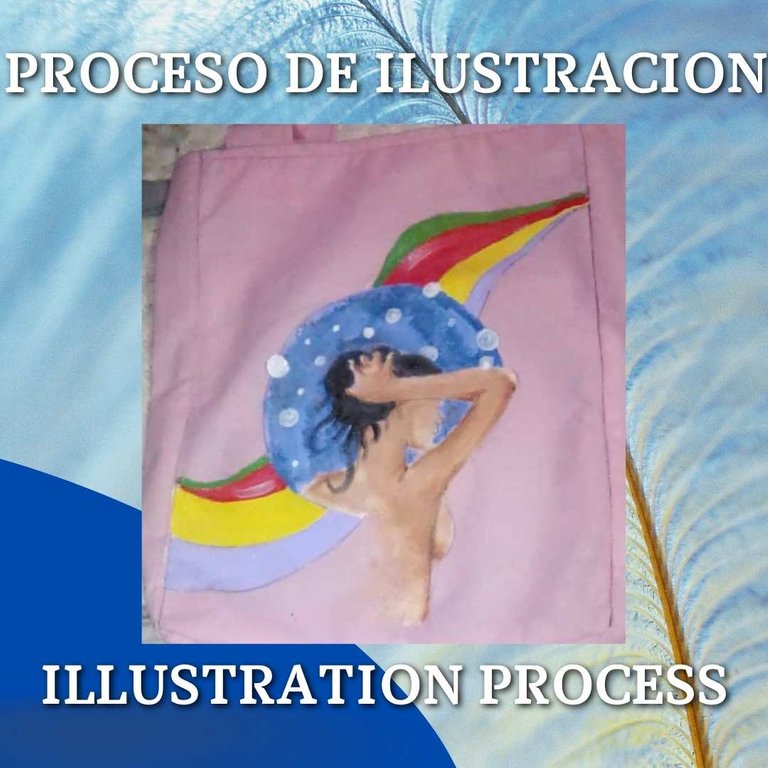
The result is this beautiful illustration, in particular I enjoy doing each of these jobs, but I fell very much in love with it and I hope you like it as much as I do.
Deje secar la pintura por todo un día, para luego hacerle unos detalles con un marcador punta fina, en los bordes para definir y pulir la lineas, y hacer resaltar los colores sobre la tela.
Quedando como resultado esta hermosa ilustracion, en lo particular yo disfruto haciendo cada uno de estos trabajos, pero quede muy enamorada de este y espero que les guste tanto como a mi.
Quiero agradecer a mis hermosas abejitas de antemano, si no fueras por ustedes no quisiera el gusto de estar aquí.
Besos y abrazos desde la distancia.
Nos leemos en la siguiente entrega.
Quiero agradecer a mis hermosas abejitas de antemano, si no fuese por ustedes no tendría el gusto de estar aquí.
Besos y abrazos desde la distancia.
Nos leemos en la siguiente entrega.


English version translated with Translate Google.
Banner made in Adobe Ilustrator.
Original photos and my exclusive property
100% original content
Versión en inglés traducida con Traductor Google.
Banners elaborado en Adobe Illustrator.
Fotos originales y de mi exclusiva propiedad.
100% contenido original.

❤️❤️|Nos vemos en la próxima entrega, besos❤️
❤️See you in the next installment, kisses|❤️❤️
❤️❤️|Nos vemos en la próxima entrega, besos❤️
❤️See you in the next installment, kisses|❤️❤️
Congratulations @glamaybert98! You have completed the following achievement on the Hive blockchain and have been rewarded with new badge(s):
Your next target is to reach 20 posts.
You can view your badges on your board and compare yourself to others in the Ranking
If you no longer want to receive notifications, reply to this comment with the word
STOPTo support your work, I also upvoted your post!
Check out the last post from @hivebuzz:
https://twitter.com/GlamaPrim/status/1462993740361084929
The rewards earned on this comment will go directly to the person sharing the post on Twitter as long as they are registered with @poshtoken. Sign up at https://hiveposh.com.