STEP BY STEP TUTORIAL: SEMI CUT CREASE USING BROWN, GOLD AND GREEN [ESP//ING]
(Edited)
✨HOLA MI LINDA COMUNIDAD✨
✨HELLO MY BEAUTIFUL COMMUNITY✨
EL DÍA DE HOY QUISE TRAERLES ESTE PEQUEÑO TUTORIAL PASO A PASO DE UN SEMI CUT CREASE EN TONOS MARRONES VERDES Y DORADO UNA COMBINACIÓN UN POCO DIFERENTE PERO SÚPER HERMOSA PERFECTO PARA CUANDO QUIERES RESALTAR TU MIRADA SIN PERDER ESE TOQUE CLÁSICO DE LOS TONOS TIERRA.
TODAY I WANTED TO BRING YOU THIS LITTLE STEP BY STEP TUTORIAL OF A SEMI CUT CREASE IN GREEN BROWN AND GOLD TONES A COMBINATION A LITTLE DIFFERENT BUT SUPER BEAUTIFUL PERFECT FOR WHEN YOU WANT TO HIGHLIGHT YOUR LOOK WITHOUT LOSING THAT CLASSIC TOUCH OF EARTH TONES.
PASO A PASO | STEP BY STEP
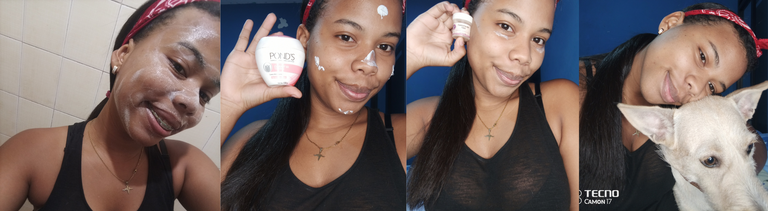
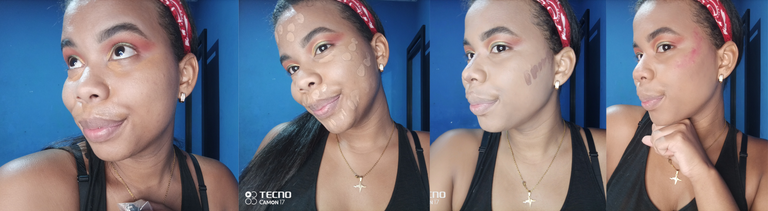
Como siempre, mi maquillaje inicia con un buen skincare utilizó mi jabón facial para piel grasa, luego hidrato mi piel con la crema ponds para piel grasa, luego aplico un contorno de ojos, agrego una foto junto a Maya, porque ella siempre está en el detrás de camaras de mis tutoriales aunque nunca la pongo en las fotos.
As always, my makeup starts with a good skincare I use my facial soap for oily skin, then I moisturize my skin with the ponds cream for oily skin, then I apply an eye contour, I add a photo with Maya, because she is always in the behind the scenes of my tutorials although I never put her in the photos.
Ahora comienzo con mis cejas. Últimamente he utilizado este lápiz de Aoa Estudio para cejas y créanme qué es lo mejor qué probado hasta ahora; entonces peino mis cejas, luego relleno los espacios vacios y por último utilizo esta base súper clara para corregir y también la extiendo por mí párpado para que funcione como prebase de sombras.
Now I start with my eyebrows. Lately I've been using this Aoa Estudio eyebrow pencil and believe me it's the best I've tried so far; then I comb my eyebrows, then I fill in the empty spaces and lastly I use this super clear base to correct and also spread it on my eyelid to work as a pre-base for eyeshadows.
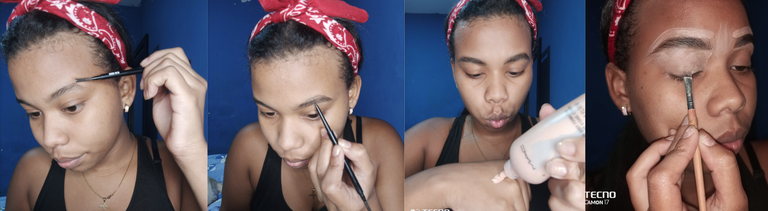
Procedemos a sellar nuestra base usando una sombra similar a nuestro tono de piel hoy incluso nuestro polvo, luego aplico una sombra marrón rojizo por todo nuestra cuenca: desde el lagrimal hasta la esquina externa del ojo, por último difuminaremos este marrón rojizo con un marrón mucho más claro yo utilice uno con subtono amarillo, tú escoge el de tu preferencia. Recuerda que lo más importante va hacer este difuminado, porque será el que le dará sutileza a tu maquillaje.
We proceed to seal our base using a shade similar to our skin tone today even our powder, then I apply a reddish brown shade all over our socket: from the tear trough to the outer corner of the eye, finally we will blend this reddish brown with a much lighter brown I used one with yellow undertone, you choose the one of your preference. Remember that the most important thing is to do this blending, because it will be the one that will give subtlety to your makeup.

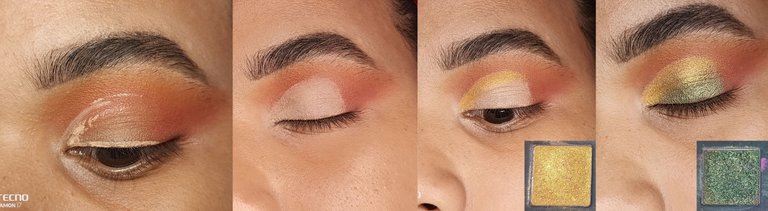
Ahora viene el corte de cuenca, como siempre les digo yo inicio el corte haciendo líneas guía, comienzo delineandome con un poco de base o corrector y luego mirando hacia arriba y luego relleno. Después de esto, aplico mi sombra dorada, está ira desde el lagrimal hasta dónde terminé mi corte de cuenca, y luego aplico la sombra verde, que era justo por debajo de la dorada rellenando los espacios que quedaron en blanco. Por último difumino la línea entre las sombras de colores y el marrón rojizo de la esquina externa.En las fotos pueden verlo un poco mejor.
Now comes the socket cut, as I always tell you I start the cut by making guide lines, I start outlining with a little bit of foundation or concealer and then looking up and then fill in. After this, I apply my gold shadow, it will go from the tear trough to where I finished my eye socket cut, and then I apply the green shadow, which was just below the gold one filling in the spaces that were left blank. Lastly, I blend the line between the colored shadows and the reddish brown of the outer corner.
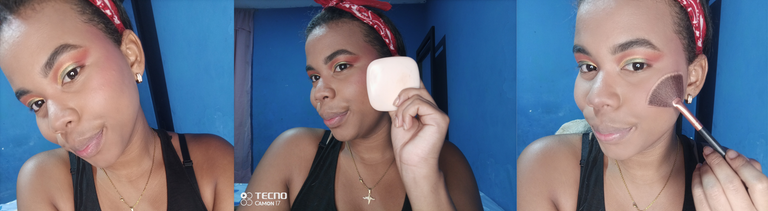
Llegó el momento de hacer la piel para esto comienzo corrigiendo mi bozo y ojeras con un corrector naranja, luego aplico mi base, luego hago mis contornos en mejillas nariz y labios, y por último aplico una tinta de labios como rubor líquido. Algo súper importante es que cada uno de estos productos los difuminos con esponja siento que le da un acabado más ligero y me gusta.
It's time to do the skin for this I start by correcting my puffiness and dark circles with an orange concealer, then I apply my foundation, then I do my contouring on cheeks nose and lips, and finally I apply a lip tint as a liquid blush. Something super important is that I blend each of these products with a sponge, I feel it gives a lighter finish and I like it.
Por último sello todo con los productos en polvo correspondientes y aplico iluminador más abajo les muestro paso a paso cómo maquillo mis labios.
Finally, I seal everything with the corresponding powder products and apply highlighter, below I show you step by step how I apply my lips.
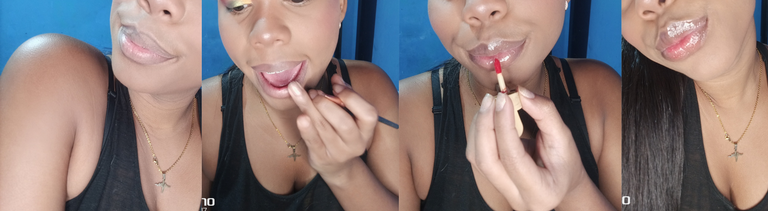
Ahora mis labios, este tip es súper fácil: yo comienzo delineando todo el borde de mis labios con un lápiz café oscuro, luego con mis dedos trato de difuminar esa línea hacia el centro de mis labios, aplico un poco de gloss y por último tinta de labios en el centro y listo tienes unos labios diferentes y bonitos.
Now my lips, this tip is super easy: I start by outlining the entire edge of my lips with a dark brown pencil, then with my fingers I try to blend that line towards the center of my lips, I apply a little gloss and finally lip tint in the center and ready you have a different and beautiful lips.
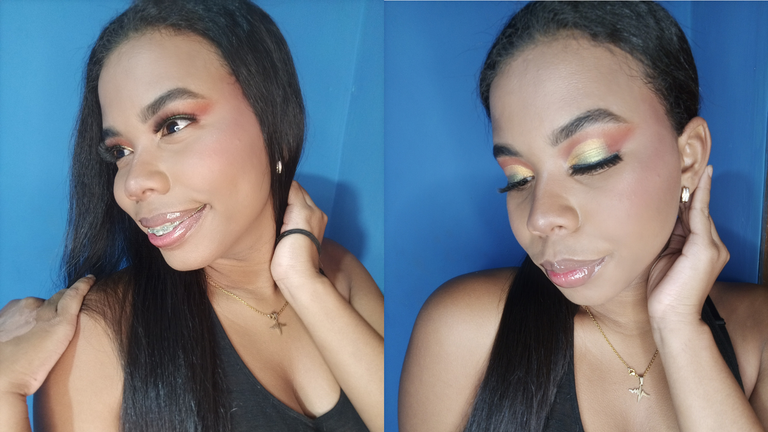
Ya por último apliqué mis pestañas postizas que nunca pueden faltar, y listo. Aquí les dejo las fotos finales:
Finally I applied my false eyelashes, which are a must, and that was it. Here are the final photos:
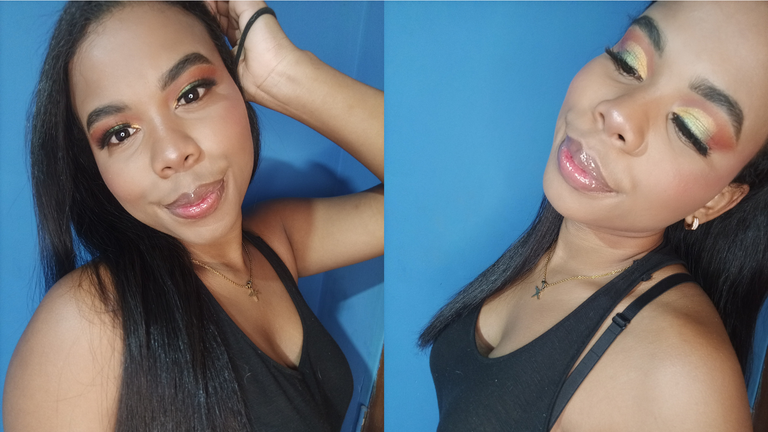
Y bueno este fue mi pequeño tutorial paso a paso de un maquillaje usando marrones dorado y verde, de verdad me gustó bastante el resultado y aunque estoy un poco fuera de práctica; creo que es un maquillaje que todos podemos usar cuando necesitamos darle algo de color a nuestra mirada, pero aún así queremos mantenernos en nuestra zona de confort usando estos tonos tierra, si gustas puedes usar un poco de azul en lugar de verde o rosa o algún tipo de rojo... Ya lo dejó tu creatividad.
And well this was my little step by step tutorial of a makeup using golden browns and green, I really liked the result and although I'm a little out of practice; I think it is a makeup that we can all use when we need to give some color to our look, but still want to stay in our comfort zone using these earth tones, if you like you can use a little blue instead of green or pink or some kind of red .... It's up to your creativity.
Gracias por leerme y hasta un próximo post
Thanks for reading and see you in a future post
Traducción: Deepl // Traslation: Deepl
0
0
0.000
Sin lugar a dudas muchas de nuestras Mayvileras están felices de tus tutoriales Gaby.
¡Gracias por eso!
¡Saludos!
Gracias por leerme y por tu apoyo🥰 me incentivas a seguir con mi contenido
Tu incentivas seguramente a muchas personas de la comunidad, te invitamos a ser una miembro activa.
Pronto estaremos de vuelta con las dinámicas y demás ☺️
Saludos Gaby!