Selective Coloring on African Lilies - Mini Tutorial [EN] // [ES]
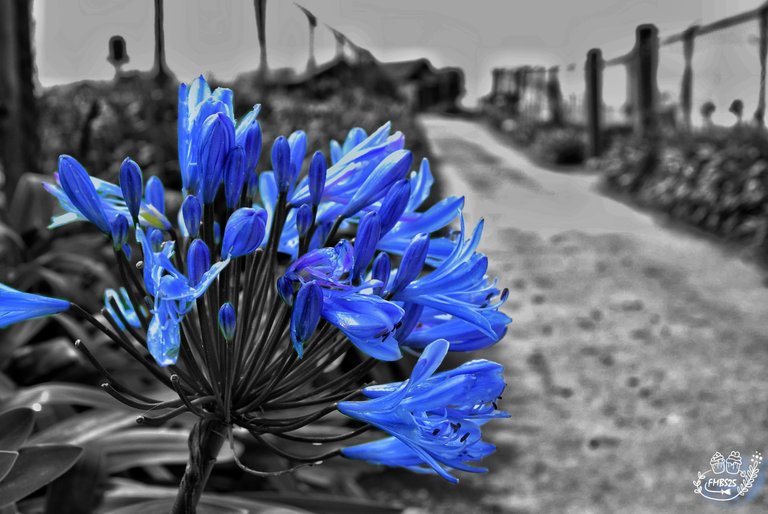
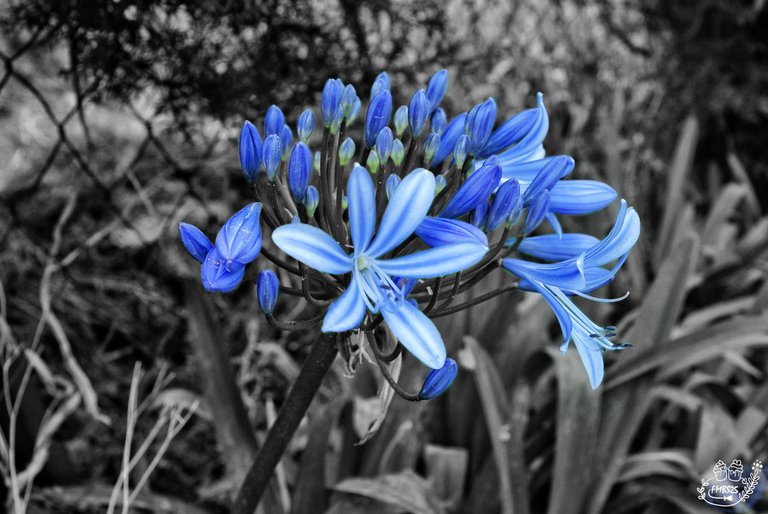
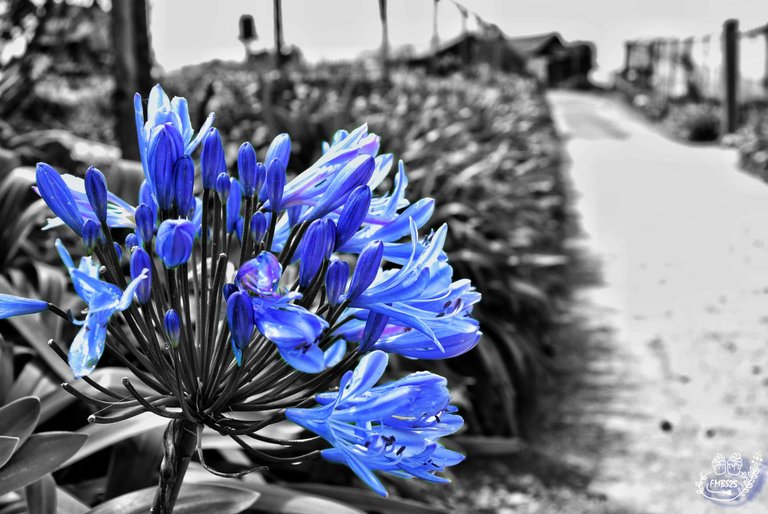
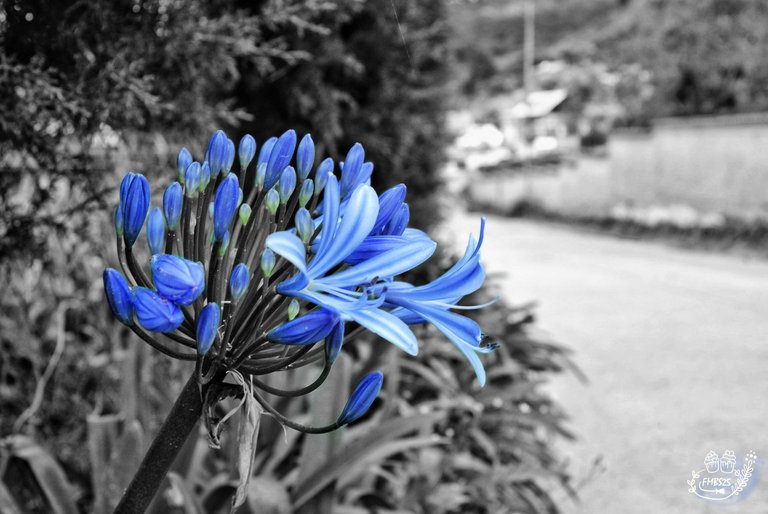
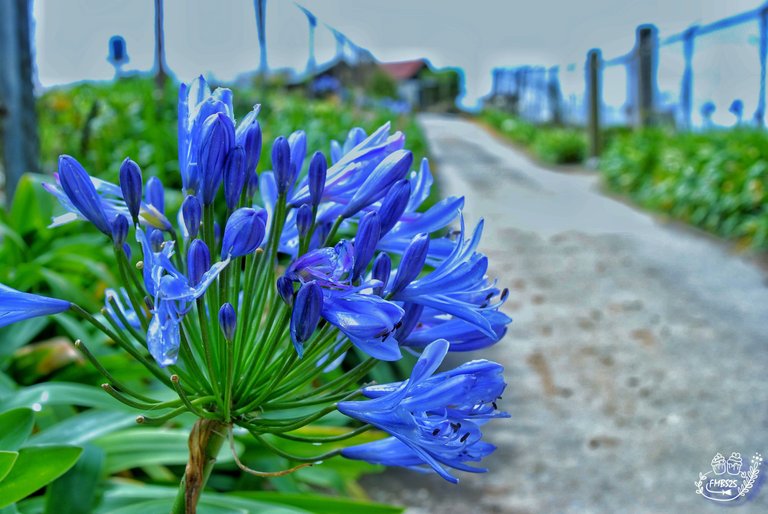
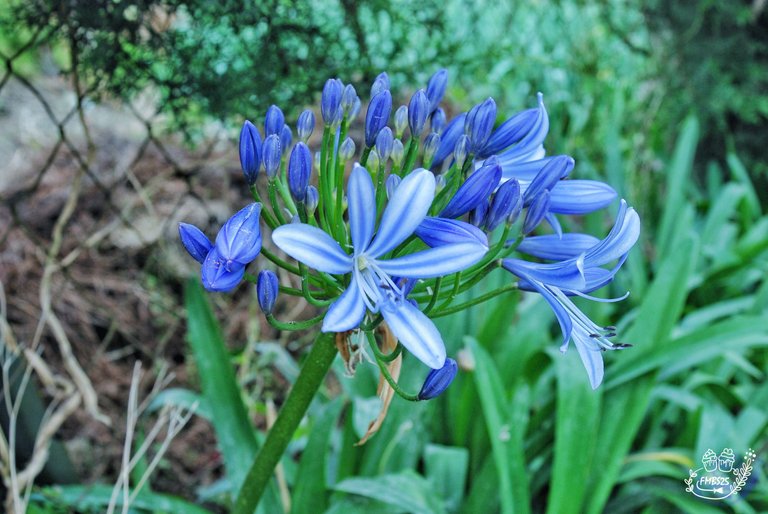
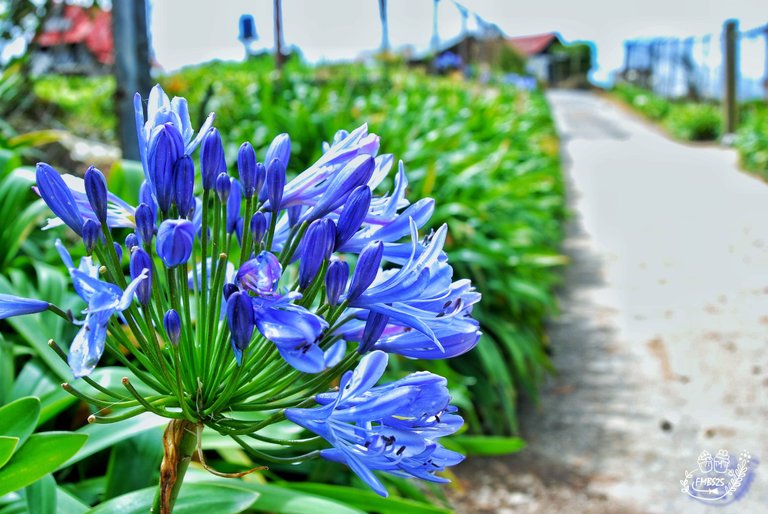
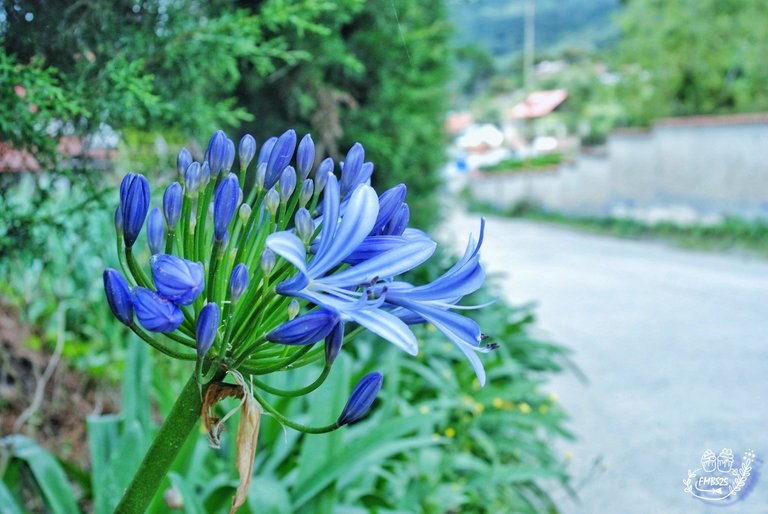
Some people who do not know the world of photo editing ask me when they see my photographs with selective coloring, how do I get that result? I dare to say without fear of being wrong that this is the photo editing technique that I like the most among the few I know, and is that long before I knew the photo editing or even imagine that I could love taking pictures so much, was that effect of being able to highlight the colors between the monochromatic tones of black and white, And as you can see in these images, what looks like a lilac flower in this case an African Agapanthus or African Lily, when we use selective coloring we can notice that there is a whole range of tones and shades ranging from lilac, through purple, to blue, and at other points of the flowers we can also see the green color in various shades.
It is that magic of opening my eyes and observing these small details that makes me love this editing technique. Color photographs will always be beautiful, of that I have no doubt, but small details go unnoticed and with selective coloring we are able to highlight them.
Most of my photos I edit them with Snapseed, a mobile application quite friendly for beginners like me, and whose editing options are not so complicated, they are really quite basic, but it is still a good application, in my opinion. I also use PicsArt but basically to give the final touches like adding the signature to the photos and some letters when it is needed, since for this kind of editing I feel more comfortable with Snapseed.
When I have already made the first editions to my photograph, such as color saturation, brightness adjustment, contrast and saturation as well as warm or cold tones, which are basically the adjustments I use, I proceed to select the type of black and white filter that best suits each photograph, in this case as it has been an image with enough daylight, the dark filter seems to me the most appropriate, this way it darkens the shadows more and makes these bright tones vibrate even more. Once selected the dark filter, we accept the option and we go to the layers and editions tab that is at the top right of the application, in it we will observe the amount of editions that we have done to the image and select Black and White, we click on the edit button and it opens the image with the option to paint so to speak, the image we want to edit.
At the bottom of the Snapseed screen we can see two arrows, one up and one down, in them we can set the intensity of the tones, in this case I always use 100% for both colors and black, and I prefer to shade the colors I want to highlight with black and then see how it looks with the layer selector, which is the icon that has a circle on a square, located on the left side of the arrows that I already mentioned.
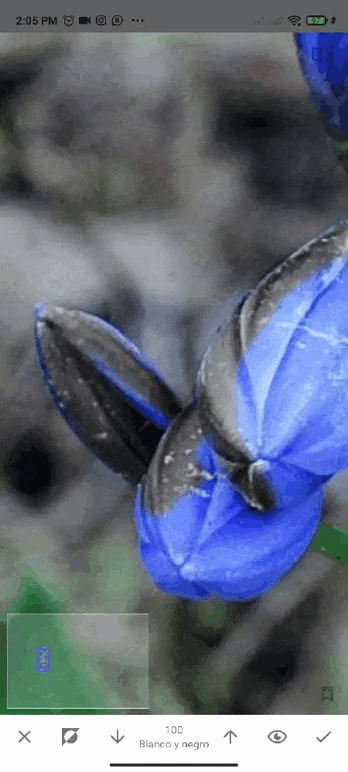
With the help of the layer selector we can check how our image is getting, if by mistake we have shaded a part of it by mistake, and any detail that we may have missed, it is a process that I enjoy a lot and that relaxes me, although sometimes when I accidentally leave the application and lose the whole editing process I get a little stressed, but I get over it when I do it again hahaha.

Once the edition is finished we accept the edition and save, that's how easy it is to have an image with selective coloring, which as I already told you are one of my favorites. Let me know any doubt you have in the comments box, although I am not an expert I can probably help you in something.
Images owned by me, taken with my Nikon D80 camera and edited with Snapseed and PicsArt.
Thank you for taking the time to read this post, if you have any questions, criticisms or suggestions, I would appreciate it if you put them in the comment box, and remember, you too can do magic on the kitchen and wherever you go!

It is that magic of opening my eyes and observing these small details that makes me love this editing technique. Color photographs will always be beautiful, of that I have no doubt, but small details go unnoticed and with selective coloring we are able to highlight them.
Most of my photos I edit them with Snapseed, a mobile application quite friendly for beginners like me, and whose editing options are not so complicated, they are really quite basic, but it is still a good application, in my opinion. I also use PicsArt but basically to give the final touches like adding the signature to the photos and some letters when it is needed, since for this kind of editing I feel more comfortable with Snapseed.
When I have already made the first editions to my photograph, such as color saturation, brightness adjustment, contrast and saturation as well as warm or cold tones, which are basically the adjustments I use, I proceed to select the type of black and white filter that best suits each photograph, in this case as it has been an image with enough daylight, the dark filter seems to me the most appropriate, this way it darkens the shadows more and makes these bright tones vibrate even more. Once selected the dark filter, we accept the option and we go to the layers and editions tab that is at the top right of the application, in it we will observe the amount of editions that we have done to the image and select Black and White, we click on the edit button and it opens the image with the option to paint so to speak, the image we want to edit.
At the bottom of the Snapseed screen we can see two arrows, one up and one down, in them we can set the intensity of the tones, in this case I always use 100% for both colors and black, and I prefer to shade the colors I want to highlight with black and then see how it looks with the layer selector, which is the icon that has a circle on a square, located on the left side of the arrows that I already mentioned.
With the help of the layer selector we can check how our image is getting, if by mistake we have shaded a part of it by mistake, and any detail that we may have missed, it is a process that I enjoy a lot and that relaxes me, although sometimes when I accidentally leave the application and lose the whole editing process I get a little stressed, but I get over it when I do it again hahaha.
Once the edition is finished we accept the edition and save, that's how easy it is to have an image with selective coloring, which as I already told you are one of my favorites. Let me know any doubt you have in the comments box, although I am not an expert I can probably help you in something.
Thank you for taking the time to read this post, if you have any questions, criticisms or suggestions, I would appreciate it if you put them in the comment box, and remember, you too can do magic on the kitchen and wherever you go!
[ES]
Algunas personas que no conocen el mundo de la edición fotográfica me preguntan cuando ven mis fotografías con coloreado selectivo, ¿Como hago para obtener ese resultado? Me atrevo a decir sin temor a equivocarme que es esta la técnica de edición fotográfica que me gusta más entre las pocas que conozco, y es que mucho antes de conocer la edición fotográfica o de tan siquiera imaginar que podría amar tanto tomar fotografías, era ese efecto de poder resaltar los colores entre los tonos monocromáticos del blanco y el negro, y es que como pueden ver en estas imágenes, lo que se ve como una flor lila en este caso un Agapanto Africano o Lirio Africano, cuando utilizamos el coloreado selectivo podemos notar que hay todo un abanico de tonos y matices que van desde el lila, pasando por purpura, hasta llegar al azul, y en otros puntos de las flores logramos ver también el color verde en varios matices.
Es esa magia de abrir los ojos y observar estos mínimos detalles lo que me llevan a amar esta técnica de edición, las fotografías a color siempre serán hermosas, de eso no me cabe duda, pero pasan desapercibidos pequeños detalles que con el coloreado selectivo logramos resaltar.
La mayoría de mis fotografías las edito con Snapseed, una aplicación móvil bastante amigable para los principiantes como yo, y cuyas opciones de edición no son tan complicadas, son realmente bastante básicas pero no por ello deja de ser una buena aplicación, a mi manera de ver. También utilizo PicsArt pero básicamente para dar los toques finales como agregar la firma a las fotografías y algunas letras cuando lo amerita, puesto que para este tipo de ediciones me siento más cómoda sin duda con Snapseed.
Cuando ya le he hecho las primeras ediciones a mi fotografía, como lo son, saturación del color, ajuste de brillo, contraste y saturación al igual que los tonos cálidos o fríos, que son básicamente los ajustes que utilizo, procedo a seleccionar el tipo de filtro de blancos y negros que le va mejor a cada fotografía, en este caso como ha sido una imagen con suficiente luz de día, el filtro oscuro me parece el más adecuado, de esta manera oscurece más las sombras y hace que estos tonos brillantes vibren aún más. Una vez seleccionado el filtro oscuro, aceptamos la opción y nos vamos a la pestaña de capas y ediciones que está en la parte superior derecha de la aplicación, en ella vamos a observar la cantidad de ediciones que le hemos hecho a la imagen y seleccionamos Blanco y Negro, hacemos clic en el botón de edición y nos abre la imagen con la opción para pintar por así decirlo, la imagen que queremos editar.
En la parte inferior de la pantalla de Snapseed podemos ver dos flechas una hacia arriba y otra hacia abajo, en ellas podemos fijar la intensidad de los tonos en este caso yo siempre lo uso al 100% tanto para colores como para el negro, y prefiero sombrear los colores que deseo resaltar con el negro para luego ir viendo cómo va quedando con el seleccionador de capas que es el icono que tiene un círculo sobre un cuadrado, ubicado al lado izquierdo de las flechas que ya les mencione.
Con ayuda del selector de capas podemos ir verificando como va quedando nuestra imagen, si por error hemos sombreado una parte de la misma sin querer, y cualquier detalle que se nos pueda haber pasado, es un proceso que disfruto mucho y que me relaja, aunque en ocasiones cuando sin querer me salgo de la aplicación y pierdo todo el proceso de edición me estreso un poco, pero se me pasa cuando nuevamente lo hago jajaja.
Ya terminada la edición aceptamos la edición y guardamos, así de fácil podemos tener una imagen con coloreado selectivo, que como ya les dije son de mis favoritas. Déjame saber cualquier duda que tengas en la casilla de comentarios, que si bien no soy una experta probablemente pueda ayudarte en algo.
Imágenes de mi propiedad, tomadas con mi cámara Nikon D80 y editadas con Snapseed y PicsArt.
Gracias por tomarse el tiempo de leer esta publicación, si tiene alguna pregunta, crítica o sugerencia, la agradecería que la pusiera en la caja de comentarios, y recuerda, ¡Tú también puedes hacer magia en la cocina ya dondequiera que vayas!

Created by @robinsonlgil

Created by @derangedvisions
Es esa magia de abrir los ojos y observar estos mínimos detalles lo que me llevan a amar esta técnica de edición, las fotografías a color siempre serán hermosas, de eso no me cabe duda, pero pasan desapercibidos pequeños detalles que con el coloreado selectivo logramos resaltar.
La mayoría de mis fotografías las edito con Snapseed, una aplicación móvil bastante amigable para los principiantes como yo, y cuyas opciones de edición no son tan complicadas, son realmente bastante básicas pero no por ello deja de ser una buena aplicación, a mi manera de ver. También utilizo PicsArt pero básicamente para dar los toques finales como agregar la firma a las fotografías y algunas letras cuando lo amerita, puesto que para este tipo de ediciones me siento más cómoda sin duda con Snapseed.
Cuando ya le he hecho las primeras ediciones a mi fotografía, como lo son, saturación del color, ajuste de brillo, contraste y saturación al igual que los tonos cálidos o fríos, que son básicamente los ajustes que utilizo, procedo a seleccionar el tipo de filtro de blancos y negros que le va mejor a cada fotografía, en este caso como ha sido una imagen con suficiente luz de día, el filtro oscuro me parece el más adecuado, de esta manera oscurece más las sombras y hace que estos tonos brillantes vibren aún más. Una vez seleccionado el filtro oscuro, aceptamos la opción y nos vamos a la pestaña de capas y ediciones que está en la parte superior derecha de la aplicación, en ella vamos a observar la cantidad de ediciones que le hemos hecho a la imagen y seleccionamos Blanco y Negro, hacemos clic en el botón de edición y nos abre la imagen con la opción para pintar por así decirlo, la imagen que queremos editar.
En la parte inferior de la pantalla de Snapseed podemos ver dos flechas una hacia arriba y otra hacia abajo, en ellas podemos fijar la intensidad de los tonos en este caso yo siempre lo uso al 100% tanto para colores como para el negro, y prefiero sombrear los colores que deseo resaltar con el negro para luego ir viendo cómo va quedando con el seleccionador de capas que es el icono que tiene un círculo sobre un cuadrado, ubicado al lado izquierdo de las flechas que ya les mencione.
Con ayuda del selector de capas podemos ir verificando como va quedando nuestra imagen, si por error hemos sombreado una parte de la misma sin querer, y cualquier detalle que se nos pueda haber pasado, es un proceso que disfruto mucho y que me relaja, aunque en ocasiones cuando sin querer me salgo de la aplicación y pierdo todo el proceso de edición me estreso un poco, pero se me pasa cuando nuevamente lo hago jajaja.
Ya terminada la edición aceptamos la edición y guardamos, así de fácil podemos tener una imagen con coloreado selectivo, que como ya les dije son de mis favoritas. Déjame saber cualquier duda que tengas en la casilla de comentarios, que si bien no soy una experta probablemente pueda ayudarte en algo.
Gracias por tomarse el tiempo de leer esta publicación, si tiene alguna pregunta, crítica o sugerencia, la agradecería que la pusiera en la caja de comentarios, y recuerda, ¡Tú también puedes hacer magia en la cocina ya dondequiera que vayas!
photography
photoshoot
naturephotography
selectivecolor
photographylovers
diy
spanish
cervantes
palnet
curie
0
0
0.000
https://twitter.com/fmbs25/status/1568034794889519104
The rewards earned on this comment will go directly to the people( @fmbs25 ) sharing the post on Twitter as long as they are registered with @poshtoken. Sign up at https://hiveposh.com.
Looks very beautiful between the monochrome there are bright colors, so luxurious.
I thought this post was great! Many thanks for all the explanation provided. Greetings.