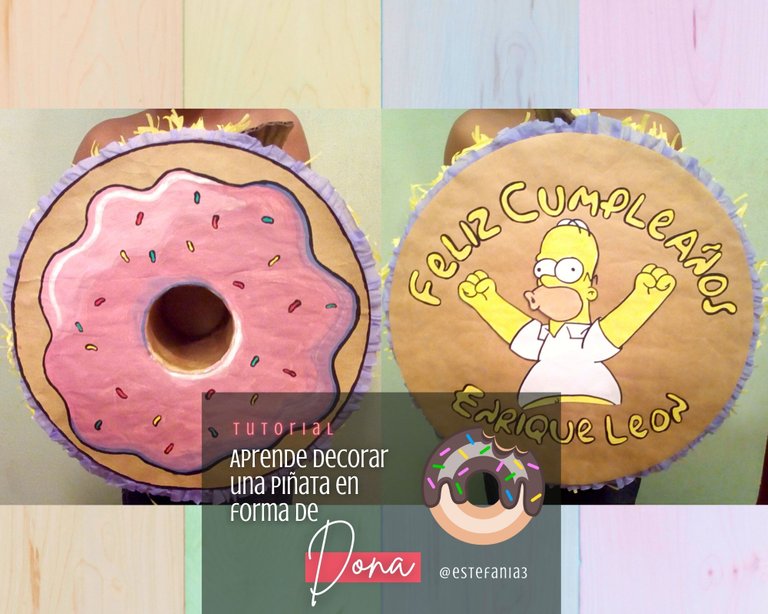
Tutorial: Aprende a Decorar una Piñata en Forma de Dona de los Simpsons || Tutorial: Learn How to Decorate a Simpsons Donut Piñata 🍩🥳

¡Hola Chicos!
Que alegría el estar compartiendo de nuevo con ustedes luego de una semana de ausencia. Estuve enferma y se me fue imposible continuar con las labores en mi blog 😔. Tuve que tomar esos días para poder recuperarme y afortunadamente hoy ya estoy con mucha más energía para poder retomar lo que quedamos. ♥
En mi ultima publicación les estuve compartiendo los pasos para elaborar la Estructura de una piñata en forma de Dona. Los materiales muy fáciles de encontrar y los pasos super sencillos.
Una vez lograda la estructura es momento de decorarla para que deje de ser una simple caja y se convierta en esa piñata de dona estilo Los simpsons.
¿Quisieras aprender a hacer una piñata tal y como la ves en mi foto de portada?
¡Acompáñame!
¡Acompáñame!
Hello Guys!
What a joy to be sharing with you again after a week of absence. I was sick and it was impossible for me to continue with the work on my blog 😔. I had to take those days to be able to recover and fortunately today I am already with much more energy to be able to retake what we were left with. ♥
In my last post I was sharing the steps to make the Structure of a piñata in the shape of a Donut. Very easy to find materials and super simple steps.
Once the structure is achieved, it is time to decorate it so that it stops being a simple box and becomes that Simpsons-style donut piñata.
Would you like to learn how to make a piñata as you see it in my cover photo?
Join me!
Join me!
- Estructura de Piñata
- Papel craft
- Pegamento
- Papel crepé amarillo y morado
- Pintura
- Pincel
- Tijeras
- Lápiz
- Piñata structure
- Craft paper
- Glue
- Yellow and purple crepe paper
- Paint
- Brush
- Pair of scissors
- Pencil
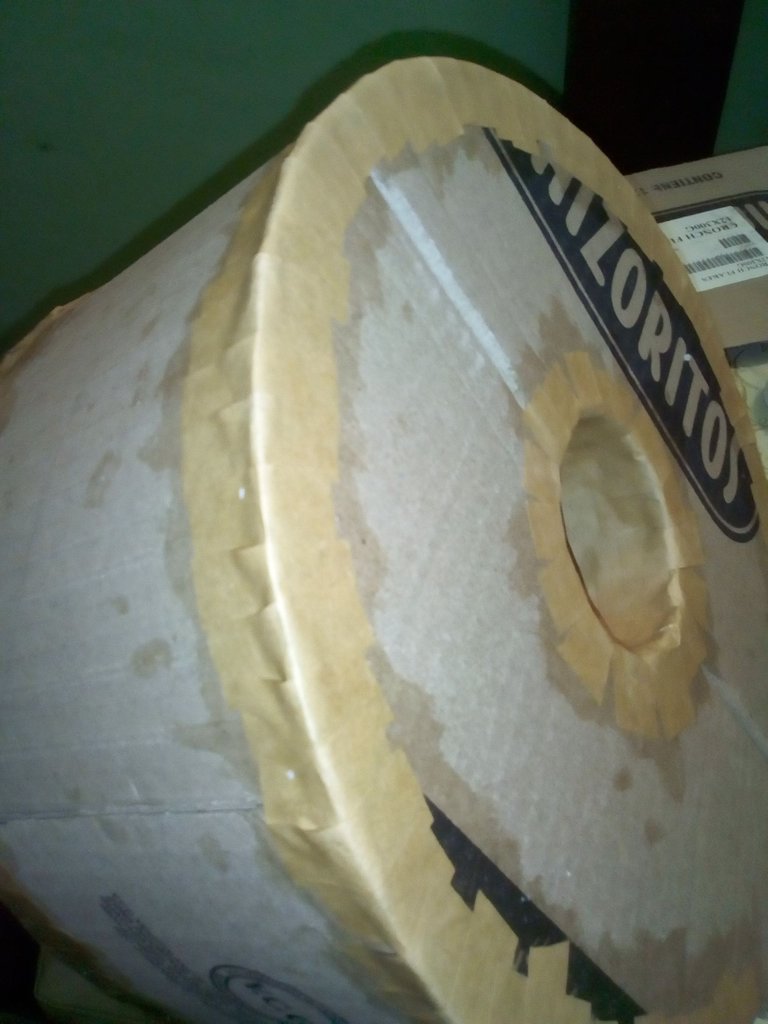
Primero vamos a cubrir con papel craft todas las uniones de la estructura de la piñata. Así logramos reforzarla un poco más y tendrá un aspecto más prolijo.
Para ello cortamos pequeñas tiras de unos 2 centímetros de ancho * 6 centímetros de largo, le agregamos pegamento y poco a poco las vamos pegando por todo los bordes de la piñata, incluyendo el centro de la misma. Acá colocamos un trozo del tamaño del agujero para cubrir todas las imperfecciones de la caja y luego reforzamos con las tiras por todo el borde.
Esto lo hacemos por ambos lados. Dejamos secar el pegamento por completo para luego continuar.
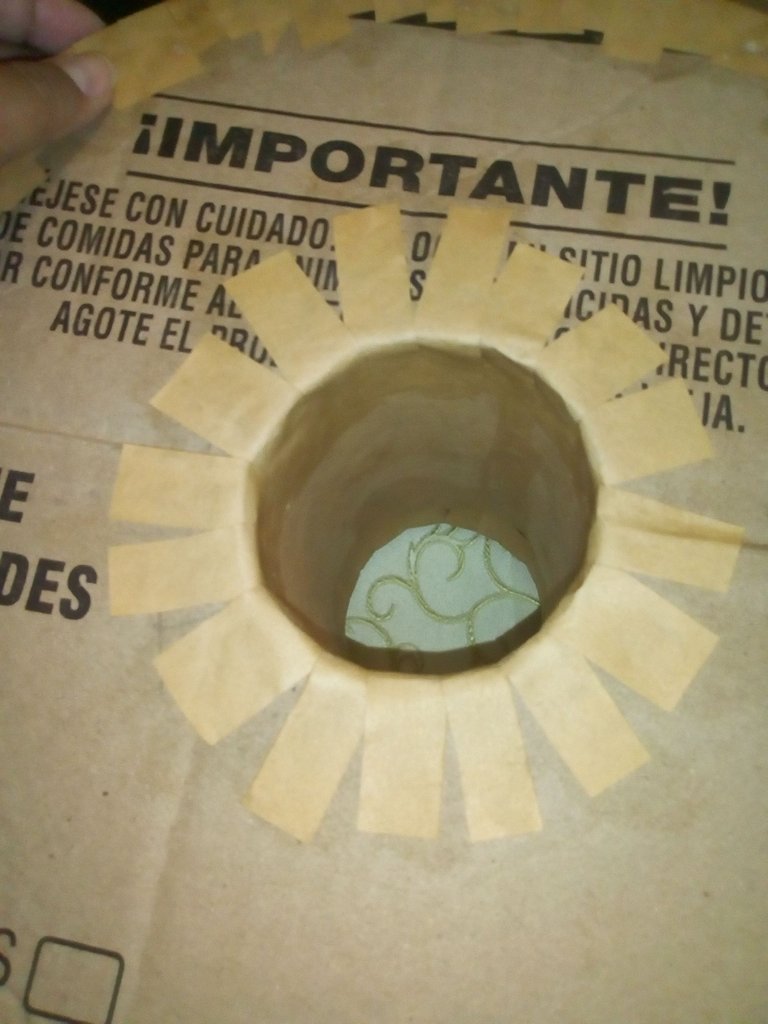
First we are going to cover all the joints of the structure of the piñata with craft paper. This way we can strengthen it a little more and it will look more neat.
To do this, we cut small strips about 2 centimeters wide * 6 centimeters long, we add glue and little by little we are gluing them all over the edges of the piñata, including the center of it. Here we place a piece the size of the hole to cover all the imperfections of the box and then we reinforce with the strips around the edge.
We do this on both sides. We let the glue dry completely and then continue.
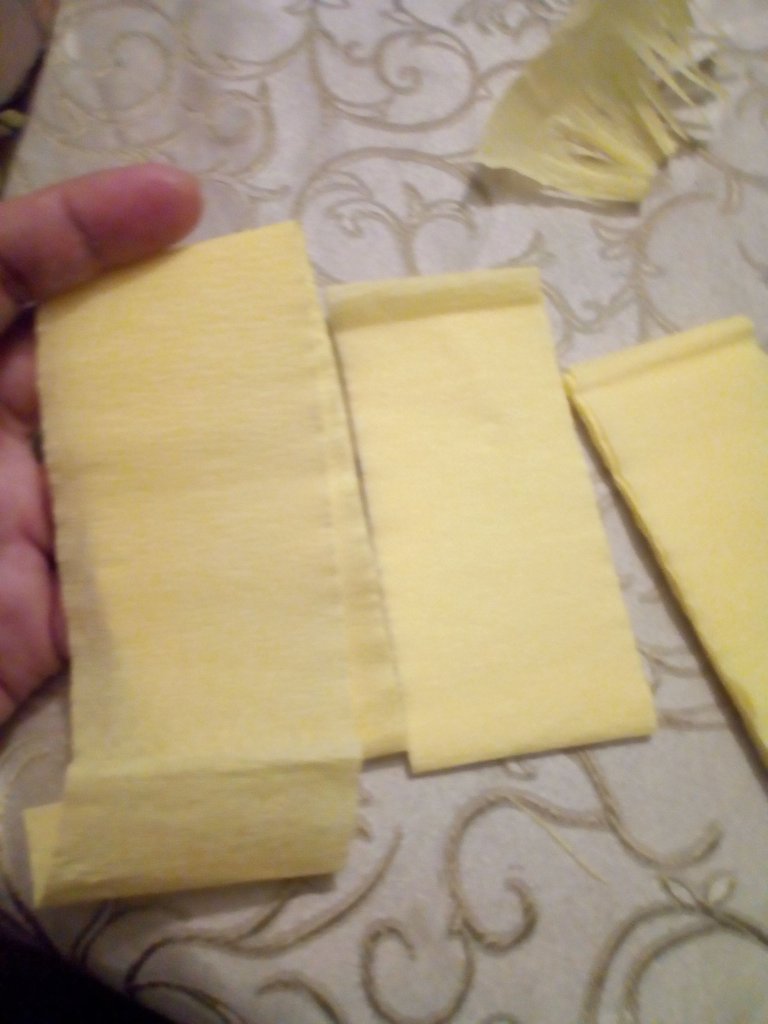
Ahora es momento de comenzar a agregar los flecos de papel crepé, para ello cortamos tiras de unos 5 centímetros de altura, sin desdoblar el pliego, y luego cortamos pequeños flecos sin llegar al otro extremo del papel.
El ancho de estos flecos lo determinas tú. Yo los he hecho de 2 milímetros de grosor aproximadamente.
Con estas tiras de flecos vamos a forrar todo el borde de la piñata, de la siguiente manera:
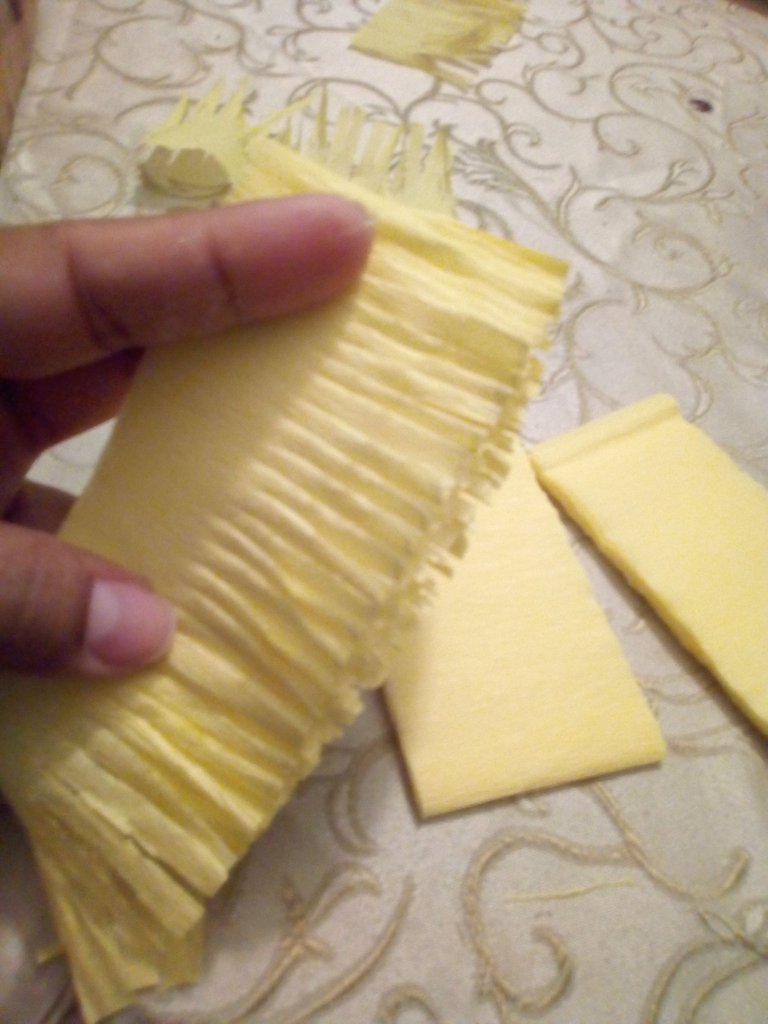
Now it is time to start adding the crepe paper fringes, for this we cut strips of about 5 centimeters high, without unfolding the sheet, and then we cut small fringes without reaching the other end of the paper.
The width of these fringes is determined by you. I have made them approximately 2 millimeters thick.
With these fringe strips we are going to line the entire edge of the piñata, as follows:
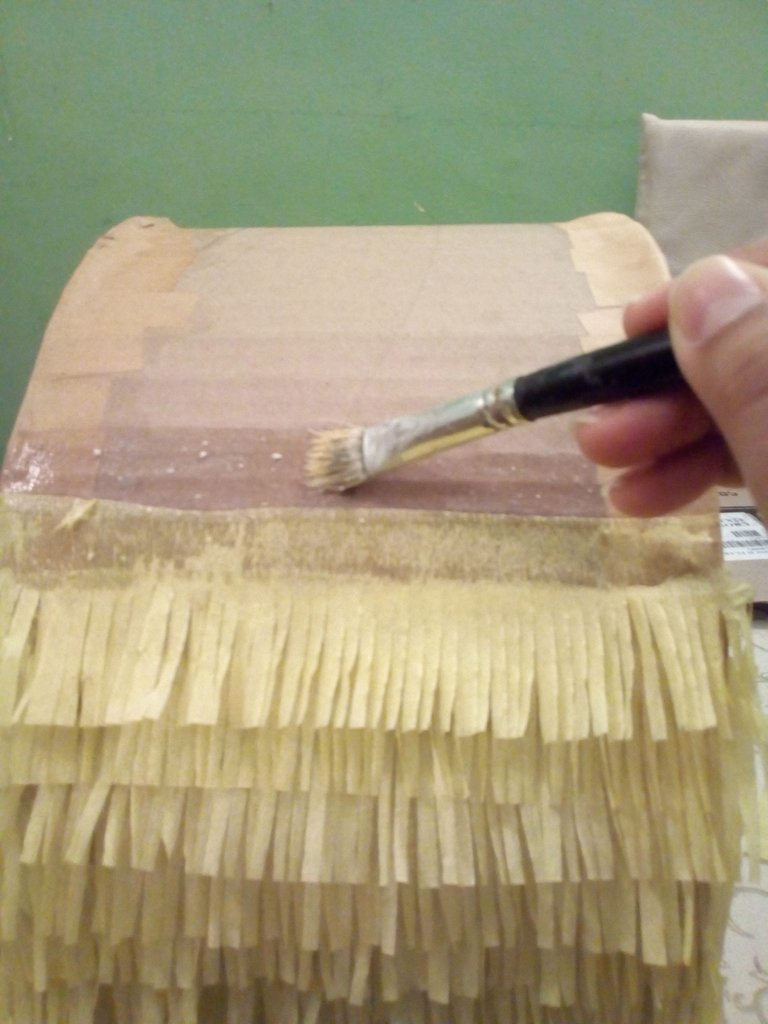
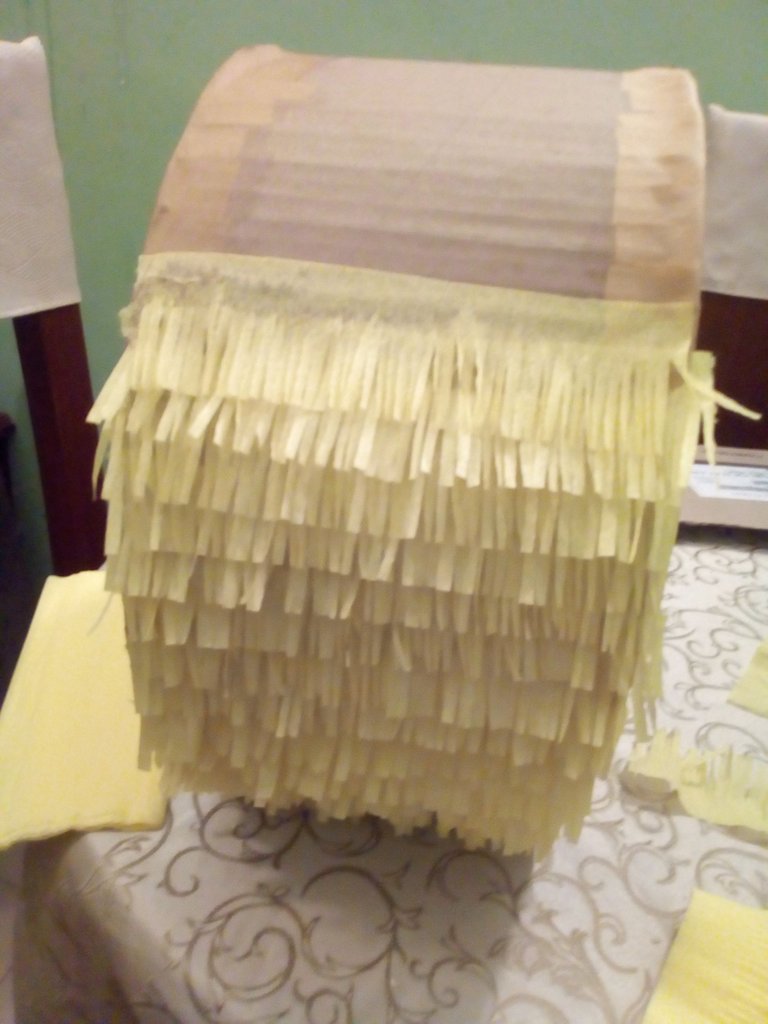
Agregamos un poco de pegamento con un pincel a lo ancho de la estructura y luego pegamos un trozo del papel crepé que picamos con flecos.
Este proceso demora un poco de tiempo, pero vale la pena el esfuerzo pues el resultado es una piñata bastante peludita.
Luego perfeccionamos los bordes con una tijera por si sobresale alguno de los papeles que pegamos.
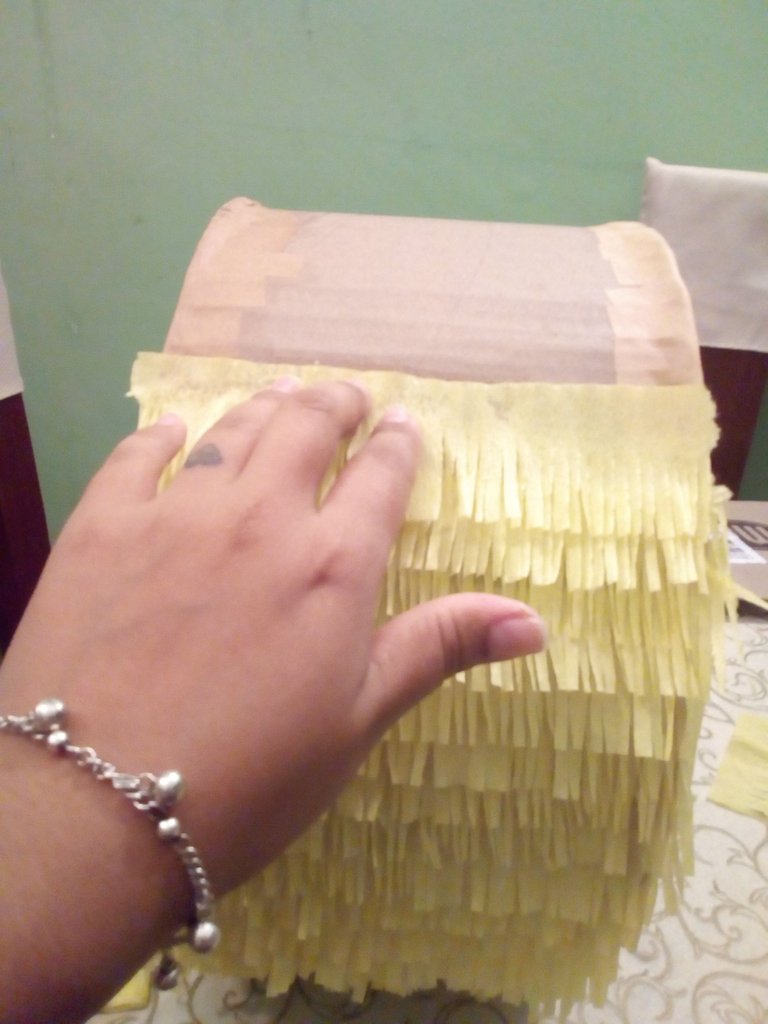
We add a little glue with a brush to the width of the structure and then we glue a piece of the crepe paper that we chop with fringes.
This process takes a little time, but it is worth the effort as the result is a very furry piñata.
Then we refine the edges with a scissors in case any of the papers that we glued protrude.
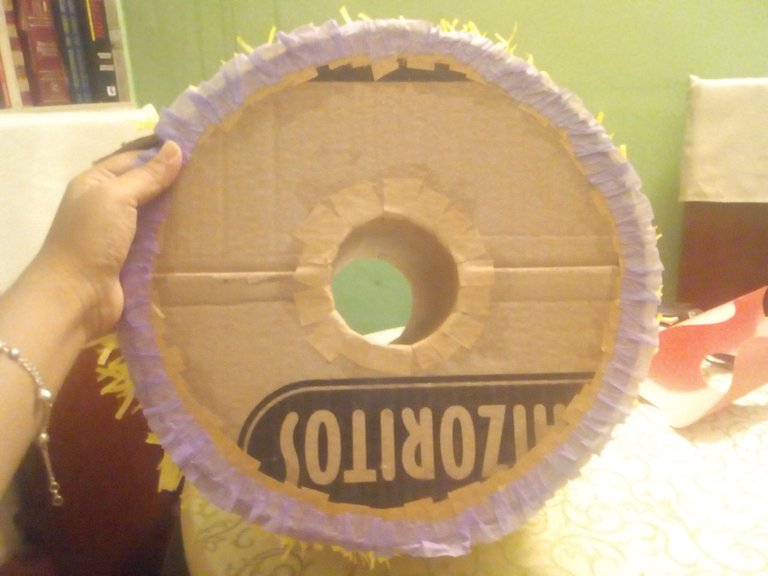
Ahora con el papel crepé morado vamos a pegar un pequeño volado de unos 3 centímetros de altura por el borde de ambas caras de la piñata. Esto para marcar una separación entre el centro y los costados.
Pegamos poco a poco el papel haciendo pequeños pliegos para así dar el efecto de volado.
Now with the purple crepe paper we are going to glue a small ruffle about 3 centimeters high along the edge of both sides of the piñata. This to mark a gap between the center and the sides.
We glue the paper little by little making small sheets to give the effect of ruffling.
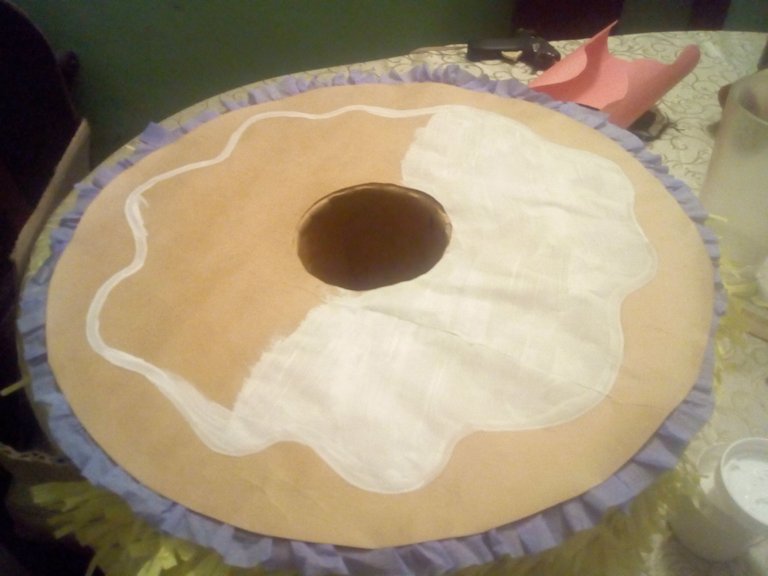
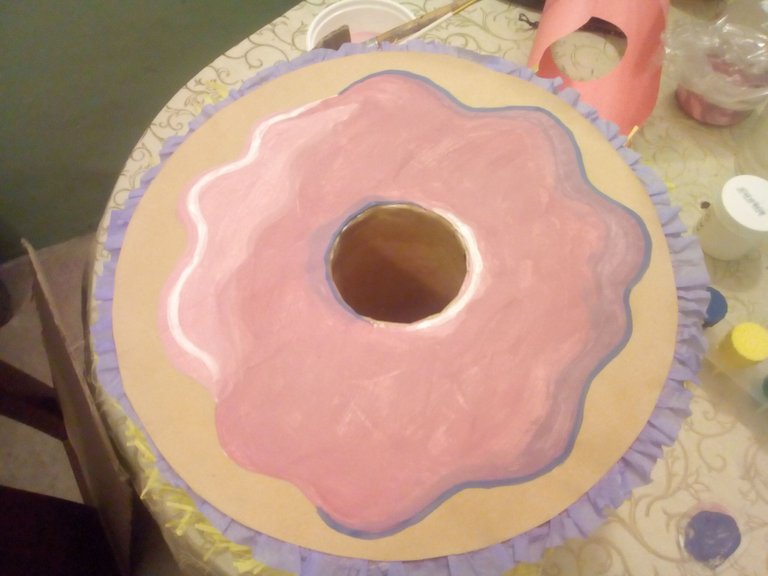
¡Vamos a pintar!. Yo he optado por hacer un diseño diferente en cada cara de la piñata, en una la dona y en la otra colocar un mensaje de "feliz cumpleaños" con un gran dibujo de Homero.
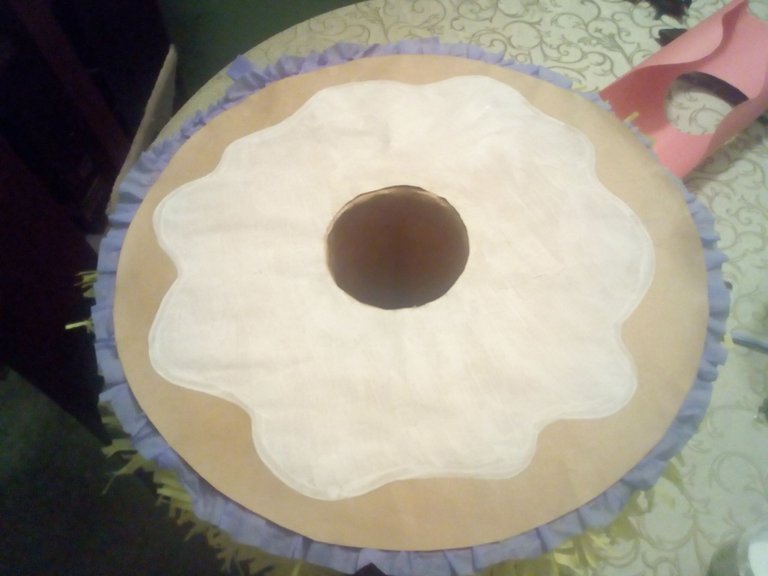
Para el lado de dona he utilizado papel craft cortado en círculo y con un agujero en el centro. Hice la silueta de la crema de la dona y pinté dos capas en color blanco para que se pidieran apreciar mucho mejor los tonos rosas que pintaré luego.
We'll paint!. I have chosen to make a different design on each side of the piñata, on one the donut and on the other place a 'happy birthday' message with a large drawing of Homer.
For the donut side I have used craft paper cut in a circle and with a hole in the center. I made the silhouette of the cream of the donut and painted two layers in white so that they would be asked to appreciate much better the pink tones that I will paint later.
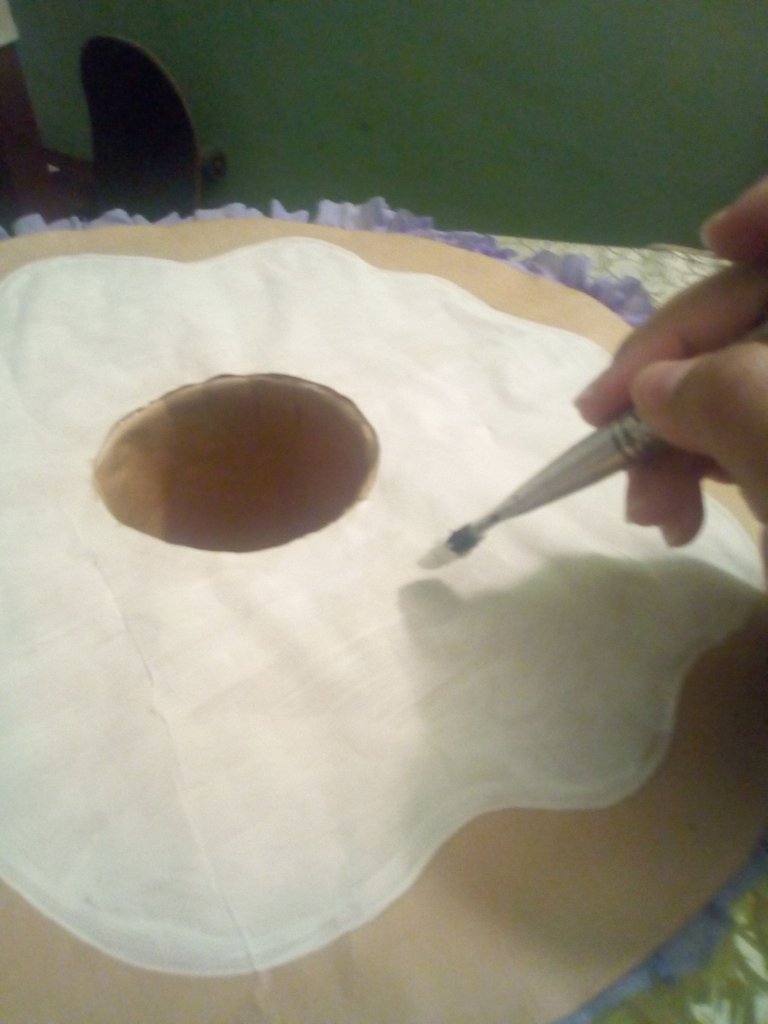
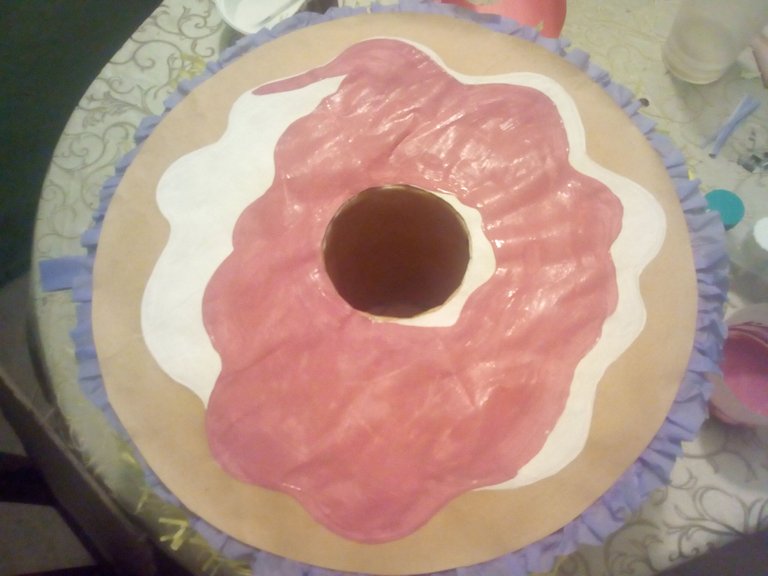
Ahora con un tono rosa pinté algunas partes de la dona, dejando unas zonas sin pintar ya que en ellas colocaré un tono rosa más claro y en las zonas de la derecha un tono un poco más oscuro para dar las luces y sombras en la crema, lo que de agrega un mejor detalle.
Al secar pinté algunas chispas de colores en la superficie y luego bordeé todo de negro para dar ese aspecto caricaturezco.
Now with a pink tone I painted some parts of the donut, leaving some areas unpainted since in them I will place a lighter pink tone and in the areas on the right a slightly darker tone to give the lights and shadows in the cream, which adds a better detail.
When drying I painted some colored sparks on the surface and then I edged everything in black to give that cartoonish look.
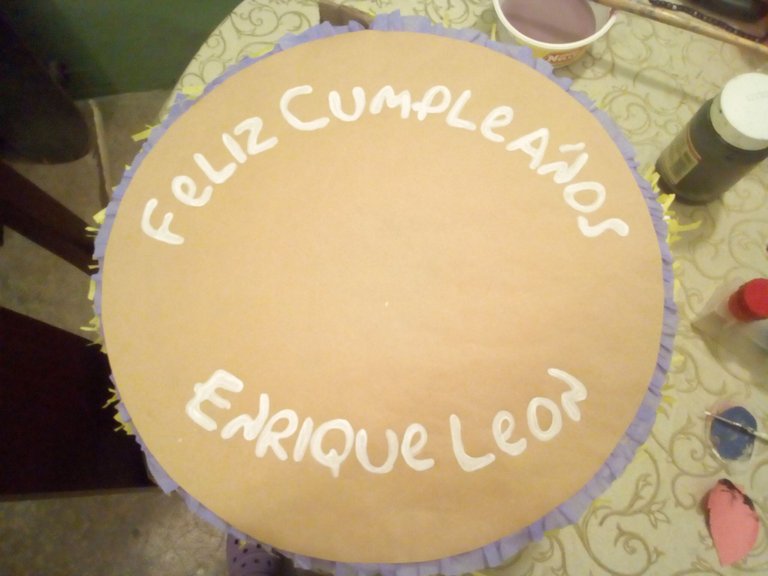
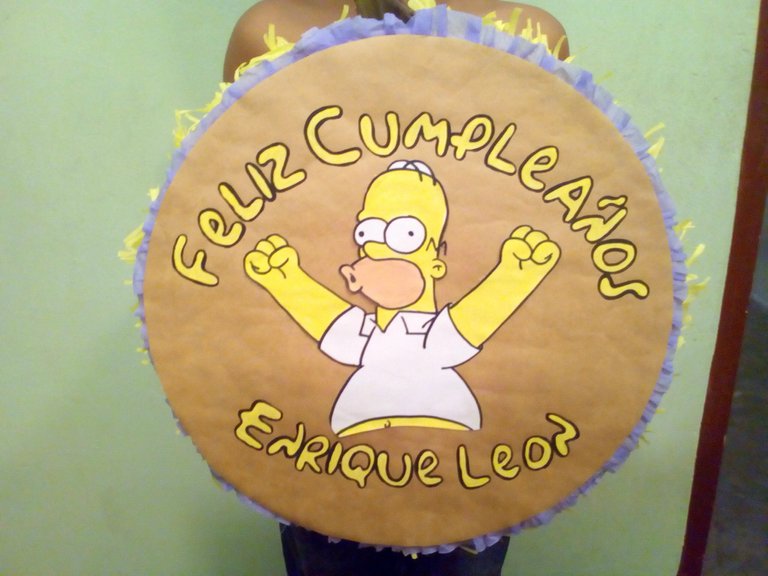
Para la otra cara preferí dejar el centro del papel craft sin recortar así podría ubicar mejor el dibujo de Homero.
Descargué en mi computadora la fuente de los Simpsons para escribir el mensaje de Feliz Cumpleaños junto al nombre de mi hijo y fuera mucho más apegado al motivo del cumpleaños.
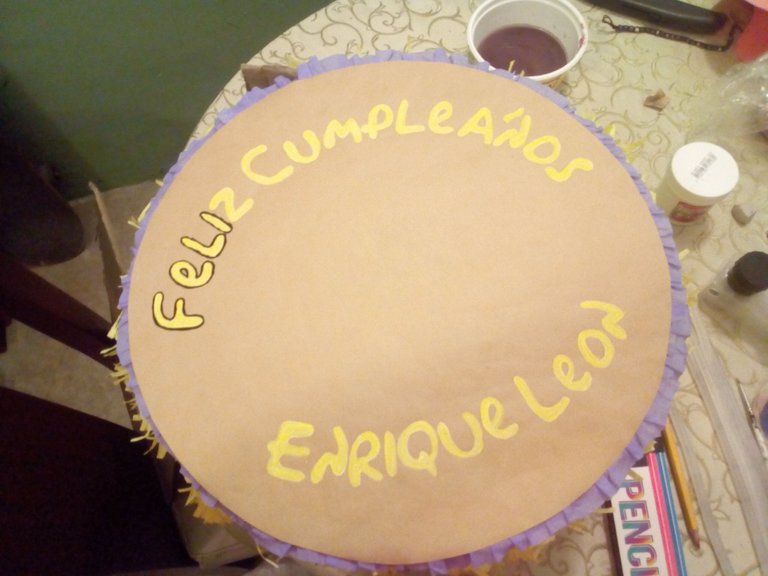
Hice la base con pintura blanca, luego las pinté de amarillo y por ultimo bordeé todo con pintura negra.
El dibujo de Homero lo hice en una hoja aparte, que pinté recorté y posteriormente pegue con un poco de silicón a la piñata.
Ahora les muestro el resultado final, me gustaría leer sus opiniones. 😊
For the other side, I preferred to leave the center of the craft paper uncut so I could better locate Homer's drawing.
I downloaded the Simpsons font to my computer to write the Happy Birthday message next to my son's name and was much more attached to the reason for the birthday.
I made the base with white paint, then I painted them yellow and finally I edged everything with black paint.
I made the drawing of Homer on a separate sheet, which I cut out and then glued with a little silicone to the piñata.
Now I show you the final result, I would like to read his opinions. 😊


Espero haya sido de tu agrado y provecho.
Un gran abrazo a todos, y nos leemos en un próximo post
• Lakrearte en Hive •
Att: Estefania Garcia ♥

Imágenes y separadores de mi autoría
Portada editada en Canva
😁🤩😘